I paint things. Sometimes I post them. || I'm ckao_03 on Twitter/X, and instagram || || They/Them, currently infected by the ROTTMNT brainrot (don't send help)
Last active 3 hours ago
Don't wanna be here? Send us removal request.
Statistics
We looked inside some of the posts by ckao03 and here's what we found interesting.
Average Info
Notes Per Post
7K
Likes Per Post
6K
Reblog Per Post
1K
Reply Per Post
30
Time Between Posts
17 days
Number of Posts By Type
Text
13
Note
4
Last Seen Tumblr Blogs


Fun Fact
The most popular pages on Tumblr are about Minecraft, GIFs, and David J. Peterson.
Text
#WHAAAAAT #THISISAWESOME?! #comic #notmyart #socool #art
i am not a witch - animated comic coming May 2025
☆ My thesis comic is coming out soon! Shares are appreciated!☆
☆ Physical Copies would be sold in person, and on kofi
Credits ☆ i am not a witch - a comic by : @mushroomgrenade ☆ Kae : @mushroomgrenade ☆ Yorme : Minh Ton ☆SFX : Jackson Vanguard ☆Animation : 曾耀德
38 notes
·
View notes
Text
For the next few months, I'll only be taking projects and c0mms I've previously discussed/agreed to (unless we're mutuals, then shoot me a message and we can chat!).
I've had some health issues the last few weeks, and discovered I REALLY like the ability to breathe and eat food, lolol
2 notes
·
View notes
Text


Reminder that these charms are in preorder on my kofi shop until April 15th!
36 notes
·
View notes
Text
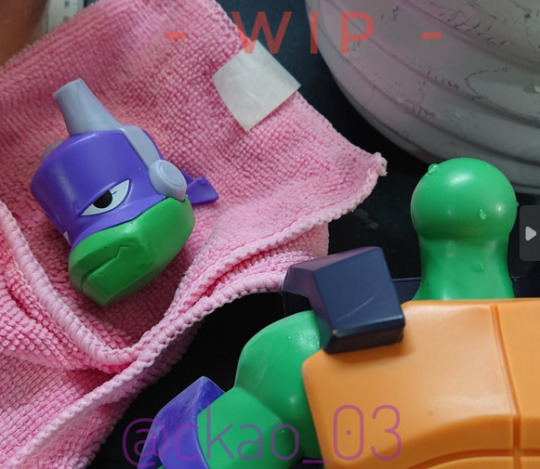
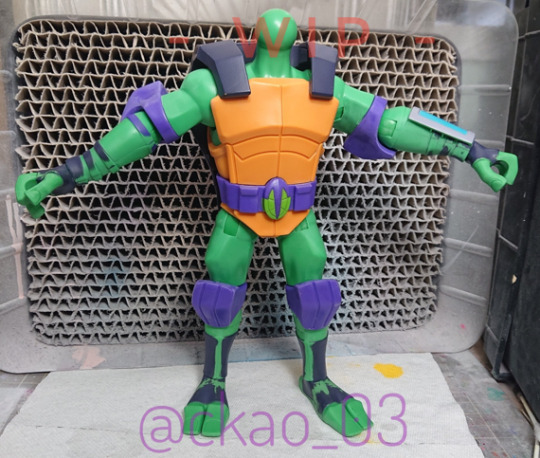
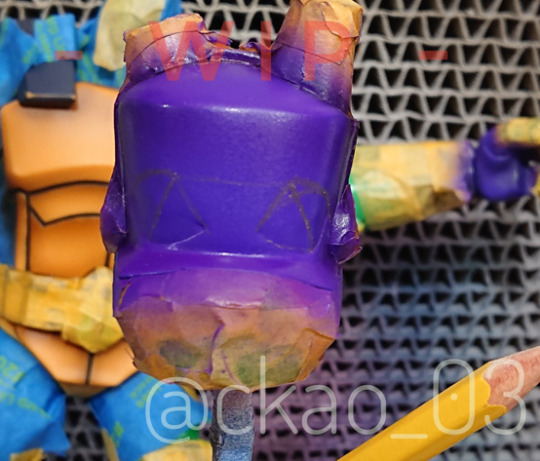
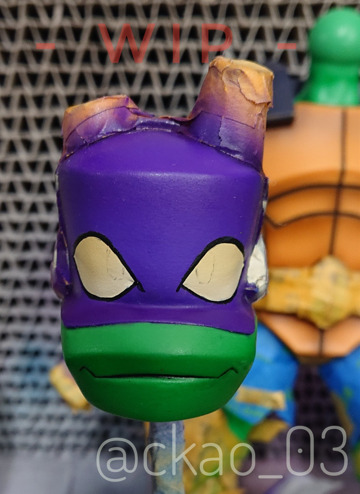
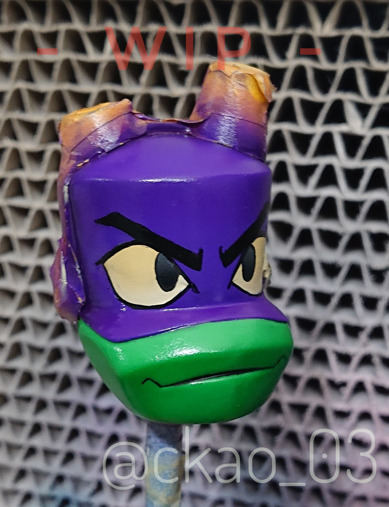
A couple side projects I've been working on, while I'm waiting for the c0mms to dry and cure...
Mini/brief tutorials for Raph's shell and plastron are on my X/Twitter
Please excuse the messy work on the Donnie, he's a demo I'm testing colors on


#rottmnt#tmnt bayverse#bayverse raphael#ckaosstuff#unpause rise of the tmnt#rise of the tmnt#saveriseofthetmnt#save rise of the teenage mutant ninja turtles#unpauserottmnt#save rottmnt#tmnt#3dprint#rottmnt donnie#bay raph#raphael
57 notes
·
View notes
Text
In this house, it doesn't matter how tiny the turtle is.
They all get a mani pedi 😤


#rottmnt#ckaosstuff#unpause rise of the tmnt#rise of the tmnt#saveriseofthetmnt#save rise of the teenage mutant ninja turtles#unpauserottmnt#save rottmnt#tmnt
31 notes
·
View notes
Text

Edit: cause I hate seeing the base model in my page bar I'm adding a day 2 image bout the original post

One night + a hour progress on @cupcakeslushie s DTIYS challenge celebrating 2 years of EW!
This is REALLY ROUGH still.
But I got all the main elements blocked in so I can start sculpting and actually making it look good next xD
274 notes
·
View notes
Text


links to some translations under the cut
и заодно выложу пару любопытным образом перекликающихся переводов потрясающих фанфиков!
тьма нынче обретает жизнь великолепного автора @/goodlucktai
и еще одна покорившая меня зарисовка rem - а тени пусть уходят
#rottmnt#unpause rise of the tmnt#rise of the tmnt#saveriseofthetmnt#save rise of the teenage mutant ninja turtles#unpauserottmnt#save rottmnt#tmnt#I'm crying#this is so cute#omgggg
6K notes
·
View notes
Text
I'm locked away in a hotel room for the day, so enjoy the tutorial spam, lol
Got another one for the Omega lithophane I posted on Twitter and more color guides coming soon... Ish?
3 notes
·
View notes
Text
Part 3 - Priming (For covering the skin color (ie, for an oc))
If you want to change the skin color (such as for an OC turtle), you need to start with a blank slate by covering the original color.
[Please note that no matter how you prepare and protect the figure, the joints in the arms and legs will always scrape away your paint and reveal the original plastic sooner or later in those areas.]


If you still want to continue...
You'll need: A can of white spray primer (Mr Hobby's Mr Base White 1500 or Citadel's White Scar work well. Citadel products are found in most model/hobby shops)
Arrange your figure in a t-pose, lay it on newspaper or paper towel and, IN A WELL VENTILATED OR OUTSIDE AREA, spray the figure in light sweeps from side to side, from about 10-12 inches away. You do not want to coat the entire figure all at once; you want to let it dry, and apply thin coats until the figure is eventually covered. Spraying too much too fast will cause the primer to run down and 'flood' the details.

If you flood your model, it can be a difficult and lengthy process to remove the primer. Solvents used to dissolve and wipe away the paint can sometimes melt or disfigure your toy...
If you want to practice first, try it on a cheap toy or figure from the dollar store (You could always paint that, too!). Use extra patience with this step.
Also, always read the safety instructions on the can before using any sort of spray and use breathing protection, like a chemical rated respirator when recommended.
13 notes
·
View notes
Text
Part 3 - Priming (keeping the default skin color)
This part is for the even you plan to keep your turtle's default skin color. You can use this if you are using transparent paints for shading. But first we have to take them apart a little...


If you're painting a Giant model, then at this point, you probably want to remove your turtle's head for easier painting. Carefully dunk your turtle head down in a bowl of very hot water and let sit for 20-30 seconds as the plastic softens. Then with a towel to protect your hands and a fair bit of force, pull it off. There may be pockets of hot water that spill out, especially from Donnie's battle shell, so use caution.
Once your turtle is fully dry, we're ready to prime!
Primer is a clear or colored layer that allows your paint to stick and reduces the chances of it scratching and flaking off.
If you plan to keep the default color of the plastic, you'll need a can of clear coat to smooth the surface, as well as deepen the color of the plastic. In a WELL VENTILATED AREA or OUTSIDE, arrange your figure in a t-pose and spray the clear coat from a distance of 10-12 inches. Do not spray a lot; just a light misting in a sweeping gesture. Wait until the clear coat has dried, then reangle your figure to get the other side. Repeat these steps until you have a smooth, dry surface (usually 2-3 sweeps per side).

For beginners, just a coat of this helps give the color of your figure more depth; if this is your only step for the skin, that is fine.
The brand of clear coat I use is Mr Super Clear Gloss. I use the gloss version to provide an extra layer of protection and really smooth the surface for the kind of paint I use (Which are lacquers, which adheres very well. Acrylics don't like to stick to gloss.). I later cut the gloss down with a layer of flat/matte clear coat. If you plan on using acrylics, chalk pastels (more info on these later), or aren't going to paint the skin, I would go straight to using a few layers of the flat version, to avoid the shine but still deepen the color.
18 notes
·
View notes
Text
Donnie Color Guide - Pt 2
[Part 1 HERE] This is where we cover the eyes and accessories...

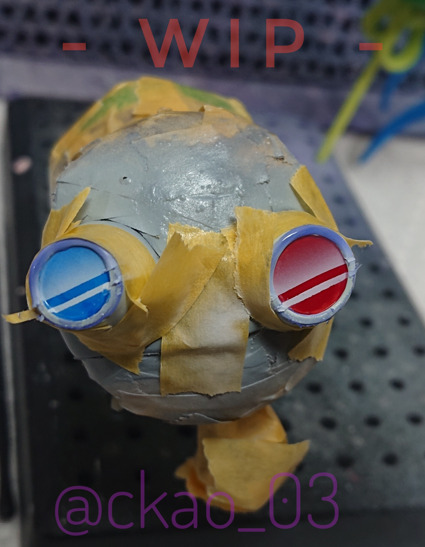
Eyes: Top half of sclera: (Vallejo Model color - 60% Yellow Ochre + 30% White mix) Bottom half: (Vallejo Model Color - Above mix, but with added White) Outline: (Vallejo Model Color - Black)


Iris: Top half: (Vallejo Model Color - Light Grey) Bottom half: (Vallejo Model Color- Black) Outline: (Vallejo Model Color- Black)) [Fun fact: I used the same mix for Leo, but in reverse. His shading is on the bottom] [The blue goop you see is Gaia Notes Masking liquid, but any brand of masking fluid works)


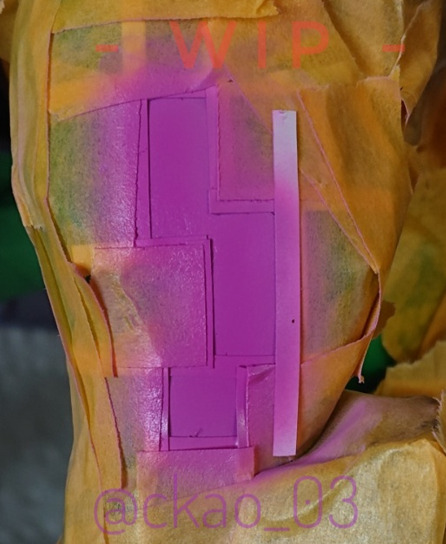
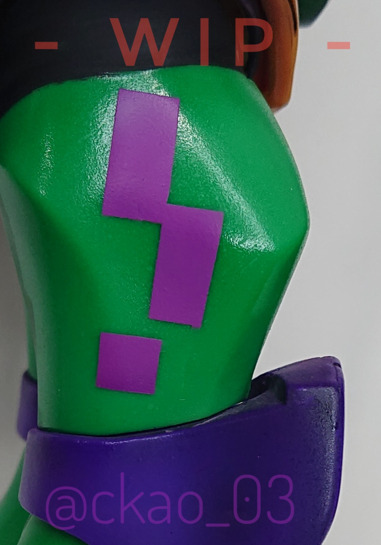
Markings: Shaded area: (Mr Color - 174 Fluorescent Pink + 67 Purple) Can't remember the exact ratio, sorry ): Base color: Above mix + 4-5 drops of Mr Color - 1 White


Accessories: Goggle and Tech Brace: Base color: (Mr Color - 338 Light Gray) Shading: (Mr Color - GX101 Clear Black (Very. Lightly.)) Highlights: (Vallejo Model Color - White. (Also lightly)) Red and Blue Lenses: (Tamiya enamel - XF-7 Red, X-14 Sky Blue) Shine: (Vallejo Model Color - White) Hard Shading on bottom of ear pieces: (Vallejo Model Color - Dark Gray)


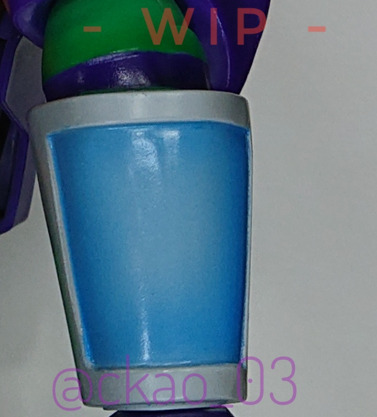
Tech Brace screen: Base: (Createx Wicked Color - 50% Fluorescent White + 50% Fluorescent Blue) Edges: (Createx Wicked Color - Fluorescent Blue) [Honestly, just use any light blue/darker blue combo, I just wanted to see if this kind would glow under a blacklight, lol! Maybe Mr Color Sky Blue with Clear Blue for the edges]
Emblem: Top Third: (Mr Color - 50% 175 Flourescent green + 50% 66 Bright Green) Middle: Above mix, but a few drops more of 66 Bright Green Bottom Third: (Mr Color - 66 Bright Green) Individual segments: Tape off each segment as you go, working from top to bottom (Like with the plastron), spraying a single layer of (Mr Color - 175 Flourescent green) along the top edge to provide a highlight.


'Cell shading' outlines, under the arms and shorts/shadows: (Tamiya Enamel - XF-1 Flat Black) <- Works great while you still have a glossy layer, it makes it much easier to erase if you need to. (Vallejo Model Color - Black (on soft plastic pieces))
#rottmnt#ckaosstuff#rise of the tmnt#unpause rise of the tmnt#saveriseofthetmnt#save rise of the teenage mutant ninja turtles#save rottmnt#unpauserottmnt#action figure repaint#actionfigure#tmnt#rise of the teenage mutant ninja turtles#save rise of the tmnt#RiseoftheTMNT#rottmntrepaint#rottmnt donatello#rottmnt donnie
79 notes
·
View notes
Text
Donnie Color Guide - Pt 1
Below is a list of the paints I used for my Playmates Giant Donnie repaint, along with some applicable photos of how I applied them. It's not mentioned in the guide, but I used Mr. Super Clear Gloss to protect each layer/step, then Mr SC Flat/Matte when he was completed. Apologies for the poor photo quality! If you have any questions, feel free to shoot me a message :)
Note: Almost all of these are lacquer and enamel paints, which require good ventilation during use. Everything except for the eyes, portion of the Battleshell and black outlining were airbrushed. [Part 2 HERE]

Skin: (Mr Color - 138 Clear Green)
I first applied this 2-3 times as shading/blushing, then finished with a layer overtop to blend it all together so it doesn't look like bruising.


Plastron/Chest piece: ( Mr Color - 60% GX106 Clear Orange + 40% GX109 Clear Brown mix) Panel lines: (Vallejo Model Color - 80% Flat Brown + %20 Black)
[Note: Photos show my first version of Donnie, in which I used only Clear Brown. The orange + brown mix looks far better in person imo]
I taped off each section of plastron, working from the top down. This provides a cleaner result when spraying paint. I finished with a single layer overtop for blending.


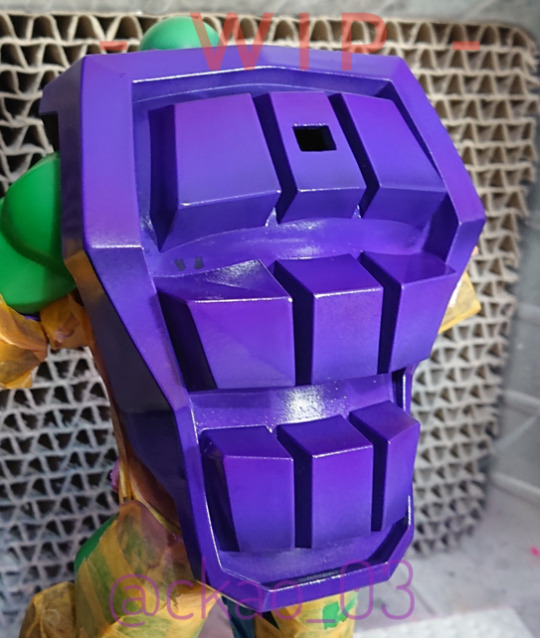
Purple pieces:
Base color: (Mr Color - 67 Purple) Highlights: (Mr Color - GX 105 Clear Pink) Shading: Mr Color - GX 101 Clear black Final coat: (1, maybe 2 layers, meant to blend colors) Mr Color - GX107 Clear purple Deep shading: (Mr Color GX101 Clear Black) Only for the darkest of spots or areas that need more drastic shading, such as the edges of socks gloves, lower Battleshell edges) [You can also use Tamiya Enamel XF-1, but only on the hard plastic pieces. Enamel reacts poorly on soft pvc plastic.] Arm/sock bands: (Tamiya enamel X-16 Purple. Add a little X-2 White for highlighted edges)

Recessed part of Battleshell: (Vallejo Model Color) 70% Purple + 30% Black mix. This was handpainted in.

#rottmnt#ckaosstuff#rise of the tmnt#unpause rise of the tmnt#saveriseofthetmnt#save rise of the teenage mutant ninja turtles#save rottmnt#unpauserottmnt#action figure repaint#actionfigure#tmnt#rise of the teenage mutant ninja turtles#save rise of the tmnt#RiseoftheTMNT#rottmntrepaint#rottmnt donatello#rottmnt donnie
79 notes
·
View notes
Text
Managed to increase the transparency on some clear turtles I've been posting over on twitter/X.
Sculpt is by @reddbug27 / Omygameing 😄
#rottmnt#ckaosstuff#unpause rise of the tmnt#rise of the tmnt#saveriseofthetmnt#save rise of the teenage mutant ninja turtles#unpauserottmnt#save rottmnt#tmnt#3dprint#rottmnt mikey#rottmnt michelangelo#rottmnt leo#rottmnt leonardo
227 notes
·
View notes
Note
I was wondering if you did commissions for your repaint rottmnt ?
I do! 😄
Some details...:
There's usually a 2-3 month wait time per turtle makeover (I should be able to do two at once within that time frame, depending on how life goes)
- A shipping cost for sending the action figure both to and from me
- the commission fee (which is a little adjustable depending on how many turtles there are).
- A note: I've only done the 10.5" figures so far, I'm not sure how the small 5" figures would look just yet...
If that all works for you, then sure! ☺️
10 notes
·
View notes
Note
Hello, I've seen your paint works going around on Tumblr for a while now. You do an absolutely amazing job, seriously. I didn't see anything for this I apologize if I missed it, but do you do commissions for painting figures? I just bought Rise Donnie and Mikey figures and will win an auction on Raph and Leo (hopefully). They're all pretty good condition (except Donnie definitely needs serious help) but I don't have the time or patience to paint them myself. Would it be possible to commission you to do them (likely not all at once)?
Aaah, thank you so much!! 😭 😭 😭 That's so sweet! I'm glad everyone seems to like them! 🥹
You didn't miss a thing, I haven't really advertised commissions, lol! The inquiries that come along naturally keep me pretty busy so I haven't needed to! But yes! ☺️ It's usually a 2-3 month wait time per turtle makeover (I should be able to do two at once within that time frame, depending on how life goes), and the shipping cost both to and from me, plus the commission fee (which is a little adjustable depending on how many turtles there are).
I haven't painted the basic 5" tall figures so I don't know how those would turn out just yet... But as you've seen, I've gotten pretty familiar with the Giant product line.
I'm intrigued by Donnie's status 👀 I wouldn't mind seeing pictures...
7 notes
·
View notes
Note
Thank you so much for all your repainting tutorials, I've been slowly gathering the supplies to try my own hand at it and just wondered... would you ever be willing to sell weapons for those of us without 3D printers? :Oc I'd LOVE to get them for the boys I found on ebay who sadly came without them!
YEEES, I'm so glad you're going to paint them!! 🤩🤩 I love when more people get into this hobby, it's so fun to improve figures and model kits!! If you have questions once you start, I'd be happy to answer what I can!
As for your question... Let me check into the legalities of the file use! I think I can! But I want to make sure first, lol
10 notes
·
View notes
Note
Hello! Quick question, sending it here since I don't have a twitter. Where did you get the 3d print files for Donnie's staff and Leo's odachi? You've inspired me to repaint my own figures, but the spare disaster twins set I'm painting for a friend is missing their weapons, and I'd hate to send them off empty-handed. Thank you, and I absolutely adore your work! Keep it up!!
Aaah, thank you so much! 🤩☺️🥺
I've actually been meaning to make a post for the files, but life keeps getting away from me! This was the push I needed to get it done, so thank you for the ask! 😄
Leo's Odachi is actually ripped from the Ninja Run mobile game! It isn't detailed as you probably saw, but it's still great for that unique shape found in Rise. It shouldn't take much to modify the handle into a better shape, as it consists of edges, instead of being round.
The Rise weapon files are here:
Notes on the Odachi:
- If I remember right, I imported the obj file to Prusa, then exported it as an stl for printing.
- I think printed it to be 152mm from end to end, but I might increase that to 155mm for a better fit for the 10.5" Leo figure.
Donnie's Tech Bo is originally a cosplay file from Dangerous Ladies (They have his goggles too!!! 🤩). You can buy it here, it's way more detailed than the Ninja Run version:
Notes on the Tech Bo:
- Originally, the file was in multiple pieces, but I sent them a message and for a small fee, Dangerous Ladies was able to modify it into either one solid piece, or into two: The handle and the Spike top. I don't know if the modified file is now available by default at purchase, but if it's not, Dangerous Ladies were SUPER nice and accommodating!! They can help you out. 😄
- A little bit of modification was needed to account for resin shrinkage between the top and the main handle, but it was fairly straightforward
- The two-piece format works best if you're printing in resin; the amount of force needed to push the handle into Donnie's hand would either snap the Bo, or scrape the paint. By leaving it in two, you can thread the handle into his hand, and snugly fit the top in place afterwards.
- My notes say I printed the handle to be 273mm in length or at 16.20%, for the 10.5" Donnie action figure. Increase the Spike top just a touch above that, for a better fit. I have a large printer though, so you may need to further cut and key it into smaller pieces depending on your set up.
Sorry for the mini essay! 😂 Good luck with repainting your figures and have fun!! 😄
#ckaoanswers#rottmnt#rise of the tmnt#saveriseofthetmnt#save rise of the teenage mutant ninja turtles#unpause rise of the tmnt#tmnt
18 notes
·
View notes