
Don't wanna be here? Send us removal request.
Statistics
We looked inside some of the posts by clickwish2-blog and here's what we found interesting.
Average Info
Notes Per Post
0
Likes Per Post
0
Reblog Per Post
0
Reply Per Post
0
Time Between Posts
3 days
Number of Posts By Type
Text
17
Last Seen Tumblr Blogs


Fun Fact
Hackers stole 65M passwords from Tumblr in 2013.
Text
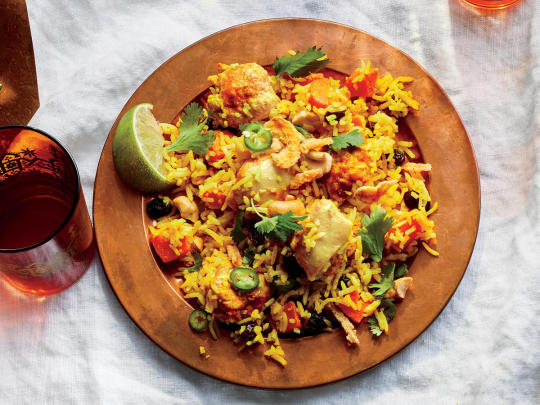
Apple BBQ Grilled Chicken
The 4th of July is almost here. We have a little more than a week before the big day of celebration. Grilling is something that goes hand in hand with this holiday.
So to help you plan your party, I have this awesome grilled chicken recipe. It’s super simple, using only 4 ingredients. One of those ingredients is apple juice. This helps keep the chicken juicy and tender but also adds some nice sweetness and flavor. You just need to make sure you plan time for the chicken to marinade and this recipe couldn’t be easier.
Print
Scale 1x2x3x
Ingredients
1 cup apple juice
6 Tbsp brown sugar
1/2 cup BBQ sauce, plus additional for brushing
4 to 6 boneless skinless chicken breasts
Instructions
Add the apple juice, brown sugar, and BBQ sauce together in a gallon sized ziploc bag.
Place chicken in the bag and seal. Seal and knead chicken and marinade together. Refrigerate 2 to 4 hours or up to overnight.
Remove chicken from marinade and grill for 10 to 12 minutes until cooked and internal temperature is 165 degrees.
Brush chicken on both sides with additional BBQ sauce before removing from grill. Serves 4-6.
Source: https://www.realmomkitchen.com/apple-bbq-grilled-chicken/
0 notes
Text
Allam chutney for pesarattu, ginger chutney recipe
Allam chutney or ginger chutney for pesarattu. An easy yet lip smacking, appetizing ginger chutney perfect to go with pesarattu. Learn how to make allam chutney with step by step pictures. Ginger is not a favorite for many, including me until I started to cook. I hated ginger so much until then. I see many people hate ginger, but somehow my taste for ginger changed. I now love it in everything, be it in upma, lemon rice, tea, etc. So at times I crave for inji thogayal too. When I posted pesarattu, I thought I won't like allam pachadi as it is made with more ginger. So posted a ginger flavoured coconut chutney to go with it. But I thought I should give it a try this morning when I made pesarattu for breakfast. It turned out to be a great combination with the pesarattu and I felt I missed making it for so long. It is pretty simple, similar to the inji thogayal me and my mami makes, except for jaggery and tadka. Do give it a try if you are having a presumption like me.
Allam chutney recipe Recipe Cuisine: Indian | Recipe Category: Breakfast side dish Prep Time: 5 mins | Cook time: 10 mins | Serves: 3 | Author: Raks anand
Click here for cup measurements
Allam chutney or ginger chutney for pesarattu. An easy yet lip smacking, appetizing ginger chutney perfect to go with pesarattu. Learn how to make allam chutney with step by step pictures.
Recipe ingredients:
Ginger, chopped - 1 & 1/2 tbsp Red chilli - 6 Urad dal - 1 tbsp Tamarind - 1 tsp, packed Jaggery - 1 tsp Oil - 1 tsp Salt - as needed To temper Oil - 1 tsp Mustard - 1/4 tsp Curry leaves - a sprig
Method
Heat a pan/ kadai, with a tsp of oil. Splutter 1/4 tsp mustard, add curry leaves and transfer to a serving bowl.
In the same kadai, add 1 tbsp urad dal, 6 red chilli and roast in medium flame until slightly golden.
Now add ginger, tamarind and roast well for 2 minutes or until dal turns deep golden.
Remove in a plate for cooling. Transfer the ingredients to a mixer along with salt and jaggery.
Add 1/4 cup water and grind smoothly or it can also be slightly coarse.
Transfer to serving bowl with tadka and mix well. Allam chutney ready.
Notes:
It is important to balance spice and tamarind along with salt for perfect tasting chutney.
The chutney won't be sweet because of jaggery, so no worries, just add.
Tags:allam, ginger, chutney, pachadi, pesarattu
How to make Allam chutney Step by step pictures:
In a pan/ kadai, add 1 tbsp urad dal, 6 red chilli and roast in medium flame until slightly golden.
Now add ginger, tamarind and roast well for 2 minutes or until dal turns deep golden.
Remove in a plate for cooling. Transfer the ingredients to a mixer along with salt and jaggery.Add 1/4 cup water and grind smoothly or it can also be slightly coarse.
Heat a pan/ kadai, with a tsp of oil. Splutter 1/4 tsp mustard, add curry leaves. Transfer to chutney bowl and mix well. Allam chutney ready.
Serve best with pesarattu or even with idli dosa.
Share:
Source: https://www.rakskitchen.net/2019/01/allam-chutney-for-pesarattu-ginger.html
0 notes
Text
Yogurt and Oats for Breakfast
Yogurt is a super versatile ingredient or dish in itself. This recipe for yogurt and oats contains all kinds of extra goodies to help you start the day right.
You love yogurt. It’s a health food, isn’t it? It’s even what they call a super food. But, is it really all it’s cracked up to be, or are there some things you should take into consideration when you choose yogurt to enjoy at home?
Yogurt has long been considered a healthy food to enjoy on a regular basis. Not only is it high in protein and important nutrients, but it also can aid digestion, boost your immunities, protect against osteoporosis, and promote heart health and a healthy weight.
However, for years yogurt companies have stuffed their yogurts with sugar and additives making it a little less impressive as a healthy food. The junk they put in can detract from some of yogurt’s innate benefits.
So, how can you enjoy yogurt without all the bad stuff?
Buy or make it plain and dress it up yourself.
Yogurt: Health food or junk food?
As you know, over the last few years I’ve been doing some serious food reading. Not about cooking per se, but about nutrition, portion control, eating habits, our food sources, government regulations on food, and the way marketers try to get us to buy stuff. It has been an education to be sure.
Some of the books that have had a tremendous impact in how I think about food include:
It’s through the reading of these books that I’ve made slow shifts in how I shop and cook and in how my family eats. We’re not as “crunchy” as they come, but we don’t eat exclusively out of a box, either.
Slowly but surely, I’m making changes to improve my family’s diet without busting our budget. I cook more from scratch, and we try to avoid chemicals, artificial ingredients, processed sugars, and unfermented soy. I am working on making healthy eating easier over all.
One of the new wrinkles in this healthier eating paradigm, has been to examine the yogurt we eat.
Yogurt has always been one of my very favorite breakfast foods. In my non-pregnant and nursing years, I haven’t really been a milk-drinker, so yogurt and cheese help me keep up on my calcium.
Years ago I was a diehard Yoplait or La Creme fan. Coupons and sales were plentiful for those items so I could keep the refrigerator stocked to the brim, buying as many as 60 cartons at a time. I thought that I was buying “health food.”
It was only later when I started to reduce our intake of processed sugars and processed foods in general that I found out how SWEET these yogurts actually were. Plus, often they had all kinds of ingredients I couldn’t pronounce.
How to switch to plain yogurt
So, I made some changes. I started buying large 32-ounce cartons of plain, or sometimes vanilla, yogurt, preferably Cascade, Mountain High, or Fage brands.
Not all my kids liked that change. But most of them have gone along with it, especially when honey or maple syrup is drizzled over the top. Occasionally I buy Trader Joe’s vanilla and blueberry cups, but not often.
If you or yours are slow to be won over to plain yogurt, consider one or more of the following toppings for plain yogurt:
maple syrup
honey
jam
fruit syrup
fresh fruit
granola or nuts
It may take some time, but you’ll be a convert before too long.
Uses for plain yogurt.
Plain yogurt is an incredibly versatile ingredient to keep on hand.
It’s great to use in baking instead of buttermilk. Just mix half yogurt and half milk as your buttermilk substitute.
Use it as a thickener in smoothies.
Mix it with whipped cream to reduce the fat and increase the protein in your favorite sweet topping.
Substitute it for sour cream in recipes to give an equivalent tang without all the fat.
Can you make yogurt at home?
Believe it or not, it’s incredibly easy to make yogurt at home! A few years ago I experimented with making yogurt myself. One night I tested two different methods:
I also read about the microwave/oven and cooler methods, but decided to go with these first two methods. The next morning I compared the yogurts I had made. They were like Laurel and Hardy, one was thick, the other thin.
The slow cooker method was good, but thin like buttermilk. Folks suggested that I strain the yogurt to thicken it, but it was so thin, the yogurt went right through the sieve. I used some in baking and churned the rest into frozen yogurt.
The yogurt incubated on the heating pad was thick and creamy. Since we like THICK yogurt, you can guess that I’m a fan of the heating pad method.
Try them both out and see for yourself which you prefer. I originally tested with whole milk, but have since made homemade yogurt with nonfat milk and it turned out fine and thick, albeit a little on the tart side in comparison.
My preferred method for making homemade yogurt is to combine 1 quart milk, 1/4 cup powdered milk, 2 tablespoons yogurt with live cultures, and to incubate it for 5 hours according to the heating pad method.
Enjoy Yogurt and Oats for Breakfast.
As a born Francophile, I’ve loved reading The French Women series by Mireille Guiliano and have been encouraged by many of the suggestions she has to offer for life, work, and good eats.
One of those habits that I’ve adapted for my own is what Ms. Guiliano calls “Magical Breakfast Cream”. I can’t vouch for its magical properties, but I know that I like it, at least how I tweaked it.
I’ve made some significant changes to her recipe. Her recipe calls for shredded wheat cereal instead of oats, flax seed oil instead of meal, and orange instead of lime, as well as the addition of ground nuts. My tweaks are thanks to what I normally stock in my pantry.
This variation has become my daily breakfast, packed with protein and filling enough to get me through the morning.
Yogurt is a super versatile ingredient or dish in itself. This recipe for yogurt and oats contains all kinds of extra goodies to help you start the day right.
Cuisine: American, French
Keyword: oatmeal, oats, yogurt, yogurt and oats
1/2 cup plain greek yogurt
2 tablespoons rolled oats not cooked
1 tablespoon chopped roasted almonds
1 teaspoon flax seed meal
the juice and pulp of half a lime
1 teaspoon honey
In a small bowl, layer the ingredients in the order listed. Stir or not, depending on how you like it.
Level up your meal planning and prep.
Need a little extra motivation to get on your meal planning game? Want to make lunch packing less of a drag? Creating a kitchen survival kit to help you WIN in the kitchen this school year.
I’d love for you to join me for the next Mom’s Kitchen Survival Workshop!
Together, we’ll create a plan to help you get dinner on the table every night, fill your freezer with wholesome snacks and breakfasts, finesse your lunch-packing skills, and even make sure you get a daily dose of MOM food.
Learn more here so that when registration opens, you won’t miss out.
Source: https://goodcheapeats.com/2018/09/morning-yogurt-and-oats/
0 notes
Text
August Menu Plan - Menu Plan Monthly

Happy Friday Friends! Goodbye July and Hello August! ☀ Summer is quickly coming to an end and I for one am looking forward to Fall. I know it will be closer to October before the weather starts to really change here in North Texas, but every month that passes is one month closer to Fall and cooler temps .
Today I have our August Menu Plan for you. Our vegetable garden is still overflowing with summer veggies, so I have quite a few recipes using green beans, zucchini and fresh corn. I have also included a few of our favorite summer desserts that I know you'll like. Any recipe with (New) noted next to the title are the recipes I plan to make and will post in the near future. I hope everyone has a fabulous weekend!!!
August Dinner Menu
Chicken Bog, Buttery Crisp Green Beans & Ambrosia Fruit Salad
Italian Sub Sandwiches & Antipasto Pasta Salad
Barbecue Chicken Fajitas W/Peppers, Onions & Pineapple
Crock Pot Sweet Garlic Chicken, Jasmine Rice & Green Beans
Honey Barbecue Meatloaf, Thickened Potatoes & Steamed Carrots
Taco Salad & Watermelon Wedges
Bourbon Chicken , Sesame Noodles & Honey Baked Acorn Squash
Trisha's Oven Baked Pork Chops & Rice & Oven Veggie Packets
Fall Off The Bone Ribs, Potato Salad, Squash & Green Beans & Fresh Fruit
Cheese Enchiladas, Charro Beans & Mexican Rice
Honey Garlic Shrimp Stir Fry & Buttery Crisp Green Beans & Baked Brown Rice
Blueberry Pancakes, Oven Cooked Bacon & Eggs (Breakfast for Dinner)
Ground Beef & Potato Casserole & Sweet & Sour Green Beans
Pepperoni & Supreme Pizza (DIY Frozen Pizza) & Olive Garden Salad
Grilled Smoked Sausage Kabobs, Grilled Corn & Peach Fluff
Creamy Baked Ziti, Focaccia Bread & Italian Green Beans
Hamburger Steaks with Gravy & Grilled Lemon Pepper Zucchini
Cowboy Barbecue Baked Beans & Pepper Jack Cornbread
Mom's Meaty Cornbread Skillet & Garden Salad
Taco Stuffed Zucchini Boats & BLT Bowtie Pasta Salad
One Pot Spaghetti with Meat Sauce , Freezer Rolls & Olive Garden Salad
Grilled Balsamic Steaks, Baked Sweet Potatoes & Mexican Street Corn
Green Chili Pork, Flour Tortillas & Re Fried Beans
Bean & Cheese Burritos (Leftover Re Fried Beans with Rotel)
Old Fashioned Salmon Patties, Mac & Cheese & Southern Cream Peas
Grandma Mack's Breakfast Casserole & Sweet Cooked Apples
Ham Bone & Potato Soup & Hot Water Cornbread
Taco Cups & Sopa de Conchas
Desserts: Mandarin Orange Cake Creamy Frozen Key Lime Pie Chocolate Chip Cookie Bowls
No Bake Chocolate Eclair Cake
Join the Mommy's Kitchen Free Email Subscription and you'll receive an email each time, I add a new recipe or post to Mommy's Kitchen. As a subscriber you'll also receive a monthly issue of "My Texas Table" newsletter packed with all the latest recipes, menu plans, special features, seasonal recipes, canning, gardening, holiday recipes and DIY projects!

Source: https://www.mommyskitchen.net/2019/08/august-menu-plan-menu-plan-monthly.html
0 notes
Text
Avocado Chicken Egg Salad Recipe with Creamy Lemon Dill Dressing
Egg Salad with avocados, chicken, corn, bacon, and a creamy lemon dill dressing! Delicious just served on its own, as a side, or on a bun!
Upgrade your classic Egg Salad recipe with this flavorful and chunky Avocado Chicken Egg Salad. This Low Carb recipe has everything you want in a delicious salad including juicy chicken, avocados, eggs, onions, corn, and bacon.
My Avocado Egg Salad recipe has been a reader favorite for years now that I have finally listened and created another version of it. This time around, I have included more yummy ingredients, plus a creamy mayo dressing that you will absolutely LOVE!
I guarantee that even the pickiest of eaters will want to dig into this Chicken Egg Salad. It’s not only delicious, but it’s also very easy to prepare. The only time-consuming part is chopping up all the ingredients. AND boiling the eggs.
Buying a rotisserie chicken might also take a bit of your time…? Or, just cook your own Chicken Breasts. 🙌
AVOCADO CHICKEN EGG SALAD
This loaded up Egg Salad is everything BUT boring. With a wonderful Lemon Dill Dressing slathered on top, this salad is beautiful to look at, and with a variety of ingredients, it satisfies to the max!
To start, gather your ingredients:
4 hard boiled eggs, diced
12 to 16 ounces chopped chicken breasts
2 avocados, diced
1 cup corn (I use canned corn)
8 bacon slices, cooked and chopped
1 small red onion, chopped
Add all that to a salad bowl, mix together gently, and set aside.
HOW TO MAKE CREAMY LEMON DILL SALAD DRESSING
1/3 cup mayonnaise
1/3 cup sour cream
2 tablespoons chopped fresh dill
1 1/2 tablespoons lemon juice
2 teaspoons Dijon mustard
1/4 teaspoon salt
1/4 teaspoon fresh ground black pepper
Whisk all of that together; add as much of it as you prefer over the prepared Chicken Egg Salad and toss until well combined.
Serve immediately, or refrigerate until ready to use.
You’ll be happy to know that this Avocado Chicken Egg Salad tastes even better the next day! It is a perfect salad for lunch on-the-go.
HOW TO STORE EGG SALAD
Store egg salad in an airtight container and keep in the fridge for 4 to 5 days.
MORE SALAD RECIPES
ENJOY!
TOOLS USED IN THIS RECIPE
Avocado Chicken Egg Salad with Creamy Lemon Dill Dressing
Egg Salad with avocados, chicken, corn, bacon, and a creamy lemon dill dressing! Delicious just served on its own, as a side, or on a bun!
Course: Appetizer, Salad, Sandwiches
Cuisine: American, American/Southwest
Keyword: avocado and chicken recipe, avocado recipes, chicken breast recipe, chicken salad recipe, egg salad, salad dressing recipe
Servings: 8 serves
Calories: 383 kcal
Ingredients
FOR THE SALAD:
4 hard boiled eggs, diced
12 to 16 ounces chicken breasts, chopped or shredded
2 avocados, diced
1 cup corn, (I use canned corn)
8 bacon slices, cooked to a desired crispness and chopped
1 small red onion, chopped
FOR THE CREAMY LEMON DILL SALAD DRESSING:
1/3 cup mayonnaise
1/3 cup sour cream
2 tablespoons chopped fresh dill
1 1/2 tablespoons lemon juice
2 teaspoons Dijon mustard
1/4 teaspoon salt
1/4 teaspoon fresh ground black pepper
Instructions
Add all the Salad ingredients to a large mixing bowl; mix gently just to combine and set aside.
In a mixing bowl combine all the Salad Dressing ingredients; whisk until thoroughly incorporated. You can also place the ingredients in a jar and shake until combined.
Add as much of the salad dressing as you prefer over the prepared Avocado Chicken Egg Salad; gently toss until well combined.
Served immediately or refrigerate until ready to use.
Recipe Notes
WW FREESTYLE POINTS: 7
To lower your points down to 4, use turkey bacon, fat free sour cream, and fat free mayonnaise.
HOW TO STORE EGG SALAD
Store egg salad in an airtight container and keep in the fridge for 4 to 5 days.
Nutrition Facts
Avocado Chicken Egg Salad with Creamy Lemon Dill Dressing
Amount Per Serving
Calories 383 Calories from Fat 261
% Daily Value*
Total Fat 29g 45%
Saturated Fat 7g 35%
Cholesterol 152mg 51%
Sodium 400mg 17%
Potassium 604mg 17%
Total Carbohydrates 10g 3%
Dietary Fiber 4g 16%
Sugars 2g
Protein 20g 40%
Vitamin A 6.9%
Vitamin C 10.8%
Calcium 3.5%
Iron 5.5%
* Percent Daily Values are based on a 2000 calorie diet.
SUBSCRIBE TO GET FREE UPDATES & A FREE ECOOKBOOK!
GET AN EMAIL WHEN THERE'S A NEW RECIPE

Source: https://diethood.com/avocado-chicken-egg-salad/
0 notes
Text
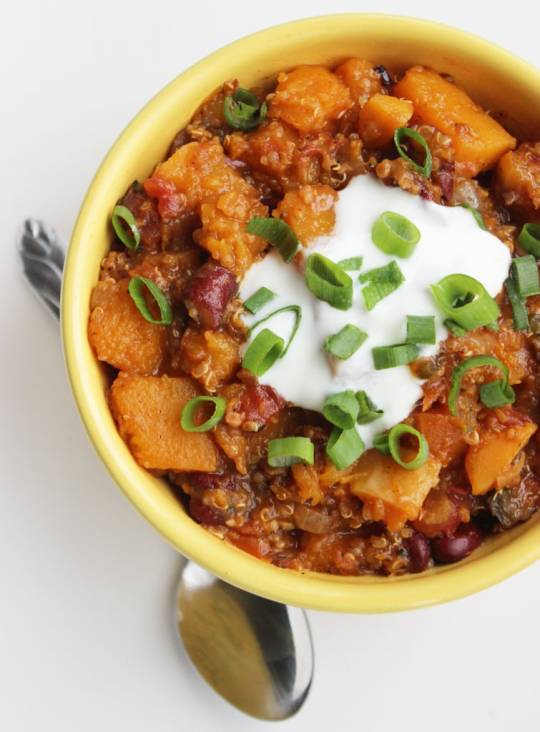
Clean Eating Butternut Rice Casserole Recipe
This clean eating butternut rice casserole is a delicious side dish, or even a plant-based main meal!
I’ve had a butternut squash sitting on my counter for a while now and I knew that if I didn’t use it soon, it would be going in the trash. Well I’m not one to waste food, so I decided we were going to have it for dinner. But truth be told, I’ve made butternut squash a million different ways this season and I was bored with every single one of them.
I wanted something hearty, filling and somewhat on the creamy side. But since I don’t eat dairy, I figured I’d substitute with cashew cream. So I decided on this clean eating butternut brown rice casserole. It was perfect for dinner and I was able to eat off of it for a few days!
WHAT IS CASHEW CREM?
Cashew cream is a wonderful dairy-free substitution for anything you would usually want to make creamy. In fact, one of the main takeaways from my plant-based culinary program was that I should ALWAYS have a bowl of cashews soaking in the fridge because frankly, it’s never a wrong time to add cashew cream to something you are making. Seriously. It goes with just about everything!
MAKING CASHEW CREAM:
The trick with cashew cream is to always have a bowl of cashews soaking in the fridge. That being said, you can’t leave them in there forever. So if you soak them overnight but don’t want to use them right away, simply strain off the water, transfer the cashews to a freezer-safe container and keep them in the freezer until you are ready to use them. So simple!!
Add plenty of water for soaking. Cashews will nearly double in size when done soaking and they should still be covered in water at that point.
Use ONLY raw cashews. They absolutely must be raw.
Freeze for up to 6 months after draining.
Note that to get a truly creamy texture, you’ll need a high powered blender like a Vitamix. If you don’t have one, your cashew cream will be a little less creamy. Still good, but you’ll be able to detect some of the cashew bits in the cream. Not necessarily a bad thing, just a difference worth noting.
ABOUT THIS RECIPE:
If you make your cashew cream ahead of time and dice all your ingredient first, this dish comes together super fast and easy!
If you bake it and the liquid is gone but something isn’t cooked, feel free to add about another 1/2 to 1 cup of liquid and continue baking until done. There should be no liquid left in the dish when it’s finished.
RECIPES USED:
Remember to subscribe to my free, Gracious Pantry Newsletter to receive all my latest recipes in your inbox! Click here to sign up!
YOU MIGHT ALSO ENJOY THESE CLEAN EATING RECIPES:
Enjoy!

CLEAN EATING BUTTERNUT RICE CASSEROLE RECIPE:
Clean Eating Butternut Brown Rice Casserole
A delicious side dish the whole family will love!
Course: Casserole, Grains, Main Course, Side Dish, Vegetables
Cuisine: American
Yield: 9 servings
Calories: 370 kcal
Author: The Gracious Pantry
Ingredients
2 cups long grain brown rice (I used basmati)
3 cups diced butternut squash (small dice)
1 1/2 cups diced carrots (small dice)
1 cup diced yellow onion (small dice)
1 tbsp. oil
5 medium garlic cloves (minced fine)
1/2 tsp. ground nutmeg
5 cups vegetable broth (low sodium, no sugar added)
2 cups cashew cream sauce (see link for cashew alfredo sauce above)
salt to taste at serving
Instructions
In a large 10 X 14 casserole dish, pour in the brown rice.
Then add the butternut squash.
Now, in a separate skillet, sauté the onions in the oil until they are golden brown. In the last minute of sautéing, add in the garlic and nutmeg and continue stirring. Then add this mixture to the casserole dish.
Pour in the vegetable broth and cashew cream sauce.
Bake at 375 F. for approximately 1 hour, or until the rice and butternut are cooked through. (Time will vary based on your oven).
Cool slightly and serve, seasoning with salt as needed.
Recipe Notes
Please note that the nutrition data below is a ballpark figure. Exact data is not possible.
Nutrition Facts
Clean Eating Butternut Brown Rice Casserole
Amount Per Serving (1 serving)
Calories 370 Calories from Fat 135
% Daily Value*
Total Fat 15g 23%
Saturated Fat 2g 10%
Sodium 545mg 23%
Potassium 539mg 15%
Total Carbohydrates 51g 17%
Dietary Fiber 4g 16%
Sugars 6g
Protein 9g 18%
Vitamin A 176.1%
Vitamin C 15.4%
Calcium 5.4%
Iron 16.4%
* Percent Daily Values are based on a 2000 calorie diet.
Source: https://www.thegraciouspantry.com/clean-eating-butternut-rice-casserole-recipe/
0 notes
Text
The Best Pasta Salads
Sharing is caring!
These tried and true pasta salad recipes make a great addition to a summer potluck, cookout or picnic. They are easy to make for a crowd and can be made in advance. There’s something here for everyone. Everyone loves a good pasta salad and cold pasta salads are perfect for summer meals as a side dish and they also work as a main dish if you add some protein.
Pasta salads can be a little bland, but not these recipes. They really pack the flavor.
Whether it be Memorial Day, the 4th of July or a poolside cookout, there’s a pasta salad for every occasion!
BBQ Ranch Pasta Salad is probably my all-time favorite pasta salad, especially for the summer months. This pasta salad goes so well with a cookout. It’s full of corn, black beans, cheddar cheese and crunchy frito chips all tossed in a BBQ Ranch dressing.
Caesar Pasta Salad is another summer favorite and you can easily add grilled chicken to it to make it a main dish. Penne pasta is coated in a homemade Caesar dressing and tossed with cherry tomatoes, croutons, romaine lettuce and grated Parmesan cheese. This pasta salad is fabulous!
Jalapeno lovers will adore this Jalapeno Popper Pasta Salad not only does it have a spicy kick, it’s full of smoky bacon and shredded cheddar cheese.
Shrimp Remoulade Pasta Salad is a fun take on the classic New Orleans dish. It has a little tang and is full of baby shrimp.
You can’t beat the creaminess of this Creamy and Tangy Pasta Salad. There’s so much flavor in this pasta dish!
Spicy Horseradish Pasta Salad is another great pasta salad for people who like a little heat. So creamy and good! This pasta salad goes really well with grilled steak.
Broccoli, Grape and Bacon Pasta Salad has a little sweetness and lots of crunch. This is another one of my favorites.
Tzatziki Pasta Salad goes great with any Mediterranean type meal. It’s full of feta cheese, dill, and olives.
Cobb Pasta Salad has all the ingredients of a classic cobb salad. Bacon, tomatoes, avocado, hard-boiled egg and blue cheese make this one delicious pasta salad.
Easy Macaroni Salad is a classic, simple pasta salad at its best. You can’t go wrong with this one. It is a real crowd-pleaser.
Tuna Macaroni Salad is an old-fashioned favorite and one of the best pasta salads ever!!
Hawaiian Macaroni Salad is the creamiest pasta salad I’ve ever eaten. Just like the simple mac salad that gets served all over Hawaii.
Chicken Curry Pasta Salad works great as a main dish for lunch or dinner. Just the right amount of curry flavor and the crunch of almonds makes this one a winner.

Source: https://spicysouthernkitchen.com/the-best-pasta-salads/
0 notes
Text
Broad bean dip
I don’t seem to have the best timing lately… I waited with my last recipe for vegan quiche with asparagus for so long that asparagus was almost out of season by the time I published the recipe. This recipe on the other hand appears to be quite the opposite. According to many online seasonal veggie calendars, broad beans should be in season here in the UK from May onwards, for about 4 months.
Well, this year appears to be different. I had trouble finding fresh pods in town, but I put that down to a high demand as broad beans are a summer favourite in the UK. I finally did find them and bought almost a kilo, which turned out to be only enough for half a portion of my dip – I needed almost two cups of podded beans in total! Turns out that my estimate was wrong because the pods inside were unusually small. When I used to buy broad beans in Greece, nearly the same weight of pods would yield triple the volume of podded beans, as they were substantially larger.
I made another trip into town and bought some more and it suddenly dawned on me that the season must be delayed this year – probably because we’ve had an unseasonably cold spring – which would explain why it was hard to find them and why the pods look a little underdeveloped (so to speak). Oh well. It was too late to change the recipe and I had 2 kilos of broad beans sitting on my kitchen counter, so here is my broad bean recipe. If you live in a broad bean desert, save it for later in the year or use green peas (frozen are okay too) instead.
While Europe is going through a major heatwave this week, even the UK is going to get a few degrees warmer apparently. The sun is supposedly meant to show its face for a few days in a row towards the end of this week – which is never 100% guaranteed with several major weather fronts battling it out daily, but something most of us, sun-loving peeps, anticipate with excitement.
I enjoy moderately hot weather and as it’s such a rarity here in the UK, whenever it does happen, it is always my excuse to spend as little time as possible in the kitchen. I am sure you are on the same wavelength as me? Dips, served alongside mounds of exciting salad, some decent bread and fresh fruit, are ideal heatwave food – which is why I am guessing that they all originate from countries that do hot weather rather well.
I made this vibrant green, minty dip hoping that the forecasted sunny 25° C (77° F) will happen later on this week. If it does, I am planning to sit in my garden, hoovering up photoshoot leftovers for lunch, alongside pitchers of iced strawberry milk and iced coffees. Apart from 2 kilos of broad beans, I also bought 5 punnets of strawberries and prepared an excessive amount of ice cubes, so I am sincerely hoping that the weather forecaster got it right this time. 🙂
PS: If you make my broad bean dip, don’t forget to tag me on Instagram as @lazycatkitchen and use the #lazycatkitchen hashtag. I love seeing your takes on my recipes!
serves: 2-3 as starter
prep: 30 min
cooking: 5 min
Ingredients
250 g / 1½ cups podded and optionally shelled* broad beans**
1 small garlic clove
1½ tbsp lemon juice (or 2 for a more lemony taste)
½ ripe avocado (or 2 tbsp extra virgin olive oil)
fresh mint or basil leaves (I used 15 medium mint leaves)
½ tsp fine sea salt
freshly ground pepper, to taste
fine chilli flakes, to taste (optional)
Method
Boil a pot of water on the stove. Put podded and washed beans into boiling water and simmer for about 3-5 minutes (depending on the size of the pods). Test one to make sure the inside is cooked.
While your beans are cooking, put a few ice cubes into a bowl of cold tap water. As soon as the beans are ready, drain them and then chuck them into the bowl with the icy water. This step isn’t necessary, but it will ensure that the beans keep their vibrant colour.
For a bright green dip, shell the beans by making a tiny incision at the top of the bean and pressing the inside out.
Place shelled beans, garlic, lemon juice, avocado, mint leaves, half of the salt and a grind of pepper into a food processor. Blend until smooth. Add a touch of cold water if the dip is too thick.
Taste and adjust seasoning to your taste. If you wish, serve with a bit of extra virgin olive oil drizzled on top – it will make it look pretty and prevent the spread from drying up once served.
Notes
*Young broad beans do not necessarily require shelling but I did this to keep the dip vibrantly green.
**If you cannot get hold of broad beans, but like the concept – feel free to use green peas instead – they will make a just as delicious base for this creamy dip.
If you want more info on some of the ingredients that we use in our recipes, check out our glossary.
Join our mailing list
and get a sweet e-book
Source: https://www.lazycatkitchen.com/broad-bean-dip/

0 notes
Text
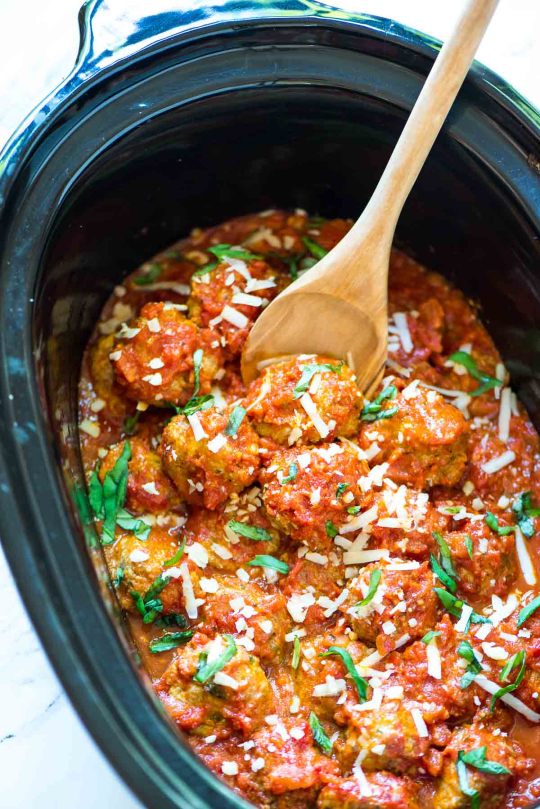
Amazing Crock Pot Marinara Sauce
Bottled marinara sauce definitely has it’s place in the kitchen. I use it for convenience in a recipe that incorporates it into the meal. However, when the sauce is the focus of the dish and just served over pasta, homemade is the way to go.

Now the key to a good marinara sauce is simmering. In order to get that amazing depth of flavor, the sauce needs time to simmer. That is what the crock pot is such a great option when making sauces.
You can also hide veggies in your sauce when you are making it yourself. This sauce incorporates carrot and celery. My family had now idea that there were veggies in the sauce when I served it.

Amazing Crock Pot Marinara Sauce
1 stalk celery, cut into chunks
1 medium yellow onion, cut into chunks
1 medium carrot, cut into chunks
4 cloves garlic
1 Tbsp olive oil
2 (28 oz) cans crushed tomatoes
1 (6 oz) can tomato paste
2 cups chicken stock or water
2 Tbsp honey
2 bay leaves
1 tsp Kosher salt
pepper
½ tsp dried basil
½ tsp dried oregano
½ tsp dried thyme
¼ tsp red pepper flakes, optional
Place celery, onion, carrot, and garlic in a food processor and process until finely chopped.
In a skillet, heat olive oil over medium heat. Add in processed celery/carrot mixture and cook for about 5 minutes, or until tender. Add mixture to a 5-7 quart crockpot.
Add the crushed tomatoes, tomato paste, chicken stock or water, honey, and all spices: stir to combine. Cover and cook on low heat 8-10 hours.
This can be stored refrigerator for up to 3 days or freeze for up to one month. Makes 10 cups.
3.5.3251
Recipe adapted from Crazy for Crust.
Source: https://realmomkitchen.com/24466/amazing-crock-pot-marinara-sauce/
0 notes
Text
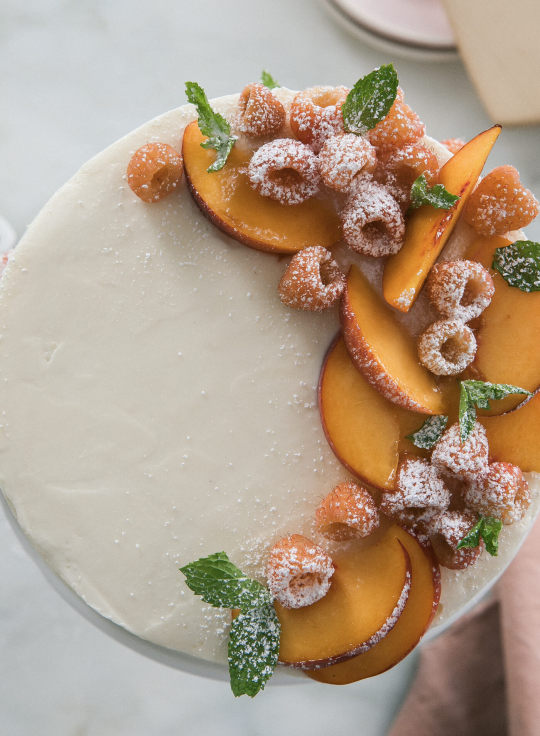
Peach Maple Yogurt Cake
Peach Maple Yogurt Cake
Cakes, Desserts, Summer
I’m currently watching old BadGirlRiri music videos because I’m procrastinating from cleaning out the dishwasher. There’s a white film that’s coating all my dishes and after I did some googling I found that it must be clogged and I gotta clean it with citric acid. Sounds fun!
A few weeks ago, I went to Vermont where everything is maple this and maple that. I came home regretting that I didn’t buy a jar of maple cream. So I figured it wouldn’t be too difficult to make it and umm…it’s not difficult per se, but man is it time consuming and petty. I love pettiness but not this type of pettiness, you know?!
I’m dreaming of maple cream cookies or making cajeta or dulce de leech but with maple. Maybe I’l put my cookie cutters that I bought in Japan to good use.
Instead, I opted to put off my maple cream dreams for fall (sounds more seasonally appropriate) and make something summery…with just a hint of maple.
This cake is so fluffy. The yogurt gives it a lovely light texture, while the peach jam that’s in between the layers gives a nice summer-y vibe. The yogurt and maple in the frosting tie it all together. This is a summer-y dream. I love this cake so very much.
I topped it with some slices of yellow peaches, golden raspberries, random sprigs of mint and a sprinkling of powdered sugar. Have fun with it, there’s no right way to do it.

Peach Maple Yogurt Cake
Prep Time: 30 minutes
Cook Time: 35 minutes
Total Time: 1 hour, 5 minutes
Yield: 1 (8-inch) cake
Serving Size: 6 to 8
Ingredients
Peach Quick Jam:
2 large ripe yellow peaches, peeled and then quartered
Juice from 1 lemon
1/4 cup white granulated sugar
Pinch of salt
Yogurt Cake Layers:
2 1/2 cups all-purpose flour
2 1/2 teaspoons baking powder
1/2 teaspoon salt
1 cup plain whole milk yogurt
1/2 cup milk
3/4 cup unsalted butter, softened
1 3/4 cup white sugar
3 large eggs
2 teaspoons pure vanilla extract
Maple Frosting:
1 cup unsalted butter
4 cups powdered sugar
2 tablespoons maple syrup
2 tablespoons yogurt
Pinch of salt
Decorative Toppings:
1 peach, sliced
Handful of golden raspberries
Mint leaves
1 teaspoon powdered sugar, sifted
Directions
To Make the Peach Quick Jam:
To a blender, add the quartered peaches and lemon juice. Blend until smooth. Pour into a medium saucepan and then add the sugar. Turn the heat to medium and bring to a gentle simmer and cook this, while stirring frequently, until thickened, about 8 minutes. Set aside.
To Make the Yogurt Cake Layers:
Preheat the oven to 350 degrees F. Grease and prep two (8-inch) round cake pans. I like to place round of parchment on the bottom of my cake pans too, just to make sure nothing sticks.
In a medium bowl, whisk together the all-purpose flour, baking powder and salt. Measure out the yogurt and milk and whisk it together until smooth.
In the bowl of a stand-up mixer, with the paddle attachment, add the butter and sugar; beat until light and fluffy, about 2 minutes. Add the eggs and vanilla extract; beat until combined about 30 seconds.
Next, alternating between the dry ingredients and yogurt mixture, add them to the butter mixture until combined. Scrape the bottom of the bowl just to make sure there aren’t any flour-y bits hiding. Divide amongst the two prepared cake pans and transfer to the oven to bake for about 25 to 30 minutes, until a skewer inserted into the center comes out clean.
Allow to cool in their pans for 5 to 7 minutes, until inverting them onto cooling racks.
To Make the Frosting:
To the bowl of a stand-up mixer with the paddle attachment, add the butter. Beat for 30 seconds, until smooth. Add the sifted powdered sugar, maple syrup, yogurt and pinch of salt. Beat until smooth and fluffy, about 1 to 2 minutes.
To Frost the Cake:
Add the frosting how you like, adding the peach jam in between the layers. (You might end up with about 1/4 cup leftover--you can use it on toast!) I did a simple crumb coat and then transferred it to the fridge and added one more smooth coat.
I added a few slices of peaches, golden raspberries and mint leaves to one side of the cake. And then dusted it with sifted powdered sugar. That’s it! Slice and serve.
3.1
http://www.acozykitchen.com/peach-maple-yogurt-cake/
August 8, 2018 by Adrianna Adarme
Adrianna Adarme
A Cozy Kitchen is a blog written by Adrianna Adarme. Adrianna likes corgis, pancakes and cute things.
Previous Post Next Post
You Might Also Like
Blackberry Semi-Freddo
July 6, 2011
Homemade Mint Milano Cookies
December 9, 2015
Rocky Road, Two Ways
September 5, 2011

Hi! This is my lil’ corner on da internets called A Cozy Kitchen. I live in Los Angeles, California with my husband Joshua and my corgi Amelia.
Read More
Cozy Cooking Playlist!
Cookbook!

Stay Up To Date
SUBSCRIBE
Late Summer Stuff To Eat


Fun Brand Partnerships


Source: http://www.acozykitchen.com/peach-maple-yogurt-cake/

0 notes
Text
Shrimp and Grits (and Instagram!) by The Pioneer Woman
I made Shrimp and Grits on a recent episode of my Food Network show, and when I made it again yesterday, I decided to document the process on my Instagram story.
Here’s where you can find it: The Pioneer Woman on Instagram
(To access the story, just click on the round “Shrimp and Grits” link or click on my photo if it’s before Monday evening.) I enjoy doing step-by-step recipes on Instagram, because it’s captured in the moment and you never know what can happen. (You’ll see a cameo by Paige, who stirred the grits for me, and by Henry, who was just standing next to me and waiting for me to drop something.)
To make the Shrimp and Grits, here are the basic steps (which you’ll see in living color on Instagram):
1. Make cheese grits. Set them aside. 2. Saute shrimp in cajun spice and butter. Remove from the pan. 3. To the same skillet add chopped bacon, onion, red bell pepper, and jalapeno. Cook on high heat. 4. Add tomato paste and cook for a couple of minutes longer. 5. Add hot sauce. 6. Add broth to make it saucy and cook until thick. 7. Add the shrimp back in. 8. Serve the sauce shrimp over the cheese grits and sprinkle with green onion!
It is divine and so easy. The printable recipe is below!
My prediction: You’ll kinda love it.
Happy Monday, friends!

Speedy Shrimp & Grits
April 23, 2018 0
Prep Time:
20 Minutes
Difficulty:
Easy
Cook Time:
20 Minutes
Servings:
6 Servings
Ingredients
5 cups Low Sodium Chicken Stock
3/4 cups Quick Cook Grits
1-1/2 cup Grated Pepper Jack Cheese
1-1/2 cup Grated Sharp Cheddar
1/2 cup Mascarpone, Softened
4 Tablespoons Butter
1 Tablespoon Olive Oil
1-1/2 pound Peeled And Cleaned Jumbo Shrimp, Tails Off
1 Tablespoon Cajun Seasoning
Salt And Pepper, to taste
6 strips Bacon, Chopped
1 whole Medium Onion, Chopped
1 whole Red Bell Pepper, Seeded And Chopped
1 whole Jalapeno Pepper, Seeded And Chopped
1 Tablespoon Tomato Paste
Several Dashes Hot Sauce (I Use Cholula)
1/2 whole Lemon, Juiced
Sliced Green Onions, For Garnish
Instructions
Bring 3 cups of the chicken stock to a boil in a saucepan. Slowly stir in the grits. Return to a boil and cook for 3 to 4 minutes. Turn down the heat and stir in the pepper jack, Cheddar and mascarpone. Cook for another 3 to 4 minutes. Stir in 2 tablespoons of the butter, season with salt and pepper to taste, and keep warm.
Heat the remaining 2 cups stock in a separate saucepan until hot.
Meanwhile, heat the oil and remaining 2 tablespoons butter in a large skillet over medium-high heat. Season the shrimp with the Cajun seasoning and some salt and pepper. Add the shrimp to the skillet and cook for 1 to 2 minutes on each side, then remove and set aside. (The shrimp will finish cooking in the sauce.)
Add the bacon, onion, red pepper and jalapeno to the skillet and season with salt and pepper. Cook over high heat until beginning to brown, about 3 minutes. Add the tomato paste and cook for 1 minute. Stir in the hot stock and add hot sauce to taste. Return the shrimp to the skillet with any juices that have accumulated. Cook until the shrimp are just cooked through, another 2 minutes. Add the lemon juice. Taste and adjust the seasoning.
To serve, spoon the shrimp and sauce over the grits and garnish with scallions.
Source: https://thepioneerwoman.com/cooking/shrimp-and-grits-and-instagram/
0 notes
Text
Classic Red Wine-Braised Beef Short Ribs
It’s one of those gray December days that makes me feel like cozying up on the couch with a blanket and a cup of hot chocolate. I know that it’s too warm for snow, but it looks like it could start flurrying any minute. It’s early enough in the season that I don’t mind. It still feels festive to stay inside by the Christmas tree, or even to bundle up and walk through the neighborhood at dusk, looking at everyone’s lights (and, let’s be real, the plethora of horribly tacky but also endearing Christmas inflatables in our neighborhood).
It’s also the perfect sort of day for slow cooking. It will be dark by 4pm, at which point we’ll start thinking about dinner and wonder what we have that we can pop in the oven. That’s what this short rib recipe is for. It’s for days when you have hours to while away indoors, when you crave something rich and tender, when you want an excuse to open a nice bottle of red wine before 5. This is your excuse – you’ll need a cup or two of wine to braise the short ribs. This is also your excuse to stay put while the short ribs roast, filling your house with the savory scent of beef slumping into red wine.
These short ribs are classic but wonderful. If you do a little research, you’ll find that most short rib recipes out in the world are fairly similar, with only minor tweaks in the order of operations and a secret ingredient here or there. You could argue that this means the recipe is ripe for innovation, or you could just take what’s been tried and tested by the world’s greatest chefs and go with it. This version is most closely inspired by Sunday Suppers at Lucques, my favorite cookbook. I go through periods when I can’t seem to cook from any other book, as I’ve mentioned before. It also takes a few cues from this Daniel recipe. Whichever recipe you use, the tricks I’ve picked up for great short ribs are as follows. One, season generously. Two, brown until caramelized, not just grayish-brown. Three, set aside at least 3 hours cooking time and don’t be tempted to take the ribs out before they are super tender. Four, refrigerate overnight before serving in order to skim and discard as much fat as you can.
I had originally planned on doing a follow-up post as well – a short rib grilled cheese sandwich. They offer a similar sandwich, on rich challah bread, at Tatte. We made the sandwiches but, shockingly, they were too rich for me. It turned out I had met my match when it comes to how much richness you can squeeze into one bite. So I’ll save the short rib grilled cheese for another day, when I’ve cracked that recipe. For now, I hope these delicious red wine-braised beef short ribs will warm up your kitchen this winter.
Like what you just read? Subscribe to Katie at the Kitchen Door in the box on the right, on Feedly or Bloglovin‘, or follow along on Facebook, Twitter, Pinterest, and Instagram. Thanks for reading!
More winter braises…
Tunisian Lamb-and-Eggplant Stew with Farro and Harissa
Braised Lamb Shanks with Blue Cheese Polenta
French Beef Stew with Red Wine
Print
<![CDATA[ .tasty-recipes-image float: right; .tasty-recipes-print-button background-color: #666677; display: inline-block; padding-left: 1em; padding-right: 1em; padding-top: 0.5em; padding-bottom: 0.5em; text-decoration: none; a.tasty-recipes-print-button color: #FFF; a.tasty-recipes-print-button:hover color: #FFF; .tasty-recipes-rating.tasty-recipes-clip-10 -webkit-clip-path: polygon(0 0, 10% 0%, 10% 100%, 0% 100%); clip-path: polygon(0 0, 10% 0%, 10% 100%, 0% 100%); .tasty-recipes-rating.tasty-recipes-clip-20 -webkit-clip-path: polygon(0 0, 20% 0%, 20% 100%, 0% 100%); clip-path: polygon(0 0, 20% 0%, 20% 100%, 0% 100%); .tasty-recipes-rating.tasty-recipes-clip-30 -webkit-clip-path: polygon(0 0, 30% 0%, 30% 100%, 0% 100%); clip-path: polygon(0 0, 30% 0%, 30% 100%, 0% 100%); .tasty-recipes-rating.tasty-recipes-clip-40 -webkit-clip-path: polygon(0 0, 40% 0%, 40% 100%, 0% 100%); clip-path: polygon(0 0, 40% 0%, 40% 100%, 0% 100%); .tasty-recipes-rating.tasty-recipes-clip-50 -webkit-clip-path: polygon(0 0, 50% 0%, 50% 100%, 0% 100%); clip-path: polygon(0 0, 50% 0%, 50% 100%, 0% 100%); .tasty-recipes-rating.tasty-recipes-clip-60 -webkit-clip-path: polygon(0 0, 60% 0%, 60% 100%, 0% 100%); clip-path: polygon(0 0, 60% 0%, 60% 100%, 0% 100%); .tasty-recipes-rating.tasty-recipes-clip-70 -webkit-clip-path: polygon(0 0, 70% 0%, 70% 100%, 0% 100%); clip-path: polygon(0 0, 70% 0%, 70% 100%, 0% 100%); .tasty-recipes-rating.tasty-recipes-clip-80 -webkit-clip-path: polygon(0 0, 80% 0%, 80% 100%, 0% 100%); clip-path: polygon(0 0, 80% 0%, 80% 100%, 0% 100%); .tasty-recipes-rating.tasty-recipes-clip-90 -webkit-clip-path: polygon(0 0, 90% 0%, 90% 100%, 0% 100%); clip-path: polygon(0 0, 90% 0%, 90% 100%, 0% 100%); .tasty-recipes-nutrition ul list-style-type: none; margin: 0; padding: 0; .tasty-recipes-nutrition ul:after display: block; content: ' '; clear: both; .tasty-recipes-nutrition li float: left; margin-right: 1em; @media print .tasty-recipes-no-print, .tasty-recipes-no-print * display: none !important; ]]>
Classic beef short ribs, braised in red wine for hours until meltingly tender. Best served over creamy mashed potatoes, potato gnocchi, or buttered egg noodles.
Adapted from Sunday Suppers at Lucques and Daniel (via Serious Eats)
Author: Katie at the Kitchen Door
Ingredients
4 bone-in short ribs, about 10-12 oz each (3 lbs. total)
1/2 tsp freshly ground black pepper
1/2 tsp coarse sea salt
1 TBS fresh thyme leaves
1 TBS olive oil
1 onion, peeled and finely chopped
2 carrots, peeled and finely chopped
2 stalks of celery, finely chopped
5 cloves garlic, peeled and finely chopped
2 cups full-bodied red wine, such as Cabernet Sauvignon
1/2 cup port wine
3 cups beef broth
3 TBS saba or aged balsamic vinegar
2 whole bay leaves
1 bunch fresh parsley
Instructions
Preheat the oven to 325F.
Pat the short ribs day and sprinkle the pepper, sea salt, and thyme leaves on top of them. Rub the seasoning in to fully coat the short ribs on all sides. Heat the olive oil in a dutch oven or medium heat, then add the short ribs to the pan (do this in batches if they don’t fit in a single layer). Brown the short ribs on all sides, about 2-3 minutes per side, until a nice, caramelized brown crust has formed on the exterior of the ribs. Remove the browned short ribs to a plate.
Drain the rendered fat from the pan, reserving only 1 TBS of fat in the pan. Return the pan to the heat and lower the heat to medium-low. Add the chopped onions, carrots, celery, and garlic to the pan. Saute until the vegetables are tender and translucent, about 5-7 minutes.
Add the red wine and port wine to the pan with the vegetables. Bring to a simmer and scrape up any browned bits stuck to the bottom of the pan with a wooden spoon. Simmer the wine until it has reduce by one third, which should take 5-8 minutes.
Add the beef broth to the reduce wine and stir to combine, then place the short ribs back in the pan. They should fit snugly in the pan and be just barely covered by the liquid. Cover with a lid and transfer to the preheated oven. Roast the short ribs for 2 1/2 to 3 1/2 hours, checking every 30-45 minutes and turning the ribs over in the pan at least once. When finished, the ribs should be completely tender, such that you can easily pull the meat apart with a fork. Remove them from the oven and let cool for 20 minutes. For best results, cover and transfer them to the fridge overnight before serving.
When ready to serve, remove the ribs from the fridge. Skim off and discard the hard white fat on top of the dish (there will likely be a lot of this). Preheat the oven to 400F, and return the ribs, uncovered, to the oven for 15-20 minutes – this is to both reheat the ribs and to gently brown the exterior. Before serving, ladle the sauce and vegetables out of the pan and strain through a fine mesh strainer. Discard the vegetables. Serve the ribs on mashed potatoes, gnocchi, or buttered egg noodles, topped with the strained sauce.

Source: http://katieatthekitchendoor.com/2017/12/03/classic-red-wine-braised-beef-short-ribs/
0 notes
Text
Maryland-ish Crab Soup
I fear posting anything I cook as a specific-style dish, like “Maryland Crab Soup.” Have you seen the way people react when someone tries to get creative with food? For Pete’s Sake people, there’s more than one way to cook something, and I’d argue there really isn’t a “right” way.
Did you cook it?
Did you like it?
That’s all the matters!
In a world where people cook less and less, why do we want to discourage any cooking? Let people be creative. That’s my favorite thing about food! Find inspiration in anything and be as creative as you want it to be.
Anyway, I’ll get off my soapbox now. Today, I want to share a Maryland-Crab-Soup-inspired-soup I made yesterday. It may not be how you make it but damn it was delicious, and I will be making it again.
Inspired by this recipe a friend shared with me on Facebook, I used what I had (and usually have) on hand, and I couldn’t be happier with the result. It may be the best tasting soup I’ve ever made. Ever! Both The Husband and The 13-Year-Old loved it.
The 7-Year-Old? He’s STILL in his picky phase. I can’t wait until it’s over. He did try it and gave me a sideways thumb. That’s all I ever get out of him.
Here’s what I did.
Prep 15 mins
Cook 30 mins
Total 45 mins
Author Roni Noone
Yield 18 cups
A Maryland Crab Soup inspired bowl of awesome! This soup will warm you on a cold day. It makes a great starter or meal with all those veggies! Macros per cup: carbs 12g, fat 2g, protein 9g
Ingredients
1 tbsp olive oil
1 large onion chopped (~200g)
2 carrots chopped (~200g)
2 celery stalks chopped (~100g)
1 large russet potatoes, cut into small squares (~300g)
1 bag frozen cut green beans (~400g)
1 15oz can of corn, drained (~270g)
2 15oz cans of diced tomatoes
2 tbsp Old Bay Seasoning
1 tbsp dried parsley
6 cups broth/stock
7 oz leftover cooked beef, cubed
1 lb Crab Meat
Instructions
Heat the oil in a soup pot over medium heat and add the veggies as you prep them starting with the onion, then carrots, celery, potato. Add a pinch of salt and toss after adding each one.
Then add the bag of frozen green beans, corn, tomatoes, Old Bay, parsley, and broth.
Stir in the beef and crab meat.
Continue to cook over medium until the potatoes soften, about 30 minutes. It shouldn't boil, if it does, just lower to a simmer.
Notes
I used a mix of beef and chicken bone broth I had frozen but any broth would work. Traditionally I believe it's beef.
The leftover beef I used was London Broil. Again, any leftover steak or beef you can cube would be fine. It would be good without the beef too but it does up the protein and makes the whole soup "meatier" and more meal-like.
I normally use claw meat as it's the most cost effective and I think it's yummy.
I measured just over 18 cups so again I'm going conservative on the nutritional info. I weighed everything out by the gram to try to be as accurate as possible. That said, adding my own broth always throws me for a loop. I just pick store-bought brand in MFP to estimate.
Courses Any
Cuisine Any
Nutrition Facts
Serving Size 1 cup
Amount Per Serving
Calories 113
% Daily Value
Total Carbohydrates 12 g
4%
Dietary Fiber 2 g
8%
Sugars 3 g
Protein 9 g
18%
* Percent Daily Values are based on a 2,000 calorie diet. Your daily values may be higher or lower depending on your calorie needs.
1
Related
Source: https://greenlitebites.com/2019/01/16/maryland-crab-soup/
0 notes
Text
A Chocolate Snacking Cake for Any & Every Occasion
A snacking cake is, for the unfamiliar, a one-layer cake, typically baked in an 8-inch round or square cake pan (I’m partial to square). It's the sheet cake’s little sister. But where a sheet cake can be a big production, often baked for a special occasion (be it a birthday party, a potluck, or the school bake sale), a snacking cake is for any day and everyday.
I have been loving on snacking cakes for as far back as I can remember (not just since Melissa Clark memorialized them in The New York Times earlier this year). In fact—and yes, I am dating myself here—my earliest snacking cake memory is Betty Crocker’s now defunct Stir 'n' Frost boxed cake mix (RIP), the one that came with its own 5x7-inch disposable pan and squeeze packet of frosting. My favorite was the chocolate cake with vanilla frosting—what all of my snacking cake dreams are made of, and the inspiration for this one:
The snacking cake’s attributes are many, beginning with its name: Who doesn’t want to eat a cake with the word “snack” in its title? But it's also the ultimate user-friendly baked good: Snacking cakes are easy to make, even for the novice baker, as they call for only one pan, a handful of ingredients, and are often not even frosted.
Moreover, the fact that you can decide you want a slice of cake, and within an hour or two find that you’re eating one, is nothing short of remarkable. This is particularly true if your snacking cake is oil-based (my favorite kind—sorry, haters), as assembling it does not require bringing butter to room temperature or pulling out the stand mixer.
Such cakes are as good on Saturday nights when you're feeling all festive as they are on Wednesday nights when you're binge-watching Dead to Me solo. They're consumed as quickly as they are assembled—except when they're not! (Then, they're the perfect breakfast with a cup of coffee.)
Finally, though frosting can elevate a simple snacking cake—as the billowy, tangy cream cheese icing does for the chocolate-carrot number featured here—no cake travels as well as a naked snacking cake. A mere unfrosted slice, usually square-shaped and tall with a dusting of confectioners’ sugar, wrapped in wax paper and brought to the office, transforms even the saddest desk lunch into something special.
Cake for lunch? I mean, come on.
Why You Should Add Carrots to Your Snacking Cake
If there ever were a good snacking cake for breaking up the workday, chocolate-carrot with cream cheese frosting might top the list, and for a variety of reasons:
Adding finely grated carrots to chocolate cake makes for the moistest of cakes, with the softest of crumbs. (The texture is best if the carrots are grated with a Microplane, as they easily incorporate into the batter when processed so fine and practically disappear once baked.) The carrots impart no true flavor of their own, but combined with the Dutch-process cocoa powder (for its deep color and taste, I’m fond of the brand Valrhona) and a smidge of espresso, make for a deliciously dense and fudgy cake, one that tastes intensely of chocolate.
I use cream cheese here as a tribute to a carrot cake’s traditional frosting, and because I love it combined with chocolate. Its tanginess cuts the sweetness of the cake nicely. And although I am a big fan of sweet, I know many who feel differently—and anyway, the beauty of the snacking cake lies in its versatility, both in flavor and in occasion. To each snacking cake their own.
Chocolate-Carrot Snacking Cake With Cream Cheese Frosting
View Recipe
Ingredients
Snacking cake
1 cup all-purpose flour 1/2 cup Dutch-process cocoa powder 1 1/2 teaspoons baking powder rounded 1/4 teaspoons baking soda 3/4 teaspoon table salt 1 cup granulated sugar 3/4 cup light brown sugar 3/4 cup neutral oil, preferably a mild olive oil, not extra-virgin 1 1/2 teaspoons pure vanilla extract 2 large eggs, plus 1 egg yolk, room temperature 1/4 cup buttermilk, room temperature 1 1/2 teaspoons espresso powder 2 tablespoons boiling water 2 cups finely grated carrots (about 3 1/2 regular-sized carrots), lightly packed
1 cup all-purpose flour 1/2 cup Dutch-process cocoa powder 1 1/2 teaspoons baking powder rounded 1/4 teaspoons baking soda 3/4 teaspoon table salt 1 cup granulated sugar 3/4 cup light brown sugar
3/4 cup neutral oil, preferably a mild olive oil, not extra-virgin 1 1/2 teaspoons pure vanilla extract 2 large eggs, plus 1 egg yolk, room temperature 1/4 cup buttermilk, room temperature 1 1/2 teaspoons espresso powder 2 tablespoons boiling water 2 cups finely grated carrots (about 3 1/2 regular-sized carrots), lightly packed
Cream cheese frosting
1 stick unsalted butter, room temperature 1 (8-ounce) package cream cheese, room temperature 1 tablespoon pure vanilla extract 1/4 teaspoon table salt 2 1/2 to 3 1/2 cups confectioners' sugar, sifted if lumpy
1 stick unsalted butter, room temperature 1 (8-ounce) package cream cheese, room temperature 1 tablespoon pure vanilla extract
1/4 teaspoon table salt 2 1/2 to 3 1/2 cups confectioners' sugar, sifted if lumpy
What's your favorite time of day to eat cake? Let us know in the comments below.
Jessie Sheehan is a cookbook author, food writer, recipe developer, and baker. She is the author of The Vintage Baker and the co-author of Icebox Cakes (both published by Chronicle Books). She has developed recipes for many cookbooks, besides her own, and has contributed recipes/and or written for Epicurious, Food52, Fine Cooking, TASTE, Little Sous, and Main Street Magazine, among others. She blogs at jessie sheehan bakes and can be found on Instagram at @jessiesheehanbakes. She likes layer cakes with lots of frosting and cookies that are thick and chewy. Oh, and she has a soft spot for chocolate pudding. She lives in Red Hook, Brooklyn, with her husband and two boys, not far from her beloved Baked, the bakery where she got her start.
Source: https://food52.com/blog/24343-what-is-a-snacking-cake
0 notes
Text
My Dad
I haven’t been keeping up with my blogging the past two weeks. The reason for this was my Dad passed away on May 29th after a 7 month battle with pancreatic cancer at the age of 67.
This has been a hard 7 months. Pancreatic cancer is a cancer that doesn’t give you much warning. Usually once you have symptoms, it’s too late to stop it. The only signs my dad really had before he was diagnosed was back pain, stomach issues, and then unexplained weight loss.
The back pain began in June of 2018. Everyone has back pain at one point or another so this really wasn’t too alarming. Then abut the end of August, he began to have stomach issues. Again, nothing too alarming because there can be a bunch of reasons this could be causing this. The one symptom that got him to the doctor which resulted in his cancer diagnosis was a 20 pound weight loss that occurred in one month.
By the time he got the official diagnosis, his cancer was stage 4. The likely-hood of coming back from this awful disease was small, but my dad was willing to try whatever he could to fight the odds and elected to try chemo. This treatment was given every other Monday. At first, the chemo really wasn’t doing much as far as the cancer markers went, but it was making my dad extremely sick. Eventually we did start to see results and his cancer markers went from the 90,000’s to 4,000. Hope was there and we thought he was going to be one of the few to kick this cancer in the butt and be a successful cancer survivor.
However, after that, the markers started to go back up. The doctors then told us that we needed make Christmas 2018 the best Christmas ever, because it would probably be the last for my dad. It really was the best Christmas I could ever ask for. It was the first time in 4 years our entire family was together. We had an amazing Christmas Eve dinner at my house. My brother hired a chef to cook the entire meal so none of us had to worry about anything for the meal. We could relax, eat, and just enjoy our time together. My dad was pretty sick, but he was able to be there and eat a few bites of the meal.
Christmas day was spent at my parents’ home, just like we do each Christmas morning. My mom made the meal with all the traditional foods that we enjoy each year. Gifts revolved around items that were more meaningful. My parents gave all the grandsons a Nerf gun as a reminder of my dad’s first rifle and with the hopes that dad would get better and they could all have a great Nerf gun war one day. All the girls got a Build-a-Bear dressed in fish attire with a recorded message from my dad saying, “It’s Grandpa Craig. Let’s go fishing. I love you!” My dad’s favorite pass time was fishing.
We also scheduled to have a family picture taken. The original place was to have the pictures taken up at our state capital building. However, as we got closer to the date of the pictures, my mom was concerned that we needed to change where we were having pictures taken. Our capital build is big and has a lot of stairs. She was afraid it would be too much for my dad to get to the building for the picture as he was getting even more weak and tired. Taking pictures outdoors in Utah wasn’t a good option either because of the unpredictable weather and my dad’s sensitivity to the cold from the chemo treatments.
We then found a local photography studio that you could rent by the hour that was close to where my parents lived. This was a much better choice. We changed the location and were able to get the best family pictures done. After this, my dad still wasn’t ready to give up. He elected to try a different type of chemo, the last option if he was going to beat his diagnosis.
This treatment was very hard on his body and also has a results of lowering blood platelets. This treatment was every Monday for 3 weeks and then one week off. After the first treatment, he was unable to get his second treatment because his blood platelets were now too low. So the doctors said he would have to try the next Monday. The next Monday the platelets were up enough to do the treatment. This would still be considered the 3rd treatment for this round. After this, it would be a week off and then he could start this second round of this treatment.
As it came close to the day for starting round 2 of the new chemo, my dad ended up in the hospital. There was a fear that he had a stroke. They discovered he didn’t have a stroke but had many other issue like being severely dehydrated, blood clots in his legs, low platelets, etc. He was given an IV, blood thinners, and an infusion of blood platelets. At this point, Monday was the day he was suppose to start his second round of chemo and the doctors were surprisingly ready to do treatment. However, we all knew it was time to stop the fight. There was no way to win the battle.
My dad was then transported back to home, hospice was brought in, and he was going to spend whatever days he had left in his own home along with my mom. It was just about 1 1/2 weeks after he came home that his body finally succumbed to the cancer in his pancreas that had also spread to his liver. Over the course of those 7 months, my dad lost 85 pounds. The doctors said other than his cancerous liver and pancreas he was a healthy man. His heart was strong, his lungs were great. He was a healthy 67 year old. Cancer sucks! We have a history of colon cancer, so my dad was diligent and getting his screenings as needed. However, cancer still found a way to come into his life another way.
Even though those 7 months were extremely painful for my dad, he chose to give us the gift of time and hope. As hard as it was to see him that way, I am so grateful of the time we had to talk and say good bye. My dad was responsible, wise, practical, a provider, generous, hardworking, a fisherman, smart, considerate, industrious, blessed, strong, patient, dedicated, humble, a repairman, resourceful, and selfless. I couldn’t ask for a better angel watching over us in heaven. We also believe we will see each other again one day. I love you dad – and can’t wait until we are reunited again one day.
My brother and his wife started a non-profit organization in Texas in memory of her Aunt who passed away from cancer. The organization, The Ruth Cheatham Foundation, was named in her honor and givers scholarships to cancer patient/survivors ages young adults in Texas. Before my father passed away, my brother and his wife were able to tell my dad that they were adding a scholarship to their foundation in honor of him to benefit young adult cancer patients/survivors for the state of Utah. He couldn’t have been more proud! If you would like to donate to the scholarship in honor of my father, it will benefit some amazing kids!
Source: https://www.realmomkitchen.com/my-dad/
0 notes
Text
Chopped Greek Chicken Salad with Pita Croutons and Tzatziki Dressing
210shares
Share
Pin
Twitter
Fresh and flavorful, this chopped Greek chicken salad is packed with so many delicious ingredients – toasted pita croutons + amazing tzatziki dressing + marinated chicken. Plus, most of it can be prepped ahead of time! Yes!
Oh man, I love a good dinner salad. And I especially love a good dinner salad that can be prepped almost 100% ahead of time so when dinner time rolls around my family thinks I’m a rock star for giving them a plate piled high with tender, juicy chicken, chopped vegetables and slathered with creamy dressing.
Ok, actually in the interest of full disclosure, I don’t think any child of mine except for the two that eat like little goats have ever declared “mom of the year” status for salad (crazy kids), but all of them agree that the simple pita croutons in this recipe are the stuff dreams are made of, so that’s a win. Meanwhile, Brian and I heartily declare this chopped Greek chicken salad one of the best salads ever.
If you also have kids that might turn up their noses at salad for dinner, one way we’ve gotten around this (because we eat a lot of main dish salads) is to serve everything separately instead of tossing the salad together in one big bowl before serving. That way those of us who don’t mind building our own salad on our plate can do so, and the rest can keep everything well ordered and happily separated into little piles. With ample amounts of dressing on the side for dipping.
You guys, this salad is so good. It may look like there’s a ton of prep. And let’s be real, there is. But that’s not bad news, because all of it (yes, all of it!) can be prepped ahead of time. Like, days ahead of time.
As long as you store everything in separate containers and wait to toss it together until right before serving, you’ll be golden in the not-soggy-salad department. This also ensures dinner will come together snappy fast OR it can be a great make-ahead lunch option. Just grab the prepped ingredients from the fridge and put together individual servings when you want it!
If you still just can’t get behind eating salad for dinner, don’t worry, we can still be friends. Just promise me that you’ll still make the right choice and one day, throw some chicken into that flavorful marinade listed below in the recipe. It is incredible. So, so flavorful – and the grilled chicken is more tender and juicy than ever before.
Don’t waste time giving the side eye or panicking at bathing chicken in buttermilk/lemon. I promise it works. Not only does it amp up the flavor profile, but buttermilk is one of the key ingredients that contributes to super juicy, perfect chicken.
I don’t want to waste any more of your time that could be spent getting to work on this amazing salad, but let’s just have a quick moment of silence for that creamy tzatziki dressing. Light and fresh thanks to the cucumbers, it is tangy, creamy, and you’re going to want to spoon it on everything.
Seriously, Do I Have to use Mayo??
If you are a mayo hater (you’ll remember, I swore it off after this traumatizing experience), you can try subbing in extra yogurt. But even I was able to dig deep and use it, and I’m a stronger woman for doing so. The mayo definitely helps bind the dressing together and adds a silkiness that you probably won’t get if using all Greek yogurt (bonus: you can hardly taste the mayo anyway).
I hope you love this super tasty chopped Greek chicken salad! It’s on my short (ok, long) list of things I could eat every day and never get sick of. It’s that good.
Read through the recipe to get a glimpse at all the make-ahead options for everything!
Fresh pineapple or fruit salad
One Year Ago: Sheet Pan Unstuffed Chicken Cordon Bleu with Roasted Broccoli Two Years Ago: Easy Pull-Apart Italian Asiago Bubble Bread Three Years Ago: Sweet Baked Ham Instant Pot Instructions Four Years Ago: Lemon Sticky Buns with Lemony Cream Cheese Glaze Five Years Ago: Fluffy Whole Wheat Dinner Rolls
Yield: 6 servings
Prep Time: 1 hour
Cook Time: 15 minutes
Additional Time: 12 hours
Total Time: 13 hours 15 minutes
Print

Ingredients
Tzatziki Dressing:
1/2 seedless/English cucumber, peeled and finely diced
1/2 teaspoon coarse, kosher salt
1/2 cup plain Greek yogurt
1/2 cup mayonnaise, light or regular
1 clove garlic, finely minced (or 1/4 teaspoon garlic powder)
1 tablespoon freshly squeezed lemon juice
1 tablespoon red wine vinegar
1/2 teaspoon dried parsley
Pinch of black pepper
Greek Chicken Marinade:
1 1/2 pounds chicken breasts (I like to use thin cut chicken)
2 tablespoons olive oil
1/3 cup fresh lemon juice (from about 2 large lemons)
1/3 cup buttermilk
4 cloves garlic, finely minced or pressed (or 1 teaspoon garlic powder)
2 teaspoons dried oregano
1 teaspoon coarse, kosher salt
1/2 teaspoon black pepper (I use coarsely ground; use less if finely ground)
Pita Croutons:
4 to 5 pita breads (or flatbread like this homemade recipe)
Salad:
3 small to medium heads romaine, chopped (about 8 cups)
1/2 to 1 seedless/English cucumber, peeled and diced
1 medium bell pepper (red, yellow or orange), cored, seeded and diced
1 cup chopped or sliced kalamata or black olives
1/4 to 1/2 red onion, sliced into thin slivers
1/2 cup (or more, to taste) crumbled feta cheese
Instructions
For the dressing: place the cucumbers in a colander or fine mesh strainer and sprinkle with the 1/2 teaspoon salt. Toss. Let the cucumbers sit and drain for 15-20 minutes (this helps the dressing not turn watery). Place the drained cucumbers and remaining dressing ingredients in a blender and process until smooth. Season to taste with salt and pepper, if needed. Refrigerate until ready to serve. The dressing can be made up to a week in advance.
For the chicken: place the chicken in a shallow dish or gallon-size ziploc bag. Whisk together the olive oil, lemon juice, buttermilk, garlic, oregano, salt and pepper. Pour over the chicken, cover (or seal the bag) and refrigerate for 8-12 hours. Grill the chicken on medium-high, discarding excess marinade, until cooked through or an instant-read thermometer registers 165 degrees F at the thickest part. Let the chicken rest 10 minutes before slicing and serving. The chicken can be marinaded, grilled and stored in the refrigerator for 1-2 days before assembling the salad.
For the pita croutons: cut the pita breads into small squares, about 1/4- to 1/2-inch in size. Place them in an even layer on a baking sheet and toast in a 375 degree F oven for 15-20 minutes (watch closely so they don't burn) until they are golden and crunchy on the outside. The pita croutons can be made 2-3 days in advance and stored in a sealed bag at cool, room temperature (they'll probably keep ahead best in a dry climate vs a humid climate).
For the salad: in a large serving bowl, add the chopped romaine, cucumber, bell peppers, olives, and onion. You can toss all the ingredients together (salad + chicken + dressing + croutons + feta), but if you plan on having leftovers, I suggest tossing only the chopped veggies together and adding chicken, dressing, croutons and feta to each serving (so the leftovers don't get soggy).
Notes
There is a lot going on in this recipe, but I promise it comes together fast, especially since almost all of the components can be made ahead of time!
Recommended Products
Bamboo Cutting Board

8-Inch Chef's Knife

Vitamix Blender

Fine Mesh Strainer
As an Amazon Associate and member of other affiliate programs, I earn from qualifying purchases.
Follow @melskitchencafe on Instagram and show me the recipes you are making from my blog using the hashtag #melskitchencafe. I love seeing all the goodness you are whipping up in your kitchens!
© Mel
Category: Salad Main Dish

Recipe Source: inspired by this recipe from Jen at Carlsbad Cravings (used my own chicken marinade, changed up quantities and ingredients in dressing a bit, simplified pita croutons, etc)
Posted on March 25, 2019 by Mel
7 Comments »
never miss a recipe subscribe via email
Sign Up
« Previous PostRecipes the World Forgot: 9 of the Best

Source: https://www.melskitchencafe.com/chopped-greek-chicken-salad/
0 notes
Text
Copycat Cheesecake Factory Bang Bang Shrimp
Copycat Cheesecake Factory Bang Bang Shrimp is quick and easy to make bursting with curry, peanut, coconut flavors. With this copycat recipe at your fingertips, you can eat bang bang shrimp whenever the cravings strike - in your slippers – at a fraction of the price!

I am a huge fan of Cheesecake Factory. From their wonderfully long diverse menu, to their luscious cheesecakes to their Bang Bang Shrimp.
If you’ve never tried this famous entrée, it is a symphony of flavors and textures, down to the crowning sweet toasted coconut.
In my Copycat Cheesecake Factory Bang Bang Shrimp recipe, we get all the same coconut, Thai curry flavors in under 30 minutes!
Hi all, its Jen from Carlsbad Cravings and I am excited to be with you again sharing another quick and easy dinner!
I absolutely love Thai food for its harmonious dance of savory, sweet and sour flavors and so I was super excited to recreate this this Copycat Cheesecake Factory Bang Bang Shrimp.
The ingredient list might look long, but keep in mind most of the ingredients are just dump and run with no time/skill required so it is actually super easy to make and tastes just as good or better (in my humble opinion) than the restaurant version.
If you are looking for more fabulous Thai recipes, be sure to check out my Panang Curry and Pad Thai – you won’t be disappointed!
Speaking of simple recipes, of course our new cookbook The Simple Kitchen - available to order nowis packed with delicious, easy recipes.
The Simple Kitchen is loaded with more than 75 BRAND NEW recipes and a hand full of family favorites too.
8 chapters with a total of 82 quick and easy recipes that are bursting with flavor!!!
Every recipe has a photo that will make your mouth water. It has slow cooker meals, one-pot recipes, quick dinners, simple appetizers, desserts and more!!!
And we have included kitchen tips to make dinnertime less stressful.
We are so excited to share our recipes with you!!! So, don't wait. Go and grab yours today! The Simple Kitchen <-- click here to order.
WHERE TO ORDER:
🔥 Amazon 🔥 Barnes & Noble 🔥 Books-a-Million 🔥 IndieBound
Helpful Tips to make Copycat Cheesecake Factory Bang Bang Shrimp:
This recipe calls for smooth peanut butter but if you only have crunchy peanut butter on hand, that will definitely work. Brands such as Skippy and Jif work best in this recipe as opposed to natural peanut butters because they don’t melt as well.
If you don’t have chicken broth on hand, you can substitute with water.
Asian Sweet Chili Sauce can be found in the Asian aisle of your grocery store. It is a dynamic balance of tangy sweet heat derived from red Thai chilies, sugar, rice vinegar, garlic and ginger.
To toast coconut, preheat oven to 400 degrees F. Spread coconut in an even layer on a baking sheet. Bake for 3-5 minutes, stirring occasionally, until coconut is golden. Watch closely towards the end because it will go from golden to burnt very quickly.
You can make this Bang Bang Shrimp perfect for YOU by customizing the consistency, flavor and spice level. I find Cheesecake Factory Bang Bang Shrimp a little on the sweet side, so I prefer 2 tablespoons Asian Sweet Chili Sauce and 1/2 teaspoon pepper but I recommend tasting first before you change/add any ingredients.
If you would like a thinner sauce, thin with additional chicken broth or water.
For a spicier sauce, add sriracha.
For a tangier sauce, add lime juice.
For a sweeter sauce, add additional brown sugar (keeping in mind the coconut will add sweetness).
What you will need to make Copycat Cheesecake Factory Bang Bang Shrimp:
Wide Stainless Steel Pan - Using a wide stainless steel pan allows you to cook your shrimp in one batch. It also heats evenly and quickly which allows your food to cook faster and develop that pretty sear on seafood, chicken and meats that adds a lot of flavor. Stainless steel pans also clean up beautifully with a little baking soda so they still look brand new.
Garlic Press - One of my moist used kitchen tools! I received mine as a gift years ago and I can't imagine why I never had one. It minces garlic with one squeeze, with the peel still on!
Microplane/Zester - This is great for zesting ginger, garlic, citrus and even potatoes. You will use it practically every day!
Enjoy!
With love from our simple kitchen to yours.
Do you ❤ love ❤ TSRI? Don't miss another recipe. Click here to Subscribe to The Slow Roasted Italian by Email and receive new recipes in your inbox every day!
Don't miss a thing! Follow us on Facebook | Twitter | Pinterest | Instagram ❤ ❤ ❤
Check out more of our favorite copycat recipes:
Copycat Red Lobster Cheddar Bay Biscuits Chipotle Copycat Cilantro Lime Rice Wendy's Chili Copycat Olive Garden Copycat Chicken Vino Bianco Copycat Texas Roadhouse Rolls Cinnabon Cinnamon Rolls Copycat
Copycat Cheesecake Factory Bang Bang Shrimp, Bang Bang Shrimp
copycat
American
Yield: 4-6Author: Jennifer SattleyPrint Recipe
With ImageWithout Image

Copycat Cheesecake Factory Bang Bang Shrimp
Copycat Cheesecake Factory Bang Bang Shrimp is quick and easy to make bursting with curry, peanut, coconut flavors. With this copycat recipe at your fingertips, you can eat bang bang shrimp whenver the cravings strike - in your slippers – at a fraction of the price!
prep time: 10 minscook time: 18 minstotal time: 28 mins
Ingredients
Shrimp
1 pound medium uncooked shrimp, shelled, deveined, tails on
2 tablespoon Asian Sweet Chili Sauce
1/4 teaspoon salt
1 tablespoon olive oil
1 tablespoon butter
Coconut Curry Sauce
1 tablespoon olive oil
1/2 large onion, chopped
1 large carrot, julienned and cut into 1” length pieces (1 cup)
2 teaspoons freshly grated ginger
3 garlic cloves, minced
2 teaspoons curry powder
1 13.5 oz. can quality coconut milk (I like Chaokoh)
3/4 cup low sodium chicken broth
1 tablespoon cornstarch
3 tablespoons brown sugar
3 tablespoons smooth peanut butter
2 tablespoons less sodium soy sauce
2 tablespoons lime juice
1-2 tablespoons Asian/Thai Sweet Chili Sauce (like Mae Ploy) (2 for spicier)
1 tablespoon fish sauce (may sub soy sauce)
1/2 teaspoon dried basil
1/4-1/2 teaspoon pepper
sriracha to taste (optional)
Add later
1 small zucchini, julienned and cut into 1” length pieces (1 cup)
1/2 cup frozen petite peas
Garnish
1/3 cup toasted sweet coconut flakes
1/4 cup chopped peanuts
2 chopped green onions
Instructions
Add shrimp to a medium bowl along with 1 tablespoon olive oil, 2 tablespoons Asian Sweet Chili Sauce and 1/4 teaspoon salt. Stir to combine and set aside while you prep your veggies. (Shrimp may sit at room temperature for 30 minutes or refrigerate for up to 8 hours.)
Melt one tablespoon butter over medium high heat in large skillet. Discard shrimp marinade and add shrimp to the pan in a single layer (you may need to work in 2 batches). Cook shrimp just until opaque, about 3 minutes, then flip over and cook another 2-3 minutes until cooked through. Remove shrimp to a cutting board. Chop off tails when cool enough to handle/while sauce is simmering.
Using the now empty skillet (don’t wipe out), heat one tablespoon olive oil over medium-high heat. Add onions and cook three minutes. Add carrots, ginger, garlic and curry powder and sauté 1 minute. Turn heat to low and add coconut milk. Mix chicken broth with 1 tablespoon cornstarch and add to skillet along with all remaining Coconut Curry Sauce ingredients.
Bring sauce to a simmer until thickened and the carrots are crisp-tender, about 5 minutes. Stir in zucchini and frozen peas and cook until peas are heated through, about one minute. If you would like a thinner sauce, thin with additional chicken broth or water. For a spicier sauce, add sriracha, for tangier, add lime juice, for sweeter, add additional brown sugar (keeping in mind the coconut will add sweetness).
Serve with rice and garnish with toasted coconut, green onions and peanuts.
https://www.theslowroasteditalian.com/2018/09/copycat-cheesecake-factory-bang-bang-shrimp.html
Recipe developed by Jennifer Sattley for The Slow Roasted Italian Copyright ©2018 The Slow Roasted Italian – All rights reserved.
<![CDATA[.recipe-innertext-align:left;max-width:620px;border:6px double #009BFF;padding:20px;background:#f2f2f2;margin: 40px auto;font-family:Lato, sans-serif;.recipe-keywords,.recipe-categories,.recipe-cuisine,.recipe-videodisplay:none;visibility:hidden;.recipe-inner acolor: #4193f0;#recipe .recipe-namefont-size: 21px;#recipe .infoposition:relative;font-size:13px;text-transform:capitalize;border-bottom:2px solid #000;padding-bottom:7px;margin-bottom:20px.info:aftercontent:'';display:table;clear:both#recipe .info span:first-childmargin-right:30px#printbuttonborder:0;margin:0;color:#fff;float:right;background:#555; padding:5px;border-radius:3px;cursor:pointer#recipe .timetext-transform:uppercase;font-size:12px;text-align:center;background:#fff;padding:15px 0;margin-bottom:20px#recipe .time span:not(:last-child)margin-right:12px#recipe .time span:not(:last-child):aftercontent:'';display:inline-block;height:10px;width:1px;background:#000;vertical-align:middle;margin-left:12px#recipe .summaryline-height:1.7;font-style:italic;font-size: 15px !important;font-family:Lato, sans-serif !important;.ingredients,.instructionsline-height:1.7;clear:both;font-size: 15px !important;font-family: 'Roboto','Open Sans', Lato, sans-serif;.ingredients *, .instructions * font-size: inherit !important; font-family: inherit !important; .ingredients h3,.instructions h3,.notes h3font-size:20px !important;font-weight:400 !important;margin-bottom:0;color:#000;text-transform: uppercase;.ingredients ulmargin:0!important;margin-top:5px !important;.instructions limargin-bottom:15px !important;line-height:1.6;text-align:left;.ingredients litext-align:left#recipe .instructionsmargin-top: 30px;#recipe .instructions ol,#recipe .instructions ol li list-style:decimal !important;#recipe .instructions olpadding-left:39px;margin:0!important;margin-top:6px !important;.posturlborder-top:1px solid #ccc;padding-top:10px;.ing-sectionpadding-left:20px;margin: 10px 0;.ing-section > spanfont-weight:700.recipe-creditfont-size:13px;border-top: 1px solid #ccc;padding:10px;text-align:center;background:#ffffff;margin:-20px;margin-top:15px;.recipe-credit acolor:blue;text-decoration:none;.copyright-statementfont-size: 13px;font-style:italic;border-top: 1px solid #ccc;margin-top:15px;padding-top:15px;line-height:1.6;.notes prefont-size: 15px;margin: 10px 0;padding-left: 20px;font-family: inherit;line-height: 1.7;white-space: pre-line;.notes h3margin: 0.nutrition-infofont-size: 0;margin: 20px 0;padding: 10px;background: #fff;.nutrition-info>div display: inline-block;font-size: 14px;width: 20%;text-align: center;.nutrition-info>div:nth-child(5) ~ divmargin-top: 20px;.nutrition-info>div pmargin-top: 0;margin-bottom: 7px;.print-options display:none;position: absolute; top: 0; right: 0; background: #fff; border: 1px solid #ccc;z-index: 1;.show-print-optionsdisplay:block.print-options button display: block; background: transparent; border: 0; cursor: pointer; padding: 10px; width: 100%; text-align: left; .print-options button:hover background: #555; color: #fff;#recipe .imagewidth:auto;text-align:center;margin-bottom:25px;margin-right:20px;float:left#recipe .image imgmax-width:250px#recipe .recipe-namemargin-bottom:10px;line-height:1.6;text-transform:uppercase;margin-top:0;letter-spacing:1px;text-align:left#recipe .summaryline-height:1.7;font-style:italic#recipe .timebackground:#fff;clear:both;border:1px solid #d7d7d7]]>


Disclosure: Posts may contain affiliate links. If you purchase a product through an affiliate link your price will remain the same and The Slow Roasted Italian will automatically receive a small commission. Thank you for supporting us, it helps us keep creating new recipes.

Source: https://www.theslowroasteditalian.com/2018/09/copycat-cheesecake-factory-bang-bang-shrimp.html
0 notes