
Last Seen Blogs

true-love-true-lose-blog
L'uomo della folla
lhotymopsa
llovemops

southsidedenver
Platt Park
true-love-true-lose-blog
L'uomo della folla

columboscreens
columbo screenshots
Text
Retrode Birthday Video
Matthias (of Retrode fame) is running a give-a-way to celebrate the Retrodes 3rd Birthday. I had an idea for a video, but thought that someone else would be sure to do it so I didn't bother. After a week, nobody had done my idea, so I thought I should (as it was so good!).
If you like it, [head on over to the Retrode site](http://www.retrode.org/birthday/?t=0&c=27#c27) and give my video a vote!
0 notes
Text
Multi Region Super Game Boy
A PAL Super Nintendo game can only be played on an unmodified PAL Super Nintendo console. This is due to the CIC lockout chips, one in the console and one in the cartridge. I have written previously about replacing the chip in the console to allow it to play any region game, but what about the other way round?
If you have the desire to make a Super Nintendo game work on any region console, you are in luck, not only did ikari make a replacement CIC ‘lock’ chip for the console, he made a replacement CIC ‘key’ for cartridges too!
It works by booting the cartridge as one region, if it doesn’t work, when you hit reset, it tries as the other. If it is successful, it remembers its state for the next time it is powered on.
Different CIC chips
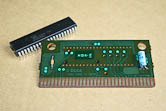
While we are talking about CIC chips, here are a few photos of some different SNES game PCB’s, each with a different lock out chip.
First is Street Fighter II Turbo. It has a D413A CIC, through hole DIP16 chip. Next is Doom, it has a surface mount 18 pin chip, which is the same as the lockout chip in the PAL Super Nintendo console, just connected up differently. I can only assume they changed the lock out chip in later games as they were using all surface mount components (apart from the XTAL). The last one is PGA Tour 96. It doesn’t have a CIC chip per say, but the SA1 chip handles all the region checking duties, in a more complex way than the basic CIC.
Super Game Boy
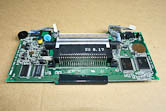
The Super Game Boy uses one of the F413A surface mount chips, and in order to add the SuperCIC, I had to remove it, which I did with my trusty soldering iron and solder sucker.
PAL Super Game Boy PCB (orange/red/black wires on the left go to an EXT port I had previously added)
Close up of the F413A CIC chip
Close up of the PCB with the F413A CIC chip removed
Close up of the removed F413A CIC chip
Next, I flashed the SuperCIC key code to a PIC12f629 and soldered it to the Super Game Boy as per the instructions in the source file. It mentions that an LED can be added to pin 3 to show what state the chip is in, LED lit means everything is OK, LED off means there is an error. I decided to add a tri-colour LED, with one leg wired to 5v (via a 220R resistor), the middle leg to ground, and the other to the output pin on the SuperCIC (also via a 220R resistor). By wiring it like this, if the SuperCIC can’t boot the cartridge when you turn on the console, the LED lights up red. When you hit reset, the SuperCIC then boots the cartridge, and outputs a signal on pin 3 making the LED light up orange. A nice addition being as the original Super Game Boy doesn’t have a power LED (or an EXT link port). The Super Game Boy 2 has both of these features, it was only released in Japan though.
PAL Super Game Boy PCB fitted with SuperCIC (key) chip
Here is a video demo of the muli region Super Game Boy working, my very first video!
If you have an urge to read more about the CIC lock out chip and find out how it works, have a read of this at hackimii.com or this thread over at nesdev.parodius.com.
0 notes
Text
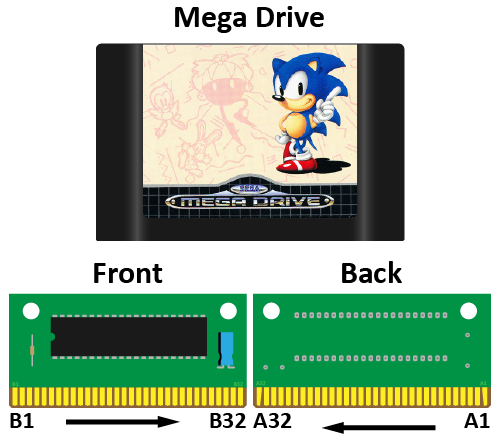
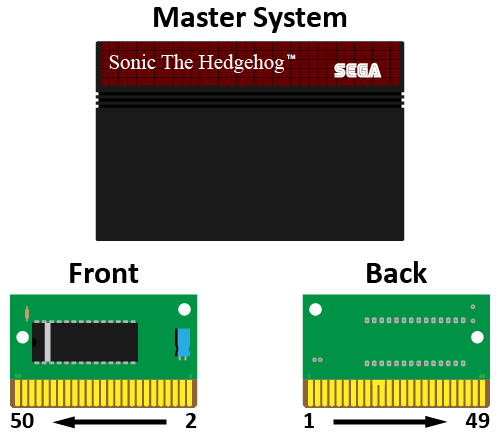
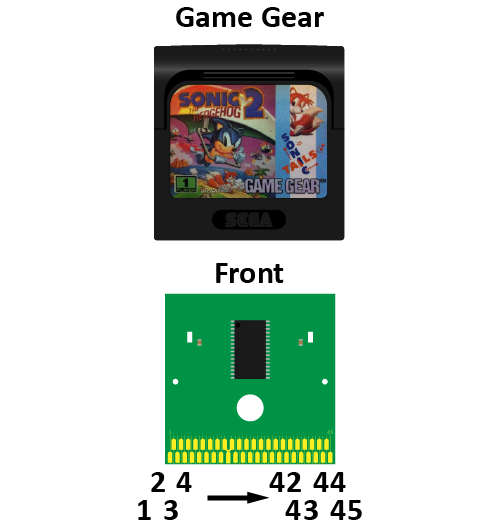
Retrode SMS/GG plug-in adapter pin-out
Okay then, this is the pin-out for the Master System / Game Gear plug-in adapter. Not sure if this is exactly the same as the final production version that Matthias is making, but its the same as the prototype and it works!
MD EdgeSignalSMS EdgeGG Edge A1gnd2116 A2+5v12 A3a7325 A4a101225 A5a6316 A6a111029 A7a5307 A8a12334 A9a4298 A10a13732 A11a3289 A12a14633 A13a22710 A14a1511,3628 A15a12611 A16a1649- A17a02512 A18gnd2017 A19d714- A20d024- A21d8-13 A22d615- A23d123- A24d9-14 A25d516- A26d222- A27d10-15 A28d417- A29d318- A30d11-19 A31+5v35,4635,39 A32gnd1918 B1N/A-- B2N/A-- B3N/A-- B4a8831 B5a9930 B6a175- B7a18-- B8a19-- B9a20-- B10a2123 B11a22426 B12N/A-- B13N/A-- B14N/A-- B15N/A-- B16/C_OE-24 B17/C_CE 1324 B18N/A-- B19N/A-- B20N/A-- B21N/A-- B22d15-23 B23d14-22 B24d13-21 B25d12-20 B26N/A-- B27N/A-- B28/LDSW-- B29/UDSW-- B30N/A-- B31N/A-- B32/CART_IN--
As each system uses a different cartridge pin numbering scheme, I have made up a few images to help make it (hopefully) obvious for each one.
With all three of these PCB's, I have considered the side with the components mounted as the front as it is the side that faces the side of the cartridge case with the label.
2 notes
·
View notes
Text
Retrode SMS/GG plug-in adapter follow up
I have been going through my Game Gear and Master System games, trying them out with the SMS/GG Plug-in adapter and have noticed two things:
The Game Gear connector needs to be secured.
Game size detection is a little flaky.
Game Gear connector - Every time you insert/remove a Game Gear game, the connector moves a bit as it is only secured by the solder joints. Now this might not seem like much of an issue, but over time, it could cause the solder joints to fail. In the Game Gear, the connector is held in place with two rivets (see photo below), the plug-in adapter could do with two holes to secure it in a similar way. I mentioned it to Matthias and he said that the production Adapter will have such holes, perfect.
Game Gear PCB
Game size detection - The first few cartridges I tried with the adapter worked fine, the resulting ROM files were the correct size and they loaded straight up in an emulator. As I tried more, I started to notice that some of them were not working, mainly because the ROM files were smaller than they should be. Lets take Super Monaco GP as an example, it is a 256KB cartridge which the Retrode makes a 128KB ROM file from.
It isn't the Retrode that's at fault here, its the cartridge (or the games programmer).
The SMS/GG ROM header has a location that specifies the ROM size (0x7FFF), and it turns out that quite a few games (seems to be mostly games larger than 128KB from my experience) don't have the correct size there, they have a smaller size listed. The Retrode looks here to work out what size to make the ROM file, and if it is wrong in here, the file you get is the wrong size and doesn't work. In this instance, Super Monaco GP has $F (128KB) at 0x7FFF, which is wrong (it should be $0 (256KB).
Super Monaco GP SMS header screenshot (location 0x7FFF highlighted)
Luckily, the Retrode is a clever beast. As of firmware v0.16a, there has been an overdump function. The HWB button cycles between auto size detection and 3 predefined ROM sizes. Using this feature I set the size to 256KB, and what do you know, I had a working ROM file! I was able to get all the other non-working games to work using the same method.
It won't be a problem with every game you use, but it is something to bare in mind when using this adapter.
0 notes
Text
Final testing of Retrode Master System / Game Gear adapter
Well I finally got my adapter back from Matthias (postage times are way longer during the Christmas holiday) and there was a surprise in the box! Along side my mess of wires was a nice PCB and a couple of 50 way Master System edge connectors. Matthias had taken my mess of wires and turned it into a PCB with mounting holes for both a 50 way Master System edge connector, and a 50 way Game Gear connector. As it was not a final product, the edge of the PCB was not chamfered so I filed along the edge to make it easier to insert in to the Retrode cart slot. Next, I soldered the connectors to the board, Master System on the front, Game Gear on the back. First off I tried a master system game (Wonder Boy). I plugged it in to the adapter which in turn I plugged into the Retrode 2. Nothing happened. I took the cart out, cleaned the contacts and tried again. Still nothing. So I tried a Game Gear game (Columns), which did exactly the same. I decided to leave it until I could email Matthias to see if I was missing something. Before I got round to it, Matthias sent me an email to say that I would need to bridge two points on the PCB for cartridge detection to work, specifically, the two points marked with Xes (pin 19 on the Master System and a pin 32 on the PCB edge). I had noticed these when I was soldering the connectors in and wondered if something needed to be done with them. I joined the points with a length of wire and tried again. Bingo, a file appeared on screen (generic name as master system headers don't contain the game name) which loaded in my emulator. Sorted. I guess this wire won't be necessary when the adapters are released, the link will be added to the board. All the Master System games I tried worked straight off, as did most of the Game Gear games, a couple needed a clean and one didn't work at all, Fantastic dizzy. This is a Codemasters game and they used their own mapper chip which handles things differently to the Sega ones. [It is documented](http://www.smspower.org/Development/Mappers?from=Development.Mapper#TheCodemastersMapper "Have a read over at smspower.org"), so maybe Matthias will be able to add compatibility in a future firmware version. Can't wait to see the final version of the adapters, it's been great fun being part of the process :)
1 note
·
View note
Text
My Retrode 2 has arrived
A nice post-Christmas parcel arrived the other day, doesn't it look lovely! Time for some playing...
0 notes
Text
Initial testing of Retrode Master System / Game Gear adapter
After my success with the Virtual Boy Retrode adapter, I decided to try making another for some of my other cartridges that weren't already catered for. This time I opted for the Sega Master System. As Game Gear games are near enough the same as Master System games data-wise (you can play master system games on a Game Gear with a converter), I thought I would try to make a dual system adapter.
Following the same procedure as with the Virtual boy adapter, I located the Master System and Game Gear cartridge pinouts and matched them up with the relevant pins on the Mega Drive connector, first for the Master System, then for the Game Gear. There were a few differing signals, but I matched up the main ones.
Next job was to remove the ROM chip from a donor Mega Drive cartridge and start the tedious process of attaching wires to the vacant holes. I use individual strands of wire from an old Ultra DMA IDE/ATA cable for this (like the one on the left in this picture), it's single strand and just the right thickness.
Cartridge connectors next. Master System turned out to be simple, I de-soldered an ISA card socket from an old motherboard and cut it down to size, same pin pitch and board thickness, sorted. The Game Gear proved to be more difficult. The pins on the edge of a Game Gear cartridge are arranged in offset parallel lines, so finding a suitable replacement for a real one proved to be impossible. I didn't fancy destroying my fully working (even the sound!) Game Gear, so got a faulty one off of ebay for next to nothing and de-soldered the cartridge socket.
I soldered the Master System connector on, connected a game and plugged it in the Retrode. A quick check of the resulting file in a hex editor showed that it was reading something, and after comparing it to a reference ROM, it was almost the same, albeit with additional FF's. This was because the Retrode is expecting 16bits of data, and the Master System is only 8bits, so the upper 8bits were empty, something for Matthias to sort in the firmware.
The Master System uses Frame Control Registers (FCR's) to access the ROM, so the Retrode would need to be able to do the same. Matthias sent over a couple of test firmwares to try out, but unfortunately, the only cartridge we got to read correctly was Transbot, which is a 32KB cartridge, so didn't use any FCR swapping.
Unable to resolve the issues, Matthias asked if I would be willing to send my adapter to him to continue testing, which I of course did. Now he has a working firmware, and is getting some boards made up based on my prototype! Make sure to order one when he gets them in.
Talking with Matthias before I sent off the adapter, I wondered if the Game Gear could be put on the higher 8bits of the Mega Drives 16bit data lines, enabling both Master System and Game Gear cartridges to be plugged in at the same time. He said it would be possible, but it would interfere with the auto detection. He has since mentioned that he is adding space to solder on a Game Gear cartridge connector to his adapter PCB, so hopefully he worked out a way round this. I will post the pinout for the adapter when I find out how Matthias has added the Game Gear to it.
2 notes
·
View notes
Text
Goodies from Tokyo

I recently found myself visiting the great country of Japan, to Tokyo specifically. Where did I go to visit whilst there? Akihabara of course!
It didn't take too long to find some retro shops, my favourite being Super Potato (Will do another post about the shops).
Here is a quick run down of what I got:
Nintendo Super Famicom
SHVC-001
¥200
This was labelled as 'Junk', which I guessed meant it didn't work. Never one to let a little issue like that stop me, I snapped it up figuring that I could at least use the case after a clean. When I got home and plugged it in, it loaded Super Mario RPG up first try, so not sure why it is 'Junk'.
Nintendo Super Famicom
SHVC-001 + SHVC-005
¥200

This was also labelled as 'Junk', but included a controller. This one was A LOT dirtier than the other. When I got home and plugged it in, the LED lit up, but it wouldn't load any games, the controller worked in the other console though! I will give it a good clean and see if I can get it going at some point.
Nintendo Power SF Memory Cassette
SHVC-MMSA-JPN-1
¥399
This is a flash cart of sorts. Nintendo sold them blank, and you could go to various shops and upload games onto them for a price. They have 7 banks, I assume for 7 games, I think mine has the one game on it. I want to try and see if it is possible to read/write to the Flash Memory.
Nintendo SF Same Game
SHVC-ZS5J-JPN
¥100

Mainly got this for the expansion card. Someone made a comment about trying to read the little BSX expansion carts with the Retrode as the connector was similar to the Virtual Boy connector.
Nintendo SF Super Mario RPG
SHVC-ARWJ-JPN
¥800
Saw this and thought it was worth a buy as it wasn't much. I don't speak Japanese, so will be hard to play it through, but it's a good addition to the collection.
ASCII TurboFile GB Card
ASC-1502C
¥100
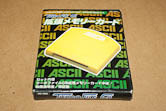
Had no idea what this was, but thought I would get it anyway. Turns out it is a card for backing up Game Boy save files on to using the ASCII TurboFile, guess I will have to get one of these now.
Nintendo GBA Wireless Adapter
AGB-A-WA-JPN
¥100
Already have one of these, but you need two of them to actually use them (plus it was only ¥100!).
Nintendo Game Boy Link up lead
DMG-04A
¥280

Can never have too many of these, especially when they are boxed.
Nintendo Mario 8-bit Playing cards
NAP-01
¥800
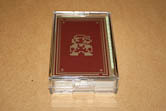
Wanted a set of these since I saw them mentioned on the Nintendo web ages ago, preferred the 8-bit ones over the later sets.
Nintendo Game Boy Tamagotchi V3. OSUCHI & MESUTCHI
DMG-AOMJ-JPN
¥50
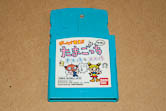
I got this more as an oddity than anything else (plus it was only ¥50!), it's not often you see a Game Boy game with a speaker and battery in its extended blue case.
5 notes
·
View notes
Text
SuperCIC = The best mod for your Super Nintendo
If you own a Snes and some import games, your best bet to playing them up to now was using a converter or [disabling the CIC chip inside the console](http://www.gamesx.com/importmod/sneslockout.htm). There are many different types of converters, and they vary a lot with compatibility. The basic ones work by passing the Snes the CIC chip signals from the local cart and the game info from the import cart, tricking the Snes into thinking that it has a local game plugged in. Nintendo got wise to these converters and built checks into later games that locked out the game if it didn't pass them. after this, more advanced converters came out such as the Datel programmable universal adapter, which allowed you to enter codes to get round the extra checks in most of the troublesome titles, but neither of these options can play ALL games (SA-1 titles being the main problem).  After reading [this thread on the nesdev forums last year](http://nesdev.parodius.com/bbs/viewtopic.php?t=5676&start=0), I made a mental note to check back periodically to see if it went anywhere. I checked back in May to find that forum user ikari_01 had released SuperCIC. SuperCIC is a PIC microcontroller based CIC replacement which works in any region Snes. Its main features are: * lock allows the region to be set+saved by holding the reset button. * region can be set to 50Hz, 60Hz, or autodetect based on key CIC. * selected region is indicated by LED color (uses a dual LED). * has a ~9s timeout before switching from detected to forced region to trick most games. This feature can be enabled/disabled using a configuration pin on the lock. I bought me a PIC programmer, some PIC 16F630 chips and got to work. I won't bother with a guide as Klaus at Wolfsoft.de has [already done a great job with his](http://wolfsoft.de/wordpress/?p=603). I opted to remove the CIC chip and use the resistor, I then mounted the SuperCIC in an IC socket nearby (the resistors you can see go off to the tri-colour LED).  My Snes now runs all my games, no matter what region, even my only SA-1 based cart, PGA Tour 96. Best option is to do the mod to an American Snes, [snap the tabs off](http://www.gamesx.com/importmod/snescon.htm) and you have a system that will play ANY game with no need to mod the cart slot.
3 notes
·
View notes
Text
My Retrode N64/GB/A2600 adapters have arrived
Well look what we have here...  Guess I had better crack out my Game Boy carts and have a play :)
1 note
·
View note
Text
Retrode Virtual Boy adapter build #3
 Behold, It is finished! Since the last update, I finished securing the bits inside the case, and made a nice label for the front. I have tested it with the following games, a couple of them don't show the proper names, but that is due to them being in Katakana characters, they all work fine apart from one, Red Alarm. * Virtual Boy Wario Land - USA * Galactic Pinball - USA * Mario Clash - USA * Teleroboxer - USA * Mario's Tennis - USA * T&E Virtual Golf - JPN * Panic Bomber - JPN * V Tetris - JPN * Red Alarm - JPN I am not sure why, but it registers as a 512KByte file when it should be a 1024KByte file. The other 1024KByte game I have works fine, so am not sure why this one isn't behaving. I will try and post a video of the adapter working soon. [](http://media.tumblr.com/tumblr_l4jh4xkT3k1qae5e8.jpg "click to enlarge")[](http://media.tumblr.com/tumblr_l4jh70tO6Q1qae5e8.jpg "click to enlarge")[](http://media.tumblr.com/tumblr_l4jh8x6tBu1qae5e8.jpg "click to enlarge") This is the final pin-out I used if you fancy making one yourself!
--------------------------------------- Sega Edge Signal VB Edge --------------------------------------- A1 gnd 1, 2 A2 +5v 54 A3 a8 15 A4 a11 22 A5 a7 17 A6 a12 24 A7 a6 19 A8 a13 26 A9 a5 21 A10 a14 28 A11 a4 23 A12 a15 30 A13 a3 25 A14 a16 32 A15 a2 27 A16 a17 34 A17 a1 29 A18 gnd 33 A19 d7 38 A20 d0 39 A21 d8 37 A22 d6 42 A23 d1 43 A24 d9 41 A25 d5 46 A26 d2 47 A27 d10 45 A28 d4 50 A29 d3 51 A30 d11 49 A31 +5v 36, 53 A32 gnd 59, 60 B1 N/A - B2 N/A - B3 N/A - B4 a9 18 B5 a10 20 B6 a18 13 B7 a19 11 B8 a20 16 B9 a21 - B10 a22 - B11 a23 - B12 N/A - B13 N/A - B14 N/A - B15 N/A - B16 /C_OE (Output Enable) 35 B17 /C_CE (Chip Enable) 31 B18 N/A - B19 N/A - B20 N/A - B21 N/A - B22 d15 40 B23 d14 44 B24 d13 48 B25 d12 52 B26 N/A - B27 N/A - B28 /LDSW (not used) - B29 /UDSW (not used) - B30 N/A - B31 N/A - B32 /CART_IN (not used) - ---------------------------------------
0 notes
Text
Retrode Virtual Boy adapter build #2
There were no updates last month as I was busy with other things, but I am aiming to get this finished soon. After spending a couple of hours last night and again tonight, I have got it to a point where it works again, and fits in its case. I tried a couple of other games that I didn't try before, and they both worked. It's so much easier now it's just a question of plugging it in, instead of doing it pin by pin! It was mainly a case of routing each wire from my home made edge connector to the relevant ROM point on the megadrive cart board as neatly as I could. Next step is to make the vb cart connector nice and secure in the case, I will probably try and get that bit done later this week. [](http://media.tumblr.com/tumblr_l3cyll8Ns21qae5e8.jpg "click to enlarge")[](http://media.tumblr.com/tumblr_l3cynhbL2q1qae5e8.jpg "click to enlarge")[](http://media.tumblr.com/tumblr_l3cyq8l5IM1qae5e8.jpg "click to enlarge") Am really pleased with how it looks... 
0 notes
Text
Retrode Virtual Boy adapter build #1
I have finally started to work on the nice looking, easily usable adapter. First thing was to somehow make a socket for the Virtual Boy cartridges, something sturdy that you can just push the cartridge onto, rather than have to insert individual pins each time. I have had this in mind for a while now, trying various bits to see if they fit or not. I finally came up with something suitable. the pitch for a 2.5" HDD is the same as it is for the Virtual Boy, but unfortunately, the pin size is too big. I managed to find a couple of sockets that connect a 2.5" HDD to a laptop main board, these looked perfect. I was able to push the pins from a PCMCIA socket through this HDD socket and then solder them in place from the back, leaving a convenient pad to solder the wires to later. I then glued them together so that there was the full 60 pins needed (I will use the extra bits at the sides to fix it in place). I cleaned the sticker off my donor Mega Drive cartridge too, ready to make some cuts, hopefully, it will look quite neat when it is finished. [](http://media.tumblr.com/tumblr_l09au2nWLe1qae5e8.jpg "click to enlarge")[](http://media.tumblr.com/tumblr_l09avqwSnZ1qae5e8.jpg "click to enlarge")[](http://media.tumblr.com/tumblr_l09awhcehd1qae5e8.jpg "click to enlarge") It fits really well, wish I had found these earlier... 
2 notes
·
View notes
Text
Final testing of Retrode Virtual Boy adapter
If you haven't already read the [initial tests of the adapter](http://consolingmyself.co.uk/post/452962236/initial-testing-of-retrode-virtual-boy-adapter "read about it here"), I would advise doing so before reading this. Okay, so where were we? Ah yes, It didn't work. [Matthias suggested](http://consolingmyself.co.uk/post/452962236/initial-testing-of-retrode-virtual-boy-adapter#comment-40334556) that I send him a copy of the dumped ROM so that he could cast his ever-so-slightly-better-qualified-eye over it, to hopefully find something of worth in it. Which he did. Somehow*, he noticed that the addressing was shifted by 1 bit, and suggested checking my wiring, as the [text file](http://www.goliathindustries.com/vb/download/gen2vb.txt) I had followed showed that the Mega Drive address lines started on a1 where as the Virtual Boy's started at a0. Sure enough, I had wired a1 to a1 and so on, meaning that they were all out by one. Oops. >*_This was found by looking at the first few bytes of the dump in a hex editor. If a game is 4Mbit, it should wrap around at 0x080000 (512kByte). The Dump started over at 0x040000 (256kByte) and everything was half as long as it should have been, this pointed to all addresses being off by a factor of two. After noticing the mismatched pin numbering in the text file, it all became clear._ I unplugged all of the wires, and put them back taking into account the Virtual Boy's shifted address lines. I made another dump and sent it to Matthias. This was better he informed me, but still didn't look quite right. He said that the data lines looked like they were crossed** and suggested swapping d0-d7 with d8-d15. >**_Reading BB AA DD CC where it should be AA BB CC DD points straight at the data bytes being flipped. There are different standards as to how the bytes in a 16-bit "word" are aligned in memory, little-endian and big-endian. After a quick bit of research, it was found that the [Virtual Boy CPU (NEC V810)](http://www.planetvb.com/modules/dokuwiki/doku.php?id=system_overview) is little-endian and the [Mega Drive CPU (Motorola 68000)](http://en.wikipedia.org/wiki/Motorola_68000) is big-endian. The Virtual Boy cart data lines needed to be switched to match the order that the Retrode was expecting._ So again I unplugged all of the wires, and again I put them back in, only this time switching the data lines (by this time I had added a strip of masking tape with the socket numbers written on it to the Virtual Boy PCB to aid in re-seating the pins). Again I sent a dump to Mathias, and this time it was almost as it should be, but there was still an issue with the data lines***, he suggested checking their continuity with a multimeter, which I did. >***_Comparing the Retrode dump to a known good dump showed that all the data was correct apart from one recurring bit. This bit corresponded to data line 14 on the Mega Drive side._ It was now I found my second wiring mistake, somehow I had switched the d7 and d14 lines which was causing the issue (I am blaming the tiny holes I was having to push the pins into...). After swapping them back to their correct locations, I made another dump, and this time, it had the correct information in it!! The file was the wrong size, but this was due to the Retrode not finding the correct info where it thought it should be, as far as the Retrode was concerned it had a MD cart plugged in. I sent the ROM dump over to Matthias. After a couple of attempts, he was able to make a new firmware file for the Retrode that correctly reads the game title and file size! All this without the hardware in front of him, clever chap! I'm not entirely sure why I had to switch the data lines over as it wasn't mentioned in the text file. Perhaps it is something to do with the way the Retrode reads them? All I know is that it works, mainly due to the help I received, thanks Matthias.  The working test Retrode Virtual Boy adapter. Screen shots of different sized games registering their sizes correctly and running in Reality Boy: [](http://media.tumblr.com/tumblr_kznbnmOrUy1qae5e8.jpg "click to enlarge")[](http://media.tumblr.com/tumblr_kznbfngkus1qae5e8.jpg "click to enlarge")[](http://media.tumblr.com/tumblr_kznbowmGBa1qae5e8.jpg "click to enlarge") Next task is to make it more user friendly and look pretty...  Edit: Added more detail regarding how the errors were found.
0 notes
Text
Initial testing of Retrode Virtual Boy adapter
When Matthias posted the news that he was working on an [adapter for Atari 2600 carts](http://www.retrode.org/wordpress/2010/01/2600-adapter/) for the Retrode, it made me think of something I had read years ago about Nintendo's Virtual Boy cartridges (which I mentioned in the comments on the news post). It was [a text file](http://www.goliathindustries.com/vb/download/gen2vb.txt) that documented how to connect a Virtual Boy cart to a Mega Drive copier. This was possible as they both use the same ROM (albeit in a different form factor). I never got round to trying it on any of my Mega Drive copiers, so I thought I would give it a try with my Retrode. I will do a proper write up when I have more time. Here is a quick bit of info on what I did: 1. Got a donor Mega Drive cart and Virtual Boy cart to try and read. 2. Removed a PCMCIA slot from an old laptop. 3. Extracted the pins from the slot (unfortunately the Virtual Boy cart doesn't use a standard pitch connector). 4. Tested the fit of the pins in the cart, seemed to be okay. 5. Undressed both carts. 6. Soldered wires to the PCMCIA slot pins. 7. De-soldered the ROM chip from the Mega Drive cart PCB. 8. Soldered the wire/pin combo leads to the Mega Drive PCB in place of the ROM chip. 9. Joined the relevant wires from the Mega Drive PCB to the Virtual Boy cart as per the details in the text file.          I plugged the Retrode in to my computer and altered the Mega Drive file extension to be .vb, saved the config file and plugged the mess of a cart in. It showed up a file that was 6.12 MB which was obviously wrong as Mario's Tennis is a 4mb cart (should show up as 512 KB). I tried it in an emulator anyway, but it didn't boot, it just showed the error 'Invalid PC - 00000000'.   I had a look at the file in a Hex editor and compared it to a known good dump of Mario's Tennis, but couldn't find anything that was visible in the good dump of the game. I haven't given up, I will re-check the connections are all going to the right place, and try again. If that fails, I will probably solder the wires directly to the Virtual Boy cart, to remove the possibility of poor contact between the pins and the connector. If I still get the same resulting file, I will have to get the old Mega Drive copier out and try it in that, to see if the text file information is correct. I leave you with a photo of the mess in the Retrode.  Edit: [Read part two](http://consolingmyself.co.uk/post/464498214/final-testing-of-retrode-virtual-boy-adapter "read part two"), where I manage to get it working!
0 notes
Text
Retrode Golden Edition case is here!
As I was lucky enough to get one of the beta Retrode devices sent out to me, the case on mine is black. Matthias said that he would send out replacement cases to the few who received black ones and mine has now arrived! Doesn't it look lovely. 
0 notes
Text
Current bits I am working on
Thought I would make a quick list of things that I am currently fiddling with. ###Retrode### This is an amazing device that allows you to play your SNES and Mega Drive cartridges on your PC/Mac/Wii/Anything that can run SNES/Mega Drive roms from a USB device. Still not quite sure how Matthias has managed it, but he has just shipped his first lot of pre-orders out, not bad for a self financed project. I have already added the joypad ports for USB SNES pad usage, but I have lots more planned for it. Read more about the retrode at www.retrode.org ###Super Game Boy### I bought a flashcart for the original Game Boy a while ago and purchased myself a copy of LSDJ with the intention of having a go at making some chiptunes. Unfortunately, I wasn't able to whip up anything worth listening to, but it gave me an idea for a hardware mod involving the Super Game Boy and a four player adapter. ###Super Wild Card DX2### I have a few SNES consoles, PAL, NTSC and one with lockout chip and 50/60Hz switches. My SWCDX2 came with an NTSC lockout chip in it but I wanted the option of using it on any of the consoles so I came up with an idea for a region switch on it. I will get round to writing about them in more detail at some point, hopefully not too far away.
0 notes