
corwynte
corwynte cosplay
how do i tumblr?
I'm mostly here to see the arts! you can find my cosplay tutorials here too!
6 posts
Don't wanna be here? Send us removal request.
Last Seen Blogs

laporan
laporan

framemakerswtvl
The Framemakers

tom-hunter-summah
multi-fandom page

autoaccidentlawyerrevie
Untitled

hbmarvel
Cardiophile
Text

I had a mighty need to see more of these two in a band AU, so I made some pop punk Klance ❤💙
#klancecosplay#voltronau#voltroncosplay#voltron#keith (voltron)#keith kogane#lance mcclain#lance (voltron)
10 notes
·
View notes
Text
Space Lion Earmuff Tutorial
So I made some earmuffs inspired by a piece of Klance fanart by Viodino!
Then I made this pattern for the artist! Here is the pattern.
The tutorial can be found below
First, you will need some remnant-sized pieces of the material of your choosing (I suggest blizzard fleece) in the following colors:
blue (or your lion color of choice) - at least a 6″ wide cut of fabric
white - at least a 6″ wide cute of fabric
yellow (for eyes) - just a small piece
black (for nose) - just a tiny piece
You will also need yellow, black, and white thread.
From the pattern, cut 4 pieces of the color, 4 pieces of the white, 2 of the yellow (cut apart for the eyes) and 2 of the nose. The eyes and nose will be appliqued to just the outside of the muffs.
First, pin the right side of the blue (or your color, but hereafter referred to as blue) to the right side of the white. You will have to gently adjust the edges since they curve slightly. Sew with a straight stitch with a 3/8″ (1 cm) seam allowance to the middle point, then readjust your pin to finish the other half. Take your time or it won’t look symmetrical (which is okay! but it looks nicer if it is). Do the same for each set.
Next, applique the eyes, one at a time, using the yellow thread (top and bottom, don’t get lazy or it might show through like mine does). Once the first is on CAREFULLY make sure the second one matches it. Do the second muff too while you have yellow in! Applique the noses next with black thread. Trim the loose threads.
Now, the next part depends heavily on what kind of muff you make. I couldn’t find any hard headbands I liked (and I threw my first set off muffs together with remnants I had at home already) so I used no-fold elastic. My second pair (in progress as of first draft of this) used the end of armbands from some old t-shirt sleeve scraps - less stretchy, so I recommend a more forgiving material personally.
HARD HEADBAND DIRECTIONS:
If you are using a stiff headband, laugh at our suffering for a moment. Put the outsides (”right sides”) together, sew from the inside of one ear around the outside to the inside of the other ear, leaving a gap between the ears. Push the lion through the gap to make it right side out, then go stuff your muffs with fluffs, insert your headband, and hot-glue the muffs to the headband.
ELASTIC HEADBAND DIRECTIONS:
Line up the band between where the lines were marked on the pattern with the “good side” (if applicable) down toward the lion face piece. Put the back of the face (no eyes & nose piece) on top of this with the "right” sides (outsides) together. Sew across the top between the ears. Then sew around your ears and down to where the blue meets the white, back-stitch to secure the seam, and STOP.
Sew around the other ear, down the face, and into the white but CAREFULLY because you will need to be very deliberate about where your band goes here. Pull the band to the side through where you will leave a hole to flip it inside out. Insert the other piece of band (that will go around the bottom of your head) into the bottom piece. If you are using elastic, instead pull the elastic down across the inside of the muff (currently on the outside) and wrap it under and tuck it in before sewing this seam. I suggest pulling it tight just a little bit to help smush the muff into a rounder shape.
Repeat everything for the other muff.
If you have nay questions, feel free to DM me (instagram is best, but I am @corwynte on most social media!)
0 notes
Text
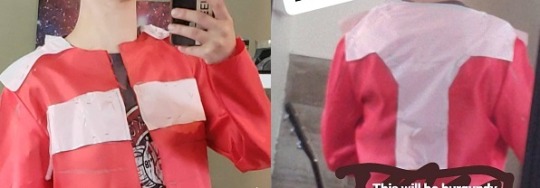
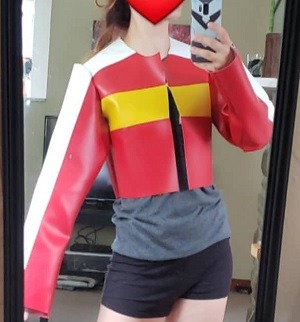
Keith Jacket Tutorial
I made my Keith cosplay jacket, and I’ve had quite a few people ask about it, so I’ve complied this guide! It’s quite long, but hopefully it helps if you are going the DIY route! You can either see this guide on Google Docs (recommended) or under the cut!

If you like this guide and found it helpful, consider fueling my future cosplay efforts by buying me a ko-fi?
Materials List:
Marine Vinyl
Red - i think i bought a yard of this?
White - i had about a yard and a half of this and half quite a bit leftover. A yard would probably do.
Yellow - 6” cut (default width from Joann’s is 54” so this is plenty!)
Burgundy - 6” cut (see above)
Marine vinyl isn’t the most expensive cosplay fabric out there (*cough* Yaya) but it isn’t exactly cheap at $19.99/yard. I got lucky and found some big pieces in the remnants bin. It seems to rarely go on sale, so maybe save those 50% off coupons for this!
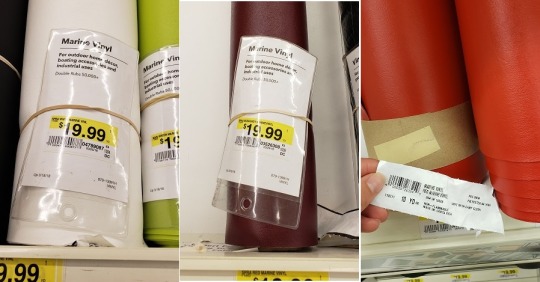
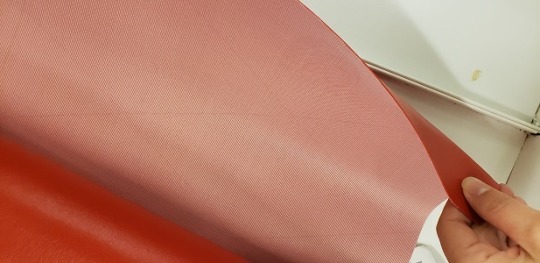
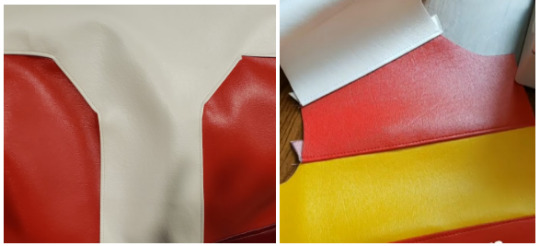
I DO NOT RECOMMEND YAYA’S 4-WAY PLEATHER. I bought some in red to use originally for the red portions for the stretchiness, and it BLED on my white vinyl while the materials sat waiting to be used, so i opted not to use it (and had to scrap that portion of vinyl). The stuff you want looks like this on the backside!
Needles
I used leather needles in my sewing machine, since i was using marine vinyl as a substitute for leather. They are specifically designed to cut through the heavier material. Mine were 90/14. You might want something even heavier. These would probably do just fine.
I used stretch knit needles for the jetset (see “lining”).
Thread
You will need white, red, yellow, and burgundy thread to match the vinyl. Either buy at the same store so you can check that it matches, or take a small sample snippet with you to make sure the colors match!
Zipper
I used a 12" sport separating zipper. These come in 2” increments, and I am on the tiny side (5’2”) so you might need a longer one if you are taller (or want a longer jacket)
Pattern
On the advice of CrescentShay (who is very talented and you should follow her if you aren’t already!) I based my jacket on McCall’s “totally not pokemon go trainer” pattern (M7556). You will also want either tissue paper (from your local dollar store), tracing paper, or medical pattern paper.
Lining
I used Red JetSet for my lining - i think i bought like 1.5 yards because it’s pretty cheap. It’s soft, colorfast, and fairly easy to work with. It also has some stretch and a nice flow to it. You can use whatever you’d like.
Mockup Fabric
I bought crazy cheap satin from walmart cuz it’s $2/yard. You can use muslin, old bedsheets, whatever you have handy, as long as it isn’t stretchy because THE JACKET WILL NOT BE so you want the mockup to have the same fit. DON’T. SKIP. THE. MOCKUP!
Tips and Notes:
Marine vinyl DOES NOT STRETCH. This guide is written based on the jacket I made as of its writing (Sept 2018) and thus is written based on NONSTRETCHY material. If you use a different material, be mindful of how that material works!
MEASURE EVERYTHING TWICE
Do not skip the mockup!
Pine & try it on frequently!
Watch your foot (of your sewing machine!)
Test stitches on scraps first! You want to make sure that tension and stitch sizes are what you want them to be!
Finished seams make it look professional
This portion will be broken down into several components:
Pattern and Mockup
Jacket base
Sleeves
Collar
Cuffs
Burgundy stripe
Lining and zipper
I will assume you, dear reader, have a base knowledge of sewing with a machine (like to sew inside out, how to thread the machine & adjust tension/stitch size, etc.) but you are welcome to DM me if anything is unclear or I have left out details! I am @corwynte on most social media.
Pattern and Mockup
If you have never used a pattern before, it is important to make sure you CHECK YOUR MEASUREMENTS. Pattern sizes are usually NOT standard sizes! I am a size 10 in patterns and a 0-6 in most clothing. So check your measurements! I used the “B” design for the pattern, because the jacket has a collar. This pattern is designed for sweatshirt type fabrics, not vinyl, so if you are not sure, GO UP A SIZE because again, VINYL. DOES. NOT. STRETCH.
I cut out my pattern pieces, but you might want to trace them instead. I trace my patterns now because then I can reuse them. Your call.
You will need pattern pieces 3, 4, 7, and 10. The band and cuffs are meant for stretchy material, so we’ll make our own patterns for those. You can also freehand the collar but I worked from the base of the hood.
With your tracing paper, add an extra 3” to the bottom of pieces 3 and 4.
Follow the instructions to cut out the vest and sleeves from your mockup fabric. Be mindful that many patterns have seam allowances, and for this pattern they are ⅝”. We are going to use this standard allowance.
My machine has marks on it, so I line up the edge of the fabric with these for my seams. If yours does not, you can mark them out with a marking pencil or a sharpie. It doesn’t matter if your mockup is a mess, we are going to draw on it later anyway. You do want to sew the seams properly though because NOW IS THE TIME to make sure the fit is correct.
**Save your patterns! We will use them for the lining too!**
You only need to attach the sleeves and pieces for the mockup - the rest of the sems don’t need finished. Once your mockup is complete, try it on! Make sure it fits the way you want it too. Don’t worry too much about the length - we’re can add a couple more inches to the bottom with the burgundy.
With help from a friend or with a dressform if you have one, trace out the lines for the different colors on your mockup.
My white came out pretty big. You can adjust this to suit your own preferences, because this is an animated show so the size and shape of the jacket does vary slightly, and if you are basing your jacket on fanart rather than screenshots, different artists interpret the marks differently. Find what you like!
Once you are satisfied with the marks, either cut up your mockup for patterns, or trace the shapes with your pattern paper. I opted to trace, because my mockup was cheap satin which shreds easily and because I wanted to be able to reuse the mockup. For now we only need the chest portion of the vest - we’ll come back to the sleeves later, so don’t cut those apart just yet.
**Label your pattern pieces!** important things to include are:
Color the piece should be
What the piece is
How many to cut
Marks for where pieces will join together
Which side is which (side, front, top, etc.)
Jacket Base
If you are using vinyl, you can trace your patterns directly onto the backside of the vinyl with a light colored sharpie pen (mine was light pink). **ADD YOUR SEAM ALLOWANCES!!** You can eyeball these, since you will have the marks on the back of the vinyl to know where to stitch, but you should add ½ -⅝” seam allowance.
Cut out your pieces for the front and back of the jacket. Pin the “T” for the back of the jacket to a red pieces. You will need to notch the allowances to get it to lay right, but don’t jump into notching too quickly. Be careful with the T - you want to get it as symmetric as possible.
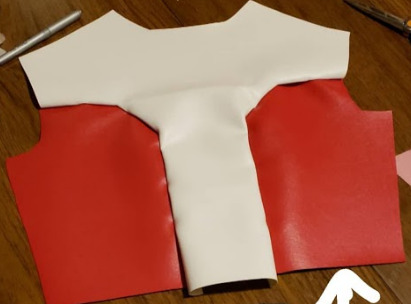
Once the back is done, pin the front too, then pin the front and back together and try the whole thing on!
It will fit slightly more loosely when the seams are done
The armholes might be tight (mine were) - we will adjust these later
Mostly we want to make sure it is lookin’ good, feelin’ good!
Sew the seams with a normal straight stitch first. Them we will fold over the excess and sew the seam again, lining up the seam with the edge of the foot and sewing a line in the color of the top material to give it a finished look. I did this to help my “T” lay flat and it really makes a huge difference in the look of the jacket - this will give it that “pro” touch!
For the “T” - the white should be the “top” layer.
For the front stripes, white is the top over red, and both reds are top over yellow.
For the top seam, i sewed the back as top over the front.
Sew the sides together last. We will not fold over and double stitch that seam.
Now you’re done with the base! Pat yourself on the back!
Sleeves
Okay, now it gets harder from here.
A few notes before we start the sleeves:
Remember your seam allowances!
Vinyl does not stretch!
You can take extra fabric away, but you cannot (nicely) add more, so when in doubt, size up!
Measure the final width of the white on the shoulder of the jacket base. Good. Now measure it again. BE CAREFUL because matching these widths is really important to having the final product look clean and professional! (And remember your seam allowances!)
On your sleeve pattern, mark out the width of the white on the top of it and at the bottom of the sleeve (wrist). Use a straight edge to connect the lines. I made my white fairly wide, but again, suit your own preferences!
REMEMBER YOUR SEAM ALLOWANCES!
I made my sleeves MASSIVELY over-wide and trimmed them down a ton, because I was worried about not being able to bend my arms.
Test the size of your arm holes now, with your chest portion of the jacket complete. Widen them ass necessary so you can comfortably put on the jacket by cutting away from the BOTTOM portion of the arm hole.
Sew the white into the middle of the sleeves, again, being VERY CAREFUL to make sure the width matches up. Test it a bunch. Measure it a bunch. If you think you’ve measured enough, measure it one more time.
Finish the seams with white on top and a line of stitching.
Turn the sleeve inside out and sew the red pieces together. We will not fold over and double stitch this part either.
Turn the jacket base inside out and pin your sleeves to the base. Start at the top and MATCH UP THE WHITE. The excess should be at the bottom of the sleeve. You will probably have a bunch if you followed my advice. That’s fine.
Try it on again (Carefully! Pins!) Test the sleeves. Bend your arms, see how it feels. Get a sense of how much you want to take in the sleeves. Take it apart, take in the sleeves, pin it on again.
CAREFUL with the “pinches” that will develop from the sleeves (the bunching) - I was not careful with mine and they are not quite evenly pinched. You want these in the same spot.
Sew on your sleeves. Exhale. Be proud. The foundation of our jacket is now laid!
Collar
Okay, now we are going off the books. Remember pattern piece 10? The hood? We are going to base the collar on this because it is sized appropriately for our collar. Trace the pattern onto your pattern paper. Hold it up to your jacket. Tweak it, feel it out. Adjust as needed.
We are going to want a little extra for the hems, so BE MINDFUL of that as we proceed.
My collar is HUGE because aesthetic. You may want a smaller collar based on your own preferences, practicality for wearing, etc.
If you are using vinyl, you won’t need any interfacing because the vinyl is pretty stiff. If you are making your jacket from cotton, fleece, canvas, THE FORBIDDEN PLEATHER, etc. you will definitely need interfacing to stiffen it up.
I’m sure you know this by now but…
ADD YOUR SEAM ALLOWANCES
MEASURE IT TWICE

Cut FOUR pieces - be careful with mirroring these.
Sew the middle bits (back of neck) together first. Trim the excess (this is one of the ONLY times we will do this!) on this seam. Stitch the front edges and the top together. Leave the bottom open. Cut the corners diagonally so it can lay flat when you turn it right side out. Finish your seams with another line - be careful at the corners! Pin the collar to the neckline and check. It is okay if the neckline has a tiny bit extra at the front - we still need our zipper! If your collar is too big, take it in along that middle seam. Then, stitch your collar to the jacket.
Cuffs
Okay you know the drill by now. Allowances. Measure twice. Etc.
Measure around the bottom (wrist) of sleeve. Measure LOOSELY around the sleeve where you want the top of the cuff to be. Mine was 4½”.
Cut a pattern with the measurements that has a shape like the one shown. You’ll need 2 - one for each arm.
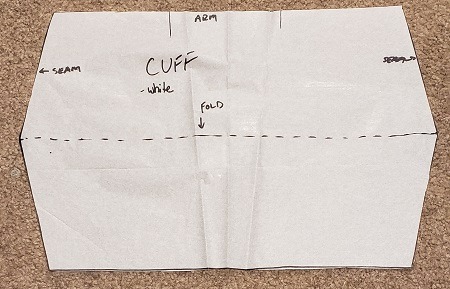
Fold the cuff in half with the “V” edges together - stitch these together.
Turn the cuff right side out and fold to make a tube. Stick the tube, top of cuff out, into the sleeve, and CAREFULLY stitch the cuff on. The fold the cuff up and over the sleeve. Make sure both sides are even!
Burgundy Stripe
Pine the burgundy vinyl to the base of the jacket and sew a seam. Fold it over, then finish the seam with the line of stitching. Easy peasy.
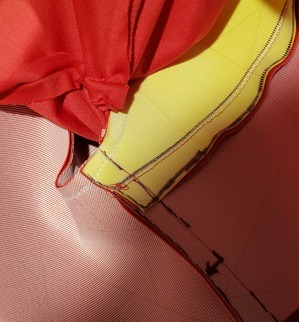
Lining
Use the patterns from your mockup to make a lining. I used red jetset, it is soft, it is colorfast, is has some give and is easy to work with. You can use whatever you like.
The only parts you will hem will be the bottom of the jacket and the bottom of the sleeves (near the wrist).
Sew the lining to the collar (right sides together) - this will finish this inner seam.
Stuff the arms into the sleeves. Pop your cuffs back down, then sew the lining into the sleeve (this is a tricky bit). The bottom we will leave open, so the last part to attach is the seams along the zipper.
Zipper
HOMESTRETCH!
Turn the jacket inside out. Open up the zipper and sandwich it in between the vinyl and lining. Sew the zipper on. Do the same on the other side.
Turn the jacket right side out and FINISH THOSE SEAMS! You will need your red, yellow, and burgundy thread for this. Use the appropriate color for the portion of jacket. My machine got real cranky on the burgundy cuz of the layers. I am going to tweak this guide with where you can trim excess to make this easier.
CrescentShay - her post helped me get started on my jacket! It was immensely helpful
My mom - she taught me how to sew, helped me make all my early cosplays, gave me her sewing machine, and always answers the phone when i call begging for tips and advice on a new project!
2 notes
·
View notes
Photo


WHO’S READY FOR ANOTHER “PICK YOUR PRIZE” GIVEAWAY!?
That’s right, part 2 baby, I still got stuff to give! So! In celebration of my boi Keith’s birthday this time, and the upcoming, heart wrenching Voltron finale, I decided to give you guys the chance to win some awesome prizes! Again! So just like before:
✧・゚: *✧・゚:* THERE WILL BE 3 WINNERS! *:・゚✧*:・゚✧
Each winner will get to pick one large item from the Galaxy Lot, one medium item from the Nebula Lot, and one small item from the Starlight Lot!
1st place will get first pick, 2nd will get to pick from what remains, and 3rd will get all the rest! ( All items are 100% brand new and unused! Better photos of the prizes can be seen on my instagram here! )
In addition, each winner will get their choice of either a fic or art commission by me! + A bonus mystery acrylic charm from the Cosmic Lot!
[ Note: Since the Nebula Lot has a Klance item, should you get stuck with this and don’t care for the ship, I will be substituting out the item for a Lion Paladin sticker sheet by elefluff and a mini Lotor acrylic pin by cattnib! I will ONLY substitute items for ship based reasons!! ]
Also; this is completely open to international and domestic shipping!
Rules:
~ You must be following me! (this is to help keep track of everyone, as always you’re welcome to unfollow me after but you must be following for the duration of the giveaway for it to count)
~ Please no giveaway blogs, and yes I do check.
~ One Like = One Entry / One Reblog = One Entry (limit of 2 reblogs per person)
~ In addition, I will be posting about this on my instagram as well! Following me there and reposting the giveaway banner under { #leggyvoltrongiveaway } with your tumblr url in the caption will get you 2 more entries!
{ Important Note: Make sure to keep an eye on my instagram, as I will be launching a separate, shorter giveaway there later this month that will give you even more opportunities for entries in this one too! }
~ This event is for EVERYONE! No hate will be tolerated. Should you win and I find that you are guilty of harassment or bullying for any reason, you will be disqualified.
This giveaway will end right before the final season, on December 10th and winners will be announced and messaged within the following week! You will have 48 hours to respond or I move on to the next person, giving 2nd place first pick and so on.
And that’s about it! Good luck and Stay Leggy My Dudes!
NOTE: All of these amazing artists have given their explicit permission to be a part of this giveaway! Please check them out and show them some love:
{ bondibee II lowah II rachelhuey II azoriawolf II lemonboba II cattnib II beefeyeround II cosumosu II happyscharms II elefluff } + My AO3 for fic examples!
247 notes
·
View notes
Text

Yea so i am awful at remembering to use tumblr whoops
Anyway here's a Keith
2 notes
·
View notes
Photo

Oh I have the hardest time resisting you And if you feel the same way, then how can we be friends He's right you know, we can't go on like this And oh I try to give you everything And if I fail well then I failed But at least I gave you something 🎶 • • Today i am clocking a much-needed self care day, so here is a collage of some witchy bois! Plz ignore Lance's missing armwraps, I noticed after this photo but i like that angle sooooooo • • Voltron Witch AU by @_kiilea Lyrics in caption: "If I Fail" by Cartel • • • #klance #klancecosplay #lancecosplay #lanceVLD #lancemcclain #lancevoltroncosplay #voltroncosplay #keithcosplay #keithkogane #keithkoganecosplay #keithVLD #witchaukeith #witchau #vldwitchau #witchaulance https://www.instagram.com/p/BouqN-dBszQ/?utm_source=ig_tumblr_share&igshid=1x8h8tc5yxi7o
#klance#klancecosplay#lancecosplay#lancevld#lancemcclain#lancevoltroncosplay#voltroncosplay#keithcosplay#keithkogane#keithkoganecosplay#keithvld#witchaukeith#witchau#vldwitchau#witchaulance
5 notes
·
View notes