#cosplaytutorials
Text
Running Your First Cosplay Event: Picking a Concept


Cross-posted from Instagram: I've started to put together some notes on my experiences of running events!
7 notes
·
View notes
Text
Cosplay Tutorial: Genshin Impact Dottore´s mask
Cosplay Tutorial: Genshin Impact Dottore´s mask
I return today with you a quick rundown on how you can easily make your own mask, and even provide you with a pattern and list of materials I used.
As for the rest of the Cosplay, I honestly need to get out of the Cosplay burnout before I will make the rest of it, and this will take some time. Stay tuned for that!
This tutorial is specifically for the “Omega Build” of Dottore, and not the…
View On WordPress
5 notes
·
View notes
Text
This is just incredible 📹 • @cowbuttcrunchies#cosplay #cosplaytip #cosplaytutorial #cosplayhelp
6 notes
·
View notes
Text
Basic Leather Bracers Tutorial
This is my tutorial for how to create a set of leather bracers. I also cover how to add simple detail in this tutorial. You can also use this tutorial if you are using Pleather or Foam for your bracers. See the notes in each section pertaining to the different materials.
What you will need
Sometime to draft a pattern with (Muslin, Wrapping Paper, Quilt backing, etc)
Leather (Pleather or foam can also work)
Leather Punch
Eyelits
Eyelit Punch (Needle noise pliers will work in a pinch)
Leather Cording (or Suede cording)
Leather Dye (Optional)

________________________________________________________________
Step One
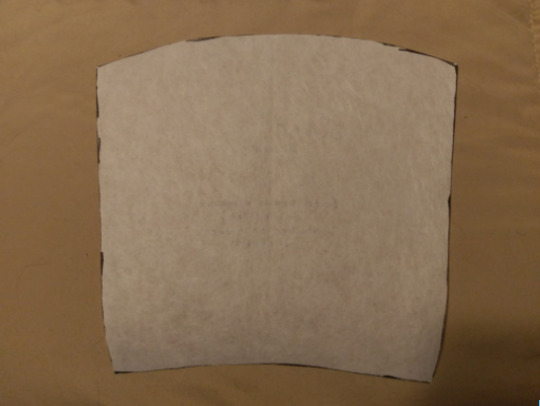
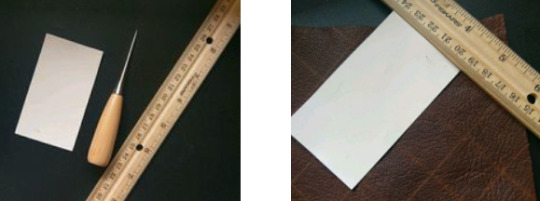
The first thing you want to do is draft your basic pattern piece. Muslin works nicely for this since it's cheap and easy to write on and you can get it at any fabric store or Walmart.
Another neat option is wrapping paper since this can be bought in abundance during after Christmas sales for next to nothing. My favorite is the wrapping paper that has the grid on the underside as it's great for drafting things that need to be symmetrical or with exact measurements.
In this case I ended up using some quilt backing since I got a large bolt of it that's been sitting in my closet forever unused.
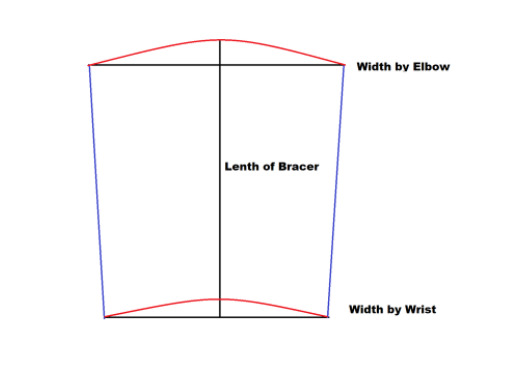
After you have your pattern material, the first thing you want to do is take some measurements. The length of your bracer should be length of your lower arm from the wrist to just before your elbow. You will take 2 width measurements, one at the wrist and one up near the elbow. Don't forget to write down your measurements so you have them saved for later.
Start by drawing a line for the length measurement (Black), then add the width measurements as seen (Black). Once you have the base lines, connect the two width measurements on the sides using a ruler to make a straight line (Blue). Finally add the curves as seen (red).
Once you have your pattern piece completed to your liking, put it off to the side and grab the material you want to use for the bracers themselves. In this case I used some leather from a leather scraps bag I bought at the store (many fabric stores have these available for a decent price). If you do not access to leather then you can use pleather as a good substitute (see notes below regarding it). If you not have either, I would suggest the thin crafting foam that you can get at most crafting stores. It will be a bit stiffer, but should still work just fine.
________________________________________________________________
Step Two
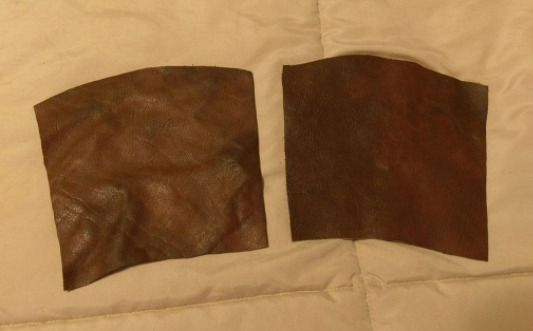
Take your pattern you just created and lay it over your material. Trace and cut 2 pieces out of the fabric. In my case the leather I was using was off in color by quite a bit so I dyed the leather to what you see on the left.
Leather Note:
Make sure you get clean edges on the outside. You can take a V shaped edge tool to clean this up if need be.
Pleather Note:
If you are using pleather you want to add a seam allowance on each side of the pattern piece. Cut the fabric with the seam allowance and then fold and stitch the hem on. This will prevent the fabric from fraying and will give it a more finished look.
________________________________________________________________
Step Three
Time to add the line detail to the bracers (Below). This is where it will differ depending on your material. Regardless of your material choice, I would recommend using a card to help align everything to make sure your lines are perpendicular. (see image below left)
Leather:
Wet the leather some before working with it. Take a ruler and a leather stamp or tooling piece to follow along the edge of the ruler to get the lines on. See photos on right.
Pleather:
Use a fabric pencil and a ruler to mark where you want your lines. Then go to your sewing machine and stitch them into the fabric.
Foam:
You can either draw/paint the lines on or you can use a tool to indent into the foam creating depressions on it.

________________________________________________________________
Step Four
This is where you punch the holes for the eyelets in order to string the bracers. Mark on the bracer sides where you want to place the holes. Make sure each side is symmetrical or as close as possible.
If you are using leather or pleather, I would suggest using a leather punch. These can be bought at most crafting stores.
If you are using foam you can use a regular hole punch.
________________________________________________________________
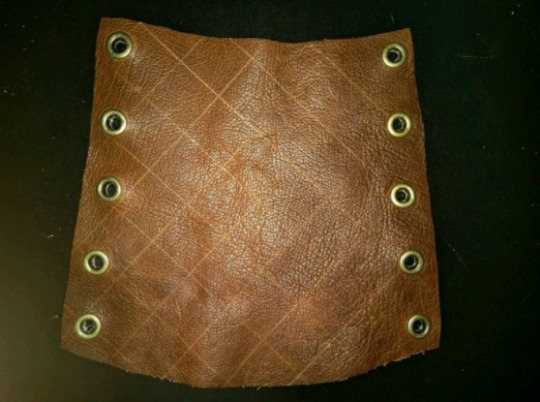
Step Five
You're almost there. Now you just have to string them using your preference of cording. On the right is possible lacing patterns you can use. I opted for C as that is my favorite and seems to hold the best, however, you can use whichever one you like the best.
Start your lacing at the wrist and work towards the elbow. This way you can adjust the tightness yourself and you can tuck the cord ends into the larger part of the bracer.

________________________________________________________________
Ta-Dah! Congratulations!
Now you have a set of working bracers for a variety of different costumes. Have fun and enjoy!
#cosplaytutorial#leather#pleather#tutorials#cosplaying#corsetbracers#bracers#leatherbracers#leatherworking#leathercrafting#cosplaytutorials#basictutorial#leathertutorial#sewingtutorial#costumemaking#costumer#cosplayer#sewing
14 notes
·
View notes
Photo

Learn my wing making secrets in my iridescent fairy wing tutorial that is now public, free for everyone to view! Swipe for the intro, my Instagram Stories will also take you there as will my bio menu 🌟 🧚♀️🌟 #fairywings #diyfairywings #cosplaytutorials #wingtutorial #fairwingstutorial #faerie #maker #iridescentwings #steampunkwings #faeriewings #fairyartist https://www.instagram.com/p/B0o7FDUlDjo/?igshid=1aikr8m741pgk
#fairywings#diyfairywings#cosplaytutorials#wingtutorial#fairwingstutorial#faerie#maker#iridescentwings#steampunkwings#faeriewings#fairyartist
41 notes
·
View notes
Photo

#protip - "When weathering and aging a prop or garment using sand paper, as well as washes of browns and greens and dusting the still-wet paint with ground up chalk or pastel is a great way to add a 'well loved' look to your items." - ❤️ 🐰 . . . . #bunni #snowbunnystudios #cosplay #costume #costuming #cosplaying #cosplayer #cosplayersofinstagram #rpf #replicapropforum #craftyourfandom #cosplayprop #cosplaywip #cosplaytutorials #cosplayhelp #propmakingtips #propsmaking #props #diy #howto #crafting #cosplayproblems #weatheringprops #weatheringcosplay #inspirationalquote #thingsbunnisays #bunnihelps #cosplaytips #sewingtips https://www.instagram.com/p/B3NiwaSD_Zw/?igshid=1nz5zfq5eazsp
#protip#bunni#snowbunnystudios#cosplay#costume#costuming#cosplaying#cosplayer#cosplayersofinstagram#rpf#replicapropforum#craftyourfandom#cosplayprop#cosplaywip#cosplaytutorials#cosplayhelp#propmakingtips#propsmaking#props#diy#howto#crafting#cosplayproblems#weatheringprops#weatheringcosplay#inspirationalquote#thingsbunnisays#bunnihelps#cosplaytips#sewingtips
2 notes
·
View notes
Photo

Hey everyone! - Did you miss us? - - We missed you! After a much needed mental health break we are coming back to our channel with new videos and a new ideology to go back to our roots and create what makes us happy. - - Some new video concepts include prop making tutorial/vlogs, costume making vlogs, make up tutorials, and wig styling videos in addition to our regularly scheduled con vlogs and skits. - - New fandoms you can expect to see on our channel include BNHA, Critical Role, Disney, and more. - - With this new surge in content you can also expect to see us more on here too! - - Thank you for following us and for your support! We are excited to get back to doing what we love 💕 - - - #thecosplayinitiative #cosplaygroup #cosplayyoutube #cosplayskit #cosplaytutorials #cosplayvlogs #convlog #cosplayinitiative #cosplay https://www.instagram.com/p/BtJJX28nK4L/?utm_source=ig_tumblr_share&igshid=1njpv5byxhayb
#thecosplayinitiative#cosplaygroup#cosplayyoutube#cosplayskit#cosplaytutorials#cosplayvlogs#convlog#cosplayinitiative#cosplay
1 note
·
View note
Text
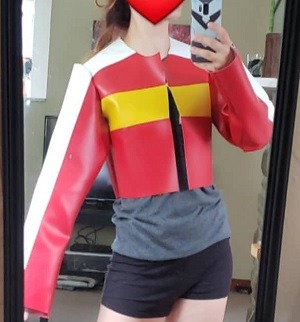
Keith Jacket Tutorial
I made my Keith cosplay jacket, and I’ve had quite a few people ask about it, so I’ve complied this guide! It’s quite long, but hopefully it helps if you are going the DIY route! You can either see this guide on Google Docs (recommended) or under the cut!

If you like this guide and found it helpful, consider fueling my future cosplay efforts by buying me a ko-fi?
Materials List:
Marine Vinyl
Red - i think i bought a yard of this?
White - i had about a yard and a half of this and half quite a bit leftover. A yard would probably do.
Yellow - 6” cut (default width from Joann’s is 54” so this is plenty!)
Burgundy - 6” cut (see above)
Marine vinyl isn’t the most expensive cosplay fabric out there (*cough* Yaya) but it isn’t exactly cheap at $19.99/yard. I got lucky and found some big pieces in the remnants bin. It seems to rarely go on sale, so maybe save those 50% off coupons for this!
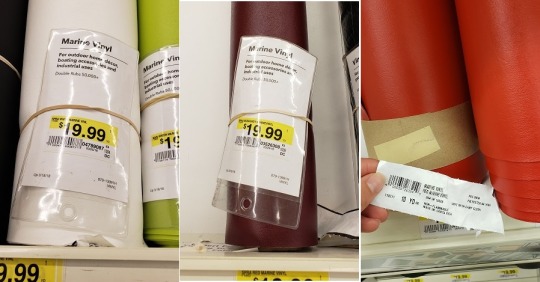
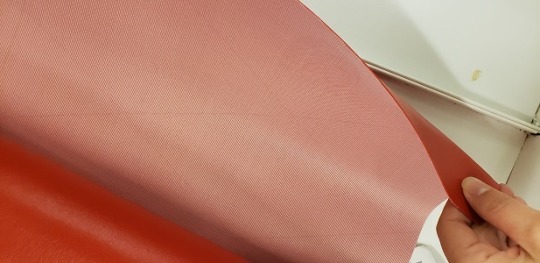
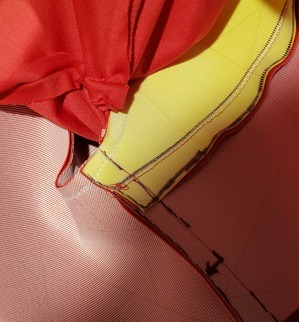
I DO NOT RECOMMEND YAYA’S 4-WAY PLEATHER. I bought some in red to use originally for the red portions for the stretchiness, and it BLED on my white vinyl while the materials sat waiting to be used, so i opted not to use it (and had to scrap that portion of vinyl). The stuff you want looks like this on the backside!
Needles
I used leather needles in my sewing machine, since i was using marine vinyl as a substitute for leather. They are specifically designed to cut through the heavier material. Mine were 90/14. You might want something even heavier. These would probably do just fine.
I used stretch knit needles for the jetset (see “lining”).
Thread
You will need white, red, yellow, and burgundy thread to match the vinyl. Either buy at the same store so you can check that it matches, or take a small sample snippet with you to make sure the colors match!
Zipper
I used a 12" sport separating zipper. These come in 2” increments, and I am on the tiny side (5’2”) so you might need a longer one if you are taller (or want a longer jacket)
Pattern
On the advice of CrescentShay (who is very talented and you should follow her if you aren’t already!) I based my jacket on McCall’s “totally not pokemon go trainer” pattern (M7556). You will also want either tissue paper (from your local dollar store), tracing paper, or medical pattern paper.
Lining
I used Red JetSet for my lining - i think i bought like 1.5 yards because it’s pretty cheap. It’s soft, colorfast, and fairly easy to work with. It also has some stretch and a nice flow to it. You can use whatever you’d like.
Mockup Fabric
I bought crazy cheap satin from walmart cuz it’s $2/yard. You can use muslin, old bedsheets, whatever you have handy, as long as it isn’t stretchy because THE JACKET WILL NOT BE so you want the mockup to have the same fit. DON’T. SKIP. THE. MOCKUP!
Tips and Notes:
Marine vinyl DOES NOT STRETCH. This guide is written based on the jacket I made as of its writing (Sept 2018) and thus is written based on NONSTRETCHY material. If you use a different material, be mindful of how that material works!
MEASURE EVERYTHING TWICE
Do not skip the mockup!
Pine & try it on frequently!
Watch your foot (of your sewing machine!)
Test stitches on scraps first! You want to make sure that tension and stitch sizes are what you want them to be!
Finished seams make it look professional
This portion will be broken down into several components:
Pattern and Mockup
Jacket base
Sleeves
Collar
Cuffs
Burgundy stripe
Lining and zipper
I will assume you, dear reader, have a base knowledge of sewing with a machine (like to sew inside out, how to thread the machine & adjust tension/stitch size, etc.) but you are welcome to DM me if anything is unclear or I have left out details! I am @corwynte on most social media.
Pattern and Mockup
If you have never used a pattern before, it is important to make sure you CHECK YOUR MEASUREMENTS. Pattern sizes are usually NOT standard sizes! I am a size 10 in patterns and a 0-6 in most clothing. So check your measurements! I used the “B” design for the pattern, because the jacket has a collar. This pattern is designed for sweatshirt type fabrics, not vinyl, so if you are not sure, GO UP A SIZE because again, VINYL. DOES. NOT. STRETCH.
I cut out my pattern pieces, but you might want to trace them instead. I trace my patterns now because then I can reuse them. Your call.
You will need pattern pieces 3, 4, 7, and 10. The band and cuffs are meant for stretchy material, so we’ll make our own patterns for those. You can also freehand the collar but I worked from the base of the hood.
With your tracing paper, add an extra 3” to the bottom of pieces 3 and 4.
Follow the instructions to cut out the vest and sleeves from your mockup fabric. Be mindful that many patterns have seam allowances, and for this pattern they are ⅝”. We are going to use this standard allowance.
My machine has marks on it, so I line up the edge of the fabric with these for my seams. If yours does not, you can mark them out with a marking pencil or a sharpie. It doesn’t matter if your mockup is a mess, we are going to draw on it later anyway. You do want to sew the seams properly though because NOW IS THE TIME to make sure the fit is correct.
**Save your patterns! We will use them for the lining too!**
You only need to attach the sleeves and pieces for the mockup - the rest of the sems don’t need finished. Once your mockup is complete, try it on! Make sure it fits the way you want it too. Don’t worry too much about the length - we’re can add a couple more inches to the bottom with the burgundy.
With help from a friend or with a dressform if you have one, trace out the lines for the different colors on your mockup.
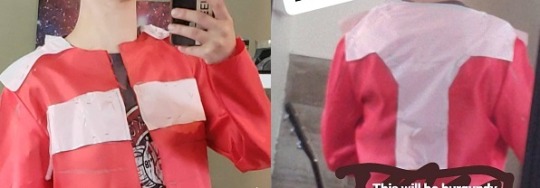
My white came out pretty big. You can adjust this to suit your own preferences, because this is an animated show so the size and shape of the jacket does vary slightly, and if you are basing your jacket on fanart rather than screenshots, different artists interpret the marks differently. Find what you like!
Once you are satisfied with the marks, either cut up your mockup for patterns, or trace the shapes with your pattern paper. I opted to trace, because my mockup was cheap satin which shreds easily and because I wanted to be able to reuse the mockup. For now we only need the chest portion of the vest - we’ll come back to the sleeves later, so don’t cut those apart just yet.
**Label your pattern pieces!** important things to include are:
Color the piece should be
What the piece is
How many to cut
Marks for where pieces will join together
Which side is which (side, front, top, etc.)
Jacket Base
If you are using vinyl, you can trace your patterns directly onto the backside of the vinyl with a light colored sharpie pen (mine was light pink). **ADD YOUR SEAM ALLOWANCES!!** You can eyeball these, since you will have the marks on the back of the vinyl to know where to stitch, but you should add ½ -⅝” seam allowance.
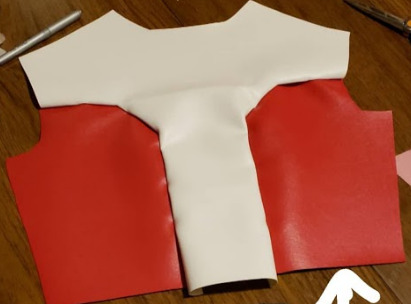
Cut out your pieces for the front and back of the jacket. Pin the “T” for the back of the jacket to a red pieces. You will need to notch the allowances to get it to lay right, but don’t jump into notching too quickly. Be careful with the T - you want to get it as symmetric as possible.
Once the back is done, pin the front too, then pin the front and back together and try the whole thing on!
It will fit slightly more loosely when the seams are done
The armholes might be tight (mine were) - we will adjust these later
Mostly we want to make sure it is lookin’ good, feelin’ good!
Sew the seams with a normal straight stitch first. Them we will fold over the excess and sew the seam again, lining up the seam with the edge of the foot and sewing a line in the color of the top material to give it a finished look. I did this to help my “T” lay flat and it really makes a huge difference in the look of the jacket - this will give it that “pro” touch!
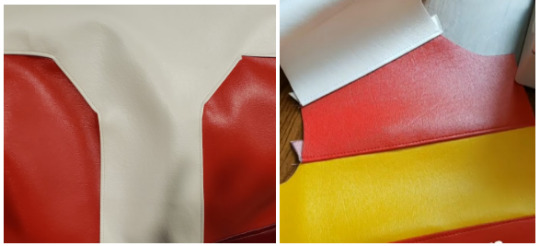
For the “T” - the white should be the “top” layer.
For the front stripes, white is the top over red, and both reds are top over yellow.
For the top seam, i sewed the back as top over the front.
Sew the sides together last. We will not fold over and double stitch that seam.
Now you’re done with the base! Pat yourself on the back!
Sleeves
Okay, now it gets harder from here.
A few notes before we start the sleeves:
Remember your seam allowances!
Vinyl does not stretch!
You can take extra fabric away, but you cannot (nicely) add more, so when in doubt, size up!
Measure the final width of the white on the shoulder of the jacket base. Good. Now measure it again. BE CAREFUL because matching these widths is really important to having the final product look clean and professional! (And remember your seam allowances!)
On your sleeve pattern, mark out the width of the white on the top of it and at the bottom of the sleeve (wrist). Use a straight edge to connect the lines. I made my white fairly wide, but again, suit your own preferences!
REMEMBER YOUR SEAM ALLOWANCES!
I made my sleeves MASSIVELY over-wide and trimmed them down a ton, because I was worried about not being able to bend my arms.
Test the size of your arm holes now, with your chest portion of the jacket complete. Widen them ass necessary so you can comfortably put on the jacket by cutting away from the BOTTOM portion of the arm hole.
Sew the white into the middle of the sleeves, again, being VERY CAREFUL to make sure the width matches up. Test it a bunch. Measure it a bunch. If you think you’ve measured enough, measure it one more time.
Finish the seams with white on top and a line of stitching.
Turn the sleeve inside out and sew the red pieces together. We will not fold over and double stitch this part either.
Turn the jacket base inside out and pin your sleeves to the base. Start at the top and MATCH UP THE WHITE. The excess should be at the bottom of the sleeve. You will probably have a bunch if you followed my advice. That’s fine.
Try it on again (Carefully! Pins!) Test the sleeves. Bend your arms, see how it feels. Get a sense of how much you want to take in the sleeves. Take it apart, take in the sleeves, pin it on again.
CAREFUL with the “pinches” that will develop from the sleeves (the bunching) - I was not careful with mine and they are not quite evenly pinched. You want these in the same spot.
Sew on your sleeves. Exhale. Be proud. The foundation of our jacket is now laid!
Collar
Okay, now we are going off the books. Remember pattern piece 10? The hood? We are going to base the collar on this because it is sized appropriately for our collar. Trace the pattern onto your pattern paper. Hold it up to your jacket. Tweak it, feel it out. Adjust as needed.
We are going to want a little extra for the hems, so BE MINDFUL of that as we proceed.
My collar is HUGE because aesthetic. You may want a smaller collar based on your own preferences, practicality for wearing, etc.
If you are using vinyl, you won’t need any interfacing because the vinyl is pretty stiff. If you are making your jacket from cotton, fleece, canvas, THE FORBIDDEN PLEATHER, etc. you will definitely need interfacing to stiffen it up.
I’m sure you know this by now but…
ADD YOUR SEAM ALLOWANCES
MEASURE IT TWICE

Cut FOUR pieces - be careful with mirroring these.
Sew the middle bits (back of neck) together first. Trim the excess (this is one of the ONLY times we will do this!) on this seam. Stitch the front edges and the top together. Leave the bottom open. Cut the corners diagonally so it can lay flat when you turn it right side out. Finish your seams with another line - be careful at the corners! Pin the collar to the neckline and check. It is okay if the neckline has a tiny bit extra at the front - we still need our zipper! If your collar is too big, take it in along that middle seam. Then, stitch your collar to the jacket.
Cuffs
Okay you know the drill by now. Allowances. Measure twice. Etc.
Measure around the bottom (wrist) of sleeve. Measure LOOSELY around the sleeve where you want the top of the cuff to be. Mine was 4½”.
Cut a pattern with the measurements that has a shape like the one shown. You’ll need 2 - one for each arm.
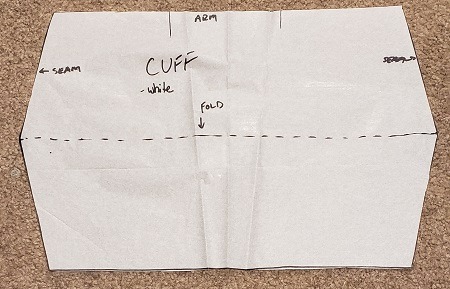
Fold the cuff in half with the “V” edges together - stitch these together.
Turn the cuff right side out and fold to make a tube. Stick the tube, top of cuff out, into the sleeve, and CAREFULLY stitch the cuff on. The fold the cuff up and over the sleeve. Make sure both sides are even!
Burgundy Stripe
Pine the burgundy vinyl to the base of the jacket and sew a seam. Fold it over, then finish the seam with the line of stitching. Easy peasy.
Lining
Use the patterns from your mockup to make a lining. I used red jetset, it is soft, it is colorfast, is has some give and is easy to work with. You can use whatever you like.
The only parts you will hem will be the bottom of the jacket and the bottom of the sleeves (near the wrist).
Sew the lining to the collar (right sides together) - this will finish this inner seam.
Stuff the arms into the sleeves. Pop your cuffs back down, then sew the lining into the sleeve (this is a tricky bit). The bottom we will leave open, so the last part to attach is the seams along the zipper.
Zipper
HOMESTRETCH!
Turn the jacket inside out. Open up the zipper and sandwich it in between the vinyl and lining. Sew the zipper on. Do the same on the other side.
Turn the jacket right side out and FINISH THOSE SEAMS! You will need your red, yellow, and burgundy thread for this. Use the appropriate color for the portion of jacket. My machine got real cranky on the burgundy cuz of the layers. I am going to tweak this guide with where you can trim excess to make this easier.
CrescentShay - her post helped me get started on my jacket! It was immensely helpful
My mom - she taught me how to sew, helped me make all my early cosplays, gave me her sewing machine, and always answers the phone when i call begging for tips and advice on a new project!
2 notes
·
View notes
Video
instagram
Venom 🕸️ #venom #venommovie #cosplaygirl #cosplaytutorials #nolamua
12 notes
·
View notes
Photo

I think because I posted a few bodypaint cosplays last week, I've gotten a handful of messages about bodypaint! If you are interested in tutorials, I have both cream paint and airbrush bodypaint tutorials available for FREE on my 100% free Patreon! www.patreon.com/AmazonMandy I fell behind on adding new tutorials after just moving but should be soon! #cosplaytutorial #tutorial #cosplaytutorials #bodypaint #bodypainttutorial #makeup #makeuptutorial #airbrush #airbrushtutorial #cosplaymakeup
#airbrushtutorial#bodypainttutorial#makeuptutorial#bodypaint#cosplaytutorials#airbrush#cosplaymakeup#tutorial#makeup#cosplaytutorial
15 notes
·
View notes
Photo

I am so very happy to announce a new group has been created where there has been a void for too long.. @sheprop! has been forged for female propmakers, costumers, sfx artists and more! Ladies, this is a space for us to gather, learn, show off, question, ask for advice, and post your WIP photos. . More information about this amazing (and quickly growing) group can be found on Facebook! I hope to see you all there, whether you are new to cosplay or have been doing this for decades, we would love you to join us! . #sheprop #propmaking #womenofpropmaking #womenofcosplay #femalemakers #strongwomen #artists #sfxartist #cosplayer #girlsofcosplay #cosplaytutorials #warriorwomen #helpinghand
#sheprop#sfxartist#propmaking#cosplaytutorials#helpinghand#warriorwomen#femalemakers#strongwomen#girlsofcosplay#artists#womenofcosplay#womenofpropmaking#cosplayer
5 notes
·
View notes
Text


Since I was so busy with con crunch I didn't really post progress photos from Jolyne and Jotaro, so I'll be starting to post some WIP breakdowns with useful tips and tricks I learned along the way! Buckle up for a long post below!
Here's an overview of the applique process for Jolyne. The main techniques I learned from a spandex applique tutorial by Spandex Simplified which you can find in my Linktree. I started by planning and drawing all of the applique designs on my sewing patterns, experimenting with a couple different scales of the grid and spiderweb design until I found something that looked proportionate to me and the artwork. This also allowed me to pre-plan for the pattern matching of the grid on the seams of the pants and top. Additionally, the top applique pattern is designed to hide the bust dart seams so it has a visually seamless appearance. The darts are curved rather than angular to avoid a pointed shape with the excess fabric cut away and stitched in a lapped seam style to reduce bulk.
After finalizing the applique patterns in paper, I used chalk tracing paper and a tracing wheel to transfer them to the white holographic spandex. Basically for each blue garment fabric piece, there was a corresponding white piece of the same shape that I then cut the applique designs out of. I couldn't get a rotary cutter to behave for cutting the applique designs out since the spandex was slippery, so I found it worked best to just cut the designs out with a sharp pair of fabric scissors.
Odif 505 temporary fabric spray adhesive is the BOMB. I just got it from my local Joann store, but if you can't get it the Spandex Simplified tutorial compares other adhesives you can try. Basically instead of using Heat-n-Bond like for regular applique, you spray the back of your spandex applique piece and then stick it onto your base fabric. Make sure to ventilate your workspace and wear a respirator, the fumes are not good! The Odif is temporary and can be repositioned, which I had to do quite a bit especially on the pants with a ruler to get all of the grid lines perfectly straight and positioned. You can always spray a little more on your piece and try again if it loses tackiness. I also had to go back and pin down all the areas that felt loose to prevent the design from shifting while sewing.
After your designs are temporarily glued on, use a small zizag machine stitch to stitch them on permanently. From a distance the zizag is nearly invisible, and more importantly it can stretch. I used Sulky rayon thread since the shine helped it vanish into the shiny spandex. The worst part of the applique process is doing trial and error tests to find the perfect machine tension and stitch size. I recommend cutting a sizable test version of one of your applique designs, and keep playing with machine settings until you end up with pucker free results. Then don't dare change your machine settings until you're done. I usually take pictures of my machine settings to document for later in case I need to remake something. The process is such a pain but so worth it!
This post is already way too long haha. I'll post some more stretch sewing tips I've learned in the future though since it's an entirely different beast from most stitching. Let me know if you have any questions!
#cosplay#costume#cosplaywip#cosplaytutorial#jojosbizarreadventure#jojocosplay#jolynecujoh#jolynecosplay#stoneocean#jojopart6#spandex#spandexapplique#stretchapplique#applique#stretchsewing
6 notes
·
View notes
Video
youtube
Some tips to make sewing with vinyl/pleather easier.
Want to learn how to cosplay? Check out the rest of my channel! New tutorial videos every Monday and Thursday with extra bonus content sprinkled throughout the week!
My Website: http://www.koumorinohime.com/
Facebook: https://www.facebook.com/KoumoriNoHimeCosplay
Tumblr: http://koumori-no-hime.tumblr.com/
Twitter: https://twitter.com/koumori_no_hime
118 notes
·
View notes
Text
Jack Frost Staff Tutorial - Part 2 : Painting the Staff
I have two main versions of this staff that the tutorial is based around: Painting & Stringing. Both versions do require a painted base prior to the detailing aspect - the tutorial will split after the initial process.
Which option you choose will depend on your own personal preferences, time, and how much you have to spend.
What you will need for Option 1 - Painting
Painter's Tape (or masking tape)
Gesso (or spray paint)
Paint brushes (a few different sizes)
Different shades of brown paint (I prefer acrylics for this)
Different shades of blue paint (I prefer acrylics myself)
White or silver paints (Glitter ones optional)
What you will need for Option 2 - Stringing
Painter's Tape (or masking tape)
Gesso (or spray paint)
Paint Brush (a few different sizes)
Hemp cording (2 shades of brown minimum)
Hemp cording (3 or more shades of blue)
Hemp cording (white and or silver)
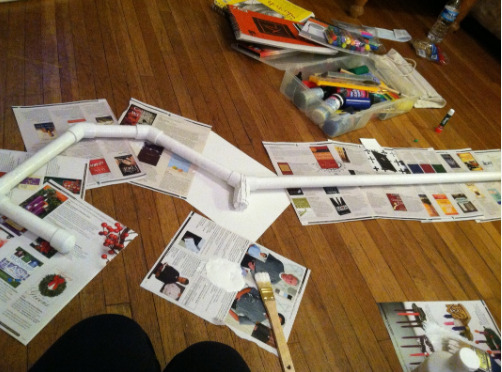
Step 1 Prep Work - Hiding the PVC joints
There are a few different ways to cover/hide the joints where the multiple PVC pipes connect. I will cover two of my preferred types here - Painters Tape & Primer/Wood Filler
Option 1 - Painter’s Tape
Cover each of the joints with either masking tape or painters tape. This acts as two fold: the first part is to help give the staff some added sturdiness, the second part helps smooth out the roughness of each joint. This means that after it is painted it looks like one whole piece rather than a disjointed staff.
I would do at least 2 layers of tape, more if you see it as necessary. Definitely do a healthy amount around the joint at the bottom of the crook. This will also help to reinforce the glue and rubber bands holding it on.
Make sure you also do this at the bottom of the staff as well on the foot joint.
Personally I use painter's tape because I have more of it, but as long as it is thick enough it really doesn't matter what kind of tape you use.

Option 2 - Primer/Wood Filler/Modeling Clay
There a few different mediums you can use here, though wood filler and modeling clay are two of my favorites. The idea is to use a material that can be added in around the joints to fill in the void where it connects and smooth them out to make a seamless connection.
**Unfortunately I do not have a photo to share of this aspect as we did the painter’s tape for the original tutorial**
Step 2
After adding the tape around the joint you want to prime the staff for painting. Because of the smoothness of the staff and the type of plastic, normal paint doesn't stick to it as nicely, thus the primer.
You can do this one of two ways and it is whichever you prefer. You can use a spray paint and do 1-2 coats on each side. If you choose the spray paint I would suggest doing white or a light brown. Your other option and the one I used was Gesso. This stuff works great. I did about 2-3 coats of Gesso on each side. Make sure you lay newspaper or something else down before painting.
NOTE: I forgot to put the tape on before taking this image (which meant I had to do it afterwards - please don't make my mistake)
HINT: Do small layers of Gesso at a time to prevent globing or uneven drying. It takes longer but it worth it.
Step 3
After you Gesso (or spray paint) and it is fully dry, then you can do your initial painting.
I would suggest starting with a medium brown, and then do coats of darker and lighter trying to get it to look like wood. Keep your paint strokes going in the same direction (Up & Down) to help get this particular look.
This photo isn't a very good example so I apologize.
You can always look up wood references to get an idea of how you want it to look. This is entirely personal. Don't worry too much if you can't get it right. The blues, whites, and silvers will help cover up any mistakes you have.

This is the point where the two options split.
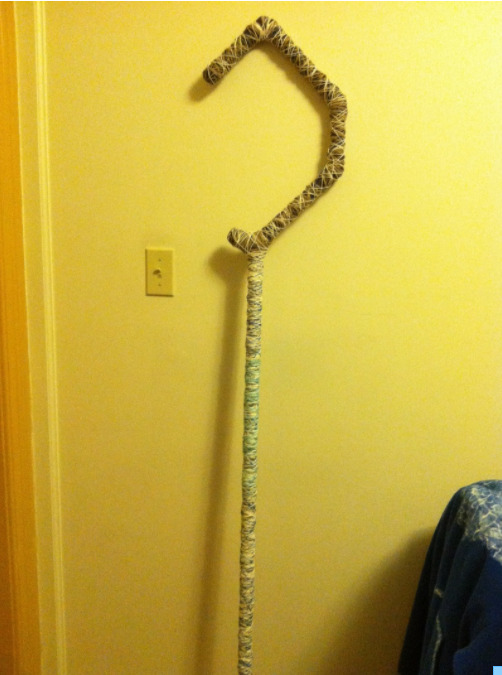
Step 4 - Option 2
Take your your first shade of tan (or brown) hemp cording and wrap it loosely like so. I would suggest getting a friend to help hold the staff while you wrap the hemp cording. (You can see my friend in the bottom corner - though the staff is hers, it was more so me helping her make it)
Continue adding hemp cording around the staff. Alternate the thread colors with the different shades of brown and tan. After you have a decent amount you can change over to the blues. Again keep alternating the colors as you go to give the staff dimension with the colors.
After you feel you have enough, switch to the white or silvers to give it the highlights. The goal is to make it look frosted. Where your hand sits should be the most frosted part gradually changing back to brown around it.
This does take awhile but it looks unique and awesome when its done.


#cosplaytutorial#cosplaytutorials#jackfroststaff#jackfroststafftutorial#riseoftheguardians#riseoftheguardianstutorial#dreamworks#jackfrost#cosplayer#cosplaying#cosplayers#stafftutorial#propmaking#propmakingtutorial#propmaker#staff#cosplayprop
7 notes
·
View notes
Photo

#protip - "Invisible zippers, one of the weakest zipper styles, are perfect if you want the zipper to disappear into a seam. Perfect for making fitted leotards, catsuits, slacks, dresses, and skirts; while usually applied with an invisible zipper foot, it can be installed with a standard zipper foot as well.." - #bunni ❤️ 🐰 #snowbunnystudios #cosplay #costume #costuming #cosplaying #cosplayer #cosplayersofinstagram #rpf #replicapropforum #craftyourfandom #cosplaytutorials #cosplayhelp #sewingtips #diy #howto #crafting #cosplayproblems #bunnihelps #sewingtipsandtricks #cosplaytips #sewingtips #zipper #invisiblezipper
#rpf#sewingtipsandtricks#cosplay#snowbunnystudios#costuming#crafting#protip#cosplaying#cosplaytutorials#cosplayhelp#craftyourfandom#cosplayer#cosplayersofinstagram#costume#replicapropforum#diy#cosplaytips#howto#bunnihelps#bunni#sewingtips#cosplayproblems#invisiblezipper#zipper
1 note
·
View note
Photo

Number one rule don't leave me with make up. Step two even leave me alone. Step three this happens Harley quinn & & joker makeup. New video coming soon #newvideo #videoedits #videoedting #NewProfilePic #makeuptutorial #harleyquinn #Joker #cosplaytutorials #cosplay #cosplaygirl #cosplaymakeup #charlie01 #youtubecharlie01 #youtubechannelcharlie01 #good https://www.instagram.com/p/BvhUlDUgl_a/?utm_source=ig_tumblr_share&igshid=1cv9w1hqguelz
#newvideo#videoedits#videoedting#newprofilepic#makeuptutorial#harleyquinn#joker#cosplaytutorials#cosplay#cosplaygirl#cosplaymakeup#charlie01#youtubecharlie01#youtubechannelcharlie01#good
0 notes
Last Seen Blogs

matisyntaitt
DISCOVERING

maosia
MaOsi

il0ve-friends0x0
🌸💕✨
feezy350
Feezy350

crazedlifeofcole
Take It As It Comes