
dansederniere
resources.
recources saved by izzie. tracking #userizzie
101 posts
Don't wanna be here? Send us removal request.
Last Seen Blogs

melodyd57-blog
d-melody

melody-inwonderland
Melody In Wonderland 💙

unclerickisfullofschist
Oya Oya Oya?

framejademon
Frame's Inn

mortarperekathebel
Untitled
Photo
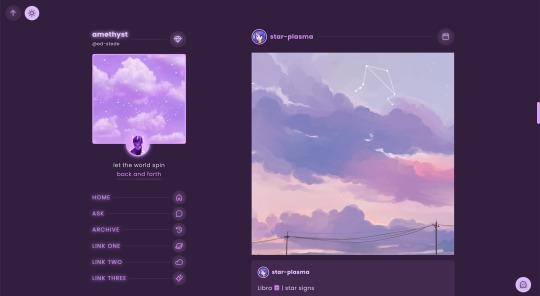
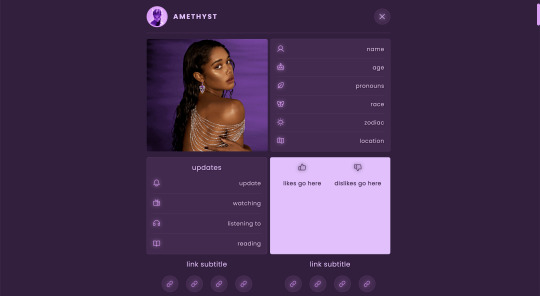
amethyst theme
static preview & download / live preview
features:
sidebar with uploadable image, title, icon, url & menu button
up to 3 extra sidebar links
scroll to top & day/night toggle
lots of customizable colors & options
option to toggle day/night button, glow effect, hover tags, & reblog via info
540px posts
0px, 5px, & 10px border radius options
custom description, post margin, google fonts, & font size
slide out menu with uploadable image (334px x 300px), about info, updates, likes/dislikes, & up to 8 links
nothing needs to be edited in the code, everything can be changed in the customize panel!
credits:
base code by @seyche
all credits listed in the code
terms:
like/reblog if using
please consider supporting me!
do not redistribute as your own
do not remove the credit
2K notes
·
View notes
Photo

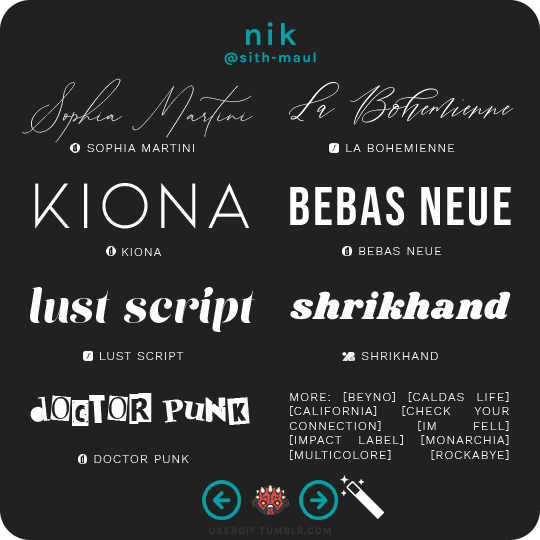
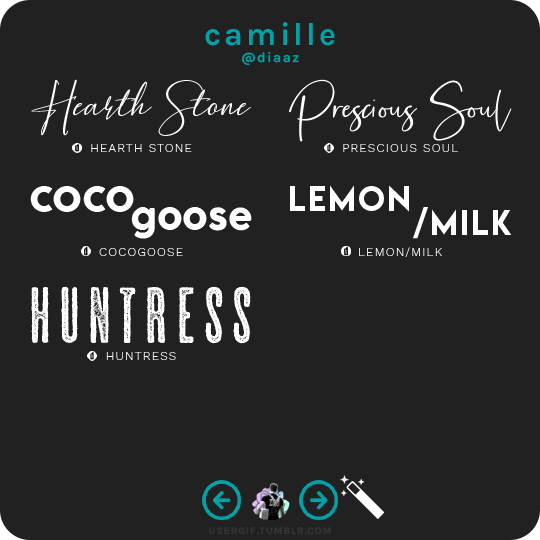
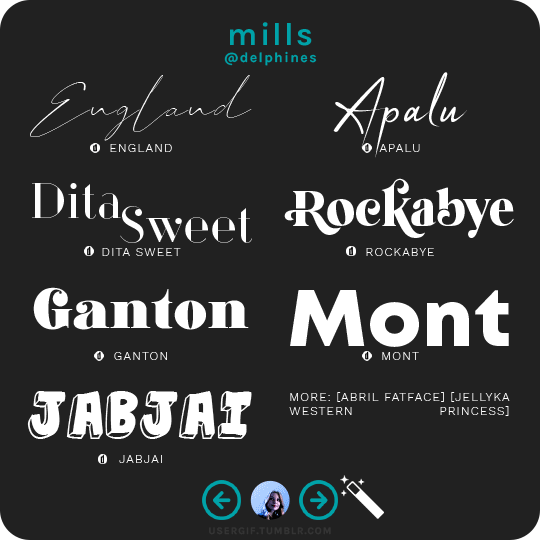
anonymous asked 💬 what are your personal font recs?
USERGIF FONT RECS 🪄 PER MEMBER
Here are some of our members’ favorite fonts! Fonts without a source icon are default fonts on Photoshop. Fonts with the source listed as “other” may require a deeper Google search or are only available to purchase, but most fonts are free! TIP: On mobile, slide your finger over the gif to slowly scrub through frames.
MORE RESOURCES FROM USERGIF MEMBERS:
— fade-animated text tutorial by nik [@sith-maul]
— font compilation by kate [@selinakyle]
— font compilation by sole [@fionagallaqher]
— font packs + downloads by jennifer [@antoniosvivaldi]
— glitching text tutorial by nik [@sith-maul]
— moving text tutorial by drea [@sashafierce]
— quick text styles tutorial by kate [@selinakyle]
— warp text tutorial by drea [@sashafierce]
3K notes
·
View notes
Note
drea!! i wanted to ask, what font do you usually use in your sets? they look so amazing omg
hi shreya !! 💕💕💕 sorry this is late omg but i usually use a variation of made bruno, earwig factory, shutter stone, scarlette, queenstown signature, acumin, montserrat, intro, avenir, preta, nouvelle vague, and luna. these are just some of my favs at the top of my head<3
6 notes
·
View notes
Photo

i was asked by an anon to make a giffing/coloring tutorial, so here it is! i’m certainly not a professional and everyone gifs differently, but i hope i can pass on some helpful tips to you. this is very screenshot heavy.
Keep reading
403 notes
·
View notes
Photo


theme thirteen: zinnia — a very customizable, mobile responsive one column sidebar theme.
previews: static preview, live preview / code: pastebin, github
features and options:
left or right sidebar
optional updates tab
225px wide sidebar image or 75px x 75px icon image
options for rounded corners and posts with a solid background
post info: tags on click or show tags, optional via/source info on hover
hide or show captions on index
post sizes: 400px, 450px, 500px, 540px, 600px, 650px.
up to four custom links and an unlimited number of Tumblr pages.
ten body font options, five title font options, font sizes from 12px to 18px, and all colours customizable.
responsive for both desktop and mobile devices
notes:
tumblr’s customize page is very buggy and when you first install the theme, you have to toggle the toggle options on and off to get them to work properly.
see full list of credits here.
2K notes
·
View notes
Photo
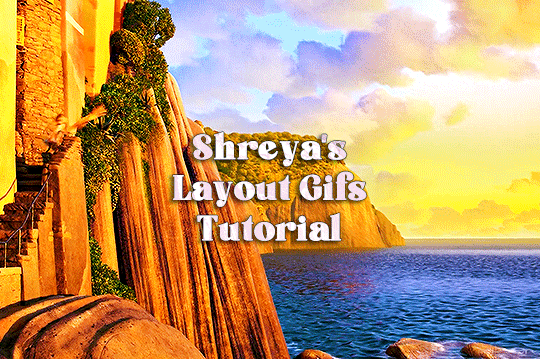
hi everyone! this tutorial is for @xuixialing, who asked for a tutorial on how to make layout gifs, based on my recent gifset here, so here it is! (also this is what i usually do to make simple/complex layout gifs)
you will need: adobe photoshop of any version with timeline (i use cc 2019)
difficulty: medium. previous knowledge of giffing and basic knowledge of masks (optional) is required
the tutorial is under the cut!
Keep reading
486 notes
·
View notes
Photo
tutorial under the cut!
Keep reading
3K notes
·
View notes
Text
hi everyone! i've decided to make a tutorial on how i make gifs. it came about as i'm teaching my dear friend @ellesgreenaway the bases of gif making. as a reminder, everyone has a different way to gif, this is just how i personally gif. i'll be giving a fully detailed tutorial, from downloading the video files to saving the gif. if you find this useful, please like/reblog :)
software: photoshop (any version with timeline feature)
difficulty: easy
full tutorial undercut
getting high-quality videos
1080p is the best quality if you want clean and crisp gifs. you can get away with 720p,
i use different websites to t*rrent tv show episodes and movies. be careful when searching through these websites as they could affect your device with a virus. it's best to use a vpn to protect your device.
some links:
‣ tvshows.today
‣ filmxy.tv
‣ pahe.ph
for music videos, i use 4k download to parse the music video or any other youtube video in 1080p (if available). to directly download video files directly from websites such as soap2day, i use video download helper (it's a chrome extension).
*before you import your video into photoshop, make sure your version of photoshop has the timeline feature. to make sure it is on, open photoshop, go to windows, and near the bottom, there's the timeline option
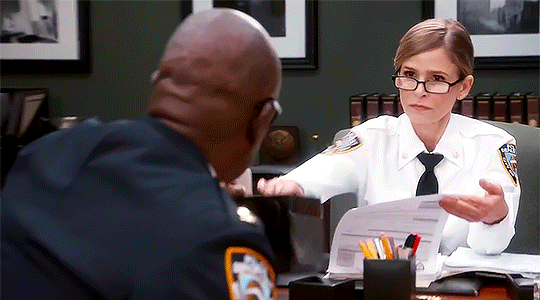
this is the example gif i will be showing:
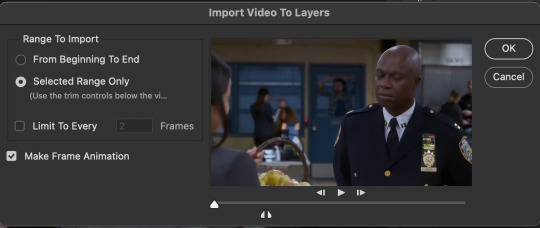
importing to photoshop
open photoshop and go to files > import > video frames to layers. a dialogue box will appear. make sure to select "selected range only" and to deselect the limit to every 2 frames option. use the arrows under the video to drag them to the moment you want to gif. make sure to have frame animation selected!
deleting unnecessary frames, set frame delay, crop, image resize
with the timeline on, you will see your gif having some frames that aren't needed. using the trash can button at the bottom, only delete the frames you don't want in your gif. in case you accidentally deleted a frame, you can always go back by clicking on the history panel.
now, click on the first frame and go all to the end, and press on the shift button while clicking the last frame to select all the frames in your timeline. optionally, you can click on the little button, in the upper right corner of the timeline panel, that has a bunch of straight lines. once you click on that, you can select the "select all frames" option. from there, go over to one of the frames and click on the number and go to other. this will pop up a dialogue box for setting the frame delay. personally, i set the delay to 0.06.

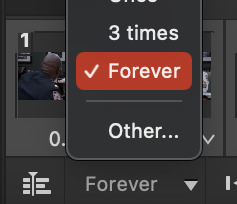
the larger the frame delay, the slower the gif will be. from there, with all the frames selected, go to the bottom left corner of the timeline panel to convert all the frames to video timeline. *make sure the forever option is selected. this will allow for your gif to loop infinitely.
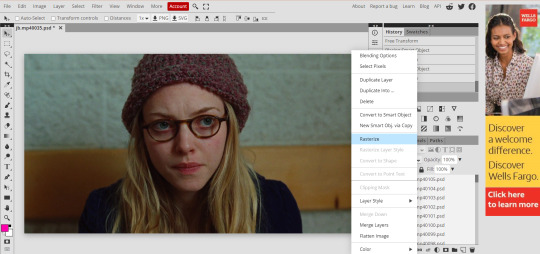
then, going to the layers panel, press the shift button and select all the layers and right-click. you should see the option "convert to smart object". this will condense all the layers and make it into one singular object.
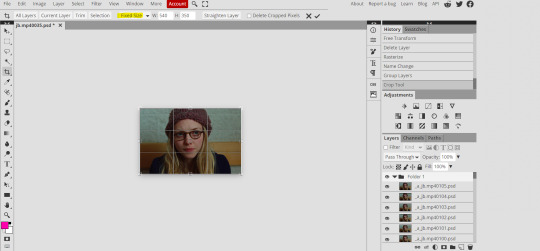
on the toolboard to the left, click the crop tool option. crop according to the different dimensions. with this example, i'm cropping this gif 540px by 300 px.
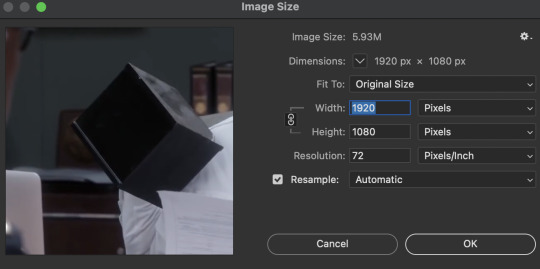
now to resize, go to image > image size. a dialogue box will appear.
make sure to change inches to pixels. on width type, change your gif width accordingly. for this example gif, i'm going to change the width from 1920 to 540. the height will adjust accordingly.
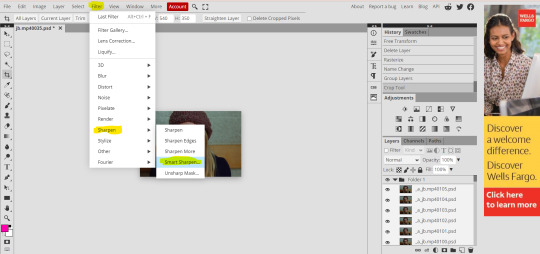
sharpening
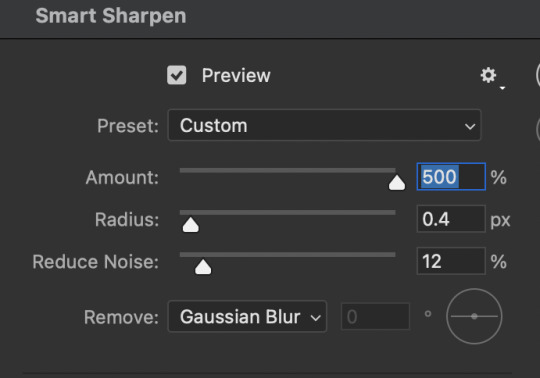
now it's time for some sharpening!. these smart filters help with making your gif(s) clean and crisp. go to filter > sharpen >smart sharpen. these are the settings i use for all the gifs i make.
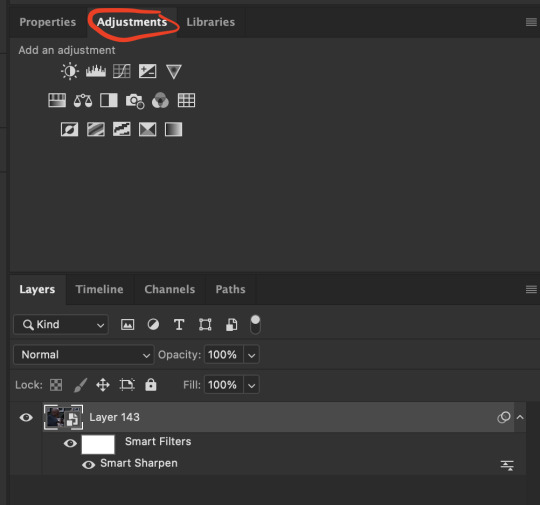
after you’ve sharpened your gif, you can color your gif. this basically means brightening, adjusting, adding contrast, bringing out or muting certain colors, et cetera. since this is a basic gif tutorial, i'll only show the layers that i use to create vibrant gifs.
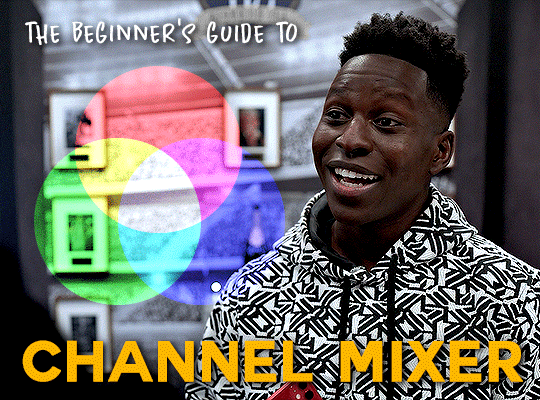
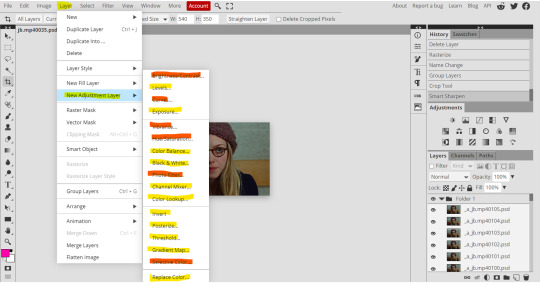
adjustment layers
to add adjustment layers, hover over to the panel right above the layers tab. right next to the properties tab, click on the adjustment tab (circled in red). this tab will show the different options for adding adjustments that will make your gif look better!
i. brightening
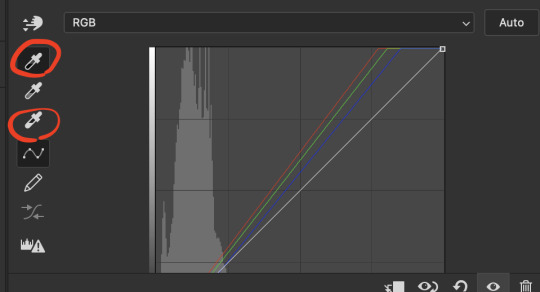
the first adjustment layer i add is the curves layer (the top third to the left in the first row of the adjustments tab). using the little eyedroppers to the left, i set both a white point (by clicking the lightest area of the gif) and a black point (by clicking the darkest point of the gif), both are circled in re. by using these, these points instantly brighten the gif.
ii. coloring
with this example gif, there isn't much to color besides adding more color. by adding a vibrance adjustment layer (two over from the curves layer), you adjust according to how you would like your gif to appear. for this example, i'll show you a before and after.
and since i want it to be a bit more brighter, i use the brightness/contrast layer. i use this to give the gif an overall brightening lift and add some contrast. here's what the gif would look like at this point. i try not to add too many adjustment layers as it may add any unnecessary grain.
saving your gif
and finally, it's time to save the gif! go to file > export > save for web (legacy). most gifmakers, if not all, use this method to save their gif(s). use the most optimal save for web settings. what i mean by optimal is what save settings are best suited for you and your gifs specifically. here are my save settings. most of the time i use selective + pattern, but then again, it depends on the gif itself. for quality, i use bicubic. personally, i feel like it keeps the gif clean and crisp. remember to keep the looping option as forever.
and that's it! here's the final product:
with anything, practice practice practice!
136 notes
·
View notes
Photo

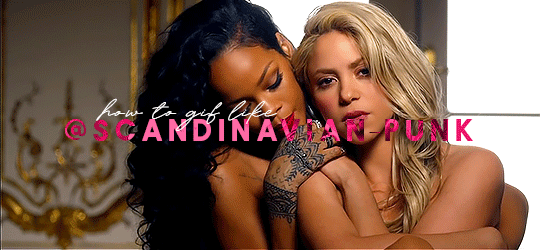
This October @snowxstormworld is hosting an event I’m really looking forward to: Jonerys orgasmic october 2k21!
And since @libradoodle1 is the queen of edits, I can’t wait to see what she can pull out of a gifset, so here’s a little tutorial for doing it in photoshop. Hope you find it helpful, lovely!! ❤️
If anyone has any additions or tips, feel free to add them (even just dropping a link is cool), because I really think this method can be somewhat improved!!
Here are a few more professional toturials:
Blending and gradually appearing text + Background Text Effect by @kiekiecarrera
Handwriting Text Effect by @lilabard
Gif Editing in Photoshop by @yelenabelovvs
And now, without further ado, here are my two cents on the subject:
‘GIF EDITING IN PHOTOSHOP (QUICK AND DIRTY)’
[ under the cut, because otherwise the whole post would have become way too long ]
Keep reading
83 notes
·
View notes
Text
hey! so if you’re new to gifmaking here are some places to get 1080p videos if you don’t want to t*rrent:
sharemania
youtube (download from y2mate or 4kdownloader)
@dazelogoless
@logolessevery
@221logoless
@logolessgreen
@lqwlogoless
@logolessenergy
878 notes
·
View notes
Photo


oh shit 16k… what a day! thank you all so much for being a part of the circus that is my blog. i love you all. here’s a base coloring i made for you as a thank you that works on literally everything i’ve tried it on, but it was originally made for my love bucky, so it might have to be adjusted a bit for other stuff than tfatws. please like and reblog if you download ❣️download
351 notes
·
View notes
Text

for the longest time, i made my gifs on ezgif, but more recently i have started to use this method to make higher quality gifs for free. so if anyone wants to start making gifs, but can't afford photoshop, this might help.
WHAT YOU NEED
photopea (free)
kmplayer (free to download and use)
access to movies or scenepacks (you can send me an ask for these)
sharemania (free)
OTHER HELPFUL TUTORIALS
how to make with photopea by @lacebird (super helpful for mac users)
giffing on photopea by @benoitblanc (different method of giffing on photopea)
ofcamerasflashing's masterlist by @ofcamerasflashing
background colouring tutorial by @sashafierce
giffing tutorial by @newrcmantlcs
colouring tutorial by @lovestory
text tutorial by @yelenafbelova
THIS TUTORIAL REQUIRES . . .
you to know the layout of photopea (you can find this in @benoitblanc's tutorial)
patience. a lot of patience.
tutorial under cut
i usually download my videos from sharemania or instagram using mega or google drive links. these ensure higher quality than youtube, but take much longer. if i download from youtube i like to use the 4kdownloader, since youtube lowers video quality automatically.
SCREENCAPPING
after downloading the video i open it on kmplayer (the screencapping software i use) and move to the point i want to gif. i pause the video any press ctrl + g, and a little tab pops up!
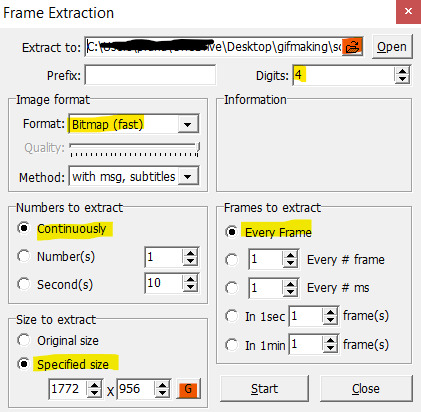
make sure all your details are the same as mine, otherwise your gif will be choppy and squashed/stretched. press the little G button to get YOUR videos specific size, and pick your file for the screencaps.
after you reach the end of the point you need to gif, pause the video and press ctrl + g again to press stop. go to the file you've saved the screencaps in, and delete the extras.
now you've got your frames!!!!
GIFMAKING
if you can't find something on photopea, use the search option.
go to photopea and press the file option, press open and select your first frame. then press open & place and select them all. since they are psd files they load in the correct order on photopea (this usually doesn't work on poor internet, so induvidually select the first seven/eight and then select the rest together).
after the frames have loaded delete the first one you opened (the one named background), and select the rest. tap them with two fingers and select rasterize.
go to layer > animation > make frames. i then use ctrl + g to make a folder.
select the crop option (left side) and change it to fixed size (i always use 540 x a smaller number, since that's tumblr's size limit). this gif's proportions are 540 x 350.
i pull the cropping thing until i've selected everything i want in my gif and press the check mark (✅).
now you've got your gif!!!! you can go to file and save it. remember to change the speed according to your gif (i usually make it 200%).
SHARPENING, COLOURING AND TEXT
although we have a full gif, it doesn't look as good as it can, so we move on to the fun part; sharpening, colouring and text!!!
to sharpen the image go to filter > sharpen > smart sharpen and change it from 150% to 200%
for basic colouring you have to use the options in layer > new adjustment layer. the ones highlighted in red, are what i use for every gif. i follow this tutorial by @lovestory and the colouring part from @newrcmantlcs's tutorial.
my gif now looks like this:
to do the next part, @sashafierce's tutorial is great.
sometimes i like to colour my background, so i go to layer > new layer and change the blending option of the layer to color (i select and double tap the layer).

i select the paint brush from the left, and turn the hardness to zero, and increase the size to what i want (the bigger, the smoother). i paint the background of the image, and if i want to remove a certain part i go to tools > background eraser.
the above is what my gif looks like now.
next i followed @yelenafbelova's text tutorial, which is SUPER helpful for edits. i used the fonts cutie star and lemon milk. i usually add a drop shadow with 100% opacity, 100% spread, distance of 2/3 pixels, and size of 0 pixels (this stuff can be found in blending options).
. . . and this was my result!!!!
i hope you're able to make awesome gifs!!! feel free to share them with me via ask, or by tagging #tusersai.
1K notes
·
View notes
Photo
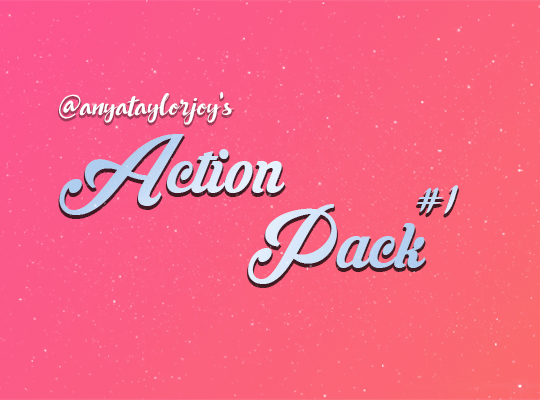
I’m still procrastinating on making a color tutorial so here is a pack of gif actions! Includes an action for scripts, two sharpens and a timing/save/export action! I use all of these every time I gif & they will save you serious time 💜 If you download, please like or reblog. Explanations for each action are under the cut, and as always if you have any questions please let me know!
do not re-upload/claim as your own.
action pack
Keep reading
1K notes
·
View notes
Photo

gold : preview / download
a filtered icons page. the header has space for title, links and a short description. there are markers in the code for editing as well as instructions on customising filters, so it should hopefully be fairly easy to edit!
all icons in the preview were created by @thaleias.
1K notes
·
View notes
Photo

@emberoflife kind of (not really) requested a tutorial for how to merge two gifs together on photopea, and as this is something i’d been thinking about making anyway, i thought why not just do it? big shoutout to @bethmarchs again for teaching me how to do this in the first place… maybe lily should just be making these…
onward!
Keep reading
466 notes
·
View notes
Photo


theme 3: “no tears left” by @lizzie-olsen
static preview / pastebin
another minimalistic theme inspired by ariana grande’s “no tears left to cry” because it was released 3 years ago and also i’ve had it on repeat the entire day.
features:
a simple, minimalistic theme with the option to have the icons of the theme accented with a color.
selectable post width: 350px, 400px, 450px, 500px, 540px
selectable sidebar width: 220px, 230px, 240px, 250px
selectable sidebar image with: icon (30% of your selected image), full image, none
selectable sidebar image shape: square, corners, rounded, circle
selectable text transform: lowercase, uppercase, capitalize, none
selectable custom fonts
selectable font sizes: 11px, 12px, 13px
selectable title font sizes: 13 - 18px
selectable font weight: normal, medium, semi-bold, bold (please note that this will work depending on your selected font. if the selected font does not support said font weight, it will automatically set to it’s nearest neighbor: 500>400, 600>700)
hide/show: sidebar image, custom scrollbar, custom links
custom sidebar title
four custom links (excluding standard links: home & ask) with customizable icons
customizable icons: feathericons cheatsheet
audio player by @octomoosey
un-nested captions plugin by @neothm & @magnusthemes
video resizing script by @shythemes
modified pxu photosets by @bychloethemes
please like/reblog if you use this theme !
support me on paypal or ko-fi if you want!
351 notes
·
View notes
Photo

@yelenabelovca requested a tutorial for how to create a big gif from smaller gifs on photopea, so i am here to deliver! i would be remiss not to give a big shoutout to @bethmarchs because she was the one who taught me how to merge gifs on photopea in the first place.
onward!
Keep reading
254 notes
·
View notes