
Statistics
We looked inside some of the posts by dbhmodarchive and here's what we found interesting.
Average Info
Notes Per Post
3K
Likes Per Post
3K
Reblog Per Post
526
Reply Per Post
50
Time Between Posts
1 hour
Number of Posts By Type
Text
13
Photo
4
Last Seen Tumblr Blogs


Fun Fact
There were a total of 171.5 billion posts on Tumblr in 2019.


Text
Eden Club Markus
If you're curious about how I make my Eden Club Markus, here's a hopefully simple guide!
First off, the actual model itself.
You may be surprised to learn Markus' "destroyed" model--seen in the chapter From the Dead--can look several different ways, depending on how you alter the textures.
How I'll refer to them from left to right: Base, Android, Eden

Adding in a cut to avoid eating the entirety of your timeline. Much, much more info below!
Here's what the base textures look like:

The clothes.
27EDD & 27EAC: These two make the pants and shirt appear, respectively. Black them out completely to make them disappear, or make 27EDD white and 27EAC red to make them fully show up.

27EDC & 27EAE: These two are the specular textures, which create highlights and shadows. Nothing special here.
27EE2 & 27EB6 (plus 27EAC): These two make the mud appear. Make 27EE2 completely white and 27EB6 brown (or whatever color, really) to make the mud fully appear, or make them completely black and completely white, respectively, to make it disappear. 27EAC is special, because the yellow also adds mud to the shirt!
27EDE & 27EB2: The former is the mud texture that 27EE2 pulls from to create the muddy look. The latter is the texture for the base of the shirt. You can change the look of the mud and shirt, respectively, by altering these textures.
The skin.
3C70C, 3C71B, & 3C898: These textures create the holes in Markus' skin (body, face, and chest respectively). Make them fully white to make all of his Eden textures appear. Black them out to make all of his Android textures appear.
3C714, 3C70F, 387B9, 382E9, 3C6F2, 27ECB, & 37E40: Specular textures for both Android and Eden models. Again, nothing special.
3C712, 385E9, 382EB, & 37E3F: Basic textures for both Android and Eden face and body skin/plastic.
37E41, 37E47, 37E45, 3C718, 3C713, 3C70D, 37E36, & 3C71C: Details textures plus a few that prompt the game to load the correct textures. I can go into more detail on these if folks are interested, but they're not needed to make our Android model.
3C715, 3C70E, & 3C71D: These textures make the mud appear on his Android details, his Android and Eden body, and his face, respectively. Black out to remove the mud, turn fully white to add more.
37FE4 & 27ECF: Copies of the mud texture the game pulls in. Can be seen more clearly in the shot below.

Mud Monster Markus. TM
BUT, a few roadblocks...
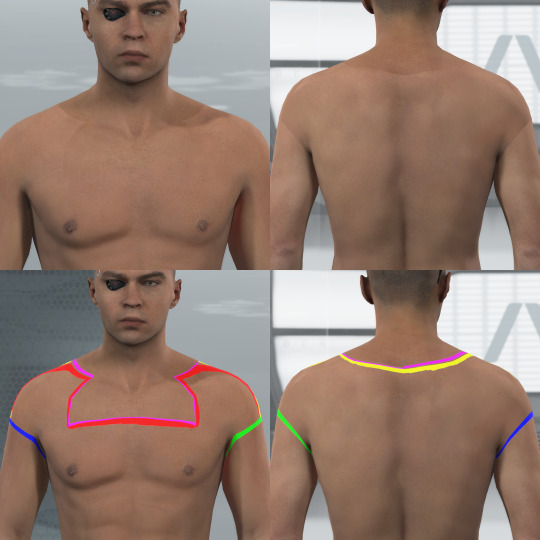
Markus' face/neck, torso, arms, back, and legs all appear to be different colors. This model isn't meant to be viewed like this, so while they all look the same on the skin texture itself, they cannot be easily adjusted to match his face/neck because the necessary shaders just don't exist on the rest of his body. I'm sure some intrepid soul could get it to work, but all my efforts have looked terrible because his body texture is so small and low quality to begin with. I personally just gave up on this and accepted Eden Markus as he is, severely mismatching skin tone and all.

When moved in ways this model was not intended to move, some of his internal biocomponents stick out of the skin. With still images, I clone or heal these blemishes away in GIMP. With videos, I just let it go.

And the big one. When Markus is model-swapped, his auditory processor, eye, and legs do not load in like they do at the end of the chapter and on one of the gallery variants. The method I use to accomplish this was taught to me by a couple of modding friends and is not my information to share.

When I load the lower legs in, these lines remain. I don't have the power to get rid of them at this time but if someone else figures it out, I'd be curious to learn. But, for the time being, I choose to adopt @my-name-is-markus-with-a-k 's headcanon that they are scars from his ordeal in the junkyard.
And thus concludes my TedTalk. If you use this information in the future, I would kindly ask that you properly credit me. I put many hours of testing over the past few months into this project, and I would appreciate the handful of extra keystrokes it takes to point in my direction.
Thank you for taking this little journey with me into the makeup of our beloved doofus.
82 notes
·
View notes
Photo


A Handsome Markus + Journalist North WIP Freecam Mod I’m working on. Kamski’s house is swapped with its daylight map, which makes for a very beautiful setting.
Credit to Vrtuellereality/Ellellebe and Cereal on Instagram who taught me how to swap maps!
49 notes
·
View notes
Photo

I’m not bringing back Kamski no more, this chapter stays with Gavin’s model now.
883 notes
·
View notes
Text
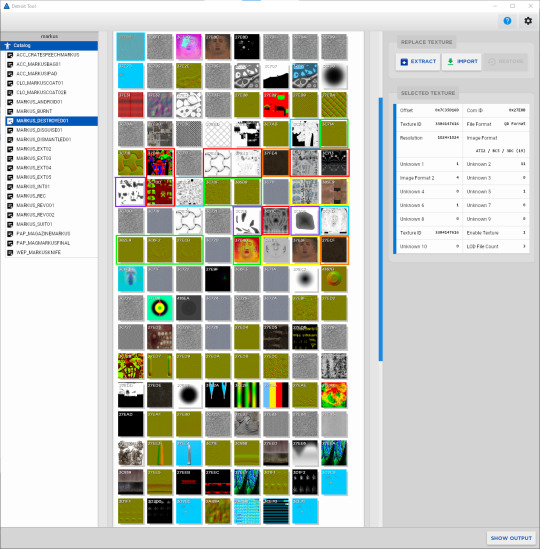
Textures and Texture Maps
The Detroit Tool is useful for displaying Detroit: Become Human's textures in thumbnails, along with associated information.

Keep reading for more information.
Types of Texture Maps
Diffuse/colour map. This applies colour to your model.

Roughness/Glossiness map. These maps are in greyscale or two-toned. White means maximum glossiness and black means maximum roughness. This determines how reflective your model is.

Bump map. These maps are in greyscale. It creates illusion of bumps without affecting the geometry of the model.

Metalness map. These maps are in greyscale. Black and white values dictate what is considered metallic (white) or not (black).

Normal Maps. These maps are typically purple but can come in green. The different colours dictate how light reflects on the model's surface without actually changing the geometry of the model.

Displacement maps. These maps are typically in greyscale. They are used to change the geometry of a surface to give depth, like pushing bricks out from a wall or carving cracks into a road.

Opacity map. These are typically greyscale and are used to make parts of your model transparent, like tree branches and grass.

File Types in Detroit: Become Human
DDS format. DDS stands for Direct Draw Surface. These textures can typically be replaced through IMPORT without having to change similar textures in other containers. QD format. This is specific to Quantic Dream. If replaced, these textures may crash your game since these assets are typically shared between models. To prevent crashing, replace all necessary files.

Tips:
GIMP or Photoshop is recommended.
Export your DDS image upside-down because it will flip when you import it into the Tool.
Remember to match its compression to the Image Format. For example: DX1 / BC1 (5).
If you need to export something as DX10 but your editing program doesn't allow that, instead use DX1. It works the same.
Related:
Download and Set Up the Custom Texture Tool
Sources:
What are texture maps? on webdew.com Other image sources:
Normal Map on docs.unity3d.com
PBR Texture Conversion on marmoset.co
File:Displacement Mapping.jpg on commons.wikimedia.org
THE PBR GUIDE BY ALLEGORITHMIC - PART 2 on substance3d.adobe.com
Bump-mapping on en.wikipedia.org
Different maps in PBR Textures on a.23d.co
Dead Tree Alpha Stock Photos on 123rf.com
2 notes
·
View notes
Text
This is what happens before his programming tries to take over 🤣
77 notes
·
View notes
Text
MODDING DBH (7) - SWAT CONNOR PROGRESS
Hello everyone and
Dear Diary
Welcome to another mod diary! If you missed it, here is my previous one. It’s 30/01/2023 and I whispered to my computer screen, “Oh my McFuck, I figured it out.”
Behold my progress:
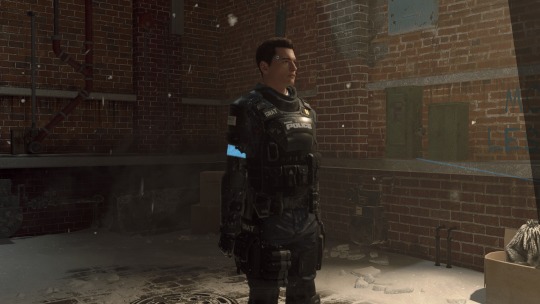
I’m absolutely feral over this.
But this is unclean because I still have to edit the code more since you can still see Connor’s suit and things. Please don’t save these pics! Better ones will come! I’m so excited to do a full photoshoot with him when he’s ready!
I can’t believe that a month ago, I could hardly imagine wading through screens like this:
Keep reading
73 notes
·
View notes


Text
How to create your own custom textures for Detroit: Become Human (Epic Games + Steam)
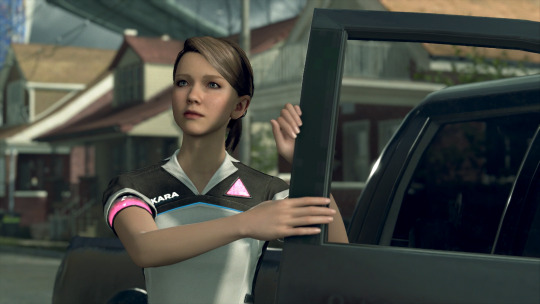
Some people have been asking how I get the dbh models to look like this in my game:
So today I’m going to break down how to manipulate the textures in the game with deadray’s custom tool and how to avoid crashing.
Before we start with the tutorial, we require several tools. The dbh custom tool found on the website linked above, a texture exporter tool and an image converter which you can find and install in the “resources” folder I’ve prepared here.
PART 1: RECOLORING CLOTHING & ACCESSOIRES.
The character textures we want to change are in the tools “catalog” section. You can locate any specific model by typing their name into the search function, we are going to start with Kara. Kara uses mostly DDS textures which won’t cause trouble in your game, while Alice and Connor for example use mostly QD textures which will cause crashes if not used correctly.
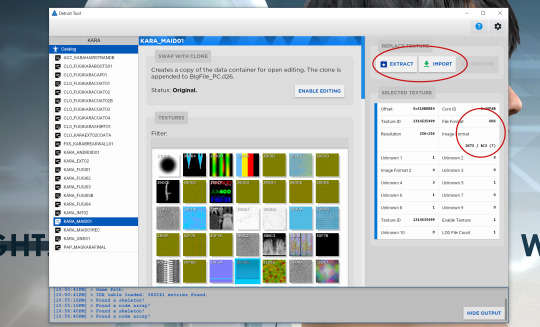
Once we’ve searched for KARA, the catalog lists all of her models. Here I have opened the section “maid” which is her standard outfit and selected her armband. To change the texture, we select to “extract” the file and pay attention to the required image format listed on the right side of the panel. Her armband is listed as DTX5 / BC3.
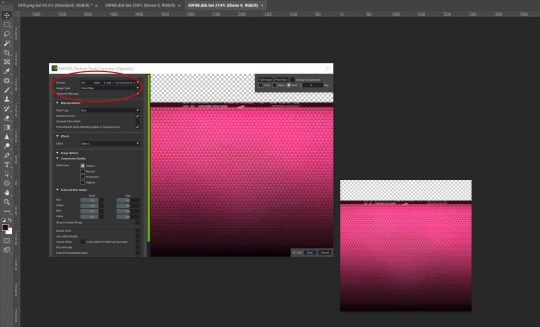
Once you have installed the Nvidia Texture Exporter, launch Photoshop and open your exported DDS file. (Btw, the texture tool can’t be installed with a cracked PS version, so if you can’t purchase PS then Gimp will also work.) In Photoshop, I have recolored the blue armband to pink and I save my new file, selecting the “DDS - Nvidia Texture Exporter” under “Data Type”. The Texture Exporter will open in Photoshop and ask for the required DDS image format. I select BC3, as listed by the custom tool, and click “save.”
Now you need to insert your new file into its respective thumbnail by selecting “import” in the custom tool. I have changed Kara’s triangle in addition, which is the same image format (BC3) as her armband. Close the tool, open your game and voilà, Kara is now sporting preppy pink android markers!
PART 2: OVERWRITING FONTS & SERIAL NUMBERS.
To change fonts and serial numbers, we simply need to paint over the file’s original letters and overwrite it with something else. Here you can see an example of Connor’s original model identification marker and my custom marker. You can blacken out the whole thumbnail if you want to erase the markers on the jacket altogether. The image format for this particular DDS is DTX1 / BC1 and you can find it in the catalog under CONNOR_HOSTAGE, CONNOR_INT02 and CONNOR_WAR.
CONNOR_INT03 is NINES, so don’t change those files unless you want to overwrite Nines’ markers as well.

Serial codes can be swapped and overwritten in a similar fashion. The RK models all draw their serial numbers from the same file. In this example you see I’ve swapped the serials of Connor-51 and Connor-60. The image format for this particular DDS is DTX1 / BC1.
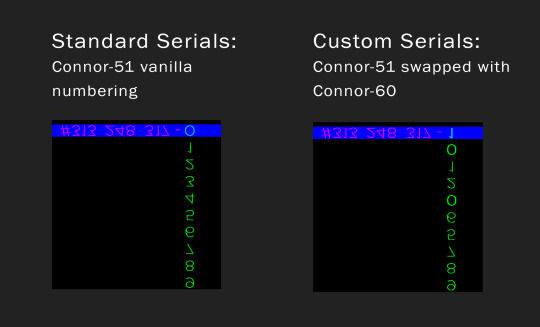
However, a swapped serial won’t update accordingly with every death within in the game. If you were to do a death run starting with -60, the serial bugs out at death five because of the modified starting number. -65 becomes -66 instead because -55 can’t be overwritten.
PART 3: EXTRACTING AND IMPORTING QD TEXTURES.
Don’t start with QD textures unless you’re already experienced with DDS textures or don’t know what you’re doing. Otherwise I guarantee you will break/corrupt your game files. Always have a backup of your original files on your PC in the case of corruption. QD textures are usually shared between various different models and need to be updated within every single model in the game that uses the same texture. Otherwise, your game will crash.
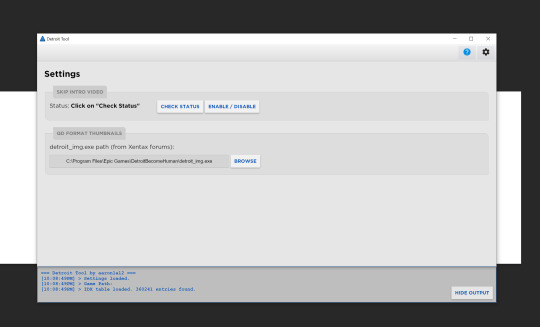
First things first, open the tool and add the detroit_img.exe in tool settings in order to display QD texture thumbnails.
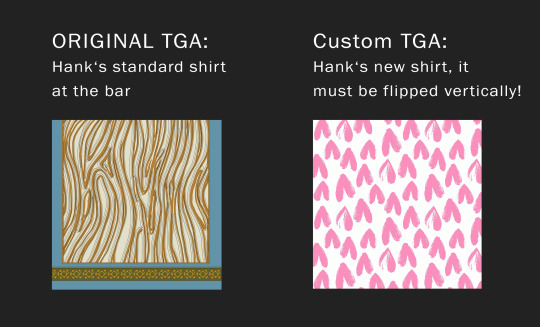
We are going to change Hank’s intro shirt for the QD example. All of Hank’s shirts are shared between HANK_INT01, HANK_INT03, CLO_HANKSHIRT_01 and CLO_HANKCLOTHESBALL. They are DTX1 / BC1 QD formats. In order to export the texture, we need to unlock “enable editing” on top of the catalog chart.
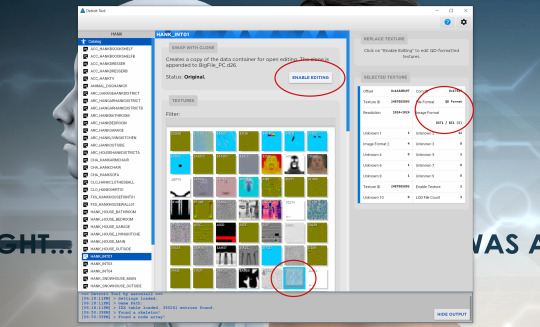
To export and edit QD files, it’s important to “enable editing” in each catalog section you want to modify. QD files are exported in uneditable data format. Drag and drop this data file into the detroit_img application to convert it into a TGA file. Open this TGA in Photoshop or Gimp and flip the new image vertically before you save the edited file as a DDS.
Afterwards you need to import this new DDS into each thumbnail that used the original QD texture. After I imported the first custom DDS into HANK_INT01 its thumbnail will turn black in every other section and needs to be refreshed. Therefore remember the position of your original thumbnail or note their file names in order to find them again later. If your game starts crashing because you haven’t refreshed every shared texture, selecting “restore” for the thumbnail won’t work for QD files. So it’s always important you have backed up your game files in case something goes wrong.

For beginners, stay away from QD eye colors since they are shared with lots of random NPC. (If you’re absolutely itching to edit the eyes, you can message me and I can send you a list of known NPC who shares it with them).
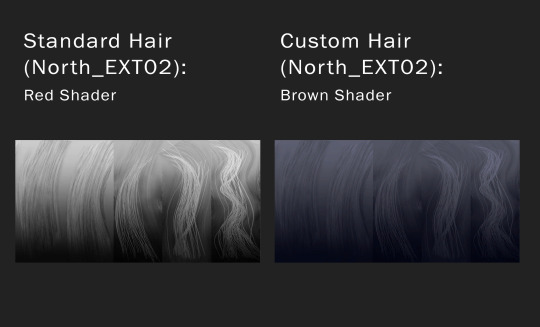
PART 4: COUNTERACTING SHADERS.
Some texture have an inaccessible colored shader assigned, meaning your own recolor and this shader will combine and create an entirely different color. We don’t want that, so we need to counteract the shader’s color preset. An example is North’s hair for EXT01 and EXT02, both are assigned a red shader. To turn her hair brunette I’ve recolored her hair texture into a soft blue and lowered the lightness to counteract the red.
Some color shaders are accessible to you, like the hair coloration of Echo (blue) and her girlfriend Ripple (reddish). Her shader looks like this:
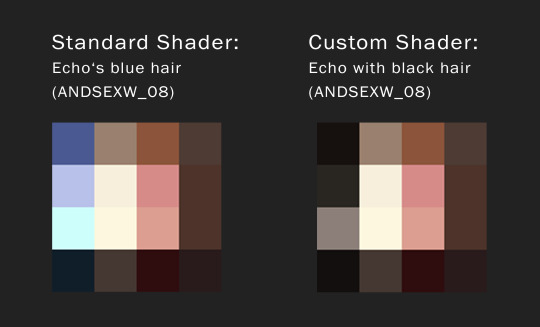
In Echo’s case, I’ve turned her hair black just by recoloring the blue-ish section and left her actual hair texture the way it is. I don’t recommend recoloring these type of shaders with android uniforms unless you only want to take photos, as it will take a toll on gameplay and cause a slight lag (same goes for editing facial textures with heavy make-up).
I hope I managed to explain the tool in a somewhat comprehensible way. This is all old news to me by now, but I remember it was incredibly hard to understand back when I was a newbie with modding dbh. If you have any specific questions about the custom tool that I haven’t addressed, or if you get stuck with a texture and don’t know how to procced feel free to chat me or comment under this thread! :)
158 notes
·
View notes
Photo

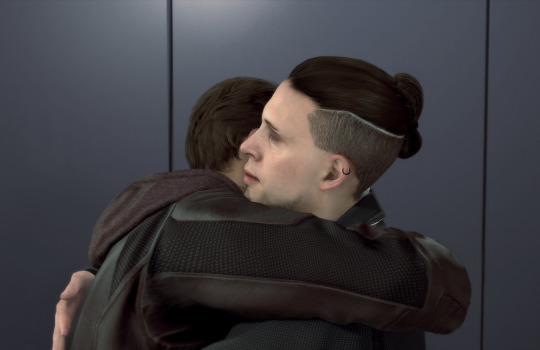
Sometimes a silent hug is the only thing to say.
403 notes
·
View notes
Text
All Tutorials by DBH Mod Archive
#getting started
Model Swapping: Browser Download and Set Up the Custom Texture Tool
#skills
Bits and Bytes How to Read a String Textures and Texture Maps
1 note
·
View note
Photo


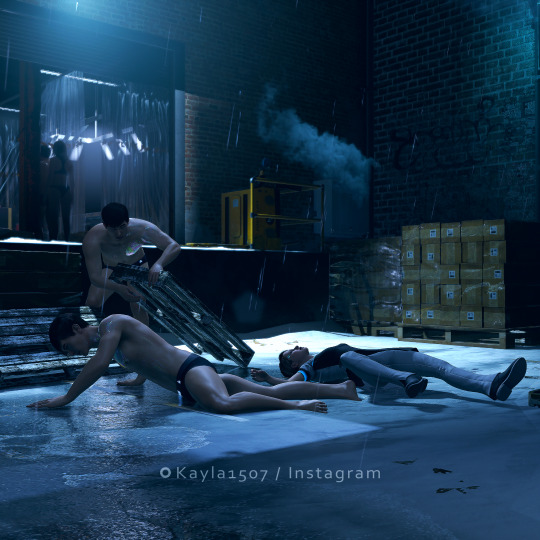


Kara sent by Cyberlife [ Eden Club #2 ]
Kara versus two scantily clad boys.
87 notes
·
View notes
Text
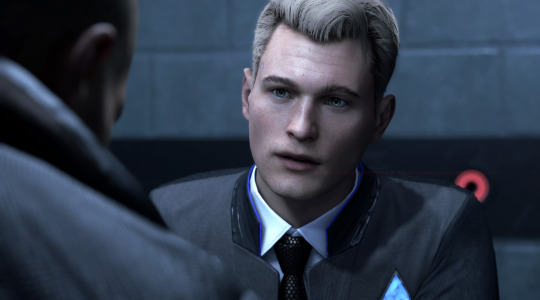
The full version of the animation used for Connor looking at himself in the mirror.
(photomode mod by Otis_Inf)
473 notes
·
View notes
Text
How to Read a String
Strings are 28 bytes of hex code that can be split into sets in order to easily identify what you're working with.

Keep reading for more information.
You have seven sets of hex data (28 bytes) that looks like this: XXXX XXXX XXXX XXXX XXXX XXXX XXXX Except these are actual numbers, so Connor's infiltration model looks like this: 00 00 00 1D 00 00 00 01 00 00 1C 80 6A 22 78 00 00 B8 5A 9E 00 A8 79 9C 00 00 00 13
The first block is the data type for models and props. 00 00 00 1D
The second block is undefined. If anyone has any information about its role, please contact DBHMA. For now, consider it a spacer. 00 00 00 01
The third block is where the code starts to vary. That's the ID of whatever you're looking at. For CONNOR_DISGUISE01, it's: 00 00 1C 80
The fourth block is the offset of the data itself. For connor_disguise01 it's: 6A 22 78 00 You can get rid of whole models by replacing the offset block with 99 99 99 99, which tells the game to "look into the void" for the object, instead of a correct location in the files.
The two blocks that come next are the file sizes. They tell the game how much data to expect so it knows where to start (the offset) and where to end (after the two file sizes).
The last block, in this case 00 00 00 13, is which file the game looks in to draw the data. It would be BigFile_PC.d13. > 00 would be BigFile_PC.dat > 01 is BigFile_PC.d01
Sources:
Tutorial replicated with permission from Trinity.
Original instructions by Ami.
Related skill (by DBHMA): Bits and Bytes.
1 note
·
View note
Text
SWAT Connor: Tactical shots (part 14)


Please don't save my screenshots and post them elsewhere. <3
Related:
Learn how to create SWAT Connor for yourself here. See my mod learning progress and how-tos here. See other gallery stuff here.
28 notes
·
View notes
Text


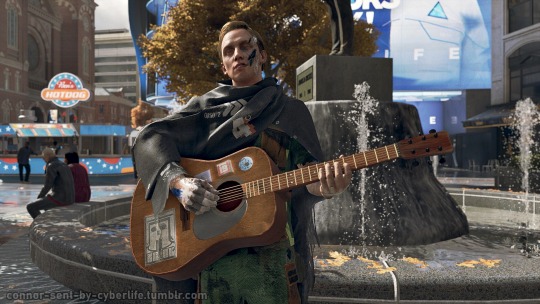
When Deviant!Connor gets badly damaged during the revolution, CyberLife doesn't bother to send a new one. They send the new RK900 instead. Connor ends up at the junkyard, sure that this is where his new deviant life will end. He's wrong...
(click for better quality)
533 notes
·
View notes
Text
Bits and Bytes
Each number is a unit of data that a computer can process and store. Detroit: Become Human utilises hex code.

Keep reading for more information.
One digit = a bit.
Two digits = a crumb.
Four digits = a nibble.
Eight digits = a byte.
Sixteen digits = a word.

Binary code is a base-2 system. It has digits that range from 0-1. (0, 1.) Decimal code is a base-10 system. It has digits that range from 0-9. (0, 1, 2, 3, 4, 5, 6, 7, 8, 9.) Hexadecimal code is a base-16 system. It has characters that range from 0-F. (Since digits can only range from 0-9 before they repeat, the alphabet is used. 0, 1, 2, 3, 4, 5, 6, 7, 8, 9, A, B, C, D, E, F.)
Detroit: Become Human utilises hex code, which means that it uses fewer digits to store more data. A hex character represents 4 bits. A byte is 8 bits and is always represented by 2 hex characters.
6A <- 1 byte
Sources:
Tutorial replicated with permission from Trinity.
Image and information: Bit, Bytes and Pixels information website.
Information: How Bits and Bytes Work.
Information: Understanding Different Base Systems.
ASCII character chart.
1 note
·
View note