
Weekly documentation of my semester under Professor Robert LiKamWa (ASU Arts, Media + Engineering) iterating a reliable workflow for the creation of completely mobile, browser-based (Web,) Augmented Reality (AR,) experiences. The goals are to publicly showcase the failures and successes behind cobling together a workflow built around 3D Networked Virtual Environment authoring tools (i.e.Gravity Sketch, Adobe Substance 3D, and Niantic 8th Wall) that are available to me as a student today at ASU, Herberger Institute of Design and the Arts.
Don't wanna be here? Send us removal request.
Statistics
We looked inside some of the posts by dmgreenw-asu-cap2 and here's what we found interesting.
Average Info
Notes Per Post
3
Likes Per Post
3
Reblog Per Post
0
Reply Per Post
0
Time Between Posts
7 days
Number of Posts By Type
Text
15
Last Seen Tumblr Blogs


Fun Fact
70% of Tumblr users say the Dashboard is their favorite place to spend time online.
Text
WEEK 14: Art Piece #2 , "Unnamed" Until Distributed.
0 notes
Text
WEEK 13: The Making of a Finished Art Piece. From Galleys to Gallery on “Symphony #5.”
0 notes
Text
WEEK 12: Working With Spatialized/Attenuated/Ambisonic Sound Files in Quill and Learning to Optimize in Oculus Media Studio to Leverage the New Positional Audio in PrintCAST AR Experiences.
youtube
2 notes
·
View notes
Text
Week 11: Fun With Optimizing Quill .FBXs & Gravity Sketch .OBJs in Blender and Adobe Substance for WorldCAST WebAR Publishing. Fun but Challenging!
0 notes
Text
WEEK 10: Mastering Live Animation in VR with Quill For WebAR
0 notes
Text
WEEK 9: <<SPRING BREAK>> ...or How to Piss Off Your Friends by Wearing Nerd Goggles Learning Quill in the Hotel Room When You're Supposed to be at the Beach Hanging Out with Them.
As I am often known to do, I did a bit of a working vacation this Spring Break because I was as excited to get a chance to learn how to use Quill by Smoothstep as I was to hit the beaches of San Diego.
youtube
I have been dying to try it but never had a computer that met the specifications neccessary to use it until I got my MSI GF63 with the Nvidia GTX 3060 and intel i7.
youtube
Until now I have lusted after the ability to create experiences like Sam Luck's "Day of the Dead"(seen here) and to be able to create brilliant immersive, live 3D animations completely in VR that can be imported into WebAR authoring platforms like WorldCAST. The learning curve is a little steep but luckily Sam, and other pasionate and generous Quill Artists, have explained their processes in detail.

Of course I could only scratch the surface of what Quill can do during Spring Break but what I showed my friends was enough to amaze them and get their forgiveness for my nerdiness when I should have been hanging out with them more at the beach. :)
I can't wait to see how it improves the experience for pieces like Porch Light in Week 10.
0 notes
Text
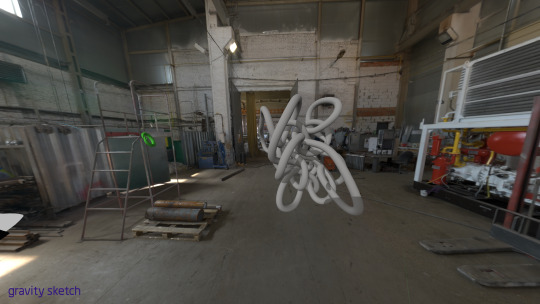
Week 8: Now We're Gettin' Some Where!
With a pretty reliable and streamlined workflow I can now get down to the process of creating WebAR experiences built upon my existing studio work. This webAR experience is built upon an action painting I did called "Porch Light" where the abstract line work is intended to simulate the frenetic and caotic movement of bugs flying around a light source.
I'm creating 3D line work in Gravity Sketch over the actual painting in my studio in real life (IRL) and in real time. When I am happy with the result I simply export it as an .obj from my Meta Quest 2 to Gravity Sketch cloud, download the model from Gravity Sketch Landing pad web site to my Laptop, import the 3D model into worldCAST Print Studio website, adjust slightly in the builder, add glow and rotation, publish, and experience:
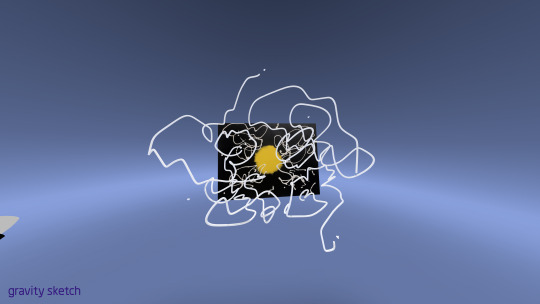


And there you have it! As close to instant WebAR Gallery experience as you can get! Of course it took many iterations over the course of the week to get to this point but yeah, Viola! ;D
But seriously, now comes the hard work of creating actual animated 3D models over real life gallery pieces. For that I may have to use another great VR application called Quill, instead of Gravity Sketch, which will give me the ability to animate in VR in real time and then export it out as an .FBX. WorldCAST can now import .FBXs instead of having to convert files to .GLBs which will help avoid an extra step and whole batch of possible artifacts.
Onward down the road to end of semester Gallery WebAR show where I intend to have completed at least 4 finished professional pieces, filling the existing 4 frames on my studio wall, that will exhibit the potential of WebAR as a serious art medium.
But first lots of practice. ;)
0 notes
Text
Week 7: How to Transform a 1 Bdrm Apt Kitchen / Living-Room space into a Working Studio for Gallery-Grade WebAR Art Workflow
So now that I found a workflow that will allow me to augment my Gallery Art with WebAR experiences I now needed as professional a work space as possible to create at least 4 gallery grade AR Art pieces by the end of the semester. No easy task and a lot of work but worth it in the end.
Since I recently lost my stand alone art studio, where I had worked for over 10 years, I also had to integrate its whole contents into my 660 sq foot 1 bedroom apt. So the little overlooked corner of my apartment, where I stored my microwave, easel, and occasionally documented / worked on pieces at home…


…not only had to transform into a new working studio, but also had to somehow accommodate all of the tools, art supplies, and various other materials that come along with 10 years of professional work in a rented art studio…


So I got track light, bullets, lamps, removed the ceiling fan, and after 4 days…


I achieved a professional level working art studio in my 1 bdrm apt that can support WebAR gallery grade art!


0 notes
Text
Week 6 : The road to WebAR Just Cleared! A No-Code Alternative to Adobe Aero and Niantic 8th Wall That Just Works, Finally!
After a week of coding with AI tutors in WebGL on the IDE and A-Frame.js coding in Niantic 8th Wall platform this week I got so sick of hopelessly breaking existing projects with every modification of the code. So in desperation I threw a Hail Mary by turning to Perplexity AI, which I strongly endorse for no nonsense sourced info, if it knew any other WebAR alternatives I hadn't used yet.

low and behold Perplexity AI turned me on to WorldCAST AR, an IBM partner. I knew of WorldCAST as a stand alone AR app, like all the others, since 2014 but unbeknownst to me it went fully WebAR a couple years ago under my radar. Thanks Perplexity!
WorldCAST is easy to sign up for for, is designed to be Drag and drop WYSIWYG interface, and comes with an elegant browser-based 3D model editor -connected to Sketchfab to supply countless free, 3D models for newbies.

Most importantly, WorldCAST doesn't charge by the view and costs nothing to use with watermarks and banners, so I'm not afraid to design experiences with scale in mind. Hooray! So I'll pay the $10 a month to remove them for my end of semester show and enjoy the fact it just works!
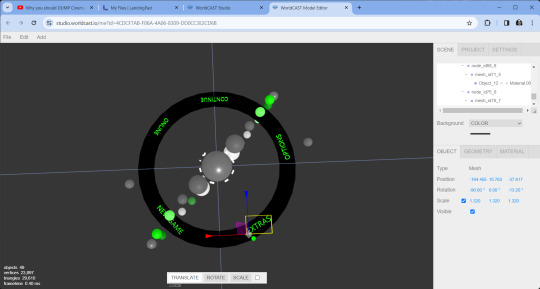
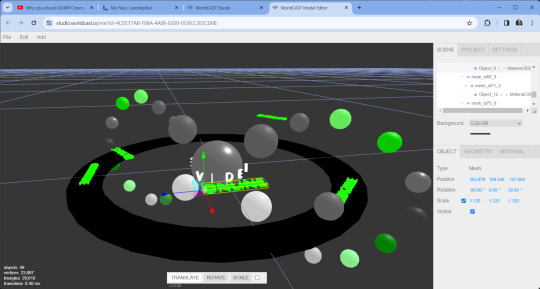
Over the week I built a simple animated 3D model of a futuristic AR Game UI, turned it into a .GLB, imported it into WorldCAST and connected it to a 2D image of a 3D sculpture I made as the visual target for the AR experience. WorldCAST let me edit and preview in real time right in the browser so there was no going back and forth from Cinema4D or Blender.
the simple browser based 3D model editor makes it easy to iterate by makeing incremental adjustments to the model, publishing, quickly trying the experience, making another quick adjustment, and so on until it looks the way you want...or at least works well enough. Here is the best results from Week 6:
After 7 Months of trying I finally found a WebAR build and publish platform that just works with my VR 3D workflow, no coding neccessary and no limitations. Week 7 will be focused on creating framed Gallery pieces for my end of semester show that incorporate elements of target based AR in a way that is organic to the piece rather than as a gratuitous novelty in what passes as AR Art today, this for example:
Stay tuned!
0 notes
Text
Week 5: Resolving Pinch Points in the Workflow!
Last week's workflow test brought to light my Adobe Substance Painter and 8th Wall AR builder skills, among others, needed special attention in week 5 to know that this work flow is going to work to attain my semester objectives.
For Substance Painter I am putting the hours into tutorials until I have a better understanding and proficiency for adding textures and materials to my Gravity Sketch/ Substance Modeler models optimized for WebAR.
For help with the coding part of 8th Wall projects I decided to look for an AI Code advisor to help wrap my mind around what all the lines of code in 8th Wall example projects do exactly so I can better understand how to modify them and avoid reinventing the wheel every new project.

There are many starter projects for each type of WebAR project from which to choose from in my account available to me as a paid subscriber
Ultimately I hope to teach myself to code my WebAR projects from scratch to publish WebAR expereinces directly from my own servers to avoid the limitations on numbers of projects, numbers of views, and tier fees that just about every AR platform, 8th Wall is no exception, charges me to publish.
So I went directly to futuretools.io, a trusted reference site run by Matt Wolfe, @mreflow AI futuretech and digital marketing guru on YouTube, where I found two AI Code assistants that looked promising: Amazon CodeWhisperer And Codium.
Because they both needed to be run from within a Code Editor (IDE) I looked for the easiest and most versitile one that allows integration with these Ai code tools.
Visual Code Studio, an IDE used by over 70% of WebGL developers, fit the bill perfectly. I was able to integrate these two Ai extensions, and many others needed for WebXR development, quickly and easily.

Visual Studiio Code with its easy AI extension integration
After installing VS Code all I had to do was open it, go to the AWS Toolkit install page in Chrome, hit the install button, follow the link to create a free AWS Builder account, and CodeWhisperer was immediately ready in VS Code. It promised; explanations of what a line of code or code function does, answers to questions about general programming concepts, help writing unit tests and code, debugging and fixing of code, and refactoring (simplifying) of code!
Then I went crazy and installed any extension WebXR related available in VS Code (i.e. A-Frame Autocompletion, Debugger for Java, Python, Pylance, Language support for JAVA by red Hat, Shader Languages support vor VS Code) to support any 8th Wall projects I copy and paste into the editor to help me understand what each line of code was doing for the project and then get suggestions as to how to modify them. I was even able to easily install Microsoft’s AI-assisted development extension IntelliCode, and Codeium:AI Coding Autocomplete
Then I copied a line of code from an example 8th Wall project, that I imported into the VS Code editor, and pasted it into the Amazon Q chat box with the question:
”What does this line of code do: xrweb="allowedDevices: any"?

8th Wall Flier Target Project copied and pasted into VS Code and the line in question highlighted
To which AmazonQ responded:
”That line of code is setting a parameter called "allowedDevices" to the value "any" in WebXR.
The WebXR API allows developers to create augmented and virtual reality experiences in web pages. It provides access to VR and AR hardware like VR headsets and AR glasses.
The "allowedDevices" parameter specifies which types of XR devices are allowed to be used. Setting it to "any" means both immersive VR headsets and AR platforms can be used.
Some other common values for "allowedDevices" include:
"vr": Only allow VR headsets like Oculus Rift or HTC Vive.
"ar": Only allow AR platforms like HoloLens or Magic Leap.
"vr-position-tracked": Allow VR headsets that support positional tracking.
So in summary, the line of code "xrweb=”allowedDevices: any" is allowing the WebXR experience to support both VR and AR devices, giving the maximum flexibility and compatibility. It allows the content to be viewed on any type of XR hardware available to the user.

So that's what that line does! The easy to use Amazon Q chat bar within VS Code.
Hooray! AI code tutor whenever I need help while I code WebAR projects in VS Code!
0 notes
Text
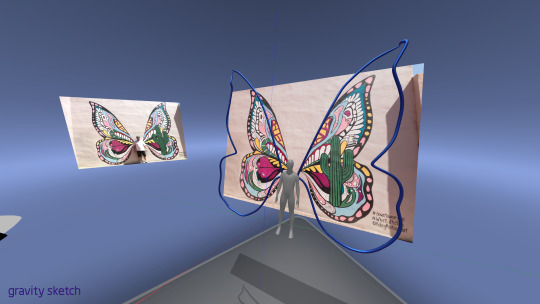
Week 4: Keepin' an Eye out for Potholes and Vicious Dogs.
In addition to bettering my in-world VR building skills, this week’s leg of the journey has been completed with an eye on the over all workflow needed to reliably produce up to 5 pieces for the semester showcase. That is going to take a worfkflow down pat to knock 'em out in the last quarter of the semester.
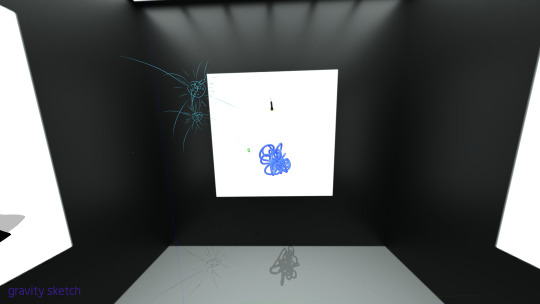
First decent Right Wing build, after many hours, in Gravity Sketch
As stated in the first post, there are many steps involved in creating a working AR experience for the user, and I want to get an idea of where the difficulties may lie before I get too attached to any one particular methodology.
Right wing exported out of Gravity Sketch from the Quest 2 uploaded to the cloud and to Landing Pad on my laptop to be used in Adobe Substance Painter
I don’t want to fall in love with building shiny subdivided geometries in GravitySketch just to find out they don’t work well with Niantic 8th Wall’s AR build and publish system.
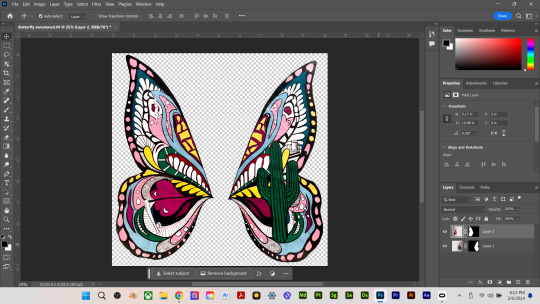
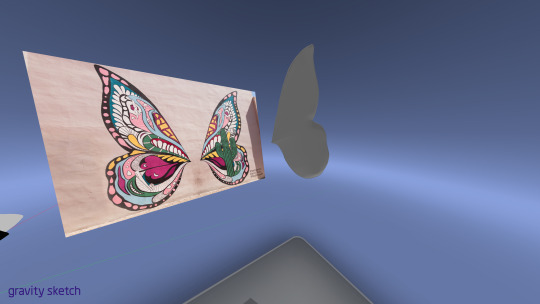
Turning each side of the Mural's wings into .png with transparent alpha channels to map onto the .obj models for the finished AR project.
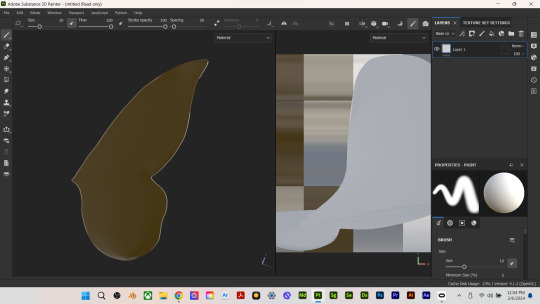
Raw right wing .obj from Gravity Sketch imported into Substance Painter
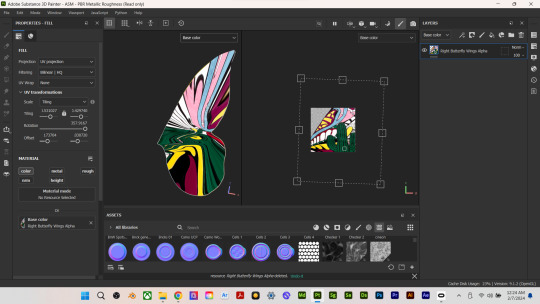
First attempt to map the .png. Needs a lot of adjustment to get it to look just like the mural,but still a small victory for a first run.
This is the time for trial and error to find the most optimized file type that demands the least amount of resource. The slowest mobile device a user may try to experience the AR piece with may crash (inadvertantly what usually happens right out of the gate when you try and demo to someone.)
Beggining of the build in Niantic 8th Wall complete with Code that needs many kinks unkinked. looks like I found the real pinch point I need to address next week.
If things aren't optimized throughout the whole workflow there will be much wailiing and nashing of teeth (or more than there was this week). So this week went well doing what we used to call preventative error trapping.
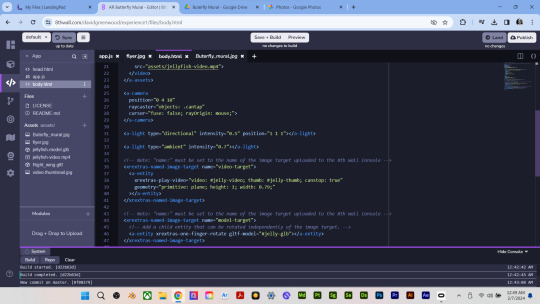
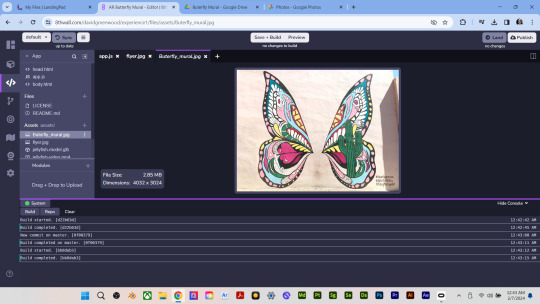
Looks like Gravity Sketch -to- Substance Painter - to - ?Cinema 4D? (didn't have time for this week) -to - 8th wall (with optimizers and graphics in there when needed) is a viable process. Unfortunately I didn't have enough time to get the Butterfly Mural AR project working well enough to publish but as long as the components like the .Gltf and targets are being accepted by picky Niantic servers (which they were) I have high hopes.
On target! I hope to see that first proof-of-concept Butterfly mural AR project flapping away by next week and then it's on like Donkey kong! :)
0 notes
Text
Week 3: WebAR Experiences are Made to be Mobile So You've Gotta Be Able to Take It On the Road to Build 'Em!
Knowing that to eventually make the wings on the Buterfly Mural in downtown Mesa seem to come to life behind the user of my first location-based WebAR project this semester I'll need to be able to iterate this and other projects on site. That requires a lot of gear. So it has to be as easy to carry and well organised as possible so that I have everything I might need but I don't suffer like a Himalayan Sherpa. Thank God it's not Summer right now! :D

WebAR Jump Bags: Location Gear.
So as practice for packing all the gear I'd need for ANY location based session I decided to pack up everything I thought I needed to go to my production partner's place and introduce him to Gravity Sketch (on his unused Quest 2) and the world of Immersive VR, 3D object and world building, GS Colab Room designing on the same project in real time, and hopefully perfect the Virtual Camera Method of documenting it all that I dedicated myself to mastering by this week.


Greg Szimonisz of SPINX Digital's and my Location Set up.
The setting up of a colab room in Gravity Sketch and using the same physical space in real-time to build together went really well! My long time production partner, Greg Szimonisz of SPINX Digital, L.A., was really excited about the possibilities and for the first time saw a professional pre/post production use case for the Quest 2 gathering dust on his closet shelf for the last year. We both now know enough from this apparently vital step, of working out all the bugs in person together, to remotely work together on 3D scenes and objects for import into other 3D optimization programs. Greg now agrees there are all sorts of potential projects we can use Gravity Sketch in our workflow including in Unity/Unreal cinema pipelines, WebAR advertising campaigns, or 3D Product visualizations for clients.

Our initial collaborative studion environment for the session and our first attempt at acollaborative modern art piece.
One of the many great things about collaborating in GS, we have found, is that we can not only work together in real-time from any where in the world, with good Wifi, but that all of out builds are "persistent" within the GS colab room we create for each project. What that means is that we can come and go to review and make changes, to what we colaborated on or have been made in our absence, that stay as they are left every session non destructively.

Mocking up a collaborative Art Sculpture in an environment!

So got a lot out of this all-day session except for accomplishing on-location, AR documentation, a la Shameless Mahem, GS Tutor from YT because ...
.....................................FAIL!

... I forgot to pack the key external web cam! D'oh!
That's why we try to make all our absent minded mistakes at practice, if we have the luxury. Won't forget the external web cam next time it really counts, hopefully. Thankfully it wasn't on an actual gig with the client looking at his watch and questioning having hired us.
When packing for an emergency bug out, a film shoot on location, or an Itterative WebAR session, You never know everything you're going to need till you get on location and get to work. So it is a luxury not usually afforded a commercial project. That's why I love school projects! I get to do extra to ready myself for every concieveable eventuallity that challenges difficult art forms where there are no field manuals...yet!.

So I had to go it alone when trying to master the Mixed Reality technique so vital to best use case AR documentation. After many many hours of frustration I believe I have become decently proficient at the three week mile post, as planned, but it ain't for the faint hearted. Fur Sure!
The Work flow that eventually ended up delivering halfway decent results, after many attempts with green screens and juggling nerd goggles and laptop simultaneously was more or less the 10 step method lined out in Capturing Gravity Sketch workflows in augmented reality. Except that what they didn't tell me there, and it took a few days in other AR forums to figure out, was that to initialize Gravity Sketch ap on the laptop, while Oculus link is enabled to the Quest, requires that it be done directly from the executable on the C: Drive, or where ever the Oculus program's Software/software/gravity Sketch folder is. If you try from within the Library in the Quest or Laptop Occulus Ap you will get a deadly "Unsupported System for Rift" error message which will stop all progress with no way forward!
In fact, I got so frustrated I had to stop for the day and start the next, after I had cooled down, or (Skreed warning!) I would have thrown my laptop out the &$?!?'n window because I couldn't believe I paid all that money for an RTX 3060 i7 gaming laptop that did not meet the minimum requirements for VR even though I was so SURE it would after months of research!! :(
youtube
Anyway, all the extra effort was worth it! I succeeded in mastering Mixed reality Capture Documentation and in setting up a remote colab workflow with a producing partner. That leaves only to get proficient enough within Gravity Sketch to quickly build and export .OBJs or .FBXs for texturing, optimization, and animation for the next semester milestone .
Thank you for reading! WebAR you next time!
0 notes
Text
Week 2: The Road to WebAR Travel Companions are Technical Difficulties, Learning Curves, and Endless New XR Workflows, & Fun!
(First lesson, make sure your Tumblr posts are on "Publish" instead of still on "Draft" to avoid late posts! :D)
XR 3D authoring tools like Gravity Sketch (GS) and Substance Modeler (SM) are tantalizing in their promise yet come with some pretty steep learning curves in this stage of their nascent development. Both currently sport controls and tool menus that're far from intuitive.
I'm betting my time, however, that it will be so worth the efforts to reach a basic level of proficiency as fully immersive Networked VR world building, at real-life scale, has been the holy grail for half a century and is finally here!
Case in point, all the new Walkabout Mini Golf experiences made by the former Disney Imagineer Don Carson's team at Mighty Cocunt for Meta Quest. Courses like the one below were built in Gravity Sketch and are frankly mind blowing in their balance between low poly and creative limitation wrangling of limited resources. For the Quest 2 the results are much better player experiences than they have any right to be and point to the potential of Gravity Sketch to help creators transcend technological limitations!
youtube

Though these very powerful authoring tools offer so many alternate ways to author in 3D based on prefered way of working, there are obscure tool sets nested in toolsets. So much so that they will overwelmingly thwart most, accept for the most driven, trying to reach a professional entry level of proficiency, and could easily fill a whole semester class curiculum of nothing but GS or SM.
I am determined and have spent a good deal of time optimizing my room scale authoring workflow to make it as easy and efficient to learn fast and guarantee the highest and most repeatable quality output:


Most GS artists I have learned from tend to focus on a select number of major tools and techniques that work for them (i.e. Subdivision modeling Vs. Ink and Stroke tools) and forgo the rest. Likewise, I plan to master the methods neccessary to both wrap my mind around what they are capable of and then become proficient in the techniques needed to complete just the projects I want to accomplish within the scope of this Capstone. the rest will be there to enjoy later.
For next week's blog I plan to have mastered the Virtual Camera techniques used by one of my favorite YouTube Gravity Sketch Tutors, Shameless Mahem, as seen in his video "Teaching Gravity Sketch: Cut Holes In Shapes." Then I can avoid casting from the Quest 2 to my Google Cromecast on my tv, Shooting inworld with my iPad and me with my Pixel 2 seperately, uploading to the cloud, and editing different streams in Premiere before sharing it. Heck I may even be able to stream live to Twitch if I want!
Anyway I plan on being proficient enough to build a decent model in GS, export an .FBX or .OBJ via GS Landing Pad Cloud to Blender or Cinema 4D for texture and optimizeing, to After Effects for animation, then into Niantic 8th Wall AR expereince builder. That workflow seems daunting but a milestone I feel reasonably certain to achieve get to within 2 or 3 more posts.
Luck has nothing to do with it, just dogged determination and Passion for WebAR expereinces!
1 note
·
View note
Text
Week 1: Welcome to my Spring 2024 Independent Focus, Capstone ll, WebAR Dev Study
The intent of my work this semester is no less than to help midwife a brand new art form into the world! A very rare occurrence in the life of any artist and I am honored and pleased to do this work at ASU’s Herberger Institute of Design and the Arts, School of Art, and Arts, Media, and Engineering.

Screenshot of In-world, real time, media streaming wall in my richly apportioned, rented, West Angel Manor office in Second LIfe (streaming my VirtualWorldsInitiative.com website) during Virtual Art Education Research phase at ASU AME c.a. 2013
My desire to be in the vanguard of a nascent art form with eventual historical importanceas some of my Art heroes like Keith Haring or Pablo Picasso that dealt with the immediacy and 3 dimensionality of the line in action, the former bombing NY subway poster black with chalk and the later employing long exposure flash light trails to make AR sculptures.
In fact, all of my academic career, going back over the course of three degree programs (theatrical set design and lighting, motion picture television production, and now virtual world’s art education and technology) have finally come together with sufficient advancement in hardware and software to put me in the perfect position to see my dreams! So go big, or go home! ... Win some, lose some, suit up for ‘em all! …as my mom used to say.


My avatar (Light. Planer) in front of "Go Fish!" By Gwen Carillon,Day and night Windlight settings. — Laputa Gallery and Sculpture Garden in Second Life. 2009
My family knew that I could have been a doctor or a lawyer but they loved and believed in me so much that that indulged my passion for ART. Being an Artist has been a long and winding road full of much sacrifice and hardships, financial being one I haven't shaken yet. But I always had my heroes bekoning me forward through it all. To create new knowledge for Humanity about itself. And to that end I eschewed mainstream notions or Art and leaned into to the bastard artforms like Absurdist Theater, Performance art, Art Happenings, Action Painting, Experiential Installation Art, Neon Art, Puppetry, Experimental Film, live motion graphics (VJing,) and DJing to attain a certain degree of mastery in all of them.


Laputa Gallery and Sculpture Garden in Second Life.
And then in 2004, shortly after the amazing Nvidia graphics card came out, I discovered computer simulated, networked, fully immerive Virtual Worlds (i.e. open sim, Second Life, Othervers, etc.) where some of the best fine artists in the world were creating whole worlds full of my beloved bastard artforms without all the limitations of money, access, or physics only limited by the 2D computer screen with hopes of 3D Stereoscopic immersion in the near future.

"The Core" is a four-level art installation by Betty Tureaud at the SLEA. It offers a vibrant and interactive journey through digital art. With distinctive visual experiences and a colorful palette, it blends art with audience engagement, creating a personalized, immersive adventure that challenges your imagination.
So I dedicated myself to researching and developing VR Art with hopes that some day I could create pieces that I could lead somebody with agency and presence for a viscerally experienced piece of art unmatched by any artform heretofore known to Humanity. And I'm still chasing that dream.
youtube
Final Project for ENG 465, Great Directors Class (Professor James Barnard, Spring '14 ASU) In the style of Charlie Chaplin's ca. 1913-1915 1/2 to 2 reelers live. Improvisational performance captured in the Virtual world Second Life much like digital puppetry on a virtual set (Known as Machinima.)
And even though the superimposition of that digital world on the real world via head mounted displays (HMDs) with pass-through (AR) was a distant daydream, that day has more or less come with the Meta Quest 2 and more capable mobile devices running browsers with WebGL , ARkit, and ARcore.
This has allowed companies like Adobe and Niantic (Pokémon GO,) among many others, to create augmented reality authoring tools so people can look through their phone’s camera lens and see virtual digital art an artist has created in front of them in real life (IRL.)

The first hit multi user, Geospatial, AR game called Pokémon GO that requires the user to be able to find, install, create an account for, and login to an app on their mobile device before experiencing. Something WebAR does not require.
Adobe and Niantic walked back their support of true WebAR (no app needed) geospatial experience authoring platforms for artists like me that allowed me to offer art that is persistently (like a statue) anchored to places in the real world (my primary focus since it's release in beta by Adobe and Google 1 year ago) without the need of an app. So this Capstone ll (AME 499) will be dedicated to answering the question, "What is the best way to create reduced pain-point (no need to download and install a seperate app) direct to browser, WebAR experiences for users?"
In addition, I will document my attempts throughout the semester to create these experiences using a workflow that employs as much development immersed in VR using the Meta Quest 2 as possible. To accomplish this I will first try building 3D models in Gravity Sketch and Adobe 3D Modeler "in-world", creating custom materials and textures in Adobe Substance Painter in VR. Then I'll offline optimising in Blender and Cinema 4D, animating in Adobe After Effects, and building/deploying AR experiences with Niantic 8th Wall direct-to- browser from a QRL.
To compare and contrast throughout the semester I may explore the usefulness of other established development platforms that require the user to download an app (a huge pain point I am trying to avoid) such as Meta Spark studio, WebAR, Zappworks, Blippar, MywebAR, Vuforia, Overlyapp, Assemblr Studio, SQUARS, PlugXR and anything else that comes to light during my investigation that may be beneficial towards my goal of completely browser based AR experiences.
Here are the components of my workflow thus far:

Wing building process begun in Gravity Sketch on the Meta Quest 2 towards eventually allowing the user to experience flapping wings seen through their mobile device when standing in front of the real mural.
#AME 499#ASU#Spring 2024#WebAR#AR Art#Media and Immersive eXperience (MIX) Center#Herberger Institute of Design and the Arts#Meteor Studios#Youtube
0 notes