
Double A Ceiling Fixers Pty Ltd, based in Perth, brings over 10 years of experience to every project. We specialise in home renovations, plasterboard installation, flashing services, cornice installation, and bulkhead ceiling work. Our focus is on turning houses into homes with quality craftsmanship and attention to detail. We're all about innovation and sustainability, striving to make your space as beautiful as it is functional. When it comes to luxury and customisation in Perth, we're here to help.
Don't wanna be here? Send us removal request.
Statistics
We looked inside some of the posts by doubleacf and here's what we found interesting.
Average Info
Notes Per Post
1
Likes Per Post
1
Reblog Per Post
0
Reply Per Post
0
Time Between Posts
1 month
Number of Posts By Type
Text
5
Last Seen Tumblr Blogs


Fun Fact
Tumblr has 16.74 million mobile monthly users in the US.
Text
How to Save Money on Plastering Without Sacrificing Quality

Want smooth, stunning walls without breaking the bank? You're not alone. Plastering is essential for a polished look. But it can get expensive if you're not careful. The good news? There are innovative ways to cut costs without sacrificing quality.
This guide teaches you how to get the most from your plasterer's services in Perth. We'll walk you through easy, proven strategies to keep your walls flawless and your wallet happy. Let's dive in.
Plan to Avoid Surprise Costs
Poor planning is one of the biggest money-wasters.
Before hiring anyone, get clear on:
The size of the job
Your budget
The finish you want
The timeline
Write it all down. This helps you avoid last-minute changes that cost extra. It also enables you to communicate clearly with professionals. When you're clear from the start, you're less likely to pay for work you don't need.
Compare Multiple Quotes
Never go with the first quote.
Get at least three quotes from different plasterers' services in Perth. Look at:
Price
Experience
Customer reviews
What's included
Don't just pick the cheapest. Look for the best value. A slightly higher quote sometimes includes extras like cleanup, better materials, or a warranty.
This step alone can save you hundreds.
Choose the Right Type of Plaster
Different types of plaster have different costs. Choosing the right one matters.
Some options:
Gypsum plaster – Affordable and quick to apply.
Cement plaster – Durable but takes longer to dry.
Lime plaster – Great for older homes but more expensive.
Talk to your plasterer. Let them know you want to save money without losing quality. They can help you choose a cost-effective material that suits your needs.
Do Some Prep Work Yourself
You can cut labour costs by handling some simple prep.
Here's what you can do:
Move furniture out of the way
Remove old wallpaper
Clean walls
Patch small holes
You don't need skills—just time and care. This saves the plasterer time, which means fewer labour hours billed to you.
Ask your provider what you can handle before they arrive.
Avoid Peak Seasons
Like many trades, plasterers get busy during certain months—especially in spring and summer. You may get a lower rate if you schedule your job during the off-season. Many plasterers services in Perth offer discounts during slower months to keep their crews busy.
Bonus? Faster service and better attention to detail.
Go for Larger Jobs, Not Multiple Small Ones
Hiring a plasterer for many small jobs costs more over time. Why? Every visit includes setup, travel, and admin costs. These add up. Instead, group all your plastering needs into one big job. It's more efficient and often cheaper. Ask for a bulk discount if you're doing multiple rooms at once. This tactic is one of the easiest ways to save more.
Focus on Key Areas First
If your budget is tight, start where it matters most.
Focus on:
High-traffic rooms
Walls with damage
Areas that affect property value
This helps you spread out costs without neglecting the essentials. You can always complete less important rooms later when you have more funds. This way, you still enjoy a quality finish where it counts.
Use Reputable Local Professionals
It's tempting to hire a cheap, unlicensed contractor. But it usually backfires.
Low-cost work often leads to:
Uneven finishes
Cracks
Moisture damage
Redos (which cost more!)
Instead, hire professionals with strong reputations. If you do your research, many plasterer services in Perth offer affordable rates and quality work.
Check for:
Reviews
Licenses
Insurance
Past work examples
Spending a little more upfront can save you big in the long run.
Reuse or Recycle Materials
Sometimes, leftover materials from past jobs can still be used.
Ask your plasterer if they have spare:
Plasterboard sheets
Buckets of plaster
Tape or mesh
You might get a discount for using recycled materials. It's eco-friendly and budget-friendly. Also, if you've done renovations before, check your garage or storage for leftover supplies.
Understand What You're Paying For
Always ask for a detailed breakdown of your quote. Know precisely what you're paying for.
Typical costs include:
Materials
Labour
Cleanup
Travel
Knowing this helps you spot hidden fees or inflated charges. If something looks odd, don't be afraid to ask. The more informed you are, the better decisions you'll make. Trustworthy plasterers services in Perth will happily explain your quote in full.
Conclusion
Plastering doesn't have to cost a fortune. With planning, smart decisions, and help from the right plasterer's services in Perth, you can get smooth, professional walls without overspending. Remember, cutting corners can lead to expensive mistakes. But is cutting costs the right way? That's just smart.
0 notes
Text
What are the best practices for preparing a surface before home renovations?

Preparing a surface before home renovations is crucial for achieving professional results. Whether painting, installing new flooring, or applying coatings, a well-prepared surface ensures that materials adhere properly, leading to a durable and long-lasting finish.
Here are some best practices to follow for home renovations in Perth:
Assessing the Surface
Before starting any renovation, assess the surface condition:
Identify Imperfections: Look for cracks, holes, peeling paint, or other damage. This helps determine the necessary steps for repair.
Consider Surface Type: Different surfaces like wood, metal, or concrete require unique preparation methods.
Cleaning the Surface
A clean surface is essential for optimal adhesion:
Remove Contaminants: Use appropriate cleaning agents to remove dirt, dust, grease, and other substances that might interfere with adhesion.
Dry the Surface: Ensure the surface is completely dry before proceeding with further preparation.
Repairing and Patching
Fix any damages to create a smooth surface:
Use Suitable Fillers: Apply fillers or patching compounds to fill holes and cracks. Sand the area to achieve a smooth finish.
.
Sanding Techniques: Use sandpaper from different grits, depending on the surface. For example, drywall might require 120-grit sandpaper, while wood surfaces may need a range of grits.
Priming the Surface
Priming enhances paint adhesion and provides a uniform finish:
Choose the Right Primer: Select a primer suitable for your surface type. For instance, latex-based primers are ideal for drywall and wood, while metal surfaces require specialized primers.
Apply Primer Correctly: Follow the manufacturer's instructions for application and drying times.
Additional Preparation Steps
Other important steps to consider:
Caulking and Masking: Apply caulk to seal gaps and use masking tape to protect adjacent areas from unwanted paint or coatings.
Protecting Surroundings: Use plastic sheets or drop cloths to protect floors and furniture from dust and debris.
Safety Precautions
Safety should always be a priority:
Personal Protective Equipment (PPE): Wear gloves, safety goggles, and a face mask to protect yourself from dust and chemicals.
Work in a Well-Ventilated Area: Ensure good airflow to prevent inhaling dust or fumes.
Choosing the Right Materials
Select materials that are compatible with your surface and desired finish:
Consider Environmental Conditions: Choose materials that can withstand your local climate and humidity levels.
Durability and Ease of Application: Opt for materials that are durable and easy to apply to minimize potential issues during the application process.
Preparing a surface before home renovations is not just about cleaning and repairing; it's about creating a foundation for a successful project. By following these best practices, you can ensure that your renovations result in a lasting professional finish. Whether you're a DIY enthusiast or hiring a professional, proper surface preparation is key to achieving the desired outcome.
Furthermore, documenting your preparation process can be beneficial. Take photos or notes of the surface before and after preparation. This helps track progress and identify any areas that may need additional attention. It is also a valuable reference if you need to consult professionals or revisit the project. By keeping a record, you can ensure your renovation is well-documented and easier to manage.
In Conclusion
As you embark on your renovation journey, remember that patience and attention to detail are crucial. Properly preparing your surfaces will save you from future headaches and costly repairs. With the right preparation, your home will look beautiful and stand the test of time.
Maintaining a clean and organized workspace throughout the renovation can streamline tasks and reduce stress. This includes regularly cleaning tools and disposing of waste responsibly. By combining these practices with a well-planned timeline and budget, you can ensure a smooth and successful home renovations in Perth experience.
0 notes
Text
Why Does Ceiling Framing in Perth Matter for Your Home
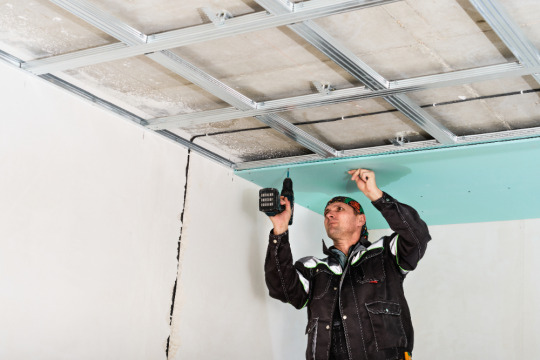
When building or renovating a home, ceiling framing in Perth is an essential part of the process. It provides the structure that holds your ceiling in place and ensures your home is safe and stable. Perth's climate and architectural styles make it especially important to get ceiling framing done correctly.
In this article, we'll explain what ceiling framing is, why it's essential in Perth, and what you should know to make the best choices for your home. Let's dive in!
What Is Ceiling Framing?
Ceiling framing is the framework that supports your ceiling. It's usually made from timber or metal and is designed to carry the weight of the ceiling materials and any additional load, like lights or insulation.
The main parts of ceiling framing include:
Joists: Horizontal beams that support the ceiling.
Trusses: Pre-made frames that hold up the roof and ceiling.
Battens: Smaller pieces that hold the ceiling panels in place.
Without proper framing, your ceiling wouldn't be strong enough to hold everything securely.
Why Is Ceiling Framing in Perth Important?
Perth has a unique climate, and building styles make proper ceiling framing essential. Here's why it's so important:
Handles Extreme Weather Perth experiences hot summers and occasional storms. A well-framed ceiling can handle temperature changes, strong winds, and heavy rain without cracking or sagging.
Supports Modern Designs Many homes in Perth have high ceilings or open-plan layouts. These designs need strong framing to support large spaces and unique shapes.
Improves Energy Efficiency Ceiling framing plays a significant role in insulation. Proper framing ensures insulation fits perfectly, helping to keep your home cool in summer and warm in winter.
Types of Materials for Ceiling Framing
Regarding ceiling framing in Perth, builders often choose between timber and metal. Each has benefits, so the choice depends on your home and needs.
Timber Framing
Timber is a popular choice for ceiling framing. It's lightweight, easy to work with, and looks great in traditional homes. It's perfect for:
Residential houses.
Heritage or older homes.
Projects that need a natural or classic finish.
Metal Framing
Often made from steel or aluminium, metal framing is strong and durable. It's an excellent option for:
Homes in termite-prone areas.
Buildings in bushfire zones.
Large, modern homes with complex designs.
How Is Ceiling Framing Done?
Building a strong and reliable ceiling frame involves several steps. Here's how it's done:
Planning the Design Builders start by designing the ceiling frame. It includes deciding the materials, size, and shape of the frame.
Measuring and Marking Precise measurements are taken, and lines are marked on the walls and beams to ensure everything is level.
Installing Joists Joists are the main supports for the ceiling. They're installed first to create the basic structure.
Adding Battens Battens are added to hold the ceiling panels, like plasterboard, in place.
Insulation Insulation is installed into the frame to improve energy efficiency and soundproofing.
Fixing the Ceiling Finally, the ceiling panels are attached to the battens, completing the process.
Challenges in Ceiling Framing in Perth
Every construction project has its challenges, and ceiling framing is no different. Some of the common difficulties in Perth include:
Termites: Timber frames need to be treated to protect against termites, which are common in Perth.
Heat and Humidity: The hot climate can cause materials to expand and contract, so builders need to choose materials carefully.
Custom Designs: Unique ceiling designs, like vaulted or coffered ceilings, require skilled professionals to frame them properly.
How to Choose the Right Professionals for Ceiling Framing
Hiring the right experts for ceiling framing in Perth is critical. Here are some tips to help you choose the best team for the job:
Look for Local Experience Choose a company with experience in Perth's building styles and conditions.
Check Qualifications: Ensure the builders are licensed and insured to ensure quality work.
Ask for Examples Reputable builders should be able to show you examples of their previous projects.
Get a Detailed Quote A precise quote helps you understand what's included and prevents surprises later.
How to Maintain Your Ceiling Frame
After your ceiling frame is installed, regular maintenance can keep it in excellent condition. Here's how:
Check for cracks or sagging, especially after storms or heavy rain.
Look for signs of termite damage if your frame is made of timber.
Ensure proper ventilation in the roof to prevent moisture buildup.
Why You Should Prioritize Ceiling Framing in Perth
Ceiling framing isn't just a technical part of building—it's a key element that impacts your home's safety, durability, and comfort. With its unique weather and modern designs in Perth, proper ceiling framing is more critical than ever.
Choosing quality materials, skilled professionals, and regular maintenance ensures your ceiling is strong, safe, and built to last. If you're planning a construction or renovation project, make ceiling framing in Perth a top priority!
0 notes
Text
How to Install Cornices: Simple Steps for Beginners
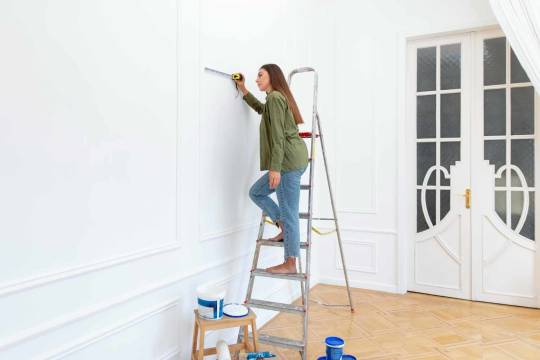
Adding cornices to your walls can make any room look polished and stylish. Cornices, called crown mouldings, create a smooth transition between the wall and ceiling, giving your space a finished look. Many people think you need a professional to install cornices, but this is a project you can do yourself! This guide will walk you through each step to make installing cornices easy and rewarding.
What Is a Cornice and Why Add It to Your Home?
A cornice is a decorative strip or moulding along the top of your walls, right where they meet the ceiling. They can make a room feel more elegant, hide gaps or flaws at the ceiling’s edge, and even increase your home’s value. Plus, they come in many styles and materials, so you can find one that suits your taste.
Step-By-Step Guide to Installing Cornices
Step 1: Measure and Plan
Measure the Wall Lengths: Use your measuring tape to check the length of each wall where you’ll install the cornice.
Buy a Little Extra: Having more cornice than you think you’ll need is always a good idea. Mistakes happen!
Mark the Placement: Use a pencil to lightly mark where the cornice will go along each wall.
Step 2: Cut the Cornice
Use the Miter Box: This tool helps you cut at an angle. You’ll want a 45-degree angle for corners so the cornices meet nicely.
Smooth the Edges: Use sandpaper to smooth out rough spots after cutting the cornice.
Tip: Double-check your measurements before cutting!
Step 3: Apply the Adhesive
Prepare the Adhesive or Cement: Follow the instructions on the adhesive. Most cornices can be installed with a cornice cement or adhesive.
Apply Along the Edge: Spread the adhesive along the back of the cornice, focusing on the edges for a stronghold.
Step 4: Place the Cornice on the Wall
Align with Your Marks: Press the cornice firmly along the lines you marked on the wall.
Hold in Place: Hold the cornice briefly to allow the adhesive to stick.
Use Supports if Necessary: For heavier cornices, you might need temporary supports to keep them in place while the adhesive dries.
Step 5: Fill Any Gaps
Apply Caulk Along the Edges: After securing the cornice, run a line along the top and bottom edges to fill gaps.
Smooth with a Putty Knife: Use a putty knife to spread the Caulk evenly for a clean look.
Let It Dry: Wait for the Caulk to dry completely before moving on to the next step.
Step 6: Paint the Cornice (Optional)
Prime the Surface: If your cornice material needs it, apply a coat of primer.
Apply Paint: Choose a colour that matches your ceiling or walls for a seamless look, or pick a contrasting shade to make the cornice stand out.
Add a Second Coat: Once the first coat is dry, apply a second coat for a durable finish.
Tips for a Smooth Installation
Practice Cutting: If you’re new to using a mitre box, practice on a spare piece before cutting your cornice.
Watch for Gaps: In older homes, walls or ceilings can be slightly uneven, leading to small gaps. Use extra Caulk to fill these.
Get Help with Heavy Pieces: If the cornices are heavy, ask a friend for help, especially during placement.
FAQs About Installing Cornice
Q1: Do I need a professional to install a cornice?
No! With some patience and the right tools, you can do it yourself.
Q2: Can I install cornices on uneven walls or ceilings?
Yes, just be prepared to use a bit more Caulk or filler to hide any gaps.
Q3: What type of cornice should I choose?
Consider your room’s style and size. Large rooms can handle wider, more ornate cornices, while small rooms look best with simpler designs.
Q4: Do I need to paint the cornice?
Painting is optional but recommended. It can protect the material and create a seamless look.
Q5: Can I install cornices independently, or do I need help?
Light cornices, like polystyrene, are easy to install solo. For heavier materials, a helping hand is useful.
Conclusion
Installing cornices can be a satisfying DIY project that adds style and value to your home. By following these steps, you’ll be able to install cornices with confidence. Whether you choose a sleek modern look or a classic design, a well-installed cornice will make any room look polished and complete. So gather your materials, take your time, and enjoy the results of your handiwork!
#installingCornice#corniceInstallation#installCornices#installCornicesService#installCornicesInPerth#installCornicesPerth
0 notes
Text
Step By Step Cornice Installation: A Simple Guide to Follow

Cornice installation is an excellent way to add a decorative finish to the edges where walls meet ceilings. Whether you are renovating or simply want to enhance the look of your room, installing cornices can make a big difference. In this guide, we will explain what cornices are, why you should consider Cornice Installation, and how to go about it.
Why Install a Cornice?
Cornices serve both aesthetic and functional purposes. Here are some reasons to consider installing them:
Aesthetic Appeal: Cornices can elevate the look of any room. They add a touch of elegance and can transform plain walls and ceilings into something more sophisticated.
Hides Imperfections: If your ceiling has uneven edges or imperfections, a cornice can effectively hide them, giving your room a cleaner and more polished appearance.
Increases Property Value: Decorative features like cornices can increase the value of your home. They make rooms look more finished, appealing to potential buyers.
Types of Cornices
Various types of cornices are available, and the choice depends on your style preferences and budget. The most common types include:
Plaster Cornices: These are traditional and often found in older homes. Plaster cornices are heavier and more durable but require skilled Cornice Installation.
Polystyrene Cornices: Lightweight and easy to install, polystyrene cornices are a popular choice for DIY enthusiasts. They are also more affordable than plaster cornices.
Polyurethane Cornices: These are durable, lightweight, and water-resistant. Polyurethane cornices are often chosen for moisture-prone areas, such as bathrooms and kitchens.
How to Install Cornices?
Installing a cornice is not as difficult as it might seem. You can achieve a professional-looking result with a little patience and the right tools. Here’s a simple step-by-step guide to help you through the process:
Measure the Area
Start by measuring the length of the walls where the cornice will be installed. This will help you determine how much cornice material you need. Be sure to add a little extra for any mistakes.
Cut the Cornices
Use a miter saw or a handsaw to cut the cornices at a 45-degree angle for the room's corners. This ensures a perfect fit when the pieces meet. If you need more clarification, practice on a scrap piece of cornice first.
Prepare the Surface
Before cornice installation the cornices, clean the area where they will be placed. Make sure the walls and ceiling are free of dust and grease. A clean surface ensures that the adhesive will bond properly.
Apply Adhesive
Apply a strong adhesive designed for cornices to the back of the cornice. Be sure to apply the adhesive evenly along the entire length of the cornice. You can also use nails for extra security, especially for heavier cornices.
Attach the Cornice
Carefully position the cornice on the wall and press it into place. Use a spirit level to ensure that it is straight. Hold it in place for a moment to allow the adhesive to bond. For longer pieces, it may be helpful to have someone assist you.
Fill the Gaps
Once the cornices are in place, fill any gaps between them and the wall with filler. This will give the installation a seamless look. Allow the filler to dry, then sand it smooth.
Conclusion
Cornice installation is a great way to add style and elegance to your home. With the right tools and patience, you can transform your space in no time. Whether you choose plaster, polystyrene, or polyurethane cornices, the result will be a beautiful finishing touch to your room. Follow the steps this guide outlines, and you’ll be well on your way to a successful Cornice Installation .
1 note
·
View note