
Hi! I am student with interests in radiology, technology, the human body. This blog allows me to creatively express my journey in both the medical and alternative health field.
Don't wanna be here? Send us removal request.
Statistics
We looked inside some of the posts by dr-azie and here's what we found interesting.
Average Info
Notes Per Post
39K
Likes Per Post
21K
Reblog Per Post
18K
Reply Per Post
36
Time Between Posts
2 months
Number of Posts By Type
Text
2
Video
5
Photo
9
Quote
1
Last Seen Tumblr Blogs


Fun Fact
130K people were victims of a chain letter scam that affected Tumblr in May 2011.
Text
tumblr
The anatomy of a c-section, as told with felt.
Props to Tracy Sher for the creative presentation.
4K notes
·
View notes
Video
youtube
Myocardial infarction

3 cardinal signs:
Elevation of ST segment
Inversion of T wave
Deep & wide Q wave
With reciprocal changes in the leads facing the opposite wall:
Depression of ST segment
Tall, upright T waves
Changes do not appear at the same time. It happens in this order:
Elevation of ST segment stays for 2-3d and gradually goes back to base level in 1-2w
T wave becomes inverted after 2 days, and remains like that for 3w, and gradually becomes flat and then upright over 2-3m
Q wave = muscle death, appears after 1 week, and gradually deepens and remains permanent. Size proportional to size of infarct.
Timeline:

1°d: ST segment elevation + tall T wave
2-3°d: ST segment still elevated + T wave slowly becomes inverted
7°d: ST segment starts returning to base level + T wave inverted + Q wave starts appearing, it deepens. (If ST segment stays elevated >6m, think of development ventricular aneurism)
3°w: Q wave fully developed + T wave starts becoming flat
End of 3m: only Q wave stays the same, ST segm and T wave return to normal. If the size of the infarct was small, Q wave goes back to normal.
Coronary Arteries, branches & supply:
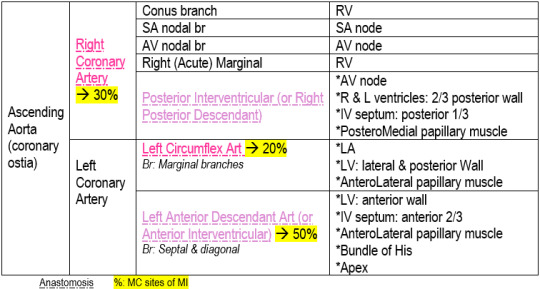
Localization of infarct:
1K notes
·
View notes
Photo
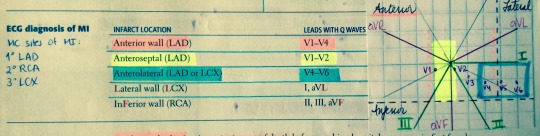
Ventricular Arrhythmia Pharmacological Treatment.. #mnemonics
#pharmacology #pharmacy #arrhythmia #drugs #cardiology #heart #usmle #usmlestep1 #doctor #doctordconline #nhs #nurse #nursing #hospital #patient #mbbs #md #medicine #medstudent @doctordconline
88 notes
·
View notes
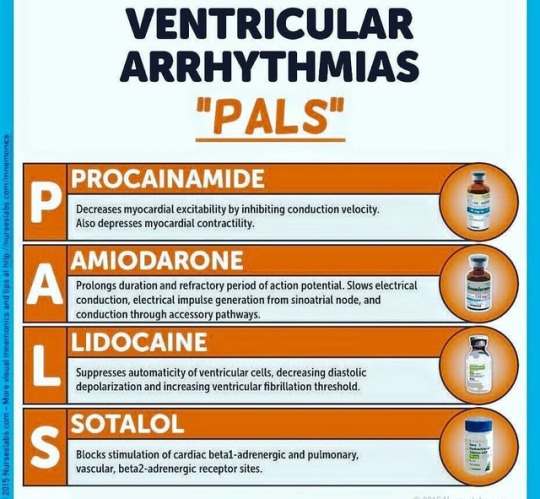
Photo
The cardiac cycle refers to the sequence of mechanical and electrical events that repeats with every heartbeat. It includes the phase of relaxation diastole and the phase of contraction systole. #cardiaccycle #heart #cardiology #physiology #ecg #ekg #pathology #usmle #usmlestep1 #usmlestep2 #doctor #doctordconline #nhs #nurse #nursing #mbbs #md #medlife @doctordconline #amc #plab #hospital
261 notes
·
View notes
Video
youtube
I’ve got a intubation test coming up and found this gem online.
The world needs teachers like you, sir <3
453 notes
·
View notes
Text
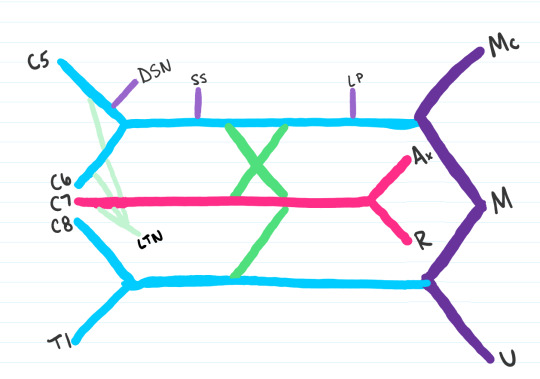
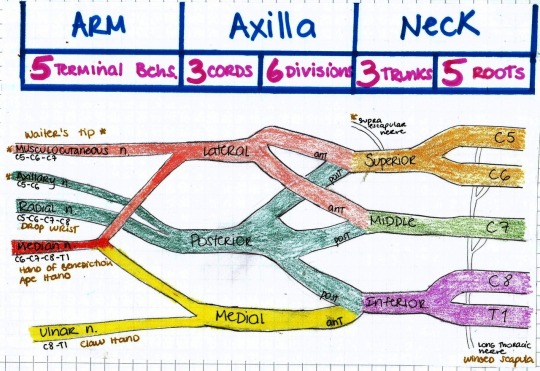
Medschoolmanic Presents: Brachial Plexus Made Easy!
The bane of all students who take anatomy seems to be the same: the brachial plexus. But never fear! I I found a link online that you can follow here that makes learning the brachial plexus incredibly simple. I drew out the steps themselves to show the process in color. Furthermore, I corrected a few mistakes within the presentation. Let us begin!

Step 1: Start by drawing two y shaped lines in the same direction. Feel free to draw them in either direction as it will make it easier to learn if you can draw it both ways.��

Step 2: Draw another Y shaped line in the opposite direction.

Step 3: Draw an M connecting your initial two Y’s. This will also be an important point of reference when looking at the cadaver.

Step 4: Draw an X and a dash
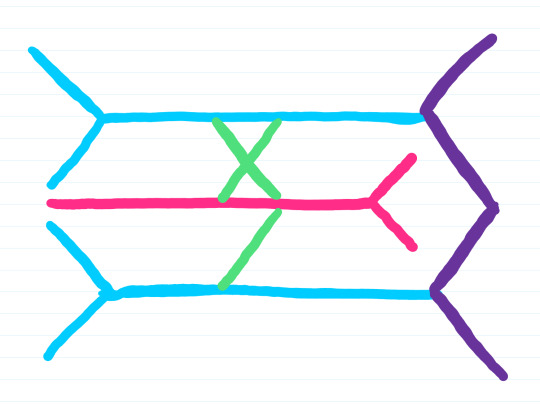
Step 5: Label the nerves roots (C5-T1)
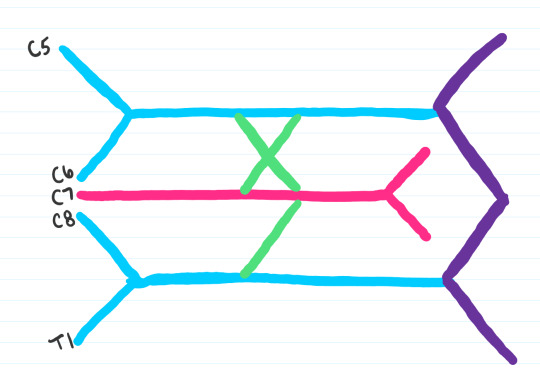
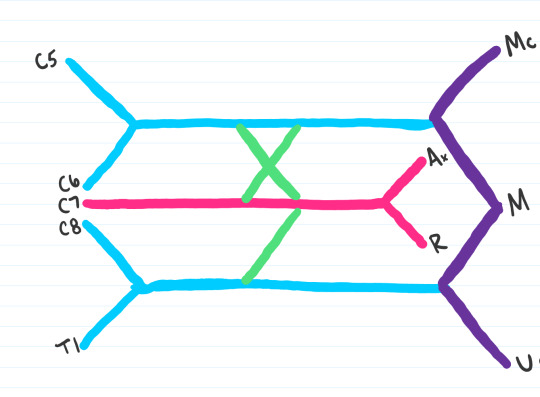
Step 6: Label your nerve branches. Key is as follows:
Mc: Musculocutaneous
Ax: Axillary
R: Radial
M: Median
U: Ulnar
Some people like to remember the mnemonic MARMU for the brachial plexus branches
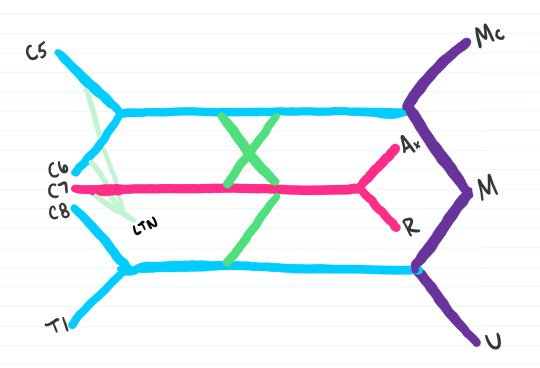
Step 7: The rest of the brachial plexus can be split up into four groups of 3. Our first 3 would be the branches to C5, C6, and C7 that form the lateral thoracic nerve (LTN)
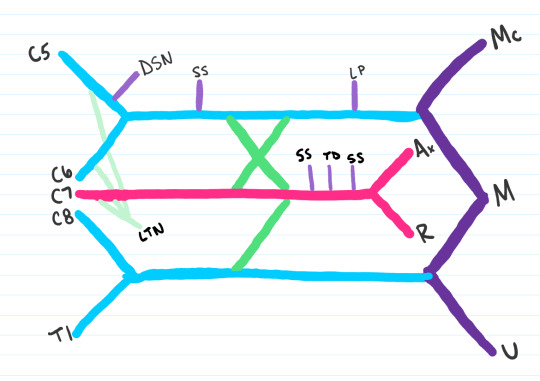
Step 8: The next three to be added are the following:
DSN: Dorsal scapular nerve
SS: Suprascapular nerve
LP: Lateral pectoral nerve
Step 9: The next three nerves to be added are the:
SS: Subscapular nerve
TD: Thoracodorsal nerve
SS: Subscapular nerve
Step 10: The last three to be added are:
MP: Medial Pectoral Nerve
MBC: Medial Brachial Cutaneous Nerve
MABC: Medial Antebrachial Cutaneous Nerve
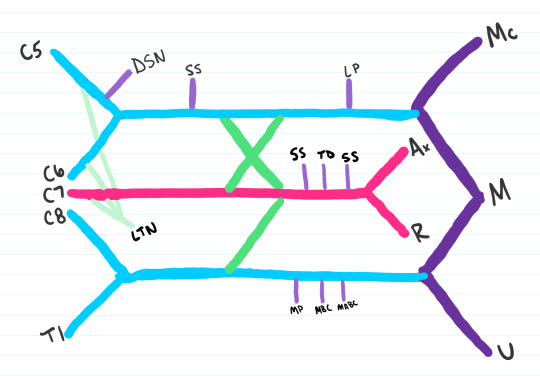
Step 11: Last nerve to be added is the Subscapular nerve

Step 12: The last step is to label your roots, trunks, divisions, cords, and branches, which I separated with a faint gray line. At this time, you’ll want to label your upper, middle, and lower trunks, the anterior and posterior divisions, and your lateral, medial and posterior cords. Some people like to remember the order from roots to branches with the mnemonic: Real Truckers Drink Cold Beer.

All done! After drawing this out a few times you should get to the point where you can draw out the entire plexus from memory. The key to anatomy is repetition repetition repetition. Best of luck!
3K notes
·
View notes
Video
tumblr
These tattoos change color to track your health — and could be a beautiful game changer for those with health conditions like diabetes.
follow @the-future-now
6K notes
·
View notes

Quote
“As a doctor, you go into this work thinking it is all a matter of canny diagnosis, technical prowess, and some ability to empathize with people. But it is not..In medicine, as in any profession, we must grapple with systems, resources, circumstances, people—and our own shortcomings, as well.”
Atul Gawande, Better, A surgeon’s notes on performance (via flyonthewallmedstudent)
929 notes
·
View notes
Photo
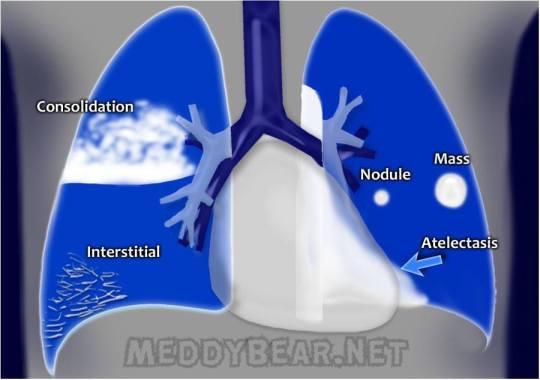
The basics of lung X-ray findings
Consolidation - the alveoli and small airways are filled with dense material:
pus - pneumonia
blood - hemorrhage
fluid(transudate) - pulmonary edema
Interstitial formation - strokes and lines, due to processes in the lung interstitium, most commonly:
viral and atypical pneumonia
pulmonary fibrosis
interstitial pneumonitis(due to physical or chemical factors)
Masses and Nodules:
Lung cancer
tuberculosis
parasites
fungal infections
lymphomas
Atelectasis - collaps of lung respiratory tissue due to:
blockage of the airway to that part of the lung:
from the inside - foreign body, excess of mucus, tumor of bronchial wall
from the outside - due to compression by tumor, lymph nodes, tuberculs.
lack of surfactant (IRDS and ARDS)
breathing air with high percent oxygen( % Oxygen > % Nitrogen )
38 notes
·
View notes
Photo
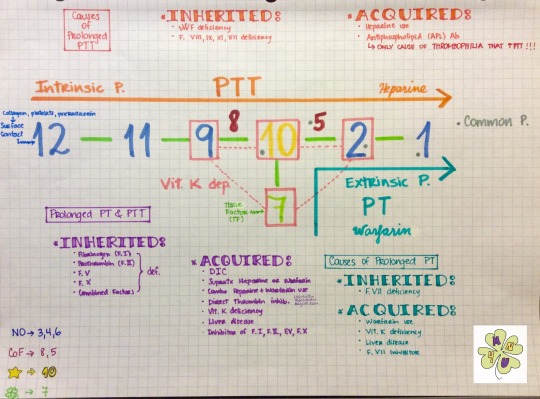
CLOTTING CASCADE
I’ve seen this visual aid going around Tumblr and I remembered that I learned it a couple of years ago from Dr. Barone’s Youtube channel. Sadly that video was taken down, so I made one with my phone. Hope it helps!!!
youtube
A couple of clarifications/corrections:
I meant so say that factors 3, 4 are not in this mnemonic & 6 doesn’t exist, instead I said “they are not in this mnemonic”
I forgot to mention the common pathway: factors 1, 2, 5 & 10 (they have a gray dot next to them)
I meant to say “clinical scenario” not “clinic scenario”
All PTT &/or PT prolongation lead to bleeding problems, except AntiPhosphoLipid (APL) antibodies which causes thrombophilia.
166 notes
·
View notes
Photo

Wound Healing Wound healing is a natural restorative response to tissue injury. Healing is the interaction of a complex cascade of cellular events that generates resurfacing, reconstitution, and restoration of the tensile strength of injured skin.
Healing is a systematic process, traditionally explained in terms of 4 overlapping classic phases: hemostasis, inflammation, proliferation, and maturation. While platelets play a crucial role in clot formation during hemostasis, inflammatory cells débride injured tissue during the inflammatory phase. Epithelialization, fibroplasia, and angiogenesis occur during the proliferative phase. Meanwhile, granulation tissue forms and the wound begins to contract. Finally, during the maturation phase, collagen forms tight cross-links to other collagen and with protein molecules, increasing the tensile strength of the scar.
#wound #healing #bone #fracture #trauma #pathology #physiology #orthopedics #usmle #usmlestep1 #usmlestep2 #doctor #doctordconline #nhs #nurse #nursing #hospital #patient #mbbs #md #medicine @doctordconline #amc #plab
410 notes
·
View notes
Photo
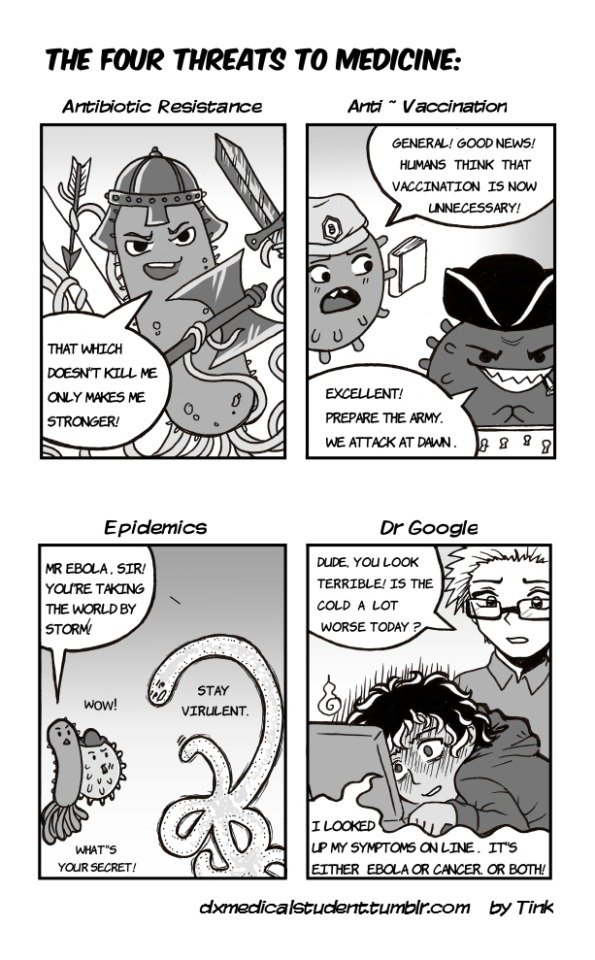
Inspired by the fact that I just really, really miss drawing cute pathogens.
1K notes
·
View notes
Photo


this is why we need vaccines (x) | follow @the-future-now
14K notes
·
View notes