
After years of making many mods for Skyrim, due to the number of works I decided to create a blog not only showcasing mods but also dumping some random screenshots, and some random thoughts committed to here. https://www.nexusmods.com/skyrim/users/4756051/?tb=mods&pUp=1
Don't wanna be here? Send us removal request.
Statistics
We looked inside some of the posts by dskyrimmods and here's what we found interesting.
Average Info
Notes Per Post
341
Likes Per Post
276
Reblog Per Post
65
Reply Per Post
0
Time Between Posts
4 months
Number of Posts By Type
Text
4
Photo
13
Last Seen Tumblr Blogs


Fun Fact
If you dial 1-866-584-6757, you can leave an audio post for your followers.

Text
A bit have changed since the publication of this guide. Like Ousnius eventually kicking out UUNP from the Bodyslide suite for SSE/AE, citing claims of poor performance, with instead the high-tri count BHUNP kit replacing it as a separate mod, but otherwise CBBE and its 3BA variant have enjoyed a virtual monopoly in terms of base installs and conversions.
Outfit Studio Conversion Guide
Most of the guides out there for converting armor to BodySlide are honestly pretty bad. Many are out of date, many are poorly-written, and some are just straight-up incorrect. I don’t claim to be an expert on this subject, but I think I have the knowledge and skill to write a basic primer on the process involved.
First, so we’re clear, and so we’re both on the same page, I’m going to explain exactly what BodySlide and Outfit Studio are. BodySlide is not a mod. BodySlide is a tool for generating meshes. The magic in BodySlide is that meshes designed to work with it come with a set of sliders. I’m talking about those sliders you play with when you open BodySlide. Those things. When you pull one of those sliders, BodySlide needs to know how the mesh should distort in response. That’s what it means to add BodySlide compatibility to a set of armor or clothing. You’re creating the data BodySlide needs to transform the mesh according to a set of sliders.
Outfit Studio is a tool packaged with BodySlide. Ostensibly, it’s a 3D editing program, but it’s designed specifically for making BodySlide conversions. You’ll find basic tools for 3D modeling–editing vertices and bone weights (which we’ll get into later). Importantly, you’ll also find tools for editing sliders.
If you already knew all that, then that’s good. I’ve seen a lot of confusion around them, though. Lot’s of misconceptions about what they are and what they do, and it’s important you know exactly what your tools are, and what they’re for, before you continue.
Let’s get on to a real conversion, though. We’ll clear up terminology as we go. Find a set you want to convert, preferably something simple. Open OutfitStudio (via a button in BodySlide), and select New Project. You can name it here, or you can wait until you’re done. The important thing on this first screen is that we need to select a reference (Figure 1). Your reference will provide your bones and your sliders as well as a guide for you to shape the armor mesh(es). Don’t worry if you don’t know what bones are–we’ll get to that last. CBBE is old and busted, and you probably want UUNP. You’ve got choices here. You can choose Unified UNP HDT if you want physics support (breasts, butt, belly, etc.). Or, you can choose regular old Unified UNP if you don’t want jiggly bits. In terms of a conversion, they both go through the same process. UUNP HDT isn’t harder. If you’re converting a set of plate mail, you probably don’t want HDT. If you’re converting a robe, maybe you want some bounce. It’s up to you.
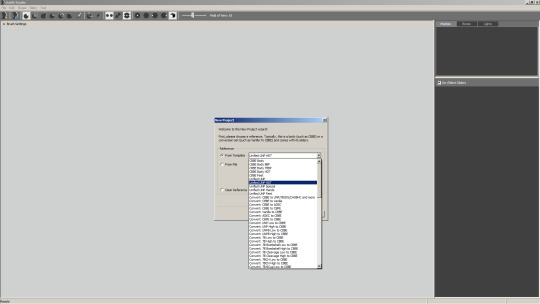
Figure 1
After selecting a reference, you’ll need to choose an outfit mesh. This is what you want to convert. You’ll want the high-weight mesh, the one that ends in _1.nif (Figure 2).
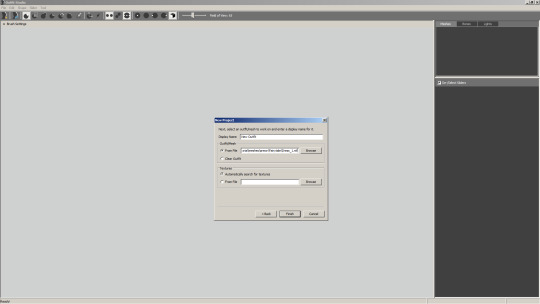
Figure 2
Now you should see a bunch of shit on your screen, with both the armor and your reference displayed. On the right, you can hide or show the wireframe of individual pieces if you want. On the top, you’ve got your tools. They’re all fairly self-explanatory. Inflate moves vertices away from the center. Deflate moves them toward the center. Move allows you to translate vertices arbitrarily. Smooth smooths things out, eliminating sharp angles and bumpy surfaces. You’ll also see options to enable or disable mirroring. If it’s enabled, your actions will be mirrored across the vertical axis. There’s also the “only edit connected” option. If this is enabled, only vertices physically, directly connected to the one directly under your cursor will be modified. Below that toolbar is a drop-down for brush options. These are all pretty self-explanatory, too, and I don’t think I really need to explain them.
First things first. Your armor set may have another reference (read: body mesh) included. This is common in sets that show off some amount of skin. Find it in the list on the right and delete it (Figure 3). We’re replacing it with the UUNP reference.
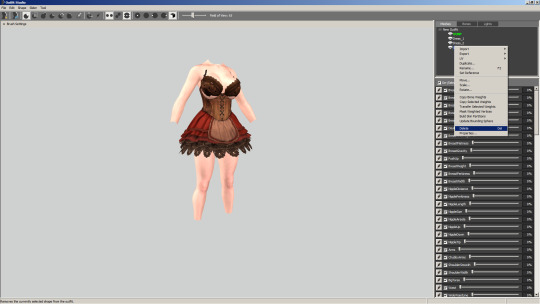
Figure 3
If you move any of the sliders on the right, you’ll notice that the reference transforms, but the rest of the meshes stay the way they were. This is because we haven’t bound those meshes to our sliders yet. We’re going to use this to our advantage. Play around with these sliders now, and try to get the reference to fit your armor mesh. A little bit of clipping is fine (and expected), but try and get it as close as possible. Don’t be afraid to manually enter values or even use negative values! If you’re converting an armor that already uses a UNP variant, you’re in luck! UUNP has sliders for many of them. For example, if your armor set is made for UNPB, then turn the UNPB High slider all the way. You’ll find that the reference matches the armor pretty closely (Figure 4).
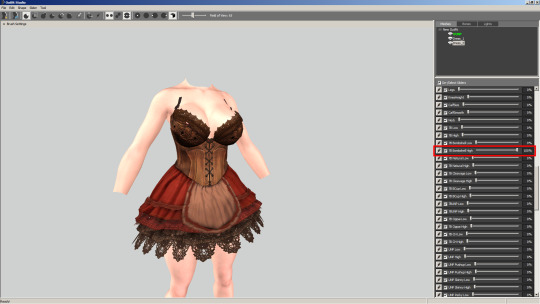
Figure 4
Now we’re going to do some magic. Click File > Make Conversion Reference. It’ll pop up with a dialog box, asking you to enter a name (Figure 5). Doesn’t matter what it is. Feel free to name it. Click OK and you’ll notice that all our sliders disappeared! All according to keikaku. They’ve been replaced with a single slider. What’s happened is that all the sliders you moved in the previous step have been condensed and inverted. If you set this new slider to 100%, you’ll notice that the reference mesh will look like the Unified UNP body we started with! Click Sliders > Conform All. We’ve now bound the armor meshes to our slider. If you move the slider now, you’ll see that the armor meshes move as well. Set the slider to 100% and click Slider > Set Base Shape (Figure 6).
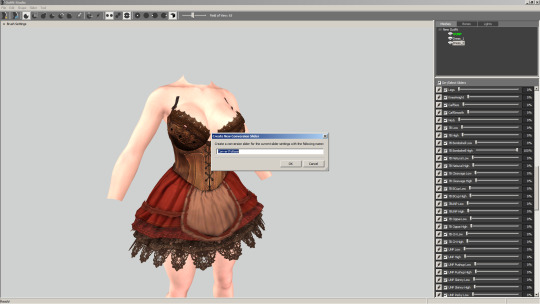
Figure 5
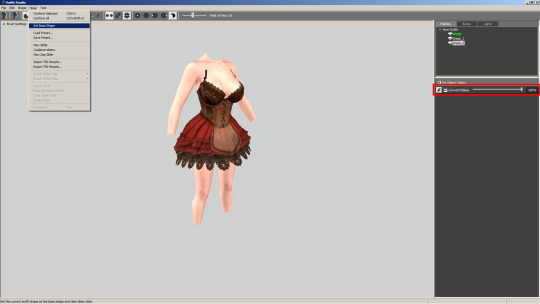
Figure 6

Figure 7
Oh no! Look at all that clipping! Don’t worry. What we’ve done is set that maxed out shape to the default shape of our armor mesh. Click File > Load Reference and reload the same Unified UNP reference you selected at the beginning. Notice how they match up now? And we’ve got all our sliders back! We’re in business. Click Slider > Conform All again to bind the armor mesh to our sliders (Figure 8).
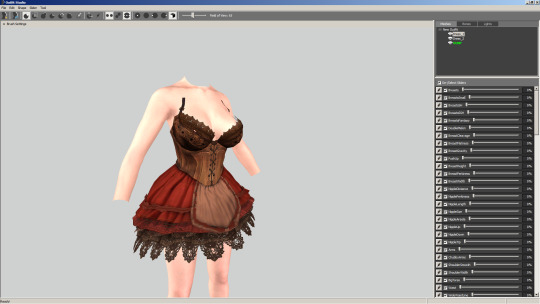
Figure 8
It’s been pretty easy up until now. Unfortunately, this is where it gets tricky, and where some skill is required. Use the tools provided by Outfit Studio to edit the armor meshes and fix any remaining clipping. Take your time here. I can’t give you a tutorial on this. It’s a matter of skill. Practice and git gud.
Now it’s time to edit sliders. But first, let’s take a detour and talk about low-weight and high-weight meshes. Skyrim’s character creator has a weight slider. I’m sure you’re familiar with it. You also may have noticed that you armor set probably had an <armor>_0.nif and an <armor>_1.nif. These two things are related. If your character’s weight is set to 0, Skyrim loads the _0 (low-weight) mesh. If your character’s weight is set to 1, Skyrim loads the _1 (high-weight) mesh. If your character’s weight is anywhere in between, Skyrim essentially averages the low-weight and high-weight mesh. Make sense? You can think of sliders the same way. The normal UUNP reference is functionally the low-weight version of a slider. Internally, BodySlide knows what, for example, “100% Double Melon” should look like. When you move the Double Melon slider, BodySlide can use those two pieces of information to find an average. In reality, it’s a bit more complicated, but that’s the gist.
Click on the pencil icon next to the first slider on the list to your right. This will set the slider to 100% and make it editable. Changes made to the meshes now are changes to the slider (Figure 9). By editing the Beasts slider, you’re telling BodySlide what “100% Breasts” should look like. No doubt, you’ll see some clipping on your model now. Fix it like you did before. When you’re done, click that pencil icon again to exit edit mode for that slider. Move down to the next slider on the list and repeat. Yes, it’s time consuming. Yes, it’s difficult. However, this is the process that separates good conversions from bad conversions. If you don’t plan to release the set publicly, you can get away with just working on the sliders you personally use and ignoring the rest, which could save you hours of work.
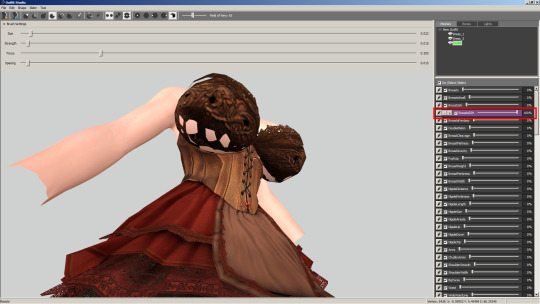
Figure 9
You may have just thrown away hours of your life playing with sliders, but you’re not out of the woods yet. Next up is weighting! Weighting is its own special hell, as you’ll soon find out. First, let’s explain bones. 3D models that are made to be animated have a skeletal structure. If you’re reading this primer, you’ve no doubt already got XPMSE installed, so this should sound familiar. Each vertex on a mesh is weighted to one or more bones. When those bones move, the vertex moves accordingly. The higher a vertex is weighted with respect to a given bone, the more closely the vertex mimics the motion of that particular bone.
Highlight all your meshes except for the reference at the top right. Right click > Copy Bone Weights. This will give you some rough weights to get started. Truthfully, depending on the outfit, these weights may be fine, but it’s best to check anyway. Select a mesh (or multiple meshes), then go to the Bones tab at the top right. Select a bone, and you’ll be editing the weight for vertices on the selected mesh for the selected bone. You can press T to toggle textures on and off, which may make seeing the bone weights easier. Click to strengthen the weighting, alt-click to weaken it (Figure 10). At this point, all you’ll really be able to do is check for obvious issues. Sides of dresses weighted to arm bones, things like that. After you “finish” your conversion, you’ll open it up in-game, test some poses to look for weighting issues, and adjust the weighting accordingly.
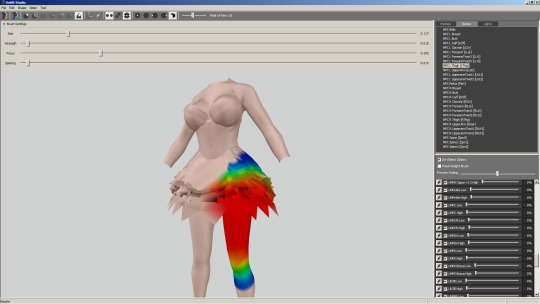
Figure 10
After you’ve checked the weights, save your project (Figure 11). You may be warned that some vertices have no weighting. You definitely want to fix this, as it’ll cause serious problems for you armor in-game. Anyway, you’ll need to enter the name of the armor in several places. You’ll also need to name the mesh. By default, this will match the name of the mesh you loaded way back when we started. Make sure to remove the _1 at the end of the name if it’s there. As long as you have the “Create low/high weight meshes” option ticked, BodySlide will take care of that for you. Also notice the “Copy reference shape into output” option. If your armor originally came with a body mesh built in, you’ll want to keep the ticked. If it didn’t, make sure this is unchecked. Basically, if this is checked your reference mesh will be part of the armor.
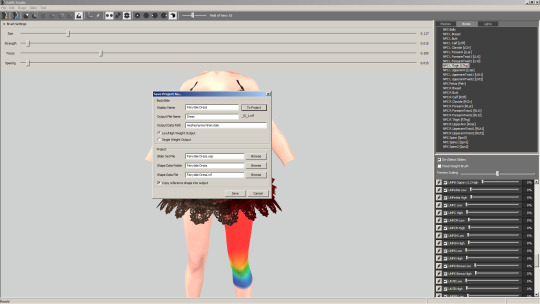
Figure 11
Finally you’ll have to create a slider group definition. This is easier than it sounds. Create a new file in CalienteTools\BodySlide\SliderGroups. Name it whatever you want, but obviously it should be something relevant. Change the file extension to xml. Here’s an example file. Note, the names are case sensitive. We’ll be defining two groups. One to tell BodySlide that our set is made for Unified UNP, and another to group all the pieces of our set together. When naming your set’s group, any old name is fine. For the names of each Member, they MUST match the names you gave them in Outfit Studio (Figure 12).

Figure 12
With that out of the way, build your outfit in BodySlide and try it out in-game! If you’re lucky, it’ll just work the first time. Odds are, though, you’ll notice issues now. Bits of clipping and odd weighting. Load your project in Outfit Studio and fix any issues you might have noticed. Repeat until you’re bored or satisfied.
Tips:
Some armor sets will be easier to convert than others. Particularly, sets with a lot of fine details around the breasts will certainly be horribly distorted. Things like buttons will not survive. You will need to manually fix the shape of these features for every single slider. This is an extremely time-consuming process.
Don’t be afraid to make minor edits to the reference mesh! It can be extremely useful to do things like flatten nipples.
Don’t make the armor mesh skin-tight if you don’t have to. The closer it is to the skin, the more likely it is to clip, and the more precise your weighting needs to be. Inflate it a bit, bring it away from the skin, and you can save a lot of headache.
Testing your set out can be an arduous process. You can actually update the mesh in-game without restarting, which greatly speeds things up. Unequip the armor, open the console and run ‘pcb’. This stands for “purge cell buffer”, and basically it clears shit out of Skyrim’s memory. Then hit F4. Provided you have ENB installed, this will clear your vRAM. Make your edits and rebuild the set in BodySlide. When you re-equip the armor, it should be updated with your new mesh.
I hope this guide was helpful. If you notice any issues, mistakes, grammar or spelling errors, let me know. And there probably are issues because I’m awful at proof-reading my own work. If you think anything is unclear, I’m open to that feedback as well.
328 notes
·
View notes


Photo


How’s it going? About a few years and a new hard drive later, still not getting tired of the game.
Instead... it’s constantly evolving.
0 notes
Text
Notice to some people coming into here...
Well, TBH, I’m much less using Tumblr in these days, preferring instead to use Twitter.
Which means that I spend more time at here: https://twitter.com/DSkyrimmods
See you there.
0 notes
Photo


Sorry if I was away for nearly a long time, but currently playing and modding SSE.
3 notes
·
View notes

Photo

My character along with favorite followers, all in school garb. :)
0 notes

Photo


Me after applying a new dot of Noctua’s finest thermal paste onto the RX470 GPU.
Belated Happy 8th Anniversary.
2 notes
·
View notes

Photo


mods: Crential’s Skyrim Seaworld; Hepsy’s School Days 2.0 UNP conversion (WIP)
preset: Patrician ENB for NLVA.
0 notes
Photo


The World of Rudra, lands of wonder and depth.
English grammar fix/patch is now available for downloading; after installing the original mod (version 1.75), the patch should be installed, overwriting WorldOfRudra.esm.
1 note
·
View note
Text
STATUS
On a rest break:
Hepsy School Days conversion
Due for a revamp:
Lucky Skeever Player Home
Warmstone Player Home
Possible bugfixes (if I feel like doing one):
Project Rainforest
Paradise City
Peregrine Highwatch HFX
0 notes

Photo


The impetus for choosing this mod for conversion is that the massive variety of uniforms brought me back to the days when I was then grinding in a South Korean MMO called Ran Online; specifically I like the Japanese school gang aesthetic of the MMO where characters get to dress up as schoolkids to go out into the world to dish out some damage against enemy mutants.
Anyway, it took me months of considering then in weeks converting a portion of this large Oblivion costume mod to Skyrim -- using Gerra6′s Pose Converter, 3DSMax 2010 and Bodyslide, along with copious amounts of learning from Nightstasy’s videos and other tutorials, plus trial and error -- to get to this point.
I mean, it’s nearly done, still some kinks to fix like the weight painting and clipping but I thought I did a great job. Also, whatever I learned from the experience could be of great use for future original modding projects.
Not sure when I’ll be releasing it and where, but Hepsy’s School Days for UUNP (and hopefully later, for male bodies) is coming soon.
Original by Hepsy (HGEC/Roberts):
https://www.nexusmods.com/oblivion/mods/45711
2 notes
·
View notes
Photo


Suckerpunch/Babydoll aesthetic screenshot dump.
Armorset originally by JackSH
0 notes