
Hello and welcome! This is a portfolio showcasing my recent work in Graphic UX Design and app development. I'm currently studying Interactive Media at the University of Miami, with a minor in Marketing .
Don't wanna be here? Send us removal request.
Statistics
We looked inside some of the posts by eleanorlusteinbrecher and here's what we found interesting.
Average Info
Notes Per Post
0
Likes Per Post
0
Reblog Per Post
0
Reply Per Post
0
Time Between Posts
7 days
Number of Posts By Type
Text
17
Last Seen Tumblr Blogs


Fun Fact
In Q3 of 2020, 31% of US users access the Tumblr app daily.
Text
FIGMA ADVANCED INTERACTIONS PROTOTYPE APP
this is a interaction test showcasing a mock up app i created on figma.
the app is mean to showcase my career exploration vlogs.
the playtest goes through the entire app from the lens of the user
youtube
0 notes
Text
Webflow Creative Coding Informational Page
This is a base prototype for an information page on the the subject of Creative coding based on a research paper I did on the same topic
it is inspired by retro video game and old computer pages
it utilized information content, grids, sliders , custom shapes, videos, etc
0 notes
Text
Web-flow Recipe Page
This is a simple recipe page using web flow. Color, layout, content: grid images and videos, and a Navigation Bar
0 notes
Text
Code Sandbox Grid Assignment
This is a Link for a first draft page coding a simple portfolio using HTML and CSS
Employing use of Images, navigation , lists, google fonts and grids
0 notes
Text
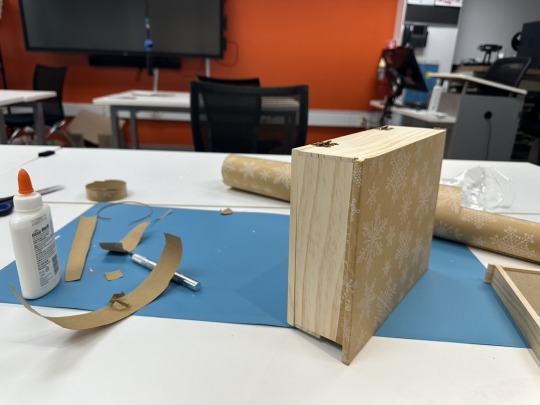
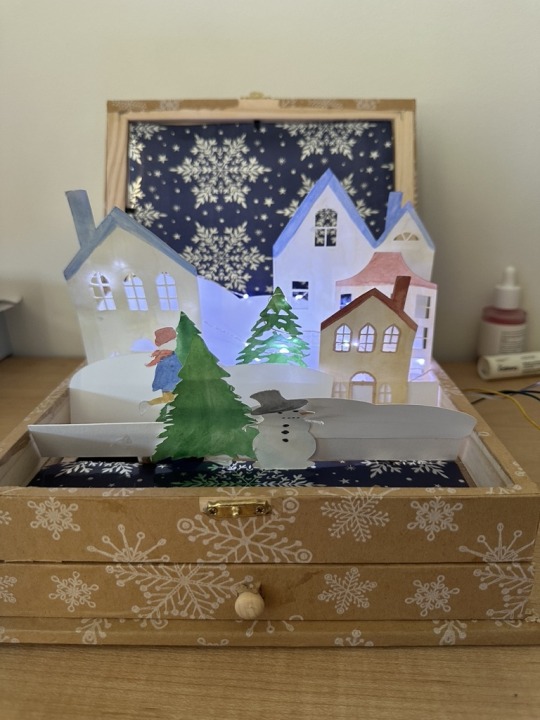
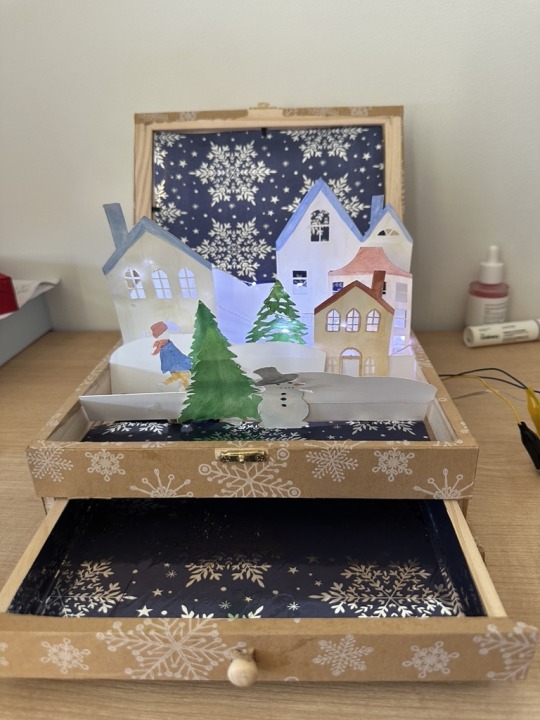
Project 3 Final Revision - Light Up Christmas Jewelry Box
VIDEO LINK
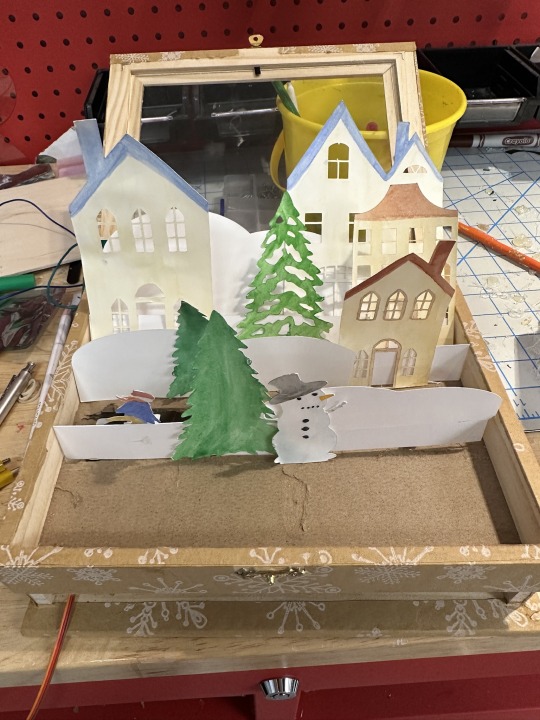
The goal of this project was to revise one of my previous two projects while incorporating an advanced sensor with at least one input and one output. My original concept was a paper frame with a 3D picture created using paper cutouts from the Cricut machine. This was a highly art-focused project, with the electronic output being LED lights and sound. For the revision, I decided to make it Christmas-themed for the holidays. The final idea was a jewelry box that opens to reveal a paper Christmas village with lit houses and music.
I wanted to continue using LED lights to illuminate the village and add sound. Additionally, I wanted to experiment with a motor to create a little girl ice skating, reminiscent of the ballerina in classic jewelry boxes. For the interactive element, I initially planned to activate the box when it was flipped open, like traditional ballerina boxes. However, this proved challenging, so I opted to use a light sensor. The sensor was placed in the drawer area so that when someone opened the drawer to access their jewelry, the circuit board would detect light and activate the features.
Initial Design and Materials
I originally wanted to make the box entirely out of paper for customization and flexibility. However, I encountered difficulties designing a drawer and lid mechanism with paper. Additionally, the size of the box exceeded the capabilities of the Cricut machine. Fortunately, I found a suitable wooden box at Michael's, which served as the perfect base. The box’s top section was made of wood and cardboard, which could be easily removed and cut to accommodate wires. The bottom section was a simple wooden drawer.
Wrapping the Box
I wrapped the box with tan gift paper featuring white snowflakes to maintain a subtle wooden appearance without overwhelming color. Using an X-Acto knife, I precisely measured and cut the paper, gluing it on with Elmer's Glue. Every edge was carefully wrapped and smoothed to achieve a professional finish. Although this process was time-consuming, I was very pleased with the result.
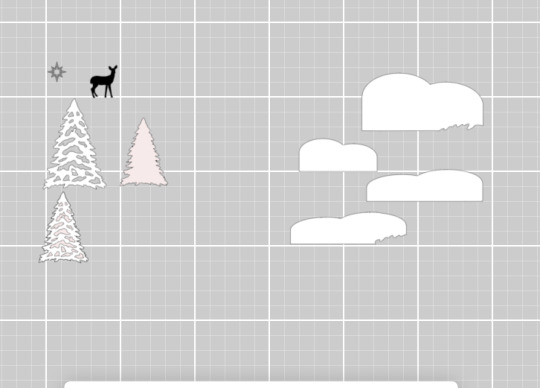
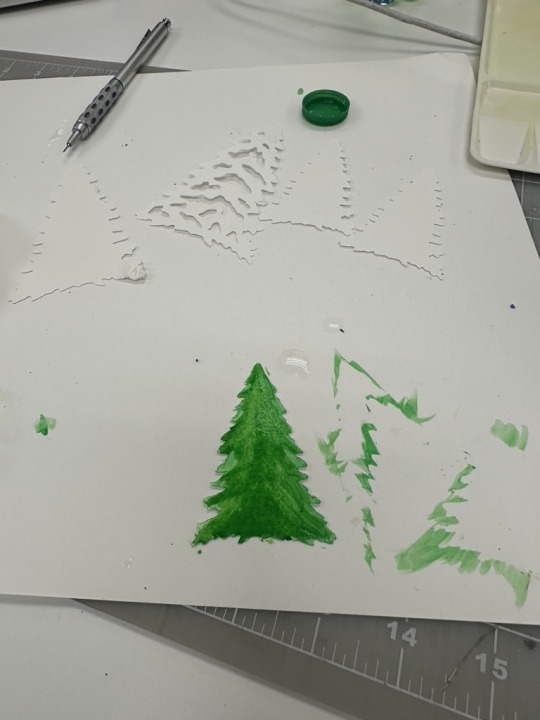
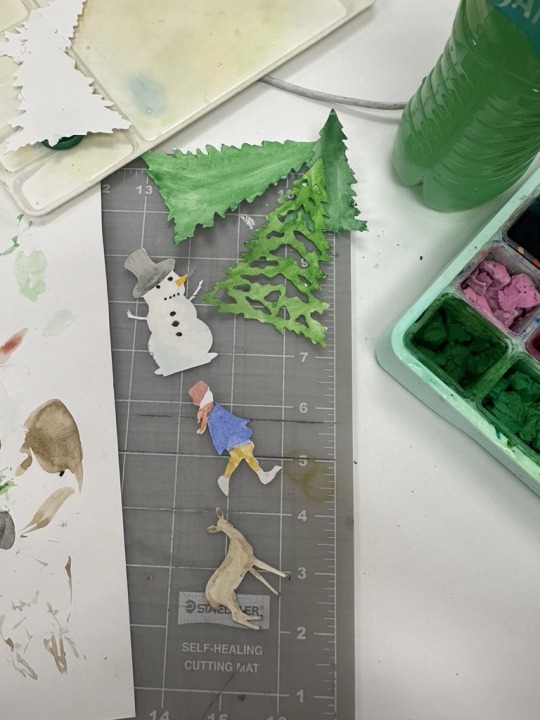
Creating the Village
I used pre-made Cricut cutouts for some elements and customized others by uploading silhouette designs found online into the Cricut software. Once the pieces were cut, I painted them for added dimension. Initially, I tried dark colors but disliked the outcome. I switched to a soft watercolor effect, which added depth and a charming aesthetic to the project.

Assembling the Box
After painting and drying the components, I began assembly by cutting holes in the box for wires using an X-Acto knife.
Foldable Mechanism
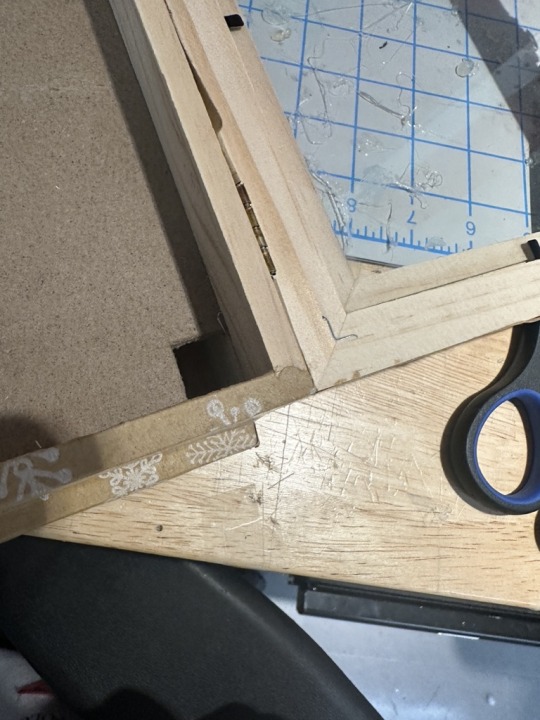
Creating the foldable mechanism for the village was a challenge. My first attempt involved attaching the village to the lid using paper. However, the paper wasn’t strong enough to support the weight, causing the pieces to collapse. I reinforced the paper with a second layer, which worked temporarily but still looked unstable and cheap.
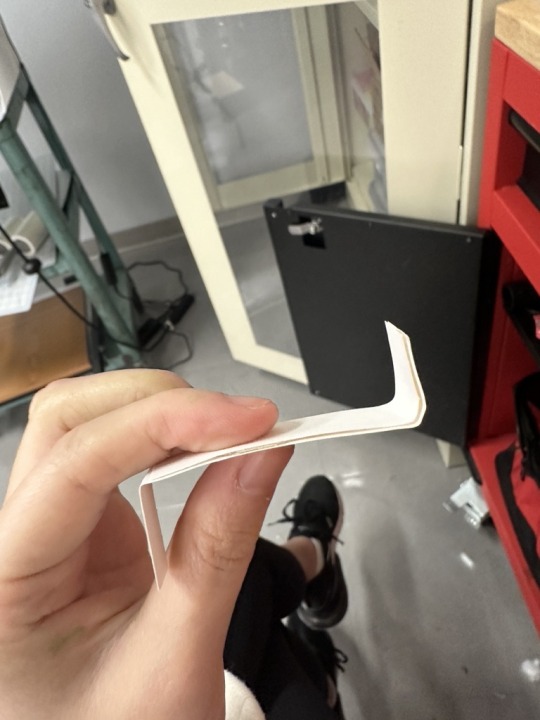
For the second attempt, I mounted the village on a cardboard panel and used small, folded paper strips as supports. These strips added layers to the village and allowed it to fold neatly when the box was closed and pop back up when opened.
I also experimented with 3D coils made of soldering metal and 3D-printed materials. Unfortunately, the coils were either too stiff or too flexible to function effectively.
Electronics and Code
Motor and LED Lights
Initially, I planned to use a linear actuator to mimic the girl skating across a pond. However, the actuator was too tight, damaging the ice skater. I instead programmed the motor to spin the girl in a circular motion, resembling a figure-eight pattern. The motor ran for 30 seconds after activation.
The LED lights were the same brand as my previous project, so I reused the original code and connected the LEDs using alligator clips.
Sound
I sourced sound from FreeSounds.org, edited it in Audacity to ensure compatibility with the circuit board, and integrated it into the code.
Light Sensor
the ciruct board with a built in light sensor was placed in the drawer area to detect when the drawer was opened. This triggered the lights, motor, and sound.
Final Assembly
I wrapped the inside of the drawer, as well as the base of the village and parts of the glass, in blue-silver wrapping paper to evoke a snowy contrast against the tan exterior.
Code
Code to say I wrote:
import time
import board
import pwmio
from analogio import AnalogIn
from adafruit_motor import servo
import digitalio
# Try importing the audio modules compatible with your board
try:
from audiocore import WaveFile
except ImportError:
raise ImportError("audiocore module not found on your board.")
try:
from audioio import AudioOut # Use audioio if available
except ImportError:
try:
from audiopwmio import PWMAudioOut as AudioOut # Fallback to audiopwmio
except ImportError:
raise ImportError("Neither audioio nor audiopwmio is available on your board.")
# Setup for light sensor on Pin A1
light_sensor = AnalogIn(board.A1)
# Setup for the speaker
spkrenable = digitalio.DigitalInOut(board.SPEAKER_ENABLE)
spkrenable.direction = digitalio.Direction.OUTPUT
spkrenable.value = True
# Load the sound file
wave_file = open("christmas.wav", "rb")
wave = WaveFile(wave_file)
# Audio output
audio = AudioOut(board.SPEAKER)
# Setup for rotation servo motor on Pin A2
pwm = pwmio.PWMOut(board.A2, frequency=50)
cont_servo = servo.ContinuousServo(pwm)
# Setup for fairy lights on Pin A5
light_pin = digitalio.DigitalInOut(board.A5)
light_pin.direction = digitalio.Direction.OUTPUT
# Function to get light level
def get_light_level():
return light_sensor.value # Returns a value between 0 and 65535
# Threshold for light detection (adjust based on environment)
LIGHT_THRESHOLD = 30000
# Variables to track servo and timer state
servo_running = False
start_time = 0
while True:
light_level = get_light_level()
print(f"Light level: {light_level}") # Debugging output
if light_level > LIGHT_THRESHOLD: # Light detected
print("Light detected! Turning on lights, starting servo, and playing sound.")
# Turn on fairy lights
light_pin.value = True
time.sleep(0.5) # Flashing effect
light_pin.value = False
time.sleep(0.3)
# Play sound if not already playing
if not audio.playing:
audio.play(wave)
# Start servo
if not servo_running:
cont_servo.throttle = 1.0 # Full speed forward
servo_running = True
start_time = time.monotonic() # Record the current time
# Check if 30 seconds have elapsed for servo
if servo_running and (time.monotonic() - start_time >= 30):
print("30 seconds elapsed. Stopping servo.")
cont_servo.throttle = 0.0 # Stop the servo
servo_running = False # Reset state
# Ensure lights are off if no light is detected
if light_level <= LIGHT_THRESHOLD:
light_pin.value = False
time.sleep(0.1) # Small delay for loop stability
Final Product
Here is a video: VIDEO LINK
0 notes
Text
Project 3 Idea
Interactive Christmas Jewelry Box
Features:
LED Lights
Person Moving (Skating)
Sound (Music)
Activation: Lights and sound are triggered when the drawer is opened (using a light sensor).
Linear Actuator: Utilizes a 3D-printed actuator from Thingiverse.
Notes:
May need to connect power and ground to the breadboard.
To-Do List:
Design: Plan the layout and design for the village inside the jewelry box.
Build the Box: Include a drawer and allocate space for movement and lighting components.
Mechanics: Develop foldable mechanisms for smooth operation.
Cut and Color: Prepare, cut, and decorate the components.
Lighting System: Ensure LED lights function correctly.
Motor Operation: Configure and test the motor for movement.
Custom Sound: Implement a sound system for personalized music.
Light Sensor: Test and confirm the sensor's functionality.
Breadboard (Optional): Assemble circuits if needed.
Final Assembly: Put all components together.
Testing: Run thorough tests to ensure all features work seamlessly.
0 notes
Text
0 notes
Text
Project 2: Life Hacks Documentation
Note: I cannot include more than one video in this post. Please click the links to view the progress videos.
Premise: The assignment was to create a machine that aids an activity you perform daily. Using 3D printing and electronic input and output, I decided to design a hearing aid. This hearing aid would function as an ear horn to amplify sound around your ear, without amplifying the sharp, uncomfortable noises that traditional hearing aids sometimes produce (such as glass clicking or screeching). It is intended to serve as a conversational aid for people with tinnitus.
The original idea came from the common gesture of holding your hand to your ear to better hear someone speaking. During research, I discovered an object called an ear horn, which is a comically large horn or metal attachment worn on the ear. Obviously, this would be too big and heavy for practical use. So, I came up with the idea for a motorized version that would attach to your ear and could be adjusted to point toward the direction of the sound.
Process:
After brainstorming, I decided that a servo motor would be the best choice for rotating the device within a 180-degree range, maximizing the sound amplification.
I started testing the servo motor by running the standard Servo.py code in code.py. Since I didn’t have a male alligator clip, I used female alligator clips and double-ended male jumper wires to make the connections.
Note: You must have the adafruit_motor folder in your lib folder to run this code.
CODE:# CircuitPython Essentials - Standard Servo Example import time import board import pwmio from adafruit_motor import servo # Create a PWMOut object on Pin A2 pwm = pwmio.PWMOut(board.A2, duty_cycle=2 ** 15, frequency=50) # Create a servo object, my_servo my_servo = servo.Servo(pwm) start_time = time.monotonic() interval = 1 flipflop = False while True: print(“Current time:”, time.monotonic()) # Check if the interval has passed if time.monotonic() - start_time > interval: # Reset the timer start_time = time.monotonic() # Toggle flipflop and set servo angle accordingly if flipflop: my_servo.angle = 0 flipflop = False else: my_servo.angle = 180 flipflop = True time.sleep(0.1) # Add a short delay for stability
You can see this code in action running the motor in the following video
[VIDEO LINK]
Then, to enable user control over the direction and timing of the motor, I edited the code. I decided to use the A and B buttons to represent left and right, respectively. It took some time to figure this out, but I ultimately ended up with the following code:
import time
import board
import pwmio
from adafruit_motor import servo
from digitalio import DigitalInOut, Direction, Pull
# create a PWMOut object on Pin A2.
pwm = pwmio.PWMOut(board.A2, duty_cycle=2 ** 15, frequency=50)
# Create a servo object, my_servo.
my_servo = servo.Servo(pwm)
# Set up buttons A and B
button_a = DigitalInOut(board.BUTTON_A)
button_a.direction = Direction.INPUT
button_a.pull = Pull.DOWN
button_b = DigitalInOut(board.BUTTON_B)
button_b.direction = Direction.INPUT
button_b.pull = Pull.DOWN
# Set initial angle for the servo
angle = 90 # Start at the middle position
# Set the speed of angle change
angle_step = 5 # degrees per loop iteration
while True:
# Check if button A is pressed
if button_a.value:
# Increase the angle, but limit it to 180 degrees
angle = min(angle + angle_step, 180)
my_servo.angle = angle
print(“Button A pressed, increasing angle:”, angle)
# Check if button B is pressed
elif button_b.value:
# Decrease the angle, but limit it to 0 degrees
angle = max(angle - angle_step, 0)
my_servo.angle = angle
print(“Button B pressed, decreasing angle:”, angle)
# Wait a short time to debounce and avoid overwhelming the servo with changes
time.sleep(0.05)
[VIDEO LINK]
Next, I designed the sound amplifier. I sketched it to resemble the shape of the ear and chose to focus on the right ear. Using Onshape, I created the model and extruded it to be about half an inch tall, smoothing out the edges. Initially, I wanted to make it more rounded, but I realized that would be uncomfortable next to the ear. So, I opted for a flatter base. This did reduce the amplification effect, and in hindsight, I would have aimed for a better balance between comfort and effectiveness.


After printing the amplifier, I decided to attach it to the servo motor using a cap. This way, I could easily remove the device whenever needed. I measured the cap to ensure it would fit securely on the rotating part of the servo motor and printed it out.


The most challenging part was designing the rotating mechanism. While the servo motor would perform the rotation, I needed a way to attach it to the ear. That’s when I came up with the idea of using a hinge. After testing various hinges, I chose a 30x40 hinge because it allowed for a full 180-degree rotation and could be positioned close enough to the ear to be effective. I experimented with different ways to attach the hinge to the device and ultimately decided to connect one side to the ear horn and the other to the cap on the servo motor.
[VIDEO]
For the attachment to the ear, I knew I wanted the device to sit on the outside of the ear rather than inside it. An internal device would act like a plug or be too harsh as a sound magnifier. I opted to use an ear hook, which I sourced from Amazon. It was important to choose a hook made of flexible plastic so it could adapt to different ear sizes.
Once everything was connected, I tested the device. It successfully rotated left and right, didn’t interfere with the ear, and helped amplify speech when someone was speaking directly in front of or beside the user.
[INSERT VIDEO LINK]
Initially, I planned to use the A and B buttons on the Adafruit board to control the left and right rotation. However, I later decided to add two 6mm buttons on the back of the servo motor for manual control, eliminating the need to rely on the board. While these buttons made the device more accessible, the extra wiring could potentially get in the way for users with long hair. Despite this, the buttons' placement near the ear made the controls easy to reach.
[FINAL VIDEO]
Conclusion: Overall, this was a fun project that allowed me to take an idea and a problem and come up with a practical solution. While the device isn't highly effective for long-term use—due to its fragility and reliance on wiring—it served its purpose as a prototype. If I were to redo the project, I would aim to make it wireless, improve the amplification, and refine the attachment system to make the device more durable and aesthetically clean.
0 notes
Text
Project 2 Motor Video w/buttons
0 notes
Text
Project 2 Documentation: Servo Motor
I started testing the servo motor by running the standard Servo.py code in code.py. Since I didn't have a male alligator clip, I used female alligator clips and double-ended male jumper wires to make the connections.
Note: You must have the adafruit_motor folder in your lib folder to run this code.
CODE:# CircuitPython Essentials - Standard Servo Example import time import board import pwmio from adafruit_motor import servo # Create a PWMOut object on Pin A2 pwm = pwmio.PWMOut(board.A2, duty_cycle=2 ** 15, frequency=50) # Create a servo object, my_servo my_servo = servo.Servo(pwm) start_time = time.monotonic() interval = 1 flipflop = False while True: print("Current time:", time.monotonic()) # Check if the interval has passed if time.monotonic() - start_time > interval: # Reset the timer start_time = time.monotonic() # Toggle flipflop and set servo angle accordingly if flipflop: my_servo.angle = 0 flipflop = False else: my_servo.angle = 180 flipflop = True time.sleep(0.1) # Add a short delay for stability
You can see this code in action running the motor in the following video.
Then, to enable user control over the direction and timing of the motor, I edited the code. I decided to use the A and B buttons to represent left and right, respectively. It took some time to figure this out, but I ultimately ended up with the following code:
import time
import board
import pwmio
from adafruit_motor import servo
from digitalio import DigitalInOut, Direction, Pull
# create a PWMOut object on Pin A2.
pwm = pwmio.PWMOut(board.A2, duty_cycle=2 ** 15, frequency=50)
# Create a servo object, my_servo.
my_servo = servo.Servo(pwm)
# Set up buttons A and B
button_a = DigitalInOut(board.BUTTON_A)
button_a.direction = Direction.INPUT
button_a.pull = Pull.DOWN
button_b = DigitalInOut(board.BUTTON_B)
button_b.direction = Direction.INPUT
button_b.pull = Pull.DOWN
# Set initial angle for the servo
angle = 90 # Start at the middle position
# Set the speed of angle change
angle_step = 5 # degrees per loop iteration
while True:
# Check if button A is pressed
if button_a.value:
# Increase the angle, but limit it to 180 degrees
angle = min(angle + angle_step, 180)
my_servo.angle = angle
print("Button A pressed, increasing angle:", angle)
# Check if button B is pressed
elif button_b.value:
# Decrease the angle, but limit it to 0 degrees
angle = max(angle - angle_step, 0)
my_servo.angle = angle
print("Button B pressed, decreasing angle:", angle)
# Wait a short time to debounce and avoid overwhelming the servo with changes
time.sleep(0.05)
VIDEO LINK: HERE
0 notes
Text
Button Project 3D Printing
Buttons and their designs in onshape


0 notes
Text
PROJECT 1 SOMETHING ABOUT YOU
PROCESS: https://eleanorlusteinbrecher.tumblr.com/physicalcomputing1
0 notes