
k / 21+a collection of resources forrp, writing, and more!
Don't wanna be here? Send us removal request.
Statistics
We looked inside some of the posts by enchanthings and here's what we found interesting.
Average Info
Notes Per Post
32K
Likes Per Post
19K
Reblog Per Post
13K
Reply Per Post
13
Time Between Posts
14 hours
Number of Posts By Type
Text
14
Note
3
Last Seen Tumblr Blogs


Fun Fact
In 2020, 44% of users from Denmark used Tumblr daily.
Text


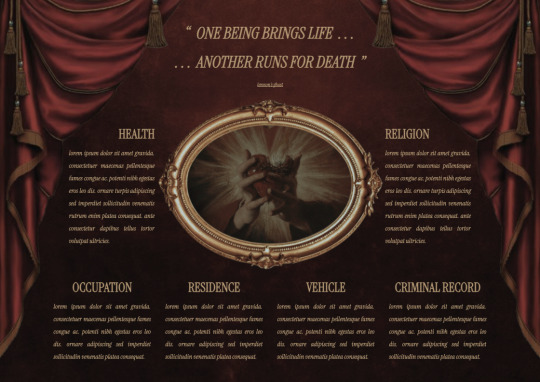


GOOGLE DOCS TEMPLATE XXIII - KING OF EVERYTHING
. . . single-muse template
rules
i. please don't remove credit
instructions
i. click the link in the title
ii. select "file" in the toolbar, then "make a copy"
iii. edit images by right-clicking on them and selecting "replace image"
iv. feel free to edit as you please!
96 notes
·
View notes
Note
is it possible to have the rag doll dividers recolored into light and dark blues? if not just ignore this lol, tysm! love all ur work ^_^
hi, yes sure! I do love blue. hope these work!
◦˚~ BLUE RAGDOLL DIVIDERS ~˚◦


Info: these were all made by me. please follow my rules & reblog/like if use!
#blue dividers#light blue dividers#aesthetic dividers#button dividers#ragdoll dividers#dividers#page dividers#tumblr dividers#line dividers#plaid dividers#post dividers#m: a#m: d#r: dividers
48 notes
·
View notes
Text


Monochromatic — Carrd template #006
Free (pay what you want) monochromatic/greyscale Carrd template designed for single muse blogs.
Preview here!
Features landing, rules, and muse pages. A pro-lite account is required for this template.
Guide to using:
➥ Don't claim as your own, and leave the credit in tact! You may edit the colour and size. I don't mind how you change it as long as it still links back to my blog.
➥ This template doesn’t have any special requirements. However if you want to upgrade, feel free to add my referral code ( ZPOOKYCODEZ ) at the checkout, or through this link <3
➥ Like and reblog if using! Optional, but it helps.
➥ Link to the template's shop page is here. The template is free, but any donations are thoroughly appreciated <3
30 notes
·
View notes


Text
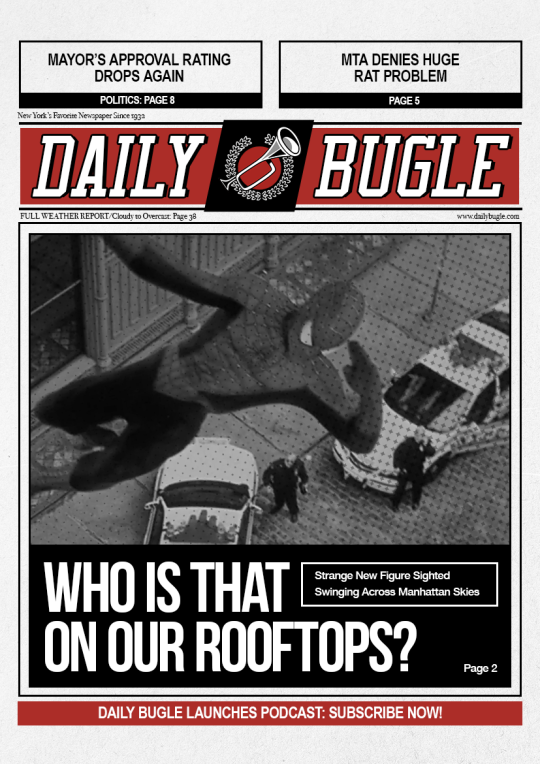
DAILY BUGLE ⠀ ⋆ ⠀ A NEWS TEMPLATE.
click on the source link to download DAILY BUGLE, a free/pay what you want newspaper template based on the daily bugle newspaper! basic knowledge of photoshop is needed for this template. usage guidelines are inside the psd. ♡ if you like my work, consider buying me a coffee!
37 notes
·
View notes
Text
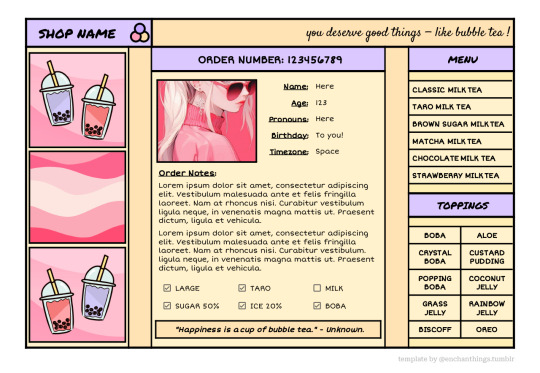


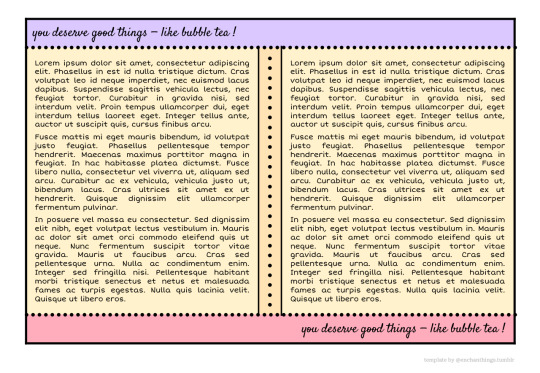

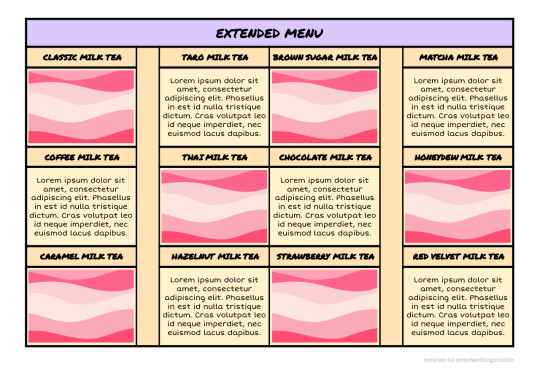
◦˚~ BOBA SHOP by enchanthings ~˚◦
Info:
A colourful, single-character doc inspired by bubble tea menus and shops!
Page size: Executive (7.25" x 10.5")
Number of pages: 6
Drawings: No
Features: Statistic levels, social media widget
Credits: @tragedynoir's #03 Creator Sprint
Terms of Use:
Always copylock your edited doc when sharing it with others.
You may edit editable parts as you wish (colors, images, add, replace, or remove, etc).
You may mix pages only with pages from my other templates.
Do not remove my credit from the templates.
Do not copy, sell, redistribute my templates in any way.
My ask box is open if you have any questions/problems!
◦˚~ [ download access through source link ] ~˚◦
75 notes
·
View notes
Text
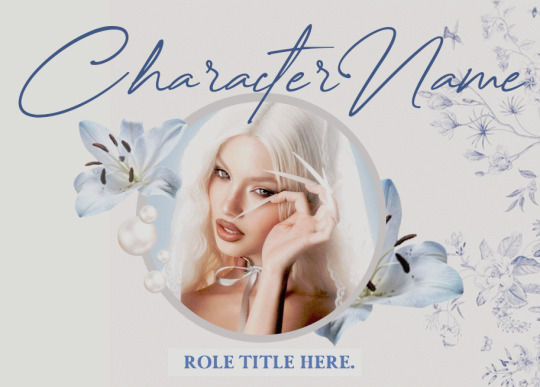
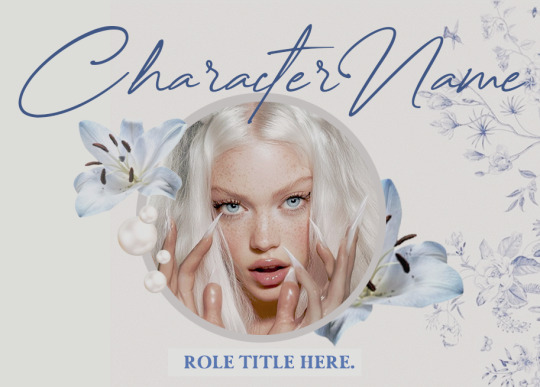
•✦ [ 21. 𝐂𝐋𝐎𝐔𝐃𝐁𝐄𝐋𝐋 ] ✦• a header & character template
─── 𝒅𝒆𝒔𝒄𝒓𝒊𝒑𝒕𝒊𝒐𝒏.
this is an easy to edit header/character template that was inspired by the color blue, pearls and ceramic patterns. very simplistic and user friendly. anyways, feel free to dm me if you have any further questions or need help! enjoy!
─── 𝒆𝒙𝒕𝒓𝒂 𝒅𝒆𝒕𝒂𝒊𝒍𝒔.
fonts: creattion demo, galileo
PSD coloring is NOT INCLUDED [ click here for psd ]
images do not belong to me and are credited to their rightful owners.
do not copy, do not steal, or monetize. [ read my rules ]
tip me at my coffee jar ♥
please credit me if you use the content.
please [ like/reblog ] this if you intend to use.
•✦── 𝐚𝐜𝐜𝐞𝐬𝐬 𝐠𝐫𝐚𝐧𝐭𝐞𝐝 𝐢𝐧 [ 𝐝𝐢𝐬𝐜𝐨𝐫𝐝 ] 𝐬𝐨𝐮𝐫𝐜𝐞 𝐥𝐢𝐧𝐤. ──✦•
55 notes
·
View notes
Text

LEMON DROP … a two-panel simplistic graphic template, sized 360x450. coloring is included. fonts used are im fell dw pica and old english text mt. as always, credit is mandatory. please do not use in any paid commissions. price is free.
23 notes
·
View notes
Note
hi, do you still do dividers? if yes, would you be able to do some similar ones like the first divider in 'dark cemetery', the gradient one? thank you in advance <3
hi! yes I do recolours of my dividers. if you could give me a general colour or a specific hex code, I could put the req in my to do list. (*please note that I do my list in order from top to bottom)
0 notes
Text
set the scene setting prompts (but a little more specific) from yours truly.
001, a convenience store past midnight.
002, a hospital waiting room at 3 in the morning.
003, a photoshoot outdoors in the middle of winter.
004, an indoor filming set of a detective's office.
005, a new house/apartment filled with unopened cardboard boxes.
006, a swing set in an empty playground at night.
007, on stage in an empty theatre.
008, inside an old abandoned house.
009, an empty cemetery at night.
010, the arrival hall at an airport.
011, the last train compartment that's not full.
012, the roulette table in a casino.
013, on the deck of a cruise ship.
014, a kitchen during a black out, surrounded by candles.
015, a treehouse in the middle of the woods.
016, on the dance floor during a wedding.
017, behind the chapel before the wedding ceremony starts.
018, backstage during the middle of a concert.
019, a crowded club during a bachelorette party.
020, standing in front of a painting at a museum.
021, a small, intimate family barbecue.
022, a gazebo while it's raining.
023, the back of an empty bus.
024, a hotel room with only one bed.
025, an empty balcony while a party goes on inside.
026, a bar just after closing.
027, an empty sports stadium.
028, lakeside while the sun is setting.
030, an empty stretch of road beside a broken down car.
031, in front of a suspicious pool of blood in an empty parking lot.
032, in the crowd of spectators during an underground fight.
033, a plane during a bout of turbulence.
034, on kiss cam at a sports game.
035, at a table during a charity gala.
036, a masquerade ball.
037, a halloween party in a suburban house.
038, the beach in the late afternoon.
039, a dressing room after a big performance.
040, exploring the depths of a mysterious cave.
4K notes
·
View notes
Text

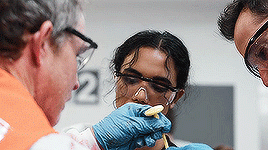
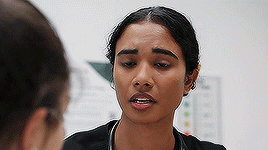
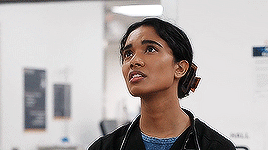
-ˋˏ ☾ SUPRIYA GANESH, #580 / THE PITT, S01E01-15 (2025)...
INFORMATION: supriya was born in 1997 and is of INDIAN descent, cast appropriately when using my resources. ALL OF THESE GIFS WERE MADE FROM SCRATCH. you may edit these as much as you like. do not redistribute or claim as your own. CHECK THE SOURCE LINK BELOW.
୭ THIS PACK IS FREE AND ACCESSIBLE THROUGH A ZIP FILE.
200 notes
·
View notes
Text

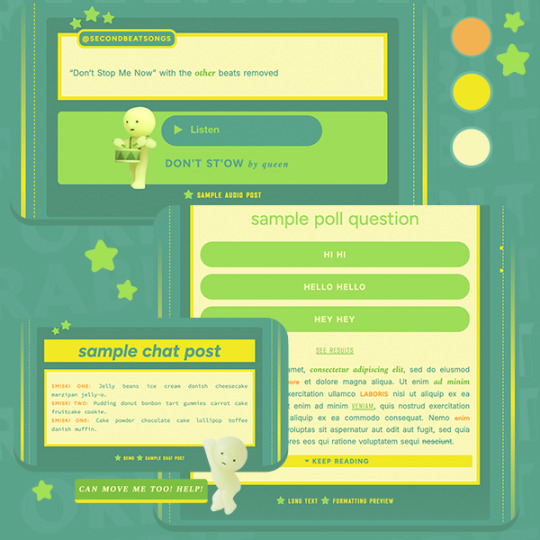
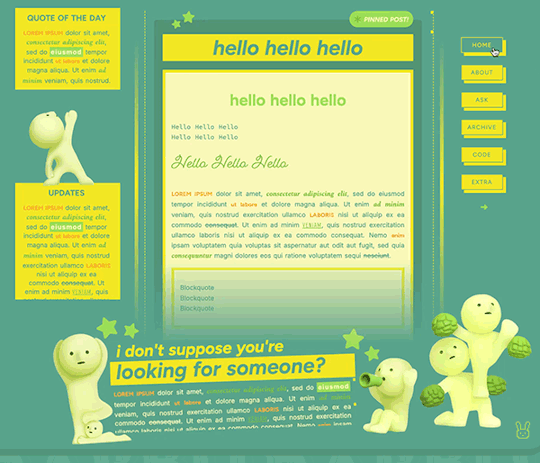
SMISKIS (#001)
dress your blog up with a theme that says in another life, you’d probably be reincarnated into a smiski 💚

live preview ★ download here — includes theme guide, credits & code
★ core features
single column container
npf + legacy friendly 400px posts
browser tab title, blog title, subtitle and description
1 - 2 sidebars
3 - 6 custom links
customizable font sizes, color scheme and tumblr controls
maximize freewill by dragging the smiskis anywhere
can even replace some of them with your own PNGs
scroll at the bottom of your posts to find a lil guy
★ theme notes
slow connection will cause the theme or some parts of it to look glitched out. just refresh and patiently wait for the smiskis to fix that up on the back-end !
unable to test on other browsers / screen sizes, but is so far suitable for google chrome + safari desktop with the ff. screen resolutions: 1280 x 800, 1440 x 900, 1512 x 982px.
credits to @zacharyfury-blog (smooth scroll), malihu (tooltips), @neothms & @magnusthemes (unnest captions), @glenthemes (npf audio player), and taye adeyemi (interact js).
this first theme of mine took a whole month to finish and i just got the courage to publicly release it 🥹 so likes and reblogs are greatly appreciated, thank you !
113 notes
·
View notes


Text

INFO & RULES:
follow all my general rules.
please do not claim, do not repost, do not reupload, do not edit/alter any of my dividers. most of my dividers are hand-drawn and all are edited by me.
do not use my dividers for smut fics involving real life people/celebrities.
credits are very much appreciated!
do not recolour my dividers. you can ASK me for a recolor of my dividers regardless if my requests for new designs are open or closed.
if you're able & willing, support me with cup of ko-fi ? tyvm!!
requests for new designs are [ CLOSED ].

list below:
AESTHETIC
dark cemetery
ragdoll / blue ver.
space
watercolor waves
pastel cloud drop
feathers & hearts blue & gold
ANIMATED
yellow lightning | moon & stars | green | pixel | stars | hearts
COLOUR
set of maroon / blue
bunch of light grey & white / beige & brown / black / pink / maroon / yellow / purple
swirly black & white / beige & brown / purple / pinkish purple
hearts and pink / purple
LINES
brown | green & pink
SEASONAL
december holiday
halloween (+ icons)
FANDOM
winter soldier
pokemon sword & shield
twilight
6 notes
·
View notes
Text
My GIF Making process: Screen capturing using MPV player, Organizing files, 3 Sharpening settings, Basic Coloring PSD + Actions set

This is a very long post so heads up.
I’ll try to be as thorough and true as much as possible to the way I make my gifs (I already use Photoshop Actions which I’ve long since set up but now for this tutorial I’m reviewing them to show you the exact steps I’ve learned to create my gifs 😃) and present them to you in a semi-coherent way. Also, please bear with me since English is my second language.
First things first. Below are the things and tools we need to do this:
Downloaded 4K or 1080p quality videos (let’s all assume we know where to get these—especially for high definition movies and tv series—so this post doesn’t get removed, okay? 😛)
Adobe Photoshop CC or the CS versions can work as well, but full disclosure I haven’t created gifs using the CS versions since 2020. I’m currently using Adobe Photoshop 2024.
mpv player. Use mpv player to get those frames/screenshots or any other video player that has a screen grabber feature. I’ve used adapter for the longest time but I’ve switched to mpv because the press to screenshot feature while the video is playing has been a game changer not to mention ultimate time saver for me. For adapter you need to play it in another video player (like VLC player), to get the start and end timestamps of the scene you want to gif which takes me ages before I can even open Photoshop.
Anyway! Please stop reading this post for a moment and head over to this amazing tutorial by kylos. She perfectly tells you how to install and use mpv player, both for Mac and Windows users.
One thing I have to share though, I had a tough time when I updated my MacOS to Sonoma since MPV is suddenly either duplicating frames or when I delete the duplicates the player seems to be skipping frames :/ I searched and found a solution here, though it didn’t work for me lol. My workaround for this in the meantime is decreasing the speed down to 0.70 then start screenshotting—it’s not the same pre Sonoma update but it works so I’ll have to accept it rather than have jumpy looking gifs.
Now, after this part of kylos’ tutorial:

you can continue reading the following sections of my gif tutorial below.
I want to share this little tip (sorry, this will only cater to Mac users) that I hope will be helpful for organizing the screenshots that MPV saved to the folder you have selected. Because believe me you don’t want to go through 1k+ of screenshots to select just 42-50 frames for your gif.
The Control + Command + N shortcut
This shortcut allows you to create a new folder from files you have pre-selected. As you can see below I have already created a couple of folders, and inside each folder I have selected screenshots that I want to include in one single gif. It's up to you how you want to divide yours, assuming you intend to create and post a Tumblr gifset rather than just one gif.

Another tip is making use of tags. Most of, if not all the time, I make supercorp gifs so I tag blue for Kara and red (or green) for Lena—just being ridiculously on brand and all that.
Before we finally open Photoshop, there's one more thing I want to say—I know, please bear with me for the third? fourth? time 😅
It's helpful to organize everything into their respective folders so you know the total number of items/frames you have. This way, you can add or delete excess or unnecessary shots before uploading them in Photoshop.
For example below there are 80 screenshots of Kara inside this folder and for a 1:1 (540 x 540 px) Tumblr gif, Photoshop can just work around with 42-50 max number of frames with color adjustments applied before it exceeds the 10 MB file size limit of Tumblr.

Sometimes I skip this step because it can be exhausting (haha) and include everything so I can decide visually which frames to keep later on. You'll understand what I mean later on. But it's important to keep the Tumblr 10 MB file size limit in mind. Fewer frames, or just the right amount of frames, is better.
So, with the screenshot organization out of the way, let's finally head over to Photoshop.
Giffing in Photoshop, yay!
Let’s begin by navigating to File > Scripts > Load Files into Stack…

The Load Layers window will appear. Click the Browse button next.
Find your chosen screenshots folder, press Command + A to select all files from that folder then click Open. Then click OK.
After importing and stacking your files, Photoshop should display the following view:

By the way, I'll be providing the clip I've used in this tutorial so if want to use them to follow along be my guest :)
If you haven't already opened your Timeline panel, navigate to Windows > Timeline.
Now, let's focus on the Timeline panel for the next couple of steps.
Click Create Video Timeline, then you’ll have this:

Now click the menu icon on the top right corner then go to Convert Frames > Make Frames from Clips

Still working on the Timeline panel, click the bottom left icon this time—the icon with the three tiny boxes—to Convert to Frame Animation
Select Make Frames From Layers from the top right corner menu button.
So now you have this:

Go and click the top right menu icon again to Select All Frames
Then click the small dropdown icon to set another value for Frame Delay. Select Other…

The best for me and for most is 0.05 but you can always play around and see what you think works for you.
Click the top right menu icon again to Reverse Frames.
I think Photoshop has long since fixed this issue but usually the first animation frame is empty so I just delete it but now going through all these steps there seems to be none of that but anyways, the delete icon is the last one among the line of feature buttons at the bottom part of the Timeline panel.
Yay, now we can have our first proper GIF preview of a thirsty Lena 😜

Press spacebar to watch your gif play for the very first time! After an hour and half of selecting and cutting off screenshots! 😛 Play it some more. No really, I’m serious. I do this so even as early (lol) as this part in the gif making process, I can see which frames I can/should delete to be within the 10 MB file size limit. You can also do it at the end of course 🙂
Now, let’s go to the next important steps of this tutorial post which I’ve numbered below.
Crop and resize to meet Tumblr's required dimensions. The width value should be either 540px, 268px, or 177px.
Convert the gif to a Smart Object for sharpening.
Apply lighting and basic color adjustments before the heavy coloring. I will be sharing the base adjustments layers I use for my gifs 😃.
1. Crop and Resize
Click on the Crop tool (shortcut: the C key)

I like my GIFs big so I always set this to 1:1 ratio if the scene allows it. Press the Enter key after selecting the area of the frame that you want to keep.
Side note: If you find that after cropping, you want to adjust the image to the left or another direction, simply unselect the Delete Cropped Pixels option. This way, you will still have the whole frame area available to crop again as needed and as you prefer.
Now we need to resize our gif and the shortcut for that is Command + Opt + I. Type in 540 as the width measurement, then the height will automatically change to follow the ratio you’ve set while cropping.
540 x 540 px for 1:1
540 x 405 px for 4:3
540 x 304 px for 16:9
For the Resample value I prefer Bilinear—but you can always select the other options to see what you like best.
Click OK. Then Command + 0 and Command + - to properly view the those 540 pixels.

Now we get to the exciting part :) the sharpen settings!
2. Sharpen
First we need to have all these layers “compressed” intro a single smart object from which we can apply filters to.
Select this little button on the the bottom left corner of the Timeline panel.


Select > All Layers
Then go to Filter > Convert for Smart Filters
Just click OK when a pop-up shows up.
Now you should have this view on the Layers panel:

Now I have 3 sharpen settings to share but I’ll have download links to the Action packs at the end of this long ass tutorial so if you want to skip ahead, feel free to do so.
Sharpen v1
Go to Filter > Sharpen > Smart Sharpen…
Below are my settings. I don’t adjust anything under Shadows/Highlights.
Amount: 500
Radius: 0.4
Click OK then do another Smart Sharpen but this time with the below adjustments.
Amount: 12
Radius: 10.0

As you can see Lena’s beautiful eyes are “popping out” now with these filters applied. Click OK.
Now we need to Convert to Frame Animation. Follow the steps below.
Click on the menu icon at the top right corner of the Timeline panel, then click Convert Frames > Flatten Frames into Clips
Then Convert Frames > Convert to Frame Animation
One more click to Make Frames From Layers
Delete the first frame then Select All then Set Frame Delay to 0.05

and there you have it! Play your GIF and make sure it’s just around 42-50 frames. This is the time to select and delete.
To preview and save your GIF go to File > Export > Save for Web (Legacy)…
Below are my Export settings. Make sure to have the file size around 9.2 MB to 9.4 MB max and not exactly 10 MB.

This time I got away with 55 frames but this is because I haven’t applied lighting and color adjustments yet and not to mention the smart sharpen settings aren't to heavy so let’s take that into consideration.
Sharpen v1 preview:

Sharpen v2
Go back to this part of the tutorial and apply the v2 settings.
Smart Sharpen 1:
Amount: 500
Radius: 0.3
Smart Sharpen 2:
Amount: 20
Radius: 0.5
We’re adding a new type of Filter which is Reduce Noise (Filter > Noise > Reduce Noise...) with the below settings.

Then one last Smart Sharpen:
Amount: 500
Radius: 0.3
Your Layers panel should look like this:

Then do the Convert to Frames Animation section again and see below preview.
Sharpen v2 preview:

Sharpen v3:
Smart Sharpen 1:
Amount: 500
Radius: 0.4
Smart Sharpen 2:
Amount: 12
Radius: 10.0
Reduce Noise:
Strength: 5
Preserve Details: 50%
Reduce Color Noise: 0%
Sharpen Details: 50%
Sharpen v3 preview:

And here they are next to each other with coloring applied:
v1

v2

v3

Congratulations, you've made it to the end of the post 😂
As promised, here is the download link to all the files I used in this tutorial which include:
supercorp 2.05 Crossfire clip
3 PSD files with sharpen settings and basic coloring PSD
Actions set
As always, if you're feeling generous here's my Ko-fi link :) Thank you guys and I hope this tutorial will help you and make you love gif making.
P.S. In the next post I'll be sharing more references I found helpful especially with coloring. I just have to search and gather them all.
-Jill
771 notes
·
View notes
Note
hiii could you do dividers with the hex code/s:
7A8450
F9CDD5
thank youuu 💞🍵
hi there! sorry this took me a long while!! I wasn't sure if you were asking for a specific recolour, but I hope these still work!


Info: these were all made by me. please follow my rules & reblog/like if use!
#was dealing with stuff irl whew#dividers#line divides#post dividers#green dividers#pink dividers#m: a#m: d#r: dividers
19 notes
·
View notes
Text
PRIDE ICONS !
in this post, you will find 17 bi pride inspired dash icons. please don’t redistribute or claim as your own, like or reblog if using.


Keep reading
216 notes
·
View notes