
Hello! I am Remi, founder of Engelen Audio. Here I document my research and findings as I explore the world of audio mixing, audio software and plugins, and apply it to my current work.
Don't wanna be here? Send us removal request.
Statistics
We looked inside some of the posts by engelenaudio and here's what we found interesting.
Average Info
Notes Per Post
0
Likes Per Post
0
Reblog Per Post
0
Reply Per Post
0
Time Between Posts
15 days
Number of Posts By Type
Text
17
Last Seen Tumblr Blogs


Fun Fact
Users from the US are the majority of Tumblr visitors.
Text
FMP Post 9 - Reflecting On My Progress
At this stage, my practical side of the project is complete. I only have to consolidate my write up and prepare the plugins for final testing and distribution. I think now is a good time to reflect on my project and how far I have come since the start.
This project has been difficult, much more so than I initially anticipated. My original plan included some extra topics of research such as granular synthesis, however, reverb algorithms ended up consuming my entire project. Today I want to go over some of the goals I set myself to achieve.
My first goal was to create a unique and usable effect plugin for which there was room for in the modern plugin market. I believe I have been successful in this, through the design of my algorithms and my GUI. My algorithms offer sounds that are mostly not suitable for normal reverb sounds, but instead focus on large and wild sounds great for experimental and ambient music. The only other plugin I know that achieves this is Valhalla Supermassive, which has been a great inspiration for me.
Furthermore, what sets my plugin apart from Supermassive is the XY pad control. I believe the GUI has a pivotal role in the usability of a plugin, and that a well designed GUI can be the deciding factor for a user to prefer the plugin over another which might potentially sound better. Although the XY pad is nothing new regarding plugin GUI's, I think it was the right choice to add that extra bit of inspiration for the user to craft their own wacky reverb sounds.
Conversely, as happy as I am with my final algorithms, they are far from perfect. Compared to the genius of Valhalla, my reverbs fall short in my opinion. This is of course the difference between 2-3 months of learning compared to Valhalla's decades of reverb enthusiasm. There is definitely room for improvement for my algorithms, and as my knowledge grows over the next few years, I have no doubt that I will update this plugin many times.
My journey into audio programming has only just begun, but to leave my Master's degree with the portfolio of plugins that I have now, I am proud to look back on what I have achieved, and look forward to the continued learning and growth in this area in the future.
0 notes
Text
FMP Post 8 - Designing a Unique Plug-in
This week marked the beginning of my journey into designing my own reverb algorithms. I was very excited to begin this stage and really let my creativity flow, however, I knew it would be a challenge. My goal for this plugin is something exciting and unique within the commercial landscape. There are hundreds of reverb plugins out there, and I don't want mine to just be another standard one to add to that list.
My tutor David pointed me towards a short blog post by Sean Costello (ValhallaDSP) speaking about his Supermassive plugin, a reverb designed to create huge otherworldly reverb sounds. I use this plugin all the time in my own music and I was set on designing my own algorithms to be in a similar style. In this post, Sean explains the origin of the included algorithms to be failed experiments for other projects, which really struck a chord with me. I understood that to achieve crazy-sounding algorithms was essentially a trial and error process until something 'good' sounding is achieved. I have been so busy replicating existing algorithms and using precise maths to ensure the sound is "correct", that this is a refreshing and exciting change in the philosophy of creating reverb algorithms. With algorithms like these, there is no such thing as correct.
I am now equipped with all sorts of reverb components such as allpass delays, comb filters and FDNs, but it's now up to me to combine and experiment. I have some guidelines, namely Keith Barr's (the creator of famous ambient reverb algorithms for Alesis) blog and forum posts, explaining his methodology, but beyond this, it's a blank canvas.
Additionally, I am very interested in GUI design. I know that a good GUI goes a long way for commercial viability. When brainstorming ideas, I knew I wanted a way for the user to blend and control the reverb sound quickly, and I settled on building an XY pad. This allows the user to interact with two parameters at the same time, giving interesting results.
I am glad to have reached what is in my opinion the most exciting stage in my project, and thanks to advice from various sources, I am confident in my journey to craft the reverb plugin that I have always wanted.
0 notes
Text
FMP Post 7 - 10,000 Words Later
The last couple weeks have been intense. Due to my schedule, I won't have much time during August to complete my project, so I've been working 8 hours a day to keep up. Such an intense period has provided me with some thoughts on my progress.
When writing code, it's very easy to become frustrated when something isn't working. There are hundreds if not thousands of lines of code to comb through to find the bug. Double this with the fact that my only real testing equipment to see if my reverb algorithms are good or not, are my ears, and I find that the question "is my algorithm working as it should?" is painfully blurred. These last days have been focused on the relatively more complex algorithms of Dattorro and Jot's FDN, with the maths becoming exponentially more difficult in my view. That said, burn out has become an issue for me, which I have had to keep in mind when setting out my daily plan of action.
I have resolved to split my work day into sections of research and coding. This prevents me from getting stuck into the code preemptively and running into roadblocks that could have been avoided had I read up on the topics. I have found it easy to fiddle with broken code for hours and feel productive, while in reality little progress has been made. To combat this habit, I have begun following a 'write, code, write' pattern. First, research the theory in it's entirety, without opening up Xcode once, followed by writing the code, and finishing off by documenting my implementation of the code. This structure has helped me focus on working efficiently, and has helped me immensely. As a result, my write up has broken the 10,000 word barrier, and I can start to feel proud of my accomplishments so far.
At this point, my implementation of a simple FDN is nearing completion, and I plan to soon move on towards designing my custom algorithm. My research so far has fuelled my brain with plenty of ideas to create my custom reverb, and I am eager to begin.
0 notes
Text
FMP Post 6 - A Morphing brief
My preferred style of working is being given a brief, or a set of instructions, and completing the task by going through each element of said task. So when starting this project, where the brief was a very rough guideline, and where I had to essentially create the brief myself, I realised how this would be more difficult for me than normal.
The advice I received before starting this project was that the project will constantly change throughout the process of completing it, and upon hearing this I felt a little worried, as I enjoy working to a set brief. In the planning stages, I set out my goals for the project with the intent of barely changing them, so that my work would consistently add towards these goals as the weeks went by.
In reflection, however, I can admit that my project has changed significantly and without any major detriment to my workflow.
I begun with the goal in mind to research both reverb and pitch shifting DSP, but now that I have a proportion of the project completed, I have decided to focus solely on reverb. This is because the work of reverb DSP is much larger and more intricate than I first imagined, and it has absorbed my interest away from pitch shifting, for now.
Additionally, I have been constantly changing and re-writing my contents page of my write-up, which has been serving as my visual plan for my project. These changes include re-ordering the various algorithms, when I realise one algorithm leads on better into another.
Finally, I have been reassessing my end products for this project. Initially I aimed to design one plugin, which would include all the algorithms I researched plus a custom built one. However, now I have realised that I should separate the researched algorithms from my own one. I will design a plugin with a basic GUI, that offers the researched algorithms to demonstrate and compare them, and I will create a second plugin with a commercially attractive GUI, that contains a single (or a couple) algorithms of my own design, that cater specifically to a commercially useful purpose. This purpose, at the moment, is designing an ambient reverb that creates a washed out pad like sound. Doing it this way will help me achieve the brief where it states to consider the commercial purpose of my end product.
Overtime I have learnt to be more flexible in my approach to this project, while still retaining some rigidity and purpose.
0 notes
Text
FMP Post 5 - Beyond the Project
At this point, my project has been underway long enough for me to reflect on my progress so far. I recently took the time to sit down and write a short list of issues I've come across and how (and if) I solved them, as well as all the things I succeeded at.
My big takeaway from this exercise was my understanding of code and C++ was struggling to keep up with my solid knowledge of audio theory (digital audio, acoustics etc.) that I have built up over the last 4 years of my education. This was to be expected, as I have only been working with C++ for a year now, but it was presenting problems whenever I tried to apply my audio knowledge to code.
For example, when I was designing my Lowpass Comb Filter (LBCF), I knew exactly how the structure worked. A simple case of filtering the samples coming back through the feedback loop of the Comb Filter, by ways of adding together the current sample with the previous sample. The theory was easy. However, when I tried implementing it in code, I struggled for many hours, as the results never seemed to be what I wanted them to be. Granted, the only way I can really test my code is by auditioning audio through it in my DAW, quite a subjective method, especially when I don't have code versions for some of the raw algorithms from other developers to compare it against. Furthermore, I would reference the built in JUCE reverb, which utilises LBCFs, however the code for this was designed so differently and I will admit more elegantly than my code now, but I didn't want to just copy and paste the code if I didn't understand how it worked.
A lot of time has gone into wrestling with code for algorithms that shouldn't be too difficult to code, which signals to me that I need to again start practicing C++ outside the sphere of my project. The obvious choice of online tutorials is a good first step, but I've also set myself the task to study the DSP basics from Will Pirkle's book, and browse the internet for C++ examples relevant to audio, or even better, reverb algorithms, so I can dissect them and discover new ways of writing code within the context of audio processing. Having already struggled with Schroeder and Moorer, I know that the later algorithms don't get any less complex, so taking this step is vital for the progress of my project.
0 notes
Text
FMP Post 4 - Attention to Detail
The last few days have been tough, but very enjoyable. I've finished the prep work and have gotten stuck into the re-creation of the first couple reverb algorithms, Schroeder's Original and Forgotten, as I have named them. At this stage, I believe I have achieved a successful implementation of both, although to me they don't sound quite right. This will be something I will discuss with David.
Having built the delay line components required for both algorithms, I somewhat underestimated the difficulty of converting the block diagrams from Schroeder's paper into DSP code. I thought it was a simple process of ordering these components correctly. However, this turned out to be more complex than I thought.
One thing that caught me out was selecting values for g, delay time and rt60 time. My goal was to control the reverb time via a user selected rt60 time, as most reverb plugins do. However, it took me a few attempts to realise the relationship between these 3 variables is always linked. I had heard of Kahrs' equation, but hadn't seen a reason to use it until I discovered it mentioned in Schroeder's 1962 paper, albeit rearranged. This was the first of a few discoveries that made me realise the true detail in his paper.
Another such discovery was me realising the g value in the Forgotten algorithm is independent of the g value used for the series Allpass structure used inside the algorithm. I came to this realisation after test running my recreation of the algorithm multiple times and not getting anywhere near a good reverb sound.
The process of implementing Schroeder's algorithms from start to finish resulted in me initially skim reading the 1962 paper and picking out the important bits, to me reading it in thorough detail multiple times to glean any details that might help me through my troubleshooting process. It's been an important lesson in reading the fine print of all the resources I collect, especially for a topic that is quite new to me. I'll be taking this into account for all my future research for this project.
0 notes
Text
FMP Post 3 - Organising my DSP code
One thing I have discovered over the last year of researching and writing DSP code, is that organisation of code is essential to a concise and effective project. Before this week, I had a functioning reverb algorithm, but the code was messy and convoluted. I've had this issue with my previous coding work during this year, so I'm making it a priority to better this.
I've made the choice to use the VariableDelayLine Class that we built in lectures way back in January-February. The alternative would've been the juce::dsp DelayLine object, but since I used the custom Class for my Prog II assignment, I am familiar with how it works. Building the algorithm from last week, I was simply editing the VariableDelayLine Class itself, as the Comb Filters and AllPass Delay objects are largely based on simple delay lines. This was fine for experimenting, but now that I'm tackling the other algorithms, I wanted to create a dedicated class for each object. This image shows how I created multiple versions of the AllPass Delay quickly and easily, while keeping the VariableDelayLine class unaltered.

Here you can see I'm using an instance of the VariableDelayLine called delayLine1, which I edited so that the important functions of reading, writing, and adding feedback are contained in separate functions. This lets me call them when and where I need to do so.
Doing it this way sets me up for an easier time implementing the much more complex algorithms later on such as Dattoro's Plate and Jot's FDN.
JUCE contains its own reverb algorithm: an 8 comb filter 4 allpass Schroeder algorithm with some extra bits such as damping. In the last couple weeks I've looked at it in detail to get a grip of how I might go about writing my code. I noticed its use of Arrays to process many instances of the delay line objects in very few lines of code. As I said before, I wanted to condense my code for efficiency's sake, and went and watched a few videos on how Arrays work in C++. My code went from a line for each comb filter and allpass delay to two for loops summing the comb filters in parallel and the allpasses in series. I was very pleased with how much this simplified my code, while doing exactly the same as the longer version. An added benefit for this method was the ability to create arrays for the delay line object delay times, each being unique.

Here you can see them laid out nicely, easily edited. The allpass timings are in milliseconds and the comb filter timings are coefficients used to multiply the incoming value from GUI controls. The exact way this is set up will change as I explore how to convert these into RT60 values that make more sense to the user.
This week has been very important not only to the project, but to my coding knowledge as a whole, as it has proven I have the ability to write concise code using advanced C++ utilities.
0 notes
Text
FMP Post 2 - The First Steps
I left off last week by mentioning the importance of research before action. So far I’ve held true to this. I’ve spent the last week scouring the internet for books, articles and research papers concerning reverb, and have started building a solid bibliography ready to use for my write up. Although I had a decent idea of my direction for this project, my new-found research has solidified some aspects and removed others from my plan, and as a result I feel much more confident that I can achieve a good end result in a few months time.
I created a contents page for my write up, setting out chapters and sub chapters. Not only does this act as a structure for my write up, it also helps guide me fo my practical project. I have selected a few major reverb algorithms that I want to cover in detail, and I have considered the order of these based on their complexity. I found that there was a nice linear growth of complexity from one algorithm to the next, which makes for a nice easy structure.
Not only must I consider the algorithms, I must also reinforce this research with solid foundations of DSP and reverb knowledge. As such, I have dedicated the first couple chapters to the history and anatomy of reverb. Exploring these topics gives me a deeper understanding of what I will eventually be coding, instead of just copying the algorithms into code without knowing how they truly work. At this stage, I have begun writing the first chapter: the anatomy of reverb. Thanks to my last 4 years of education, much of the basic acoustic theory is already known to me, but I really enjoyed delving in deeper and discovering the maths behind reverb. I have had countless “a-ha” moments this week where an aspect of reverb that I knew existed, was finally explained to me in more detail, and that is an amazing feeling.
At the current moment, I’m unsure whether the anatomy of reverb will precede the history of reverb within my write up. I think I will have to complete both and decide which makes more sense to come first. I expect to also make many changes to these chapters as and when I decide their final order. So far, my research has been very fulfilling and has gifted me more motivation to carry on.
This week hasn’t just been reading and writing. I’ve also started experimenting with some code, namely, implementing a basic Schroeder algorithm. This is by far the simplest algorithm, but having managed a successful implementation, it gives me hope that I’ll be able to tackle the later algorithms. Schroeder’s algorithm consists of parallel comb filters followed by all-pass filters in series. This sounds complex, but from my work with delay lines in my audio programming course this year, I learnt that a comb filter is just a single sample delay with feedback, and an all-pass filter is a comb filter combined with a single sample feedforward delay, as shown in the following block diagram.

Despite the simple DSP, I ran into some difficulty creating the all-pass filters. The comb filter was easy enough, but combining it with the feedforward delay proved difficult to wrap my head around in code. After some discussion with David, he pointed out that I would have to edit the delay line itself to feedback and feedforward the sample at the same time, when previously I was attempting to build it without altering the delay line. His walkthrough helped me practice converting algorithm block diagrams into lines of code, which I was definitely struggling with.
I am glad I started practicing this early, because had I left my coding until after all my research is done, I would’ve felt the time pressure to figure out these issues.
At the current time, I feel as if I am at a good position in my project, eager to move forward, but also with enough time to get the work done and still enjoy the sunshine of the summer months.
0 notes
Text
FMP Post 1 - Setting Up a Plan of Action
The last 7 months of my life have been full of intensive learning. The result is a set of new-found skills I hardly could’ve imagined having before. With 2 commercial plugins publicly available under my name and one more underway, it is safe to say I have found a niche in the music industry I am passionate about. With all this considered, I want my FMP to be the magnum opus of my Master’s degree, showcasing a deep understanding in all areas of Audio Programming and plug-in architecture.
Having now a good grasp of DSP fundamentals such as simple delay lines and compression algorithms, I want to tackle the larger topics of DSP. I considered filter design and machine learning in audio, but a quick glance of the maths involved quickly gave me a headache. A quick chat with David, my supervisor, lead me to consider the big topic of algorithmic reverb. Reverb is something that intrigues me in my musical work, especially when taken to the extreme: creating luscious, ambient pads out of pretty much any sound source. Over the course of the last week or two, I have scratched the surface of this topic and found it to be a great area to dig deep in. It has a rich history and promising future, with maths that I can just about handle!
My main goal for my FMP will be to develop a detailed understanding of algorithmic reverb, exploring its timeline and developing, from scratch, my own code. I believe that being able to demonstrate deep knowledge in such an important aspect of DSP will set me up for my future, and aid me in an ongoing discovery of everything DSP has to offer. In addition, I want to create a practical project that is useful for not just me but others. So with help of David, I have decided to design a plug-in that contains various reverb algorithms, selectable by the user, allowing the user to compare and contrast their effects. This will offer an interactive history lesson into algorithmic reverb. This will be paired with a detailed report discussing the ins and outs of these algorithms and the creators intentions behind them.
The reverb will be the bulk of the project, however, another area of DSP has caught my eye, and I will want to include this here too: pitch shifting. Fortunately, these two topics are related in the form of shimmer reverbs and similar effects. This topic will be covered in less detail, as I will only want to focus on Granular pitch shifting, as this is an efficient, real-time method suitable for my purpose. I believe combining these two relevant areas with demonstrate my wider knowledge of DSP, and will be an interesting topic to cover. However, at this point, I am ready to set this area aside if the workload becomes to much.
Finally, every good audio plug-in has a beautiful GUI. This is an area I enjoy very much, as I have found that a good GUI can peak a plug-in above the sea of similar products, even if the DSP is not revolutionary. I wish to discuss, in brief, GUI design and research popular trends in this area. As a result, my practical project will hopefully come equipped with an easy to use, attractive GUI.
I am very excited to start this project, and must resist getting stuck in with the actual coding of the plug-in. For now, my goal is research: gather as much knowledge as possible and begin a deep dive into world of DSP.
0 notes
Text
Reflection 10: Reflecting on my research
Over the last few months, I feel like I have significantly evolved as a practitioner and researcher in my field. In this final post, I want to reflect on my journey and evaluate what went well and what didn’t.
To analyse my research, I want to reference two aspects: my methods and my methodology. My methods concern the practical ways I have conducted research, whereas my methodology talks about the choices I made regarding how I conducted my research. My first analysis is that whilst conducting my research, I considered my methods much more than I did my methodologies. Right from my first blog post, I knew what methods I would use. For example, I focused heavily on collecting evidence from papers and journals that would reinforce the ideas I explored in my posts. This method can be referred to as Secondary Research, which “may provide a researcher with a basis of knowledge on what relevant information had already been compiled by other researchers in the past.” (McCrocklin, S., 2018). My other methods involved experimentation (Blog Post #2) and market research (Blog Post #3).
The experiment was the rare occasions where I utilised Primary Research, which is where the researcher collects data by themselves. I found Primary Research to be a more difficult area of research because I myself needed to collect data and evaluate it to produce a reliable conclusion that would stand up to criticism. Although my experiment was quite simple, I wanted to ensure it was reliable. First, I ensured that the only thing affecting the dependant variable (sound quality) was the singular independent variable I had selected for the experiment (bit depth). This meant using the same high quality audio chain for each instance, for example the sound card and headphones. However, the experiment was intrinsically flawed. In my conclusion, I presented what I believed to be the results, however due to the nature of the results I could not objectively analyse them, as critical listening is always subjective. Instead, I offered the results as downloadable files so that the reader can analyse the results themselves.
In hindsight, I believe I could have improved my experiment. After reading a chapter on Qualitative Data Analysis (Walliman, N., 2018) I realised my results fit into this category. Qualitative data "is based on data expressed mostly in the form of words – descriptions, accounts, opinions, feelings, etc. – rather than in numbers.”. The chapter, amongst other things, encourages the reader to “search for evidence that might support or contradict” the results. So, to improve my experiment I could find similar experiments and reference them in tandem with my own results. Furthermore, I could have taken a more reflexive role in the research by acknowledging that the results are based on my own expertise and identity. For example, my years of critical listening experience would make me more suited to analyse sound quality than someone without this experience. This would have been a valid argument to reference when analysing my results and arguing their validity.
Fundamentally, the biggest self criticism of my research is my lack of thought towards my methodologies. Had I thought of this earlier, my research would have included more relevant and varied methods. Anne Håkansson writes in a paper that “Typically, students consider the research methods and methodologies at the end of the research process" followed by “Then, the research methods and methodologies, in general, are applied by ”bending the methods” or, even worse, inventing new methods to suit their existing working process.” (Håkansson, A., 2013). To avoid this, I researched established methodologies and concluded that mine was Exploratory Research, which “intends merely to explore the research questions and does not intend to offer final and conclusive solutions to existing problems.” (Dudovskiy, J., n.d) I believe my research fits under this category because the majority of it was to further my personal knowledge and expertise in my field. This included market research, historical context and exploring current innovations within Audio Programming.
From this I can analyse that my role as a researcher is subjective, as all the knowledge I gained was written about through the lens of how it furthered my personal knowledge. Essentially, my blog documents my individual progression into Audio Programming and is very personal. Because of this, I chose my methods to always back up my own questions and theories, resulting in a bibliography consisting of objective research as opposed to disputed theories that could not reinforce my personal ideas. Having said this, I retained an open mind and considered all points of view from various sources, as long as they contained enough objective data to back themselves up.
Finally, I wanted to re read my entire blog and pick up on any progress I have made throughout. One noticeable difference was my attention to source validity and reliability. In more recent posts, I begin to use more up to date sources, which is important in an ever evolving industry. At the start of my blog, I was more focused on obtaining academic sources and didn’t pay attention to how out of date they were. For example, the Audio Programming Book (Boulanger, R., 2010) was a source I referenced often until I realised that there were more relevant sources available online, such as JUCE tutorial pages.
In summary, I think that this blog has elevated my research skills and provided me with valuable experience for future research projects. I have learnt that I, as a researcher, am ingrained into the research process and that my own subjective opinions influence my decisions in my methodology.
References:
McCrocklin, S., (2018) Primary Vs. Secondary Research [Online] October 4th 2018. Available from: https://www.geopoll.com/blog/primary-vs-secondary-research/#:~:text=Primary%20research%20is%20information%20gathered,usually%20where%20most%20research%20begins. [Accessed: 11th January 2021]
Walliman, N., (2018) Research Methods the basics. Chapter 10. 2nd Edition. Routledge - Abingdon, Oxon. [Accessed: 11th January 2021]
Håkansson, A., (2013) Portal of Research Methods and Methodologies for Research Projects and Degree Projects. The 2013 World Congress in Computer Science, Computer Engineering, and Applied Computing. 22nd-25th July 2013. Las Vegas USA: CSREA Press U.S.A. Available from: https://www.diva-portal.org/smash/record.jsf?pid=diva2%3A677684&dswid=9988 [Accessed: 11th January 2021]
Dudovskiy, J., (n.d.) Deductive Approach (Deductive Reasoning) [Online] n.d. Available from: https://research-methodology.net/research-methodology/research-design/exploratory-research/ [Accessed: 11th January 2021]
0 notes
Text
Reflection 9: Evaluating my progress
With my Semester A drawing to a close, I want to use my penultimate blog post to overview my progress in programming so far, specifically by evaluating my programming assignment that is pretty much completed bar a couple final touches.
My programming assignment was to write a simple program that allowed the user to generate an audio file that played a 3 note chord of a complex waveform, for example a square wave. A high level submission would allow the user to customise various parameters of this audio file such as sample rate and bit depth, alongside a text file which logged all of the user’s choices.
Coming into the module with a very basic foundation in C++, I was initially intimidated by this assignment, however, a combination of extra reading, tutorial lectures and utilisation of the JUCE library (a C++ library designed to build audio programs) allowed me to add every feature listed on the assignment brief except one or two.

(Fig 1.1: My Audio Programming assignment brief.)
My approach to tackling this assignment was to build a bare bones prototype of the program and then slowly add extra features as we covered them in lectures and as I progressed through my reading. For me this was an effective strategy as I had a functioning program very early on that I could refine overtime. It allowed me to view and use the extra features we covered in lectures, in context with a working program. This helped me organise my code and understand what each part was doing.
From my research, I learnt that organising code was vital to building successful code. Especially when it comes to debugging (fixing) code, ‘When your code follows specific order, it is much easier for you or anyone else to find particular line or property to change it.’ (Devero, A., 2014). This is important when your code is doing lots of things at the same time. I found with my code that organising it and labelling the individual parts really accelerated my work flow as it allowed me to access different parts of the code efficiently, especially since at my level, I found it difficult to quickly recognise the code as doing a specific task, so labelling helped with that. Furthermore, I wanted to make my code easy to read for when it will be assessed.
Organising my code took some practice, and I often had to go back and re-write functional lines of code wholly to simplify them. For example, I initially had my code that receives user input, located in the main section of the code (”int main” function). However this resulted in a messy section of my code. Below, Fig 2.1. shows how I presented my code initially. The top section is the code that receives and processes the user input, and the lower section tells the program to run the above section. I had a top section for every single parameter listed in the bottom section, which cluttered up the code.

(Fig 2.1: Initial, less organised code.)
I learnt that it was good practice to house code that isn’t included in the “int main” function, in a “header file”. This means that the code is in a separate file that is out of the way, but can still be accessed by code with the “int main” function.

(Fig 2.2: Main.cpp file housing the main code, alongside the Classheader.h header file with the extraneous code.)
Whilst progressing my programming skills, I encountered and used multiple sources. One valuable source was Will C. Pirckle’s Book titled “Designing Audio Effect Plugins in C++” (Pirckle, W., C., 2019). This hefty textbook gave me detailed, math based theory and fundamental knowledge of contexts where audio programming might be used. As digital audio processing is largely based on pre-digital eras, knowing what code to use when is significant. There is little actual source code mentioned in the book, as it focuses more so on the contexts of audio programming. I found this very useful as it was a perfect companion to other sources that I used which focused on the code itself but didn't explain when and where to use them. This book was by no means an easy read, and required me to brush up on my A-level maths, but it definitely assisted my research and work.
An example of a complimentary source as mentioned above, were the JUCE tutorials and the JUCE modules list. These webpages gave me direct access to components from the JUCE library that I could implement into my code. For example, within my code I wanted to allow the user to export the audio in multiple formats such as WAV. The WavAudioFormat Class Reference page (JUCE, n.d) gave me a clear overview of its features so that I could add them to my code.
Employing multiple sources into my research turned out to be a very effective strategy, as there was never a source that would encompass everything I needed.
Overall, I think I have made very good progress in programming. The assignment has introduced me to JUCE and has given me not only more knowledge of audio specific programming, but also introduced me to more general rules and ways of going about building a program start to finish. I have much further to go as I begin to delve into audio plugin architecture, but I feel more confident approaching this with a more solid foundation in audio programming.
References:
Devero, A., (2014). How Many Plug-ins is Too Many? Does It Matter? [Online] October 19th 2014 Available from: https://blog.alexdevero.com/why-every-developer-should-organize-his-code/ [Accessed: December 29th 2020]
Pirckle, W., C. (2019) Designing Audio Effect Plugins in C++. 2nd Edition. New York: Routledge. [Accessed: December 29th 2020]
JUCE, (n.d) WavAudioFormat Class Reference [Online] n.d. Available from: https://docs.juce.com/master/classWavAudioFormat.html [Accessed: December 29th 2020]
Figures:
Figure 1.1: ‘My Audio Programming assignment brief’, Remi Engelen, December 29th 2020
Figure 2.1: ‘Initial, less organised code.’, Remi Engelen, December 29th 2020
Figure 2.2: ‘Main.cpp file housing the main code, alongside the Classheader.h header file with the extraneous code.’, Remi Engelen, December 29th 2020
0 notes
Text
Reflection 8: Keyboard and Mouse, an audio engineer’s enemy
During my research over the last few months, a particular trend has come to my attention. It is not one that has exploded in popularity but rather has crept its way into the workflow of many professionals over the years, as well as my own. It is the phenomenon of the MIDI controller. In this post I want to examine the influence MIDI controllers have had on the audio industry, as well as my personal experience with them. I will also entertain the question of their necessity within a studio setting.
With digital audio having had many years now to settle as the main platform for professional audio, people have been realising that the keyboard and mouse are far from the ideal tool. In relative terms, the mouse is an extremely old piece of tech, first coming to light when ‘Engelbart, now 84, filed the patent in 1967′ as a tool to ‘navigate graphics-filled computer screens with a simple motion of the hand rather than by wading through screens filled with green-tinted text using keys or a light pencil pressed up against a computer monitor.’ (Greenemeier, L., 2009). For many industries, the mouse works fine, and if it isn’t broken, don’t fix it, right? Well, the audio industry is an example of an industry that grew up on pre-digital tech, specifically faders and knobs, and so when DAW’s became the new workspace, many found using a mouse to move sliders and faders to be a pain. The solution that manufacturers found was to utilise the pre-existing technology of MIDI to control anything from virtual instruments to the virtual mixer available in most DAWs.
MIDI was initially developed in the early 80′s as a form of digital communication between various hardware instruments, as the boom of digital synthesisers was beginning. However, nowadays, MIDI is much more commonly used in DAW controllers such as Novation’s Launchkey series and Arturia’s Keystep (Clews, D., 2020).

(Fig 1.1: Novation’s Launchkey Series.)
These particular products focus on being a compact performance interface with your DAW, offering a velocity sensitive keyboard and some even with drum pads to trigger drum samples. This allows the user to perform within a DAW using virtual instruments and synthesisers that they would otherwise have to manual program, making the users ‘computer setup instantly becomes about a hundred times more musical.’ (Computer Music Specials, 2008). Furthermore, Isaac Ben, a Berklee College of Music graduate, claims MIDI controllers are ‘are not mandatory for music production’, but they can help with ‘making your work easier’ while ‘also helping with your creative process.’ (Ben, I,. n.d.)
However, MIDI controllers are not just targeted at producers and composers. Although less spoken about, MIDI controllers for mixing and mastering exist too, and these are particularly interesting to me. The shift from analog consoles to DAW’s was a heavy one, littered with pros and cons, but the change from physical to virtual faders and knobs was a significant change for engineers at the time. This is why mixing consoles are still prevalent in the workspaces of audio legends such as Chris Lord-Alge and Bob Clearmountain who use an ‘60 input 4056 E-series SSL’ (Tingen, P., 2007) console and a ‘72-input SSL’ (MusicTech.net, 2015) console respectively. Luckily, products are being developed that give you the control of a premium console without having to spend large sums, and all the while remaining in the box.
My personal experiences with MIDI controllers of this type are mixed. My first purchase was the Presonus Faderport Classic.

(Fig 2.1: Presonus Faderport Classic.)
This product offers controls for basic DAW transport, as well as channel strip controls such as panning and a volume fader. What attracted me to this product was the inclusion of a motorised fader. The meant that the fader not only sent MIDI data to the DAW, but also knew the position of the digital fader on each channel, so when switching between tracks the fader would automatically jump to the correct position. By observing the figure, we can notice that a large portion of the controller is dedicated to fader automation. This is a specific area of DAW controllers that are arguably the most difficult to do without one. In pre-digital audio, engineers would “ride the fader”, which ‘is the act of constantly monitoring and adjusting gain as necessary during the recording process to prevent overloading the recorder.’ (Fernandez, A., 2004) Doing this with a mouse is notoriously difficult, and with the Faderport, you can quickly select the automation type and record automation just like how the pre-digital engineers would do on their consoles.
More recently, I have replaced the Faderport with the KORG nanoKONTROL2.

(Fig 2.2: KORG nanoKONTROL2.)
This is for a few reasons. MIDI controllers notoriously suffer from compatibility issues with DAWs and OSs. Most manufactures offer drivers that sort this out for you, but these must be updated and in the case of the Faderport, I had a lot of trouble with this aspect. In the end, it made the product more hassle to set up than I got use out of it, as I decided to temporarily go back to 100% keyboard and mouse control. The nanoKONTROL2 is a newer product, and was much better suited to me as it is extremely compact and easy to use. Furthermore, it offered a very intuitive way of customising its controls. This is another big positive of MIDI controllers, compared to analog consoles or even digital/analog hybrid consoles such as the Neve Genesys Black. When setting up the controller, I customised the mapping of the buttons to various options within my DAW (Logic Pro X) and managed to optimise it to the extent that I rarely touch my mouse when mixing. Everything that I need from Logic Pro is now mapped directly to my nanoKONTROL2.
Overall, I believe that MIDI controllers are an essential part in optimising workflow while producing or mixing. While some may argue that it’s another part of the audio industry stuck in the past of analog desks, I fully believe that they offer more efficient workflow than a keyboard and mouse. With digital audio still improving with things like MIDI 2.0, I believe MIDI controllers have a big role in the future of audio.
References:
Greenemeier, L., (2009) The Origin of the Computer Mouse [Online] August 18th 2009. Available from: https://www.scientificamerican.com/article/origins-computer-mouse/#:~:text=Engelbart%20originally%20invented%20the%20mouse,information%20stored%20on%20their%20computers. [Accessed: 21st December 2020]
Clews, D., (2020) The 15 best MIDI keyboards 2020: Mac, PC, iPhone and iPad MIDI controller keyboards for beginners to pros [Online] October 30th 2020. Available from: https://www.musicradar.com/news/the-best-midi-keyboards-our-favourite-laptop-desktop-and-ios-keyboards [Accessed: 21st December 2020]
Computer Music Specials, (2008) The beginner's guide to: MIDI controllers [Online] October 29th 2008. Available from: https://www.musicradar.com/tuition/tech/the-beginners-guide-to-midi-controllers-179018
Ben, I., (n.d.) Are MIDI Keyboards Worth It? [Online] (n.d) Available from: http://makethatbeat.com/are-midi-keyboards-worth-it/#:~:text=They%20are%20not%20mandatory%20for,controllers%20to%20make%20your%20beats! [Accessed: 21st December 2020]
Tingen, P., (2007) Secrets Of The Mix Engineers: Chris Lord-Alge [Online] May 2007. Available from: https://www.soundonsound.com/techniques/secrets-mix-engineers-chris-lord-alge [Accessed: 21st December 2020]
MusicTech.net, (2015) Bob Clearmountain Interview: Scaling the Heights [Online] September 28th 2015. Available from: https://www.musictech.net/features/bob-clearmountain-interview/ [Accessed: 21st December 2020]
Fernandez, A., (2004) What is “Gain/Fader Riding” [Online] December 9th 2004. Available from: https://www.sweetwater.com/insync/gain-fader-riding/#:~:text=Share%20this%20page%3A,faders%20of%20a%20recording%20console. [Accessed: 21th December 2020]
Figures:
Fig 1.1: ‘Novation’s Launchkey Series‘ [Online] Available from: https://novationmusic.com/en/keys/launchkey [Accessed: 21th December 2020]
Fig 2.1: ‘Presonus Faderport Classic’ [Online] Available from: https://www.presonus.com/products/FaderPort-Classic [Accessed: 21th December 2020]
Fig 2.2: ‘KORG nanoKONTROL2’ [Online] Available from: https://www.korg.com/uk/products/computergear/nanokontrol2/ [Accessed: 21th December 2020]
0 notes
Text
Reflection 7: An analysis of ‘modern’ plugins
My blog feed so far has been largely focused on analog emulations: arguably an accurate reflection of the current plugin market. However, the market saturation of analog emulations (no pun intended) is leaving room for developers to venture into different areas of plugin creation. Today, I want to delve into some of the most unique modern plugins released in the past few years and discover what makes them unique, if anything. This research will inspire me for future projects of my own.
When you think modern pop music, you think of heavy hip-hop, trap and r&b influences. Powerful low end, shrill hi-hat rolls and dark, sombre melodies. Selecting high quality drum and melody samples for these tracks is the modern pop equivalent of spending hours dialling in that perfect guitar sound and selecting the perfect mic for the specific guitar amp. After all, the sound source is one of the important parts of production. Because of this, many producers will inevitably collect hundreds if not thousands of samples, which will become a cluttered mess of folder, sub-folders and files. The developers at XLN Audio came up with an ingenious solution: a modern way of organising samples.
XLN Audio’s XO plugin is an AI based sample library, which offers a few main features that make it unique. Firstly, it offers a colour coded visual display of your sample collection that makes finding samples easier than anything else I have seen. Each colour represents a specific type of drum sound.
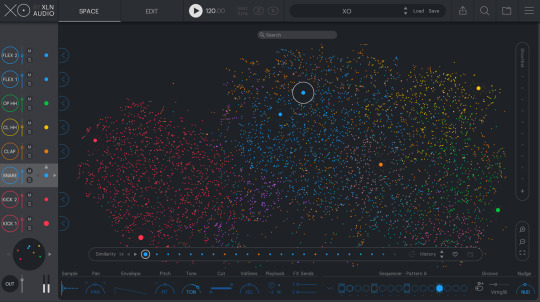
(Fig 1.1: XO’s visual interface.)
XLN Audio have made adding samples to this interface extremely easy. A simple drag and drop employs an AI which not only categorises the samples by type of drum, but groups together samples with similar timbres, so that ‘When you hear something you like, have a look around. You might find something even better close by.’ (XLN Audio, n.d.). Popular music journal Computer Music reported ‘Clearly, the accuracy of the import analysis algorithm in assigning instrument types to samples is crucial in all this, and we can report that XO is very impressive in this regard.’ (Computer Music, 2019) Additionally, XO features a sequencer, multiple audio effects, and comes with up to 8000 samples itself.
My initial exploration of XO made me believe that this was an incredible quality of life improvement plugin for beat makers all over the world, however, at a full price of €180, I questioned whether a sample organiser was worth this much money. Being aimed at the increasingly growing market of beat makers, I doubt that many will consider this a worthy investment when just starting out in music production. Bryan from Everything Recording mentioned further that its additional sequencing features are limited. ‘having only eight slots for instruments is a little annoying’ and ‘Having only two bars and one loop per preset is cumbersome.’ (Bryan, n.d), leaving much to be desired from XO as a stand alone application outside a DAW.
Overall, XO stands out as a unique and useful product, but it’s likely that its price tag will make the majority of its target audience lose interest. Attack Magazine aptly summarise it: ‘if you can afford it – and once you’ve learned how to use it – XO presents little danger of wasting time.’ (Attack Magazine, 2019) For me, XO proves that a good user interface is just as important as the inner workings of a plugin, and I will make sure my future projects reflect that.
Modern plugin creation for me is all about encapsulating the full potential of digital technology, and pushing it to its limits. No other plugin demonstrates this more the Softube’s Weiss DS1-MK3 Mastering processor. What stands out to me is that unlike analog emulations where the argument can be made that the emulation will never sound exactly like the hardware, in the case of the DS1-MK3, Softube’s recreation is ‘A line-by-line code port of the original digital hardware’,’Officially licensed and endorsed by Daniel Weiss himself’. (Softube, n.d.) Therefore, this €399 version of the $10,000 hardware is an exact replica for a fraction of the price. This makes it instantly very attractive for mastering engineers that want the digital transparency that this unit is famous for, but for much less money. The digital prowess of this plugin is supported by legendary mastering engineer Bob Katz who claims he uses it ‘on over 90 percent of my mastering projects.’ (Katz, B., 2003)
Along side the reduced price, the plugin features presets from Bob Katz, allowing users to experience the combination of top mastering expertise and top mastering equipment, right on their computer, as well as being able to load multiple instances of the plugin and no extra cost.

(Fig 2.1: Weiss DS1-MK3 Plugin by Softube.)
For me, plugins like these offer state of the art digital processors to a much larger audience. I personally would like to see more plugin versions of modern digital hardware so that they are more affordable and can be used in as many instances as the users CPU will allow. However, to criticise the DS1-MK3 plugin, many top engineers will always prefer hardware over software: 'engineers love the visceral feeling of pushing real buttons and turning real knobs.’ (McDonough, M., 2017), so when turning a hardware unit into a plugin that doesn’t suffer from analog noise, zero recall ability and all other such negatives that make digital audio processing (DSP) better, you’re left with a plugin that doesn’t do much extra and is now another CPU eating processor that you need to control using a computer mouse instead of knobs. Essentially, for a top mastering engineer who can afford the hardware DS1-MK3, there is almost no reason to go for the plugin over the hardware unit, making the plugin somewhat redundant.
Overall, Softube’s DS1-MK3 presents high quality DSP for a fraction of the usual price, despite removing the knobs and replacing them with pixels on a screen. I believe it to be a good example of useful and modern audio processing.
This research has been a valuable insight into avenues of the plugin market that don’t concern analog emulation. It has helped inspire me to begin planning a DSP project that offer similar modern approaches to audio and are not immediately lost in the sea of emulations, as I would like to build a plugin (or plugins) for my Final Project in Semester C.
References:
XLN Audio (n.d). XO. [Online] n.d. Available from: https://www.xlnaudio.com/products/xo [Accessed: December 13th 2020]
Computer Music (2019). XLN Audio XO review. [Online] July 21st 2019. Available from: https://www.musicradar.com/reviews/xln-audio-xo [Accessed: December 13th 2020]
Bryan (n.d). Review: XLN Audio XO [Online] n.d. Available from: https://everythingrecording.com/review-xln-audio-xo/ [Accessed: December 13th 2020]
Attack Magazine (2019). XLN AUDIO XO [Online] June 12th 2019. Available from: https://www.attackmagazine.com/reviews/gear-software/xln-audio-xo/ [Accessed: December 13th 2020]
Softube (n.d) Weiss DS1-MK3 [Online] n.d. Available from: https://www.softube.com/ds1 [Accessed: December 13th 2020]
Katz, B., (2003) Weiss DS1-MK2 Dynamics Processor. [Online] July 2003. Available from: https://www.weiss.ch/assets/product/6/DS1-katz.pdf [Accessed: December 13th 2020]
Figures:
Fig 1.1: ‘XO’s visual interface‘ [Online] Available from: https://www.xlnaudio.com/products/xo [Accessed: 13th December 2020]
Fig 2.1: ‘Weiss DS1-MK3 Plugin by Softube’ [Online] Available from: https://www.softube.com/ds1 [Accessed: 13th December 2020]
0 notes
Text
Reflection 6: Socially distant recording: a new mindset
Graduating from the UH Creative Music Technology BSc in 2019 and moving directly on to this MSc in 2020, I can definitely say that the impact of Covid-19 has affected the way I work. Fortunately for me, building a foundation in audio programming has not been impacted too much by the current times, as the majority of my work for this has been done from my laptop in my room. However, my work as a mixing and recording engineer has been much more difficult. In this post I want to explore the necessary adaptations I have made in this field of work recently.
In April of this year, I began planning the complete production (producing, recording, mixing and mastering) for a full length album with my band. For me, this was an opportunity to showcase everything I had learnt about music production during my BSc. Of course, due to Covid-19 these plans were delayed and only now have we begun recording. Fortunately, my band members and I are currently all part of the same household, meaning that we can record in my student accommodation room. This of course is entirely worse than a professional studio for a number of reasons, and I need to be aware of these if I want to deliver a professional sounding product.
Firstly, we realised that we would need to record elements individually, which for our style of music is very inconvenient. As mentioned in an article from “performermag”, ‘We strongly recommend in a typical band situation (drums, bass, guitar, keys and vocals), that the rhythm section record live together – including a scratch vocal take from the singer. We do it this way because bands are used to performing together and we aim to capture great performances.’ (Cataldo, Z., Godin, B., 2013). Furthermore, restrictions on indoor socialising meant that rehearsal time was practically impossible. To overcome these issues, I made sure that all parts were tracked to a rigid metronome so that everything would be in time. This compromise did mean that we lost the energy of a live recording, as well as some performers struggling to follow the metronome as opposed to the rhythm of a drummer playing in the background.
As a result of this, I did some research into if I could find a way of quantising the recordings without making them sound unnaturally in time which often happens with rigid quantisation. My research lead to me a feature in Logic Pro called Q-strength, which 'Intentionally un-quantises the notes by a factor between 1 and 100.’ (4:12 - 4:20, MusicTechHelpGuy, 2014).
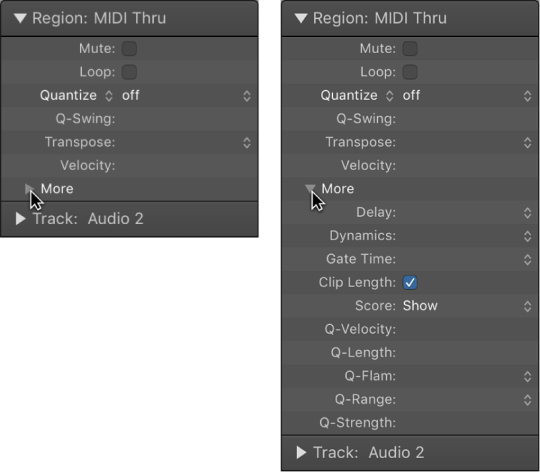
(Fig 1.1: Advanced quantisation parameters in Logic Pro)
This feature allowed me to hold on to the natural feel of the performances whilst ensuring they were all in time with each other.
Additionally, during my research I came across a blog by recording engineer Michael White who had an in depth article concerning overdubbing. A piece of advice that resonated with me was ‘Take regular breaks, especially if there is frustration and confusion in the studio.’ (White, M., 2014) While reflecting on the project so far, I have noticed often during recording sessions that progress with an overdubbing technique has not always been as smooth as we would have liked, so patience and realistic expectations from both my side and the performer’s side are vital. Again, White mentions that ‘It's very easy to overestimate what you can accomplish on any given day of recording.’ Once I realised this, our time spent in the sessions became more productive.
Another problem I encountered was an overall lack of acoustic treatment in the recording stages. Aside from the occasional opportunities I have had to record in the University’s studios (which have not been plentiful), the base of operations has been my student accommodation room. The immediate problems this presents is noisy recordings, so I delved into researching methods of preventing these issues.
I already understood the basics of acoustic treatment, but an article by iZotope was a useful source for some extra information. The article suggested that ‘you may want to convert a closet into an iso-booth, but you very well stand a better chance with a larger, multi-use space, as is-booths are hard to treat correctly.’ (Messitte, N., 2019) This made sense to me as I needed a space to both record and mix the project. Therefore, I covered the flat, reflective walls around my desk space with acoustic foam and placed foam bass traps in corners where lower frequencies may resonate. This helped, but did not solve the problem entirely, so I had to consider other options. Background noise was still present in many recordings and so I decided to purchase iZotope’s RX7 elements, which features a noise reduction module. This combined with the minimal acoustic treatment ended up being satisfactory in my opinion, as the recordings were now at a good enough standard.
Finally, and for most importantly, my research demonstrated that learning the “sound” of my mixing environment was essential to achieving a professional sounding project. In an article, Graham Cochrane suggests that ‘classic moves like throwing more treatment or nicer monitoring at the problem won’t fix it. All rooms sound weird in some way, shape, or form.’ (Cochrane, G., 2015) Instead, I learnt that by listening to professional tracks and critically analysing them in terms of tonal balance, loudness and structure, I could replicate them in my room to achieve a professional sound with my own projects as well. Furthermore, checking the mixes on multiple sound sources ‘will let you hear how most listeners will be hearing your tracks’ (Hawkins, E., n.d).
Having researched and furthered my knowledge, my confidence in producing a high quality project despite limitations set by current times, is much improved.
References:
Cataldo, Z., Godin, B., (2013) Recording Tips: Full Band Takes vs. Individual Tracking [Online] April 11th 2013. Available from: https://performermag.com/home-recording/music-production/recording-tips-full-band-takes-vs-individual-tracking/ [Accessed: December 7th 2020]
MusicTechHelpGuy (2014) Logic Pro X - Video Tutorial 34 - MIDI Quantization pt. 3 - Q-Strength, Q-Range, Q-Flam [Youtube] Available from: https://www.youtube.com/watch?v=hITfeOeauw4 [Accessed: December 7th 2020]
White, M., (2014) The Music Production Process Step 5: Overdubbing [Online] Available from: https://www.music-production-guide.com/overdubbing.html [Accessed: December 7th 2020]
Messitte, N., (2019) 7 Home Recording Studio Hacks for the Bedroom Producer [Online] Available from: https://www.izotope.com/en/learn/7-home-recording-studio-hacks-for-the-bedroom-producer.html [Accessed: December 7th 2020]
Cochrane, G., (2015) 3 Tips For Mixing In A Bedroom, Basement, Or Any Not-So-Good Sounding Space [Online] November 9th 2015. Available from: https://www.recordingrevolution.com/3-tips-for-mixing-in-a-bedroom-basement-or-any-not-so-good-sounding-space/ [Accessed: December 7th 2020]
Hawkins, E., (n.d) Setting Up Multiple Monitors for Better Mixing [Online] (n.d) Available from: https://online.berklee.edu/takenote/setting-up-multiple-monitors-for-better-mixing/ [Accessed: December 7th 2020]
Figures:
Figure 1.1: ‘Advanced quantisation parameters in Logic Pro‘ [Online] Available from: https://support.apple.com/en-gb/guide/logicpro/lgcp35029a2b/mac [Accessed: 28th November 2020]
0 notes
Text
Reflection 5: Do expensive plugins create expensive mixes?
I have already demonstrated some research into the audio plugin market. It is of great interest to me and I constantly scour the internet for the most up to date news. One question I have always asked myself is that, with digital technology being as good as it is now, does it really matter what plugins you use in a mix? Can your DAW’s stock plugins create as good a mix as expensive, top of the range plugins?
The answer seems obvious at first; if stock plugins were as good as expensive plugins, then there would be no demand for the expensive ones and the plugin market would be non-existent. However, as I delved deeper I realised this isn’t exactly true.
Many people who have just started to learn mixing (including myself when I first started my bachelors degree 3 years ago) will quickly be overwhelmed by the sheer amount of plugins that claim to be the perfect tool you need to turn your mixes from average to amazing. After reflecting on my attitude to mixing, I realised that I still bought into what is essentially a marketing scheme. Even recently I would purchase plugins that I thought I needed, when in fact, it was ‘a perfect way to blame your lack of mixing skills on your lack of software, instead of the lack of knowledge.’ (Benediktsson, B., n.d). Further research lead me to the same conclusion everytime: ‘The truth is, if your mix sounds bad – it’s because you just haven’t mixed it well. No plugin can help you there.’ (Cochrane, G., 2016).
My research and self reflection has motivated me to approach mixing with a different mindset, namely, approaching a new mix with a limit on the amount of plugins I could use and seeing how far I can get. This will allow me to really master the basics of, for example, a compressor instead of getting lost in a sea of 3rd party compressors. Once I have achieved this, I can begin exploring other plugins and get the most out of them. This approach is backed by Eric Tarr from Pro Audio Files who says ‘I recommend two things: learning (and even mastering) how to use your stock plugins, and supplementing your stock plugins with other free plugins.’ (Tarr, E., 2014).
On the other hand, as good as stock plugins maybe be, my research has shown them to be more of a starting point to progress from. The fact is hardly any professionals in the industry go for stock plugins because they have advanced knowledge of what these tools do and can get a better result from 3rd party paid plugins. Warren Huart, mixing aficionado and internet personality, states that for him his favourite plugins are ‘the Waves MV2 and Waves RBass, If you’ve seen an interview with me or more importantly an interview with Andrew Scheps. Those are go-tos for both of us.’ (Huart, W., 2019) As a user of Waves RBass, I have to agree that I haven’t found anything else that achieves the same job as it does. To seal the deal, Huart continues: ‘They might be the two things that I can throw into a mix that would take it over the edge and then use stock plugins from there.’ (Huart, W., 2019) .
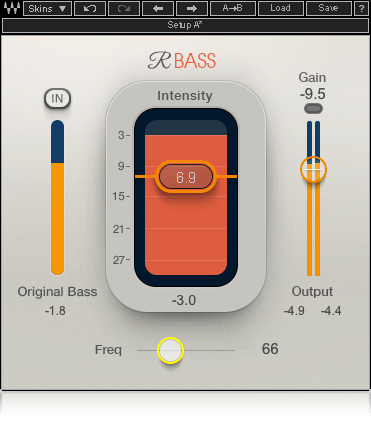
(Fig 1.1: Renaissance Bass)
The overall knowledge I have gained from researching this particular topic comes down to having a good understanding of the basics, before moving on to bigger and better plugins. There is no point buying plugins that you don’t understand how to use. That said, there are some plugins that I have purchased that significantly improve my current mixes. One such plugin is iZotope’s RX7 elements. This plugin suite is a stripped back version of RX7, featuring AI controlled noise removal tools that allow me to clean up my recordings to a standard met by no other plugins, certainly not stock plugins. Being forced to record untreated environments due to current COVID restrictions, RX7 is an invaluable tool in my plugin arsenal.
To test the effectiveness of RX7 versus stock plugins, I set up an experiment where I attempted to treat a noisy recording using only stock plugins. The recording used is a guitar being played quietly through a rather noisy guitar amp, resulting in a very low signal to noise ratio. Firstly, I processed the recording with RX7′s Voice De-noise module, set to adaptive mode. This means the plugin uses machine learning to constantly adapt the noise reduction across the frequency spectrum to remove as much noise while keeping the original signal as untouched as possible. Figure 2.1 shows the module at work.
(Fig 2.1: RX7 Voice De-noise real time processing)
After this, I set to work with stock plugins (Logic Pro X). I knew noise usually resides in the high frequency range, so I opened a stock EQ and used a high shelf curve to remove some level there. I could also hear some low frequency energy, so I added a high pass filter at around 150Hz. After this I attempted to find particular harmonics of the noise using a filter sweep to then notch them out, however I could not remove any without severely impacting the original signal, even with extremely narrow Q on the EQ notches. My conclusion very quickly was that RX7 was miles ahead of anything stock plugins could achieve, thus proving that the RX plugin suite is definitely an “expensive plugin” that creates “expensive mixes”. I have included the audio files below.
Overall, my research and experimentation has demonstrated that although stock plugins are powerful enough to complete most basic mixing tasks to a good standard, there are also plugins that offer features that cannot be replicated for cheap. I have learnt that the key to curating a complete plugin tool box is to first gain a high level of understanding of the basic plugins and then collect others where you feel like you do not have the tool for the job currently. Essentially, plugins are just tools, not magic buttons that improve your mix without any work. Leticia Trandafir from LANDR puts it concisely, ‘Learning how effects work and how to best use them is the key to navigating the sea of plugins and stompboxes that are out there today.’ (Trandafir, L., 2017).
References:
Benediktsson, B., (n.d). How Many Plug-ins is Too Many? Does It Matter? [Online] (n.d.) Available from: https://www.audio-issues.com/music-mixing/how-many-plug-ins-is-too-many-does-it-matter/ [Accessed: November 27th 2020]
Cochrane, G., (2016). Why Mixing With Only Stock Plugins Can Give You A Better Mix [Online] February 22nd 2016. Available from: https://www.recordingrevolution.com/why-mixing-with-only-stock-plugins-can-give-you-a-better-mix/ [Accessed: November 27th 2020]
Tarr, E., (2014). 5 Stock Plugins You Should Replace First [Online] November 20th 2014. Available from: https://theproaudiofiles.com/replace-and-upgrade-stock-daw-plugins/ [Accessed: November 28th 2020]
Huart, W., (2019) Stock Plugins vs. Third Party Plugins | FAQ Friday [Online] March 29th 2019. Available from: https://producelikeapro.com/blog/stock-plugins-vs-third-party-plugins-faq-friday/ [Accessed: November 28th 2020]
Trandafir, L., (2017) Audio Effects: The Beginner’s Guide to Shaping Your Sound [Online] May 12th 2017. Available from: https://blog.landr.com/audio-effects-plugins-guide/ [Accessed: November 28th 2020]
Figures:
Figure 1.1: ‘Renaissance Bass’, Waves [Online] Available from: https://www.waves.com/plugins/renaissance-bass#mixing-beats-vocals-renaissance-plugins-marioso [Accessed: 28th November 2020]
Figure 2.1: ‘RX7 Voice De-noise real time processing’, Remi Engelen, November 28th 2020
0 notes
Text
Reflection 4: Analysing my usage of plugins when mixing
My interest in plugins is a recent branch away from my experience as a mix engineer and producer. In this blog I want to analyse my workflow, specifically regarding choosing plugins for certain tasks within a mix.
During my relatively brief time as a mix engineer, one of the most important things I have learnt regarding plugin processing is to avoid ‘Employing too much processing on a track’ (Messitte, N., 2018). It is really easy to load dozens of plugins on your tracks, especially since many claim to be the “Magic switch” that will give you an instantly better mix. However, in your processing chain, each plugin must have a distinct purpose. ‘Whenever you’re reaching for a new plug-in, do you know what you’re trying to achieve with this next move? Are you serving or fighting the sound?’ (Messitte, N., 2018). This took me a while to learn and still to this day is something I have to remind myself to look out for. My personal rule of thumb is that if I have more than 7 or 8 plugins on a track, I bypass them all and listen to the raw sound, and then usually I will start again from scratch.
Another topic that is fresh in my mind, is something that I’ve been focusing on more and more recently: the importance of dynamics in a mix. This really digs at the essence of music, that a song is a journey that rises and falls. As mentioned in a Pro-Tools blog: ‘Static mixing is a great way to get your tracks to a listenable state’,’but it is definitely not a good technique to create final mixes.’ (Steward, G., 2016). A good mix should reinforce the energy of the song, and different techniques should be used in different sections throughout. Reflecting on my own work, I can see that approaching my mixes with this mindset has improved them drastically, as well as influencing my plugin choices. One example that stands out to me is my switch from side-chain compression to dynamic equalising. Where previously, I would employ compression on a bass track side-chained to a kick drum track to prevent frequency masking, I now instead tend to use dynamic equalisation to 'selectively apply EQ changes only when they are needed, rather than affecting the tonal quality of the track for the entire song.’ (Bieranowski, D., (2018). This technique allows for a more dynamic mix where EQ curves evolve throughout the song and only appear when needed. I have found that these extra steps really improve the overall dynamism of a song. For this reason, one of the main plugins I reach for is TDR’s Nova; the perfect tool for any of my surgical EQing needs. The figure below demonstrates a typical use for dynamic EQ: placed on a bass track, the curve is set to the fundamental frequency of the kick drum and side-chained to the kick drum, so that every time the kick drum hits, room is made for that fundamental frequency to poke out, and not be masked by similar frequencies in the bass track.

(Fig 1.1: TDR Nova with external side-chain activated)
I have found that with the plethora of plugins available on the market nowadays, it is difficult to sift through the masses and find the ones directly useful to my projects. Through my research I have discovered that an effective workflow trick is to categorize a few of the most versatile plugins that are your go too, so that I can ‘think about what are the top three plugins you use, or top 5 plugins that you’re going to use in a mix, all right, and put them in your shortcut menu,’ (Lord-Alge, C., 2017). Coming from Chris Lord-Alge, a legend in the industry, I felt like this was reliable lesson in mixing workflow. It motivated me to write a document containing a indexed list of all the plugins I own and what their specific uses are. Not only did this give me a great overview of my tools at hand, it also gave me room to explore plugins for achieving certain mixing tasks that my list couldn’t provide.
Lastly, I want to discuss the underrated nature of many digital/non-emulation plugins. As probably a lot of pro audio enthusiasts who have entered the industry in recent years know, there is a great emphasis on analog emulation that purely digital plugins are possibly being left in the dust. This is an intriguing research topic of mine that I will discuss in greater detail later, however I can reflect on how my research on it so far has influenced my plugin selection.
Many modern professionals are leaning towards non-emulation plugins for their go to’s. A good example is Luca Pretolesi (Diplo, Skrillex, Major Lazer, Lil Jon, Snoop Lion) who mentioned in an interview with ModernMixing that ‘I think the ProQ 2 [Fabfilter] is the best for what I do right now’ (ModernMixing, 2015), as well as Paul Gatehouse (Janet Devlin, Nell Bryden, Honey Ryder, Alistair Griffin) choosing the ProQ2 ‘because that is something that is so easy to operate and it sounds very transparent.’ (ModernMixing, 2015). Both producers/engineers are experienced in the industry and favour a non-emulation plugin that includes mid/side processing, linear phase, and 24 frequency bands to create an EQ the pushes the limits of whats possible with an EQ.
Overall, my research has greatly impacted my workflow in multiple ways. I now know that having a detailed understanding of when to use an analog emulation and when to not use one, is vital for an effective mixing process. Each plugin serves a purpose which must be well thought out before applying. The current ‘analog warmth’ market schemes used by the commercial market is a dangerous one for those who don’t know better.
References:
Messitte, N., (2018). 10 Beginner Mistakes to Avoid When Mixing Music. [Online] June 19th 2018. Available from: https://www.izotope.com/en/learn/10-beginner-mistakes-to-avoid-when-mixing-music.html [Accessed: November 23rd 2020]
Steward, G., (2016). Static Mixing vs Dynamic Mixing in Pro Tools. [Online] August 21st 2016. Available from: https://www.protoolsproduction.com/static-mixing-vs-dynamic-mixing/ [Accessed: November 23rd 2020]
Bieranowski, D., (2018). Dynamic EQ Tips from the Pros: How it Works and How 4 Top Mixers Use It. [Online] March 15th 2018. Available from: https://sonicscoop.com/2018/03/15/dynamic-eq-tips-from-the-pros-what-it-is-and-how-4-top-mixers-use-it/ [Accessed: November 23rd 2020]
Lord-Alge, C., Waves Audio. (2017) [Youtube Channel] (0:22 - 0:27) Available from: https://www.youtube.com/watch?v=-CqAxVuFiHc [Accessed: November 23rd 2020]
ModernMixing, (2015). ‘10 Pro Mixing Engineers Discuss Their Favourite In-The-Box Equalizers’. [Online] June 17th 2015. Available from: https://modernmixing.com/blog/2015/06/17/pro-mix-engineer-favourite-equalizer/ [Accessed: November 23rd 2020]
Figures:
Figure 1.1: ‘TDR Nova with external side-chain activated’, Remi Engelen, November 23rd 2020
0 notes
Text
Reflection 3: Analog emulations: what makes them so popular?
Anyone with some experience in the modern pro audio industry will have heard about the endless debate of analog vs digital. The fact is, as much as digital audio has improved the industry in terms of audio quality and work efficiency, the common consensus amongst professionals is that digital audio lacks the same feeling and vibe that analog audio used to have. As a result, the audio plugin market is flooded with analog emulations of famous hardware processors from decades past, that seemingly combine the efficiency of digital audio while still capturing the essence of analog. I have always been curious as to why emulations are so popular, so in this blog post, I want to document my research into exactly what makes analog so attractive and how plugin emulations attempt to recreate whatever that is.
One of the most talked about features of analog is how good it sounds when pushed to its limits. ‘Mix engineers discovered they could overload magnetic tape machines, tube amps, and transistor-based preamps to create a type of “soft-clipping.” This technique gave recordings sought-after qualities that sounded pleasing.’ (PQ, R., 2018). After some reflection on my knowledge of distortion, I realised that coming from a digital background, I was always told that distortion from overloading was to be avoided, and to ensure I always had enough headroom. However in the analog world the opposite is true, and if applied correctly, overloading electrical and magnetic components would enhance the audio source and make it sound more pleasant. Additionally, looking back on my knowledge before my research, I had known that analog was supposed to sound good, but I didn’t know exactly why, and this was key for me to learn so that I could understand the significance of analog emulations.
My research lead me to discover there is a fundamental difference in the types of distortion provided by analog and digital. Analog creates “Total Harmonic Distortion” (THD) whereas digital tends to create “Inter-Modulation Distortion” (IMD). In his article, (Siau, J., 2010) explains that ‘Harmonic distortion mimics the natural overtones of musical instruments while IMD produces distortion tones that have no harmonic relationship to the music.’ So we see that THD is the more preferable type of distortion as Siau explains further: ‘All musical instruments and human voices produce a rich spectrum of harmonics (also known as overtones). These harmonics give warmth and character to musical sources.’ (Siau, J., 2010). From this, I understood that THD, when used subtly, emphasised the naturally occurring harmonics musical elements in a song, resulting in what most people perceive as pleasant distortion.
Now equipped with the science behind analog distortion, I had a clearer understanding on why analog emulations are so popular. Digital distortion cannot achieve the same sound that analog does. But there are more reasons behind the popularity of analog emulations. Legendary mix engineer Andrew Scheps describes exactly why in an interview: ‘Harmonic distortion is something that really helps shape sounds and glues things together.’, ‘You are not trying to mimic the piece of gear, you are trying to get the same feeling of that distortion but with much more control.’ (Scheps, A., Jeppsson, N., 2018)
This is one of the biggest reasons that long term professionals in the industry, that grew up on purely analog gear, are being swayed by analog emulations. They offer much more control and versatility than their hardware counterparts. Furthermore, there is seemingly no limit to the ability of emulations. Colin McDowell, CEO of McDSP, claims that ‘Anything created in hardware can be recreated in software,’ (Lambert, M., 2010). I personally have very little experience with hardware audio processing, and so when evaluating plugin emulations, it is difficult for me to compare. However, the fact that major names in the industry are releasing emulations under their name and brand, proves to me that these emulations I work with are high quality. One major example of this is the Waves and Chris Lord-Alge collaboration on their emulation of the UA 1176 compressor: the CLA-76.
I also learnt that many developers of these emulations have taken the opportunity to add quality of life features to them. Where initially I thought most emulations were exact replicas of the hardware versions, It seems only obvious that some the plugins have been updated with these extra features, making them even more useful for their users. If we look again at the CLA-76, it features an ALL button which represents ‘its explosive All-Ratio-Buttons-In mode’ which is what ‘made the original hardware so popular’ (Waves, User Manual), along with a toggle-able option for replicating the mains hum that was present in the original hardware.
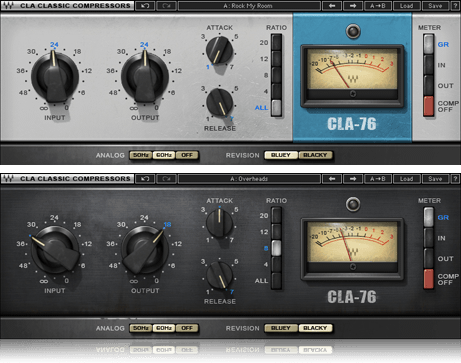
(Fig 1.1: CLA-76 Compressor / Limiter)
My goal for the near future is to begin building my own audio plugins, and this research has been vital for helping me understand the current trends in the audio plugin market and why they exist. This will allow me to apply relevant knowledge to my own work for a competitive edge in this professional industry.
References:
PQ, R., (2018). WHAT IS AUDIO SATURATION AND HOW IT IMPROVES YOUR MIX. [Online] 2018. Available from: https://iconcollective.edu/audio-saturation/#:~:text=Audio%20saturation%20is%20the%20essence,hardware%20sound%20musical%20and%20pleasing.&text=Saturation%20is%20a%20subtle%20form,through%20various%20pieces%20of%20hardware. [Accessed: 20th November 2020]
Siau, J., (2010). THE UNIQUE EVILS OF DIGITAL AUDIO AND HOW TO DEFEAT THEM. [Online] 2010. Available from: https://benchmarkmedia.com/blogs/application_notes/13124137-the-unique-evils-of-digital-audio-and-how-to-defeat-them [Accessed: 20th November 2020]
Jeppsson, N., (2018). ANDREW SCHEPS - CHARACTER VS CLARITY, QUIET TIMES, MIXING ON HEADPHONES AND MUCH MORE. [Online] 2018. Available from: https://www.youraudiosolutions.com/interview-articles/andrew-scheps-character-vs-clarity-quiet-times-mixing-on-headphones-and-much-more [Accessed: 20th November 2020]
Lambert, M., (2010). Plug-in Modelling. [Online] 2010. Available from: https://www.soundonsound.com/techniques/plug-modelling [Accessed: 20th November 2020]
Waves. CLA-76: User Manual. [Online]. Available from: https://www.waves.com/1lib/pdf/plugins/cla-76-compressor-limiter.pdf [Accessed: 21st November 2020]
Figures:
Figure 1.1: 'CLA-76 Compressor / Limiter’ , Waves [Online] Available from: https://www.waves.com/plugins/cla-76-compressor-limiter [Accessed: 21st November 2020]
0 notes