etheref
176 posts
Reblog of reference and tutorials in art, craft and litterature. May also pop in some posts that I just don't want to lose, or some The sims 4 cc.
Last active 60 minutes ago
Don't wanna be here? Send us removal request.
Statistics
We looked inside some of the posts by etheref and here's what we found interesting.
Average Info
Notes Per Post
3M
Likes Per Post
2M
Reblog Per Post
1M
Reply Per Post
2K
Time Between Posts
4 months
Number of Posts By Type
Photo
10
Text
6
Note
1
Last Seen Tumblr Blogs


Fun Fact
Tumblr has 16.74 million mobile monthly users in the US.
Text
HEY THIS IS IMPORTANT whats your favorite place to find drawing references?
214K notes
·
View notes
Text
natural voice change
Lower
Boom Your Voice
How to deepen your voice naturally
How to talk with a deeper voice
How to deepen your voice (pre-t) Voice masculinization
Vocal androgyny in speech and singing
This Phone App Helps Transgender Users Change The Pitch And Tone Of Their Voices (buzzfeed article)
Higher
Voice Feminization
Pitch, range, resonance, depth
How to develop a female voice
Feminine voice techniques
173K notes
·
View notes
Text
Some Photoshop Tips
I’ve been getting quite a few asks about the process for the patterns in my stylized artworks, so I decided to put together a couple of tips regarding them.
Firstly, what you need are
— CUSTOM BRUSHES —
Most of the patterns I use are custom brushes I made, such as those:
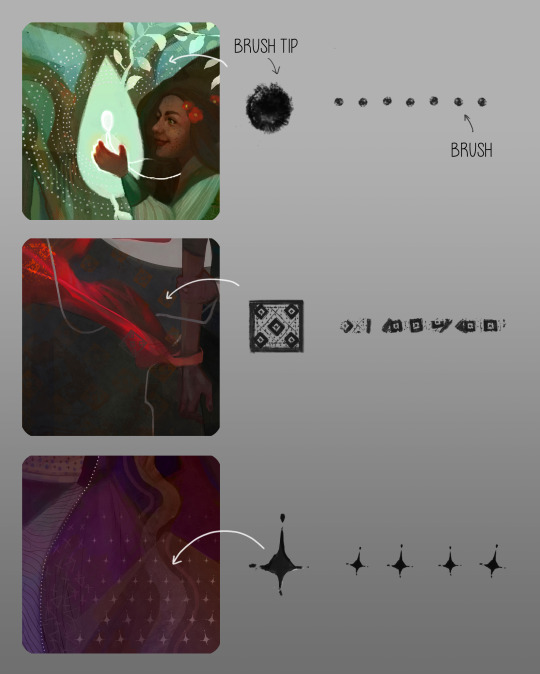
For the longest time I was convinced making brushes must be super extra complicated. I was super extra wrong. All you need to start is a transparent canvas (2500px x 2500px max):
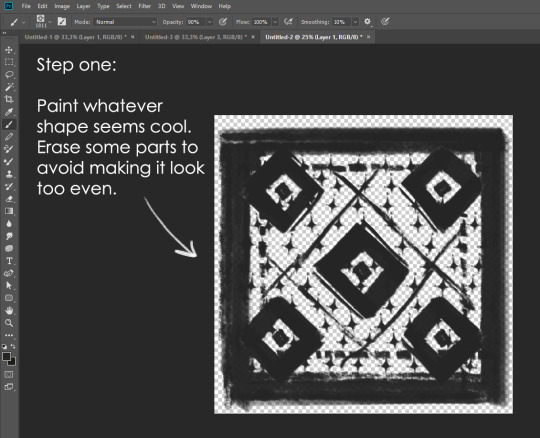
This will be your brush tip. When you’re satisfied how it looks, click Ctrl+A to select the whole canvas and go to ‘define brush preset’ under the edit menu
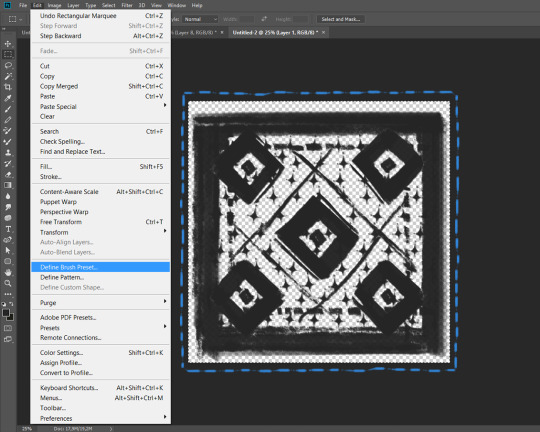
You will be asked to name your new glorious creation. Choose something that describes it well, so you can easily find it between all the ‘asfsfgdgd’ brushes you’ve created to be only used once

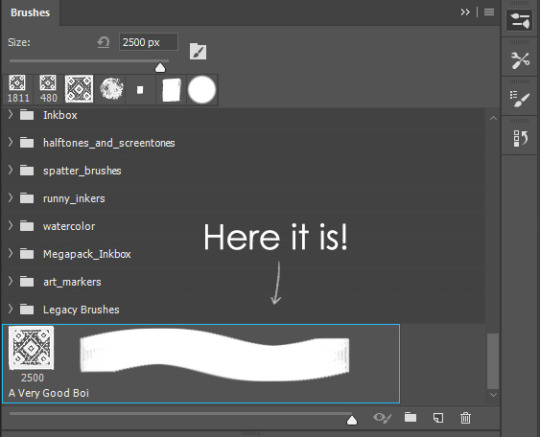
This is it. Look at it, you have just created a photoshop brush. First time i did I felt like I was cheated my whole life. IT’S SO EASY WHY HASN’T ANYONE TOLD ME
Time to edit the Good Boi to be more random, so it can be used as a Cool Fancy Pattern. Go into brush settings and change whatever you’d like. Here’s a list of what I do for patterns:
- under Shape Dynamics, I increase Size Jitter and Angle jitter by 5%-15%
- under Brush Tip Shape, I increase spacing by a shitload. Sometimes it’s like 150%, the point is to get the initial brush tip we painted to be visible.
- If I want it to look random and noisy, I enable the Dual Brush option, which acts like another brush was put on top of the one we’ve created. You can adjust all of the Dual Brush options (Size, Spacing, Scatter, Count) as you wish to get a very nice random brush to smear on your backgrounds

The result is as above. You can follow the same steps to create whatever brush you need: evenly spaced dots that look like you painted them by hand, geometric pattern to fill the background, a line of perfectly drawn XDs and so on.
BUT WAIT, THERE’S MORE
— PATHS —
But what if you want to get lots of circles made of tiny dots? Or you need rows of triangles for your cool background? Photoshop can do all of that for you, thanks to the magic of paths.
Typically, paths window can be found right next to Layers:

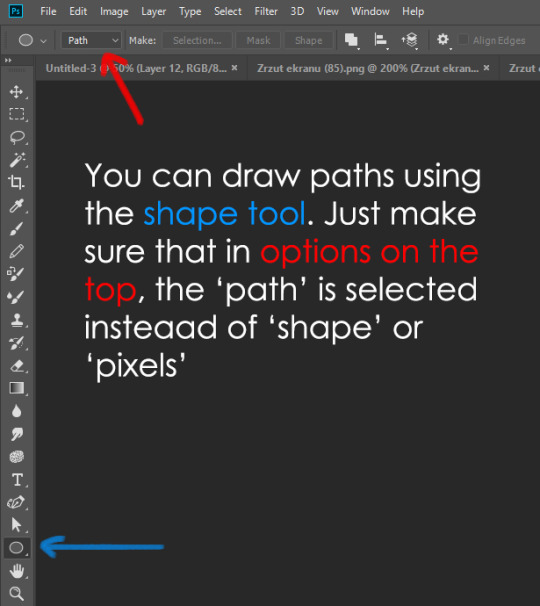
Draw whatever path you want, the Shape Tool has quite a bit of options. Remember, paths are completely different from brush strokes and they won’t show up in the navigator. To move a path around, click A to enable path selection tool. You can use Ctrl+T to transform it, and if you move a path while pressing Alt it will be duplicated.
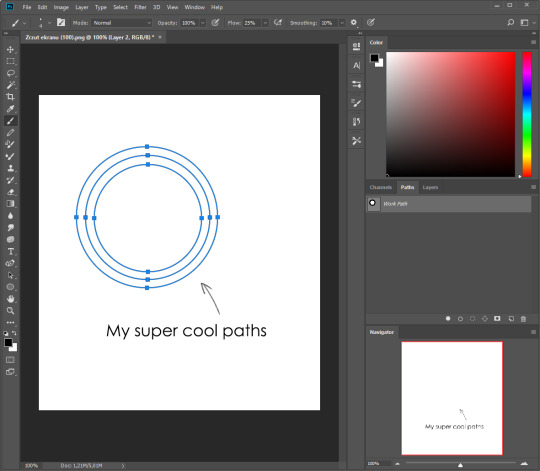
Now, pick a brush you wish really was in place of that path you’ve drawn and go to layers, then choose the layer you want it to be drawn on. Then, click this tiny circle under the Paths window:

Then witness the magic of photoshop doing the drawing for you while you wonder how tf have you managed to forget about this option for the past 2 years
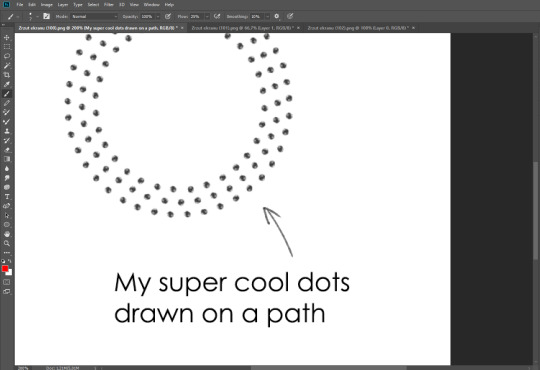
You can combine special brushes and paths for all sorts of cool effects. I mostly use them in backgrounds for my cards, but you can do whatever you want with them.
I hope that answers the questions for all of the people who were sending me inquires about the patterns. If you have any questions regarding this or any other Photoshop matter feel free to message me, I’m always up for complaining about how great and terrible Photoshop is C’:
93K notes
·
View notes
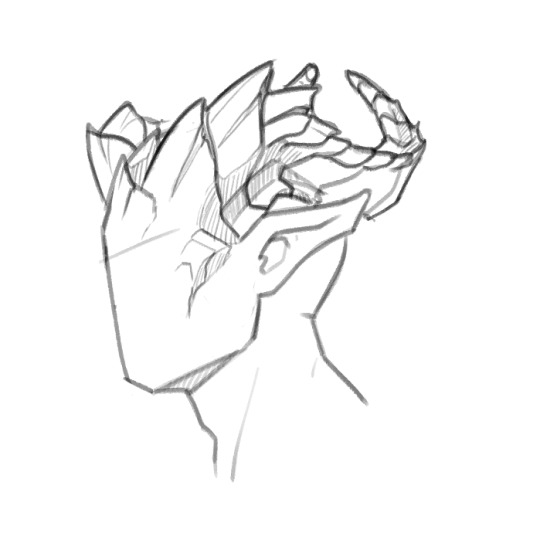
Photo
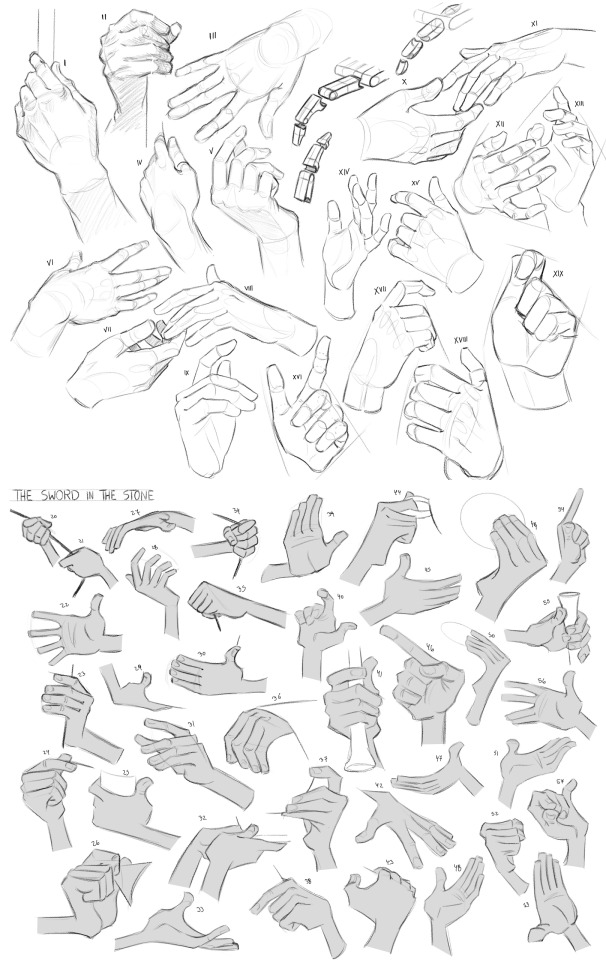

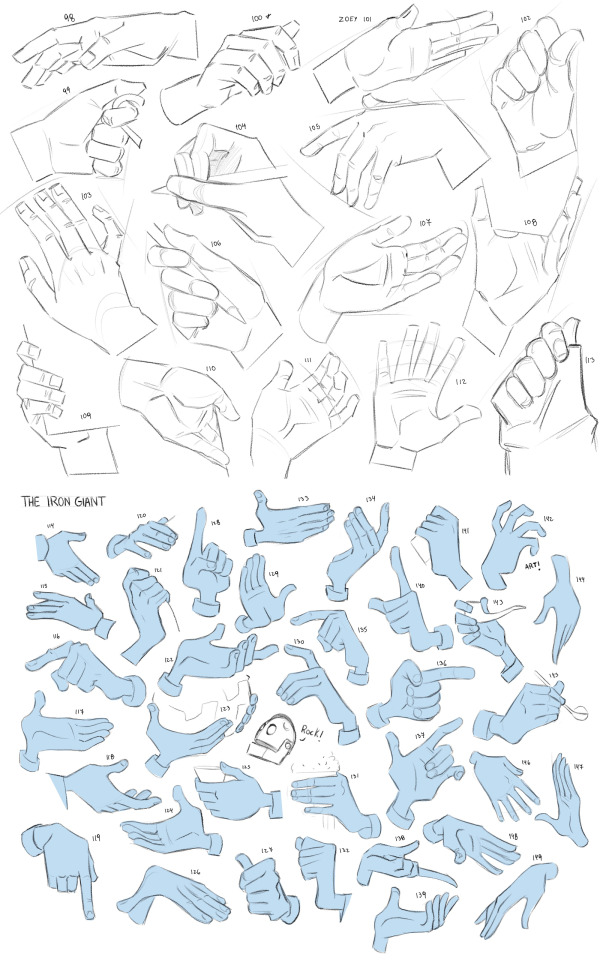
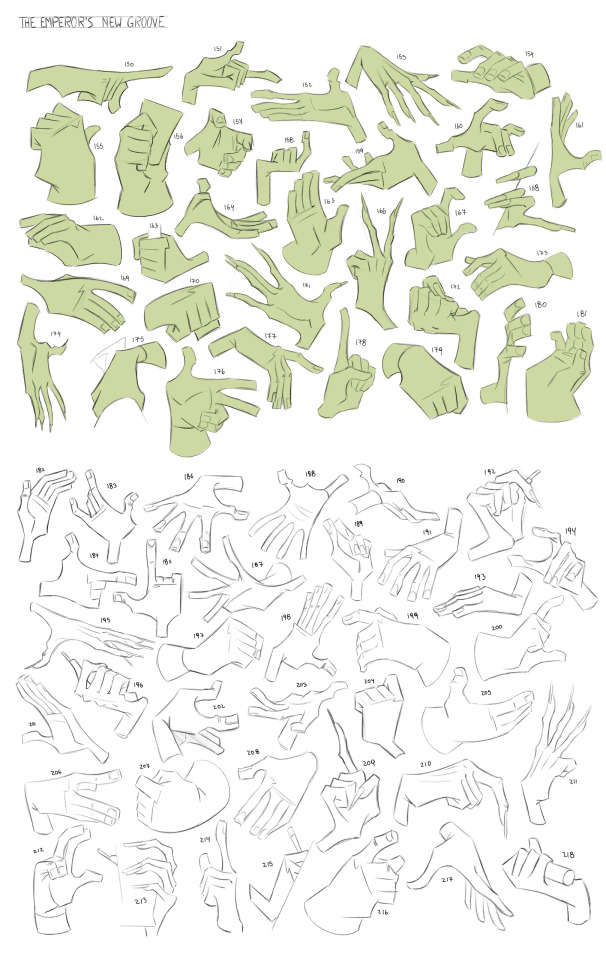


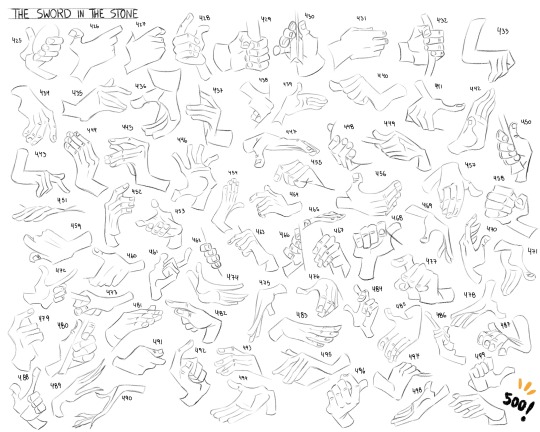
500 hands in 5 days 💀 ! feel free to use them for reference ❤️
> 500hands challenge
35K notes
·
View notes
Photo
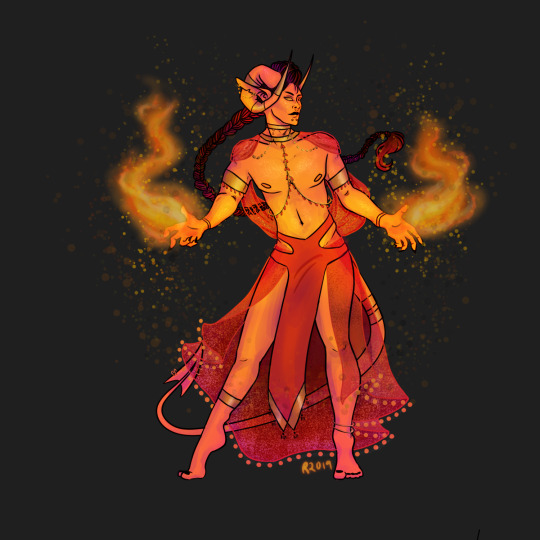
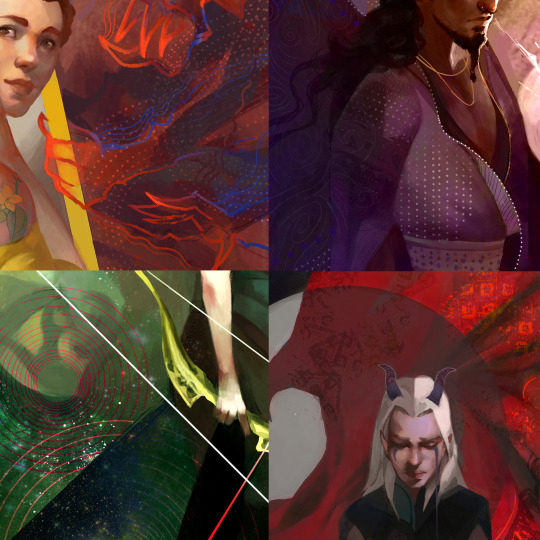
So I just needed to link this, so here’s an old drawing of my DnD character that I love very much. Dante, the ex-warlock tiefling
9 notes
·
View notes
Photo
Unanima from flightrising for miunizee on there
89 notes
·
View notes
Text
Insight Checks
A lot of times when players make a Wisdom (Insight) check to try and determine a creature’s motives, DMs may tend to immediately divulge the creature’s intent, emotions, or whether they were lying.
Instead, try to be more subtle with what you tell your players. You can especially be vague with a partial success, which might come from being “very close” to the target DC.
The most common things players use Insight for is to tell whether or not a character is lying, hiding something, or guilty of something. Use these random tables to clue players in on the character’s intent.
The Character Seems Guilty
Roll 1d10 and consult the list below when a Wisdom (Insight) check is made with a partial success and the creature is hiding something.
Their cheeks are either flushed red or drained and pale.
They seem to keep blaming other things.
They are shuffling their feet a lot.
Their pose is very closed, as if reluctant to give away information.
They keep biting the edge of their lip as they talk.
There are a lot of pauses while they are talking to you.
Their story seems highly elaborate.
They looked away for a second before answering you.
They are fidgeting a lot while they talk.
You note a drip of sweat on their brow.
The Character Seems Innocent
Roll 1d10 and consult the list below when a Wisdom (Insight) check is made with a partial success and the creature is innocent.
They are confident in their response.
Their emotions seem genuine.
They are caught off-guard when accused.
They look you in the eye without wavering.
They didn’t have to think too hard to answer you.
They take responsibility for their part, if any.
They seem more worried for safety of others than themselves.
They seem offended that they would ever be accused.
They seem preoccupied with other matters right now.
Their shoulders and chest seem relaxed.
Failed Insight Check
When a player fails their Wisdom (Insight) check, you can usually just tell them that the creature’s motives or body language is hard to read. If the player fails spectacularly (especially if the roll was made in secret) you can give them an incorrect or misleading result.
If you have a more complex Insight check you need to describe, or one you plan to describe, check out this list of emotions and their related body language at this link!
2K notes
·
View notes


Photo
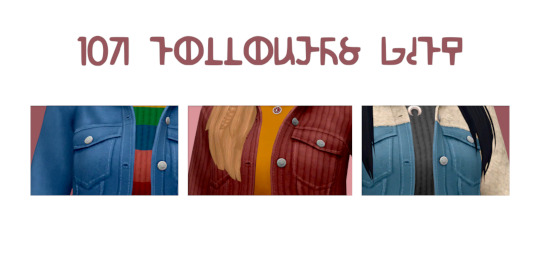
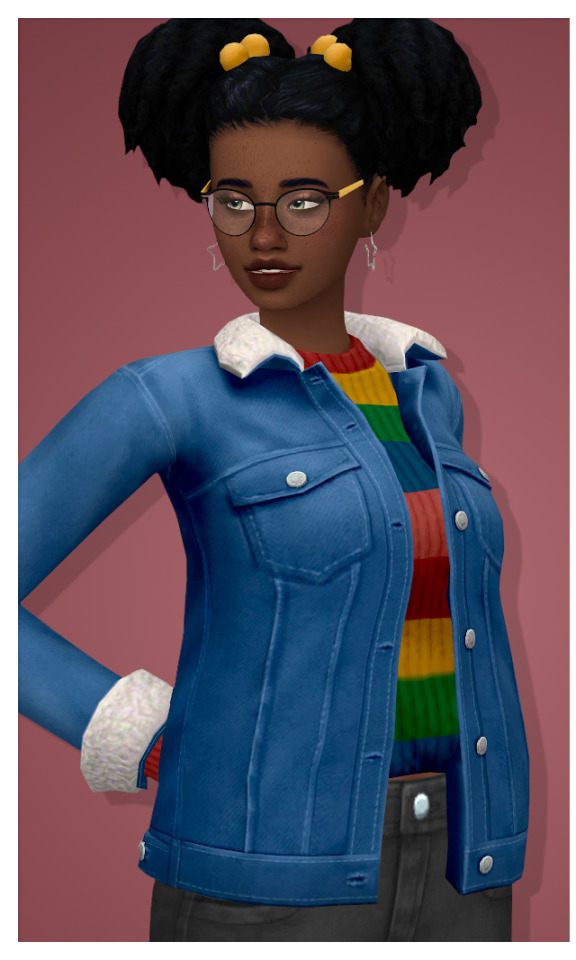
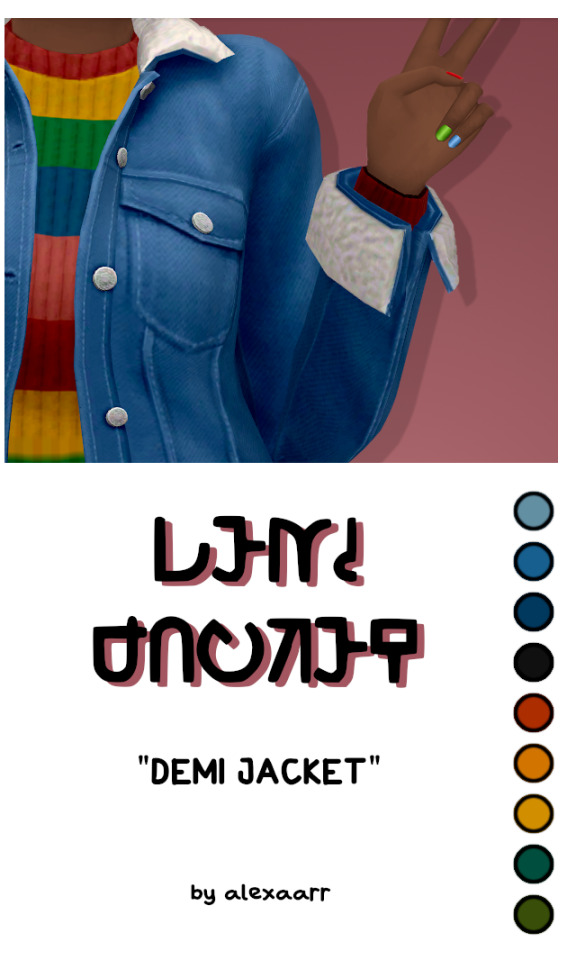

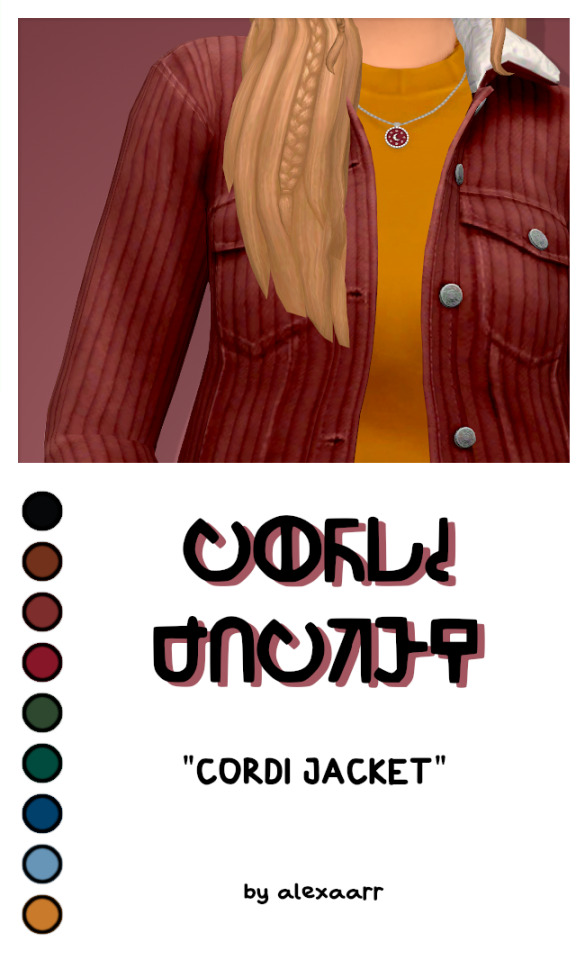
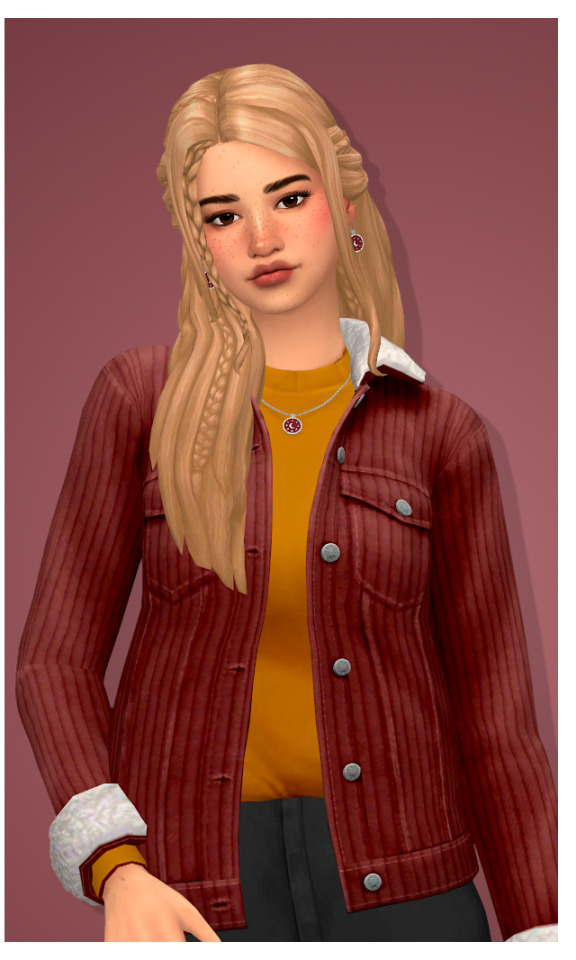
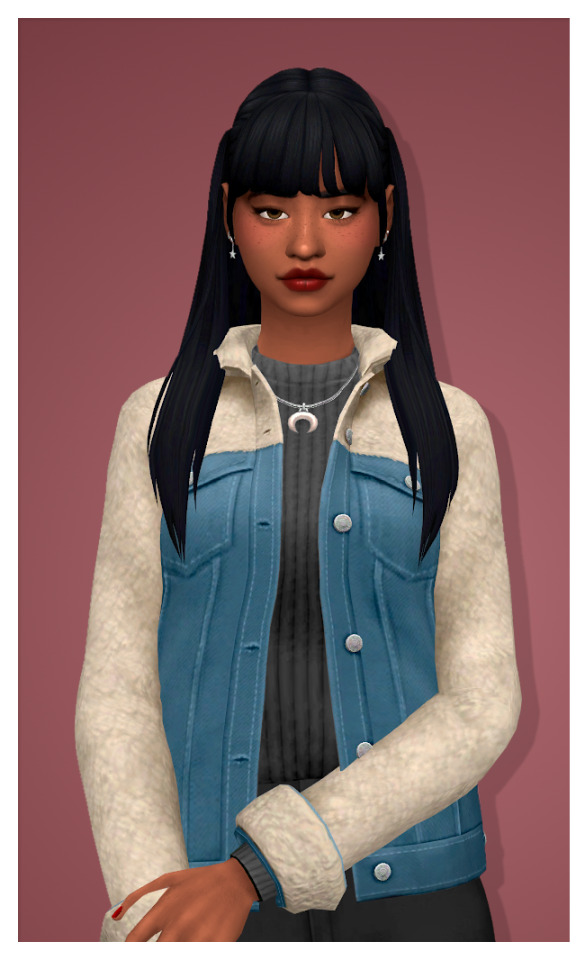
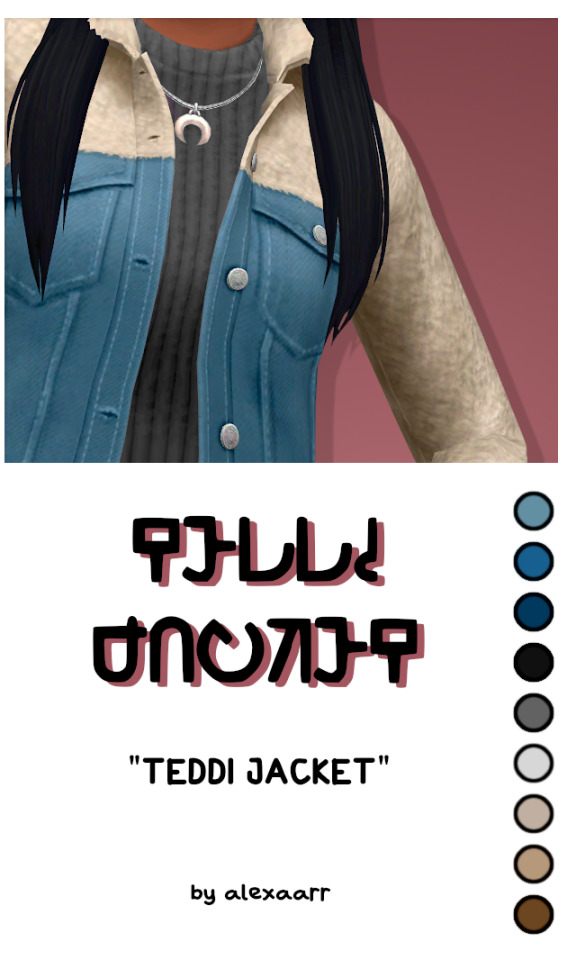
♥ Thank you for 10k followers! ♥
Here are some jackets
Can’t believe I almost managed to make a follower gift in time haha! Anyway, I always wanted to make the jacket we got with this Baby Ariel update more suitable for the colder season. So I made it a bit longer and added a pullover underneath.
Originally I only planned to make a denim jacket with some teddy fur but I just couldn’t resist to make more versions of it! Enjoy. ♥

Demi Jacket
The denim version. 48 swatches. bgc. disallowed for random.
Cordi Jacket
The corduroy version. 75 swatches. bgc. disallowed for random.
Teddi Jacket
The half denim, half teddy fur version. 48 swatches. bgc. disallowed for random.
DOWNLOAD (Patreon, free and no ads!)
DOWNLOAD (sfs, no ads)
Terms of use
CC used
Demi Jacket: Hair | Pants | Glasses | Earrings | Nails
Cordi Jacket: Hair | Pants | Earrings | Necklace
Teddi Jacket: Hair | Pants | Earrings | Necklace | Nails
6K notes
·
View notes
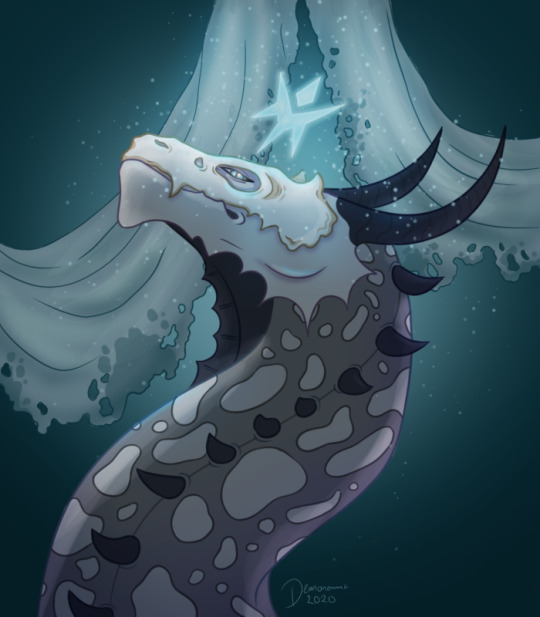
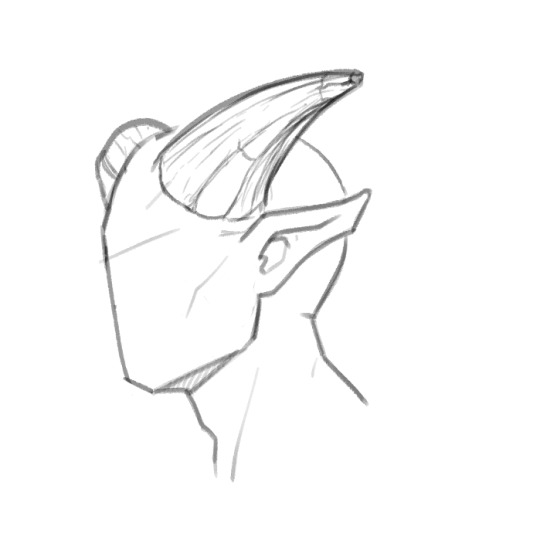
Note
Do you happen to have any tips for drawing horns?
Hi, Anon! I’ll definitely try my best. Horns are a little tricky since they’re so subjective and the styles/textures vary so drastically.
Mostly I’m going to be talking about texture here and I’ll try to keep it simple since they’re time consuming to draw.
Smooth horns are great and easy, can come in any and all shapes, but if you want to add more interest and character to the horns, it all comes down to how you texture them. Here’s a simple smooth horn. It’s okay, it’s basic, but it works and will especially work better once it’s colored if it has a sheen or a matte look.
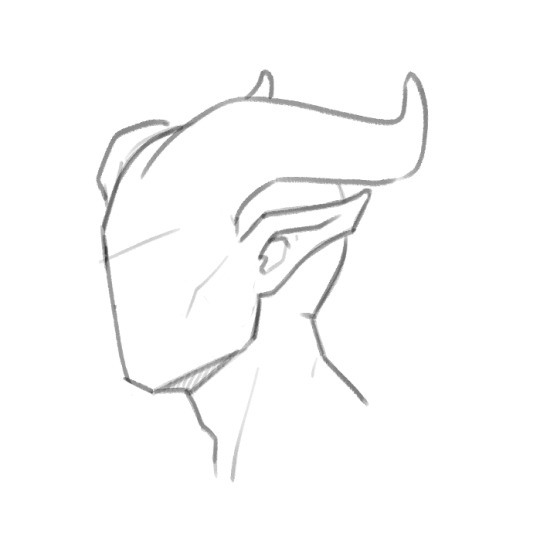
You can add simple lines to it to give it a bit more interest, but you can take it farther than just the cylinder look like drawn here. The lines give it the easy, quick illusion of being more dimensional, but it’s not the most interesting or dynamic.
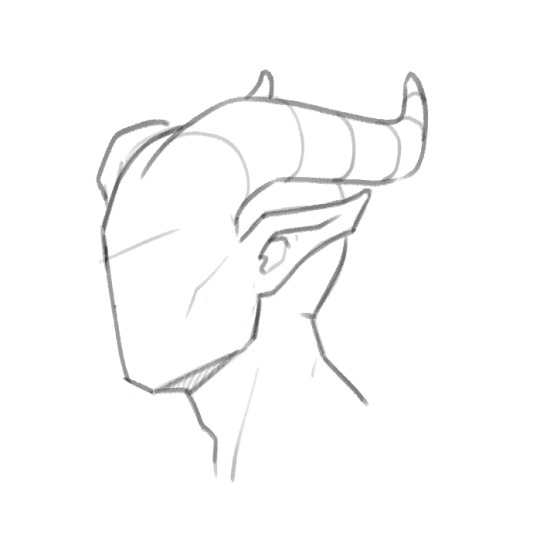
You can play with the lines however you like to give the horns more uniqueness, such as a line down the center to sort of pinch it inwards. Still more dynamic than the smooth horn, but more interesting than the rounded one.
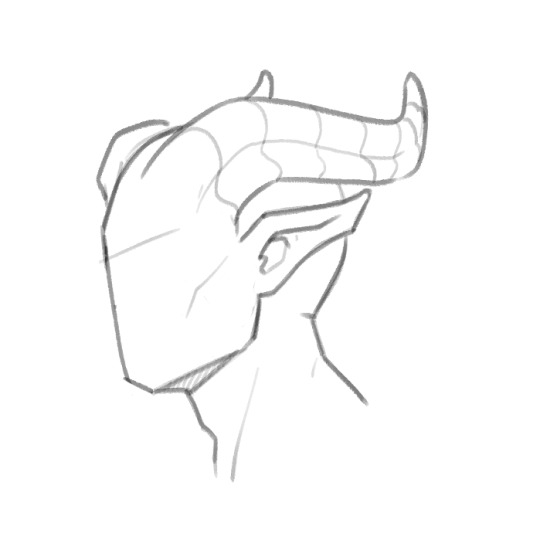
You can leave the lines as they are for an easier horn, or take it a step farther and use them as guides to texture them. This is where it gets fun, but time consuming. Definitely look up references of what you want to go for if you’re not sure. I highly recommend Ram, Ibex or Antelope references, Antelope being my favorite. They have so much texture to them in the forum of smaller and larger ridges, so here’s a horn based loosely (artistic liberties taken) off a mix of Ram and Antelope.
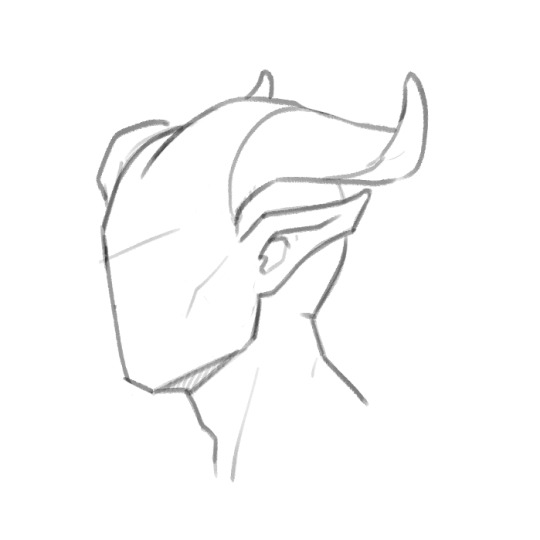
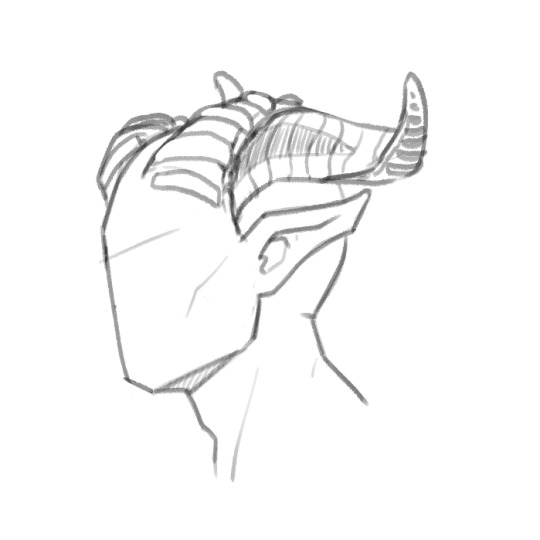
Getting into plates which are my favorite, there’s little to reference off of. Here’s a more dynamic, spiky look with plates using the guide lines as a base to get an ideal direction you want the horn to shape into.

Just take your guide lines and then extend outward. Add as little or as much wear, tear and damage as you want. Horns can get dry and crack, they can take a hit and break, age can cause grooves, your imagination’s the limit.
Outside of plates, you can look up any horned animal to get ideas for texture, anything from steer to deer and elk (if you want to get more into the antlered look), or mix and match textures from a few horn styles you like. Hope this helps! Sorry I can’t go more in depth, but I tried to explain it as best as I know how. Good luck with your horns!
20K notes
·
View notes
Photo

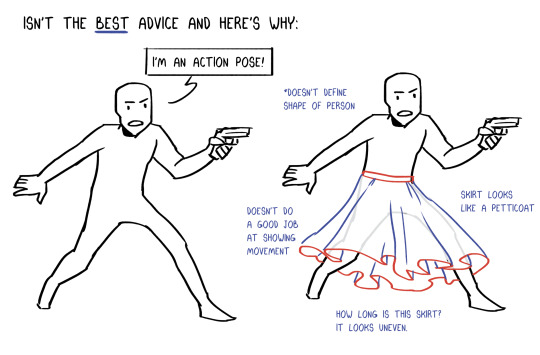
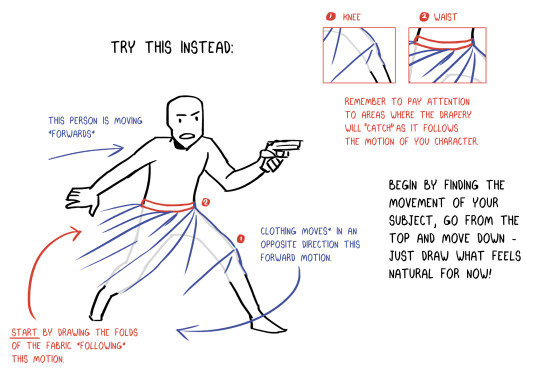
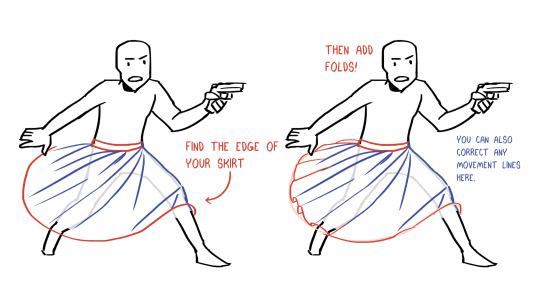


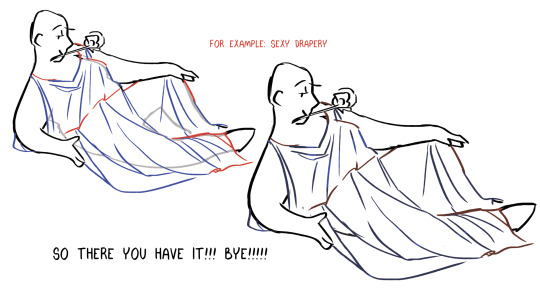
JUST SOME THOUGHTS! I don’t really like the “go from the top up” advice on drapery/clothes - if you’re having difficulty try it like this!
YES I see the typo… I’m so sorry folks… I was in a frenzied rush to make this…… and I’m too lazy to fix it……
122K notes
·
View notes
Text
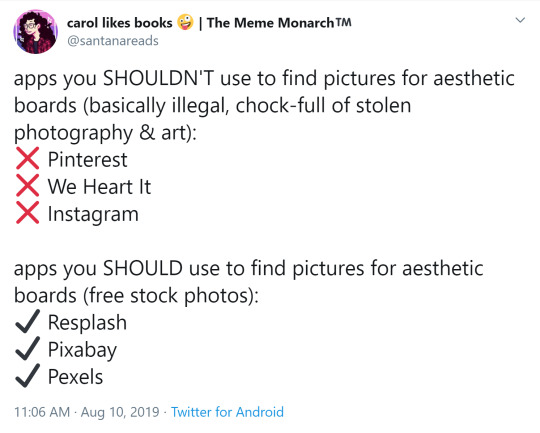
(source)
Unsplash - photography, illustration, and art
Pixabay - same as unsplash
Pexels - stock photos and videos
Stockvault.net - stock photos
freepngimg - icons, pictures and clipart
Veceezy - vectors and clipart
Getdrawings - simplistic images and drawing tutorials
Gumroad - photoshop brushes (and more)
Canva - needs login but has lots of templates
Library of Congress - historical posters and photos
NASA - you guessed it
Creative Commons - all kinds of stuff, homie
Even Adobe has some free images
There are so many ways to make moodboards, bookcovers, and icons without infringing copyright! As artists, authors, and other creatives, we need to be especially careful not to use someone else’s work and pass it off as our own.
Please add on if you know any more sites for free images <3
394K notes
·
View notes
Photo
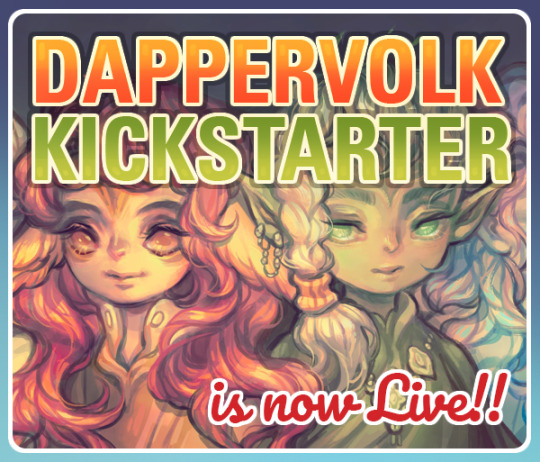
OUR KICKSTARTER IS NOW LIVE!
Click here to go to it!
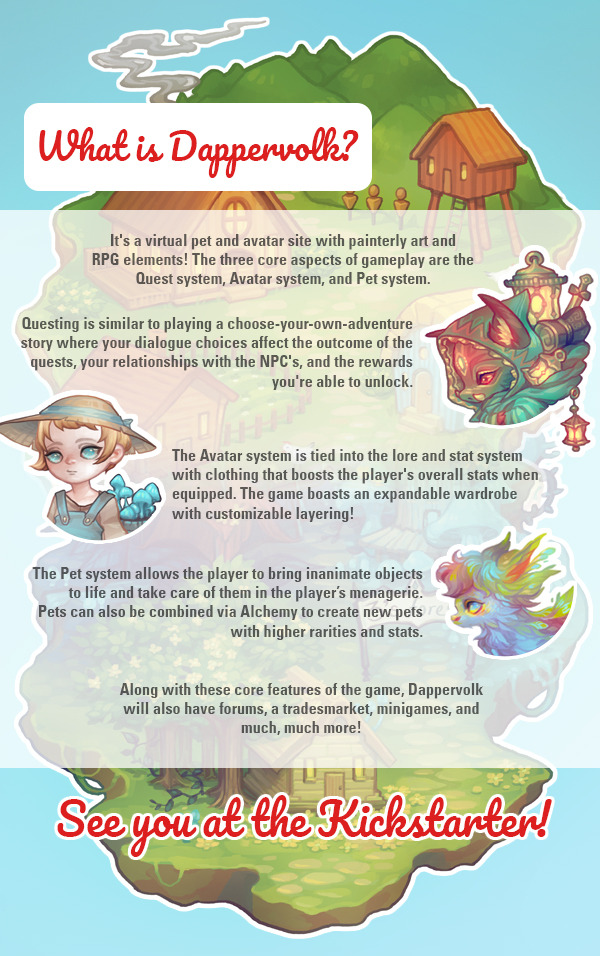
Here is some general info on our campaign for your reference:
It will last exactly 30 days.
You will be charged only at the end of the campaign if it succeeds.
You can pledge with an account or as a guest.
We’ll be looking into setting up backerkit which will allow extra convenience for backers so look for updates on that on social media!
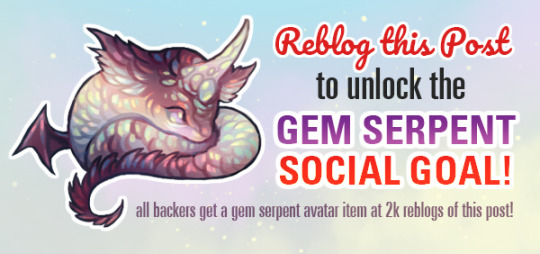
Reblog this post to help us reach our social stretch goal for the Gem Serpent avatar item!
5K notes
·
View notes