
Don't wanna be here? Send us removal request.
Statistics
We looked inside some of the posts by excelfit and here's what we found interesting.
Average Info
Notes Per Post
1
Likes Per Post
1
Reblog Per Post
0
Reply Per Post
0
Time Between Posts
12 days
Number of Posts By Type
Text
17
Last Seen Tumblr Blogs


Fun Fact
Tumblr posted its first advertisements in May 2012 and subsequently earned $13M in revenue.
Text

https://excelfitindia.com/product/m-6015-hyper-extension-roman-chair/
0 notes
Text

Complete Guide to Using an Aerobic Step
Introduction
An aerobic step is a simple yet highly effective fitness tool used for various exercises that improve cardiovascular health, build strength, and enhance balance. Popular in step aerobics, strength training, and rehabilitation, this platform adds intensity to your workout by providing a raised surface to step on. It is a versatile piece of equipment suitable for beginners and advanced athletes alike.
This guide will cover the types of aerobic steps, their benefits, key exercises, how to use them correctly, and tips for an effective workout.
Types of Aerobic Steps
Adjustable Aerobic Steps: These have stackable risers, allowing you to change the height, adding or reducing intensity to your workouts.
Non-Adjustable Aerobic Steps: A fixed-height step, typically lower in cost, and ideal for beginners or those focused on low-impact workouts.
Foldable Aerobic Steps: These steps can fold for easy storage, making them perfect for small spaces or for those who need portability.
Mini Aerobic Steps: Smaller in size and often used for limited-space workouts or targeted leg exercises like step-ups.
Benefits of Using an Aerobic Step
Cardiovascular Fitness: Stepping up and down on the platform increases your heart rate, making it an excellent tool for aerobic exercise.
Strength and Endurance: Regular use helps strengthen the legs, glutes, and core while improving endurance over time.
Balance and Coordination: Exercises on the step engage stabilizer muscles, improving overall balance and coordination.
Calorie Burn: Step workouts can be highly effective for weight loss due to the calorie burn, especially when done at a high intensity.
Low-Impact Option: It offers a lower-impact workout compared to running or jumping, reducing the stress on your joints.
Versatility: The step can be used in a variety of exercises, from basic stepping to advanced strength training and HIIT routines.
How to Use an Aerobic Step
Setting Up
Choose the Right Height: Beginners should start with a lower step (4–6 inches), while advanced users can increase the height up to 12 inches. Adjust based on your fitness level.
Stable Surface: Place the aerobic step on a flat, non-slip surface to ensure safety during use.
Footwear: Wear supportive athletic shoes to provide grip and cushion during your workout.
Basic Steps
Basic Step-Up:
Step onto the platform with one foot, then the other.
Step back down, leading with the same foot.
Repeat for a set number of reps, alternating the lead foot after each set.
V-Step:
Step wide onto the platform with both feet, forming a "V" shape.
Step back down, bringing your feet together.
Repeat, alternating the leading foot.
Knee Lift:
Step up onto the platform with your right foot.
Bring your left knee up towards your chest.
Step down and alternate sides for each repetition.
Step-Touch:
Step up onto the platform with your right foot.
Touch your left foot to the platform, then step back down.
Alternate sides to create a steady rhythm.
Intermediate Exercises
Straddle Step:
Stand behind the step, stepping one foot onto the platform and then the other.
Step down to the sides of the step.
Continue the up-and-down motion, alternating feet.
Over-the-Top:
Step sideways across the platform, moving from one side to the other.
Keep the movement continuous for a more intense cardiovascular workout.
Step Jumps:
Perform small jumps onto the platform, then step down.
Focus on soft landings to protect your knees and joints.
Advanced Exercises
Burpee with Step:
Perform a burpee using the step as your platform for the push-up phase, then jump back onto the step before standing.
Lunges:
Place one foot on the step and perform lunges by bending both knees until your back knee almost touches the floor.
Alternate legs after each set.
Step-Up with Weights:
Hold dumbbells in both hands while performing step-ups for added resistance, targeting the legs and glutes.
Push-Ups on Step:
Place your hands on the step, perform push-ups with the raised surface to engage your chest, shoulders, and triceps more effectively.
Workout Plan
Beginner Workout Plan
Warm-up: 5-10 minutes of light stepping to raise your heart rate.
Basic Step-Ups: 3 sets of 10-15 reps.
V-Step: 3 sets of 10-12 reps.
Knee Lift: 3 sets of 10 reps per leg.
Cool Down: Stretch and walk around for 5 minutes to bring your heart rate down.
Intermediate Workout Plan
Warm-up: 5 minutes of step-touches and knee lifts.
Straddle Step: 3 sets of 15 reps.
Over-the-Top: 3 sets of 10-12 reps.
Step Jumps: 3 sets of 8-10 reps.
Cool Down: Stretching routine focusing on the legs and calves.
Advanced Workout Plan
Warm-up: 5 minutes of high-intensity stepping.
Burpee with Step: 3 sets of 8-10 reps.
Step-Up with Weights: 3 sets of 12-15 reps per leg.
Lunges: 3 sets of 10-12 reps per leg.
Push-Ups on Step: 3 sets of 12-15 reps.
Cool Down: Full-body stretch focusing on recovery. Tips for an Effective Aerobic Step Workout
Maintain Good Posture: Keep your back straight and your core engaged to prevent injury and ensure effective muscle engagement.
Use Your Arms: Swing your arms for balance and to increase cardiovascular intensity.
Start Slow: If you’re new to step workouts, start at a lower height and gradually increase the intensity as you build strength and endurance.
Monitor Your Breathing: Breathe deeply throughout the workout to maintain oxygen flow and prevent dizziness.
Increase the Pace Gradually: As your fitness improves, increase your speed or step height to keep your workout challenging.
Incorporate Music: Playing upbeat music can help you maintain rhythm and motivation during your step routine.
Safety Precautions
Check the Step: Always ensure the aerobic step is stable before stepping on it.
Stay Centered: Step in the middle of the platform to avoid slipping off the sides.
Avoid Overstraining: If you feel pain in your knees or joints, reduce the intensity or height of the step.
Warm Up and Cool Down: Always include warm-up and cool-down exercises to prevent muscle strain and injury.
Listen to Your Body: Don’t push yourself too hard, especially if you’re a beginner. Gradually increase intensity as your fitness improves.
Conclusion
The Aerobic Step is a fantastic tool to enhance your fitness routine, offering a combination of cardio, strength, and endurance training in a single piece of equipment. Its versatility makes it suitable for all fitness levels, from beginners to advanced athletes. By following this guide, you can incorporate a wide range of exercises to improve your overall fitness, burn calories, and strengthen key muscle groups. Always prioritize safety, start with the basics, and gradually work up to more advanced exercises for the best results.
FAQs
Q1: How high should my aerobic step be?
For beginners, a 4–6-inch height is ideal. More advanced users can raise the step to 8–12 inches, depending on fitness levels.
Q2: How often should I use the aerobic step?
For optimal cardiovascular and strength benefits, aim for 3-4 times per week, allowing rest days in between for recovery.
Q3: Can I lose weight using an aerobic step?
Yes, aerobic step exercises are effective for burning calories and can aid in weight loss when combined with a healthy diet.
Q4: Is step aerobics bad for my knees?
Step aerobics is generally low impact, but improper form or using a step that is too high can strain the knees. Always focus on technique and start with a lower step.
Q5: Can I use the step for upper body exercises?
Yes, you can incorporate upper body moves like push-ups or triceps dips using the step to engage multiple muscle groups.
0 notes
Text

COMPLETE GUIDE FOR AB CORE
A complete guide to building your ab core is essential for developing a strong midsection, which supports overall strength, posture, and stability. This guide will cover key exercises, equipment, workout plans, nutrition tips, and best practices for building a strong core.
1. Understanding the Ab Core
The core is a group of muscles that include:
Rectus Abdominis: The "six-pack" muscles.
Obliques: Side muscles for twisting and bending.
Transverse Abdominis: Deepest core muscle, crucial for stability.
Erector Spinae: Muscles along the spine for posture and support.
2. Ab Core Benefits
A strong core enhances:
Posture: Helps maintain proper alignment of the spine.
Balance and Stability: Improves performance in various activities and sports.
Injury Prevention: Protects the back and reduces the risk of strains.
Daily Activities: From lifting objects to bending, the core supports everyday movements.
3. Key Equipment for Core Training
Some effective tools to enhance ab core exercises:
Ab Coaster: Targets the lower and upper abs by using a controlled glide motion.
Abdomen King Machine: Strengthens core muscles with a combination of crunch and leg lift movements.
Stability Ball: Adds instability to exercises, increasing core engagement.
Resistance Bands: Great for oblique twists and enhancing tension during workouts.
4. Essential Ab Core Exercises
Bodyweight Exercises:
Planks: Hold your body in a straight line for time to engage your core.
Crunches: Focus on contracting the ab muscles.
Bicycle Crunches: Targets the obliques and rectus abdominis with twisting movements.
Leg Raises: Engages lower abs by lifting legs while lying flat.
Mountain Climbers: Combines cardio with core strengthening.
Machine-Based Exercises:
Ab Coaster Exercise: Start in a kneeling position and glide upwards to engage lower and upper abs.
Abdomen King Machine: Sit on the machine and perform crunching movements.
Cable Crunches: Use the pulley system to perform crunches with added resistance.
5. Sample Core Workout Plan
Perform 3-4 sets of each exercise, 10-15 reps per set:
Warm-up: 5-10 minutes of light cardio.
Plank: 30-60 seconds.
Ab Coaster: 12 reps.
Bicycle Crunches: 15 reps per side.
Leg Raises: 12 reps.
Abdomen King Machine: 12-15 reps.
Mountain Climbers: 20 reps.
Cool Down: Stretching the lower back and hip flexors.
6. Nutrition for a Strong Core
To reveal your abs, maintaining a healthy diet is crucial. Key dietary principles include:
Protein Intake: Supports muscle repair and growth.
Healthy Fats: Found in avocados, nuts, and olive oil.
Complex Carbohydrates: Whole grains, vegetables, and fruits for sustained energy.
Hydration: Drink plenty of water to keep the muscles hydrated and support fat loss.
Caloric Deficit: To shed fat and reveal abs, ensure you're burning more calories than you consume.
7. Best Practices for Core Development
Consistency: Train your abs 3-4 times a week.
Rest: Allow muscles to recover; avoid training abs every day.
Form: Focus on the mind-muscle connection to ensure proper engagement of core muscles.
Variety: Change your routine to challenge your muscles with different exercises.
8. Common Mistakes to Avoid
Overtraining: Abs, like any other muscle group, need rest to grow and recover.
Neglecting Lower Abs: Many focus only on upper abs. Include exercises like leg raises and ab coasters to target the lower section.
Not Focusing on Diet: Even with strong abs, a poor diet can hide your results under body fat.
9. Advanced Tips for a Defined Core
Progressive Overload: Gradually increase resistance or reps to keep challenging your core.
Weighted Exercises: Add weights to your core exercises to increase intensity.
High-Intensity Interval Training (HIIT): Combine HIIT with core exercises to burn fat and build definition.
Conclusion
Building a strong and defined ab core requires dedication to both exercise and nutrition. Incorporating a variety of core exercises, using tools like the ab coaster and abdomen king machine, and following a balanced diet will help you achieve noticeable results. Remember, consistency and proper form are key to long-term success.
FAQs
How long does it take to see results in core strength?
Results depend on consistency, diet, and intensity. Typically, 4-8 weeks for noticeable improvements.
Is it safe to train abs every day?
No. Abs need rest like any other muscle group. Aim for 3-4 sessions per week.
Can I achieve a six-pack with just core exercises?
A balanced diet and overall fat loss are essential to revealing a six-pack.
What’s the best ab machine for beginners?
The Ab Coaster is excellent for beginners, as it supports proper form and isolates the abs.
Should I do core exercises before or after cardio?
It depends on your goals, but most people benefit from doing cardio first to warm up the muscles, followed by core exercises.
1 note
·
View note
Text

Here’s a complete guide for using an exercise bike effectively:
1. Choosing the Right Exercise Bike
Types of Bikes:
Upright Bike: Mimics a traditional bicycle, great for cardio and leg workouts.
Recumbent Bike: Provides back support and is easier on the joints, ideal for longer sessions.
Spin Bike: Designed for high-intensity workouts, often used in group classes.
2. Setting Up Your Bike
Adjust the Seat Height:
Stand next to the bike; the seat should be at hip level.
When seated, your knee should be slightly bent at the bottom of the pedal stroke.
Adjust the Seat Position:
Position the seat so that when the pedal is at its furthest point, your knee is directly above your ankle.
Handlebar Height:
Should be at or slightly below seat level for comfort.
3. Proper Riding Form
Posture:
Keep your back straight, shoulders relaxed, and hands lightly gripping the handlebars.
Pedaling Technique:
Push down through the ball of your foot and pull up on the pedals if using clipless shoes.
Engage Your Core:
Keep your core tight to support your lower back.
4. Workout Techniques
Warm-Up:
Start with 5-10 minutes of easy pedaling to warm up your muscles.
Intervals:
Alternate between high-intensity bursts (30 seconds to 2 minutes) and lower intensity for recovery.
Steady-State Cardio:
Maintain a steady pace for 20-60 minutes, aiming for a moderate intensity.
Resistance Training:
Increase the resistance during certain segments to build strength.
5. Tracking Your Progress
Monitor Metrics:
Keep an eye on speed, distance, time, calories burned, and heart rate.
Use Fitness Apps:
Connect your bike to apps that track your workouts and progress over time.
6. Safety Tips
Stay Hydrated:
Drink water before, during, and after your workout.
Listen to Your Body:
Stop if you feel pain or discomfort.
Cool Down:
Spend 5-10 minutes cooling down with light pedaling and stretching.
7. Maintenance
Regular Checks:
Inspect the bike for loose parts, check the resistance mechanism, and keep the bike clean.
Lubrication:
Regularly lubricate the moving parts according to the manufacturer’s guidelines.
Conclusion
Using an exercise bike can be an excellent way to improve cardiovascular fitness, build lower body strength, and burn calories. By setting it up correctly, using proper form, and varying your workouts, you can maximize your results while minimizing the risk of injury.for more about exercise bike please visit our website
FAQ
How often should I use an exercise bike?
Aim for at least 150 minutes of moderate-intensity or 75 minutes of high-intensity cardio per week.
Can I lose weight using an exercise bike?
Yes, combined with a balanced diet, it can help with weight loss.
Is it safe for beginners?
Absolutely! Start with shorter sessions and gradually increase intensity and duration.
#fitness#exercise#physicalfitness#physicalexercise#exercisecycle#exercise bike#spin bike#upright bike#recumbentbike#air bike
0 notes
Text
Complete Guide to the Treadmill

Treadmills are one of the most popular pieces of fitness equipment used for cardio exercises such as running, walking, and jogging. They are highly effective for weight loss, improving cardiovascular health, and building endurance. This guide covers everything you need to know about treadmills, from types and benefits to safety tips and workouts.
Table of Contents
What is a Treadmill?
Types of Treadmills
Motorized Treadmill
Manual Treadmill
Incline Treadmill
Foldable Treadmill
Benefits of Using a Treadmill
Key Features to Look for in a Treadmill
Treadmill Workouts
Beginner Treadmill Workout
Interval Training on a Treadmill
Fat-burning Treadmill Workout
How to Use a Treadmill Safely
Maintenance Tips for Treadmills
Common Treadmill Mistakes to Avoid
FAQs
1. What is a Treadmill?
A treadmill is a device that allows you to walk, run, or jog in one place on a moving belt. It's a staple in both home and commercial gyms and is widely used for cardiovascular exercises, endurance building, and calorie burning.
2. Types of Treadmills
Motorized Treadmill This type of treadmill uses an electric motor to move the running belt. It often comes with advanced features like speed control, incline adjustments, and workout programs.
Manual Treadmill A manual treadmill moves when you walk or run, powered by your own movement. It's simpler, more affordable, and typically requires more effort to use.
Incline Treadmill An incline treadmill allows you to adjust the slope of the running belt. Walking or running uphill can intensify the workout, targeting different muscle groups and burning more calories.
Foldable Treadmill A foldable treadmill is designed for small spaces. You can fold it vertically when not in use, making it an ideal choice for home gyms or apartments with limited space.
3. Benefits of Using a Treadmill
Weight Loss: Running or walking on a treadmill is an effective way to burn calories and promote weight loss.
Cardio Health: Regular treadmill use strengthens your heart and improves circulation.
Endurance Building: It allows you to gradually increase workout intensity and improve stamina.
Controlled Environment: With a treadmill, you can exercise indoors regardless of the weather.
Variety of Workouts: You can use a treadmill for walking, jogging, sprinting, or interval training.
4. Key Features to Look for in a Treadmill
Motor Power: A treadmill with a motor between 2.0-3.5 CHP (continuous horsepower) is suitable for home use.
Speed Range: Choose a treadmill with adjustable speeds, usually from 0.5 to 12 mph, to suit various workout intensities.
Incline: Treadmills with incline features offer added resistance for more intense workouts. Look for machines with at least a 10-15% incline range.
Belt Size: For running, a belt size of 20" x 60" is ideal, whereas for walking, smaller belts can be sufficient.
Cushioning: Good shock absorption helps reduce the impact on joints and knees, preventing injury.
Foldability: If space is a concern, a foldable treadmill with wheels for easy transport is a great choice.
Preset Programs: Many treadmills come with built-in workout programs to help guide your exercise routine.
Safety Features: Look for emergency stop buttons or safety lanyards that stop the treadmill if you lose balance.

5. Treadmill Workouts
Beginner Treadmill Workout
Warm-up: 5 minutes at 3 mph
Walk: 15 minutes at 3.5-4 mph
Cool-down: 5 minutes at 2.5 mph
Interval Training on a Treadmill
Warm-up: 5 minutes at 3 mph
Sprint: 1 minute at 7 mph
Walk: 2 minutes at 3 mph
Repeat for 20 minutes
Cool-down: 5 minutes at 2.5 mph
Fat-burning Treadmill Workout
Warm-up: 5 minutes at 3 mph
Jog: 10 minutes at 5 mph
Incline Walk: 10 minutes at 3.5 mph, incline 8%
Cool-down: 5 minutes at 2.5 mph
6. How to Use a Treadmill Safely
Start Slow: Always start at a slow speed and gradually increase the intensity.
Use the Safety Key: Attach the safety clip to your clothing to automatically stop the treadmill if you fall.
Maintain Good Posture: Keep your head up and shoulders relaxed. Avoid leaning on the handrails.
Stay Hydrated: Keep water close by to stay hydrated during your workout.
Cool Down Properly: Gradually decrease the speed during cool-down periods to prevent dizziness.
7. Maintenance Tips for Treadmills
Keep the Belt Clean: Regularly wipe down the belt with a damp cloth to remove dust and dirt.
Lubricate the Belt: Follow the manufacturer's instructions to lubricate the belt to reduce friction.
Check the Motor: Periodically inspect the motor for any issues and keep it dust-free.
Tighten the Belt: If the belt becomes loose, adjust it as needed to prevent slipping during use.
Monitor the Console: Check the console for updates or issues to ensure it's functioning properly.
8. Common Treadmill Mistakes to Avoid
Skipping Warm-ups and Cool-downs: Always warm up before and cool down after your treadmill session.
Holding onto the Handrails: Avoid gripping the handrails as it affects posture and reduces workout efficiency.
Running at an Incline Without Preparation: Sudden use of incline without gradually working up to it can cause injury.
Ignoring Posture: Slouching or looking down can cause neck and back strain. Keep your posture upright.
Overdoing It: Pushing too hard without rest days can lead to burnout or injury.
9. FAQs
Q1: How often should I use a treadmill for weight loss? A: For effective weight loss, aim for at least 30 minutes of moderate-intensity treadmill exercise 4-5 times a week.
Q2: Can I build leg strength on a treadmill? A: Yes, incorporating incline workouts or interval sprints can strengthen your leg muscles, especially the quads and calves.
Q3: What's the best treadmill speed for beginners? A: Beginners should start with a walking pace of 2-3 mph and gradually increase speed as their fitness improves.
Q4: How do I choose the right treadmill for home use? A: Consider factors like motor power, size, incline options, and foldability based on your available space and fitness goals.
Q5: Is running on a treadmill harder than running outside? A: Running on a treadmill can feel easier due to the belt’s movement, but adding incline can mimic outdoor conditions for a more challenging workout.
Conclusion
Treadmills are versatile, user-friendly, and effective for people of all fitness levels. Whether you're walking for general health, running for endurance, or using incline settings for intense cardio, treadmills offer a controlled environment for your workout goals. Remember to choose a treadmill that fits your needs, maintain it properly, and stay consistent with your workout routine for the best results.
#fitness#exercise#physicalfitness#physicalexercise#treadmill#bellyfat#cardio#walking#running#jogging#exercisetreadmill#fitness treadmill
0 notes
Text
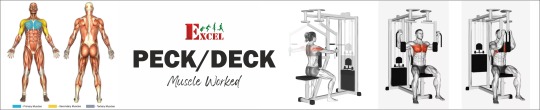
Complete Guide to the Peck Rear Delt Machine
1. Introduction to the Peck Rear Delt Machine
The Peck Rear Delt Machine, often referred to as the Reverse Pec Deck, is a popular piece of equipment used to isolate and strengthen the rear deltoid muscles. This guide will walk you through the benefits, proper setup, execution, and tips for optimal use of the machine.
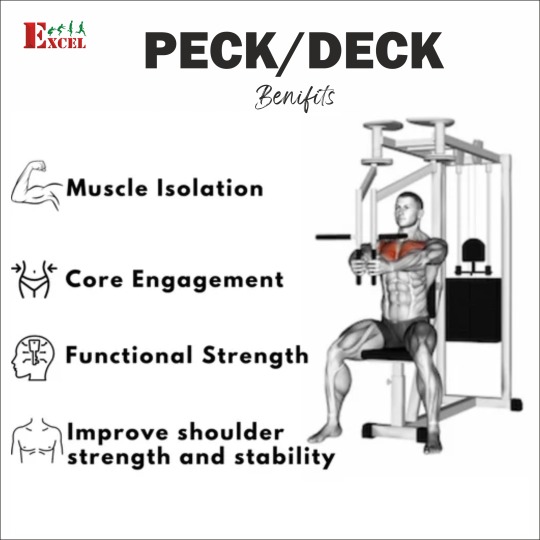
2. Benefits of Using the Peck Rear Delt Machine
Improves Posture: Strengthens the rear delts, helping to correct posture and prevent rounded shoulders.
Enhances Upper Body Stability: Builds shoulder stability and supports overall upper body strength.
Increases Shoulder Mobility: Improves flexibility and range of motion in the shoulder joints.
Reduces Risk of Shoulder Injury: Prevents muscle imbalances and related injuries by targeting often neglected muscles.
Develops Back Definition: Contributes to a more defined and aesthetically pleasing upper back.
3. How to Set Up the Peck Rear Delt Machine
Adjust the Seat Height: Sit on the machine and adjust the seat so that the handles are aligned with your shoulders.
Set the Handle Position: Position the handles at a level that allows your arms to be extended straight out when in the starting position.
Choose the Weight: Select a weight that is challenging but allows you to perform the exercise with proper form.
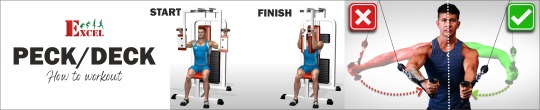
4. Proper Form and Technique
Starting Position: Sit on the machine with your back straight and chest up. Grasp the handles with your arms extended out to the sides.
Execution: Pull the handles back in a controlled motion, squeezing your shoulder blades together and engaging your rear deltoids.
Return: Slowly return to the starting position, maintaining tension in the rear delts throughout the movement.
Breathing: Exhale while pulling the handles back and inhale as you return to the starting position.
5. Common Mistakes to Avoid
Using Too Much Weight: Overloading can lead to poor form and potential injury. Start with a manageable weight and increase gradually.
Incorrect Seat Height: Improper seat adjustment can reduce the effectiveness of the exercise and increase the risk of shoulder strain.
Overarching the Back: Keep your back straight and avoid arching excessively to prevent lower back strain.
6. Variations and Alternatives
Single-Arm Rear Delt Fly: Perform the exercise one arm at a time to focus on individual muscle strength.
Standing Reverse Flyes: Use dumbbells for a standing version of the rear delt exercise.
Face Pulls: Utilize a cable machine for a different angle of rear delt activation.
7. Incorporating the Peck Rear Delt Machine into Your Workout Routine
Frequency: Include the exercise 2-3 times per week as part of your shoulder or upper body workout.
Reps and Sets: Aim for 3-4 sets of 10-15 repetitions, depending on your fitness goals.
Rest: Allow 48 hours of recovery between sessions targeting the same muscle group.
8. Safety Tips
Warm-Up: Always warm up your shoulders before starting the exercise to reduce the risk of injury.
Cool Down: Stretch your shoulders and back after the workout to improve flexibility and reduce muscle soreness.
Seek Professional Advice: Consult a fitness trainer if you're unsure about proper form or machine setup.
9. Conclusion
The Peck Rear Delt Machine is a valuable tool for enhancing shoulder strength, stability, and posture. By following the proper setup, form, and technique, you can effectively target the rear deltoids and achieve well-rounded shoulder development.
10. FAQs
How often should I use the Peck Rear Delt Machine? Use it 2-3 times a week as part of your shoulder or upper body workout routine.
Can I use the Peck Rear Delt Machine if I have shoulder issues? Consult with a healthcare provider or fitness professional before using the machine if you have existing shoulder conditions.
What is the best weight to start with? Begin with a weight that allows you to perform the exercise with proper form and gradually increase as you build strength.
0 notes
Text

Do's and Don'ts for using the lat pulldown machine:
Do's:
1.Adjust the Machine: Set the seat height and thigh pads so that your thighs are secured and your feet are flat on the floor.
2.Warm-Up: Perform a brief warm-up before starting your lat pulldown routine to prepare your muscles and joints.
3.Grip: Use an overhand grip slightly wider than shoulder-width apart to target the lats effectively.
4.Maintain Proper Posture: Keep your back straight, chest up, and shoulders down throughout the exercise to minimize strain on the lower back.
5.Controlled Movement: Pull the bar down smoothly and in a controlled manner towards your upper chest, focusing on engaging the lats.
6.Full Range of Motion: Lower the bar until it touches your upper chest or just below, then allow your arms to fully extend without locking your elbows to stretch the lats.

Don'ts:
1.Use Excessive Momentum: Avoid using momentum or swinging your body to pull the bar down, as this can reduce the effectiveness of the exercise and increase the risk of injury.
2.Lean Back Excessively: While a slight lean back is okay, avoid excessive leaning back during the pulldown, as it can strain your lower back and reduce the engagement of the lats.
3.Grip Too Narrow: Using a grip that is too narrow can limit the activation of the lats and increase strain on the wrists and elbows.
4.Neglecting Breathing: Remember to breathe naturally throughout the exercise, exhaling as you pull the bar down and inhaling as you return to the starting position.
5.Ignoring Proper Form: Always prioritize proper form over lifting heavier weights. Maintain control and focus on the muscle contraction in your lats.
6.Overtraining: Allow adequate rest between sets and workouts to prevent overtraining and promote muscle recovery and growth.
By following these do's and don'ts, you can maximize the effectiveness of your lat pulldown workouts while minimizing the risk of injury.
0 notes
Text

Hack Squat: A Comprehensive Guide
How to Do Hack Squats for Leg Strength
To build leg strength, the hack squat is an excellent exercise. Follow these steps for an effective workout:
Setup: Choose a hack squat machine compatible with Olympic sized plates. Adjust the backrest to a comfortable position, ensuring it supports your back correctly.
Positioning: Place your feet shoulder-width apart on the wide super-grip platform. Make sure your shoulders are under the padded supports.
Execution: Lower the sled slowly, keeping your back flat and your knees tracking in line with your toes. Aim for a full range of motion, lowering until your thighs are parallel to the platform or slightly below.
Movement: Push through your heels to lift the sled back up, focusing on controlled, smooth movements to maximize leg strength.
Hack Squat Machine Benefits for Bodybuilders
The hack squat machine offers several benefits for bodybuilders:
Easy Start with Safety Levers: Provides a quick setup and secure engagement, allowing you to focus on your workout without adjusting the machine mid-set.
Varying Density Padding Backrest for Maximum Comfort: Ensures that you can perform the exercise comfortably, even during longer sessions.
Adjustable Backrest with 5 Positions: Customizable to fit your body type and desired angle, enhancing comfort and effectiveness.

Two Additional Weight Plate Horns: Allows for greater flexibility in adding weight, which is crucial for progressive overload and muscle growth.
Hack Squat vs Leg Press for Muscle Growth
When comparing hack squat vs leg press for muscle growth, the hack squat machine has unique advantages:
Hack Squat: Offers targeted quadriceps activation and engages the core more effectively. The wide super-grip platform and adjustable backrest enhance stability and comfort.
Leg Press: Provides versatility in foot placement, which can target various leg muscles, but may not offer the same core engagement as the hack squat.
Best Hack Squat Machine Exercises for Quads
For optimal quadriceps development, consider these variations:
Standard Hack Squat: Position your feet lower on the platform to emphasize the quads.
Narrow Foot Placement: Focuses on quad engagement by reducing the involvement of the glutes and hamstrings.
Single-Leg Hack Squat: Helps address imbalances and provides a more intense quad workout.
Correct Form for Hack Squat to Avoid Injury
To ensure safety and effectiveness, follow these tips for correct form:
Back Position: Keep your back flat against the padded support throughout the movement.
Knee Tracking: Ensure your knees track in line with your toes to prevent strain and injury.
Avoid Knee Lockout: Do not lock your knees at the top of the movement; maintain a slight bend to keep tension on the muscles and protect the joints.
Use Safety Features: Utilize the easy start safety levers and varying density padding for added protection and comfort during your workout.
for more about hack squat please visit our website page
0 notes
Text

The Ultimate Guide: Using a Treadmill for Weight Loss
Losing weight can often feel like an uphill battle, but with the right approach, consistency, and tools like a treadmill, it becomes manageable and effective. Treadmills offer a versatile way to shed extra pounds while improving cardiovascular health, strength, and endurance. In this guide, we explore the best ways to optimize your treadmill routine for weight loss, ensuring long-term success and health benefits.
Why Choose a Treadmill for Weight Loss?
Treadmills are one of the most popular pieces of fitness equipment for weight loss because they allow for versatile and controlled workouts. Whether you are a beginner or an experienced runner, treadmills offer varied settings and incline levels to match any fitness level.
Setting Realistic Weight Loss Goals
Before starting any weight loss journey, it is important to set realistic and achievable goals. Losing 1-2 pounds per week is considered healthy and sustainable. Use the treadmill as part of a balanced approach that includes proper nutrition, strength training, and adequate rest.
Designing a Treadmill Workout Plan for Weight Loss
Creating an effective treadmill routine requires a combination of different workout styles. Varying your sessions will help you avoid plateaus and keep your body challenged. Below are key elements you should incorporate into your treadmill plan:
1. Interval Training for Maximum Fat Burn
Interval training combines short bursts of high-intensity running with periods of low-intensity walking or jogging. This method boosts metabolism and helps burn more calories in a shorter time.
Sample Interval Workout:
Warm-up: 5 minutes of brisk walking (3.5 mph)
Sprint: 30 seconds at 8.0 mph
Walk: 1 minute at 3.0 mph
Repeat for 15-20 minutes
Cool down: 5 minutes of light walking
2. Incline Walking to Boost Calorie Burn
Walking on an incline mimics the resistance of uphill walking, which engages more muscle groups, particularly the glutes, hamstrings, and calves. It’s an effective way to increase calorie expenditure while keeping the workout low impact.
Incline Walking Routine:
Warm-up: 5 minutes on a flat surface
Walk: 3.5 mph at a 5% incline for 2 minutes
Walk: 3.5 mph at a 10% incline for 2 minutes
Walk: 3.5 mph at a 15% incline for 1 minute
Repeat for 20-30 minutes
3. Steady-State Cardio for Endurance
Steady-state cardio involves maintaining a consistent pace over a longer duration. This workout is great for building cardiovascular endurance while burning calories over time.
Steady-State Example:
Warm-up: 5 minutes of light walking
Jog: 20-40 minutes at a moderate pace (5.0-6.0 mph)
Cool down: 5 minutes of light walking
Understanding Heart Rate Zones for Fat Loss
Monitoring your heart rate can help ensure you are working within your fat-burning zone. Generally, working out at 60-70% of your maximum heart rate is optimal for fat loss.
To calculate your maximum heart rate: 220 - your age = Maximum Heart Rate
Fat-Burning Zone:
60-70% of your maximum heart rate
You can use the treadmill’s built-in heart rate monitor or wear a fitness tracker to ensure you’re in the right zone for fat loss.
The Role of Diet in Treadmill Weight Loss
While treadmill workouts are highly effective, combining them with a well-balanced diet is crucial. Focus on whole foods, lean proteins, healthy fats, and fiber-rich vegetables to fuel your workouts and aid recovery. Avoid processed foods, sugary snacks, and excess carbohydrates.
Sample Balanced Diet Plan:
Breakfast: Oatmeal with almond butter and fresh berries
Lunch: Grilled chicken salad with avocado and mixed greens
Dinner: Baked salmon, quinoa, and steamed broccoli
Snacks: Greek yogurt, almonds, and apple slices
Tracking Progress and Staying Motivated
One of the key factors in a successful weight loss journey is tracking progress. Set weekly or bi-weekly check-ins to measure weight, body fat percentage, and physical endurance. In addition to physical metrics, track how you feel mentally and emotionally, as this is just as important for long-term success.
Tips for Staying Motivated:
Create a workout playlist that pumps you up
Set non-weight-related goals, like running a 5K or hitting a distance milestone
Join a treadmill-focused fitness group or class
Reward yourself for achieving fitness goals (new workout gear, spa day, etc.)
How Often Should You Use the Treadmill?
For effective weight loss, aim for at least 30-60 minutes of treadmill exercise, 5 times per week. Mix up your workouts between interval training, incline walking, and steady-state cardio to keep things fresh and challenging.
Advanced Treadmill Workouts for Accelerated Weight Loss
Once you’ve built a solid treadmill routine, it’s time to introduce advanced workouts that can further accelerate your weight loss. These workouts push your body to new limits, burn more calories, and improve your overall fitness.
1. HIIT (High-Intensity Interval Training)
HIIT is an effective way to increase calorie burn and improve cardiovascular fitness in a short amount of time. It involves alternating between intense bursts of exercise and brief recovery periods.
Advanced HIIT Routine:
Warm-up: 5 minutes of brisk walking at 3.5 mph
Sprint: 20 seconds at 9.0 mph
Walk: 1 minute at 3.0 mph
Repeat for 20 minutes
Cool down: 5 minutes of light walking
The goal is to push yourself during the sprint intervals, making each one more challenging than the last. This workout not only burns calories during the session but also boosts metabolism post-workout, aiding in fat loss.
2. Pyramid Workout for Endurance and Fat Burn
Pyramid workouts involve gradually increasing the intensity (speed or incline) during the session and then decreasing it, which keeps your muscles guessing and burns more calories.
Pyramid Treadmill Routine:
Warm-up: 5 minutes of walking
Walk: 3 minutes at 3.5 mph
Jog: 3 minutes at 5.0 mph
Run: 3 minutes at 6.5 mph
Sprint: 3 minutes at 8.0 mph
Then reverse back to walking
Cool down: 5 minutes of light walking
3. Fartlek Training for Fatigue Resistance
Fartlek, a Swedish term meaning “speed play,” is a form of unstructured interval training. This workout involves alternating between different speeds and intensities without a set pattern. It’s great for improving speed and endurance.
Fartlek Training on a Treadmill:
Warm-up: 5 minutes of walking or light jogging
Randomly alternate between sprints, jogs, and walks based on how your body feels
Aim to include at least 3 sprint segments and 3 jog segments
Cool down: 5 minutes of walking
The unpredictability of fartlek training shocks the body and promotes faster fat-burning.
Combining Strength Training with Treadmill Workouts
Adding strength training to your treadmill routine can significantly enhance weight loss. By building muscle, you increase your resting metabolic rate (RMR), meaning you’ll burn more calories throughout the day. Incorporate strength exercises before or after your treadmill session to maximize results.
Suggested Strength Exercises:
Squats: 3 sets of 12-15 reps
Lunges: 3 sets of 10 reps per leg
Push-ups: 3 sets of 10-15 reps
Plank: Hold for 30-60 seconds
Strength training combined with treadmill sessions creates a full-body workout that helps you lose fat while toning muscles.
Recovery and Rest for Optimal Weight Loss
Rest is a critical component of any fitness routine, especially for weight loss. Overtraining can lead to injury, fatigue, and mental burnout, which can hinder your progress. Make sure to incorporate rest days or active recovery days with light activity, such as walking or stretching.
Importance of Recovery:
Muscle Repair: Muscles need time to recover and grow stronger after intense workouts.
Preventing Injury: Resting helps prevent overuse injuries.
Boosting Performance: Adequate rest improves overall performance, allowing you to push harder during workouts.
Tracking Your Treadmill Progress for Continued Success
Monitoring your progress is essential for maintaining motivation and achieving weight loss goals. Keeping track of your workouts, heart rate, and body metrics can help you stay on track and make adjustments as needed.
Best Practices for Tracking:
Fitness Apps: Use a fitness app or treadmill’s built-in tracking system to log your workouts.
Progress Photos: Take photos every 4 weeks to visually track your transformation.
Body Measurements: Measure your waist, hips, and other key areas every 2 weeks.
Weight and Body Fat: Track your weight weekly, but also focus on body fat percentage as a more accurate indicator of fat loss.
By consistently evaluating your progress, you’ll be able to stay motivated and tweak your treadmill workouts for continuous improvement.
The Mental Benefits of Treadmill Workouts
In addition to the physical rewards, treadmill workouts provide significant mental health benefits. Engaging in regular cardio exercise can reduce symptoms of stress, anxiety, and depression. Furthermore, setting and achieving fitness goals boosts self-esteem and confidence.
Mental Health Benefits:
Reduced Stress: Exercise triggers the release of endorphins, which help reduce stress and improve mood.
Enhanced Focus: Regular workouts improve concentration and cognitive function.
Improved Sleep: Physical activity promotes better sleep, helping you wake up more refreshed.
Creating a Balanced Routine for Long-Term Success
Consistency is key to achieving long-term weight loss and fitness goals. Building a well-rounded routine that incorporates treadmill workouts, strength training, recovery, and a healthy diet is the best approach to sustained fat loss.
Rest or Active Recovery
By rotating between different workout styles and incorporating strength training, you can keep your body challenged and avoid fitness plateaus.
Benefits Beyond Weight Loss
In addition to weight loss, using a treadmill provides numerous other health benefits, including:
Improved Cardiovascular Health: Regular treadmill use strengthens the heart and lowers the risk of heart disease.
Increased Endurance: Consistent treadmill workouts enhance lung capacity and stamina.
Stronger Muscles: Running or walking on a treadmill targets major muscle groups, helping to tone and strengthen your legs and core.
Mental Health: Physical activity, such as treadmill workouts, is known to reduce stress and improve mood by releasing endorphins.
Common Mistakes to Avoid
1. Skipping the Warm-Up
Always start with a light warm-up to get your muscles ready and avoid injury.
2. Relying Only on Speed
Vary the intensity with incline and resistance settings instead of always increasing speed.
3. Holding Onto the Rails
Avoid holding onto the side rails as this reduces the workout’s intensity and effectiveness.
Conclusion
Utilizing the treadmill for weight loss is a practical and versatile approach. By incorporating a variety of workout styles such as interval training, incline walking, and steady-state cardio, you can ensure a balanced routine that not only helps shed pounds but also builds endurance and strength. Combined with a healthy diet and consistent tracking, the treadmill can be your key to sustainable weight loss success.
FAQs
Q: How long should I run on a treadmill to lose weight? A: For optimal weight loss, aim for 30-60 minutes per session, 5 times per week.
Q: Can walking on a treadmill help me lose weight? A: Yes! Walking at an incline increases calorie burn and engages more muscles, making it an effective way to lose weight.
Q: Should I focus more on speed or incline for weight loss? A: Incline is more effective for engaging muscles and burning more calories without overloading your joints.
Q: Is interval training on a treadmill better for weight loss? A: Interval training is highly effective for weight loss because it maximizes calorie burn and boosts metabolism even after the workout.
Q: Is it better to run or walk on a treadmill for weight loss? A: Both running and walking can be effective for weight loss. Running burns more calories in a shorter time, but walking at an incline can also provide significant fat-burning benefits with less impact on the joints.
Q: How can I prevent boredom while using a treadmill? A: To prevent boredom, vary your workouts by adjusting the speed and incline, incorporating interval training, and listening to music or podcasts. You can also watch TV shows or use a treadmill with built-in entertainment features.
Q: What is the best treadmill setting for fat loss? A: Using the incline feature is one of the best ways to maximize fat loss. Walking or running at a 5-15% incline significantly increases calorie burn and engages more muscles.
Q: How often should I change my treadmill routine? A: It’s important to change your routine every 4-6 weeks to avoid plateaus and keep your body challenged. Try incorporating new workout styles, adjusting speed and incline, or adding strength training.
0 notes
Text

Do's and Don'ts for Using a Motorized Treadmill
Using a motorized treadmill is a great way to stay fit, whether you're running, walking, or doing a cardio exercise. To get the most out of your exercise treadmill while staying safe, follow these essential tips:
Do's:
1.Warm Up Before Starting: Before stepping onto the fitness treadmill, spend 5-10 minutes walking or stretching to prepare your muscles for the workout.
2.Use the Safety Key/Clip: Always attach the safety clip to your clothing when using the motorized treadmill. It will stop the treadmill if you lose your balance.
3.Start Slow: Begin at a low speed on your exercise treadmill, then gradually increase it to avoid sudden jerks that could lead to injury.
4.Maintain Proper Posture: Keep your back straight, shoulders relaxed, and look forward while running or walking on the fitness treadmill to reduce strain on your body.
5.Wear Proper Footwear: Make sure to wear cushioned shoes designed for running or walking on the foldable treadmill for added comfort and support.
6.Hydrate: Keep a water bottle nearby to stay hydrated, especially during longer cardio exercise sessions.
7.Listen to Your Body: Stop immediately if you feel pain, dizziness, or discomfort while using the motorized treadmill. It’s crucial to avoid overexertion.
8.Cool Down After Use: Spend 5-10 minutes walking at a slow pace to gradually lower your heart rate after using the fitness treadmill.
9.Check the Treadmill Before Use: Ensure that your incline treadmill or foldable treadmill is properly calibrated and running smoothly before starting.
10. Mix Up Your Routine: Use different speeds and incline settings on your incline treadmill to target various muscle groups and prevent workout boredom.
Don'ts:
1. Don’t Jump on a Moving Treadmill: Always start the motorized treadmill while standing on the side rails and step onto the belt once it’s in motion.
2.Don’t Look Down at Your Feet: Avoid looking down while running or walking on the fitness treadmill, as it can lead to poor posture and balance issues.
3.Don’t Hold Onto the Handrails: Holding onto the handrails can compromise your posture and reduce the effectiveness of your cardio exercise.
4.Don’t Overstride: Keep your stride natural on the exercise treadmill to avoid unnecessary strain on your muscles and joints.
5.Don’t Push Yourself Too Hard: Start with manageable speeds and inclines on the incline treadmill. Gradually build up your endurance to avoid injury.
6.Don’t Use the Treadmill Barefoot: Always wear supportive shoes when using the foldable treadmill to reduce the risk of injury.
7.Don’t Ignore the Incline: The incline function on the incline treadmill can intensify your workout, but avoid setting it too high too quickly.
8.Don’t Watch TV Without Focusing on Your Workout: Watching TV while using a motorized treadmill may cause you to lose focus on your form, increasing the risk of injury.
9.Don’t Step Off a Moving Treadmill: Slow down and stop the fitness treadmill completely before stepping off to avoid accidents.
10.Don’t Forget to Maintain the Treadmill: Regular cleaning and lubrication of your foldable treadmill or incline treadmill is essential for smooth operation and long-lasting use.
For high-quality motorized treadmills, incline treadmills, and other fitness equipment, visit https://www.excelfitindia.com
Following these tips will help you get the most out of your cardio exercise sessions on a motorized treadmill, keeping your running, walking, and workouts safe and effective.
The website link has been added at the end to direct readers to excelfitindia.com for more information or purchasing options.
0 notes
Text

Effective Ways to Build Core and Abs Quickly
Building a strong core is crucial for improving overall fitness, stability, and posture. If you're looking for fast and effective ways to strengthen your core and sculpt your abs, incorporating the right exercises and equipment can make all the difference. Here's how you can speed up the process with targeted workouts like the ab coaster exercise and using tools like the abdomen king machine, while also enjoying the many ab core benefits.
1. Incorporate the Ab Coaster Exercise
The ab coaster exercise is a fantastic way to target the lower, middle, and upper abdominal muscles all at once. Unlike traditional crunches, the ab coaster works by engaging your entire core as you move your legs in a sweeping arc, placing tension on your abs throughout the movement. It's a great tool for those looking to build core strength quickly while minimizing strain on the back and neck. Some of the ab core benefits of this exercise include:
- Improved core stability and balance.
- Targeted muscle engagement for faster results.
- Low-impact on the spine, making it a safer option for people with back issues.
2. Use the Abdomen King Machine
Another effective piece of equipment is the abdomen king machine, which focuses on upper and lower abs as well as the obliques. This machine provides guided motion and adjustable resistance, allowing you to progressively increase the intensity of your workout. It’s especially useful for those looking to see rapid results in their core development. Key ab core benefits of the abdomen king machine include:
- Adjustable resistance to suit various fitness levels.
- Comprehensive engagement of abdominal muscles.
- Helps sculpt and define the abs quickly by focusing on specific muscle groups.
3. Perform Compound Movements
Along with using targeted machines like the ab coaster and abdomen king machine, incorporating compound movements such as planks, leg raises, and mountain climbers is essential for full core activation. These exercises not only work your abs but also engage your lower back, glutes, and hip flexors, giving you a complete core workout. Doing these exercises regularly will maximize the ab core benefits and contribute to quicker muscle definition.

4. Focus on High-Intensity Interval Training (HIIT)
To speed up fat loss and reveal your abdominal muscles, combining core exercises with High-Intensity Interval Training (HIIT) is a must. Short bursts of intense exercises like sprinting, jump squats, and burpees, followed by brief rest periods, will accelerate fat burning while simultaneously engaging your core. This type of workout will not only help you build core strength but also shred fat quickly, making your abs more visible.
5. Maintain a Clean Diet
Even the best exercises won't show results without proper nutrition. To reveal your abs and maximize the ab core benefits of your workouts, maintaining a clean, balanced diet is crucial. Focus on lean proteins, complex carbohydrates, healthy fats, and plenty of vegetables. Reducing excess fat around your midsection will allow your abdominal muscles to shine through faster.
6. Stretch and Recover
Don't underestimate the importance of stretching and recovery when trying to build core strength quickly. Stretching helps improve flexibility, prevent injury, and maintain good posture—all of which contribute to better core engagement during your workouts. Recovery time also allows your muscles to repair and grow, giving you stronger abs over time.
Conclusion
Building core strength and achieving defined abs doesn’t have to take forever. By incorporating targeted exercises like the ab coaster exercise and using the abdomen king machine, combined with compound movements and HIIT workouts, you can fast-track your results. Add a clean diet and proper recovery to the mix, and you’ll be well on your way to enjoying the full range of ab core benefits in no time
#fitness#exercise#physicalfitness#physicalexercise#bellyfat#ab core#ab coaster#ab glider#ab board#abdomen king
0 notes
Text

BODY BUILDING TIPS FOR CHEST Building a well-developed chest requires a combination of targeted exercises, proper form, progressive overload, and adequate recovery. Here are some bodybuilding tips specifically for chest development:
1.Focus on Compound Movements: Incorporate compound exercises like bench presses (flat, incline, and decline), dumbbell presses, and weighted dips into your routine. These exercises recruit multiple muscle groups, including the chest, shoulders, and triceps, promoting overall strength and muscle growth.
2.Isolation Exercises: Supplement compound movements with isolation exercises such as chest flies (using dumbbells or cables) and chest pullovers. These exercises help to target and exhaust the chest muscles, enhancing muscle definition and symmetry.
3.Mind-Muscle Connection: Focus on contracting and squeezing the chest muscles throughout each repetition. This technique, known as the mind-muscle connection, enhances muscle activation and improves overall muscle recruitment during exercises.

4.Progressive Overload: Continuously challenge your muscles by gradually increasing the weight, reps, or intensity of your workouts. This progressive overload principle stimulates muscle growth and adaptation over time.
5.Proper Form and Range of Motion: Maintain proper form during exercises to maximize effectiveness and minimize the risk of injury. Ensure a full range of motion to fully engage the chest muscles throughout the exercise.
6.Rest and Recovery: Allow adequate time for rest and recovery between workouts. Muscles grow and repair during rest periods, so ensure you're getting enough sleep and nutrition to support muscle recovery and growth.
By incorporating these tips into your training regimen, you can effectively build a stronger, more defined chest over time. Adjust your program based on your fitness level and goals, and consider consulting with a fitness professional for personalized guidance.
0 notes
Text

Purpose of the Multi Press
The Multi Press is a versatile piece of gym equipment designed to target multiple muscle groups through various press exercises. It combines the functionality of several machines into one, allowing for a wide range of exercises, primarily focused on pressing movements. Here’s an overview of its purpose and benefits:
1. Versatility
Multiple Exercises: The Multi Press can be used for different pressing exercises such as chest presses, shoulder presses, and sometimes even leg presses, depending on the machine's configuration.
Adjustable Angles: Allows for flat, incline, and sometimes decline press variations to target different parts of the muscles.
2. Comprehensive Muscle Development
Chest Muscles: Provides various angles for pressing exercises to work the pectoral muscles (flat bench for middle chest, incline for upper chest).
Shoulder Muscles: Includes shoulder press options to target the deltoids.
Triceps: Involved in pressing movements, particularly in chest and shoulder presses.
Legs and Core: Some multi-press machines also include options for leg press and core stability exercises.
3. Space Efficiency
Compact Design: Combines multiple machines into one unit, saving space in a gym or home workout area.
All-in-One Solution: Reduces the need for multiple separate machines, making it ideal for smaller spaces or home gyms.

4. Safety and Stability
Controlled Movements: Provides guided movement paths, reducing the risk of injury compared to free weights.
Adjustable Weight Stack: Allows for safe and easy weight adjustments without the need for a spotter.
5. Accessibility for Various Fitness Levels
Beginner-Friendly: The guided paths and stability make it accessible for beginners who might not yet have the balance or form required for free weights.
Progressive Training: Adjustable weights and settings cater to both beginners and advanced users, allowing for gradual progression.
6. Balanced Muscle Training
Symmetrical Development: The machine ensures even distribution of weight, helping to develop muscle symmetry and reducing the risk of imbalances.
Targeting Specific Areas: Ability to isolate and focus on specific muscle groups for balanced muscle development.
Benefits of Using a Multi Press
Efficiency: Allows for quick transitions between exercises, making it easier to maintain a high-intensity workout.
Consistency: Provides a consistent range of motion, aiding in maintaining proper form and reducing the risk of injury.
Convenience: Eliminates the need to switch between different machines or equipment, streamlining the workout process.
0 notes
Text

To effectively grow your triceps, you'll want to focus on a combination of targeted exercises, proper technique, progressive overload, and adequate recovery. Here’s a structured approach:
1.Choose Effective Tricep Exercises
Include exercises that target all three heads of the triceps:
Close-Grip Bench Press: Emphasizes the triceps more than a standard bench press.
Tricep Dips: Effective for overall triceps development.
Tricep Pushdowns (with various grips): Utilizes a cable machine for constant tension.
Overhead Tricep Extensions: Targets the long head of the triceps.
Skull Crushers (Lying Tricep Extensions): Builds size and strength in the triceps.
2.Focus on Proper Form
Controlled Movements: Avoid using momentum; ensure your triceps do the work.
Full Range of Motion: Extend fully to contract the triceps completely; lower slowly to stretch the muscle.
Mind-Muscle Connection: Focus on feeling the triceps engage throughout each exercise.
3.Implement Progressive Overload
Increase Resistance: Gradually increase the weight you lift to challenge your muscles.
Adjust Reps and Sets: Aim for 8-12 reps per set to promote muscle growth.
Variety: Alternate exercises and techniques to keep your muscles adapting and growing.
4.Prioritize Recovery
Rest Days: Allow at least 48 hours between triceps workouts to allow for muscle recovery and growth.
Sleep: Aim for 7-9 hours of quality sleep per night to support muscle repair.
Nutrition: Ensure you're consuming enough protein and calories to fuel muscle growth and repair.

5.Consistency and Patience
Regular Training: Train triceps 1-2 times per week, depending on your overall workout split.
Track Progress: Keep a workout journal to monitor your exercises, weights, and progress over time.
Be Patient: Muscle growth takes time and consistency; stick to your routine and adjustments will come.
Sample Tricep Workout Routine:
Day 1:
1. Close-Grip Bench Press: 4 sets of 8-10 reps
2. Tricep Pushdowns (Rope Attachment): 3 sets of 12-15 reps
3. Overhead Tricep Extensions (Dumbbell or Cable): 3 sets of 10-12 reps
Day 2:
1. Tricep Dips (Weighted, if possible): 4 sets of 8-10 reps
2. Skull Crushers: 3 sets of 10-12 reps
3. Tricep Kickbacks (Dumbbell): 3 sets of 12-15 reps
By following these guidelines and adjusting your routine based on your progress and goals, you can effectively grow your triceps while minimizing the risk of injury and maximizing muscle development.
0 notes
Text

Certainly! Here are the benefits of having strong and well-developed biceps:
Benefits of Biceps:
1.Functional Strength:
Elbow Flexion: The primary function of the biceps is to flex the elbow joint, allowing you to lift and carry objects effectively.
Grip Strength: Strong biceps contribute to improved grip strength, which is beneficial for various daily activities and sports.
2.Aesthetic Appeal:
Muscle Definition: Well-developed biceps enhance the visual appearance of the arms, contributing to a toned and muscular physique.
Symmetry: Balanced biceps add to overall upper body symmetry and aesthetics.
3.Support for Compound Movements:
Assistance Muscles: Biceps play a supportive role in various compound exercises such as rows, pull-ups, and deadlifts, aiding in overall upper body strength and muscle coordination.
Stability: They assist in stabilizing the shoulder joint during movements that involve pulling and lifting.
4.Improved Athletic Performance:
Sports Involvement: Strong biceps are beneficial in sports that require upper body strength and power, such as basketball, rock climbing, and martial arts.
Throwing and Swinging: They contribute to better performance in activities involving throwing, swinging, and gripping.
5.Psychological Benefits:
Confidence Boost: Developing strong biceps can boost self-confidence and enhance body image perception.
Mental Well-being: Regular exercise, including bicep workouts, promotes the release of endorphins, improving mood and reducing stress.

6.Posture Support:
Shoulder Stability: Well-developed biceps help maintain shoulder stability, which is crucial for proper posture and preventing shoulder injuries.
Overall Upper Body Alignment: They contribute to overall upper body strength and stability, promoting good posture and reducing the risk of back pain.
7.Functional Fitness:
Daily Activities: Strengthened biceps improve the ability to perform daily tasks such as lifting groceries, carrying children, and performing household chores.
Muscle Endurance: Regular bicep exercises improve muscle endurance, allowing for sustained performance in physical activities.
Exercises to Strengthen Biceps:
Bicep Curls: Standard curls with dumbbells, barbells, or cables target the biceps directly and allow for variations in grip and angle.
Chin-Ups/Pull-Ups: Engage the biceps along with other upper body muscles, promoting functional strength.
Hammer Curls: Target both the biceps and the brachialis muscle for overall arm development.
Preacher Curls: Isolate the biceps, minimizing involvement of other muscle groups for focused development.
Cable Curls: Provide constant tension on the biceps throughout the range of motion, enhancing muscle engagement and definition.
Training Tips:
Progressive Overload: Gradually increase the resistance or weight lifted to continuously challenge the biceps and promote muscle growth.
Proper Form: Maintain proper technique throughout each exercise to prevent injury and maximize effectiveness.
Variety: Incorporate different bicep exercises into your workout routine to target the muscles from various angles and prevent plateauing.
Rest and Recovery: Allow adequate rest between workouts to facilitate muscle repair and growth, supporting long-term progress and injury prevention.
By incorporating bicep exercises into your fitness routine and focusing on progressive training, you can enhance both functional strength and aesthetic appeal, contributing to overall upper body strength and fitness.
#fitness#exercise#physicalfitness#physicalexercise#gym equipment#biceps#triceps#strength training#weight training
0 notes
Text

The air bike, also known as an assault bike or fan bike, offers a variety of benefits that make it a popular choice for cardio and conditioning workouts. Here are some of the key benefits of using an air bike:
Benefits of Air Bike:
1.Full-Body Workout:
Upper Body: The handles engage the arms, shoulders, and chest as you push and pull.
Lower Body: Pedaling targets the legs, including quadriceps, hamstrings, and calves.
Core: Engages the core muscles for stability and balance during the exercise.
2.Cardiovascular Conditioning:
Provides an effective cardiovascular workout, increasing heart rate and improving cardiovascular endurance. High-intensity interval training (HIIT) can be easily incorporated to maximize cardiovascular benefits.
3.Calorie Burning:
Burns calories efficiently due to the combination of upper and lower body movement.Suitable for high-intensity interval training (HIIT), which is effective for calorie burn during and after the workout.
4.Low Impact:
Gentle on joints compared to activities like running or jumping. Suitable for individuals with joint issues or those recovering from injuries.
5.Adjustable Resistance:
Resistance is typically adjusted by pedaling faster or harder, making it suitable for users of different fitness levels. Some models allow for manual adjustment of resistance levels.
6.Versatility:
Can be used for steady-state cardio, interval training, or as part of circuit training workouts.Offers variety in workout routines by adjusting intensity and duration.

7.Efficient Workout Time:
Provides a high-intensity workout in a short amount of time, making it efficient for those with busy schedules.
8.Engagement of Muscles and Core Stability:
Forces the engagement of stabilizing muscles to maintain balance and control during pedaling and pushing/pulling. Improves overall muscle endurance and coordination.
9.Suitable for All Fitness Levels:Adjustable resistance and intensity make it suitable for beginners to advanced athletes.Can be customized based on fitness goals and abilities.
10.Feedback and Tracking:
Many air bikes come equipped with consoles that provide feedback on metrics such as distance, calories burned, time, and speed.Helps users track progress and adjust workouts accordingly.
11.Functional Fitness Benefits:
Mimics natural body movements, making it beneficial for improving overall functional fitness and daily activities.
Tips for Using an Air Bike:
Warm-Up: Start with a few minutes of light pedaling to warm up muscles and joints.
Interval Training: Incorporate intervals of high-intensity effort followed by periods of lower intensity or rest for optimal cardiovascular benefits.
Proper Form: Maintain proper posture with a straight back and relaxed shoulders while pedaling and using the handles.
Cool Down: Finish with a cool-down period to gradually lower heart rate and stretch major muscle groups.
Incorporating an air bike into your fitness routine can provide a challenging and effective workout while offering a range of benefits for cardiovascular health, muscle endurance, and overall fitness.
#fitness#exercise#physicalfitness#physicalexercise#exercisecycle#exercise bike#bellyfat#cardio workout
0 notes