
I'm an amateur artist that really enjoys playing videos games. I love all sorts of art from concept, traditional, tutorial, digital, comic/manga, anime, and more. If I see something that gets a reaction from me, you'll see it on my blog.
Don't wanna be here? Send us removal request.
Statistics
We looked inside some of the posts by faidenplays and here's what we found interesting.
Average Info
Notes Per Post
2M
Likes Per Post
1M
Reblog Per Post
1M
Reply Per Post
1K
Time Between Posts
2 months
Number of Posts By Type
Text
3
Photo
10
Video
2
Note
2
Last Seen Tumblr Blogs


Fun Fact
Tumblr Inc. is using 66 technologies for its website.

Photo
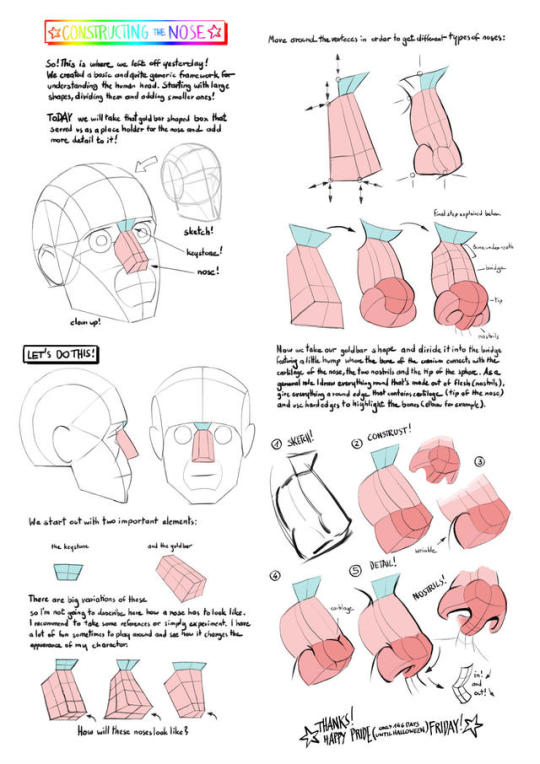
#018 - the NOSE! by gregor-kari
Support the artist on Patreon!
2K notes
·
View notes


Photo
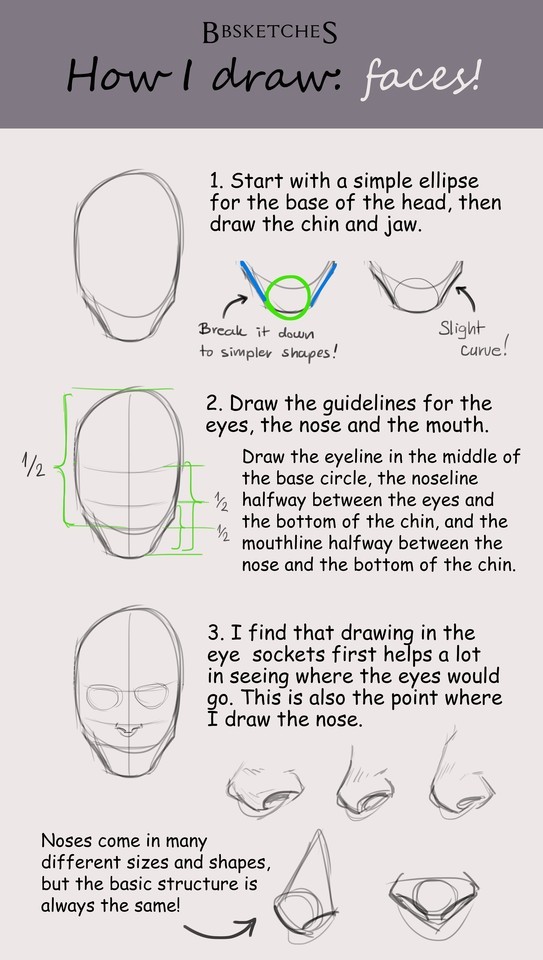

Face tutorial for Anon!
I wasn’t sure whether you meant heads or facial expressions, so here’s a very basic head tutorial! Of course not all faces are the same so proportions and the size of ears/eyes/noses etc. can vary! Feel free to explore and play with them to create unique and interesting characters! I hope this is somewhat helpful, and let me know if you’d like a tutorial on expressions as well!
8K notes
·
View notes
Photo


Source
Video of Tama
Follow Ultrafacts for more facts
1M notes
·
View notes
Video
instagram
Arm Anatomy by mathiaszamecki
2K notes
·
View notes
Note
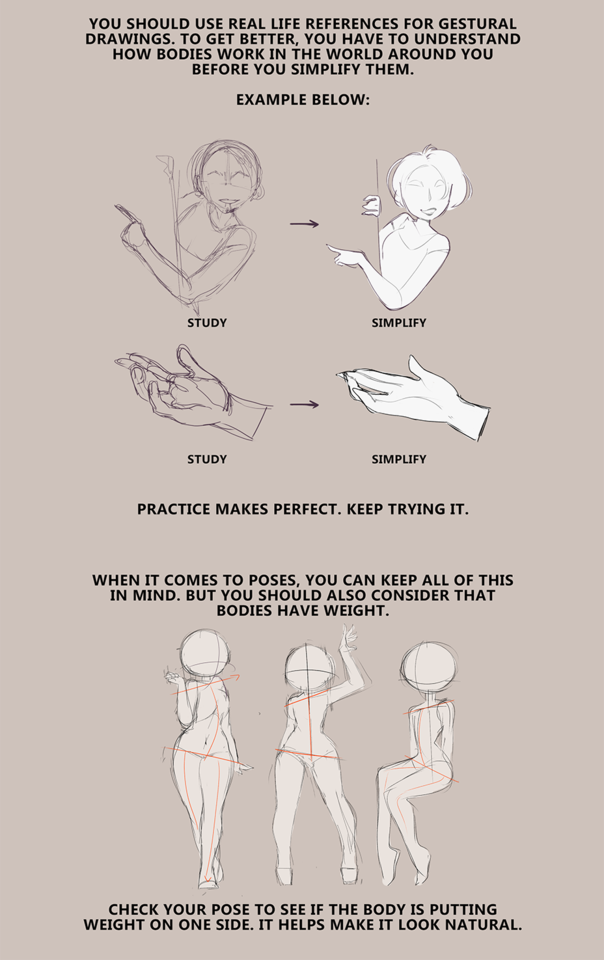
hello! can i ask for a tutorail in hands/arms and legs/feet?
Hey! Sorry for the late reply, I haven’t really had time to do the tutorial for you! But, I did one today. It’s kinda messy and not 100% anatomically perfect (I do several flaws myself) but I think I made some good points!
Arms:

Arms cannot be done without shoulders, so that’s why I will include them here. To know how one body part works, you need to understand the other parts too. I suggest drawing a stick figure, as shown above. Do it with shoulders and everything - don’t care about anatomy. Really, don’t - go mad! You can figure out how to deal with the anatomy AFTER you have figured how to draw the body freely.

I imagine most body parts to be shaped as tear drops, as shown above; especially the arms and legs. Draw them above the stick figure - don’t be afraid to overlap the teardrops. In fact, I suggest it! The best way to understand anatomy is to think of it as shapes and doll-parts.

After you’ve figured that out, do several, VERY tiny, small doodles like these. Go crazy - don’t bother with anatomy just yet. Do them also very quickly and so small you can’t think of the details. Just keep doing this until you sorta understand how arms work.

Here is a doodle of a “real” arm, and as you can see, how it’s shaped it resembles the teardrops above. A general rule is to constantly draw the body in curves - male AND female. NEVER draw a single line straight.
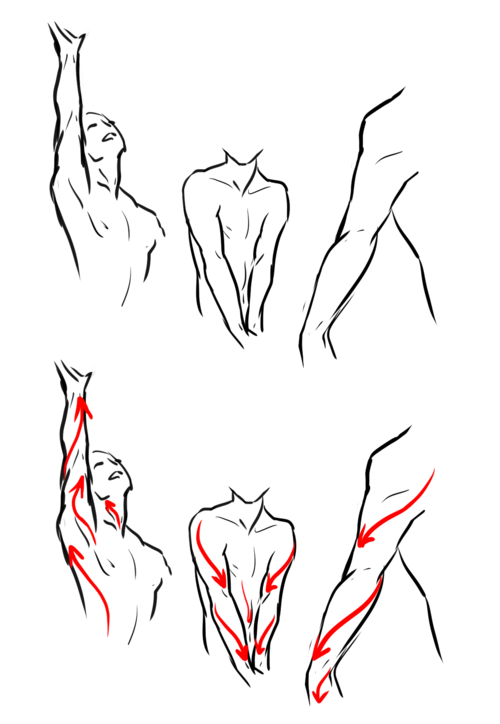
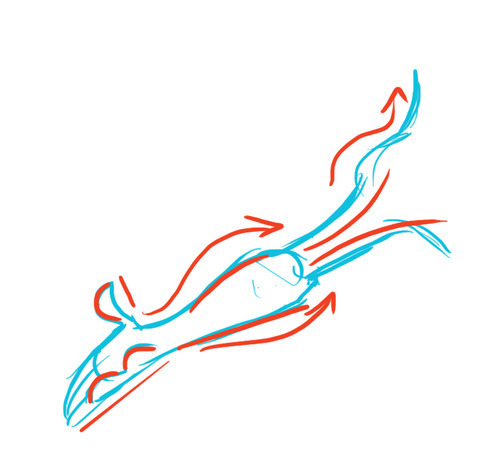
I mentioned before I thought it was important to include shoulders/other body parts to understand another. This is why. The body basically has a “flow” when you move. The red lines clearly shows the flow. This is also how you can create a dynamic pose: think of the flow. The muscles are formed that way to be able to function. Which reminds me, buy some good anatomy books. And I’m talking about more or less MEDICAL anatomy books - you think you won’t need it - but trust me, it’s more useful than you can imagine. I do NOT suggest buying “stylistic” anatomy books, like Christopher Hart (ugh NO), for example, as these can mislead you. Medical anatomy books CANNOT because they MUST be right.

And for the last part, here’s some “do’s” and “don’ts”. It’s important to remember the muscles between the neck and shoulders. Many, especially when drawing females, forget this. It’s true the most visible it is - the more muscular you will look. But even the most petite people have these. Your neck literally would not function if you didn’t have these supporters. Then, the arms below is just to show why it’s important to draw the body with curves. Many have probably heard “straight lines for males” which is a complete lie. They will look stiff and unnatural. Curves can both empathize muscles AND fat. Heck, even your bones aren’t straight.
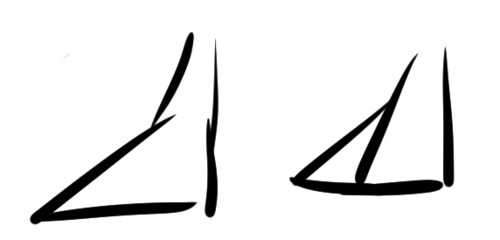
Legs:

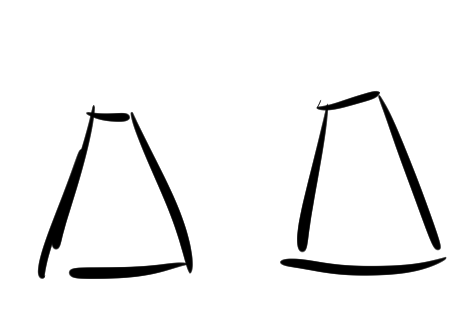
Legs certainly are the hardest. There’s a good reason for this; because they’re one of our most strongest muscles, and they are more or less dominating when it comes to poses (together with the spine). However, just like with the arms, draw a stick figure. I won’t suggest drawing them completely straight, as you can see here, as it will add weight. Do teardrops shapes. As for the hips - think of them as panties or briefs. This is not a MUST; but it will help; I think!

And just like the arms, do small doodles. Don’t be serious, play around until you get the idea.

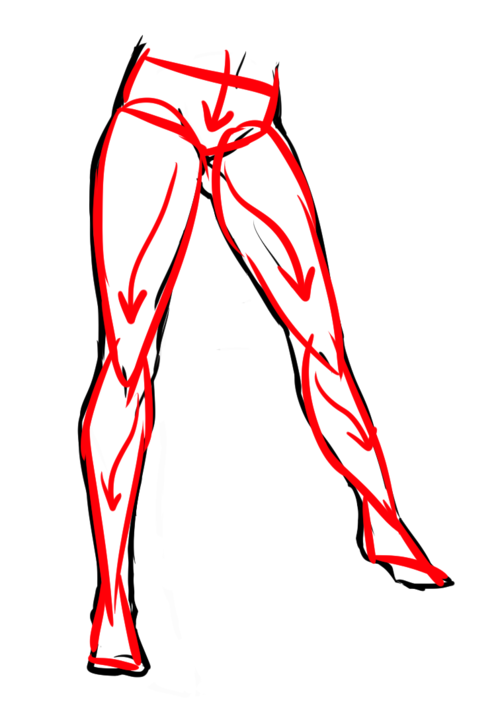
As you can see, these legs easily can be turned into teardrops even when they’re detailed like this.
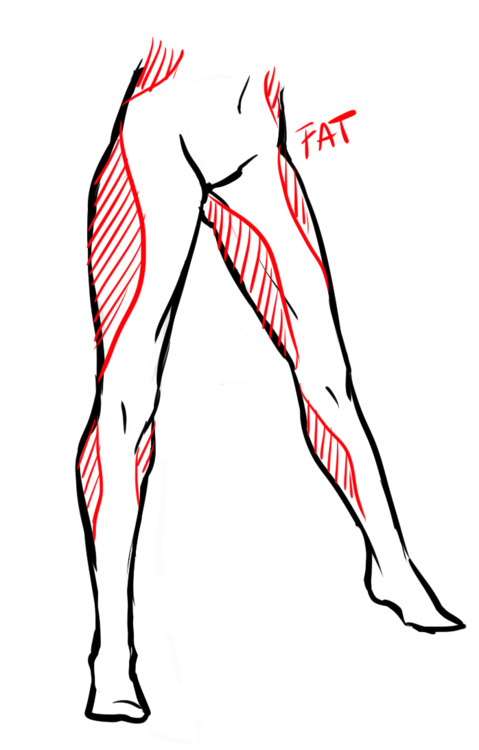
Now, what makes legs/hips interesting is that the way fat gathers there. Although not a must, seeing as we’re all different, females tend to get more fat there than men. Usually, however, it’s not at the SIDE of the hops, but at the thighs, calves and the “love handles”. (Excuse my english, aaah…) Women also tend to have bigger hips, but again, it’s not a must. It’s not uncommon to have small hips, either; or big hips for men, etc.
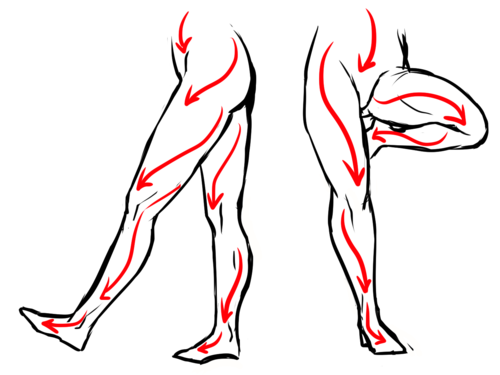
Of course, the legs too follow the “flow”!
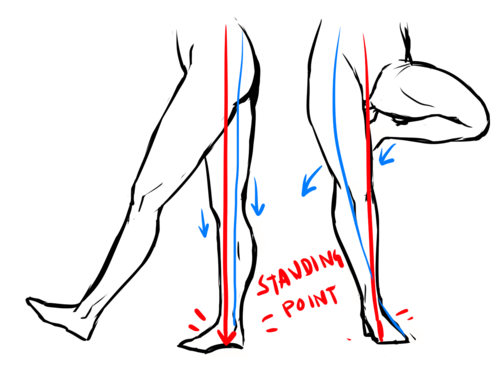
Something worth noting is the “Standing point” The standing point is basically a straight line, and the further away you are from the line; the more unbalanced you are. To create a dynamic pose you should avoid that line as much as possible. However, if you want to look balanced/realistic, have the one leg stand there for support. The leg to the left is balanced, as you can see one of the legs is taking all the weight; with other words, it’s the support leg-making it balanced. The legs to the right, however, are likely to fall over if she keeps standing like that!


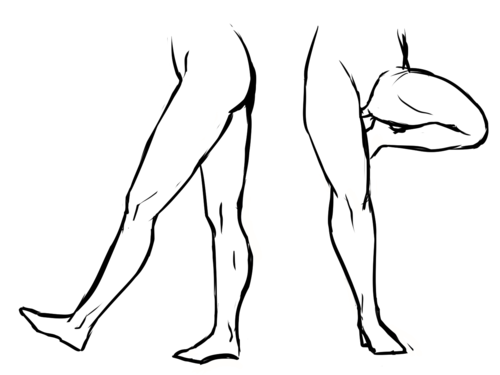
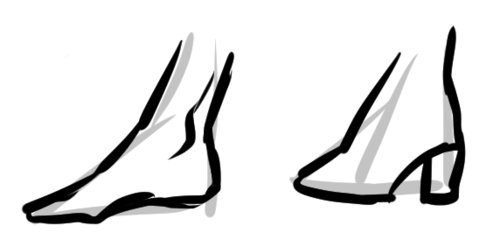
Now for some more do’s and don’ts. I already mentioned the barbie legs, invisible heels and micro-mini crotch in my previous tutorial, but these two are different. I see this mistake a lot; when you sit down, your thighs will become wider because you’re pressing all the fat to the sides. Now, this also depends on how you’re positioning your legs. How much it widens depends on how much fat you have in the first place; but it will always be there.
And then there’s this awkward “thigh gap”. Before I get any haters telling me how I “thin shame”, please, take a seat and read this. Good? Good. How much space you actually have between your thighs depends fully on how you’re standing, bending, angle, body type and everything else. However, the one to the right? Not likely.
Hands:
Okay, I’m getting really lazy now; so I’ll be quick. Draw a rectangle. Sorta like this; it doesn’t have to be exactly like this - since hands can be shaped VERY differently. Just compare to your friends.
Draw a little triangle attached to it.
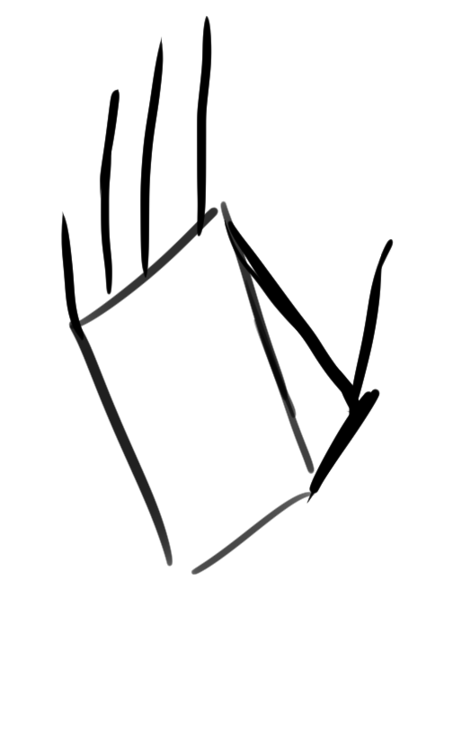
Now, the fingers! How long they should be and etc doesn’t really matter either. But if you’re unsure, draw them as tear drops, too.
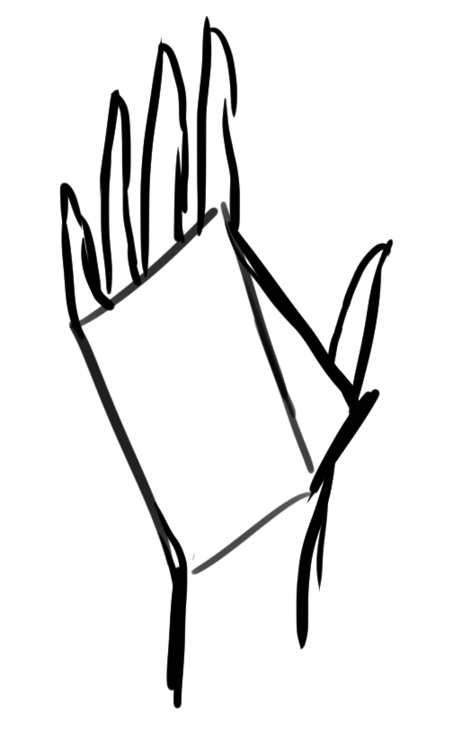
Now, draw the fingers! Starting to look like a hand, sort of.
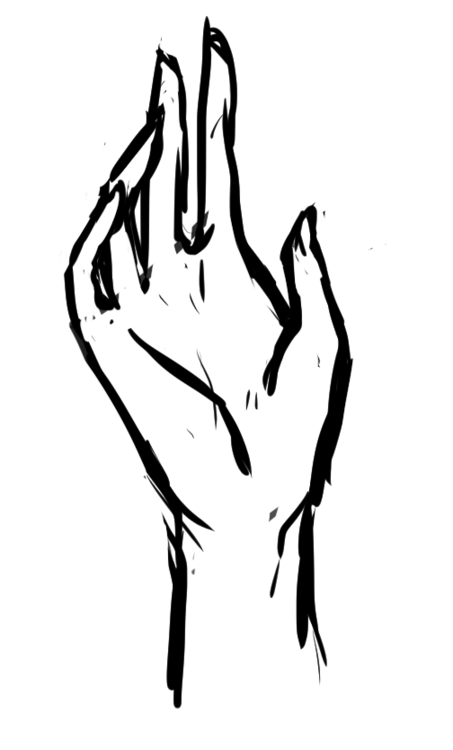
Then draw the details and fix things you didn’t like. I really don’t like the way this is drawn but I’m just tired right now.

Just like the legs/arms, practice by doing that simple figure really quickly.
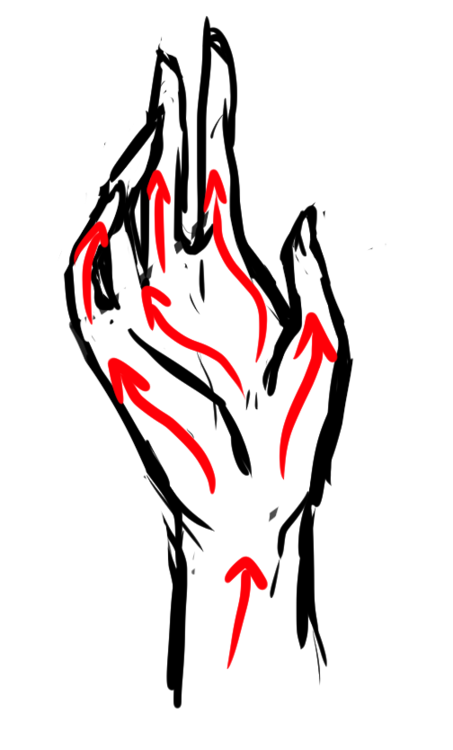
Guess what? Hands also follow “the flow”!
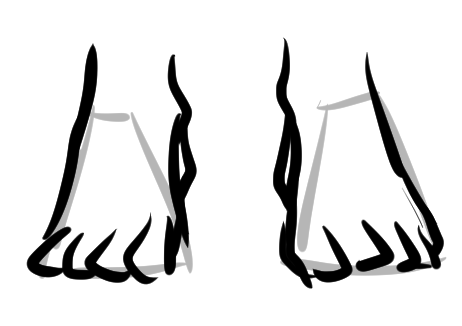
Feet:
Okay, I’m getting really lazy. Plus, feet are SUPER HARD- I’m just going to say this: think of them as triangles. Overlap them; think of it as 3D!

Practice practice practice! And medical anatomy books. And photo references. And real-life references!
Hope this helped! \o/ As I said, I’m nowhere near perfect but, ahh, I tried.
129K notes
·
View notes

Photo


The Male Torso Top Image Row 2 - 5 Row 6 Bottom Image
26K notes
·
View notes

Note
Your lines are pretty awesome! How did you make them so lively?
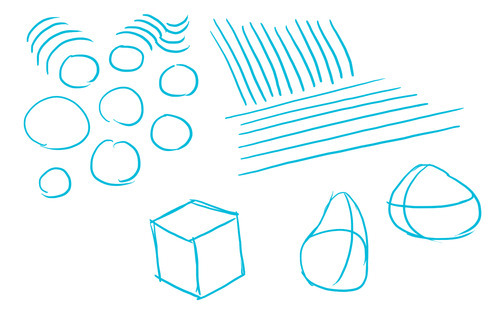
Aw, shucks. Thank you! I think a lot of it comes from just drawing a lot, but also the understanding of principles like Straights v.s. Curves and line flow. I highly recommend the Drawn to Life book series and Force.I’ve also started doing this warm-up trick that I learned from my figure drawing professor last semester. Fill a page with circles, lines, squiggles, etc.
Doing these will loosen up your wrist and also practice hand motions for quick drawing. It’s really useful!I also suggest doing lots of gestures, both from reference and from imagination. Pixelovely is great for that. These are some I did not too long ago quickly from imagination:
Just draw fast and loose and don’t think about it too much. Get those drawing principles ingrained into your head to the point where you do it without thinking about it. Practice, practice, practice!
You should also check out Rad’s how-to blog, because it’s chock full of great stuff on drawing principles.
To summarize:
Draw a lot
Know your anatomy
Learn the principles
Draw loose with your whole arm
Draw a lot!
I hope that answers your question, anon!
2K notes
·
View notes
Text
Current Favorite Tools Available in the Clip Database
I’ve had people ask what tools I use in Clip Studio Paint, which is hard for me to answer because I use a lot of different brushes. (If you want to know what’s used on a specific image, please give me the post’s ID number and I’ll find it on my blog and tell you!)
Here are some of my current favorite tools and brushes. I will give you the name that they are listed under so that you can find them in the clip database as well. These are listed in no particular order, because they’re all great!

“Tマーカー風ブラシセット” This is a collection of fantastic tools to create work that looks like it’s a traditional marker piece.

The collection contains several different tools including brushes with chisel or brush tips, blenders, and a texture you can overlay on your image to achieve the grain effect you see in traditional, scanned image. The texture is even pre-set to have the correct blending type and opacity!
For extra fun, I suggest using colour swatches from your favorite art markers in conjunction with these tools, for even more authenticity.
Overall this set is AMAZING and I love just playing with it.

“カサGペン” I’ve been using these pen tools a lot lately for sketching and sketch style ‘inks’. I’m not sure if they’re intended to mimic any specific type of pen, but they’re fun to use and the line quality they produce is really nice. “エッジ鉛筆“ in particular is one of my current favorites!

“水彩マーカー●▲■とテクスチャーセット“ Created by the same person who made the fantastic marker brush set, they’ve also created an amazing watercolour set! Like the marker set, it comes with several tools with different looks and effects and overlays you can put over your image (I use the ‘pigment pooling’ texture from this set a lot). There are also blenders in this as well.

My favorite feature of this set and what makes it rank higher than other, similar watercolour sets is the colour blending effect. These brushes can use a single colour, or it can use both your main and sub colour, showing one colour when you press lightly and another when you put more pressure. This allows for some great depth of colour and more natural flow to the blending. Fantastic!
There’s more, but these are the things I’ve been using the most lately. I highly recommend checking out the stuff in the Clip database, you might find something you love.
7K notes
·
View notes
Video
youtube
Excellently animated tutorial based on Disney’s book.
(0:10) 1. Squash and Stretch (2:07) 2. Anticipation (4:14) 3. Staging (6:33) 4. Straight Ahead/Pose to Pose (9:14) 5. Follow Through & Overlapping Action (11:17) 6. Slow In & Slow Out (12:57) 7. Arcs (14:38) 8. Secondary Action (16:11) 9. Timing (18:22) 10. Exaggeration (19:55) 11. Solid Drawing (21:38) 12. Appeal
19 notes
·
View notes
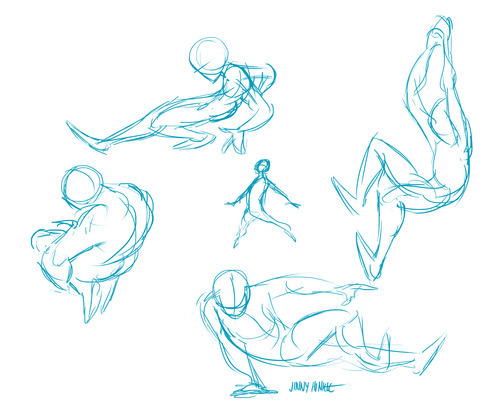
Photo


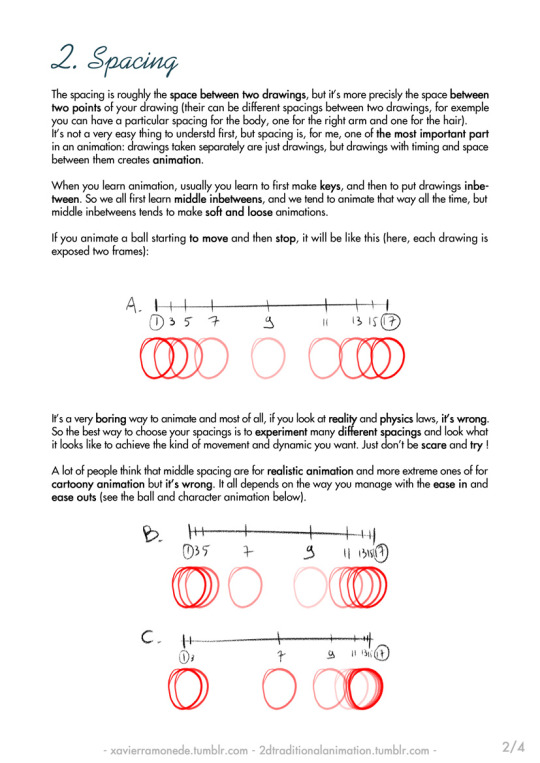

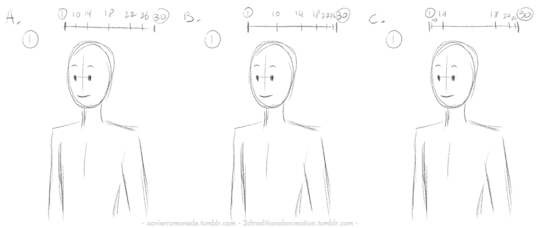
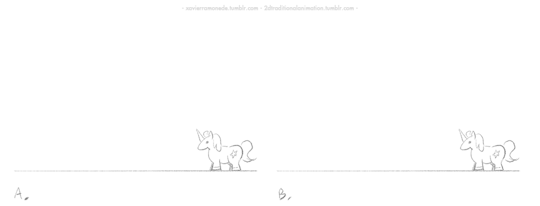
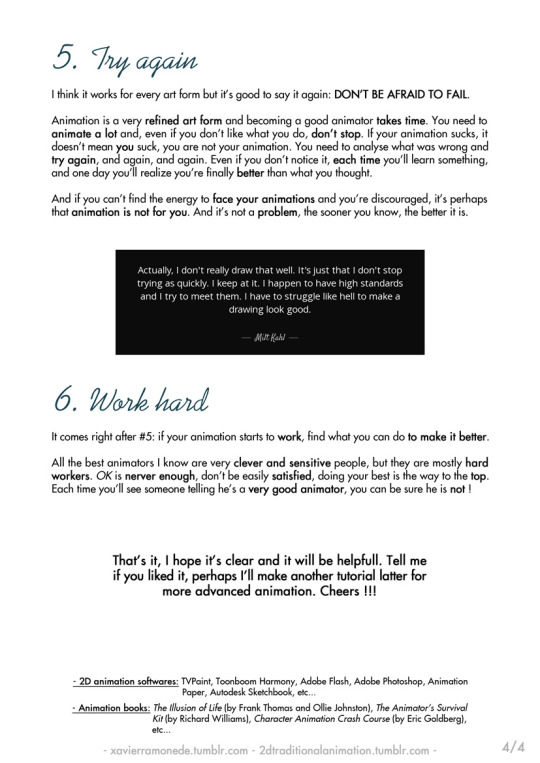
I’ve been asked a lot about tips for aspiring animators, so here are some ! Enjoy, I hope it will help some of you.
Oh, and for the ones wondering who I am, I’m a french 2D animator. I studied animation at Gobelins like 10 years ago and ever since I’ve been mostly working as a 2D animator for feature films, commercials, shorts and shows.
42K notes
·
View notes