
Last Seen Blogs

iamapearlzine
I Am A Pearl! SU Mini Zines

itishemmings
outro: Wings

pxwerl
don't you have anything else better to do?

angelicasgrotto
Angélica's Grotto

ziggypop
choices stan
Text
Fork spring replacement
After some reflections and trials [here], I decided to change the fork spring on my Fantic Caballero. Here are a few tips to help you with the process:
There is only one fork spring on the Fantic Caballero, and it is in the right fork tube.
This might be a good opportunity to change the fork oil. My dealer and the spring manufacturer recommend W10 oil (instead of the W15 recommended by Fantic).
The only supplier I found offering springs suitable for the Caballero scrambler is WIRTH-federn.
The reference is WF5015-744P-1-1 [link].
Under this reference, you get 2 springs and spacers, but you need only one. You can resell the extra spring to another Caballero rider. Then it divide the cost by two and it helps an other rider.
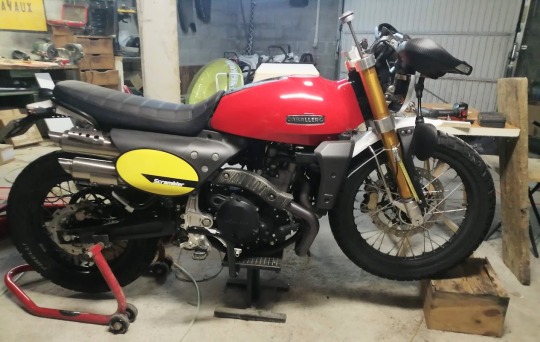
Here's the configuration I found most practical for changing this spring: Use a rear workshop stand to keep the bike upright, and use a support under the engine to lift the front wheel.
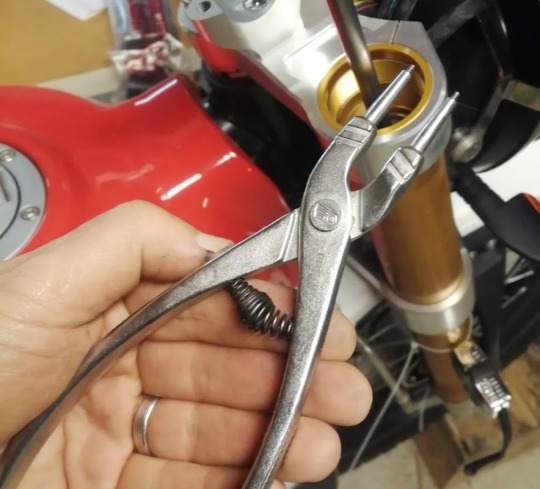
You absolutely need a circlip plier like this:
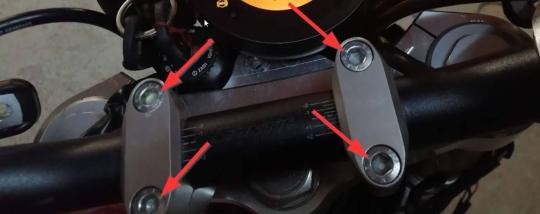
The first thing to do is to remove the handlebar clamps to move the handlebar.
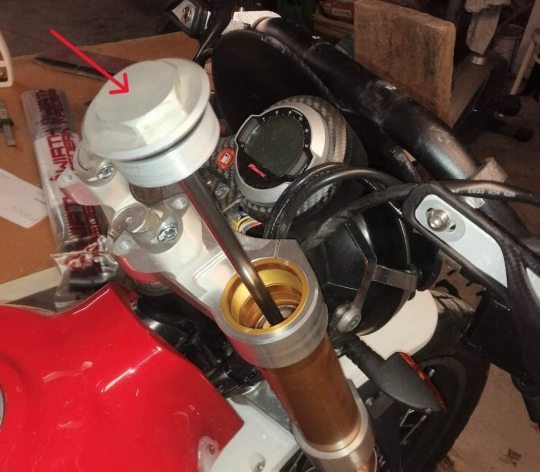
I also recommend unscrewing the two side screws of the upper fork crown to avoid tightening the fork tube around its cap.
Then, with the fork relaxed and the front wheel off the ground, unscrew the upper fork cap. You'll need a large socket. I advise against using pliers to avoid damaging the fragile fork cap (made of aluminum).
Don't worry; it won't pop out if the fork is really relaxed with the wheel off the ground.
Next, you need to raise the wheel to compress the fork, for example, by placing a box under the wheel, as shown in the first photo of this article. This will raise the cap, but you still can't remove it.
There is a circlip to remove (using the pliers) to free the spring:
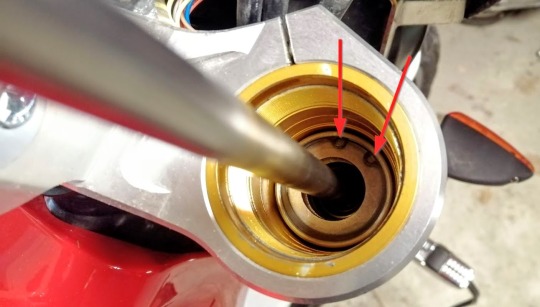
This will release the spring and the preload system.
It looks like this:
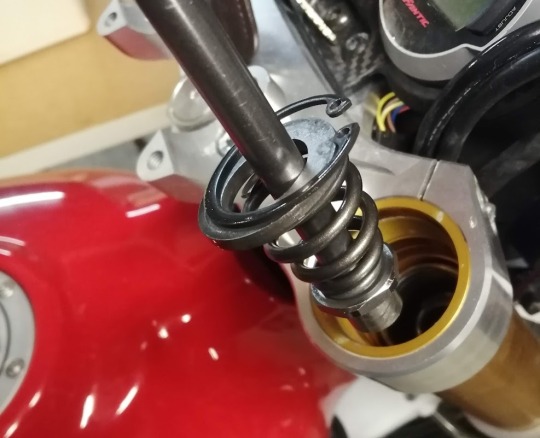
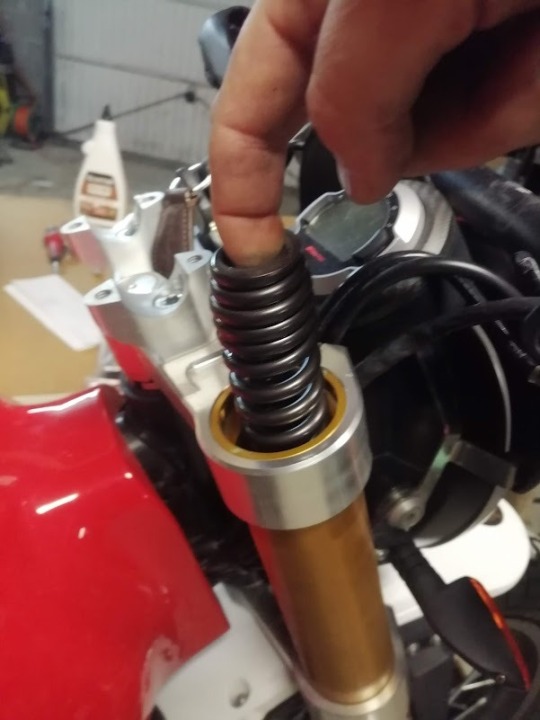
The original spring is just below and can be easily removed :
The next photo represents at the top what you removed from your bike and at the bottom the 3 pieces provided by Wirth: the spring, a PVC spacer, and a thin washer.
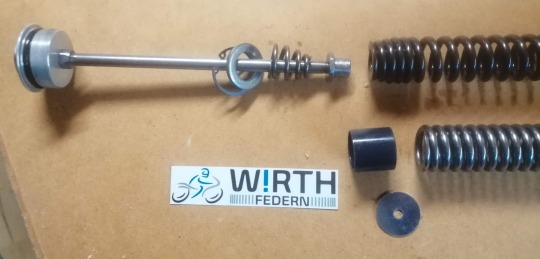
The spacer can be placed in the fork; it will fit at the bottom. Then the flat washer. Then the spring, with the tightly wound part at the top.
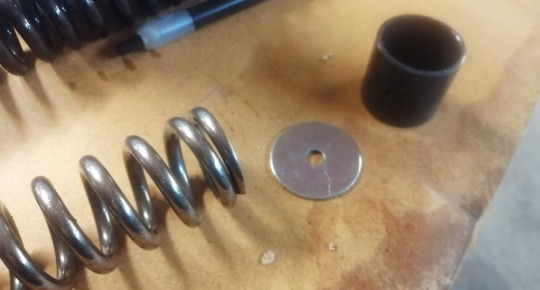
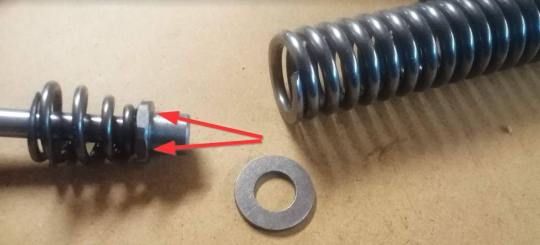
The problem is that the spring should rest on the stop indicated by the arrow, but the inner diameter of the spring does not allow for a good fit (the original spring is smaller at this point for a perfect fit). So, you need to add a washer (not provided) above the spring.
I represent the internal workings. In blue are the parts connected to the fork triple clamp. In orange are the parts connected to the wheel axle.
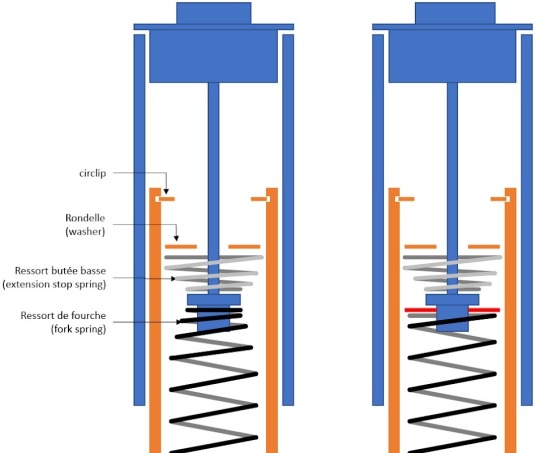
On the left: the original fork. On the right: the fork with the WIRTH spring. Since this spring is not tightened at its end, you need to add a washer (in red in the diagram) for the spring to rest properly on its stop.
I consulted WIRTH about this, and they assure me that this washer, not included in the kit, is not necessary. However, all three people whose feedback I read about installing this spring also fabricated and installed a washer at this point. I was lucky to have one in stock exactly at the right diameters.
For reassembly, this is where it gets tricky. Keep the fork extended, with front wheel not touching the ground.
Then you need to be able to press the cap and the spring stop enough to put the circlip back in place. The easiest and most effective method I found to perform the operation easily and alone is with a ratchet strap.
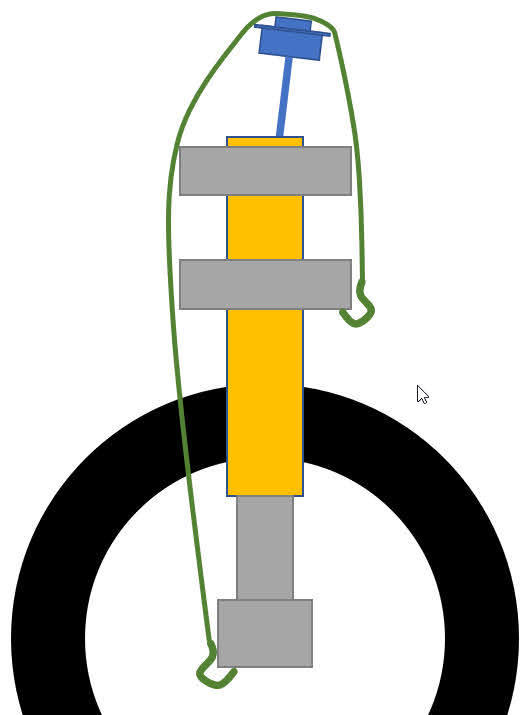
It attaches to a triple clamp or the wheel axle and presses on the fork cap.
By tightening the strap, it presses the cap a few centimeters, and you can then put the circlip back in place.
It's in this configuration that you need to adjust the oil level to the correct height (13cm from the edge).
Then, screw the cap back on, then put the handlebar back in place.
Done! Congratulation!
This change really brings a significant improvement in comfort on rough roads for a reasonable cost. Great for Scrambler, Deluxe, Anniversary, and Flat Track, 125cc and 500cc. I'm not sure if it's suitable for Rally and Explorer.
A previous article about the Caballero suspension is available [here].
Find all my tips, tricks, advice, and reviews on [this page].
1 note
·
View note
Text
Sprocket cover
When Zongshen sells its engine, it already comes with a gearbox sprocket cover. Fantic has retained it, and it's made of a flexible and rather unattractive plastic. I wanted to improve on that, at least to make it more to my liking.

The original chain on the Caballero doesn't have a great reputation for reliability. There have been several cases of chain breakage, even on motorcycles with relatively low mileage. The risk, aside from the breakdown itself, is that the chain may get caught between the sprocket and the engine, typically resulting in a broken engine case. In China, there's an aluminum machined part available for this engine, robust enough to fit between the engine and the sprocket, just in case.

This part costs around ten euros on Aliexpress.
So, I designed a piece that mounts on the Aliexpress protection and incorporates the rounded motif of the bike.


The piece includes metal inserts so that the screw sandwiches the cover without crushing it.

The metal grille is the same as the one used on the fairing holes.

And there you have it!
Find more tips, tricks, modifications, and reviews on the Fantic Caballero [here].
0 notes
Text
Carbon Wind screen
Fantic offers a reasonably priced small wind deflector. It is absolutely ineffective in protecting against the wind but adds a cute touch, giving a nice look to the bike by fitting well between the headlight and the gauge. My only complaint is its plastic/toy-like appearance. Since the bike already has carbon parts, I looked for carbon wind deflectors without success. As a result, I bought the Fantic wind deflector and did my first faux carbon covering.

The carbon used for the covering comes in different qualities and 3D, 5D, 6D finishes. In reality, these designations don't mean much, but the higher the index, the more it has a glossy varnish appearance. In our case, Fantic's carbon parts have a matte finish, so I chose this 3D covering film (€12 for a 30 cm x 150 cm rectangle).
Applying it to the flat part poses no problem:

The trickiest part is the edge to avoid wrinkles:

But overall, it looks good and matches well with the other carbon pieces:

Other tips/tricks/improvements/comments on the Fantic Caballero are available [here]
0 note
0 notes
Text
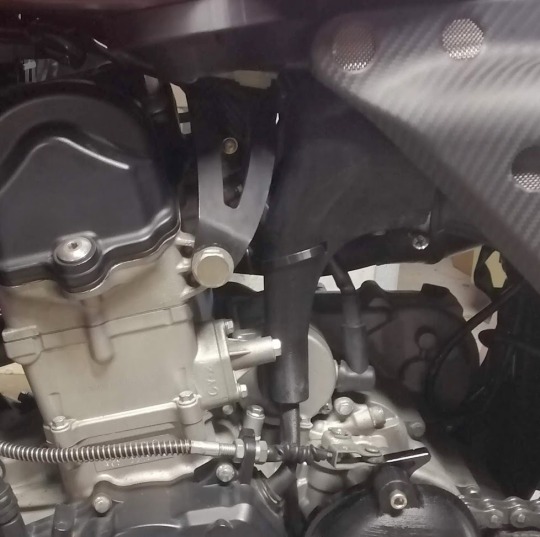
Injection System Cable Cover
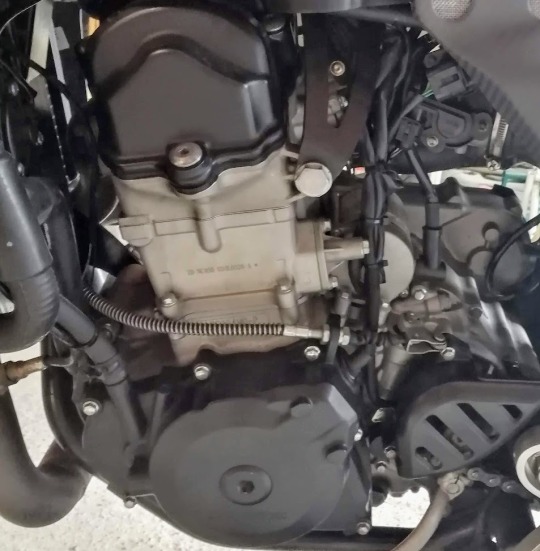
The left profile of the motorcycle is marred by the wiring of the injection system and various sensors and connectors.
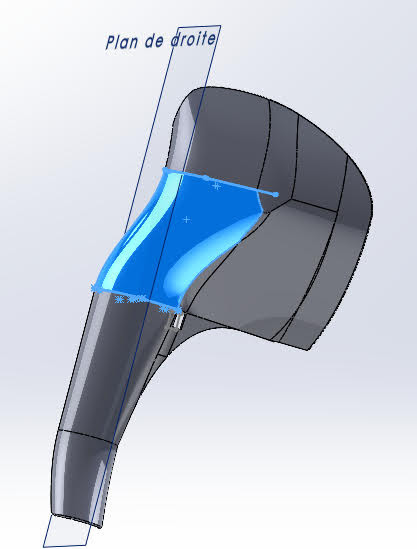
So, I designed a piece that fits perfectly on the bike (for 500cc models only).

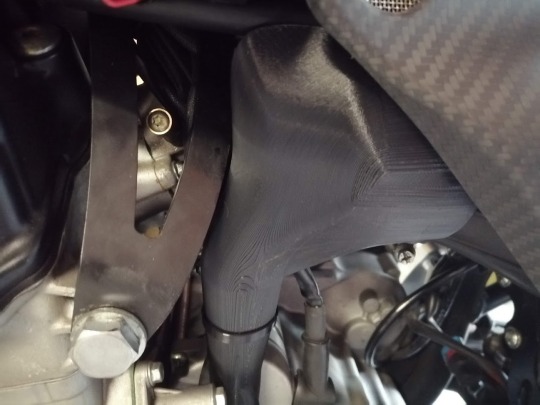
Once the canister and its hose are removed, this cover can be secured using a simple hose clamp. I print this piece in PTEG instead of PLA for good heat resistance. After printing, I give it a coat of satin black paint to avoid the cheap plastic look and ensure the piece blends seamlessly with the overall design without drawing attention.

BEFORE:
AFTER:
I'm selling this piece [here].
I've listed the modifications, improvements, and experiences with this bike [here].
0 notes
Text
Chain Guard
ave you noticed that the original chain guard is poorly designed? It sits too high above the chain and is not aligned properly. As a result, a significant portion of grease and debris gets thrown towards the bike or the passenger. Additionally, the bulky chain tension adjustment label is unsightly, and the material used gives it a cheap, plastic appearance. Something needed to be done.


I designed a new piece that attaches directly to the bike's mounts and is properly aligned with the chain.
After several prototypes and tests, I switched to a more vibration-resistant printing material. I now paint the piece in a satin black finish to match the swingarm, and I incorporated the rounded shape found throughout the bike (headlight, taillight, mirrors, dashboard) to achieve the final design.


If you're interested, I've produced some extra pieces that I can offer for sale. Check them out on my [sales page].
I've listed the modifications, improvements, and experiences with this bike [here].
0 notes
Text
Radiator carbon cover
The motorcycle is nice, but up close, the gray plastics look really "cheap." Fortunately, there are special parts available, like these genuine carbon fiber scoops in the Fantic catalog.

I'm happy with them, but they are expensive, and in case of a Fantic fall, they only sell them as a pair and not individually.

It's worth noting that it's preferable to insert a nylon washer between the radiator guard and the radiator, and this washer is not provided.
If I were to do it again, maybe I would go for metal plates like the ones sold by Septar.
I'm listing the modifications/improvements and experiences with this motorcycle <here>.
0 notes
Text
My Review of the Caballero
I find this motorcycle truly exceptional, as it possesses some rare qualities and a set of flaws, fortunately all of which are easily rectifiable.
What I particularly appreciate:
Simplicity and Agility: It combines the lightness of a 125cc motorcycle with the power of a 500cc. There's hardly any electronics onboard, just fuel injection, mandatory ABS, and a starter. The absence of excessive power to manage is truly enjoyable, offering a straightforward and carefree riding experience with sufficient horsepower.
General Design: The overall aesthetics of the motorcycle are appealing, and some parts, such as the machined side plates, fork yokes, and hubs, are simply gorgeous.
Gromono Character: Unlike competitors like the KTM 390 or Suzuki 400DR-Z, which offer similar performance, the Caballero stands out due to its extra cubic centimeters and a "Big Single" engine personality that I appreciate (although not as powerful as a KTM 640). It's closer to a 500XT (with better brakes and more horsepower).
Engine Performance: It's excellent, and I have no frustrations for urban or suburban solo riding. This was a concern before purchase (without a test ride), but the torque and power curve are perfectly suited. The gearbox's ratios and shifting are also well-matched to my usage.
Original Exhaust Sound: It's lively and makes noise but not excessively so. With the expensive racing exhaust system, it becomes downright captivating. It's a true pleasure to ride a motorcycle that hasn't been overly muffled or made excessively loud.
What I don't appreciate as much:
Low-Speed Engine Behavior: When riding at 30/40 km/h with minimal throttle input, the engine exhibits a lot of jerks. It appears that combustion is suboptimal, possibly due to the cylinder head architecture with its camshaft and four valves actuated by pushrods, causing the spark plug to be in a corner of the cylinder and thus not centered. Fortunately, by slightly adjusting the mixture and adding a heavier flywheel from Fantic's catalog, the issue becomes quite manageable.
Left Handlebar Switchgear: It might seem minor, but it's really annoying, especially the turn signal switch that resembles a bedside lamp switch and the hard-to-reach horn button. I replaced it with a standard switchgear, which solved the problem.
Original Exhaust Manifold: It has an unattractive shape, likely to accommodate a pre-catalytic converter. Thankfully, there's a superb racing exhaust system available, albeit a bit expensive.
Ugly White Plastic Coolant Reservoir: It's highly visible at the front of the motorcycle. Fortunately, a coat of black paint makes it much less conspicuous.
Some Grey Plastics: They look fine from a distance but appear cheap up close. Fortunately, there are genuine carbon replacement parts available to address this.
0 notes
Text
Canister (Evap) Removal
Modern motorcycles have a canister to prevent the emission of gasoline vapors while parked, aiming to minimize environmental impact. These vapors are redirected from the fuel tank to a canister, where they condense into liquid. A hose connects the canister to the engine's intake, allowing the engine to burn this condensed gasoline. An electrovalve controls the flow, activated by the engine control unit (ECU).
The canister's purpose is to prevent gasoline vapors from escaping into the atmosphere. However, it doesn't offer significant performance benefits and can sometimes lead to issues like air leaks and aesthetic concerns.
On the Fantic Caballero, the canister (orange circle) is visible on the left side, along with the electrovalve (yellow rectangle) and connecting hoses (green arrows).

Fantic would probably acknowledge that it looks unattractive because when they presented the motorcycle at trade shows, it was without the canister :


Removing the canister involves:
Removing the seat.
Lifting the fuel tank.
Detaching the upper left engine mounting bracket.
Disconnecting the hoses.
The Caballero uses "click" style hose clamps that can be removed by inserting a small screwdriver from the side.


The intake hose is connected here :

It's crucial to plug the intake port after removing the hose from the intake manifold. You can use a small piece of hose and a screw or purchase an appropriate cap from the market.
After removal, the electrovalve and canister bracket can be taken off.

The solenoid valve and the canister are attached to a bracket screwed to the motorcycle frame

We remove everything, and the result is very clean.

To prevent issues with the engine control unit detecting the missing electrovalve, you can create a dummy connection with a male connector and incorporate a resistor inside. This connector will simulate the presence of the electrovalve.

By following these steps, you can eliminate the canister, resulting in a cleaner-looking motorcycle.
For more tips, tricks, improvements, and comments on the Fantic Caballero, you can find them <here>.
0 notes
Text
Breather Tube Extension
The finish of the left profile of the motorcycle is marred by numerous details, especially this long tube that redirects oil vapors from inside the engine to the airbox.

This hose also appears in Zongshen's photos. Therefore, it is likely supplied with the engine to Fantic.

In fact, only 10 cm are missing for it to pass further forward, between the radiator and the large cooling hose, and higher up near the tank. It becomes yet virtually invisible.
So, I added an insert and an additional hose to extend it.

The hose can then be re-routed and join the airbox as intended.

The left profile becomes cleaner 😊

For more tips, tricks, improvements, and comments on the Fantic Caballero, you can find them <here>.
0 notes
Text
Seat lock improvement
To remove the side panels or the fuel tank, you need to take off the seat. If you do a bit of DIY or want to be able to change a fuse in the middle of nowhere, you should be able to remove the seat without any tools.
I made this small piece to access the seat screw.

What's important is that the screw head presses against an insert and that the plastic part (3D printed) is only used to handle it and turn it.

And it works well!

For more tips, tricks, improvements, and comments on the Fantic Caballero, you can find them <here>.
0 notes
Text
Coolant Solution to prevent Head Gasket issue
The Fantic Caballero's 500cc engine is of Chinese origin, and the early versions often had reliability issues with the head gasket. This was improved in the Euro5 versions, and Euro4 models were also modified to enhance the cooling system and make the motorcycle more reliable.
But what is the underlying problem? The radiator appears to be adequately sized, and the fan (super silent!) is also sufficient.
In my opinion, the problem doesn't stem from the design of the engine itself. In fact, this Zongshen NC450 engine is also used in other motorcycles not imported into France, such as the RX4, and these models don't have head gasket problems. In my view, the issue lies in the fact that the cooling system is not pressurized.
Typically, in liquid-cooled motorcycles (at least all the ones I know), the coolant pressure increases as the engine heats up. The radiator cap only opens if the pressure becomes excessive, allowing the excess coolant to flow into the expansion tank. In cars, the expansion tank is also pressurized. In the case of the Caballero (at least Euro4), this is not the case. Everything operates at atmospheric pressure. Consequently, if the coolant passes through a very hot area (such as the cylinder head), it can boil locally. When it boils, it turns into vapor, and the hot part of the engine loses contact with the coolant, logically causing it to overheat. This increases the vapor, and it ultimately may lead to a blown head gasket. To prevent this, the cooling system is usually pressurized. At 2 bars of pressure, for example, the coolant doesn't boil at 100°C but at 120°C.
The upgrade applied by Fantic on Euro4 models includes a small valve that prevents the expansion tank from venting to the atmosphere. This pressurizes the cooling system, including colang liquid tank.
So, what can you do to further secure this system?
I discovered a coolant without water, with a very high boiling point, specifically designed for these uses or for older engines (without pressure?) or high-performance off-road motorcycles.

This is what I put in my Caballero. It's quite expensive (between €30 and €40 for 2 liters), but it's more than enough for the Caballero, and there's still plenty left for top-ups in the following years.
Now, I have peace of mind, and I'm ready to go far without any concerns.
For more tips, tricks, improvements, and comments on the Fantic Caballero, you can find them <here>.
0 notes
Text
Hiding the Coolant Reservoir
Let's face it : the coolant reservoir is especially visible and ugly. There is a carbon fiber cover sold by Fantic, but it's expensive and only compatible with Euro5 models.

I ordered a sheet metal cover from Septar, but unfortunately, it's also only compatible with Euro5 models, (despite their website claims it is), and it doesn't cover the entire reservoir.

So, I had to find another solution: I painted it black.
The problem is that most painting does not adhere well to this type of plastic. So, I applied a specific base coat for this material:

Followed by a light coat of satin black spray paint:

Those who have done this have given positive feedback even after several years. I used the same products and after one year it is still perfect. Here are the products I used :

I'm keeping my fingers crossed. In any case, I'm happy with the result.

For more tips, tricks, improvements, and comments on the Fantic Caballero, you can find them <here>.
1 note
·
View note
Text
Ventilation Grilles
The side fairings of the Caballero have holes that looks like air intakes for cooling or engine intake.
I propose adding a small stainless steel mesh to them.

It's not too complicated. You just need to know how to remove the side panels.

You should choose stainless steel mesh (to ensure it lasts). It can be easily cut with scissors.

I think it's important to ensure that the wires align from one hole to the next, so you should cut pieces that cover multiple holes at once.

I use a hot glue gun. It holds up well so far, even on the exhaust side.
I repeated the operation when I switched to carbon side covers, and it worked just as well.


I applied it also on my custom sproket cover

I bought this mesh for €6 on Amazon here: https://www.amazon.fr/dp/B0B5GSG453
You can do up to 4 motorcycles with it.
Then I found out later that the early Caballero prototypes also had already grilles in the vents.

For more tips, tricks, improvements, and comments on the Fantic Caballero, you can find them <here>.
0 notes
Text
Fork Improvement
My usage of the Fantic Caballero is primarily on the road, especially in the city for commuting. I want to be able to easily and comfortably absorb pot holes and speed bumps. However, with the stock fork and settings, the result is (in my opinion) quite poor.
I measured the fork's sag. In a static state, with just my weight, the sag is only about 25 mm, while the general recommendation is to be at about 33% of the total travel, which is 50 mm.
I placed a zip tie on the fork tube to measure the maximum compression of the fork over my favorite speed bumps, and the total compression was only 80 mm. This means that only half of the fork's travel is being utilized, and the fork can only extend to "follow" the road by 25 mm, which is too little.
The fork consists of a single spring in the right tube, and the damper is in the left tube. The Caballero's spring has a stiffness of 15 N/mm, which is quite high and explains why the fork doesn't work much. Why such a value? Perhaps because if the motorcycle is loaded with a passenger and used off-road, such stiffness is needed, especially given the limited travel (only 150 mm).

The Rally version, which has significantly greater travel (200 mm), actually uses a softer spring (12.5 N/mm). So, a simple solution would be to install a Rally spring in my Scrambler, but I couldn't find such a spring.
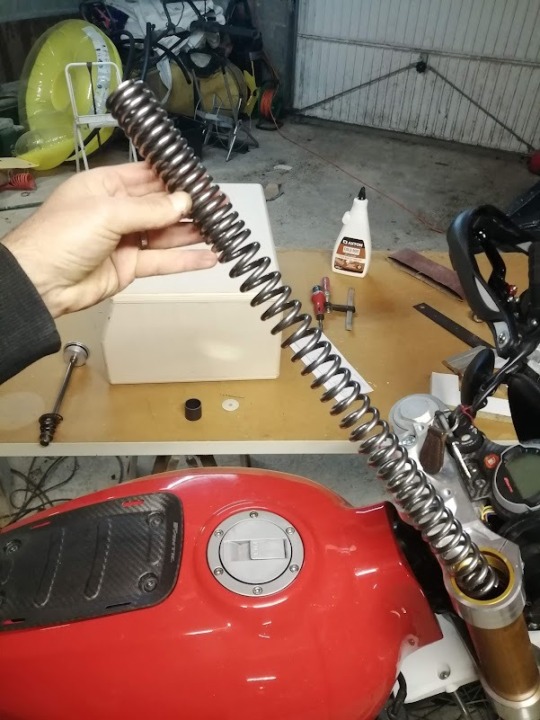
The original spring is 53cm long, less than 36mm in diameter (when uncompressed), and tapers at its ends.

I searched for a spring of suitable length, diameter, and stiffness from other motorcycles. This was quite challenging because motorcycles typically have two softer springs instead of a single stiffer one. The only reference that seemed to fit was an extremely stiff spring for a supersport bike. It had the right diameter (36mm, matching the inside of the fork), but when a spring compresses, its diameter increases, which could cause it to get stuck. So, I decided not to use this spring and put it up for sale.
Since I couldn't find a suitable spring, the only option left was to work on the damping. I switched to a more fluid 10W oil instead of 15W and reduced the oil level, particularly in the right fork tube where the spring is located.
This improved the situation, but it still doesn't compare to having a more appropriate spring.
If you have a Rally model and wish to have a stiffer spring because you ride with a heavy load or engage in severe off-road riding, please send me a message, and we could potentially exchange our springs!
Note that I also have a very reasonable quote (around a hundred euros) to have a custom spring made by "Du Fil Au Ressort" in Finistère, which I recommend.
For more tips, tricks, improvements, and comments on the Fantic Caballero, you can find them <here>.
0 notes
Text
Headlight connector
The Fantic Caballero's headlight comes with a large white connector, which is often quite visible on the motorcycle and can detract from the overall aesthetic with its white color amidst the black cables.

The solution I've adopted is to use black heat shrink tubing to conceal it. I heat the tubing to make it adhere while still allowing the connector to be detachable:
Then, with a little effort, you can slide it between the headlight and its cover like this:


It becomes completely invisible and provides a polished finish around the steering column.


For more tips, tricks, improvements, and comments on the Fantic Caballero, you can find them <here>.
0 notes
Text
Headlight Repair
When I bought the Caballero, the daytime running light (or DRL) didn't work, and there was a kind of white dust inside the headlight. This seems to be a common issue with this headlight.


Luckily, it can be easily removed.

And it can be opened into two parts.

During the opening, be mindful of these two wires.

The headlight consists of one side with electronics, powerful LEDs, and lenses:

And on the other side, there's the glass and the daytime running LED ring. It's this ring that is poorly secured, moves, and generates the white dust. What is needed is only adding a dot of glue to secure it (I did this with a hot glue gun), then it will not generate the white dust anymore.

In my case, the wire had also broken because of the movement, and I just had to solder it back.

I haven't found a highly effective way to clean the inside of the glass, and I still have some dust left. If you have any ideas or experience, I'm interested.
For more tips, tricks, improvements, and comments on the Fantic Caballero, you can find them <here>.
0 notes
Text
Carbon Handguard
Since my motorcycle now has quite a few genuine carbon fiber parts, I wanted to add genuine carbon fiber handguards as well. I couldn't find any with a shape that suited me, so I opted for copies of Acerbis Rally Pro handguards, which are made of black plastic with aluminum bars and imitation carbon fiber.

These aren't just a carbon fiber covering but are actually integrated into the structure. Unless you tap on them or look from the other side, the illusion is perfect, and they match the genuine matte carbon fiber of the dashboard surround and radiator scoops perfectly.

The only slight disappointment is the handlebar attachment. It's sturdy but not very aesthetic and much less attractive than the handlebar clamps right next to them, which are machined from solid material.

For more tips, tricks, improvements, and comments on the Fantic Caballero, you can find them <here>.
0 notes