
Don't wanna be here? Send us removal request.
Statistics
We looked inside some of the posts by faucetdouble51-blog and here's what we found interesting.
Average Info
Notes Per Post
1
Likes Per Post
1
Reblog Per Post
0
Reply Per Post
0
Time Between Posts
3 days
Number of Posts By Type
Text
17
Last Seen Tumblr Blogs


Fun Fact
Tumblr posted its first advertisements in May 2012 and subsequently earned $13M in revenue.
Text
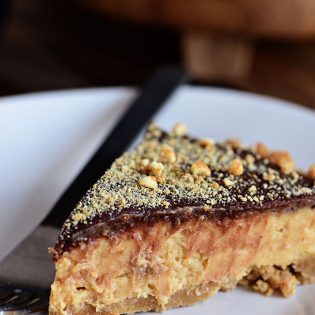
Chocolate Peanut Butter Pie of Your Dreams
Recipes
Chocolate Peanut Butter Pie of Your Dreams

Share74
Tweet
Pin1.1K
Yum14
1.2K Shares
Dessert doesn’t get any better than a Chocolate Peanut Butter Pie with layers of graham cracker, peanut butter filling, and chocolate. It’s a chocolate and peanut butter lover’s dream come true!
Chocolate Peanut Butter Pie
If there was ever a dessert to put someone in a legitimate food coma, it would be this pie. I’m kind of going into a trance just thinking about it right now. It’s only fitting that the first time this recipe came into my life it was the national day of food comas, Thanksgiving.
Just this past Thanksgiving I learned what I had been missing out on my whole life while spending the holiday in Chicago with my boyfriend’s family. His mom Jane, the sweetest lady you’ll ever meet, makes this peanut butter pie every year for Thanksgiving and it’s always a crowd favorite, like so much blood will be drawn if it’s missing from the dessert table. After trying it I totally understand why!
Thankfully, as mentioned before, she’s the best and gave me the recipe, allowing me to share it with all of you!
A Triple Threat Peanut Butter Pie
This pie is kind of like that girl you love to hate in every teenage drama lifetime movie. You know, the one that looked like she walked right off a runway while managing to be the valedictorian, and the captain of the dance team. The true triple threat that everyone wanted to be.
So, what I’m trying to say is that every other pie out there is going to be jealous of this one. From the graham cracker crust to the peanut butter filling, topped off with a chocolate ganache, this chocolate peanut butter pie has it all!
All of the flavors come together for a chocolate peanut butter perfection that’s irresistible!
How To Be A Chocolate Peanut Butter Pie Superhero
If you want to be the hero of all future parties and family gatherings, just like Jane, you just have to follow the quick and easy steps to make this pie!
It does have 3 different layers, but don’t let that make you think it’s too hard because trust me it’s not! You can actually even shorten the directions, and prep time and buy a store made graham cracker crust. It makes the whole pie no-bake, taste just as good and it saves some time!
Then all you have to do is mix up the peanut butter filling, and the chocolate topping. They’re both super simple and only take a few ingredients.
Once you get through the torture that is waiting for it chill for a couple hours, it will be ready to serve. Just don’t forget to top it with whipped cream first (a rule my boyfriend’s family lives by).
How to Save and Store A Chocolate Peanut Butter Pie
I debated on whether or not this paragraph was necessary because it’s so good, that most of the time it’s probably going to be devoured before you even have the chance to save any. If you do manage to sneak some away for later here’s what you’ll do.
The cream cheese component in this chocolate peanut butter pie means it needs to be kept in the refrigerator. It will keep for about 4-6 days refrigerated, and 6-9 months frozen.
When storing in the refrigerator be sure to cover the pie with plastic wrap, or cut it up into slices and place it in an airtight container.
Like This Peanut Butter Pie Recipe? Pin It!
More Chocolate… More Peanut Butter… More of Everything Good
A chocolate peanut butter combo is my absolute favorite. If I could only eat one thing for the rest of my life it would probably be something chocolate peanut butter. I make sure to always be on the watch for new recipes to try, and I’ve found some pretty amazing ones lately. Here are a few of my favorites.
Peanut Butter Blow Out Cookies
Chocolate Peanut Butter Energy Balls
Peanut Butter Banana Bread With Chocolate Chips
Peanut Butter Lasagna
Easy Peanut Butter Chocolate Fudge
Chocolate Peanut Butter Crunch Bars
Your New Chocolate Peanut Butter Obsession
You have to be craving a slice of pie by now. If not, I think you might need to see a doctor, because something’s must be wrong with you. Since I know you’re going to start whipping up this recipe immediately, I look forward to seeing your pics and comments in a few hours once you’ve tried your beautiful creation.
Yield: 8-10 servings
Chocolate Peanut Butter Pie
Prep Time: 25 minutes
Cook Time: 8 mins
Total Time: 33 minutes + chill time
Dessert doesn't get any better than a Chocolate Peanut Butter Pie with layers of graham cracker, peanut butter filling, and chocolate. It's pie perfection.
Print Recipe
Ingredients:
Crust
1 1/2 cups graham cracker crumbs (about 1 1/2 sleeves of graham crackers)
1/3 cup of sugar
8 tablespoons (1 stick) unsalted butter, melted
Filling
8 ounces cream cheese, at room temperature
1 cup creamy peanut butter
1 cup sugar
3/4 cup of heavy or whipping cream
Topping
1/2 cup sugar
1/2 cup heavy or whipping cream
2 ounces unsweetened chocolate
4 tablespoons (1/2 stick) unsalted butter
1/2 teaspoon vanilla extract
Directions:
Preheat the oven to 350°F
Prepare the crust: Combine the graham cracker crumbs, sugar, and melted butter in a mixing bowl, and stir until well combined. Press the mixture into the bottom and sides of a 9-inch pie dish.
Bake crust for 8 minutes. Set aside to cool completely. (throw it in the freezer to speed up the cooling process if necessary)
Prepare the filling: With an electric mixer combine the cream cheese, peanut butter, and sugar in a large bowl until well blended. Set aside.
Whip the cream with an electric mixer until stiff peaks form, and fold it into the cream cheese mixture. Spoon the filling into the cooled crust.
Prepare the topping: Combine the sugar and cream in a small saucepan and bring to a boil. Reduce the heat and simmer, without stirring, for 6 minutes.
Remove the pan from the heat, immediately add the chocolate and butter, and stir until melted. Then stir in the vanilla.
While still warm, carefully pour the topping over the pie, and refrigerate, uncovered, for at least 4 hours.
Instead of making a graham cracker crust, you can also buy a premade crust and skip directions 1-3 Make sure the cream cheese is completely softened, my best tip is to set it on the counter, or outside for several hours as opposed to softening in the microwave. It's what gives me the best results. Don't skip the chill time, or the filling and topping will be too soft, and you'll be unable to cut smooth pieces. Dust with some extra graham cracker crumbs for an extra crunch on top.
Making this recipe? Share it with us on Instagram using the hashtag #TidyMom so we can see what you're creating in the kitchen!
Want more great recipes like this? Follow my TidyMom Easy Recipes Pinterest Board
Share74
Tweet
Pin1.1K
Yum14
1.2K Shares
Categories: Desserts, Pies/Cobblers, Recipes Tags: Chocolate, cream cheese, graham cracker, Peanut Butter, peanuts, pie
10 Comments »
about the author Allison Sousan
I'm Allison, a girl who loves a challenge and is ready for anything that life dishes out. I am here to follow my passion and dive into the crazy and fun world that is strategic communications. If I'm not doing school work you can usually find me at Busch Stadium bleeding Cardinal Red, or obsessing over my pride and joy that comes in the form of a 60 pound Border Collie. If you also love those things check out my Instagram @allisonsousan
More by Allison Sousan »
BECOME A TIDYMOM VIP
New Posts
Weekly Newsletter
Like this Post?Then You'll Love These:
Mexican Black Bean Pizza
Chicken and Spinach Enchiladas
Lemon Pudding Pound Cake

Source: https://tidymom.net/2018/chocolate-peanut-butter-pie/
0 notes
Text
Cauliflower Buffalo Wings (Vegan & Gluten-free)
These Cauliflower Buffalo Wings have the spicy-hot flavor of classic buffalo chicken wings, with a plant-based twist. They are almost irresistible when served with this creamy cashew ranch dipping sauce.
This post contains Amazon affiliate links
This recipe comes from my friend Jen Hansard’s new book, Simple Green Meals. (Check out the giveaway below to win a free copy!)
It’s loaded with 100+ plant-powered meals, like Thai Lettuce Wraps, Austinite BBQ Tacos, and Sweet Potato “Nachos.” I love Jen’s overall eating philosophy, because it’s similar to mine. We both agree that when it comes to eating better, there’s no need to change everything overnight. Instead, it’s better to focus on small changes, like including vegetables in every meal you eat. These cauliflower buffalo wings are a delicious way to ease into it!
How to Make Cauliflower Buffalo Wings
Making cauliflower buffalo wings is surprisingly easy. All you have to do is dip the cauliflower in a simple batter, bake them in a oven (no deep frying required!), then coat them in hot sauce and bake again.
I used Bob’s Red Mill 1-to-1 flour, to keep this recipe gluten-free, but I imagine whole wheat or all purpose flour would work similarly. When you mix the flour with water, garlic powder and salt, you get a thick batter that easily sticks to the cauliflower for baking.
After 15 minutes of baking, you can dip the coated cauliflower in your favorite hot sauce and bake it again until the breading is lightly crisp, and the cauliflower is tender.
Vegan Ranch Dipping Sauce
While the cauliflower is baking to perfection, you have plenty of time to whip up an easy cashew ranch dip. If you have time to soak your cashews ahead of time, that should help them break down in your blender, and digest a little easier. I’m usually in such a rush to eat that I skip the soaking process and add a couple extra tablespoons of water to my blender to compensate for the lack of soaking when a recipe calls for it. (In that case, skip the extra 2 teaspoons of lemon juice or your ranch will be too tart.)
What I love about making your own dressings and dips is that you can taste the mixture as you go– so feel free to adjust the seasoning to your liking. When you dip the spicy buffalo cauliflower wings into the creamy ranch dressing, they are downright addictive! Be sure to serve them with some sliced veggies, like carrots and celery, to help your mouth cool off, too.
Buffalo Cauliflower Wings
Starch | Gluten-free, Dairy-free, Soy-free, Egg-free, Nut-free, Vegan
These Buffalo Cauliflower Wings have the spicy-hot flavor of classic chicken wings, but this plant-powered version is naturally gluten-free and vegan. They are addictive when served with the creamy cashew ranch dipping sauce!
Keyword: appetizer, cauliflower
1/2 cup gluten-free flour
1/2 cup water
1 teaspoon garlic powder
1/2 teaspoon sea salt
1 head cauliflower , cut into florets
1 teaspoon virgin coconut oil , melted
2/3 cup Frank's Red Hot Sauce
Cashew Ranch Dipping Sauce (makes 1/2 cup)
1/2 cup cashews
4 teaspoons lemon juice
1/4 teaspoon garlic powder
1/8 teaspoon dried dill (or 1/2 teaspoon fresh)
salt & black pepper
Preheat the oven to 450°F. Line a rimmed baking sheet with parchment paper.
In a large mixing bowl, combine the flour, water, garlic powder, and salt. Whisk until smooth and well combined. Dip the cauliflower pieces in the batter, making sure each piece is well coated, and arrange on the prepared baking sheet. Bake for 15 minutes, turning the pieces over halfway through the baking time.
Meanwhile, in another large bowl, stir together the oil and hot sauce. When the cauliflower is done, transfer the pieces to the bowl with the sauce and toss well. Place the coated cauliflower back on the baking sheet and bake for 25 minutes, or until crispy. Let cool slightly. Serve the cauliflower with dipping sauce.
Cashew Ranch Dipping Sauce
Place the cashews in a medium bowl. Pour 2 teaspoons of the lemon juice over the top. Add enough water to cover by a few inches. Let soak 2 hours, then drain and rinse well.
In a food processor, combine the cashews, 1⁄4 cup water, dill weed, garlic powder, paprika, the remaining 2 teaspoons lemon juice, and salt and pepper to taste. Process until smooth and creamy. Scrape down the sides as needed. Store in the refrigerator until ready to use.
Per Serving (including the ranch): Calories: 187, Fat: 9, Carbohydrate: 23g, Fiber: 5g, Protein: 7g
Recipe Notes:
I don’t recommend swapping out the gluten-free flour in this recipe for almond or coconut flour, unless you’re willing to add an egg to the mixture, too. There will definitely be some experimentation needed!
For a nut-free dip, try the tahini dressing from my Make-Ahead Lunch Bowls recipe.
Cookbook Giveaway
To celebrate her new book, Jen has told me I can giveaway a copy to one of my readers!
To enter the giveaway, simply leave a comment below letting me know a recipe you’d like to see here on my blog next. (It can be plant-based or not.) I’ll pick a winner one week from today– Tuesday, Sept 18th at 11:59pm PST.
*This particular giveaway is open to US readers only, 18 years and older.
–
I hope you’ll enjoy this recipe, and good luck with the giveaway!
Source: https://detoxinista.com/cauliflower-buffalo-wings/

0 notes
Text
Blackberry Tart Video Recipe - Joyofbaking.com
Shortbread Crust: Lightly butter, or lightly spray with a nonstick vegetable cooking spray, an 8 or 9 inch (20 or 23 cm) tart pan with a removable bottom.
In your food processor, place the flour, sugar, and salt and process to combine. Add the butter and pulse until the pastry starts to come together and form clumps (you don't want a solid ball of pastry). Place the pastry in the prepared pan and, using your fingertips, evenly press the pastry onto the bottom and up the sides of the pan. (Can use the back of a spoon to smooth the surface of the pastry.) Gently pierce the bottom of the crust with the tines of a fork. (This will prevent the pastry crust from puffing up while it bakes.) Cover and place the pastry crust in the freezer for about 15 minutes to chill. (This will help prevent the crust from shrinking while it bakes.)
Meanwhile preheat your oven to 425 degrees F (220 degrees C) and place rack in center of oven.
Place your tart pan on a larger baking sheet and bake until the crust is golden brown, about 13 - 15 minutes; Remove from oven and place on a wire rack to cool completely.
Cream Filling: In the bowl of your electric mixer, fitted with the whisk attachment (or with a hand mixer or wire whisk) beat the mascarpone cheese, heavy whipping cream, sugar and vanilla extract just until soft peaks form. Spread the filling in the baked and cooled tart shell, smoothing the top with the back of a spoon or with an offset spatula. Place in the refrigerator to chill for at least an hour.
Blackberry Topping: In a saucepan, place the blackberries and the jam. Place over medium heat and, stirring occasionally, bring just to a boil. Reduce heat to medium low and cook until the blackberries just start to release their juices (about 3 - 5 minutes). Remove from heat and stir in the lemon juice. Place in a covered container and refrigerate until chilled. The Blackberry Topping can be made several days ahead and stored in the refrigerator.
To Serve: You can spread the chilled Blackberry Topping over the Cream Filling, or you can serve the Blackberry Topping on the side.
Serves about 8 people.
View comments on this recipe on YouTube
Source: https://www.joyofbaking.com/BlackberryTart.html
0 notes
Text
Grilled Oysters with Tarragon Butter
I never had a grilled oyster until I moved to the Pacific Northwest. It seemed almost heretical to take such a delicate, luxurious food and unceremoniously slap it on the barbecue. But, owing to the northwest’s expansive coastline and cold, clean waters, oysters are abundant and they’re served every which way: on the half-shell, in chowders, baked, smoked, fried and, new to me, grilled.
When an oyster is grilled, it retains its delicacy, and yet, is also fortified by fire and smoke which gives the oyster an ethereal richness that tends toward meatiness. Grilled oysters partner with tarragon particularly well, as tarragon’s fresh, green licorice-like flavor is delicate enough to balance oysters without overpowering them.
Why I Serve Oysters and Other Seafood Throughout the Week (and you should too)
I try to serve seafoods throughout the week, maybe five or six times and sometimes more often. They’re particularly nutrient-dense, and even my toddler enjoys a filet of baked salmon, clams steamed with fresh herbs and chorizo, spot shrimp risotto and these grilled oysters. There’s a great oyster chowder recipe in my first cookbook.
Oysters and seafood are particularly nutrient-dense. Just one medium oyster contains all the zinc your body needs in a day, and then some. Zinc is particularly valuable in supporting the immune system as well as supporting fertility, endocrine health and optimal reproductive health.
How to Grill Oysters
The most popular way to grill oysters is to set them, cup-side down, on a grill and allow them to cook until they open up just slightly before you pry away the top shell and add a pat of butter. This method allows the oysters to steam a bit in their own juices.
Ever the contrarians, my husband and I prefer a different approach. First, we shuck the oysters, and then set them on a grill, cup-side down, dropping a spoonful of seasoned butter onto each oyster. Their juices will warm and begin to bubble, the butter will melt and baste the oysters as they cook and the smoke perfumes the delicate shellfish just enough to give them a wonderfully rich, meaty flavor.
3.5.3239
Grilled Oysters with Tarragon Butter
Print
Recipe type: Appetizer
Cuisine: American
Author: Jenny
Prep time: 15 mins
Cook time: 10 mins
Total time: 25 mins
Serves: 1 dozen
Tarragon's sweet, licorice-like notes pairs well with briny oysters left just slightly smoky from the grill. Grilling oysters leaves them wonderfully meaty, and further enriched with butter. Choose large oysters, if you can, as they'll shrink, slightly, while they cook. For people concerned about eating shellfish raw, grilled oysters make a nice alternative.
Ingredients
8 ounces softened butter
1 medium shallot, diced
¼ cup loosely packed tarragon leaves
1 tablespoon white wine vinegar
⅛ teaspoon finely ground sea salt
12 large oysters (order them here)
Instructions
Toss the butter, shallot, tarragon, vinegar and sea salt into food processor, and process on high speed until uniformly combined.
Preheat the grill to medium.
Shuck the oysters, reserving as much juice as you can. Top each oyster with about 2 teaspoons prepared tarragon butter.
Place the oysters cup-side down on the grill. Cover the grill and allow the oysters to cook until the butter melts, and their juices begin to bubble - about 10 minutes. Remove from the grill and serve warm.
3.5.3239
Where to Find Sustainably-Farmed Oysters
Oysters are particularly nutrient-dense, rich in vitamins B12 and D as well as the minerals zinc and selenium while also being very low in mercury.
They are also sustainably farmed, taking relatively little space to produce large volumes of oysters, providing safety and shelter for other sea creatures, and they require no supplementary feed, only clean water. Seafood Watch, a program of the Monterrey Bay Aquarium that ranks seafood choices based upon overall sustainability including ecological, bycatch and species impact, consistently ranks oysters as a “best choice.”
If you live along the coasts, you might be able to find oysters locally; however, if you do not, you can order them online here and have them delivered from the farm, fresh to your door.
Cooking with Oysters and Nutrient-Dense Seafood
Seafoods are particularly nutrient-dense foods, and they also feature prominently among the diets of long-lived peoples (source) as well as the traditional diets of some of the healthiest peoples studied by nutrition pioneer and researcher, Weston Price (source). They tend to be high in protein, rich in B vitamins, vitamin D and minerals like iodine, zinc, iron and selenium as well as omega-3 fatty acids, depending on the variety.
And while there’s inevitably concern about oceanic pollution and its effects on the nutritive quality of seafoods, it’s important to remember that you are still better off eating seafood than avoiding it (source), particularly when you make choices that are low in mercury, high in nutrients and wild-caught or sustainably produced, like oysters.
Here are some of our favorite ways to cook and serve nutrient-dense seafoods.
Salmon with Honey Chipotle Bourbon Butter is marvelously easy to prepare. Salmon is one of the few fish rich enough to stand up to the heat and intensity of chipotle chiles, and it’s worth it.
Salmon Baked in Cream and Herbs is another favorite of Nourished Kitchen readers. Salmon bakes in herb-infused cream which yields a thick, savory sauce.
Clam Chowder with Basil Drizzle is also lovely, and unlike heavy chowders thickened with a floury roux, this chowder is lighter, thinner and, owing to the basil drizzle, brighter, too.
Korean-Style Seafood Stew is positively brimming with fresh fish, prawns and nutrient-dense seafoods, partnered with the vibrant flavor of chiles, ginger, garlic, scallions and fresh vegetables.</h2)
Love it? Share it.

Source: https://nourishedkitchen.com/grilled-oysters-tarragon-butter/
0 notes
Text
Fry Herbs and Seasonings Directly in the White of Your Egg
As a writer of food-things and lover of breakfast foods (at non-breakfast times), I have eaten many an egg. I don’t know that there is a preparation I don’t enjoy, but a sunny side up egg, fried in olive oil until the edges are crispy ranks very high on my list. I didn’t think there was much improving on the method, until I read about Melissa Clark frying herbs directly in the whites on Food52.

This Is the Chillest, Easiest Way to Poach an Egg
Somehow, in the last few weeks, I have become someone who wakes up at 6:30 a.m. I did not choose…
Read more Read
This is obviously a genius move, but why stop with herbs? Anything can be fried in white, making the most boring part of your fried egg much more interesting. Just this morning, I tried sage fried eggs, everything bagel fried eggs, and crispy jalapeño fried eggs (French’s gave the peppers the crispy onion treatment), and all three—which are pictured above and below—made me very happy.
The method is simple. Heat two tablespoons of olive oil in a skillet until it is very hot, shimmering, and almost smoking. If you are using herbs, add them to the pan and let them crisp a bit, then crack the egg directly on top. Add some more herbs in the not-set whites if you like. If you are adding non-herb things, crack the egg first, then sprinkle or set your seasoning, fried vegetable pieces, or bacon bits into the white. (Be careful, these things sputter.) Spoon hot oil over the whites until they are fully set, slide them on a plate, and sprinkle with salt.
A Game-Changing Upgrade to Fried Eggs | Food52
Source: https://skillet.lifehacker.com/fry-herbs-and-seasonings-directly-in-the-white-of-your-1829005431
0 notes
Text
Chocolate Dipped Shortbread Cookies
A few weeks ago the wonderful folks over at Ancestry reached out asking if I’d like to partner together. I’ve always found family history and genetics SO interesting so I immediately said yes!
They sent me one of their AncestryDNA Kits, which can actually show you two times more geographic detail than any other DNA test.
So, are you curious to hear what my DNA results revealed…?
(I certainly was.)
The test showed that I’m about 54% British, specifically 35% from Ireland / Scotland / Wales with a likelihood that my family is from northeast and central Scotland. No big surprise there since my mom was born in Scotland and I actually have British citizenship!
It was super interesting to see the geographic detail the test showed. I think it’s just crazy that your DNA can reveal the path your ancestors took that led you to exactly where you are right now.
What was a total surprise is that I’m 8% Native American! What?!
Since this covers both North & South America, I’m thinking it must come from my paternal grandfather’s side since he’s Honduran.
The rest of my DNA is mostly south and southwest European, which also makes sense based off my great grandparents’ history.
What’s really cool about the AncestryDNA Kits test is that you can discover potential relatives through DNA matching to people who have taken the AncestryDNA test. I was shocked to see literally hundreds of my extended relatives were matched, including first and second cousins! I sent the list of potential relatives to my mom and sure enough she recognized a bunch of the names.
You can also connect your AncestryDNA results to a family tree and start to really build out an understanding and history of your heritage. I just think it’s such a special thing to connect to your ancestors and to imagine with better clarity what their lives must’ve been like and what they had to overcome for you to live today.
If you’re interested in revealing your own family story, click here to purchase an AncestryDNA kit. The kits make a great gift, too!
Being that such a large part of my heritage is Scottish, I wanted to share a Scottish-inspired recipe with you!
Since shortbread is a Scottish biscuit cookie and we all adore cookies in the Handle the Heat community, I thought this Chocolate Dipped Shortbread Cookie recipe would be the perfect creation inspired by my results.
I did a little Internet sleuthing and apparently the invention of shortbread has often been credited to Mary, Queen of Scots in the 16th century. The popular triangle shape for shortbread was inspired by the shape of fabric pieces used to make petticoats during the reign of Queen Elizabeth I. Who knew?!
I deviated from the traditional recipe by using a higher ratio of sugar to make these cookies sweeter and using brown sugar for a deeper complexity of flavor. Since I increased the sugar, I wanted to make sure I used a more traditional Scottish ingredient to balance things out: oats!
And as a true chocolate lover, I just had to add the stuff into this recipe somewhere. I opted for dipping the cookies in chocolate, which I think makes them all the more beautiful.
This recipe uses a food processor to make quick and easy work of assembling the dough. If you don’t have a food processor, use quick oats, which are finer in texture, and make the dough with an electric mixer instead.
For a fun flavor twist, add 1 tablespoon freshly grated orange zest in with the dough ingredients for chocolate-orange goodness!
Chocolate Dipped Shortbread Cookies
Yields 18 cookies
Prep Time 15 minutes Cook Time 25 minutes Total Time 40 mins
Easy Chocolate Dipped Shortbread Cookies feature a buttery shortbread made with oats and brown sugar dipped in chocolate for the ultimate afternoon treat!
Ingredients
2 sticks (227 grams) unsalted butter, at room temperature
3/4 cup (150 grams) light brown sugar
1/2 teaspoon fine salt
1 cup (100 grams) oats, old fashioned or quick cooking
1 1/2 cups (191 grams) all purpose flour
4 ounces (113 grams) semisweet or bittersweet chocolate
Directions
Preheat oven to 350°F. Line an 8 by 8-inch square baking pan with parchment paper or foil, leaving an overhang.
Place all ingredients except the chocolate in the bowl of a food processor and process until a smooth, soft, and slightly sticky dough forms.
Press the dough evenly into the prepared pan. Bake for about 25 minutes, or until very lightly golden brown and set. Let cool completely. Remove the sheet of shortbread from the pan and cut into squares with a big sharp knife. Cut each square into two triangles.
In a medium microwave-safe bowl, microwave the chocolate for 45 seconds. Stir, and continue heating in 30-second bursts, stirring between bursts, until the chocolate is smooth.
Dip each cookie in chocolate, allowing the excess to drip off. Place on a parchment lined baking sheet and allow the chocolate to set before serving or storing.
The cookies can be stored in an airtight container at room temperature for up to 5 days.
by Tessa
About Tessa...
Tessa is a professionally trained chef, cookbook author, and cookie queen. She loves to write about all things sweet, carb-y, and homemade. She's on a mission to make the world a more unapologetically DELICIOUS place. Tessa lives in Phoenix, Arizona.
Source: https://www.handletheheat.com/chocolate-dipped-shortbread-cookies/
0 notes
Text
Maple Tahini Low Carb Brownies
Maple Tahini Low Carb Brownies are made with healthy substitutes for butter, sugar, and carbs, so this is a healthier brownie recipe! These fudgy paleo friendly avocado brownies are low carb, refined sugar free, grain free, and delicious!
You have been warned. The next 2 recipes posts are baked treats, healthier refined sugar free treats, but still —> baked treats. What can I say? Fall baking mode has hit me hard already. Well, and Fall Air Frying Food. that’s a thing, right? Kidding. Anyways, let’s all pretend it’s a crisp 55F out and crank on the oven some more. Mmm k?
You see, when it comes to making brownies, there are certain things that, IMHO, shouldn’t be messed with. For example, brownies should always be fudgy. If I want cake-like brownies, I’ll bake a chocolate cake, or make any of my no bake chocolate cake bites; I don’t usually mess with perfection.
But, I admit that I wouldn’t be your favorite place to get dessert recipes if I didn’t make them HEALTHIER desserts, amiright? That’s why I took a vegan avocado brownie recipe and made some simple, healthy substitutes for butter, sugar, and grains, so these Maple Tahini Low Carb Brownies are even healthier for you!
You’re about to get mesmerized by the swirly chocolatey tahini goodness. Ohhh and ahhhh…
Well the tahini chocolate swirly topping was the easy part! Finding the right balance of fudgy and not too cakey was hard part. First world problems here ya’ll. But alas, 3rd times a charm on these bad boys! But phew, I did it! Finally. Low Carb Brownies… so worth it! You’ll see why in a minute.
The Making of Healthy Chocolate Brownies
To make this a gluten free, grain free, refined sugar free, and low carb brownies recipe, a few healthy ingredient swaps were needed. Here’s what we did.
Healthy Substitutes for Butter
We use avocado instead of butter. Avocado brownies are extra fudgy anyway, and leaving the butter out of the recipe makes them dairy free avocado brownies! Don’t worry, I have a vegan avocado chocolate sugar cookie recipe too. All bases covered here ya’ll!
Other healthy substitutes for butter in dairy free and/or vegan dessert recipes:
coconut oil
unsweetened applesauce
pumpkin
banana
More Healthy Swaps in the Low Carb Brownies
To make the Maple Tahini Low Carb Brownies recipe grain free, we use Xylitol and/or maple syrup instead of brown sugar. This swap also makes the brownies low carb and refined sugar free.
Using melted dark chocolate instead of milk chocolate pumps up the antioxidant properties and lowers the sugar.
Okay, who’s hangry? *Raises hand, both hands* One for a brownie, one for high fiving you for reading all the way through to the recipe. LOL!
Print
<![CDATA[ .tasty-recipes-image float: right; .tasty-recipes-print-button background-color: #666677; display: inline-block; padding-left: 1em; padding-right: 1em; padding-top: 0.5em; padding-bottom: 0.5em; text-decoration: none; a.tasty-recipes-print-button color: #fff; a.tasty-recipes-print-button:hover color: #fff; .tasty-recipes-rating.tasty-recipes-clip-10 -webkit-clip-path: polygon(0 0, 10% 0%, 10% 100%, 0% 100%); clip-path: polygon(0 0, 10% 0%, 10% 100%, 0% 100%); .tasty-recipes-rating.tasty-recipes-clip-20 -webkit-clip-path: polygon(0 0, 20% 0%, 20% 100%, 0% 100%); clip-path: polygon(0 0, 20% 0%, 20% 100%, 0% 100%); .tasty-recipes-rating.tasty-recipes-clip-30 -webkit-clip-path: polygon(0 0, 30% 0%, 30% 100%, 0% 100%); clip-path: polygon(0 0, 30% 0%, 30% 100%, 0% 100%); .tasty-recipes-rating.tasty-recipes-clip-40 -webkit-clip-path: polygon(0 0, 40% 0%, 40% 100%, 0% 100%); clip-path: polygon(0 0, 40% 0%, 40% 100%, 0% 100%); .tasty-recipes-rating.tasty-recipes-clip-50 -webkit-clip-path: polygon(0 0, 50% 0%, 50% 100%, 0% 100%); clip-path: polygon(0 0, 50% 0%, 50% 100%, 0% 100%); .tasty-recipes-rating.tasty-recipes-clip-60 -webkit-clip-path: polygon(0 0, 60% 0%, 60% 100%, 0% 100%); clip-path: polygon(0 0, 60% 0%, 60% 100%, 0% 100%); .tasty-recipes-rating.tasty-recipes-clip-70 -webkit-clip-path: polygon(0 0, 70% 0%, 70% 100%, 0% 100%); clip-path: polygon(0 0, 70% 0%, 70% 100%, 0% 100%); .tasty-recipes-rating.tasty-recipes-clip-80 -webkit-clip-path: polygon(0 0, 80% 0%, 80% 100%, 0% 100%); clip-path: polygon(0 0, 80% 0%, 80% 100%, 0% 100%); .tasty-recipes-rating.tasty-recipes-clip-90 -webkit-clip-path: polygon(0 0, 90% 0%, 90% 100%, 0% 100%); clip-path: polygon(0 0, 90% 0%, 90% 100%, 0% 100%); .tasty-recipes-nutrition ul list-style-type: none; margin: 0; padding: 0; .tasty-recipes-nutrition ul:after display: block; content: ' '; clear: both; .tasty-recipes-nutrition li float: left; margin-right: 1em; .tasty-recipes-plug text-align: center; margin-bottom: 1em; display: -ms-flexbox; display: flex; -ms-flex-align: center; align-items: center; -ms-flex-pack: center; justify-content: center; .tasty-recipes-plug a text-decoration: none; box-shadow: none; .tasty-recipes-plug a img width: 150px; height: auto; margin: 5px 0 0 8px; display: inline-block; @media print .tasty-recipes-no-print, .tasty-recipes-no-print * display: none !important; .tasty-recipes border: 5px solid #666677; margin-top: 6em; margin-bottom: 4em; .tasty-recipes.tasty-recipes-has-plug margin-bottom: 1em; .tasty-recipes-plug margin-bottom: 4em; .tasty-recipes-print-button display: none; .tasty-recipes-image-shim height: 69.5px; clear: both; .tasty-recipes-entry-header background-color: #666677; color: #FFF; text-align: center; padding-top: 35px; padding-bottom: 1.5em; padding-left: 2.5em; padding-right: 2.5em; .tasty-recipes-entry-header.tasty-recipes-has-image padding-top: 0px; .tasty-recipes-entry-header .tasty-recipes-image float: none; text-align: center; transform: translateY(-115px); margin-bottom: 1em; /* Decide if we need this */ .tasty-recipes-entry-header .tasty-recipes-image img -webkit-border-radius: 50%; -moz-border-radius: 50%; border-radius: 50%; border: 5px solid #666677; height: 150px; width: 150px; display: inline-block; .tasty-recipes-entry-header h2 font-size: 2em; font-weight: 400; text-transform: lowercase; margin-bottom: 0; text-align: center; color: #FFF; margin-top: 0; padding-top: 0; padding-bottom: 0; .tasty-recipes-has-image .tasty-recipes-entry-header h2 margin-top: -115px; .tasty-recipes-entry-header hr border: 1px solid #B7BBC6; background-color: #B7BBC6; margin-bottom: 1em; margin-top: 1em; .tasty-recipes-entry-header div.tasty-recipes-rating text-decoration: none; border: none; .tasty-recipes-entry-header .tasty-recipes-rating:hover text-decoration: none; .tasty-recipes-entry-header div.tasty-recipes-rating font-size: 1.375em; display: block; .tasty-recipes-entry-header .tasty-recipes-rating p margin-bottom: 0; .tasty-recipes-entry-header span.tasty-recipes-rating margin-left: .25em; margin-right: .25em; color: #FFF; .tasty-recipes-entry-header .rating-label font-style: italic; color: #B7BBC6; font-size: .6875em; display: block; .tasty-recipes-entry-header .tasty-recipes-details margin-top: 1em; .tasty-recipes-entry-header .tasty-recipes-details ul list-style-type: none; margin: 0; .tasty-recipes-entry-header .tasty-recipes-details ul li display: inline-block; margin-left: .5em; margin-right: .5em; font-size: 1em; line-height: 2.5em; color: #fff; @media only screen and (max-width: 520px) .tasty-recipes-entry-header .tasty-recipes-details .detail-icon height: .8em; margin-top: .4em; .tasty-recipes-entry-header .tasty-recipes-details ul li font-size: .875em; line-height: 1.75em; @media only screen and (min-width: 520px) .tasty-recipes-entry-header .tasty-recipes-details .detail-icon height: 1em; margin-top: .6em; .tasty-recipes-entry-header .tasty-recipes-details ul li font-size: 1em; line-height: 2.5em; .tasty-recipes-entry-header .tasty-recipes-details .tasty-recipes-label font-style: italic; color: #B7BBC6; margin-right: .125em; .tasty-recipes-entry-header .tasty-recipes-details .detail-icon vertical-align: top; margin-right: .2em; display: inline-block; .tasty-recipes-entry-content padding-top: 1.25em; .tasty-recipes-entry-content .tasty-recipes-buttons margin-bottom: 1.25em; margin-left: 1.25em; margin-right: 1.25em; .tasty-recipes-entry-content .tasty-recipes-buttons:after content: " "; display: block; clear: both; .tasty-recipes-entry-content .tasty-recipes-button-wrap width: 50%; display: inline-block; float: left; box-sizing: border-box; .tasty-recipes-entry-content .tasty-recipes-buttons a text-transform: uppercase; text-align: center; display: block; color: #FFF; background-color: #666677; font-size: 1em; line-height: 1.375em; padding-top: 1em; padding-bottom: 1em; font-weight: bold; margin-top: 0; border: none; border-radius: 0; text-decoration: none; .tasty-recipes-entry-content a img box-shadow: none; -webkit-box-shadow: none; .tasty-recipes-entry-content .tasty-recipes-buttons a:hover background-color: #979599; text-decoration: none; .tasty-recipes-entry-content .tasty-recipes-buttons img vertical-align: top; .tasty-recipes-entry-content .tasty-recipes-buttons img.svg-print, .tasty-recipes-entry-content .tasty-recipes-buttons img.svg-pinterest height: 1.25em; margin-right: .375em; margin-bottom: 0; background: none; display: inline-block; @media only screen and (min-width: 520px) .tasty-recipes-entry-content .tasty-recipes-button-wrap:first-child padding-right: .625em; .tasty-recipes-entry-content .tasty-recipes-button-wrap:last-child padding-left: .625em; @media only screen and (max-width: 520px) .tasty-recipes-entry-content .tasty-recipes-button-wrap width: 100%; .tasty-recipes-entry-content .tasty-recipes-button-wrap:nth-child(2) padding-top: 1em; .tasty-recipes-entry-content h3 text-transform: uppercase; font-size: .75em; color: #979599; margin-bottom: 1.5em; .tasty-recipes-entry-content h4 font-size: 1em; padding-top: 0; margin-bottom: 1.5em; margin-top: 1.5em; .tasty-recipes-entry-content hr background-color: #EAE9EB; border: 1px solid #EAE9EB; margin-top: 1em; margin-bottom: 1em; .tasty-recipes-entry-content .tasty-recipes-description, .tasty-recipes-entry-content .tasty-recipes-ingredients, .tasty-recipes-entry-content .tasty-recipes-instructions, .tasty-recipes-entry-content .tasty-recipes-keywords padding-left: 1.25em; padding-right: 1.25em; .tasty-recipes-entry-content .tasty-recipes-description p margin-bottom: 1em; .tasty-recipes-entry-content .tasty-recipes-ingredients ul, .tasty-recipes-entry-content .tasty-recipes-instructions ul list-style-type: none; margin-left: 0; margin-bottom: 1.5em; padding: 0; .tasty-recipes-entry-content .tasty-recipes-ingredients ul li, .tasty-recipes-entry-content .tasty-recipes-instructions ul li margin-bottom: .625em; list-style-type: none; position: relative; margin-left: 2.5em; line-height: 1.46; .tasty-recipes-entry-content .tasty-recipes-ingredients ul li:before, .tasty-recipes-entry-content .tasty-recipes-instructions ul li:before background-color: #666677; -webkit-border-radius: 50%; -moz-border-radius: 50%; border-radius: 50%; height: .5em; width: .5em; display: block; content: " "; left: -1.25em; top: .375em; position: absolute; .tasty-recipes-entry-content .tasty-recipes-ingredients ol, .tasty-recipes-entry-content .tasty-recipes-instructions ol counter-reset:li; margin-left: 0; padding: 0; .tasty-recipes-entry-content .tasty-recipes-ingredients ol li, .tasty-recipes-entry-content .tasty-recipes-instructions ol li list-style-type: none; position: relative; margin-bottom: 1em; margin-left: 2.5em; line-height: 1.46; .tasty-recipes-entry-content .tasty-recipes-ingredients ol li:before, .tasty-recipes-entry-content .tasty-recipes-instructions ol li:before content:counter(li); counter-increment: li; position: absolute; background-color: #666677; -webkit-border-radius: 50%; -moz-border-radius: 50%; border-radius: 50%; height: 1.45em; width: 1.45em; color: #FFF; left: -1.25em; transform: translateX(-50%); line-height: 1.5em; font-size: .6875em; text-align: center; top: .1875em; @media only screen and (max-width: 520px) .tasty-recipes-entry-content .tasty-recipes-ingredients ol, .tasty-recipes-entry-content .tasty-recipes-instructions ol margin-left: 0; .tasty-recipes-entry-content .tasty-recipes-notes padding: 1.25em; background-color: #EDF0F2; .tasty-recipes-entry-content .tasty-recipes-notes ol counter-reset:li; margin-left: 0; padding: 0; .tasty-recipes-entry-content .tasty-recipes-notes ul margin-left: 0; padding: 0; .tasty-recipes-entry-content .tasty-recipes-notes p, .tasty-recipes-entry-content .tasty-recipes-notes ul li, .tasty-recipes-entry-content .tasty-recipes-notes ol li background-color: #FFF; padding-left: 1.5625em; padding-right: 1.5625em; padding-top: 1.25em; padding-bottom: 1.25em; position: relative; -webkit-clip-path: polygon(20px 0, 100% 0, 100% 100%, 0 100%, 0 20px); clip-path: polygon(20px 0, 100% 0, 100% 100%, 0 100%, 0 20px); margin-bottom: 1.5em; @media only screen and (min-width: 520px) .tasty-recipes-entry-content .tasty-recipes-notes p, .tasty-recipes-entry-content .tasty-recipes-notes ul li, .tasty-recipes-entry-content .tasty-recipes-notes ol li padding-left: 2.5em; .tasty-recipes-entry-content .tasty-recipes-notes p:before, .tasty-recipes-entry-content .tasty-recipes-notes ul li:before content: "i"; display: block; background-color: #666677; -webkit-border-radius: 50%; -moz-border-radius: 50%; border-radius: 50%; height: 1.3em; width: 1.3em; font-size: .75em; line-height: 1.3em; text-align: center; color: #FFF; position: absolute; left: 1.167em; top: 1.9em; .tasty-recipes-entry-content .tasty-recipes-notes ol li:before content:counter(li); counter-increment: li; position: absolute; background-color: #666677; -webkit-border-radius: 50%; -moz-border-radius: 50%; border-radius: 50%; height: 1.45em; width: 1.45em; color: #FFF; left: 2em; transform: translateX(-50%); line-height: 1.5em; font-size: .6875em; text-align: center; top: 2em; .tasty-recipes-entry-content .tasty-recipes-notes p:last-child margin-bottom: 0; .tasty-recipes-entry-content .tasty-recipes-keywords background-color: #EDF0F2; padding-bottom: 1em; padding-top: 1em; .tasty-recipes-entry-content .tasty-recipes-keywords p font-size: 0.7em; font-style: italic; color: #979599; margin-bottom: 0; .tasty-recipes-entry-content .tasty-recipes-keywords p span font-weight: bold; .tasty-recipes-nutrifox text-align: center; margin: 0; .nutrifox-label background-color: #EDF0F2; .tasty-recipes-nutrifox iframe width: 100%; display: block; margin: 0; .tasty-recipes-entry-content .tasty-recipes-nutrition padding: 1.25em; color: #666677; .tasty-recipes-nutrition .tasty-recipes-label font-style: italic; color: #B7BBC6; margin-right: .125em; font-weight: 400; .tasty-recipes-nutrition ul text-align: center; .tasty-recipes-nutrition li float: none; display: inline-block; line-height: 2em; .tasty-recipes-entry-footer background-color: #666677; padding-top: 1.5625em; padding-bottom: 1.25em; padding-left: 2.5em; padding-right: 2.5em; text-align: center; .tasty-recipes-entry-footer .tasty-recipes-footer-content display: inline-block; .tasty-recipes-entry-footer img width: 65px; .tasty-recipes-entry-footer h3 color: #B7BBC6; font-size: 1.25em; line-height: 2.25em; margin-top: .5em; margin-bottom: .125em; padding: 0; line-height: 1em; .tasty-recipes-entry-footer p margin-bottom: 0; color: #FFF; font-size: .75em; .tasty-recipes-entry-footer p a color: #FFF; text-decoration: underline; box-shadow: none; border-bottom: none; .tasty-recipes-entry-footer:after content: " "; display: block; clear:both; @media only screen and (max-width: 520px) .tasty-recipes-entry-footer h3 margin-top: .5em; margin-bottom: .5em; .tasty-recipes-entry-footer text-align: center; @media only screen and (min-width: 520px) .tasty-recipes-entry-footer img float: left; .tasty-recipes-entry-footer h3, .tasty-recipes-entry-footer p margin-left: 90px; clear: none; text-align: left; /* Print view styles */ .tasty-recipes-print-view font-size: 11px; background-color: #fff; .tasty-recipes-print-view .tasty-recipes-print-button display: inline-block; .tasty-recipes-print padding:0; font-size: 11px; .tasty-recipes-print-view .tasty-recipes margin-top: 1em; .tasty-recipes-print .tasty-recipes-entry-header background-color: inherit; color: inherit; padding-bottom: 0; padding-left: 1em; padding-right: 1em; padding-top: 1em; .tasty-recipes-print .tasty-recipes-entry-header .tasty-recipes-image float: right; transform: none; .tasty-recipes-print.tasty-recipes-has-image .tasty-recipes-entry-header h2 margin-top: 0; .tasty-recipes-print .tasty-recipes-entry-header h2 color: inherit; margin-bottom: .5em; .tasty-recipes-print .tasty-recipes-entry-header hr display: none; .tasty-recipes-print .tasty-recipes-entry-header span.tasty-recipes-rating color: #000; .tasty-recipes-print .tasty-recipes-entry-header .tasty-recipes-details ul padding: 0; clear: none; .tasty-recipes-print .tasty-recipes-entry-header .tasty-recipes-details ul li line-height: 1.5em; color: #000; .tasty-recipes-print .tasty-recipes-entry-header .tasty-recipes-details .detail-icon display: none; .tasty-recipes-print .tasty-recipes-entry-content img max-width: 50%; height: auto; .tasty-recipes-print .tasty-recipes-entry-content .tasty-recipes-ingredients ul li, .tasty-recipes-print .tasty-recipes-entry-content .tasty-recipes-ingredients ol li margin-bottom: 0.25em; line-height: 1.1; .tasty-recipes-print .tasty-recipes-entry-content .tasty-recipes-instructions ul li, .tasty-recipes-print .tasty-recipes-entry-content .tasty-recipes-instructions ol li margin-bottom: 0.5em; line-height: 1.1; .tasty-recipes-print .tasty-recipes-entry-content .tasty-recipes-ingredients ul li:before, .tasty-recipes-print .tasty-recipes-entry-content .tasty-recipes-instructions ul li:before top: 0.3em; .tasty-recipes-print .tasty-recipes-entry-content .tasty-recipes-ingredients ol li:before, .tasty-recipes-print .tasty-recipes-entry-content .tasty-recipes-instructions ol li:before top: 0; .tasty-recipes-print .tasty-recipes-entry-content .tasty-recipes-notes p, .tasty-recipes-print .tasty-recipes-entry-content .tasty-recipes-notes ul li, .tasty-recipes-print .tasty-recipes-entry-content .tasty-recipes-notes ol li padding-top: 0; padding-bottom: 0; background-color: #EDF0F2; clip-path: none; .tasty-recipes-print .tasty-recipes-entry-content .tasty-recipes-notes p:before, .tasty-recipes-print .tasty-recipes-entry-content .tasty-recipes-notes ul li:before top: 0; clip-path: none; margin-bottom: 0.5em; @media print .tasty-recipes-print .tasty-recipes-entry-footer img display: none; .tasty-recipes-print .tasty-recipes-source-link text-align: center; ]]>
Maple Tahini Low Carb Brownies
Description
Maple Tahini Low Carb Brownies are made with healthy substitutes for butter, sugar, and carbs, so it’s a healthier brownie recipe!
Ingredients
2 small ripe avocados
2 eggs (room temp is best)
1/4 c unsweetened cocoa powder
6 tbsp almond flour
1 tbsp arrowroot starch or coconut flour
1 tsp Vanilla
1/2 tsp baking soda
1/2 tsp sea salt
1/2 c xylitol sugar or other sugar substitute (see notes)
pinch of Cinnamon
1/3 c tahini
2 tbsp maple syrup (optional)
1/4 c dark chocolate chips (to melt)
optional chopped nuts to top
Instructions
Pre-heat oven to 350F.
Line a square 8×8 baking pan, with parchment paper. Set aside
In a mixing bowl or food processor, blend together your avocado, eggs, cocoa. This will create a fudge like texture.
Next add in your flours and sugar blend or mix again until batter is smooth. use a spatula to scrape down the mix and mix again if needed. Just be sure not to over mix or the batter they will not be fudgy.
Transfer to mixing bowl.
Next mix in your vanilla, baking soda, salt, and pinch of cinnamon.
Pour batter into baking pan and smooth out to edges.
In another small bowl, melt your dark chocolate chips, either by stove top or in microwave.
Mix in your maple syrup and tahini and gently swirl together.
Spread this on top of the brownie batter. Optional nuts to top.
Bake for 25-30 minutes or until center comes out clean with tooth pick
remove from oven and let cool for 10 minutes on counter then 5 minutes in fridge to set.
Slice and serve. Freeze or keep in fridge for best storage.
Notes
Feel free to use raw sugar, coconut palm sugar, or date sugar instead of xylitol. Calories and carb count will vary.
If you are baking at altitude, check brownies at 22 -25 minutes. Oven times vary.
Keywords: brownies, low carb, sugar free, healthy, tahini, gluten free, dairy free
Want to try another great dark chocolate brownie recipe? Make a batch of Dirty Chai Dark Chocolate Flourless Brownies, and then try not to eat them all in one sitting.
You see, these are so healthy you can have them for breakfast. Or did I take that too far? Possibly, but either way you’ve got a low carb brownies recipe that is easy to make, delicious, fudgy, refined sugar free, and better for you! That’s winning in my book.
Favorite Brownie Recipe? Avocado/oil free or real butter? You decide!
Cheers!
LC
Source: https://www.cottercrunch.com/maple-tahini-low-carb-brownies/
0 notes
Text
BACK ON SHELVES: Limited Edition Sugar Cookie Toast Crunch Cereal (2018)
Hey! Welcome back, Sugar Cookie Toast Crunch! Now you can brag to original French Toast Crunch that you took less time to come back than it did. (Spotted by Robbie at Target.)
Thank you to all the photo contributors! If you’re out shopping and see an interesting new product on the shelf, snap a picture of it, and send us an email ([email protected]) with where you found it and “Spotted” in the subject line. Or reply to us (@theimpulsivebuy) on Twitter with the photo, where you spotted it, and the hashtag #spotted. If you do so, you might see your picture in our next Spotted on Shelves post.
Also, if you want to send in photos and are wondering if we’ve already covered something or if the product is old, don’t worry about it. Let us worry about it.
Here are a few posts that might interest you:
Source: https://www.theimpulsivebuy.com/wordpress/2018/10/18/back-on-shelves-limited-edition-sugar-cookie-toast-crunch-cereal-2018/
0 notes
Text
Egg Salad Recipe with the Best Dressing
Truly the best Egg Salad Recipe you are going to try with minimal ingredients and so quick to make. Hard-boiled eggs with celery, dill, seasoning and chives in a creamy garlic Dijon mayo dressing make up this classic egg salad. Add this to your Easter menu!
Eggs are are a healthy, high quality protein. We love recipes where eggs are the star ingredient like these incredible Deviled Eggs with Bacon and Egg Muffins.
This post may contain affiliate links. Read my disclosure policy.
Hey, hey! Valentina with Valentina’s Corner sharing an Egg Salad Recipe.
Egg Salad Recipe:
This is easiest egg salad recipe and the perfect way to use up leftover hard-boiled eggs. Eggs with herbs, celery and crisp onion in the creamiest dressing makes for one amazing salad.
Egg salad can be served in so many different ways – as a side salad, on toast, etc (see more ideas below). Adding hard boiled eggs is a great way to pack more protein into Potato Salad, a Pasta Chicken Caesar Salad or Salmon Cobb Salad. This classic salad is simple and just as satisfying, but so much faster to make!
What Goes Into an Egg Salad?
Though this is a simple recipe and uses basic ingredients of eggs, dill, chives, celery and onion in creamy garlic mayo, it tastes amazing. Here are suggestions for other ingredients to add to the salad for a fancier salad:
Protein- such as bacon, chicken or shrimp.
Veggies- tomatoes, cucumbers or carrots are great options.
Avocado- can either be cubed and added to the salad or blended with the dressing.
TIP: If you will be adding other ingredients to the salad, prepare a larger portion of the dressing.
How to Make Egg Salad:
Making a salad doesn’t get easier than this homemade egg salad. Just be sure your eggs have cooled completely before preparing the salad or make them ahead and refrigerate until ready to use.
Hard boil eggs and cool. Once cooled, cut into desired pieces (we like ours chunky)
Finely cube the celery and red onion (sweet onion may be substituted for red onion)
Chop the chives (or green onions) and fresh dill
Prepare homemade dressing
Mix salad well to combine and enjoy!
Are Eggs Good for You?
Eggs are the least expensive high quality protein. They are nutrient dense and will keep you feeling good throughout the day. Egg yolks are rich in choline which is important for brain and liver health. Eggs also contain lutein which benefits eye health. They also have zero carbs and no sugar. Read more below on free-range egg nutrition.
The Best Dressing for Egg Salad-
The dressing in any salad can really make or break a recipe. This awesome creamy dressing adds so much flavor to the simple salad. Eggs never tasted so good!
In a bowl, add the mayonnaise, Dijon mustard, paprika, garlic, lemon juice, salt and pepper.
Mix until the dressing is creamy and ingredients are well incorporated.
How to Serve Egg Salad-
Though the salad may be enjoyed as a side dish, it is rather versatile. Enjoy these other variations to serve Egg Salad:
Egg Salad Sandwich- Serve the egg salad as a sandwich between bread slices, as an open-faced sandwich or even in stuffed in a wrap or pita.
Avocado Egg Salad- Load the egg salad onto a halved avocado.
Lettuce wrap- Add the egg salad to lettuce or Romaine and enjoy as lettuce wraps.
Breakfast sandwich- Load salad onto toast for an easy breakfast sandwich, perfect.
Free Range Eggs Vs. Caged Eggs:
Pay attention to the packaging of the eggs you buy. Free-range hens have been shown to lay healthier eggs and more nutritious eggs* which have a shocking:
1/3 less cholesterol
1/4 less saturated fat
2/3 more Vitamin A
2x more omega 3 fatty acids
3x more vitamin E
7x more beta-carotene
Free range eggs are also 98% less likely to carry salmonella since they are surrounded by better conditions, which is reason enough to buy free-range eggs.
More Egg Recipes to Try:
I can’t wait for you to try this easy Egg Salad Recipe. Once you try it, you are going to make it over and over again!
Egg Salad Recipe
Prep Time: 5 minutes
Cook Time: 15 minutes
Total Time: 20 minutes
The easiest Egg Salad Recipe. Hard-boiled eggs with chives, dill, celery and onion in the creamiest Dijon mayonnaise dressing.
Author: Valentina Ablaev
Skill Level: Easy
Cost to Make: $3-$6
Keyword: egg salad
Calories: 290 kcal
Servings: 4 people
For the Salad:
8 hard-boiled eggs
2 Tbsp celery finely chopped
3 Tbsp red onion finely chopped
3 Tbsp dill chopped
3 Tbsp chives chopped
For the Dressing:
1/3 cup mayonnaise
2 tsp lemon juice
2 tsp Dijon mustard
1/2 tsp paprika
1/2 tsp salt
1/4 tsp ground pepper
1 garlic clove, minced
Cook eggs and cool. Once cooled, peel and chop eggs (we like ours chunky) and place into a salad bowl.
Add finely chopped celery, red onion, dill and chives.
In a separate bowl, combine ingredients for the dressing. Gently stir dressing into the egg salad until coated and serve.
Nutrition Facts
Egg Salad Recipe
Amount Per Serving
Calories 290 Calories from Fat 216
% Daily Value*
Total Fat 24g 37%
Saturated Fat 5g 25%
Cholesterol 380mg 127%
Sodium 565mg 24%
Potassium 146mg 4%
Total Carbohydrates 2g 1%
Sugars 2g
Protein 13g 26%
Vitamin A 16%
Vitamin C 4%
Calcium 5%
Iron 6.9%
* Percent Daily Values are based on a 2000 calorie diet.
If you make this recipe, I’d love to see pics of your creations on Instagram, Facebook and Twitter! Hashtag them #natashaskitchen
*Egg nutrition information sourced from Dr. Axe and The Incredible Egg.
Source: https://natashaskitchen.com/egg-salad-recipe/
0 notes
Text
Date-Nut Kale Salad
http://www.MelJoulwan.com/2019/03/18/date-nut-kale-salad/
Have you ever massaged your kale?
I didn’t understand why kale salads were so popular until I learned the massaging trick. Now it all makes sense. Bitter and tough but loaded with vitamins, minerals, and fiber, kale has a well-deserved reputation as a numero uno leafy green. When you break down its defenses with a little salt and a lot of tough love, it surrenders, becoming less bitter, more flavorful, and able to stand up to dressings for days.
This salad has a sweet-and-sour balance—thanks to the lemon, maple, and dates—with a nutty crunch of slivered almonds that complements the acerbic kale leaves. It holds up in the fridge for 3-4 days so you can make a big batch so lunch and dinner is sorted.
Date-Nut Kale Salad
Serves 2–4 | Total time: 35–40 minutes | Hands-off time: 15 minutes
Ingredients:
Salad:
2 bunches kale (about 2 pounds)
1 lemon
1 clove garlic
2 teaspoons maple syrup (omit for Whole30)
1 teaspoon salt
1/2 teaspoon crushed red pepper flakes
2 tablespoons extra-virgin olive oil
8 medjool dates
1/4 cup sliced almonds
Chicken:
4 boneless, skinless chicken breast halves (about 4–6 ounces each)
1 teaspoon salt
1/2 teaspoon ground black pepper
1 teaspoon extra-virgin olive oil
1/2 cup water
Directions:
1
Massage the kale. Remove the tough ribs from the leaves and chop the kale into slivers or bite-sized pieces. Place the leaves in a very large bowl and add a pinch of salt. Toss the leaves to distribute the salt and start massaging. Grab handfuls of kale, rubbing them against each other and squeezing. It’s similar to kneading dough, and the harder you are on the kale, the more tender it will be later. The best way to know if you’ve massaged it enough is to take a little bite: if it’s still leathery or bitter, it needs more of a rubdown.
2
Make the dressing. Squeeze the juice from the lemon into a small bowl. Peel and crush the garlic clove and add it to the lemon juice, then whisk in the maple syrup, salt, and red pepper flakes. While you continue to whisk, drizzle in the olive oil. Pour the dressing over the kale and mix with your hands to coat the leaves. Transfer the bowl to the fridge to marinate while you cook the chicken.
3
Cook the chicken. Pound the chicken to 1/2-inch thickness between two pieces of plastic wrap with the smooth side of the meat hammer, then season with the salt and pepper. Warm the oil in a large, nonstick skillet over medium-high heat, 2 minutes. Add the chicken and cook undisturbed until brown on the first side, about 5 minutes. Flip the chicken over, add 1/2 cup water, and reduce the heat to medium low. Cover the pan and continue to cook until the inside of the chicken is no longer pink, about 5 minutes. Transfer the cooked chicken to a plate to cool a bit.
4
Finish the salad. Wipe out the skillet with a paper towel and reheat it over medium-high heat. Add the almonds and toast until golden, about 2 minutes. Keep an eye on them; they can burn quickly! Set aside to cool. Pit and chop the dates. Add the almonds and dates to the kale and toss to combine. Shred the chicken with two forks.
5
To serve, divide the kale among individual serving plates and top with chicken.
You Know How You Could Do That?
Replace dates with raisins or dried apricots; replace almonds with chopped pecans or cashews; replace maple syrup with honey; replace lemon juice with orange juice. So, putting that all together, here’s another delicious flavor combo: apricots, pecans, honey, and orange juice. Or dates, cashews, honey, and lemon. You’re welcome. (And if you grow weary of this dish as a salad, you can toss it in a sauté pan and cook until it’s caramelized and heated through—it’s a whole new meal!)
Cookup Tips
Cook the chicken and make the kale salad in advance; the kale will maintain a pleasing texture for 2–3 days in an airtight container in the fridge.
Print this recipe
June 04 Posted byMelissa Joulwan
Curry Chicken-Salad Salad
In the years since I started eating paleo, I’ve learned that paleo-friendly food that’s worth eating can be found in some surprising places. For example,...
Read More
July 10 Posted byMelissa Joulwan
Paleo Cobb Salad
In each issue of Paleo Magazine, I share the history of a traditional recipe and adapt it to fit into a healthier paleo lifestyle. In this...
Read More
Source: https://meljoulwan.com/2019/03/18/date-nut-kale-salad/
0 notes
Text
Artist Forks Over $2K for Piece of Donald and Melania Trump’s Wedding Cake
What will become of Donald Trump’s wedding cake?
Artist Andres Serrano coughed up $1,880 to purchase a piece of cake leftover from Donald and Melania’s 2005 wedding. This is particularly intriguing given that Serrano is best known for a controversial 1987 artwork titled Immersion (Piss Christ), which is exactly what it sounds like: a photograph of a crucifix submerged in the artist’s own urine. What exactly Serrano is planning to do with this artifact of American history is unknown, but he did say, “I’ve got something on my mind and it’s much more than cake!” :thinking face emoji:
And in other news...
• Nonalcoholic beer sales are booming, which spells bad news for the soda industry. [WSJ]
• Trump’s trade war is hurting the U.S. whiskey industry, thanks to retaliatory tariffs from other countries: Europe is currently slapping a 25 percent duty on American whiskey, and U.S. exports are down significantly as a result. [NY Times]
• Ex-Starbucks CEO Howard Schultz’s potential presidential campaign is based on three ideas, and they’re all wrong. [Vox]
• Country singer Miranda Lambert reportedly dumped a salad on a woman at a Nashville steakhouse after getting into a verbal altercation. [TMZ]
• A new study out of Japan says an ingredient used in McDonald’s french fries could alleviate baldness. (It’s not the potatoes themselves, but rather a silicone called dimethylpolysiloxane that’s added to them to keep the oil from frothing.) [WLWT]
• The origins of the heart-shaped box of chocolates stretches back hundreds of years, all the way to medieval times. [Vox]
• But if a heart-shaped box of chocolates just won’t do for your valentine, UK grocer Marks & Spencer is selling heart-shaped “Love Sausages” for Valentine’s Day:
Eater.com
The freshest news from the food world every day
By signing up, you agree to our Privacy Policy and European users agree to the data transfer policy.
Source: https://www.eater.com/2019/2/13/18223202/donald-trump-wedding-cake-artist-andres-serrano-auction
0 notes
Text
Rhubarb Custard Cake
At the first sighting of rhubarb last week at the market, I loaded up my cart with two visions in mind: 1. Rhubarb Schnapps, a spring tradition. 2. Bon Appetit’s Rhubarb Custard Cake, one of the most delicious things I made last summer.
I discovered the recipe last July, late-ish as far as rhubarb season goes, and managed to make it a few times before summer ended and my attention turned to Brussels sprouts, sweet potatoes, and all the winter squashes. But I dreamed about this cake all winter, contemplating many a variation with apple or pear or quince, none of which materialized.
When I made this cake last week for the first time in months, I was reminded why I love it so much: its custardy texture, its sugary crust, its perfect sweet-tart flavor profile. Plus: rhubarb. Is there anything better?
This cake comes together relatively quickly, too, requiring three basic steps: 1. Mixing the dry ingredients. 2. Beating eggs with sugar. 3. Whisking wet ingredients. After you combine these three elements, you arrange rhubarb slices on top and pop it to the oven. Forty-five minutes later it’s done, emerging with sugary rhubarb slices bobbing in a custardy but cake-y base.
I find this cake tastes best the day it is made, though it makes a fine breakfast on day two. With that in mind, I wouldn’t hesitate to serve this as part of a festive spring brunch.
A Few Tips
If you’ve seen the BA photo of this cake, you may feel inspired to arrange your rhubarb slices artfully atop the cake batter, perhaps in a chevron or herringbone motif. I encourage you mostly not to bother — most of the slices will sink below the surface of the batter, rendering your efforts fruitless. But if you are eager to try, here are a few things I have found helpful for keeping those rhubarb slices afloat:
Chill the batter longer than the recommended 10 minutes.
Let the butter cool to room temperature — not so that it begins to firm up, but so that it is in fact cool to the touch.
Cut wide slices of rhubarb lengthwise in half or into thirds before cutting them crosswise to ensure the pieces are as light as possible.
Use all 13 oz. of rhubarb, laying the pieces of rhubarb that do not fit in a single layer on top of the first layer.
That’s it! I hope you make and love this one.
PS: Rhubarb-Frangipane Galette | Rhubarb Schnapps | Buttermilk Panna Cotta with Rhubarb Compote
Here’s the play-by-play: Steel yourself for a three-bowl job — don’t worry; it comes together quickly.
The batter needs to rest for at least 10 minutes in the fridge before receiving its rhubarb topping.
Print
Rhubarb Custard Cake
Author: alexandra
Prep Time: 15 minutes
Cook Time: 45 minutes
Total Time: 1 hour
Yield: Serves 8
Description
Source: Bon Appetit
Notes:
It is not recommended to mix the batter for this cake in a mixer, and there is no need — with about a minute of vigorous beating with a whisk, the eggs and sugar become lemony in color and thick and ribbony in texture.
If you are avoiding alcohol, substitute a tablespoon of vanilla for the rum.
Your rhubarb slices, no matter how lightly you place them atop the batter, will mostly sink. A few things I have found that help keep them afloat: 1. Chill the batter for longer than the recommended 10 minutes. 2. Let the butter cool to room temperature. 3. Use all 13 oz. of rhubarb, laying the pieces of rhubarb that do not fit in a single layer on top of the first layer.
Original recipe calls for buttering and flouring the pan, but I like to use sugar — it creates an irresistible crust.
Ingredients
4 tablespoons melted unsalted butter, cooled, plus more room-temperature for pan
1 cup (128 g) all-purpose flour, plus more for pan
¾ teaspoon baking powder
½ teaspoon kosher salt
2 large eggs
1 large egg yolk
1½ cups (328 g) sugar, plus more for sprinkling
¼ cup sour cream
2 tablespoons dark rum or Brandy, see notes
zest from one lemon
13 oz. rhubarb stalks, cut in half or thirds lengthwise if thick, then cut crosswise into 2-inch pieces
Instructions
Preheat oven to 350°F. Butter and sugar (see notes above) a 9-inch springform pan — (to sugar: sprinkle about a tablespoon of sugar into the buttered pan, shake it all around to distribute the sugar evenly, tap out excess.)
Whisk the baking powder, salt, and 1 cup all-purpose flour in a medium bowl. Whisk the eggs, egg yolk, and 1½ cups sugar in a large bowl until very pale and thick, about 1 minute. Whisk melted butter, sour cream, rum, and lemon zest in a small bowl. Whisk butter mixture into egg mixture just to combine. Add dry ingredients and fold in until batter is smooth; scrape into prepared pan. Chill 10 minutes (or longer) to let batter set.
Arrange rhubarb over batter however you like, trimming as needed. Don’t press fruit into batter—just place over top and let it rest on the surface. Don’t fuss too much about how you arrange the rhubarb on top because most of it will sink into the batter. Sprinkle with more sugar — I use a tablespoon — and bake until cake is golden on top and browned around the sides, about 45 minutes. If you have an instant read thermometer, it should register at least 210ºF. This make take more or less time depending on your oven temperature and material of your pan.
Transfer pan to a wire rack and let cake cool in pan 10 minutes. Slide a knife around sides of cake to loosen and unmold. Slide directly onto rack and let cool completely.
Category: Dessert
Method: Oven
Cuisine: American
Keywords: rhubarb, cake, custard, sour cream, lemon
Posted By: alexandra · In: Baking, Cakes, Desserts, Holidays, Mother's Day, Spring
Source: https://alexandracooks.com/2019/05/10/rhubarb-custard-cake/
0 notes
Text
Skinnytaste Meal Plan (March 4-March 10)
posted March 2, 2019 by Gina
A free 7-day flexible weight loss meal plan including breakfast, lunch and dinner and a shopping list. All recipes include calories and Weight Watchers Freestyle™ SmartPoints®.
First week of March and we are finally getting some snow, crazy winter in New York! A few comfort food dishes like Slow Cooker Chicken Cacciatore and Quick Beef Chili have been added to this week’s meal planner.
If you’re new to my meal plans, I’ve been sharing these free, 7-day flexible healthy meal plans (you can see my previous meal plans here) that are meant as a guide, with plenty of wiggle room for you to add more food, coffee, beverages, fruits, snacks, dessert, wine, etc or swap recipes out for meals you prefer, you can search for recipes by course in the index. You should aim for around 1500 calories* per day.
There’s also a precise, organized grocery list that will make grocery shopping so much easier and much less stressful. Save you money and time. You’ll dine out less often, waste less food and you’ll have everything you need on hand to help keep you on track.
Lastly, if you’re on Facebook join my Skinnytaste Facebook Community where everyone’s sharing photos of recipes they are making, you can join here. I’m loving all the ideas everyone’s sharing!
Also, if you don’t have the Skinnytaste Meal Planner, now would be a great time to get one to get organized for 2019! There was a print error last year, but it’s perfect now! You can order it here!
THE DETAILS:
Breakfast and lunch Monday-Friday, are designed to serve 1 while dinners and all meals on Saturday and Sunday are designed to serve a family of 4. Some recipes make enough leftovers for two nights or lunch the next day. While we truly believe there is no one size fits all meal plan, we did our best to come up with something that appeals to a wide range of individuals. Everything is Weight Watchers friendly, I included the updated Weight Watcher Freestyle Points for your convenience, feel free to swap out any recipes you wish or just use this for inspiration!
The grocery list is comprehensive and includes everything you need to make all meals on the plan. I’ve even included brand recommendations of products I love and use often. Cross check your cabinets because many condiments you’ll notice I use often, so you may already have a lot of them.
And last, but certainly not least, this meal plan is flexible and realistic. There’s plenty of wiggle room for cocktails, healthy snacks, dessert and dinner out. And if necessary, you can move some things around to make it work with your schedule. Please let me know if you’re using these plans, this will help me decide if I should continue sharing them!
MONDAY (3/4) B: 2 scrambled eggs (0) with 1 slice whole grain toast (3) and an orange (0) L: Taco Salad Meal Prep (7)* D: Cream of Broccoli Soup (4) with ½ a grilled cheese* (7)
Totals: Freestyle™ SP 21, Calories 998**
TUESDAY (3/5) B: Overnight Oats in a Jar (5) L: Taco Salad Meal Prep (7) D: Cilantro Lime Fish Tacos (6)
Totals: Freestyle™ SP 18, Calories 865**
WEDNESDAY (3/6) B: Overnight Oats in a Jar (5) L: Taco Salad Meal Prep (7) D: Slow Cooker Chicken Cacciatore (5) over 1 cup whole wheat spaghetti (5) with Roasted Asparagus ***(0)
Totals: Freestyle™ SP 22, Calories 881**
THURSDAY (3/7) B: Avocado Toast Egg-in-a-Hole (4) L: Taco Salad Meal Prep (7) D: LEFTOVER Slow Cooker Chicken Cacciatore (5) over 1 cup whole wheat spaghetti (5) with Roasted Asparagus (0)
Totals: Freestyle™ SP 21, Calories 867**
FRIDAY (3/8) B: 2 scrambled eggs (0) with 1 slice whole grain toast (3) and an orange (0) L: 2 ounces turkey (1) on 2 slices whole grain bread (6) with lettuce, tomato and 1 tablespoon light mayo (1) D: Seattle Smoked Salmon Chowder (7)
Totals: Freestyle™ SP 18, Calories 1,021**
SATURDAY (3/9) B: 4-Ingredient Flourless Banana-Nut Pancakes (4) (Recipe x 4) with 1 tablespoon maple syrup (3) L: Chicken Waldorf Salad (3) (recipe x 2) on 1 slice whole grain bread (3) D: DINNER OUT!
Totals: Freestyle™ SP 13, Calories 716**
SUNDAY (3/10) B: Breakfast Pizza (5) L: The Skinny Tuna Melt (4) (recipe x 2) with an apple (0) D: Quick Beef Chili (4) with 2 tablespoons cheddar (2), 1 tablespoon light sour cream (1) Totals: Freestyle™ SP 16, Calories 981**
*Prep Taco Salad Sunday night for Mon-Thurs lunch. Grilled cheese includes 1 slice whole grain bread and 1 ounce cheddar. **This is just a guide, women should aim for around 1500 calories per day. Here’s a helpful calculator to estimate your calorie needs. I’ve left plenty of wiggle room for you to add more food such as coffee, beverages, fruits, snacks, dessert, wine, etc. ***Boil extra pasta and roast an extra pound of asparagus for dinner Thursday.
**google doc
Shopping List:
Produce
1 pound broccoli florets (or 12 ounces pre-cut)
2 jalapeño peppers
1 large head garlic
1 (6-ounce) container fresh blueberries
1 large bunch celery
2 medium red bell peppers
1 medium green bell pepper
1 bag/bunch carrots
2 pounds asparagus
2 medium oranges
6 medium apples (your choice)
5 medium bananas
3 small red potatoes
1 small head cauliflower
½ small head purple cabbage
1 large head romaine lettuce (save 1 leaf for Friday lunch)
2 small (4-ounce) Hass avocados
1 (10-ounce) bag baby spinach
1 (1-pound) clamshell mixed greens
1 small container Pico de Gallo (or make your own with ingredients in list plus 2 medium tomatoes, 1 extra jalapeno and lime)
1 medium bunch cilantro
1 small bunch basil or Italian parsley
½ pound seedless grapes
1 medium and 1 large vine-ripened tomato
1 dry pint cherry tomatoes
7 medium limes
1 small red onion
2 small, 2 medium and 1 large yellow onion
1 small bunch/clamshell fresh chives
Meat, Poultry and Fish
1 pound 93% lean ground turkey
1 pound flaky white fish fillets (such as flounder, sole, or tilapia)
½ pound smoked salmon fillet
1 ¼ pound boneless, skinless chicken breasts
1 package center-cut bacon
2 ounces sliced deli turkey
8 boneless, skinless chicken thighs
1 pound 93% lean ground beef
Grains*
1 large loaf whole grain bread
1 package quick oats
1 package white corn tortillas
1 (1-pound) package whole wheat spaghetti
1 bag all-purpose or whole white wheat flour
Condiments and Spices
Extra virgin olive oil
Cooking spray
Olive oil spray (or get a Misto oil mister)
Kosher salt (I like Diamond Crystal)
Pepper grinder (or fresh peppercorns)
Garlic powder
Cumin
Chili powder
Paprika
Oregano
NuNaturals liquid vanilla stevia (or your favorite sweetener)
Cinnamon
Bay leaves
Hot sauce (optional, for Avocado Toast)
Thyme
Maple syrup
Light mayonnaise
Red wine vinegar
Dairy & Misc. Refrigerated Items
1 18-pack large eggs
1 (8-ounce) package sliced (regular or reduced fat) cheddar cheese
1 small box unsalted butter
1 (8-ounce) tub light sour cream
1 (8-ounce) container unsweetened almond milk (can sub soy or skim)
1 (8-ounce) container 2% milk
1 pint whole milk
1 (8-ounce) bag shredded mozzarella cheese
1 (17.5-ounce) container plain nonfat Greek yogurt
1 (8-ounce) bag shredded sharp cheddar cheese
Frozen
1 small package corn kernels
Canned and Jarred
2 (4.5-ounce) cans tuna in water
1 (15-ounce) can reduced-sodium black beans
1 (10-ounce) can mild diced tomatoes with green chilies
1 (28-ounce) can crushed tomatoes (I love Tuttorosso)
1 (8-ounce) can tomato sauce
1 small jar mild salsa
2 (48-ounce) cartons reduced sodium chicken broth
Misc. Dry Goods
1 small package chia seeds
1 (8-ounce) bag chopped pecans
1 bottle white wine (such as Sauvignon Blanc)
Baking powder
1 bottle light beer (such as Corona, or you can sub ¾ cups beef broth in chili)
*You can sub gluten-free, if desired
posted March 2, 2019 by Gina
Source: https://www.skinnytaste.com/skinnytaste-meal-plan-march-4-march-10/
0 notes
Text
Honey Lime Chicken or Pork Enchiladas
453shares
Share
Pin
Twitter
So simple to make, the flavor of these honey lime chicken enchiladas is out of this world. This recipe is delicious with pork, as well (and you can make enchiladas, burritos, salads – options are endless!)!
To say this honey lime chicken recipe has stood the test of time is a serious understatement! It has been a family favorite for over ten years and I don’t see that changing any time soon.
If your life has been without this delectable honey lime combo for enchiladas (or burritos, salads, etc), I hate to say it, but you’ve definitely been missing out. Not only are these probably some of the easiest enchiladas you’ll ever make, there really isn’t another enchilada recipe like them in terms of one-of-a-kind deliciousness.
Over the years, I’ve barely adapted this recipe. The original is just too good! But I have included a few steps and notes below to highlight a few simple ingredient substitutions that can make it even easier.
For instance
Green enchilada sauce vs green salsa. What’s the difference, really? Well, green enchilada sauce is often thicker than salsa with a deeper, roasted flavor. The good news, I’ve made this recipe countless times with either enchilada sauce OR salsa verde (green salsa). And both are delicious and amazing and life changing and wonderful. Basically, don’t stress too much about interchanging the two.
Shredded chicken. This recipe is a bit unusual in the fact that the marinade actually starts with cooked, shredded chicken. You might be thinking “Mel, you’ve finally lost your marbles” but I promise it works! The chicken is infused with that amazing honey, lime, chili combo, and it only needs about 30 minutes marinating time (although it does taste even better if you can let the chicken hang out of several hours).
A rotisserie chicken is perfect for this recipe. Or, this is my go-to stovetop cooked, shredded chicken recipe. Often, I just throw chicken breasts in the Instant Pot with 1 cup broth, salt and pepper, and cook on high pressure for 8-12 minutes (discard extra cooking liquid).
We like to add a few extra toppings to our honey lime chicken enchiladas for amped up yumminess. Chopped tomatoes, sour cream, avocado, cilantro, extra lime wedges. But you can leave them plain and simple, too.
Oh! Also, the creamy topping. I don’t want to forget this note. After the enchiladas are assembled and in the pan, they get a smothering of sorts from the green enchilada sauce + leftover marinade (don’t forget this! Flavor!) + cream, sour cream or half and half. This gives a creamy oomph to the enchiladas that is to-die for.
However! Again, after making this meal so.many.times over the last decade, there have been many instances where I’ve left out the creaminess in the topping altogether and just combined the green enchilada sauce with the leftover marinade to spread on top of the enchiladas. And then loaded on the cheese, of course. I’m not one to leave cheese out of anything.
Basically this recipe is pretty adaptable…and so incredibly easy! It pains me to think that some of you newcomers to my blog may have been living without this tried-and-true honey lime chicken enchilada recipe. It took the world by storm when I shared it over ten years ago, but I think it’s time for a comeback.
Also, remember that the honey lime meat mixture (which is super delicious with shredded pork, too) is amazing as enchiladas – but also crazy good made into burritos (smothered – yum!) or as a topping for a salad.
With this creamy cilantro lime dressing? Holy cow, best salad ever.
Confetti Rice and Bean Salad, Grilled Corn Salad, or Guacamole SaladFresh fruitTortilla Chips/Salsa or Cornbread
Yield: 6 servings
Prep Time: 30 minutes
Cook Time: 30 minutes
Additional Time: 30 minutes
Total Time: 1 hour 30 minutes
Print
Ingredients
6 tablespoons honey
5 to 6 tablespoons lime juice (2 to 3 large limes)
1 tablespoon chili powder
1/2 teaspoon garlic powder
1/4 teaspoon coarse, kosher salt
1/8 to 1/4 teaspoon black pepper (I use coarsely ground)
2 pounds chicken, cooked and shredded - about 4 cups total (see note)
8 to 10 flour or corn tortillas (about 6- to 8-inches)
4 cups (about 1 pound) shredded Monterey jack cheese (or a combo of cheddar and Monterey Jack)
16 ounces green enchilada sauce (see note)
1 cup heavy cream, sour cream, or half-and-half
Additional Toppings (optional): sour cream, chopped tomatoes, extra lime wedges, avocado, chopped cilantro
Instructions
In a small bowl, whisk together the honey, lime juice, chili powder, garlic powder, salt and pepper. Place the shredded chicken in a resealable bag or other covered container. Pour the marinade over the chicken and toss until the chicken is evenly coated. Refrigerate for 30 minutes or up to 8 hours.
Lightly grease a 9X13-inch pan with nonstick cooking spray and pour about 1/2 cup of the enchilada sauce on the bottom of the pan.
Fill flour tortillas with chicken (save the leftover marinade!) and shredded cheese, saving about 1 cup of cheese to sprinkle on top of enchiladas. Mix the remaining enchilada sauce with the leftover marinade and the the cream (or sour cream/half-and-half).
Spread sauce evenly on top of the enchiladas and sprinkle with cheese. Bake at 350 degrees for 30-35 minutes until brown and crispy on top. Serve with chopped tomatoes, salsa, sour cream, extra lime wedges, chopped cilantro, and/or avocado.
Notes
A rotisserie chicken works great in this recipe. Or, this is my go-to quick stovetop method for making cooked, shredded chicken at home. Otherwise, I often throw chicken breasts in the Instant Pot with 1 cup broth and some salt and pepper and cook for 8-12 minutes at high pressure and then shred (discarding liquid).
Here is an easy, delicious recipe for homemade green enchilada sauce. Green salsa also works for this dish (slightly different flavor profile and the consistency is a bit thinner than enchilada sauce). Also, if you want to skip the cream in the topping all together, you can mix the remaining green enchilada sauce or salsa with the leftover marinade and spread that over the top of the enchiladas and sprinkle with cheese.
Freezable Meal: Freeze prior to baking. To bake, preheat oven to 350 degrees and bake enchiladas, covered (without thawing first) for 1 hour. Uncover and bake 30 minutes longer, until brown and crispy on top. The tortillas may be a bit softer after freezing and baking.
Follow @melskitchencafe on Instagram and show me the recipes you are making from my blog using the hashtag #melskitchencafe. I love seeing all the goodness you are whipping up in your kitchens!
© Mel
Category: Main Dish
Recipe originally published March 2008; updated April 2019 with new photos, recipe notes, etc.
Recipe Source: long ago adapted from The Sister’s Cafe
Posted on April 15, 2019 by Mel
154 Comments »
never miss a recipe subscribe via email
Sign Up
« Previous PostSalted Caramel Brown Butter Chocolate Chip Bars
Source: https://www.melskitchencafe.com/honey-lime-enchiladas/
0 notes
Text
Rainy day comfort food made healthier
It’s been raining cats and dogs here in Florida (as usual in the summer months)! I don’t know about you, but when it’s raining – whether it’s cold outside or hot and humid – I often crave comfort foods. Unfortunately, if I satisfied those cravings with indulgent foods (breads, pasta and lots of carbs) every time it rained here, I’d be in pretty poor health. Luckily, I can quell my cravings for comfort foods with a healthier alterative: ParmCrisps and homemade tomato soup!
ParmCrisps, if you haven’t heard me raving about them yet, are delicious chips/crisps made of 100% Parmesan cheese. They come in Original and in many other varieties that have herbs and seasonings, like Jalapeño, Rosemary, Basil Pesto, and more. What’s great about these is that they contain 0 grams of carbs and 9 grams of protein per serving, making them a much better option than traditional crackers or chips. They are good for those on a Keto or grain-free diet, too.
ParmCrisps are available in Whole Foods and many major retailers across the country. Check in the deli section where specialty crackers and chips are available.
If you’re looking for an amazing and healthy tomato soup recipe to serve with your ParmCrisps, click here for a delicious one you’ll love!
The views and opinions expressed on this blog are purely the blog owner’s. This blog accepts free manufacturers’ samples and forms of cash advertising, sponsorship, paid insertions or other forms of compensation. Affiliate links may be included in this post.
Share This:


Never Miss a Recipe! Add your email address to receive posts/recipes via email
ParmCrisps, Tomato Soup
Source: https://simplygluten-free.com/blog/2018/09/rainy-day-comfort-food-made-healthier.html

0 notes
Text
Sausage & Squash Pasta | Jamie Cooks Italy | Behind the Scenes
Source: http://www.youtube.com/oembed?format=xml&url=https%3A%2F%2Fwww.youtube.com%2Fwatch%3Fv%3DwbNyrD_ec10

0 notes
Text
Easy and Delicious Elote Pasta
Easy and Delicious Elote Pasta
Adrianna Adarme | July 20, 2018
Source: http://www.pbs.org/food/fresh-tastes/easy-delicious-elote-pasta/
1 note
·
View note