
Statistics
We looked inside some of the posts by flowstate-creative and here's what we found interesting.
Average Info
Notes Per Post
4
Likes Per Post
2
Reblog Per Post
0
Reply Per Post
2
Time Between Posts
14 days
Number of Posts By Type
Video
1
Text
8
Last Seen Tumblr Blogs


Fun Fact
In 2020, 44% of users from Denmark used Tumblr daily.
Video
tumblr
Live Reader, an Accessibility tool for Ableton Live & Push. This project was made possible by funding from Arts Council England.

#ableton#ableton live#ableton push#accessibility#music accessibility#python#python programming#livereader
0 notes
Text
Final words / Putting it all together
That concludes this part of this project, I have learned a lot throughout the process which I am planning on putting together a more detailed series of lessons on. If anyone has any questions, wants to get involved or has any other comments please feel free to reach out to me. I will post the final video demonstration in the coming days and the code is available on GitHub here:
3 notes
·
View notes
Text
Advanced MIDI scripting
In the last post I talked about setting up a Task that runs when a pad is held to update the controls. Except there was one problem, I couldn’t find a listener to connect that would trigger this event, at least not in any elegant and simple way. I’m sure there is one, or another method, so if anyone reading this knows one feel free to reach out to me to educate me. Here is my solution:
I was going to overwrite some of the methods in the push script!
Sounds drastic, but I’m not goint to be editing any of the code, I will just simply import them into my script and overwrite them. Using a technique I use often in Python, decorators. Not the syntactic sugar version that uses the @ symbol, but a good old fashioned decorator that takes a function and returns a function and can be called like any other function.
Here is the very simple decorator, that will allow me to extend the functionality of the Push.
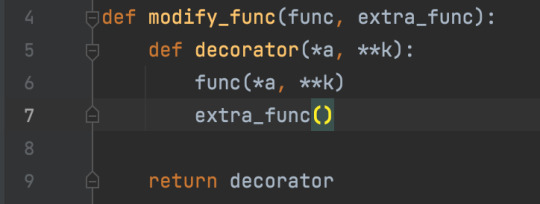
My decorator will take in the existing function I want to overwrite in this case the _on_pressed_step and _on_released_step of the note editor, and it will also take in the functionality that I want to add in this case the functions to kill and restart the tasks. It will call the original function, then my extra function. So the original functionality is preserved and I can add on any extra functionality I want. The decorator above is reusable, and I can be used to extend any method in the Push code I want. Here is it in use with the _on_press_step and _on_release_step methods of the note_editor_components.

For this purpose I create tasks for each step that restart every time the key is pressed and are killed when the key is released (this is exactly how Ableton have it set up) and this works for my purpose.
0 notes
Text
Modes & Tasks
OK to recap what I’ve done so far and where the project is at.
I set up a desktop App to handle Keyboard monitoring, MIDI ports and TTS
I created a MIDI Remote Script for communicating between Live Reader and Live
I added the Push, modifying my original code to accommodate
I explored the EventObject and some interesting things that can be done with listeners
Now I’m going to talk about two extra functions that I have learned more about over the past few weeks (and I wish I knew about at the start of this project).
Modes
Modes can simply be thought of as sections of a MIDI controller that do certain jobs. They are used EVERYWHERE throughout the Ableton MIDI Remote scripts, and particularly Push in the form of the ModesComponent class. By studying this class I have noted that it has a key property which is listenable. “selected_mode”.
How is this useful?
I have set up a listener as the main part of the Push script to listen for changes to the selected mode of the main_modes. These modes are, “user”, “mix”, “device”, “clip”, “browser”. So instead of listening for those buttons to be pressed, any time the main mode is changed for any reason my script gets updated, and it can load in the appropriate monitoring class.


How else has it been used?
I could also use this in the keyboard shortcuts functionality. At the moment I have a custom set up, but this could really streamline things. Each section could have it’s own mode, and I could switch between the modes using the number keys. I create the class for the mode, and then add it to the ModesComponent using the “add_mode” method. Now I can change the mode by updating the “selected_mode” attribute, much simpler than what is currently in place.
I am also monitoring the selected mode of a few of the sub modes, for example the “track” and “global” mixer, depending on which mode, depends on how I update the controls.
Tasks
Simply put tasks allow a particular function to be run repeatedly as its own confined task, a delay and a wait can also be set between tasks. The functionality feels familiar, you hold down the arrow key and the track selection moves over by one, waits for a short amount of time, then starts moving over much faster. This is controlled using a Task.
When did this become important?
I have known of this functionality for a while, but never needed to use it much before. Where it became important was in setting up monitoring of the MIDI clip sequencer. When modifying notes on Push, you can hold down a single note, after a short time the function of the encoders switches to modifying the note. This is a Task. I needed to update the controls when this task is run, how was I going to do this?
Create my own task and register it to the buttons, have this task update the controls, and set an initial wait on this task. So here is what the task for each of the steps in the step sequencer looks like.

After tracking down the code that handles the functionality in Push, I just needed to replicate this for my own functions. So here is how I’m creating tasks, on the note_editor_component itself.


Now all I needed was a way to restart and kill the task. Sounds simple, however I couldn’t see a way to connect a listener to the pressed buttons. I was stuck. I’m going to stop here and split this topic into two posts. In the next post I will talk about how I solved this, and some of the more advanced coding with the remote scripts that lead from this and the possibilities it leads to.
0 notes
Text
The Event Object
In the last post, I talked about “Events”, “listeners” and “register_slot”. But what are they and what do they do? In this post I thought I’d explore a little of what I’ve learned over this project. By consulting the API documentation it is easy to see that there are a number of built in methods for setting up, checking and removing listeners. These are “add_EVENT_NAME_listener”, “has_EVENT_NAME_listener” and “remove_EVENT_NAME_listener”. These are great, and I’ve been using them for a while in previous projects. But surely there is an easier way. Enter the EventObject class and `listens` * `listens_group` decorators. In a nutshell, the EventObject class gives access to the register_slot method or the use of the above two decorators. It also allows a way of of creating our own listenable_properties by decorating our methods with it, but for this purpose I will only be using the ones the guys at Ableton have set up for the Push.
Here is what they say about EventObject. There is also plenty more information in the decompiled scripts on the GitHub repo I have shared.

My PushMonitoringComponent class I mentioned in the previous post has been set up to inherit from EventObject so it can use it’s methods and functionality. I just need to also import the decorators, here is where to import them from. Again you can see what these functions do in the decompiled scripts.

And then use them on a method like this.

I then just need to make sure it has a subject, in this case the subject would be the Push Browser component. So inside the class I have set up for Monitoring the browser I simply define the subject of my decorated method.

These can become really flexible, reassigning subjects where needed, and listens_group means one method can listen to a whole bunch of events of the same time, (button or key presses for example).
The other way of using the EventObject is with the register_slot method, and these is how I set up listeners on the controls at the start. The register_slot simply takes three arguments, the subject, the callback and the property to listen to.
Here it is being used on the notification component to listen for a message.

And that’s it. The method gets called every time the focused item in the Push browser is changed, and I can use the send_midi class to send this as a SysEx message.
0 notes
Text
Adding in Push 2
To add the Push I need to make some additions to the Live reader desktop app. I need to open the Push MIDI port, so I can look out for a particular MIDI message that Push sends to Live during the handshake that loosely translates to “Yep all done I am now ready to use”. With that MIDI messages Live reader can tell Live via it’s MIDI remote script, “OK set up the actions to monitor the push” Of course all of this is done over MIDI.
To keep things simple, I will use the same MIDI message, so when Live Reader receives that message from Push, it just sends it back to Live via its own MIDI remote script.
To do this I made some modifications to the MIDI part of the Livereader app, first I will open the port from the Push if it is connected, and then I will connect a callback to this port that will check for the message, and forward it on to the Livereader MIDI Remote script. That looks like this


Now that I have a method to know the push is ready, I can start to monitor some of the behaviour. To start that process I call this method in my MIDI Remote script __init__ method

Upon using the Push myself I have noted that much of the buttons serve a single purpose, the controls that change often seem to be the encoders along the top, and the rows of buttons either side of the display. I will call these “fluid” controls for clarity. So the first thing I set about doing was logging out all of the controls and their names from the Push, then finding the ones I need. Once I had found these controls by name I set up a listener function using the inbuilt “register_slot” method of the Component (more on this later). In a nutshell, when the value of the Button or Encoder changes, the method is called with the value. By setting this up in a Lambda I can also pass the original control as well as what type of control it is (”top button”, “encoder”, etc) I also set up the touch function of the encoders up to be monitored too as it feels like it would come in handy to be able to monitor them.

Now that I have my controls I need to set up a Base class for monitoring elements of Push. I will pass a particular component in to this base class and I can then listen to parameters on this class as well as any others that are needed. For monitoring different sections I can then just inherit from this base class, when the different modes are entered on the push I will call the enter function on the relevant monitoring class.

I will set up an “update_controls” function on each of the monitoring classes, to update what the fluid controls currently do, then I can set up a “listener” on any event that might change these controls and call the “update_controls” method whenever needed. Here is an example of the update_controls method for the clip monitoring class.

And here is the Browser Monitoring class. Notice it doesn’t update the controls, but the listener is listening to the focused_item, which calls send_midi with the currently focused_item, and some additional information.

Notice that in this example, monitoring the Browser, the __init__ super class call is not in the __init__ method, but in the enter() method. This is because it can’t be called on __init__, as the BrowserComponent is not in the list of Components. So I simply call it when entering the browser mode instead. OK let’s recap what I have done:
Set up a method of monitoring push to see when it’s finished setting up with Live
When it has finished, tell Live reader to start monitoring it
Set up monitoring base class that will monitor which ever section of the Push I tell it to and update what the controls are doing
0 notes
Text
The MIDI Remote Script
Now for the fun part.
I will build a Remote Script that turns the extra key presses into actions in Live and then sends back text over SysEx to update the user.
First I create the class and file structure. In a folder named Livereader, I create two files. First an __init__.py file.

And then a file named Livereader.py which imports ControlSurface from here


This is the minimum requirement to set up a MIDI remote script.
After this, for Livereader. The first thing to handle was the MIDI communication. The ControlSurface class which I have inherited from contains a receive_midi and a _send_midi method. First thing was to overwrite the receive_midi class with my own functionality. Then write a method to do the send_midi function. How I spoke about before using ord() to convert a string into a SysEx message.

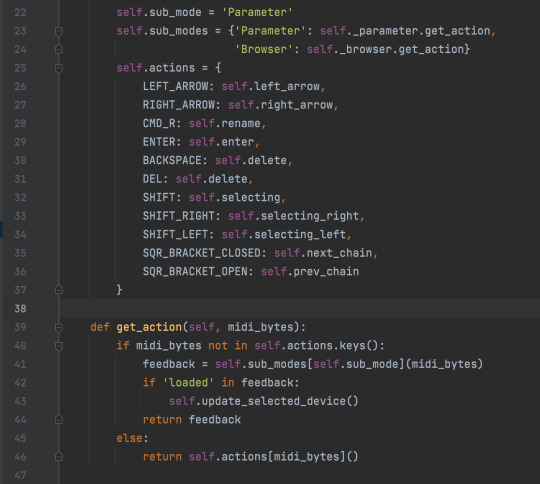
I will break the script down into sections for different areas, transport, track actions, session actions, mixer actions, device actions, clip actions etc. I want to reuse the same keyboard shortcuts for different actions with the different areas, in effect like Modes on a MIDI controller.
By looking at the existing keyboard shortcuts I have noted that holding Option + Arrow keys does nothing, and also doesn’t interfere with existing functionality, so I will use this for any additional navigation, incrementation functionality. Where possible I will connect with the arrows for navigation. The modes can then be entered using the number keys. Here you can see the map that I have used, where the SysEx coming in to receive_midi will trigger the get_action method in each mode. The number keys are used to set the current mode.

Here is an example of a get_action method in one of the modes, from here the SysEx can be broken down further to trigger the correct action.
I have then repeated this process for each of the modes and actions contained within that mode to add further functionality. To make things simple all SysEx message are contained within constants. This is perhaps not the most efficient method of achieving this, and on closer inspection of the Ableton classes it may be possible to use a ButtonSysexControl in combination with the ModesComponent. I will explore this in more detail at a later stage.

0 notes
Text
Setting up the app
The first stages of creating Live reader is to set up the App that sits outside of Live and communicates with the keyboard, the speech-to-text and the MIDI ports.
Step 1 - keyboard monitoring
Using the Pynput package I set up a basic keyboard monitoring class. This uses an observer design pattern with getters and setters. This may be overkill at this stage, but doing it like this means I have a class that I can create an instance of that will inform any callbacks when keys have been pressed, key presses can be stored and any function that needs to know about them can register with the class to be called with the key press and release events.

Step 2 - Converting keys to MIDI
With a solution in place to monitor key presses and register to them any where in the app it is time to register a function that converts key presses to MIDI events. The MIDI message has been broken down into 12 modifier keys and the alphanumeric keys. I’ll use a switching system to indicate if a modifier has been pressed. 1 for pressed 0 for not pressed, for now I’ll give them a byte per key, I’m using SysEx anyway so it doesn’t matter too much how many bytes I use. At some point it probably makes sense to do this using bit-masking but for now a byte per key is OK.
For the alphanumeric keys, to make sure I can accommodate all possible keys, I will set them up to use an LSB/MSB system, similar to how pitch bend prevents stepping in MIDI 1.0. (we haven’t got full MIDI 2.0 rollout yet)
That’s great, I’ve got a system to monitor key presses, store them and register functions to be called when the stored keys is changed, and I’ve registered a function to parse the list of key presses into a MIDI message we can send to live.

Step 3 - Sending MIDI and the MIDI ports
Now I want to send that MIDI in to Live so the MIDI remote script can do something with it. I will use python-rtmidi for this purpose. On macOS I can set up virtual MIDI ports, I will create one for input and one for output, and call them both “Livereader”. Giving them this name means later I can tell the MIDI remote script to auto detect the MIDI ports and set things up in preferences form me automatically (more on this later). With the MIDI ports created, I just need to allow SysEx communication over them. Luckily there is a built in way of allowing SysEx communication.

Step 4 - Speech to text
To speak text I have a few options:
Apple script
NSSpeechSynthesizer
accessible-output2 package
Subprocess
I had experimented with all of these options. accessible-output2 did link directly with Voice over for built in screen-reader support. However at the time of writing there are some issues. The simplest approach for now is spawn a subprocess in python to call the Apple Terminal “say” command, and call kill on this process whenever we want to interrupt the speech. That will do the trick. All that is left is to connect this speech script up to the MIDI port as a callback, so when MIDI is received from Live it loops it, builds a string and speaks it aloud. Nice.
Text can be sent over SysEx really easily by just converting each character to an ordinal using python builtin ord(), and then back to a character using chr().

That’s it, the bare bones for Live reader are created. It will need something to wrap it up to make an App that is user friendly but for now this does what I need. When it comes to it I will probably create a simple task bar app using Rumps and PyInstaller.
0 notes
Text
Livereader
Ableton Live is a popular DAW used to create many genres of music and audio. However, it lacks one key ingredient. Accessibility for blind and visually impaired users! This project aims to explore a method of combatting this, using Python programming techniques. This blog will be an a means of documenting this process. What are the main goals?
Add screen reader support for basic music creation functionality
Incorporate the Push 2 for a greater hands on experience
Enable a totally blind user access to Ableton Live & Push to be able to create a piece of original music
What are the secondary aims?
Explore other areas of accessibility with regard to physical disabilities (Push 2 is very much a two-handed instrument)
Expand my own knowledge of the Ableton Live MIDI Remote scripting system and API.
What tools will I be using?
Ableton Live 11 and Push 2
PyCharm (for programming)
Telestream Screenflow (for screen capture and video editing)
Iphone SE 2020 (for recording video)
iMac 27″ 2020 model
The resources currently available? There are NO official documentation resources for this kind of thing, and Ableton are very clear that they do not officially support the Python API, although they have made steps in recent years to make installing scripts more accessible which is always very welcome.
Hanz Petrov’s original Blog on MIDI Remote Scripts (although this is outdated, it is what got me first started on my journey with MIDI Remote scripts) http://remotescripts.blogspot.com/2010/03/introduction-to-framework-classes.html
Julien Bayle’s Live API resources (This has been so helpful to me over the years, without it I wouldn’t have been able to learn as much as I have. https://structure-void.com/PythonLiveAPI_documentation/Live11.0.xml
Julien Bayle’s decompiled MIDI Remote Script Repo on GitHub https://github.com/gluon/AbletonLive11_MIDIRemoteScripts
A better formatted version of the Live API Doc by Spray, which is available here (I have only recently found this but it makes navigating the documentation much easier) https://nsuspray.github.io/Live_API_Doc/11.0.0.xml
So with that it is time to get to work on setting up the system. The plan is to have an application that is able to detect key presses and also speak any text given to it, this will communicate with Live and Push over MIDI. Additional keyboard shortcuts will be set up to control Live, and the state of Live will be monitored via the MIDI remote script and communicated back to Live reader as text, this will then be spoken aloud with Speech-to-text (STT). Simple :)
#ableton#ableton live#ableton push#accessibility#music accessibility#music production#programming#python#livereader
1 note
·
View note