
Don't wanna be here? Send us removal request.
Statistics
We looked inside some of the posts by fmp2nd and here's what we found interesting.
Average Info
Notes Per Post
1
Likes Per Post
1
Reblog Per Post
0
Reply Per Post
0
Time Between Posts
2 days
Number of Posts By Type
Video
1
Text
16
Last Seen Tumblr Blogs


Fun Fact
The most popular pages on Tumblr are about Minecraft, GIFs, and David J. Peterson.
Text
Evaluation
Purpose / Theme / Concept For this project I had an idea in my head the whole time of what I really wanted to do, the only issue I had was on how to implement them and to not rush and forget to jump to other ideas I wanted to do. I have fixed so many issues that this project introduced to me, whether it comes to camera bugs, loading a new level glitches and many others which I had to tackle, this sometimes had simple fixes but I was looking at it too complexly which caused me to completely overcomplicate some things but then after a small break I would simplify it and get a quick fix sorted. We had to choose our crops that we would grow to match what types of crops could be grown in Russia and we had to edit the look of the game to match a tough communist life. Some of the idea had to be edited to remove certain pieces which were either irrelevant or too big to implement in the project with the time I was given but I still feel I was able to retain some of the theme. Media and Techniques I did a lot of research on Stardew Valley and the way it has the player interact with the world and the activities they offer. I took a large look at the way they did stuff and tried to implement it into my game with a different art style. This helped me understand how to use the camera to give the same feeling and look, which I think went quite well and helped me understand the use of cameras for later projects. I did the research by playing the game and looking into youtube videos about the game, “game maker's toolkit” and some tutorials. I used many different techniques which I thought could work which was nice as Unreal Engine 4 really allowed me to explore with a comfortable foundation where it's rather simple to learn how to use tools you’re not familiar with. I would definitely use Unreal Engine 4 again as it really makes life easier for me as I feel Unreal Engine 4 really offers the most and does not need as much labor for code. One thing I don't think I’ll do again is probably a 2D pixel art driven game, I am much more angled toward 3D and I really feel more comfortable working in those types of environments. Conclusion Looking back on it, I think I spent too long stuck on large complex ideas rather than exploring my other ideas which I could do quickly which would allow me to have like 7 ideas finished rather than 1 large idea and 2 small ideas finished. I feel working as a team wasn’t the best for me as it trapped me into some ideas and prevented me from doing what I would usually love to do, I feel this also really affected my motivation which prevented me from working as hard as I could’ve and should’ve. I don't work very confidently in 2D Top Down environments, I am more of a 3D game or 2D clicker type game developer, I do think this was a good way to learn my limits and teach myself what I’m comfortable with. Next project, I should do what I think is best for myself and whatever I'm most comfortable in so I can explore it more thoroughly which will allow myself to also get more expertise in that subject. Outcome My project did not meet my expectations, I spent too much time dedicating myself to some pieces that were too complex which prevented me from exploring multiple ideas rather than one big one. I do think I could’ve done a lot more and I am quite disappointed with what I did with this project. Some of my brief was met but I definitely should’ve done more. A way I could’ve done better is if I focused more time on planning how I'm going to do my ideas, how I can do them more efficiently and make a list on how hard / complicated some ideas would be to implement. It would allow me to introduce items that are more crucial to the project and that would be faster to implement.
0 notes
Text
Music For Trailer
I want to use this song:
youtube
The issue is my partner thinks that having a video which was preformed by a real military back in the time this is set may be morally wrong but personally I don't think there is anything wrong as we are not saying that whatever these people did back then was good and we aren’t saying that they are good or bad. It’s like liking a song that you later find out a convicted felon or someone who has done something terrible made, I may like the song but it doesn’t mean I like them.
1 note
·
View note
Text
Fixing Widget Bugs
youtube
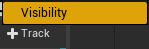
The issue I have with this is that the text shows up as in the animation it stays down there so to fix this I decided to edit its visibility. To do this I clicked “+ Track” and selected “Visibility”
I then clicked the middle button twice, one before I wanted it to be invisible and then one immediatly after and I set it to “Hidden” so now the animation will play and you wont see the text

2ND FIX
On event fix inside the main game level, I go from an event tick and attach it to a “Sequence” with the “Then 1″ to a “Get All Widgets Of Class”

The “Get All Widgets Of Class” with the “Widget Class” being “Main Menu” with the “Top Level Only” ticked, then drag from the “Found Widgets” array and do a “Get” and connect that and the “Exec” from the “Get All Widgets Of Class” to a “Cast To MainMenu” and drag out of that and do a get “Main Menu Closed” and then attach that to a “Branch” as the “Condition” with the “exec” being from the “Cast To MainMenu”, Then from the true in the “Branch” attach it to a “Do Once” which then casts to “ThirdPersonCharacter” with the “Object” being “Get Player Character” and then from the “ThirdPersonCharacter” exec attach it to the “SpawnActor Bp Inventory” with the class being “Bp Inventory” and the “Third Person Char Ref” connected to a “Reference To Self” and then from the “Return Value” and “Exec” being attached to the “Set Inventory Ref”, “Target” being connected to the “As Third Person Character” which then after the set it “Removes Parent From Widget”
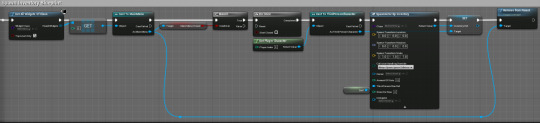
To spawn the main menu I started with an “Event BeginPlay” which connects to a “Create Main Menu Widget” with the class being “Main Menu” with the “exec” and the “return value” attaching to a “add to viewport”

In the event graph of the “Main Menu” widget I set the “On Clicked” of the start game button to “Play Animation” with the “In Animation” being the “Main Title Anim” we made earlier. The animation is 1.75 seconds so to ensure the animation gets to finish and after this I setup another “Play Animation” with the “In Animation” being the “CanvasAnim” we made earlier. The animation is 1 second so to ensure the animation gets to finish I added a delay that is 1 second, I then “Set Input Mode Game And UI” and then from the “Player Controller” to a “Get Player Controller” and then “Set Main Menu Closed” to true

I moved this from the “Main Menu” level to the game level so this doesnt need to load anything after the widget closes
Finished Work
youtube
0 notes
Text
Extra Animations In Widgets
I select the canvas panel and go to “+ Animation” and call it “CanvasAnim”

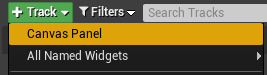
I then select “+ Track” and select “Canvas Panel″ which would be the transparent title text
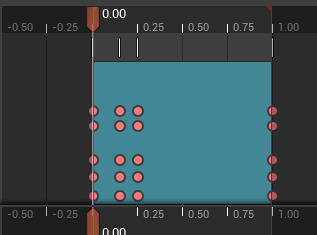
I then clicked the button inbetween the “Transform” arrows, and then select the dots you make and give each transform its own alterations when you want to change its locations and then you can record each difference in each dot and “Unreal Engine 4″ will do the inbetween movements for you
In the event graph I set the “On Clicked” of the start game button to “Play Animation” with the “In Animation” being the “CanvasAnim” we made earlier. The animation is 1 second so to ensure the animation gets to finish I added a delay that is 1 second.

What this does
youtube
0 notes
Text
Animating In Widgets
I select the transparent main title text and go to “+ Animation” and call it “MainTitleAnim”

I then select “+ Track” and select “Image_5″ which would be the transparent title text

I then clicked the button inbetween the “Transform” arrows, and then select the dots you make and give each transform its own alterations when you want to change its locations and then you can record each difference in each dot and “Unreal Engine 4″ will do the inbetween movements for you

In the event graph I set the “On Clicked” of the start game button to “Play Animation” with the “In Animation” being the “Main Title Anim” we made earlier. The animation is 1.75 seconds so to ensure the animation gets to finish I added a delay that is 1.75 seconds.

This is my end product
youtube
0 notes
Text
Editing Main Menu
I wanted to add an animation to the main menu so to get this done I opened photoshop and imported the main title. I selected “Select” and chose “Color Range”
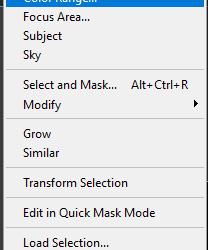
In “Color Range” I selected the colour I wanted to remove by clicking the “Eyedropper Tool” and then selected the colour I wanted gone and used the “Fuzziness” tool and set it to 51 because in the preview it made it seem like it was all selected.

But then when I pressed “OK” and deleted the selected section of the image it then deleted not only the background but also the black on the title.

and the fix I found is to set the “Fuzziness” tool to 0 and deleted the selected text and it solves the whole problem
I then exported the image and dragged it into “Unreal Engine 4″ and then dragged it into the widget so that it will show up

I then dragged in an image from the pallette and use the eyedropper tool to match the background colour and then I made it the same size of the title text so it would make it invisible, I then dragged the transparent title text

I then selected the imported text and selected the “Anchors” tool and chose the bottom right one, the large square and undid all edits to size and location. This made the image match the title text in the main menu get covered exactly by the transparent one. This worked because I didn’t crop the original image which menas they’re the same size and has the text in the same location and make sure the new image is at the bottom of the heirarchy.

0 notes
Text
Placing Square On Mouse Location

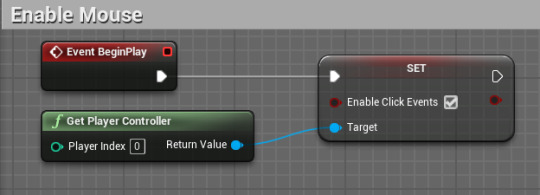
Before anything we have to ensure we have this code in, to make sure that we can actually use the mouse. On “Event Begin Play” we set “Click Events” to true with the target being “Player Controller”. This allows use to interact with objects in the game by clicking.
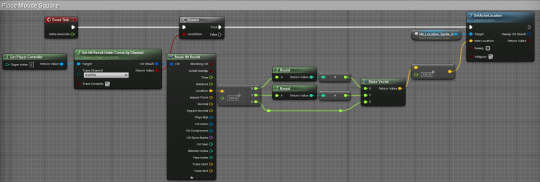
On “Event Tick” inside the level blueprint it will go to a branch with the condition of a “Get Hit Result” which checks if it hit something visible with the target of a “Get Player Controller” and then from the true in the branch it will hit a “SetActorLocation” with the target of the square sprite and then set the “New Location” by getting the “Break Hit Result” from the “Hit Result” with the location being divided by 160 and then round the x and y and attach to a “Make Vector” with the Z just attaching to the “Make Vector” which then we plug into a “Vector x Float” where we mutiply the return value by “160″ and set the location and then make the “Teleport” to true. The reason I made it “160″ is because thats how many pixels large they are in width so this means it will always be ontop of a block.
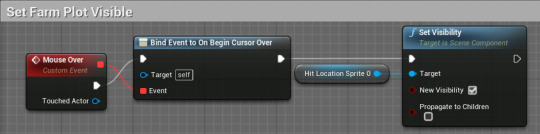
Inside the “Master” blueprint we have a custom event which is called “Mouse Over” and it connects with the “Exec” and the “Event” output connect to “Bind Event To On Begin Cursor Over” which connects to “Set Visibility” with its target being the “hit location” square which has its “New Visibility” set to true so it can be visible
youtube
0 notes
Text
Farming Tiles
youtube
Before anything we have to ensure we have this code in, to make sure that we can actually use the mouse. On “Event Begin Play” we set “Click Events” to true with the target being “Player Controller”. This allows use to interact with objects in the game by clicking.
If the player character overlaps with the farmable block then it sets “Can Farm?” to true inside the “Master” blueprint which is the farmable block. As soon as they stop overlapping it turns “Can Farm?” to false

On component overlap with the top hitbox it would sett the sprite to a middle dirt sprite. When the overlap happens it checks if the other actor is the same as itself and if true it will set the sprite as the middle dirt sprite

0 notes
Text
Random Camera Jittering
I was having an issue where the character kept jittering around and I had no idea what the problem was.
youtube
The issue happened after rotated the hitbox so that it would always be the length of the sprite, the issue with that is that it was now always hitting something and then going through it, making the sprite shake, therefore making the camera shake as well, this also was a problem because the player would slide.
youtube
A fix I found for the hitbox is just making is wider and longer as I wont have to worry about hitting something above me.

0 notes
Text
Inventory System: Key Functions
Create a new function and call it “Swap Slots” and create two inputs, both will be integers one will be called Index1 and the other Index2 and then make a boolean output called “Sucess?” and then drag off of each index and make them a local variable with the same name. Set these local variables with the corresponding index’s and then connect to a branch with the condition being this, get the “Slots” variable and do a “Last Index” on it, drag off of their and connect it to two different more thans (>) with it being the bottom part. Then make the two more thans have one of the “Local Indexs” so “Local Index 1″ and “Local Index 2″ and connect them to an “OR” statement and that makes the condition. and now if this is true it will go to a return node and keep it unticked but if its false it will go and get “Slots” and do a “Get (A copy)” of it with the index being “Local Index 2″ this then drags off the return value to make a local variable called “LocalSlot2″ and then set that from the “Get”. Drag off of the “Set Local Slot 2″ to “Set Array Elem” with the “Target Array” being “Slots”, the Index being “Local Index 2″ and then the item is: “Slots” dragged off and “Get (A Copy) with the index being “Local Index 1″ and then the return value goes into “Item. Then drag off and create another “Set Array Elem” with the “Slots” being “Target Array” and the “Index” being “Local Index 1″ and the item being “Local Slot 2″ which then we drag off and “Update Slot at Index” with the index being “Local Index 1″ which then we drag off and “Update Slot at Index” with the index being “Local Index 2″ and then connect it to the “Return Node”

Now create a new function called “SplitStack” and create two inputs and 1 output. The inputs are both integers and one is called “StackIndex” and the other is “Amount” with the output being a boolean called “Sucess?”. From the starting node drag off the “Stack Index” and the “Amount” and create local variables that have the same name but it has local first and then connect the starting node to the sets, “Set Local Stack Index” and “Set Local Amount” and then connect this to a branch with the condition of “Is Local Stack Index Empty?” if true then go to a “Return Node” and dont tick the boolean and if false then connect it to a branch with the condition being - “Local Stack Index” connecting to “Get Item Info at Index” and the drag off of “Item Info” and “Break S_ItemInfo” and connect the “Can Be Stacked? to an “AND” boolean” and drag off the “Amount from the “Get Item Info At Index” and do a more than “Local amount” (Amount > Local Amount) and drag the return boolean to the bottom of the “AND” and attach it to the condition of the branch.

If false drag off into a “Return Node” and keep it false. If true connect it to the function “Search Empty Slot” with the “Sucess?” and the Exec connecting to a “Branch” and if thats false then “Return Node” with no tick and if its true then “Set Local Found Index” with the index from the “Search Empty Slot” setting it. This then connects to a “Set Array Elem” with the “Target Array” being “Slots”, the index being “Local Stack Index”, the “Item Item Class” being - “Get (A Copy) of “Slots” with the index of “Local Stack Index” and then break the “Return Value” from the “Get” by doing a “Break S_Inventory” and then connect the “Item Class” to “Item Item Class” and the “Item Amount” being set by getting the “Amount” from the break and connect it to a “-” and negate “Local Amount” from it (Amount - Local Amount) and the return value from that will set “Item Amount”

Then drag into a “Set Array Elem” with the “Target Array” being “Slots”, the “Index” being “Local Found Index”, the “Item Item Class” being the “item Class” from the break and then “Item Amount” being “Local Amount” which then plugs into “Update Slot at Index” with the “Index being “Local Stack Index” and then this plugs into another “Update Slot at Index” to “Local Found Index” and then it plugs into a “Return Node” with a tick.

In the Event Graph of “Bp_Inventory” create a custom event called “OnUseItemAtIndex” and make a “Input” called “Index” which is an integer and then connect it to a “Branch” with the condition of - “Get (A Copy)” of “Slots” with the index being “Index” from the custom event, then get the return value from the “Get” which is connected to a “Break S_InventorySlot” which connects its “Item Class” to a “Is Valid Class” with the “Return Value” connecting to the branch. If true the branch connects to a “SpawnActor” with the class from the break earlier and it then connects to a “Event On Used” function from earlier with the “Return Value” connecting to “Target”.

Then create a new function called “RemoveItemAtIndex” and create two inputs and 1 output. The inputs are both integers and one is called “Index” and the other is “Amount” with the output being a boolean called “Sucess?”. From the starting node drag off the Index and the Exec and create a new local variable called “Local Index” and set it there and then drag off it, create another called “Local Amount” and set it from the “Exec” from the previous set and connect the “Amount” output to the “Local Amount” input and then attach it to a branch with the condition being “Local Index - Is Slot Empty? - If Not - AND” and then the other part of the “AND” is “Local Amount - > 0 -” and then it plugs into the “Condition”. This all checks if the index item at the slot is not empty and also checks if the amount is more than 0 so it would definitely mean its not empty because it has a value. Then from the false of the “Branch” plug it into the “Return Node” and set it to false, and then from true plug it into another branch with the condition of “Local Amount is >= Local Index (Amount At Index)

Then drag off the “True” to “Set Array Elem” then connect the “Slots” variable to the “Target Array” and then connect “Local Index” to the “Index” and then connect it to “Update Slot at Index” function with the “Local Index” plugging into “Index” and then connect it to “Return Node” and set “Success?” to true

If “False” drag off and connect it to “Set Array Elem” with “slots” variable connecting to “Target Array” and then connect “Local Index” to “Index” and then from “Slots” connect it to a “Get” with the “Local Index” connecting to the “Index” of that and connect it to a “Break S_InventorySlot” with the “Item Class” connecting to “Item Item Class” and connect the “Amount” to a “-” negating “Local Amount” from it and then add the outcome to the “Item Amount” which then plugs into a “Update Slot at Index” with the “Index” being “Local Index” which then we connect it to a “Return Node”

0 notes
Text
Making A Farming Land
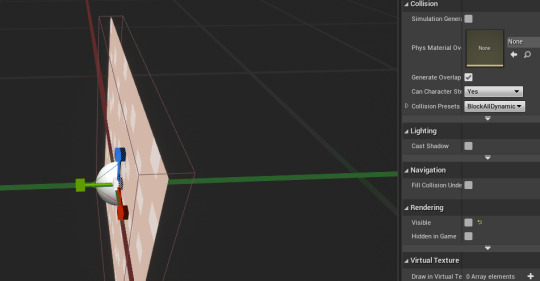
First I got my sprites and overlapped them and then made the crop one invisible and kept the normal floor visible. I also added a hitbox just to fit around its edges and extrude a tad more on the faces
Then I selected the main sprite and selected the “On Clicked” event and then set the visibility of the normal floor to false and crop floor to true and then attached it to a string just to make sure it goes through

I then tried to use the hitbox as the clicked because I thought maybe with an actual collision object it could work but then it didn’t so I released that since that wasn't working I’d need to make sure the “Click Events” are working.

I then found a fix, which was getting the “Event Begin Play” and the “Get Player Controller” to plug into “Enable Click Events” to true

0 notes
Text
Inventory System: Drag & Drop
Create a new blueprint class

Click on that and then search for “DragDropOperation” and select it and then name it “WidgetDrag”

Then create two variables, one is called “WidgetToDrag” using a “User Widget” reference and one is called “MouseOffset” which is a Vector2D variable. Make sure to make them both editable and exposed on spawn

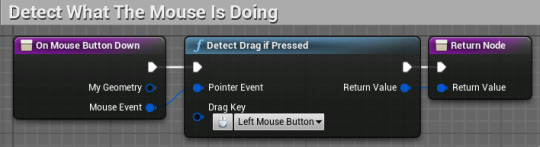
Then go to the “Inventory” widget and override a function called “OnMouseButtonDown”


and in that function drag off the “On Mouse Button Down” and attach it to “Detect Drag If Pressed” with the “Drag Key” being “Left Mouse Button”, connect the “Pointer Event” to “Mouse Event” on the beginning node and then drag the return value from the “Detect Drag If Pressed” into the “return node” “Return Value”
Then override another function, this one is called “OnDragDetected”

Inside of here drag off the starting node and connect it to a “Create Widget Drag”, connect a reference to self (Being the inventory widget) to the “Widget To Drag” and to “Default Drag Visual”. Change “Pivot” to “Mouse Down” and set the mouse offset by dragging off of “My Geometry” and getting “Absolute To Local” and connecting “Absolute Coordinate” to “Get Screen Space Position” with the input of that being “Pointer Event”. Then connect it to “Mouse Offset” with the “Return Value” of “Create Widget Drag” connecting to “Operation” and the exec connecting to “Remove From Parent” with the target being “Self”

Then go to “MainWidget” and select the top of the hierarchy and make it visible.

Then override the “On Drop” function inside the “MainWidget”

And then drag off the “On Drop” starting node to the “Cast To WidgetDrag” with the “Object” being “Operation” then drag off and get “Widget To Drag” and connect it to “Add To Viewport” with the exec going there too and then drag off of “Add To Viewport” and connect it to “Set Position In Viewport” and connect it to “Return Node” with it ticked and then untick the “Remove DPIScale”. The position is set by getting the “Pointer Event” to “Get Screen Space Position” and connect it to “Absolute To Local” “Absolute Coordinate” and then the geomtry part is connected to the “My Geometry” from the starting node and then drag that into “Vector2D - Vector2D” with the bottom Vector2D being “Mouse Offset” from the “Widget Drag” and then the return value from the “-” will be the position and then drag off of the “Widget To Drag” to the Target.
Here is the final product
youtube
0 notes
Text
Inventory System: Open And Hide Inventory
First make two functions, one called “ShowInventory” and one called “HideInventory” and then make a new variable called “IsVisibile?” and make it a boolean

Now in the “HideInventory” function, drag off the starting node and set the visibility of “Inventory Widget” to “Hidden” and then set “Is Visible?” to false and then “Set Is Enabled” of the “Inventory Widget” to false and connect it to the return node

Now in the “ShowInventory” function, drag off the starting node and set the visibility of “Inventory Widget” to “Visible” and then set “Is Visible?” to True and then “Set Is Enabled” of the “Inventory Widget” to True and connect it to the return node.

Inside your players blueprint, go to their event graph and do this, When “i” is pressed go to a branch and check if “Is Visible?” is true or false. If false it does the “Show Inventory” function and if true it does the “Hide Inventory” Function

Then go inside the “Inventory” blueprint and select the “CloseButton” and connect it to the “Hide Inventory” function with its target being “Inventory” variable. (For any testing I set the default value of the “Is Visible?” variable to true just so I can test it)
youtube
0 notes
Text
Inventory System: Quick Fix
I had an issue where even though I would walk on the items it wouldn’t show their image but it would show me that they’re taking up slots and stacking
youtube
The fix I found was to add an update slot to each return node in the “Bp_Inventory”. So I edited it and added these


And now it works :)) - The maps aren’t stacking because they’re not supposed to be stackable (The map is the person)
youtube
0 notes
Text
Inventory System: Widgets (Inventory)
First I made an widget and named it “Inventory”

Open the designer and set the screen mode to “Desired On Screen”

Then add a “Vertical Box” inside the “Canvas Panel” and then size it to content. Then drag in a “Border” inside the “Vertical Box” and then drag in “Horizontal Box” inside the “Border”. For the “Horizontal Box” make the padding 0. And then for the border make its colour black and lower its alpha to 0.6. Now add a “Text Block” to the “Horizontal Box” and change the text to “Inventory” and then align it to the left and make the font 22. the drag in a button inside the “Horizontal Box” and then drag in some text for the button and make it say X and make it size 22 and then change the padding of the bottom and top to 0 and change the left and right padding to 10. Then change the colours as you please for the normal, hovered and pressed. I made the colours red. Make sure the button is also set to fill and set is to the right, so it sticks to the border and rename the button to “CloseButton” and make it a variable. Now drag in a “Size Box” into the ”Vertical Box” and make the “height override 250″. Now add a “Border” to the “Size Box” and make the padding 0 and change the brush colour and make it black and change the alpha to 0.4. Now drag in a scroll box to the border and then add a “Uniform Grid Panel” and then for the size box make it horizontally align center and then from the “Uniform Grid Panel” make the padding 5.

Now create a function called “Generate Slot Widgets”. Then create a variable called “Inventory” and make the variable “Bp Inventory” and make it editable and exposed and then make another variable called “SlotsPerRow” which is an int and make it editable and exposed on spawn. Then go on the designer and rename the “Unifrom Grid Panel” and name it “Slot Panel” and make it a variable.

Then in the new function use the starting node and clear children from the “Slot Panel” and clear an array which will be set soon and then attach that to “For Each Loop” with the array being “Slots” from the “Inventory” variable. Then attach the “Loop Body” to “Create Inventory Slot Widget” and the “Array Index” from the “For Each Loop” to the “Slot Index” of the “Create Inventory Slot Widget” and set its class to “Inventory Slot” and then from the return value from that create a variable called “SlotsWidget” which gets attached to the “Clear” from earlier. The “Create Inventory Slot Widget” then attaches to a “ADD” with the array being “Slots” the return value from the “Create Inventory Slot Widget” to attach to the bottom part with the return value and the exec attaching to the “Add Child to Uniform Grid” with the “Target” being “Slot Panel” and the “Content” being the return value from the “Create Inventory Slot Widget”. The “In Row” is then set by the “Array Index” being connected to a “To Float” divided by “Slots Per Row” with the return value connecting to a “Truncate” and that return value connecting to the “In Row” and then the “In Column” being set as “Array Index” “To Float” connecting to the “Dividend” of the “Division (whole and remainder)” with the “Divisor” being “Slots Per Row” and then the “Remainder” connects to a “Truncate” and that return value sets the “In Column

Now create a new widget called “MainWidget”


Now in the designer in the “MainWidget” drag the user created “Inventory” onto the screen and anchor that to the bottom right and make sure to size it to content for when we add extra slots also rename it inside the widget to “InventoryWidget” so its more descriptive.

Create a variable which is the “Bp Inventory” and name it “Inventory” and then make a “Integer” variable called “SlotsPerRow” and then make them all exposed and editable.

Then from event construct attach it to a “Set Inventory” with the “Inventory” being attached to “Inventory” and the “Inventory Widget” being attached to “Target” (you may have to drag out this set from the “Inventory Widget” “Variable”) and then from the set drag off into a “Set Slots Per Row” with the “Slots Per Row” being attached to “Slots Per Row” variable which then attaches to “Generate Slot Widgets” with its target being “Inventory Widget”. Now go to “Bp_Inventory” and from the resize in the “Event Graph” drag off and “Create Main Widget” with the inventory being a reference to “Self” which then drag off the return value and get “Slots Per Row” and make a variable from it and name it “SlotsPerRow” and then set the newly made “SlotsPerRow from the “Bp_Inventory” and connecting the “SlotsPerRow” to it and then “Set Main Widget” and make it a variable and then from there set inventory widget which is made from creating a variable from the “Inventory Widget” and then connect to add to viewport with the target being “Main Widget”

0 notes
Text
Inventory System: Widgets (Inventory Slots)
First I made an widget and named it “InventorySlot”

Open the designer and set the screen mode to “Desired On Screen”

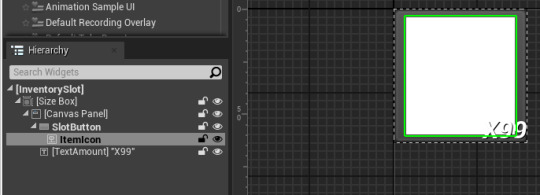
Then in the Hierarchy delete the canvas panel and then add a “Size Box” and change the “Width Override” and the “Height Override” to 64 and then add a canvas panel inside the “Size Box” and make sure the alignment are the right ones so it fills. Now add a button to the canvas and anchor the button to the bottom right one so it fills its space and then set all the offsets to 0 and name it if you want, I named mine “SlotButton”. I then changed the colours when its normal, hovered and pressed and now we will get an image and add it on top of the button. I renamed the image to the “ItemIcon” and then I change the alignment to the right sides and set its visibility to hidden. Then I added a text block and I resized it, mine is changed to size 9 and then I changed the z order 1 and made the anchor to the picture where it is bottom right cube and then I changed the x / y position, making the x -32 and the y -13 and then do that for the size x / y but inverted so make it positive and then write something inside it and align it to the right and then make the shadow colour fully opaque and made the offset for x / y to 0.5 and now the visibility is now hidden and set it as a variable.

Now make sure you have these variables. Make two integers one called “SlotIndex” and one called “Amount”, then make a “S Item Info” variable called Item Info and then make another which is a reference to “BP Inventory” which is editable and exposed and so it the “Slot Index” and then expose the button and icon aswell.

Then in the event graph create a custom event called UpdateSlot
Now connect it to a branch with the condition of “Is Slot Empty?” with the target being “Inventory Reference” and the index being “Slot Index”. The true on the branch will connect to “Set Is Enabled” with the target being “Slot Button” and then it connects to “Set Visibility” with the target being “Item Icon” and set it to hidden. Then the false will attach to “Set Is Enabled” with the target being “Slot Button” and set the “In Is Enabled” to true. Then connect it to “Set Item Info” with the set being “Get Item Info at Index” with the “Target” being “Inventory Reference” and the “Index” being attached to “Slot Index”, then the “Item Info” connecting to the set and the “Amount” connecting to a “Set Amount” which is attached to the “Item Info” set. Then attach it to the “Set Brush From Texture” function with “Target” being “Item Icon” and the texture being “Break S_ItemInfo” with that being attached to “Item Info”. Then attach the function to “set Visibility” to “Non Hit-Testable (Self Only)”

Then bind the text amount by creating a new function called “Text Amount Binding” by clicking on the text inside the widget and binding it. Once you’ve made the function attach the beginning node to the “Return Node” with its return value being “Text” and being called “ReturnValue” with that being attached to “Amount” variable attached to an “append” “B” with “A” being x and then the “Return Value” being connected to a “ToText (string)” and then to the return value.

Get a bind for the visibility of the text amount and use the beginning node and connect it to a branch with the condition of “Is Slot Empty?” with the target being “Inventory Reference” and the index being “Slot Index”. The true on the branch will connect to the return node and set it to “Visible” with the false being connected to another return node with the return value being “Item Info” being attached to a “Break S_ItemInfo” and connect the “Can Be Stacked?” to the “Index” to “Select” with the false being “Hidden” and the true being “Not Hit-Testable (Self Only)”

0 notes