
Don't wanna be here? Send us removal request.
Statistics
We looked inside some of the posts by fmprojectleonardo and here's what we found interesting.
Average Info
Notes Per Post
1
Likes Per Post
1
Reblog Per Post
0
Reply Per Post
0
Time Between Posts
3 days
Number of Posts By Type
Text
17
Last Seen Tumblr Blogs


Fun Fact
There are dozens of funny blogs to kill time on Tumblr.
Text
Main inspiration:
TBGlitch - has worked on various popular roblox games making him wanted for commissions. - His quality of work has inspired me to become like him and to improve my animation skills following the flow of his animations.
Blendergod99 - Has taught multiple people how to animate in blender for roblox and how to make exporting animations possible. Has solved my problems with setting up blender for roblox animating which has made everything made in this FMP possible.
Rell seas - producing a game that will rise expectations from any other roblox game that is related to combat. - Has made incredible animations for the roblox game they are working on. Which sets me a target to become like one of their animations which has led to me producing this FMP.
0 notes
Text
Evaluation
This project will be a massive cutscene fight between two Roblox rigs with camera motion. The animation will have both hand-to-hand combat and air combat. I will mainly focus on the torso movement and the basic swinging and after making the full scene I will then add all the details within the animation. There will be a mix of easing styles throughout the fight to make it seem more creative. For ethical considerations i do not see where I would need to consider any ethical things. The only thing I can imagine is my carbon footprint amount to create the animations. Meaning the electricity that it took.
The time I have used at home was to watch some fight scenes from films and some fight scenes in cartoons to get a better grasp on choreography. In college, I put these films onto my blog and described how the movies used choreography well and how the fight scenes played out. Then I used most of my time in college working on my animations since it is all saved here. I was over-ambitious in my project work because I thought I would have time to make a very large cutscene between two rigs to show choreography skills and smoothness in the animation, along with other animations like walking, running, and attack swings. But at the moment I have only done around 10 seconds of a cutscene with effects and a little bit of map building along with some side animations that I have already mentioned.
My primary observations on animations is the flow of them and how I would picture myself or someone else doing them to see if it is possible. This helped me understand choreography a lot better than just assuming that anything I posed was possible. When I wanted to do a more of a cartoony animation I would go to other people’s developed ideas such as the two roblox animators TBGlitch (Twitter) and blendergod99. These two animators have shown me how to make animations flow and how far back arms and torsos need to move to make certain movements more impactful. These techniques have helped me greatly when producing my fight scene as the swings seem much more impactful to how they would look without their inspiration.
The skills that I have developed in animating were from home. I have been animating for approximately 2 years now and only started blender animating 9 months ago. Before that, I was using Moon Animator (Which I occasionally use to put my blender animations together in Roblox if I want to add in-game effects, etc.). This was appropriate to my development of this project because now I know what the names of the things I need are which allowed me to make this animation pack for my FMP. I have been interested in posing and channel types because you can see how different channel types can completely change your animation from being smooth to snappy or linear. I have not yet mastered Blender animating as I have only been on it for 9 months now, however, I have made a dramatic improvement over the months which has gotten me into commissions for games! I have also used the skills I have learned myself to teach others to become animators like me by providing them with tips I had to work out myself and giving them my rigs.
On the animating side of things, I encountered a couple of issues, where my animations were not smooth in some areas and you could see it clearly when playing the animation regularly. To resolve this issue I remade the previous attack so that the idea for the unsmooth one would work. The other issue was the rig completely breaking and forcing me to reopen Blender to my backup save which was a lot of progress loss. On learning new things however, I kept encountering issues where tutorials to make effects would not work because it was slightly outdated meaning the ways they did it would not work on the current version I am using so I had to understand how nodes would work in Blender myself. Learning how to move the camera along with the animation was something new to me and to make it look decent with the impact was also relatively fun. Learning my own way to make things is more practical for me because then I actually remember how to do them whereas if I watch a tutorial and follow them step-by-step then I end up not learning a single thing.
The animation pack I have produced for my FMP was made with inspiration from some animations off of my pinterest mood board and different games. These games being Dead By Daylight and Street fighters. I gathered references off of these animations and manipulated them in my way so that I could make my own ideas. Whilst working on my animations I also gathered feedback on what to change, which on the cutscene after the first two successful hits there was a debate where after the character who has been hit recovers and lands a low attack as a surprise whilst the other was swinging expecting to land the punch. But after multiple attempts it didn’t work out, so I went with the other idea where both are given time to recover and continue the brawl.
For presenting my animations I used Render Animation Which takes a picture of each frame and puts it together in a video, and depending on what fps settings you had on the animation will set the speed of the animation. For the cutscene that I have made, it is 90 fps. The rest I believe are 60 fps. This strategy would be appropriate for professional practice because the animation would run smoothly and present the animation just as the animator would wish it to, compared to when it is in an animation player.
At first I was very ambitious, I believed that I would be able to make a very long fight scene between two characters. But in the end I spent 8 college days on a single cutscene animation because I was learning new things as I progressed. After finishing 10 seconds or so of a fighting scene I realised 2-3 weeks had passed and that I still had more animations to make so I left the cutscene at 10 seconds. I worked on multiple different animations, recorded and posted them to my blog. However I was not rendering the animations as I just stated above, so these could not be used for the final outcome as I wanted. Overall I have exceeded some of my targets which were learning effects in blender and learning interpolations. I may not have done a lot of animations but I certainly improved in animating.
0 notes
Text
Popular Roblox games with detailed animations:
Here are some games where show reasons why animations are so important in Roblox games.
Hero Battlegrounds:
youtube
Strongest battlegrounds:
youtube
Rell seas:
youtube
Parkour Reborn:
youtube
0 notes
Text
Information about Rigs
A rig is the skeleton of a model. A rig is what gives the animator power to manipulate and control the movement and deformation of characters or objects. The skeleton made up of joints and bones define how a character and object can move. There are forward Kinematics (FK) and Inverse Kinematics (IK). The rig that I have uses IK which makes the legs automatically bend when the rig reaches a lower level. The arms of the rig do not have this feature so I would have to make it look as natural as possible when a character falls to the ground or hits a wall. Some software's like Maya have auto rigging which automatically rigs the model for the animator. Blender does not have auto rigging built into the system, however you can get plugins for it to have auto rigging.

0 notes
Text
Motion capture
Motion capture (Mocap) uses video from reality into a digital form. Basically and actor can wear a suit with sensors and their movements be recorded by cameras or sensors that capture the position and orientation of each marker. Mocap is often used to replicate facial expressions or complex movements/stunts. This technology has evolved rapidly and now can be used without any equipment, however it is recommended you still use equipment as it can be inaccurate with only video.
These are how the sensors look like:

These are motion captures for the hands. These gloves give precise accuracy compared to when it is just video captured:

Or simply this bundle here:

Mocopi relies on six tracking sensors roughly the size of an Apple Airtag to track the users' movement, communicating the live data via Bluetooth to the system's Android or iOS app. The sensors strap to your head, hip, both ankles, and both wrists to provide up to 10 hours of wireless, full-body tracking.
0 notes
Text
Editing the video.
After rendering all the animations and having them all in separate videos I would have to make a montage of them all together in one video. To do this I would have to use Adobe Premiere Pro.
As I was trying to put the videos into Premiere, I was given errors because the file type was not supported. Blender made it into a Video form that Premiere did not support.
This issue was resolved using OBS studio. OBS has this converter called "Remux recordings" built into the software. This is found on the File.

Clicking on Remux recordings takes you to a tab that looks like this:

I dragged all the videos into here and pressed Remux, this turned all the rendered animations into MP4s, which Premiere obviously supported.
I made a new project in premiere and dragged all my videos into the video box:

I dragged them into the timeline and put the all next to each other. I wanted to have transitions so that it seemed like a montage and not just a series of clips just stashed together even though it is, having transitions will make it seem more prepped.
Adding transitions was surprisingly easy with this app you just have to drag which ever transition you want and place it at the end of one clip.


The purple line shows all of my clips with a transition. If it changes animations completely it fades into black, if it changes the animation slightly or is still related it flashes white. The hot pink bar you see on the right side near the end is a motion transition. The motion transition is effects that cover the screen and eventually show you the next clip:

I have added a sound track into the background since I was not able to export the audio with the animation and have it sync'd. The theme is Lo-fi just because it felt fitting for a montage for something such as animations.
0 notes
Text
Animation rendered.
To render an animation, you would simply go to the render section on the top left

and then press render animation or simply CTRL F12.

However just doing this would give you everything frame by frame in a PNG. I did not want it in PNG so I saved it as a video. To do this you would have to go to the "Scene" tab on the right side which looks like a printer:

Once you are on this tab you will have to go to output, (optional: select a folder destination, it makes a temporary folder if you do not select one) click on the file format section, then make it FFmpeg. Rendering the animation like this not only was it much quicker and efficient, its also a video now so it is usable for video editing.
0 notes
Text
Weapons seen on the recordings were not made by me.
Katana used: https://sketchfab.com/search?q=m4a1&type=models
Scythe used: https://sketchfab.com/3d-models/scythe-18e4d66de3dc43f386b472710e984986
0 notes
Text
Dead by daylight - The Oni lobby animation
This animation was slightly different to work with.
For this animation I wanted to do something new, where I animate the sword! Throughout the animation I moved around the sword as if the Roblox character had hands that you cant see. Near the end of the animation the Character spins the katana which took a while for it not to look too weird. I used the handle types Automatic once again to smooth out the spinning of the sword.

0 notes
Text
Next Idle animation:
This animation was inspired off street fighters, the fighting game.
I made two different versions, one being at a smooth frame rate and one being as if it was in an arcade.

Process in making this animation:
I have used different types of keyframes to make this animation first. To start with I used a different handle type called Automatic:
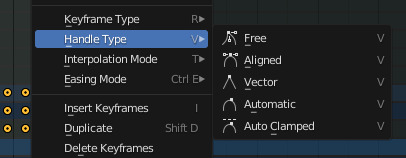
This handle type smooths things out but does not take note on what happens to the rig when this is applied. If the movement of the part is a big difference from the first position, for example the arm, the arm would be sent flying out of the character and to the next position. I solved this issue by inserting multiple frames in the a different handle type called Auto Clamped which is the default blender type, then changed all of the keyframes into Automatic handle type.
This is how the keyframes look on the default handle type (Auto Clamped)

This is how it looks like when it is in Automatic mode.

How I made it arcade styled.
To make animations into arcade style, you will need multiple frames inserted and change the interpolation mode into constant. Interpolation is how blender will make each frame to frame play, the default is linear meaning it will simply move it from point A to point B with no added detail, constant completely removes the smooth point A to point B and instead instantly moves it into the next position. Like its a drawn animation. For the animation to keep its swinging momentum like the original animation the Handle type must stay in Automatic. Changing the interpolation of the frame does not effect the Handle type. As seen below, I have set a keyframe every 3 frames. Meaning every 3 frames the rig will move. If the interpolation was still linear there would be no difference in the animation no matter how many frames you add in between, but for constant it will make it smoother the more frames you add and more jumpy the less you add. The sweet spot for this animation was 1 key frame every 3 frames.

0 notes
Text
I have made a mistake and have lost all of the animations below.
My normal routine is: I make the animation - I record it and send it to the person who wants the animation, get their confirmation of the animation - export it into Roblox and close the animation on blender without saving so I do not have multiple files.
For the FMP, I done this routine since its a normal thing for me, however doing this made me lose all of the animations that I have previously posted on my blog because I can not display it as I will for the cutscene I have made. I only have the cutscene made because it took me multiple days to finish it meaning I had to save it for another time. For the short animations however it took me one session meaning I had no reason to save it.
0 notes
Text
Dungeon mob spawn
This would be an example of what would be in an asset pack for a dungeon type game. This mob would have wings or some sort to make it fly. It drills off from the ground and initiates idle animation. To make the drilling from the ground I had to animate the Master Control which is everything being moved at once. So the IK would not be affected because it would move with it etc. When the mob reaches the top of its height gain, I had to make it so the torso kept moving upwards and then gradually get back down so it didn't look too snappy from when the Master Control stopped ascending.
0 notes
Text
Creating an arcade fps style animation.
This pose was inspired by Jotaro on JoJo's bizarre adventures.
Creating this style requires multiple frames with interpolation mode of Constant meaning that Blender will not automatically blend in the animation with different frames but instantly change the frame to the next. There are 18 individual frames for this animation.

0 notes
Text
Adding audio into the cutscene.
After looking for good sounds using freesounds.org I have found the correct hit/dodge/shuffle sounds.
Blender has this mode called Movie Sequencer which allows us to add audio and other stuff.
This is how it looks like when the audio is placed:

Timing the audio was a lot more difficult than it needed to be. My animation is playing at 90/120 fps while the audio keeps up at 60 fps. Meaning that - I would have to move the audio to the side more than when the impact happens on the timeline. Which overall was inconvenient but I made it work.
This shows that SFX adds a lot more to an animation.
0 notes
Text
Adding camera effects
I added more effects to the animation to give it more to it. I learned that you can add keyframes to almost anything on the data panel:
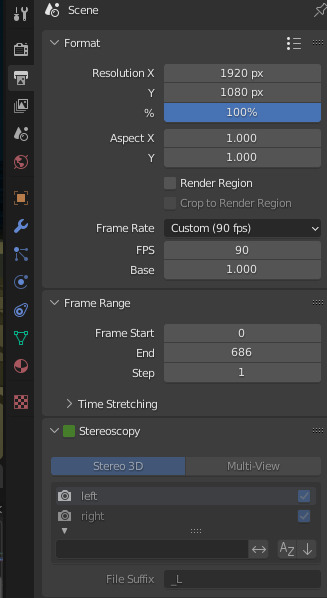
And as you can see there is something called Stereoscopy with a green box. The green box means it has keyframes in the animation. At first it was just ticking box to enable it.
Stereoscopy is used on the TikTok logo and I thought that would be a good replacement for impact frames since I wasn't able to find anything online on how to make an impact frame and add it to my animation.
Which in the frame of impact it looks like this:

0 notes