
Don't wanna be here? Send us removal request.
Statistics
We looked inside some of the posts by foxconstruction391 and here's what we found interesting.
Average Info
Notes Per Post
1
Likes Per Post
1
Reblog Per Post
0
Reply Per Post
0
Time Between Posts
46 seconds
Number of Posts By Type
Text
3
Last Seen Tumblr Blogs


Fun Fact
69% of Tumblr users are millennials.
Text
Putty Ssh For Mac

Putty Ssh Alternative Mac
Ssh Client For Mac
Putty Alternative Mac
Putty Free Download
Ssh And Putty Download For Mac
PuTTYgen is a key generator tool for creating pairs of public and private SSH keys. It is one of the components of the open-source networking client PuTTY. Although originally written for Microsoft Windows operating system, it is now officially available for multiple operating systems including macOS, Linux. PuTTYgen.exe is the graphical tool on Windows OS. While on the other side, Linux OS has the only command-line version could be accessible using SSH commands.
1 Download PuTTYgen
1.1 Download PuTTYgen on Windows
1.2 Download PuTTYgen for Mac
1.3 Download PuTTYgen for Ubuntu/Linux
1.3.3 Types of Keys Supported on PuTTYgen
Puttygen aka Putty Key Generator
The key generation utility – PuTTYgen can create various public-key cryptosystems including Rivest–Shamir–Adleman (RSA), Digital Signature Algorithm (DSA), Elliptic Curve Digital Signature Algorithm (ECDSA), and Edwards-curve Digital Signature Algorithm (EdDSA) keys.
The aforementioned public-key cryptosystems principally focus on secure data transmission and digital signatures.
Although PuTTYgen collects keys in its native file format i.e. .ppk files, the keys can easily be converted to any file format. For Windows, the software interface is PuTTYgen.exe, whereas, for Linux OS the command-line adaptation is available using SSH commands.
How to use PuTTYgen?
Cyberduck is a file transfer client for Apple Mac and Microsoft Windows Cyberduck is a fairly popular file transfer client for Apple Mac and Microsoft Windows. It supports FTP, SFTP, WebDAV, Amazon S3, OpenStack Swift, Backblaze B2, Microsoft Azure & OneDrive, Google Drive and Dropbox.
PuTTYgen is used to generate public or private key pair for creating SSH keys. Below is the complete guidance about how to generate RSA key in the Windows operating system:
Once you install the PuTTY on your machine, you can easily run PuTTYgen. For the same, go to Windows -> Start Menu -> All Programs -> PuTTY -> PuTTYgen.
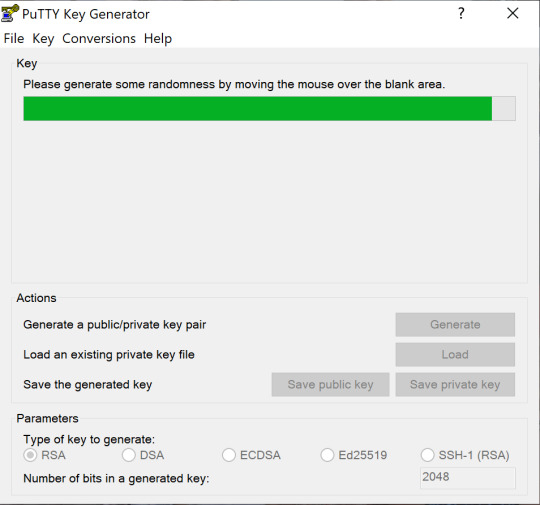
You will see the PuTTY key generator dialog box on your screen
You will find a “Generate” button in that dialog. Clicking on it will lead to generating the keys for you.
Now you will need to add a unique key passphrase in the Key passphrase and Confirm passphrase field.
Click on the “Save Public Key” and “Save Private Key” buttons to save your public and private keys.
You will see the text starting with ssh-RSA in the Public key for pasting into OpenSSH authorized_keys file field which is located at the top of the window. Copy that entire text to your clipboard by pressing ctrl+c as you will require the key to paste on your clipboard in the public key tool of control panel or directly on the cloud server.
Various Ways to Use RSA Key Pair
RSA key pair generated through PuTTYgen is used in two various ways defined as below:

To assign while creating a new cloud server You can choose the public key from the given list of keys at the time of creating a cloud server. If you don’t find your key in that list, then first add and then assign it.
Assign to an existing cloud server At the time of connecting to the cloud server, first of all, you need to tell PuTTY to use it for utilizing your newly created RSA key pair.
PuTTYgen being a component of the terminal emulator PuTTY does not have to be downloaded separately, hence, comes with the PuTTY .msi installation package. You can follow the simple steps to download PuTTYgen software for your system. That is the reason why you don’t need to download PuTTYgen separately. Once you download PuTTY software, you will be able to install and run PuTTYgen easily in no time. Below is the complete instruction about how to download and install PuTTY on Windows.
Apart from that, it is also integrated into third-party programs such as WinSCP installation package. Below you can find a complete PuTTYgen download and installation guide for all operating systems.
PuTTY Download - Free SSH & Telnet Client. PuTTY is a popular SSH, Telnet, and SFTP client for Windows. It is typically used for remote access to server computers over a network using the SSH protocol. This is the download page. For more information on PuTTY, see the PuTTY page. For information on SSH (Secure Shell), see the here.
PuTTY is an open source network file transfer application that supports various network protocols such as Telnet, SCP, and SSH. The networking client PuTTY enables the user to access another computer within the same network.
Download PuTTYgen on Windows
To download PuTTYgen the primary requisite is to acquire the copy of PuTTY installation package. For the 64-bit operating system, one must install the 64-bit version of PuTTY, i.e. putty-64bit-<version>-installer.msi.Similarly, for the 32-bit operating system, the respective 32-bit version of PuTTY, i.e. putty-<version>-installer.msi needs to be installed.
To get PuTTY, go to PuTTY Installation Download page, whereby the complete installation package will be available with setup instructions, installation guide, and download links to all other components of PuTTY such as putty.exe, pscp.exe, psftp.exe, puttytel.exe, plink.exe, pageant.exe and putty.zip.
Following the successful download of the PuTTY installation package. It is time to install the program. Go to How to install PuTTY on Windows, whereby you will find the step by step guidance for PuTTY installation for Windows operating system.
After successfully downloading and installing PuTTY on your Windows machine, you are just 2-3 clicks away to run PuTTYgen. Follow the below-given step by step guidance to run PuTTYgen:
Run PuTTYgen on Windows
To run PuTTYgen, Go to Windows -> Start Menu -> All Programs -> PuTTY -> PuTTYgen. You will see a window for the PuTTY Key Generator on your screen.
Voila! Now you can generate public or private key pair using PuTTYgen.
Download PuTTYgen for Mac
Below is the detailed guide to download PuTTYgen on Mac operating system. Mac OS has a built-in command-line SSH client known as Terminal. To utilize it, go to Finder and then opt for Go -> utilities from the top menu. After that find the terminal which supports SSH connections to remote servers.
However, to run PuTTYgen for mac, the first one must have to install PuTTY. There are multiple ways to install PuTTY, which are Homebrew or MacPorts. Both alternatives will also install the command-line of adaptations of PuTTYgen.
Ported PuTTY for Mac
Mac has the port of PuTTY which can be installed in various ways described as below:
Installation using Homebrew: First, install the ‘brew command line’ Once installed use the below-given command to install PuTTY:- sudo brew install putty
Installation using MacPorts: First of all, one must install MacPorts and then use the command-line to install PuTTY. Here is the command to install PuTTY via MacPorts sudo port install putty Additionally, a user can also add a shortcut to the desktop by writing the following command line –cp /opt/local/bin/putty ~/Desktop/PuTTY
However, there is an alternative way to install PuTTY on Mac OS. Cyberduck is a widely used Mac OS SSH Client. Once PuTTY installed on the Mac OS, a user can convert PuTTY derived private key format to OpenSSH.
To convert the private key to standard PEM format, type the following command –
puttygen privatekey.ppk -O private-openssh -o privatekey.pem

You can also read the guide to convert .pem file to .ppk using puttygen.
Download PuTTYgen for Ubuntu/Linux
Putty Ssh Alternative Mac
To download PuTTYgen for Ubuntu (Linux) operating system, a user to first install PuTTY. However, in some Linux distributions, the SSH key generation tool – PuTTYgen needs to be installed independently from the PuTTY client.
For example, Debian Linux requires the below-given code to install PuTTYgen:
sudo apt install putty-tools
Ssh Client For Mac
Generate Key Pair for Authentication in Linux
To create the key pair for authentication in Linux use the below command:-
puttygen -t rsa -b 2048 -C 'user@host' -o keyfile.ppk
Various Command Line Options of PuTTY in Linux
Below are few important command line options in the Linux operating system for PuTTY:
PuTTYgen [-t keytype [-b bits] [-q] | keyfile] [-C new-comment] [-P] [-O output-type | -p | -l | -L] [-o output-file]
Options:
Keyfile – It is the name of the existing key file to read at the time of changing the current key.
–t keytype – The command specifies the type of key to creating. Its acceptable values are RSA and dsa.rsa1.
-b bits – This command specifies a total number of bit in a particular key. 1024 is the perfect size for DSA key, while 2048 or 4096 are the perfect size for RSA keys.
–q – The command suppresses the message about progress at the time of key generation.
-C new-comment – The command will specify the comment to describe the key. It can be used for the new and/or existing key. Key operation is not affected by a comment. However, it is used to recognize the key owner, it’s not reliable completely as any value can be applied to it.
–P – Using the command will update the passphrase of a key. Passphrase helps to encrypt the private key. As passphrase can’t add or update on a command line, it prompts a new passphrase tool to alter it.
–old-passphrase-file – The old password of the key remains in this file. The command is used when the key is protected by a passphrase.
–new-passphrase file – This command prompts the new passphrase of the key. It comes in the action either at the time of generating a new key or while applying –P command to change the passphrase.
-O output-type – This command defines what to give in output. By default, the private key is the output.
Thus, above are the prominent commands of PuTTYgen in Linux operating system. Besides that, there are many other commands available to perform various tasks from the command prompt in Linux at flank speed.
Types of Keys Supported on PuTTYgen
It is important to know the types of key PuTTYgen supports prior to using it. Below are the key types that it currently supports for SSH-2 and SSH-1 protocol:-
SSH-1 protocol:- For SSH-1 only supports one key i.e. Rivest–Shamir–Adleman (RSA)
SSH-2 protocol: – SSH-2 supports multiple key types that include – Digital Signature Algorithm (DSA), Elliptic Curve Digital Signature Algorithm (ECDSA) and Ed25519.
The above description is a detailed brief on downloading and running PuTTYgen on all major operating systems. For further details please check the Download PuTTY page.
Background
Most Unix-like systems are configured to use the SSH protocol for remote access, but most SSH client applications do not support PIV as required by Federal policy. Putty-CAC, a fork of the Open Source Putty SSH client, resolves this issue.
Note that Van Dyke Secure CRT, a commercial product, also supports PIV SSH login for multiple platforms, including Windows and Mac.
Installing PuTTY-CAC
If you have a forge.mil account, download the latest Putty-CAC package from forge.mil. If you do not have access to forge.mil, you can also download it at https://risacher.org/putty-cac. Source code is available at https://github.com/risacher/putty-cac
There is no installer available for the binaries, so you must either: ● Place the executable files in a directory that you have execute rights over. ● Build an installation package to install the executables in the location you choose. This will enable the Putty-CAC applications to be available from the Start Menu.
At a minimum, you must install the following packages: ● putty.exe ● pageant.exe
Verify the version of PuTTY that was installed by opening the application and clicking About in the lower left corner.
Launch pageant from the PuTTY install directory, (eg, C:Program FilesPutty-CAC). Pageant will appear in the taskbar on the bottom right of your desktop;it will not open a window.
You must now insert the CAPI Key and configure PuTTY-CAC. Follow the steps below.
Putty Alternative Mac
Add CAPI Key into Pageant

Open Windows Explorer or click Start > Computer.
Open Pageant by clicking the executable.
A window will not open, but the Pageant icon will appear on the menu bar. Right-click the icon and select View Keys.
The Pageant Key List window will appear. Click Add CAPI Cert.
Select your Smart Card Logon certificate from the Windows Security window.
● Make sure you choose the correct certificate! Select “Click here to view certificate properties,” click “Details,” scroll half-way, and locate Enhanced Key Usage. It should begin with “Smart Card Logon;” this indicates it is the correct certificate. If you do not see this field, select a different certificate. Note: If multiple certificates exist, you may want to clear out the expired or revoked certificates by following How To – FIXME: PIV Card – Clear certificate store. ● Click OK to close the details window.
Highlight the correct Smart Card certificate and click OK.
The Pageant Window will now display the certificate information.
Click Close.
Warning: You must re-add your certificate every time pageant is started.
Configure PuTTY-CAC
Right-click the Pageant icon again from the menu bar and select New Session. This will launch PuTTY.
From within PuTTY, enter the destination IP address or hostname in the Host Name (or IP address) textbox to setup a new profile, or if you already have profiles set up in PuTTY, load that profile.
Note: If you have multiple destination profiles, you will have to do the following steps for each profile
Enter a descriptive name under Saved Sessions textbox (if setting up a new profile).
On left panel, select Connection > SSH > CAPI thencheck the box beside the words Attempt “CAPI Certificate” (Key-only) auth (SSH-2).
From within PuTTY, select Connection > SSH > Auth then select both “Allow agent forwarding” and “Allow attempted changes of username in SSH-2.”
Click Session, then Save. This profile is now configured for PIV logon.
To get your PIV card’s SSH key, in PuTTY, go to Connection > SSH > CAPI and select the browse button on the right side. This will automatically fill in the “Cert” and “SSH keystring” fields.
Copy and paste the SSH keystring value from PuTTY into Notepad as you will need to include the SSH key when you contact the jumpbox support team or create a service ticket.
The configuration file should contain “Host *” and “ForwardAgent yes” and exist in the same folder where they place the SSH key.
In Saved Sessions, click Save to save your configuration.
Putty Free Download
Verify PIV Login
Ssh And Putty Download For Mac
Open Pageant (if not already running) and make sure your CAPI key is populated, close the Pageant window. Right click the Pageant icon and choose “New Session”. This will open PuTTY-CAC.
Load one of your saved sessions that you previously configured for PIV logon.
When prompted, enter your remote Unix/Linux account name, and you should be prompted for your PIV PIN.
Enter your PIN, click OK and you should be logged in.
Once logged in, run ‘ssh-add –l’ to ensure that the forwarding agent is working. If you do not see the key printed when you run this command, something is wrong and you will not be prompted for your PIN if you ssh further into the environment.
Both the cert key that was pasted into the .ssh/authorized_keys and the config file need to be copied or scp’d to all the servers you will connect to in the data center. If the forwarding agent is working when you ssh to a server beyond the jumphost, you should be prompted for the PIN again.
After each server you ‘jump’ to, the output of ssh-add –l should always show the key. If not, either permissions are wrong or a file is mislabeled, or missing.
0 notes
Text
Media Player For Mac Plex

Devices and Mac OS X version
Plex Media Player For Mac 10.7.5
Mac Plex Client
Plex 4 includes a mini-player for browsing new content while you’re in the middle of a playing video. There’s never been a better time to try Plex for iOS since the app is now free. Turn a Mac mini into a media server with Plex If you have a large media collection, you may want to use a Mac as a dedicated device to run Plex. And the Mac mini is a perfect device for Plex. Plex Media Player for Mac. 7,004 downloads Updated: May 26, 2020 Freeware. Review Free Download specifications changelog 100% CLEAN report malware. Media center application that offers you the possibility to navigate and view the content of your Plex server in a streamlined manner. 'The Warner Bros. Movies and TV shows will likely be just the beginning of Plex’s ad-supported content, as the company plans on working with additional media partners to expand its catalog. So while the main draw of the app will still be the ability to stream a personal media library, it may eventually become a centralized app for on-demand.
VLC media player requires Mac OS X 10.7.5 or later. It runs on any 64bit Intel-based Mac. Previous devices are supported by older releases. Note that the first generation of Intel-based Macs equipped with Core Solo or Core Duo processors is no longer supported. Please use version 2.0.10 linked below.
Web browser plugin for Mac OS X
Support for NPAPI plugins was removed from all modern web browsers, so VLC's plugin is no longer maintained. The last version is 3.0.4 and can be found here. It will not receive any further updates.
Older versions of Mac OS X and VLC media player
We provide older releases for users who wish to deploy our software on legacy releases of Mac OS X. You can find recommendations for the respective operating system version below. Note that support ended for all releases listed below and hence they won't receive any further updates.
Mac OS X 10.6 Snow Leopard
Use VLC 2.2.8. Get it here.

Mac OS X 10.5 Leopard
Use VLC 2.0.10. Get it for PowerPC or 32bit Intel.
Mac OS X 10.4 Tiger
Mac OS X 10.4.7 or later is required
Use VLC 0.9.10. Get it for PowerPC or Intel.
Mac OS X 10.3 Panther
Plex Media Player For Mac 10.7.5
QuickTime 6.5.2 or later is required
Use VLC 0.8.6i. Get it for PowerPC.
Mac OS X 10.2 Jaguar
Mac Plex Client
Use VLC 0.8.4a. Get it for PowerPC.
Mac OS X 10.0 Cheetah and 10.1 Puma
Use VLC 0.7.0. Get it for PowerPC.
The media managing and streaming service Plex has rolled out a new app today, and it might mean some painful adjustments for long-time users. Starting today, there’s a new Plex desktop app for both Windows and macOS — this will replace the existing Plex Media Player client. That marks the end of old-fashioned HTPC support for Plex.
For the uninitiated, Plex is a media player platform that organizes video, music, photos, and other media. You can link Plex to files stored on computers, servers, NAS boxes, and even mobile devices. Plex streams all that media on-demand, even transcoding it on the fly as necessary. Technically, you’re only supposed to be using it for media that you own and have backed up, which is already a gray area. However, it’s also popular with the torrent crowd.
The new Plex desktop app supports most of Plex’s existing features and improves a few others. As Plex users can tell you, the “Sync” option for offline downloads has been abysmally slow and buggy for a long time. With the new desktop app, that feature gets a makeover as “Downloads.” It’s faster, more reliable, and gives clearer feedback while content is being saved. The interface is also consistent with other Plex clients with one notable exception: TV mode.
Years back, the most common Plex implementation was to attach a home theater PC (HTPC) to a TV to stream media. With the proliferation of cheap streaming devices like the Chromecast, Apple TV, and Fire TV, almost no one bothers with HTPCs anymore. Thus, Plex is retiring the TV interface with the launch of its new desktop app. This will, no doubt, upset some Plex fans nonetheless.
What about the old Windows app? The version of Plex in the Windows Store will be retired, but that’s no great loss. According to Plex, developing a Windows Store client made sense in the past as Windows Phone existed in some capacity. Today, developing for the Metro/Modern UI platform is not a good use of resources, Plex says.
If you don’t want to give up the classic Plex Media Player client, it’ll be updated through January 30, 2020. You can keep using it, but it’ll probably break before long without updates. The new Plex desktop apps are available for free. Some features like mobile sync, live TV, and more are locked behind the “Plex Pass” premium subscription.
Now read:
0 notes
Text
Ssd For Mac Pro Retina

2010 Mac Pro Ssd
Ssd For Macbook Pro Retina 2015
I have a 15' Macbook Pro that is no longer under warranty. Back in October 2016, the original SSD hard drive failed. I bought another SSD to replace it and used time machine to restore my files without a problem. My drive failed again a week ago after displaying unusually behavior for several weeks, like crashing with few programs loaded or while browsing the internet. Then, one boot up, I saw the folder with the question mark. I could not even wipe the new drive in recovery mode with the disk utility because it would not show up. The only think I see is 'disk0' and under that, Mac OS X Base System which I know is not my new SSD given the size. It does not show up no matter what I do. I checked that the cable and SSD were in correctly etc.
Upgrade your 2012 - 2013 MacBook Pro Retina Display with an SSD for a total system performance and capacity boost. SSD kit includes all the tools you need. Apple MacBook Pro 15.4' Retina True Tone Laptop (Touch Bar, 9th Gen 8-Core Intel Core i9 2.30GHz, 16GB RAM, 512GB SSD, AMD Radeon Pro 560X 4GB) Space Gray - A1990 (2019) Resolution: 2880 x 1800 Chipset: Intel Mobile Core i9.
OWC has also offered PCIe SSD upgrades for MacBook Pro Retina laptops from 2012 through early 2013. If you purchased a MacBook Pro Retina, you already shelled out at least $1,300 for the 13-in. Upgrade the PCIe-based flash SSD in your (Late 2013 - Mid 2015) MacBook Pro with Retina display with up to eight times the original capacity. Available in 24. Use this guide to upgrade or replace the solid-state drive in a MacBook Pro 15” Mid 2014. This MacBook Pro uses a proprietary storage drive connector, and is therefore not compatible with common M.2 drives without the use of an adapter. Before you perform this repair, if at all possible, back up your existing SSD.Then, either familiarize yourself with internet recovery or create a bootable.
Believing that the drive was faulty I bought ANOTHER ssd and installed it. Again I cannot get disk utility to recognize it so I can format and restore. I then bought the cable that attaches the SSD to the logic board thinking perhaps that was the problem, but still my SSD is not recognized.
What do I do to get my Mac to see the new SSD I have installed? I did not have this issue when I installed the first replacement. Would I even be able to get into the disk utility and recovery mode if this were an issue with the logic board or have I neglected something totally obvious here?
2010 Mac Pro Ssd
Thanks in advance for any advice!
Ssd For Macbook Pro Retina 2015
MacBook Pro (Retina, 15-inch, Early 2013), SSD issue
Posted on
1 note
·
View note