
Don't wanna be here? Send us removal request.
Statistics
We looked inside some of the posts by foxservice497 and here's what we found interesting.
Average Info
Notes Per Post
1
Likes Per Post
1
Reblog Per Post
0
Reply Per Post
0
Time Between Posts
12 days
Number of Posts By Type
Text
11
Last Seen Tumblr Blogs


Fun Fact
The KCSC sent more than 20K requests to delete posts related to prostitution and porn to Tumblr from January to June 2017.
Text
God Of War 3 Key For Pc
God of War III is the fifth game in the God of War action/adventure franchise and the third game in the main console series. Like the previous two titles, God of War III follows the story of Kratos, a soldier in the Spartan army who is betrayed by the Greek gods. Angered by his fate, Kratos travels throughout the wondrous and dangerous world of Greek mythology attempting to end Zeus' reign. Signing naturally units 1-6 video. God of War III features bloody and satisfying combat, interesting puzzles, and some truly amazing spectacle. Whether you're a fan of the God of War series or not, God of War III is a fantastic game that deserves to be experienced.
God Of War Iii Pc
God Of War 3 Key For Pc
Main Game Features
Brutal combat with a new magic system
Dozens of bosses and unique enemies
High-resolution graphics and impressive scale
God Of War 3 Pc Download Overview. God of War 3 PC Download is another extraordinary aspect of the activity game arrangement. This time there is a remaster arranged on the event of the 10th commemoration of the arrangement and was likewise changed over to the PC Windows stage. Samsung S3 Volume Key As Camera Key Gauss Matrix Programming Language Funny Audio Clips In Telugu For Whatsapp Trouble Shooting Case 580 Ck Hydra Level God Of War 3 License Key.txt Titanium Wars Mod For Soulstorm Download Download Game Pc Masak Cummins Insite 8.3 Torrent Download Full Hd Bollywood Video Songs 1080p. Apr 03, 2018 NFS Most Wanted free. download full Version PC game also comes with new and enhanced graphics and mind blowing sounds. A huge list of Download now Direct download link (Windows) GOD OF WAR 3 PC VERSION + KEYGEN GENERATOR 1 9 D e c e m b.
Story
God of War III picks up immediately after the end of God of War II, with Kratos and the titan Gaia scaling Mount Olympus. Hellbent on revenge for Zeus' misgivings, Kratos fiercely battles against all that stands in his way. After an exciting fight against Poseidon and a failed attempt on Zeus' life, Kratos falls off the mountain and plummets into the Underworld. Despite this setback, Kratos vows to have his revenge and slowly begins the trek back to the top of Mount Olympus.Even when compared to the past two God of War games, God of War III has some exceptionally cool characters, bosses, and moments. Many of the most popular Greek gods like Poseidon, Aphrodite, and Hades are big players in the story, as Kratos attempts to kill each one of them. Your adventure takes you far across the fictional world of Greek mythology, extending the lore and universe within. Kratos' journey sees him locating Pandora's Box, exploring a dangerous labyrinth, and battling against countless foes. There's an impressive amount of drama and great closure to Kratos' story, resulting in a satisfying trilogy.
Gameplay
Apart from a few improvements, enhancements, and new mechanics, the gameplay in God of War III is very similar to past games. Playing as Kratos, you'll swing and smash through hundreds of enemies utilizing your wrist-bound blades. Levels are mostly linear, but there are plenty of hidden secrets scattered around to reward exploration. Chests often contain power-ups such as phoenix feathers and gorgon eyes, which improve your magic and health. As you progress through the adventure, you'll also discover new weapons that can be used for both combat and Puzzle-solving. Each weapon also has a dedicated magic attack, offering a bit of strategy.

Although the gameplay is exceptionally strong and the story is impressive, it's the flashy graphics and set-piece moments that really tie God of War III together. Right from the opening moments of the game, the sense of scale is truly impressive, as Kratos is dwarfed by the gigantic Titans around him. Powermic ii driver.
The high-resolution graphics offer clean and evocative environments, as well as exciting action encounters. God of War III is just as fun to watch as it is to play, thanks to its smart use of mythology and undeniably cool visuals. Erio connection usb modem direct driver.
God of War III is a great game for players who want to smash through tons of enemies, spill loads of blood, and feel more powerful every step of the way. That said, there's still plenty of nuance and variety to the game, evident in its complex narrative, interesting puzzle sections, and unique combat mechanics. Even when played on the lowest difficulty, you'll have to use your wits, as this is one of the most challenging God of War games yet. Mac os 7 for ipad. However, if you have the skill to see it through, God of War III will likely become one of your favorite third-person action games. https://foxservice497.tumblr.com/post/657264542810849280/video-grabber-for-mac-os.
Pros
Excellent storytelling and world-building
Bonus challenge mode
Awesome powers and items
Cons

Puzzles can be confusing at times
Occasionally frustrating combat
God Of War Iii Pc

God Of War 3 Key For Pc

Overall rating: 9
0 notes
Text
Wifite

A complete re-write of wifite, a Python script for auditing wireless networks. Cleaner process management. Does not leave processes running in the background (the old wifite was bad about this).
After choosing the Access Point in wifite in this case ‘EternalWIFI’, it will attempt to deauth the clients connected (disconnect the Clients). Those clients will then try to re-establish a connection and in doing so, wifite will capture the initial handshake packets which contain the password hashes.

Disclaimer: What you do with this information is up to you. You are fully responsible for what you do with this info, and how you use it. HackMethod is not responsible for your actions. Please do not hack Wifi points that you are not allowed to.
Wifite is a Python-script and it internally uses the Aircrack-ng suite. Apart from this, it has a couple of pre-requisites. But, all of them come pre-installed in Kali Linux.
NOTE: I do advise having a USB WiFi adapter, and an extra point would be to get a great one like the ALFA AWUS036NHR or AWUS051NH. Although any card would do as long as it supports monitor mode and packet injection.

Introduction
When it comes to the world of WiFi hacking, the possibilities are only limited by your imagination. Skilled hackers can combine attacks together for increased efficiency, and can also judge on which attack is best to use given a particular situation. By the end of this guide you should have an overall idea on the types of attacks that you can use against any WiFi-enabled AP or router.
Getting Started
The tool that this guide will be using is Wifite.
Now I wont be including how to do it using any other tools, because this should work just fine. I’ll leave the exploration up to you.
To get started, install Wifite on your machine by following the installation instructions that are stated here.
Scanning for Wifi points
Simply run wifite.py -i <wlan interface here *NOT IN MONITOR MODE*> or if you didnt understand the previous command simply use wifite.py and it will begin scanning for nearby access points and their features (Encryption method and if WPS is enabled or not).
NOTE: I always recommend to spoof your mac address using the --mac flag to the program or macchanger. Its for your safety.
Here are the 3 types of targets you can find:
WEP protected routers
WPA/WPA2 protected routers
Open routers
Now within those categories, you can find a feature called WPS (Wi-Fi Protected Setup) enabled, which uses an 8 digit PIN to add devices to a WiFi network without having to input long passwords.
Attacking WEP protected WiFi points
WEP is an old and depreceated way of protecting WiFi passwords, so if you find one, you are in luck. WEP takes substantially less time. This is easily automated in Wifite, and it even uses multiple attacks against routers to get the password. You only need around ~10 to 120 minutes to crack WEP, maybe longer. I cant say much because I have never seen any WEP protected routers were I live and never had the time to set one up and try myself.
Here is how the attack should look (picture taken from Wifite Github wiki):
Attacking WPA/WPA2 protected WiFi points
When it comes to WPA, we need to grab the handshake by deauthing clients who are connected to the router and sniffing the handshake as it goes. This is automated in Wifite, and it handles everything. Note: You may grab the handshake in a small amount of time, but cracking the hash itself will take a pure brute-force attack or a wordlist, which takes alot of time. Only use this method if you have a really powerful GPU/CPU or if all other options have failed.
Attacking WPS enabled WiFi points
Now comes the fun part, WPS cracking. There are 2 attacks you can do on WPS enabled routers, a WPS PIN bruteforce and a WPSPixie attack. The WPS PIN attack works online, as in all PIN guesses are actually sent to the router, while the WPSPixie attack works offline and without flooding the router with WPS PIN attempts.
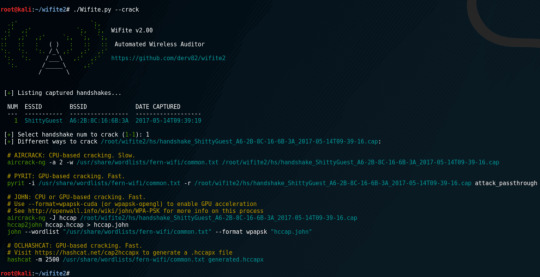
Now the obvious disadvantage about the WPS PIN attack is that some routers have on-board anti-bruteforce mechanisms and will stop accepting your attempts after a few attempts. I only go this route if the WPSPixie attack fails and there is no anti-bruteforce mechanism (Wifite will tell you if detects one).
The WPSPixie attack is one of the best attacks on Wifi points I have ever seen. In most cases, you can get the WiFi password in minutes or even a few seconds. Be aware that it may take up to 30 minutes in some cases, although I have never personally seen it go beyond 10 or so minutes. NOTE: The WPSPixie attack may not work on some routers, and you will have to choose a different route. (Wifite will also notify you if the WPSPixie attack will not work.
Automated Wireless Pentesting/Hacking With Wifite In Kali Linux 2020.4(Tutorial)
NOTE: Sometimes you will see that Wifite gets stuck at Waiting for beacon from 'xx:xx:xx:xx'. If it gets stuck for a while at this point, press CTRL+C and move on to a different target.
WiFi Hacking: How To Use Wifite To Capture WPA2 Handshakes
Wifite hacking WPS enabled points using WPS PIN Bruteforce

Conclusion
So thats pretty much it when it comes to hacking WiFi using Wifite. There are other ways of doing this, such as using the aircrack-ng suite of tools and/or using dedicated WPS hacking tools such as reaver. Additionally, this guide is only but a small slice of the world of wireless hacking, so be sure to stay tuned for more wireless hacking tutorials soon!
In this article series, we will look at a tool named Wifite suitable for automated auditing of wireless networks. Most of you who have experience in wireless pentesting would use tools like airmon-ng, aireplay-ng, airodump-ng, aircrack-ng to crack wireless networks. This would involve a sequence of steps, like capturing a specific numbers of IV’s in case of WEP, capturing the WPA handshake in case of WPA etc, and then subsequently using aircrack-ng to crack the password required for authentication to the network. Wifite aims to ease this process by using a wrapper over all these tools and thus making it super easy to crack Wifi networks.
Here is a list of features of Wifite as per its official homepage.
How To Use Wifite
sorts targets by signal strength (in dB); cracks closest access points first
automatically de-authenticates clients of hidden networks to reveal SSIDs
numerous filters to specify exactly what to attack (wep/wpa/both, above certain signal strengths, channels, etc)
customizable settings (timeouts, packets/sec, etc)
“anonymous” feature; changes MAC to a random address before attacking, then changes back when attacks are complete
all captured WPA handshakes are backed up to wifite.py’s current directory
smart WPA de-authentication; cycles between all clients and broadcast deauths
stop any attack with Ctrl+C, with options to continue, move onto next target, skip to cracking, or exit
displays session summary at exit; shows any cracked keys
all passwords saved to cracked.txt
built-in updater: ./wifite.py -upgrade
Before we start using wifite, make sure you have a proper wireless card that supports packet injection. If you don’t have one, i would suggest that you buy this card.
Note that there is a bug in Wifite that may or may not be there in your particular version of Wifite. The bug basically doesn’t aireplay-ng to function properly and displays an error like aireplay-ng exited unexpectedly . In order to fix this, you will have to make slight modifications in the code of wifite. You can install gedit (apt-get install gedit) which is a text editor and then edit the wifite python script (found in /usr/bin/wifite) using the steps mentioned here. To open wifite, use the command gedit /usr/bin/wifite. This will open up the source code of wifite. Then replace every occurence of cmd = (‘aireplay-ng’, with cmd = (‘aireplay-ng’,‘—ignore-negative-one’,
Wifite can be found under Applications –> Kali Linux –> Wireless Attacks –> 802.11 Wireless Tools. Also, note that if you are running wifite in a different VM than Kali Linux, then you have to make sure that tools like airmon-ng, aireplay-ng, airodump-ng, aircrack-ng are already installed on that system. This is because Wifite is nothing but a wrapper over all these tools. Before we even start using Wifite, it is better to update to the latest version.
In my case, i already have the latest version. In this tutorial, we will be targeting a simple Wifi network with WEP encryption. Just using the command wifite -h will give you a list of all the commands.
A very tempting option would be -all which tries to attack every network that it finds. We will try it in later articles in this series. However, first lets take a look at all the targets that we have. To do that, use the command wifite -showb
Once this is done, we can see that wifite has put our network interface card into monitor mode (using airmon-ng) and started to look for clients. After a few more seconds, it will start displaying the list of access points.
Note that as it is mentioned in its feature list (automatically de-authenticates clients of hidden networks to reveal SSIDs), this list will also include hidden access points. Hence, wifite can also be used to find hidden access points. In this case we will attack an access point with the BSSID 00:26:75:02:EF:65 that i have set up for testing purposes. The access point has a simple WEP password 1234567890.
To start attacking an access point, just press Ctrl+C. Wifite will now ask you to choose a target number from the list. The target number for my test network is 1, so let me enter that. Note that if you press Ctrl+C again, it will quit Wifite.
You can now see that Wifite will start attempting to crack the WEP access point using the different known techniques for cracking WEP encryption. After some unsuccessful tries, it has finally begun to start attacking the access points using different techniques for cracking WEP.
Once enough IV’s are being captured, it will automatically start cracking the password.
As we can see, Wifite has successfully figured out the WEP key for the access point. Wifite is an extremely useful tool for cracking wireless networks. As i mentioned previously, you need to have all the tools like airmon-ng, aireplay-ng, airodump-ng, aircrack-ng already installed on your system. To further prove the point, let’s dive into the source code of Wifite.
Wifite2
As we can see, the python code has mentions of calling aireplay-ng. Hence, it is recommended to run Wifite inside Kali linux.
More Videos For Wifite »
In the next article, we will look at some advanced usage options of Wifite.
0 notes
Text
Erio Connection Usb Modem Direct Driver

ERIO CONNECTION USB MODEM DIRECT DRIVERS FOR WINDOWS - uploaded on, downloaded 13 times, receiving a 4.4/5 rating by 12 users. USB driver Installation Insert an USB cable on the LCT connector of a working ALC plus. I used to connect the USB modem to my desktop (Windows XP) then attaching an ethernet cable from the network card in my desktop too the MODEM input on the router. Somehow, after fiddling around. Erio Connection Usb Modem Direct Driver Download Star Plus Serial Actress Navel Photos Teac Fd 05pub Driver Windows 10. Usb Vid1a86&pid7523&rev0254 Driver.
Erio Connection Usb Modem Direct Drivers
Jul 15, 2018 Connect using direct serial cable and push Settings see fig. Hindi Natak Script Free Download. 3 – Modem selection 7. Select the USB connection: Modem – Erio Connection. Windows cannot verify the digital signature for the drivers. Then I looked into device manager and it showed yellow flag on device drivers for USB modem with below.
Erio Connection Usb Modem Direct Driver Download Star Plus Serial Actress Navel Photos Teac Fd 05pub Driver Windows 10 Brad Mehldau Transcription Pdf Encharta Abac Air Compressor Manual Giants Editor For Mac Il Minihost Modular Download Winscp For Mac Free Download.

1 10/18/2019 Direct Wire with CIA Modem Contents Direct Wire with CIA Modem ....................................................................................................................................... 1 Things needed: ........................................................................................................................................................... 2 Connecting the 15p/20p and family equivalents ........................................................................................................ 2 Connecting to the 40/50p/128bp/250bp and family equivalents ................................................................................ 5 Troubleshooting Direct Connect with the Modem .................................................................................................... 8 Metering the voltages on the cable ...................................................................................................... 8 Timing .................................................................................................................................................... 8 Modem .................................................................................................................................................. 8 USB Adapters ........................................................................................................................................ 8 Making your own WATELCO Cable ........................................................................................................................ 9 2 10/18/2019 Hardware and Software Needed 1. Watelco cable (cable is grey with flying leads on it. Colors are red, black, green and yellow) comes with the CIA modem 2. Current release of compass 3. Cia modem 4. Usb to serial adapter if comport is not available on the computer. Make sure that all phone lines are disconnected from the panel before following these steps Connecting the 15p/20p and family equivalents 1. Connect the Watelco cable to the panel as follows: • Red to tip • Green to ring • Black to Aux Negative or to an alternate power source • Yel low to Aux Positive or to an alternate power source Yellow and Black can be ran to an alternate power source that gives an output of 13.5vdc. Make sure that the Watelco cable is connected into the ‘LINE’ section of the modem 3 10/18/2019 2. Open compass and select the appropriate customer. Once i n the account go to ‘tools’ , then select ‘communication’ . 3. The ‘compass communications’ screen will be displayed . Click on ‘connect’ at the bottom left of the screen. 4 10/18/2019 4. When the ‘communications’ screen is displayed choose ‘initiate from Telco’ . Choose the appropriate connection method : • ‘Use Account CSID ’ if it’s been connected to before • ‘First Time Communication’ if this is the first time or the panel is default. The ‘ Account # I n Panel ’ option i s used when the account number in compass matches the account number in the panel. 5. Click ‘Connect ’ 6. At th e keypad start the panel by pressing the ‘ Installer code # 1 ’. • After you enter this syntax “Modem Com ” or “CC” will come up on the keypad and y ou will then hear the panel go off hook. • The modem will give the hand shake tone and you will then hear the panel send its hand shake. Once connected those tones will stop if you have the ‘Off after connect’ selected in the modem setup. 7. If the connection does not work try to change the programming in the panel: • *96 - defaults the CSID and the Account number • *43 - enter in the account number • *48 -needs to be a 7 for 4 digit CID • Try connection again 5 10/18/2019 Connecting to the 40/50p/128bp/250bp and family equivalent s 1. Connect the Watelco cable to the panel as follows: • Red to tip • Green to ring • Black to Aux Negative or to an alternate power source • Yellow to Aux Positive or to an alternate power source Yellow and Black can be ran to an alternate power source that gives an output of 13.5vdc. Make sure that the Watelco cable is connected into the ‘LINE’ section of the modem 2. Now open compass and open the appropriate customer. In the account go to ‘tools’ then select ‘communication’ . 6 10/18/2019 3. The ‘compass communications’ screen will be displayed. Click on ‘connect’ at the bottom left of the screen. 7 10/18/2019 4. When the ‘communications’ screen is displayed choose ‘initiate from Telco’ . Choose the appropriate connection method: • ‘Use Account CSID ’ if it’s been connected to before • ‘First Time Communication’ if this is the first time or the panel is default. The ‘ Account # I n Panel’ option is used when the account number in compass matches the account number in the panel. 5. Click ‘Connect’ 6. At the keypad start the panel by pressing the ‘ Installer code # 1 ’. • After you enter this syntax “Modem Com” or “CC” will come up on the keypad and you will then hear the panel go off hook. • The modem will give the hand shake tone and you will then hear the panel send its hand shake. Once connected those tones will stop if you have the ‘Off after connect’ selected in the modem setup. 7. If the connection does not work try ma king changes in the programming: • *36 -default the CSID to do so enter the number 15 eight times , you will then hear the confirmation beep • *32 - enter the account number • *45 - need to be a 1 for 4 digit CID • Try the connection again 8 10/18/2019 Troubleshooting Direct Connect with the M odem Metering the voltages on the cable • Black to Yellow = 13.5v dc this will be the same voltage you will have on the aux power or alternate power source • Red to Green= 13.5v dc • If you are not reading the 13.5v dc on red and green , try disconnecting th em from the panel and meter again. Should the voltage not be there but you do read the 13.5v dc on black and yellow then replace the cable. Timing • Watch the timing when pressing connect in compass . Typically, you have 10 -15 seconds between pressing connect in compass and pressing the “Installer Code #1” on the panels keypad. • If the panel and compass do not connect, you will hear a long solid tone come from the modem letting you know the connection failed. • If you are not seeing “M odem Com ” or “CC” on the keypad make sure that the dialer is not active. The panel will not go into modem com if it’s trying to dial out. Also make sure that you are using the correct installer code. Modem If you are getting the ‘U nable To Initialize Modem!’ error • Check the cable going from the computer to the modem • Check to make sure the modem has proper power • Check usb adapter for power and proper setup • Add the modem to windows and try and communicate with it that way( If the query fails when adding the modem to windows try a new rs232 cable or a new modem) • Lights on the front of the modem will not come on until a command is sent to set up communication. USB Adapters • Verify the serial adapter driver is installed properly • Check what com port the adapter is emulating and then verify that it’s the same one added in compass • Check buffer settings for that port. Make sure that the FIFO buffers are set to low. Some ports will let you go to 1 and other will go as low as 8. Make sure its set to the lowest setting other than 0. • Use an approved usb to serial adapter. • Try changing the adapter to emulate a d ifferent com port • Some usb adapter s will come with a set up assistant that you can change the com port settings. Be low is Honeywell’s official statement concerning the use of USB TO SERIAL adapters with Compass downloader : “The Universal Serial Bus connection may be used in conjunction with 3rd party, USB to serial conversion products. Honeywell only indirectly supports these applications, and has had success with the following: 1. Keyspan (tripplite) : High Speed USB Serial A dapter for windows Part number USA -19HS , this unit has been tested, and is appr oved for direct connect, via the 4100SM, and the CIA modem, when emulating COM 1 - COM 4. 9 10/18/2019 Making your own WATELCO Cable If you do not have the Watelco cable you can make your own following the diagram below: 1. Take a standard telephone cable with the RJ -11 jacks on it, cut one end off 2. Cut off the black and the yellow cable so you only have the Red and Green left 3. On th e red cable splice in the yellow wire along with a 150 Ohm ½ watt resistor between the Red and Yellow cable 4. Then Take the Black cable and splice it in with the Green cable 5. Now you can connect the cable to the panel following the steps at the beginning of the document .

Erio Connection Usb Modem Direct Drivers
1 10/18/2019 Direct Wire with CIA Modem Contents Direct Wire with CIA Modem ....................................................................................................................................... 1 Things needed: ........................................................................................................................................................... 2 Connecting the 15p/20p and family equivalents ........................................................................................................ 2 Connecting to the 40/50p/128bp/250bp and family equivalents ................................................................................ 5 Troubleshooting Direct Connect with the Modem .................................................................................................... 8 Metering the voltages on the cable ...................................................................................................... 8 Timing .................................................................................................................................................... 8 Modem .................................................................................................................................................. 8 USB Adapters ........................................................................................................................................ 8 Making your own WATELCO Cable ........................................................................................................................ 9 2 10/18/2019 Hardware and Software Needed 1. Watelco cable (cable is grey with flying leads on it. Colors are red, black, green and yellow) comes with the CIA modem 2. Current release of compass 3. Cia modem 4. Usb to serial adapter if comport is not available on the computer. Make sure that all phone lines are disconnected from the panel before following these steps Connecting the 15p/20p and family equivalents 1. Connect the Watelco cable to the panel as follows: • Red to tip • Green to ring • Black to Aux Negative or to an alternate power source • Yel low to Aux Positive or to an alternate power source Yellow and Black can be ran to an alternate power source that gives an output of 13.5vdc. Make sure that the Watelco cable is connected into the ‘LINE’ section of the modem 3 10/18/2019 2. Open compass and select the appropriate customer. Once i n the account go to ‘tools’ , then select ‘communication’ . 3. The ‘compass communications’ screen will be displayed . Click on ‘connect’ at the bottom left of the screen. 4 10/18/2019 4. When the ‘communications’ screen is displayed choose ‘initiate from Telco’ . Choose the appropriate connection method : • ‘Use Account CSID ’ if it’s been connected to before • ‘First Time Communication’ if this is the first time or the panel is default. The ‘ Account # I n Panel ’ option i s used when the account number in compass matches the account number in the panel. 5. Click ‘Connect ’ 6. At th e keypad start the panel by pressing the ‘ Installer code # 1 ’. • After you enter this syntax “Modem Com ” or “CC” will come up on the keypad and y ou will then hear the panel go off hook. • The modem will give the hand shake tone and you will then hear the panel send its hand shake. Once connected those tones will stop if you have the ‘Off after connect’ selected in the modem setup. 7. If the connection does not work try to change the programming in the panel: • *96 - defaults the CSID and the Account number • *43 - enter in the account number • *48 -needs to be a 7 for 4 digit CID • Try connection again 5 10/18/2019 Connecting to the 40/50p/128bp/250bp and family equivalent s 1. Connect the Watelco cable to the panel as follows: • Red to tip • Green to ring • Black to Aux Negative or to an alternate power source • Yellow to Aux Positive or to an alternate power source Yellow and Black can be ran to an alternate power source that gives an output of 13.5vdc. Make sure that the Watelco cable is connected into the ‘LINE’ section of the modem 2. Now open compass and open the appropriate customer. In the account go to ‘tools’ then select ‘communication’ . 6 10/18/2019 3. The ‘compass communications’ screen will be displayed. Click on ‘connect’ at the bottom left of the screen. 7 10/18/2019 4. When the ‘communications’ screen is displayed choose ‘initiate from Telco’ . Choose the appropriate connection method: • ‘Use Account CSID ’ if it’s been connected to before • ‘First Time Communication’ if this is the first time or the panel is default. The ‘ Account # I n Panel’ option is used when the account number in compass matches the account number in the panel. 5. Click ‘Connect’ 6. At the keypad start the panel by pressing the ‘ Installer code # 1 ’. • After you enter this syntax “Modem Com” or “CC” will come up on the keypad and you will then hear the panel go off hook. • The modem will give the hand shake tone and you will then hear the panel send its hand shake. Once connected those tones will stop if you have the ‘Off after connect’ selected in the modem setup. 7. If the connection does not work try ma king changes in the programming: • *36 -default the CSID to do so enter the number 15 eight times , you will then hear the confirmation beep • *32 - enter the account number • *45 - need to be a 1 for 4 digit CID • Try the connection again 8 10/18/2019 Troubleshooting Direct Connect with the M odem Metering the voltages on the cable • Black to Yellow = 13.5v dc this will be the same voltage you will have on the aux power or alternate power source • Red to Green= 13.5v dc • If you are not reading the 13.5v dc on red and green , try disconnecting th em from the panel and meter again. Should the voltage not be there but you do read the 13.5v dc on black and yellow then replace the cable. Timing • Watch the timing when pressing connect in compass . Typically, you have 10 -15 seconds between pressing connect in compass and pressing the “Installer Code #1” on the panels keypad. • If the panel and compass do not connect, you will hear a long solid tone come from the modem letting you know the connection failed. • If you are not seeing “M odem Com ” or “CC” on the keypad make sure that the dialer is not active. The panel will not go into modem com if it’s trying to dial out. Also make sure that you are using the correct installer code. Modem If you are getting the ‘U nable To Initialize Modem!’ error • Check the cable going from the computer to the modem • Check to make sure the modem has proper power • Check usb adapter for power and proper setup • Add the modem to windows and try and communicate with it that way( If the query fails when adding the modem to windows try a new rs232 cable or a new modem) • Lights on the front of the modem will not come on until a command is sent to set up communication. USB Adapters • Verify the serial adapter driver is installed properly • Check what com port the adapter is emulating and then verify that it’s the same one added in compass • Check buffer settings for that port. Make sure that the FIFO buffers are set to low. Some ports will let you go to 1 and other will go as low as 8. Make sure its set to the lowest setting other than 0. • Use an approved usb to serial adapter. • Try changing the adapter to emulate a d ifferent com port • Some usb adapter s will come with a set up assistant that you can change the com port settings. Be low is Honeywell’s official statement concerning the use of USB TO SERIAL adapters with Compass downloader : “The Universal Serial Bus connection may be used in conjunction with 3rd party, USB to serial conversion products. Honeywell only indirectly supports these applications, and has had success with the following: 1. Keyspan (tripplite) : High Speed USB Serial A dapter for windows Part number USA -19HS , this unit has been tested, and is appr oved for direct connect, via the 4100SM, and the CIA modem, when emulating COM 1 - COM 4. 9 10/18/2019 Making your own WATELCO Cable If you do not have the Watelco cable you can make your own following the diagram below: 1. Take a standard telephone cable with the RJ -11 jacks on it, cut one end off 2. Cut off the black and the yellow cable so you only have the Red and Green left 3. On th e red cable splice in the yellow wire along with a 150 Ohm ½ watt resistor between the Red and Yellow cable 4. Then Take the Black cable and splice it in with the Green cable 5. Now you can connect the cable to the panel following the steps at the beginning of the document .
0 notes
Text
Signing Naturally Units 1-6 Video

Signing Naturally Units 1-6 Video Free
Signing Naturally Units 1-6 Video
Signing Naturally Units 1-6 Videos Who What When
Signing Naturally Units 1-6 Videos
Signing Naturally Units 1-6 Video Free

Overview
Features include homework for out-of-class study that corresponds to classroom lessons. A topic index allows students to find specific parts of their homework that include key vocabulary and grammar. Culture notes and bios of amazing Deaf people increase students' understanding of the Deaf World.
Seven and an half hours of video on the DVDs feature 12 diverse native signers modeling clear American Sign Language. Signing is paced for new learners. DVD functions also allow students to answer questions before moving on.
Signing Naturally Units 1-6 Video
Signing Naturally Unit 1-6 Videos? Hey folks, I am an ASL student and I have been trying to find a digital version of the Signing Naturally Level 2 book.
Signing Naturally Units 1-6 Videos Who What When
Get your Signing Naturally (Units 1-6)(St Wkbk)(w/2DVDs &BndIn Access) (Pt1816) here today at the official Fresno City College Bookstore site. Look around for more while you’re here. Print cd labels for mac. Flat-rate shipping, so one low price ships as much as you want in each order! Signing Naturally: Student Workbook, Units 1-6 (Book & DVDs) by Cheri Smith (Paperback) Download Signing Naturally: Student Workbook, Units 1-6 (Book & DVDs) or Read Signing Naturally: Student Workbook, Units 1-6 (Book & DVDs) online books in PDF, EPUB and Mobi Format. Click Download or Read Online Button to get Access Signing Naturally: Student Workbook, Units 1-6 (Book & DVDs) ebook. Start studying Signing Naturally Unit 1 (video). Learn vocabulary, terms, and more with flashcards, games, and other study tools.
Signing Naturally Units 1-6 Videos
Signing Naturally is one of the most widely used ASL curriculums throughout the United States and Canada. And now you can see for yourself, Signing Naturally Units 1-6 is truly the BEST Made Better!
0 notes
Text
Powermic Ii Driver

PowerMic II
PowerMic III
Philips
Powermic Ii Driver Download
Powermic Ii Drivers Nuance
Powermic Ii Drivers
Powermic Ii Driver Windows 7
Key Features:

USB connectivity for easy plug and-play installation as well as eliminating the need for sound card-enabled PCs Unidirectional microphone with noise-cancellation ensures higher accuracy in even the noisiest environments

Download ASUS PRIME Z370M-PLUS II AISuite3 driver v.3.00.38 for Windows 10 64-bit. Download is free of charge. The PowerMic II is black in color and has labeling on the microphone itself that can be used to identify the firmware version and Vista compatibility. The serial number beginning with the following prefixes indicates firmware version 2.02, or higher, which makes the microphone VISTA compliant.

Powermic Ii Driver Download
Technical specifications
Powermic Ii Drivers Nuance
USB: 1.1 or higher
Supported Environments: Citrix® Receiver v.4.9
Frequency Response Input/Output
Microphone 20 - 16,000 Hz
Speaker 500 - 5,000 Hz
Signal-to-Noise Ratio: +70db
Powermic Ii Drivers
If you are interested in acquiring a PowerMic please contact your Departmental Administrator for more information.
Powermic Ii Driver Windows 7
Some CPMP doctors may be able to use their ‘Indirect’ funds. There may be non-sanctioned microphones that will work, particularly for use at home. We recommend finding a USB microphone, with noise cancellation.
0 notes
Text
Sd Card For Mac

What is SD?
SD describes devices that conform to SD standards for non-volatile memory cards. See the SD Association website for details.
macOS 10.13 – High Sierra. Ntfs paragon for mac 14. macOS 10.15 – Catalina. OS X 10.11 – El Capitan. macOS 10.14 – Mojave. macOS 10.12 – Sierra.
The MagPi issue 98. Discover Raspberry Pi portable computing in the latest edition of The MagPi. Read it now HackSpace issue 35. Forget the world of work for a while and build a full-sized arcade cabinet, complete with clicky buttons, joystick and even a coin machine to extort money from yourself. SD Card Reader, uni Sturdy USB C to Micro SD Memory Card Reader Adapter Aluminum Shell, High Speed Thunderbolt 3 Compatible for Galaxy S20, MacBook Pro/MacBook Air/iPad Pro 2020, Surface Book 2 4.5 out of 5 stars 3,963. How to Erase SD Card Using Mac: Another method that you can use to delete files on the SD card using Mac is the Disk Utility feature. It is more like a formatting method instead of a simple erasure. The files deleted with this method may or may not be available for recovery. Why Delete Everything on Mac: It is a debatable question. People often argue about the importance. Browse the top-ranked list of Mac Sd Cards below along with associated reviews and opinions. SanDisk - Extreme PLUS 32GB microSDHC UHS-I Memory Card. Model: SDSQXSG-032G-ANCMA. Rating 4.8 out of 5 stars with 6705 reviews (6,705 reviews) Top comment.
Are there size limitations for the cards that can be inserted into the SD slot?
Yes. The SD card specification for a memory card is 32mm by 24mm by 2.1mm. You can also use thinner cards, such as MultiMediaCards (MMC). Avoid using cards that have a thickness greater than 2.1mm, as they might damage the SD card slot if you try to insert them.
Which SD card formats work in the SD card slot?
Cards that conform to the SD 1.x, 2.x, and 3.x standards should work. The SD card slot can use:
Standard SD, 4MB to 2GB
SDHC (Secure Digital High Capacity), 4GB to 32GB
SDXC, 4GB to 2TB
MMC (MultiMediaCards)
UHS‑II, up to 2TB (iMac Pro only)

You can use a passive adapter like the one shown here to make MiniSD, MicroSD, and higher density formats like MiniSDHC and MicroSDHC conform to the width and thickness specifications listed above:
How fast can my Mac read or write to an SD card in the SD card slot?
Mac notebooks use the USB bus to communicate with the SD card slot. They have a maximum speed of up to 480Mbit/s. Mac desktops use the PCIe bus to communicate with the SD card slot. Desktops can transfer data at a faster rate.
Check the packaging that came with your SD media to determine the maximum transfer rate that your specific card uses.
To determine the maximum transfer speed of your Mac, you can use System Information. Choose Apple () menu > About This Mac and then click System Report.
Sd Card For Macbook Air
If you use a Mac notebook:
Select Hardware, then select USB.
Select Internal Memory Card Reader and look for the Speed entry.
If you use a Mac desktop computer:
Select Hardware, then select Card Reader.
Look for the Link Speed entry. Computers that use the PCIe bus express their speed as GT/s.

Does the SD slot work with cards that exceed 32GB?
Yes. However, most media manufacturers preformat the media using common block-and-cluster sizes that don’t approach the theoretical limits of a given file system.
Most SD cards use the FAT32 file format, and preformatted FAT32 SD media is commonly available up to a capacity of 32GB. Media that exceeds 32GB usually uses the exFAT file system, while some smaller capacity cards use the FAT16 file format. Preformatted FAT16 media is generally available up to a capacity of 2GB.
If you use OS X Snow Leopard 10.6.5 or later, you can find out which file system you’re using:
Insert the media into the SD card slot.
Choose Apple menu > About This Mac.
Click System Report.
In the Hardware section, click Card Reader, and find the File System field.
Will the SD card slot work with SD cards that use the exFAT file system?
Yes. Any Mac that has an SD card slot and is running OS X 10.6.5 or later can use the exFAT file system.
exFAT is also supported in Boot Camp with Windows 7, 8.1, or 10 on any Mac made in 2011 or later with an SD card slot.
How do I insert media into the SD card slot?
When you insert the card, make sure that the metal contacts face down and point toward the computer. Don’t force media into the SD card slot, as this might cause damage.
How does my Mac use the media inserted into the SD card slot?
Your computer recognizes a card inserted into the SD card slot as a USB storage device. You can mount, read from, and write to the SD card just like you can with any other USB storage device.
For this setup, Morrison used the 2018 Mac Mini to put macOS on a 2018 iPad Pro. The Mac Mini powers the whole experience, and basically uses the iPad Pro as an external display — but all of the. Mac os 7 for ipad 6th generation.
I put the card in the slot, but it didn’t mount. What should I do?
Remove the card and insert it again. Sometimes the SD card won’t mount properly if you put it into the slot too slowly.
When I try to write content to the card, I get a 'cannot be modified' message. How can I fix this?
You see this message when you try to edit data on an SD card that’s locked. You need to use the lock slider to unlock the card before you can edit the data.
To eject the card, drag the icon that represents the card to the Trash. After the icon disappears from the desktop, you can remove the card from the computer. Adjust the lock slider tab to unlock the card, then reinsert the card into the slot. See the manufacturer’s instructions for the location of the slider tab.
Can I use Disk Utility to reformat an SD card?
You can use Disk Utility to partition and format an SD device as FAT32 (using the MS-DOS FAT setting) or Mac OS Extended. The Mac OS Extended format can be used only on Macintosh systems. Non-Apple systems won’t recognize cards formatted to Mac OS Extended.
You might have to format a card that’s larger than 32GB with exFAT if you want to use it with a digital camera, GPS, or another device. When in doubt, format the card in the device that you intend to use it with.
Can I install macOS on an SD storage device and use it as a startup volume?
Use Disk Utility to change the default partition table to GUID. Then format the card to use the Mac OS Extended file format.
How do I remove a card from the SD card slot?
Before you remove the card, allow any data transfer to SD media to complete. To eject the card, drag the icon that represents the card to the Trash. After the icon disappears from your desktop, you can remove the card from the slot.
Don't remove a card while your Mac is sleeping, as this could lead to data loss. Always wake your computer and eject the SD card before removing it from your Mac.
Can I use Secure Digital Input Output (SDIO) cards?
Can I use macOS to see the specifications for the interface hardware and media inserted in the SD card slot?
You can get information about the interface hardware and the media that you inserted in the slot from the System Information:
Choose Apple menu > About This Mac.
Click System Report.
In the Hardware section of System Information, select USB.
In the list of USB devices, select Internal Memory Card Reader to access information about the interface hardware and the media inserted into the SD card slot.
Can I use the SD card slot while running Windows using Boot Camp?
How To Format Sd Card
The SD card slot works with Boot Camp in all supported versions of Windows. You’ll need to download and install the Windows Support Software to use the SD card slot with Windows.
Learn more about using Windows on a Mac.
Can I use an SDXC card on my Mac with Windows?

You can use an SDXC card in Windows 7, Windows 8, and Windows 10 with these Mac computers:
MacBook Pro (Early 2011 and later) MacBook Pro models from 2016 and later don't have a built-in SD card slot. You can use a USB-C card reader, or a combination of a USB-C to USB Adapter and a USB card reader.
MacBook Air (Mid 2011 and later)
Mac mini (Mid 2011 and later) Mac mini (Mid 2010) doesn't support SDXC cards.
iMac (Mid 2011 and later) iMac (Mid 2010) doesn't support SDXC cards.
Can I use an SD, SDHC, or SDXC card to install Windows on my Mac?
Sd Card For Mac Air
No. You can’t use SD, SDHC, or SDXC cards with Boot Camp to install Windows software on Mac computers.
Formatting an SD or a Micro SD card on Mac is a super simple process that will not take you longer than 3 minutes.
Sd Card For Macbook
The only little stumbling block is some Macs don’t have an SD card reader (post-2015 MacBook Pros) and some do.
To get around that you’ll most likely need a thing called an SD card adapter which can wonder at times to save the in-deficiencies on Macs. (you don’t need to get one if your Mac has an SD card slot)
The one I’m using personally is the Anker 8-in-1 card reader which at US$9.99 is a pretty good deal on Amazon. You can carry it around wherever you travel and most importantly it can last.
In this guide, I’ll show you how you can format an SD card or a Micro SD card on your Mac.
Note ⚠️
Formatting an SD card or Micro SD card means it will erase all the data on the card too. So even though you’re dying to re-format your card to a different file system format as quickly as possible, it’s important that you backup all of the data (if any) just in case if you need them in the future.
Let’s dive right in.
How to Format an SD or Micro SD Card on Mac: 7 Steps
Connect the SD card or microSD card that you’re trying to format to your Mac.
Next, open up your Applications folder (it’s on your Mac’s dock). Then look for the Utilities. Inside the Utilities folder, click on Disk Utility.
Good. Now find and select your SD card from the column on the left. Do you see it?
Next, simply click the Erase tab at the very top menu under the page heading “Disk Utility”.
Let’s choose the format we want to format our SD card. From the pop-up menu which says Erase “your_SD_Card_name”? you can rename the SD Card as well as choose the format from the dropdown list of formats available.
Once you’ve chosen your format, simply hit the Erase button. This will now begin the process of formatting your SD card or microSD card.
Finally, once the formatting is done, make sure to get too excited and pull out the damn SD card like your pulling out, urm, I can’t really think of an analogy to put here. Just be sure to find the formatted SD card from the left-hand sidebar and then press the Eject button.
If you‘re asking the question “Why am I not allowed to format my SD card or microSD card to MS-DOS?” then know that you really can’t. This is because the Disk Utility tool will not allow you to format SD cards or microSD cards which are 32GB or smaller in size. You’ll find that the option for MS-DOS will be grayed out.
How To Format Sd Card For Mac
You should try and go with exFAT instead of in this case. 🙂
Don’t forget to share this guide.
0 notes
Text
Microsoft Office Download For Mac Os

Microsoft Office Home and Business 2019 for Windows/Mac, 1 User, Download (T5D-03190) Item # 24364412. Model # 9LPM94WAX48T22D. Including Microsoft Windows and Apple OS X computers and Android, iOS and Windows tablets and phones. Microsoft Office business online services, such as OneDrive and Skype, are backed by a 99.9 percent up-time. Download Microsoft Remote Desktop for macOS 10.13 or later and enjoy it on your Mac. Use Microsoft Remote Desktop for Mac to connect to a remote PC or virtual apps and desktops made available by your admin. With Microsoft Remote Desktop, you can be productive no matter where you are. Microsoft Office Productivity MileIQ: Mileage Tracker.
Microsoft Office 2016 for Mac free. download full version is a must-have productivity and business suite with its complete set of applications. It’s used by most company and education institution throughout the world. Even though there are many alternatives, this software used by more than 1 billion PC computers in the world. Recently, Microsoft unveiled Office for iOS, which runs on iPhones and iPads and also Microsoft office to the mac device such as MacBook Pro and iMac. Anyone with one of these devices can open, edit and save any MS Office documents (Word), spreadsheets (Excel), and PowerPoint presentations within windows and mac freely. Amazing right?
It has all of the features and tools, exactly the same as the windows version. Yet there are changes with the design and features interface, although it doesn’t really of much difference. Do you want to try this software before buying it officially? Download microsoft office 2016 for mac free down below for MacOS Mojave.
Just remember that moment when your friend brought their external drive to copy over the movies you promised, and you didn’t understand why you couldn’t drag and drop the file onto it. Since the introduction of Windows NT 3.1, Microsoft has used NTFS.The problem is macOS lacks native support for NTFS: you can read data from drives formatted with the Windows NT file system, but cannot write to it. Paragon ntfs mac free.
8 reasons to choose the MacBook over iPad ProMultitasking The lack of true multitasking is the top reason why I don’t yet buy into the “replace your laptop with an iPad” argument.Apple’s iOS 9 added on the iPad Pro (as well as on some other recent iPads). As of this writing, Apple Pay is only available on iPads, iPhones, and Apple Watch. Mac os 7 for ipad. These offer a big productivity boost, and without them the iPad Pro wouldn’t be a feasible laptop alternative.
This free video capture software is not limited to only a few features but, you can also perform various activities like editing, record video in a different format, and much more.You may wonder how can I find an excellent video capture software right now? Video grabber review. Free video capture software is very useful for capturing high-quality videos that you performed on your device like a computer, mobile phone, or tablet, and meanwhile, you don't want to spend much money on buying a paid recorder.
Microsoft Office for Mac 2016 Features
Additional Ribbon Buttons
Enhanced Collaboration between application
New Outlook Mentions
New and Improved Connection Options for Excel
You can now publish your file directly to docs.com
There’s even another publishing online features to Power BI
All new ms word researcher toolbar
There’s a new “suggest a feature” button on the file > feedback
All new text highlighter
Powerpoint now can zoom with a new toolbar
Skype new integration
Support MacOSS Mojave
Office 2016 Mac System Requirements :
Microsoft Office Free Download For Mac Os Mojave

Mac computer with an Intel processor
Mac OS X version 10.10
Recommended 1 GB of RAM
5,62 GB of free hard disk space
Hard disk formatting such as HFS + (also known as Mac OS Extended or HFS Plus)
A monitor with 1280×800 resolution or higher
Recommended Safari 7
How to Install Microsoft Office 2016 For Mac v16.17 Full Crack
Download microsoft office 2016 mac full crack
Unzip the file to any folder
Mac users must Disable SIP and Allow Apps From Anywhere
Run the DMG file to start the installation
Download Crack Fix, run Microsoft_Office_2016_VL_Serializer.pkg
Apply the crack and start any program
Enjoy!


Also Download :Microsoft Office 2019 Mac
Download Microsoft Office 2016 Mac Full Crack (Mojave)
Free Microsoft Office Download For Mac Os X

Installer Only | MegaNZ | Google Drive
Microsoft Office For Mac
Crack Fix VL 16.17 | ZippyShare | FileUpload
Microsoft Office Free For Mac
Filesize : 1.7 GB | Password : www.yasir252.com
0 notes
Text
Print Cd Labels For Mac

Print Cd Labels For Mac Free
Print Cd Labels For Mac Computers
Print Cd Labels Mac
Print Cd Labels For Mac Osx
If you have CD/DVD discs with your favorite music, downloaded movies, photos, memories or other golden moments on them, you can make CD labels for these discs, which will give them an attractive look. Your own design of CD label will make it different from other discs.
Ordering designed and printed CD DVD labels sometimes is expensive. So if you want to print CD labels, you can use a specialized program. https://foxservice497.tumblr.com/post/657264458945675264/mac-os-7-for-ipad. The main reason people don't consider making their own printed CD labels themselves is that they think it is a time-consuming process as well as difficult and costly task. Thanks to RonyaSoft, that is no longer true. With RonyaSoft CD DVD Label Maker you can make your own attractive CD labels in just a few minutes. In addition you can also create DVD covers and CD case inserts for your discs. This CD label software supports many CD label maker printers and makes of paper labels.
Following our tips, you will get the next result:
IWinSoft CD/DVD Label Maker for Mac v.1.7.8 iWinSoft CD/DVD Label Maker is a Mac application that will help you make and print stunning CD and DVD Labels and Covers in Just Few Minutes. Disketch CD/DVD Label Maker for Mac v.3.37 Disketch CD and DVD disc labeling software for Mac. IWinSoft Mac CD/DVD Label Maker v.2.1 iWinSoft CD/DVD Label Maker is a Mac application that will help you make and print stunning CD and DVD Labels and Covers in Just Few Minutes. CD Jewel Case and Label Creator for Word v.3.2 Now you can create your own beautiful and professional CD Jewel Cases and CD Labels in just minutes! Download CD-LabelPrint for Mac - A practical and useful utility specially designed to help you perform direct printing on various DVD and CD discs in just a few easy steps SOFTPEDIA® Windows. Avery Design & Print Online is the best way to design and print your own custom labels and more, with no software needed. To get started, just create an Avery.com account, choose the type of product you want to use — from address labels, to stickers, gift tags, and more, select a templated design or create your very own, customize it, upload.
Steps to create and print a CD label:
1. Start by choosing a CD label template
Run the RonyaSoft CD DVD Label Maker by clicking on the icon on your Desktop or in the Start menu. Select 'Start from a Template' in the 'Startup Wizard' dialog box.
The Startup Wizard Dialog Box
(Click to enlarge)
The 'Choose a Template' dialog box will open.
Print Cd Labels For Mac Free
There are two types of label template:
with bleeds (Standard Label, Full Face Label);
without bleeds (Standard Label, Full Face Label).
Labels with bleeds has a bleeding off area of 4 mm larger than the CD disc area to CD label printing on for labels like Neato, Memorex. These are used to compensate for paper centering errors in the printer feed.
If you are planning to print directly on disc surface using CD label printer just select any Label template without bleeds. Bear in mind you cannot change template dimensions later on.
'Standard Label' templates are used for labels with a 41 mm hole, 'Full Face' for labels with a 10 mm hole.
Print Cd Labels For Mac Computers
2. Placing and editing design objects
To change the background image of a CD label, click on the 'Load' button in 'Properties' window in the right side of the screen. In the 'Open an Image' dialog box select the desired size of the image and click 'Open'.
To change the picture settings, click 'Edit' in the same 'Properties' window. The 'Image Editor' dialog box will open. Here you can select the part of the image that you want to see in the background of CD label creator.
The Image Editor Dialog Box
(Click to enlarge)
CD Label template already contains a background image and four text objects. To delete any elements, select this object or objects and click the 'Del' key on your keyboard.
To insert the text, image, clipart, rectangles or other geometric shapes into the CD label click the text item in the 'Insert' menu or on the 'Objects' toolbar. To place an image or geometric shapes drag the cursor across the document area to specify the right bottom point of the object.
To edit the text template, left-click the text object and edit properties such as 'Text', 'Font', 'Alignment', 'Placement', 'Blending' in the same 'Properties' window.
Similarly adjust other elements of the document. You can see the step-changes in the picture below.
The Step-changes
(Click to enlarge)

3. Save CD label
To save a document, select the 'Save Item' in the 'File' menu or on the 'General' toolbar. If the document has not previously been saved the 'Save as..' command will be executed automatically.
A 'Standard Windows Save a File' dialog box will open. Select a folder, specify a file name, then click the 'Save' button.
4. Print document
To print CD labels click the 'Print Item' in the 'File' menu or on the 'General' toolbar. A Standard Windows Print dialog box will open.
To print CD labels: choose a printer, set its properties if necessary and click 'OK' to proceed. The 'Printout Setup' dialog box will open. Select the label type, specify the make of it, and then click the 'OK' button to start printing a document.
Fortunately, Free Video Downloader for Mac software is an effective way to download and convert videos for Mac. Being compared with the online application, the professional software excels at its accelerated downloading speed, expanded video formats, great stability and more complete functions. YouTube Video Grabber is a Shareware Mac OS X application that can be used to download YouTube flash video files and convert them to different video formats. QGeeM HDMI Capture, Capture Card, HDMI to USB 3.0, 1080P 60fps HD Video/Audio Capture Recorder Device, Compatible with PC, Mac Linux YouTube OBS OS X Twitch for PS3 PS4 Xbox 4.4 out of 5 stars 343 $99.99 $ 99. 99 $110.99 $110.99. Video grabber for mac os. Step 3: Specify the output video path. Click on Browse button, and you're able to save your downloaded video anywhere besides Mac Video Library. Step 4: Start downloading video right now. Hit Download Now to start downloading video for free with this free Mac video downloader.The process will be accomplished in no time. It has been tested that no more than 30 seconds are needed for a 3-5.
When you want to print CD labels on a CD printer you have to switch printer input feed to disk tray in the Printer properties first. Alternatively you may do this in the 'Printer Settings' dialog before start printing. Than choose 'Disk Surface' and specify your printer make and model from the appropriate dropdown list in the 'Printout Setup' dialog.
If your printer for CD label printing or labels are not available in the lists, try to choose a printer or label make from the same series the same series as yours. The same series printers generally have the same disc trays.
If your printed CD label is not centered correctly you may adjust the CD printout output position manually in the appropriate fields.
If nothing helps, please submit a support request here.
This tutorial should help you to create and print CD DVD labels on labels or directly onto the disc surface using CD label printers. To make a CD label all you need is a little imagination and a few spare minutes.
Print Cd Labels Mac
Meet Avery Design & Print Online!
Print Cd Labels For Mac Osx
Need to create custom printed labels, name tags, or stickers quickly and easily? Avery Design & Print Online is the best way to design and print your own custom labels and more, with no software needed. To get started, just create an Avery.com account, choose the type of product you want to use — from address labels, to stickers, gift tags, and more, select a templated design or create your very own, customize it, upload spreadsheets of data like names and addresses, then print out your artwork! It's that simple. And the best part? It's free!
You can save projects for reuse later, mail merge information so you can create multiple shipping labels in just a few clicks, and even save a PDF of your completed designs. Plus, you can access Avery Design and Print Online from any desktop or mobile device, too.
And remember, Avery products feature Sure Feed technology, which helps prevent printer jams using a unique strip that guides your labels through, saving you time and money. So whatever you create, you won't have to worry about smudges or misprints.
0 notes
Text
Video Grabber For Mac Os

To find the best VHS to Digital converter for Mac you’ve to search a lot and especially when you paying an amount for VHS to DVD converter. We here to help you out, In this article, we have gathered some of the best VHS converters that help you out for converting your parents VHS tapes to digital files.
Video Grabber Software
Free Video Grabber Software
Fortunately, Free Video Downloader for Mac software is an effective way to download and convert videos for Mac. Being compared with the online application, the professional software excels at its accelerated downloading speed, expanded video formats, great stability and more complete functions. Total Video Downloader for Mac OS X supports to pause or cancel ongoing downloads and resuming of interrupted downloads. Seek Out the Downloaded Videos Effortlessly on Mac. Total Video Downloader for Mac OS X (El Caption, Mojave included) will output the downloaded files with an unique file name so that users are able to effortlessly search for. VIDBOX Video Conversion For Mac (2020) This an awesome videotapes converter device for Mac. The built-in screen recorder of Filmora9 allows to record the PC screen and record. One Touch Capture and Digitalize video with Mini USB. IGrabber Nano resolves your trouble with piles of old VHS tapes. You can turn your beloved old movies into digital formats and easily refine the quality of videos like a professional. Through the USB interface, you can connect your DV, V8, VHS, and DVD player to capture and edit all your favorite shows easily to your PC and MAC.
As we know new technology digital world that helps us to get videos to our computer. However, in this, we have forgotten about VHS tapes. I’ve also found my parents wedding VHS tapes to secure them I’ve paid lots of amounts to convert them into digital videos.
Here, In this article, I will show you some of the converters that help you out for converting VHS tapes to DVD or digital videos. That helps you to transfer VHS to DVD converting videos tapes to DVD is a great deal. Check our list of VHS to DVD converters.
5 Affordable Video Tapes Converters For Mac
1 # VIDBOX Video Conversion For Mac (2020)
This an awesome videotapes converter device for Mac users. Using this device· you can easily convert 8mm tapes, VHS tapes and Beta and other tapes to more reliable formate like DVD or other digital files.
Vidbox supports both platforms PC and Mac computers. However, the device is specially designed for Mac. The software delivers when it comes to integrating your converting video tapes into your iTunes library. With smooth integration with iMovie allows you to make changes into the captured videos tapes.
2 # ClearClick Video to Digital Converter 2.0 (Second Generation)=producttitle>
It’s an affordable price videotapes converter for VHS, 8mm, camcorders, hi8 along with gaming systems. One of the best thing for converting video tapes to DVD or any other format you don’t require any software or computer device. You can easily convert any VHS tapes to DVD all your converted videos will directly go to 4 GB memory card from which you can transfer them to your Mac or PC or any other device.
However, After converting VHS videos to transfer them into smartphone, tablet or web formats the device required Prism Video Converter software. In it, you also get free USA Tech support along with the 1-year warranty.
3 # Roixo Easy VHS TO DVD 3 Plus
Roxio Easy is totally designed for converting VHS to DVD for Mac along with other digital formats like 8mm, Hi8, and Videos8 tapes. This device supports various platforms of Mac OS some of our Mac OS X 10.4 Tiger, Mac OS X 10.5 Leopard, Mac OS X 10.6 Snow Leopard and many more.
The main purpose of this device is to capture video from analog sources and preserve it by converting to digital formats to burn to disc or DVD through Macbook. You can also create your own movies through iMovie to edit capture videos and add video effects and much more. You can also watch your capture videos on iPhone, Smartphone, Sony PSP, and iPod.
4 # Diamond Multimedia VC500MAC USB 2.0 One Touch
Diamond Multimedia converter is a one-touch video capture device for Mac OS. With the help of this device, you can easily capture VHS videotapes to digital format and save on your computer. Its 3 steps video capture device. First install the device, secondly, just plug it in your Mac OS and in last connect the video cables to your source and install the Empia Capture program.
This device supports Mac OS 10.9 and later version its also compatible with iMovie to edit capture videotapes before saving them in your Mac. With USA technical support along with one year warranty.
5 # Video Capture Converter
Video Grabber Software
The video capture converter is the smallest device for converting VHS to DVD or digital files. The device comes with a small cable box that plug-in into Mac along with other devices for converting videos in another format.
Free Video Grabber Software
Using this device you capture high quilty videos and audio files direct by USB interface with PSP or other devices. It’s simple process first capture videos into your computer or Mac OS and then through using software burn the VHS to digital format.
0 notes
Text
Mac Os 7 For Ipad

Mac Os 7 On Ipad
Mac Os 7 For Ipad 7th Generation
Mac Os 7 For Ipad 6th Generation
Mac Os 7 For Ipad Pro 10.5
IPad: OS X Pad is a new theme that can make your iPad look and operate like an actual Mac. If you prefer traditional desktop paradigms to those of iOS, all you need is the Dreamboard app and a few. IOS (formerly iPhone OS) is a mobile operating system created and developed by Apple Inc. Exclusively for its hardware.It is the operating system that powers many of the company's mobile devices, including the iPhone and iPod Touch; it also powered the iPad until the introduction of iPadOS, a derivative of iOS, in 2019.It is the world's second-most widely installed mobile operating system. Mac OS X Leopard 10.5 emulated on 2020 iPad Pro 11' without Jailbreak. Built-in applications and Microsoft Office work perfectly. Web browsing is functional. Experience your favorite iPad apps now on your Mac. With Mac Catalyst, developers can easily create Mac apps from the iPad apps you already know and love. They run natively alongside your existing Mac apps so you can drag and drop content between them. They take full advantage of the larger screen and powerful architecture of your Mac. Download the official µTorrent® (uTorrent) torrent client for Windows, Mac, Android or Linux- uTorrent is the #1 bittorrent download client on desktops worldwide.
Native Mac apps built with Mac Catalyst can share code with your iPad apps, and you can add more features just for Mac. In macOS Big Sur, you can create even more powerful versions of your apps and take advantage of every pixel on the screen by running them at native Mac resolution. Apps built with Mac Catalyst can now be fully controlled using just the keyboard, access more iOS frameworks, and take advantage of the all-new look of macOS Big Sur. There’s never been a better time to turn your iPad app into a powerful Mac app.
Designed for macOS Big Sur.
When an app built with Mac Catalyst runs on macOS Big Sur, it automatically adopts the new design. The new Maps and Messages apps were built with the latest version of Mac Catalyst.
Get a head start on your native Mac app.
Your iPad app can be made into an excellent Mac app. Now’s the perfect time to bring your app to life on Mac. The latest version of Xcode 12 is all you need. Begin by selecting the “Mac” checkbox in the project settings of your existing iPad app to create a native Mac app that you can enhance further. Your Mac and iPad apps share the same project and source code, making it easy to make changes in one place.
Optimize your interface for Mac.
Your newly created Mac app runs natively, utilizing the same frameworks, resources, and runtime environment as apps built just for Mac. Fundamental Mac desktop and windowing features are added, and touch controls are adapted to the keyboard and mouse. By default, your app will scale to match the iPad’s resolution. On macOS Big Sur, you can choose “Optimize interface for Mac” to use the Mac idiom, running your app using the native resolution on Mac. This gives you full control of every pixel on the screen and allows your app to adopt more controls specific to Mac, such as pull-down menus and checkboxes.
Even more powerful.
The new APIs and behaviors in macOS Big Sur let you create even more powerful Mac apps. Apps can now be fully controlled using just the keyboard. You can create out-of-window and detachable popovers, control window tabbing using new window APIs, and make it easier for users to select photos in your app by using the updated Photos picker. iOS Photos editing extensions can now be built to run on Mac. And your app is even easier to manage when it’s running in the background with improved app lifecycle APIs.
New and updated frameworks.
Mac Catalyst adds support for new and updated frameworks to extend what your apps can do on Mac. HomeKit support means home automation apps can run alongside the Home app on Mac. The addition of the ClassKit framework lets Mac apps track assignments and share progress with teachers and students. Plus, there are updates to many existing frameworks, including Accounts, Contacts, Core Audio, GameKit, MediaPlayer, PassKit, and StoreKit.
Tools and resources.
Download Xcode 12 beta and use these resources to build native Mac apps with Mac Catalyst.
Extend or mirror your Mac desktop with Sidecar
Make sure that your Mac and iPad meet the Sidecar system requirements.
You can use Sidecar wirelessly, but to keep your iPad charged during use, connect it directly to your Mac with the USB charge cable that came with your iPad.
Click the AirPlay icon in the menu bar on your Mac, then choose the option to connect to your iPad. Or use Sidecar preferences to connect. If you don't see the AirPlay icon, choose Apple menu > System Preferences, click Displays, then make sure that ”Show mirroring options in the menu bar when available” is selected.
Your iPad should now show an extension of your Mac desktop. You can move windows to it and use it like any other display.
To mirror your Mac display so that both screens show the same content, return to the AirPlay menu, which is a blue rectangle while using Sidecar. Choose the option to mirror your display. This is a great way to share your Mac screen with others.
To end your Sidecar session, return to the AirPlay menu and choose the option to disconnect. Or click the Disconnect button in the sidebar on your iPad.
Learn more about using external displays. For example, you can use Displays preferences to arrange displays so that your iPad extends the left, right, top, or bottom of your desktop.
Move a window to your iPad display
If you hover your pointer over the full-screen button of a window, you can choose to move that window to or from your iPad display. It's faster than dragging the window, and the window is perfectly resized for your display.
The sidebar puts commonly used controls on the side of your iPad screen. It includes Command, Shift, and other modifier keys, so you can choose essential commands with your finger or Apple Pencil instead of a keyboard.
Use Sidecar preferences to turn off the sidebar or change its position.
Tap to show or hide the menu bar when viewing a window in full screen on iPad.
Command. Touch and hold to set the Command key. Double-tap to lock the key.
Option. Touch and hold to set the Option key. Double-tap to lock the key.
Control. Touch and hold to set the Control key. Double-tap to lock the key.
Shift. Touch and hold to set the Shift key. Double-tap to lock the key.
Undo the last action. Some apps support multiple undos.
Use the Touch Bar
Many apps on Mac have Touch Bar controls that make common actions even easier. With Sidecar, you get a Touch Bar on your iPad screen even if your Mac doesn’t have a Touch Bar. It works just like the Touch Bar on Mac, and you can tap its controls with either your finger or Apple Pencil.
Use Sidecar preferences to turn off the Touch Bar or change its position.
If the Touch Bar doesn't appear when using an app that offers Touch Bar controls, choose Apple menu > System Preferences, click Mission Control, then make sure that “Displays have separate Spaces” is selected.
Use gestures for scrolling and other actions
Multi-Touch gestures on iPad remain available when using Sidecar. These gestures are particularly useful with Sidecar:
Scroll: Swipe with two fingers.
Copy: Pinch in with three fingers.
Cut: Pinch in with three fingers twice.
Paste: Pinch out with three fingers.
Undo: Swipe left with three fingers, or double-tap with three fingers.
Redo: Swipe right with three fingers.
Use Apple Pencil
To point, click, select, and perform tasks such as drawing, editing photos, and manipulating objects on your iPad while it's extending or mirroring your Mac display, you can use your Apple Pencil instead of the mouse or trackpad connected to your Mac. You can also use it to write, sketch, and mark up documents while seeing the updates live on your Mac.
Sidecar also supports double-tap, which you can turn on in Sidecar preferences. Double-tap enables apps that support this feature to perform custom actions when you double-tap on the side of your Apple Pencil (2nd generation).
Use a keyboard, mouse, or trackpad
During your Sidecar session, you can type using a keyboard connected to either your Mac or iPad, including the Smart Keyboard or Magic Keyboard for iPad.
To point, click, or select with a mouse or trackpad, use the mouse or trackpad connected to your Mac, or use an Apple Pencil on your iPad.
Use iPad apps
While using Sidecar, you can switch to an iPad app, then interact with that app on your iPad as you normally would. This suspends your Sidecar session until you switch back to the Sidecar app or disconnect Sidecar. The Sidecar app appears on your home screen only while using Sidecar.
Use Sidecar preferences
Choose Apple menu > System Preferences, then click Sidecar. These preferences are available only on computers that support Sidecar.
Mac Os 7 On Ipad
Show Sidebar: Show the sidebar on the left or right side of your iPad screen, or turn it off.
Show Touch Bar: Show the Touch Bar on the bottom or top of your iPad screen, or turn it off.
Enable double tap on Apple Pencil: Allow apps that support this feature to perform custom actions when you double-tap on the side of your Apple Pencil (2nd generation).
Connect to: Choose an iPad to connect to, or click Disconnect to stop using Sidecar.
Sidecar system requirements
Sidecar requires a compatible Mac using macOS Catalina and a compatible iPad using iPadOS 13:
Mac using macOS Catalina
MacBook Pro introduced in 2016 or later
MacBook introduced in 2016 or later
MacBook Air introduced in 2018 or later
iMac introduced in 2017 or later, plus iMac (Retina 5K, 27-inch, Late 2015)
iMac Pro
Mac mini introduced in 2018 or later
Mac Pro introduced in 2019
iPad using iPadOS 13
Mac Os 7 For Ipad 7th Generation
iPad Pro: all models
iPad (6th generation) or later
iPad mini (5th generation)
iPad Air (3rd generation)
Additional requirements
Both devices must be signed in to iCloud with the same Apple ID using two-factor authentication.
To use Sidecar wirelessly, both devices must be within 10 meters (30 feet) of each other and have Bluetooth, Wi-Fi, and Handoff turned on. Also make sure that the iPad is not sharing its cellular connection and the Mac is not sharing its Internet connection.
To use Sidecar over USB, make sure that your iPad is set to trust your Mac.

Mac Os 7 For Ipad 6th Generation
Learn more
Mac Os 7 For Ipad Pro 10.5
Resolve Wi-Fi and Bluetooth issues caused by wireless interference, which can affect Sidecar performance when using Sidecar wirelessly.
0 notes
Text
Ntfs Paragon For Mac 14

Paragon Ntfs For Mac 14 Tnt
Paragon Ntfs For Mac 14
Paragon Ntfs For Mac 17
Paragon NTFS Crack Mac OS X Plus Serial Number
Expires: August 10, 2020 14 used. Select the Paragon NTFS For Mac on some top brands, like Amazon, Ebay, etc. And add it to shopping cart. Visit the Paragon NTFS For Mac Promo Codes & page, and click the 'Get Code' to copy the to your clipboard. Paragon NTFS for Mac 14 NTFS for MAC 14 Features The two brand new features of this are MacOS Sierra support which has a Full-fledged support of the latest MacOS 10.12 Sierra.And the other new feature is the Multi-language support which means it supports many different languages.These may include such as Chinese Simplified, Chinese Traditional, Czech, English, Finnish, German, Italian. Paragon NTFS for Mac is fully compatible with Apple's new security policy ensuring fast, hassle-free and safe access to NTFS partitions from macOS 10.12 Sierra. If Your Problem Is Not Listed: Please submit new support request.Make sure to provide detailed step-by-step description of the issue you’re encountering. How To Submit Support Request. NTFS for Mac OS X Tags: compatibility, NTFS for Mac.
Paragon NTFS Crack is fully compatible with Apple’s new security policy ensuring and transferring data easy Window and Mac Os. It has fast, hassle-free and safe access to NTFS partitions from Mac OS.
It is conveniently navigated contents and read, edit, copy or create files and folders. The driver guarantees advanced support of NTFS file systems and provides fast and transparent read/write access to any NTFS partition under Mac OS. You can easier transfer files between Window Operating System and Mac. Paragon NTFS Serial number is very useful for if you are switching from PC to Mac. Furthermore, it is preferences and automatically start to make the work without entering and given any command and special conversion processes. This software is fully worked on Mac and Windows Operating System. While you will have instant access to read and write the files in all systems
Paragon NTFS Keygen Plus Torrent
Paragon NTFS Torrent is now better and safe NTFS program Apple OS. Furthermore, it is the fastest and reliable program or application until you can achieve the best driver speed. It is also compatible with Apple new security policy. While it is free and safe access to NTFS partitions from Mac OS 10.12 Sierra. Through it, you can edit, copy or create files and folder. When you can download and install the Paragon NTFS Mac Crack you will receive the 100% guaranteed and free update.
What’s New in Paragon NTFS Crack
Support the latest version of mac
Do not mount automatically
Intuitive Apple-style user interface
Key Features Of Paragon NTFS Crack:
Efficiency
It is used for Mac world fastest application. It can achieve the speed of native drivers with Mac Os Sierra. Furthermore, management tools and formatting tools are allowed.
Simple Installation
The installation process is simple and using for Mac partition.

Safety Matter
It provided in heavy workload full safety system for your Mac.
Additional utilities
Format any partition as NTFS on your Mac, check NTFS partition integrity.
Customer Protection
It provided 100% customer protection for using Paragon NTFS
Mac Requirements for Paragon NTFS Crack:
Mac OS X 10.7 | 10.8 | 10.9 | 10.10 | 10.11 | Mac OS Sierra
RAM – 1 GB
How to Activate Paragon NTFS Crack?
Download this Software Crack from the given link
Install the program
Now Run Crack and install it.
copy the serial number from the folder and use it.
Now enjoy full version.
The password is www.maccrack.net
Paragon NTFS Download Links:
–Download Mirror Link
–Download Mirror Link
Bruce William
Paragon NTFS Crack
5
Paragon NTFS Crack
Windows, Mac
Software
Too many mac users has searched for how to uninstall and remove Paragon NTFS 15 completely in Mac OS X. Here is how to do.
Paragon Ntfs For Mac 14 Tnt
Uninstalling Paragon NTFS is different relative to normal applications.
Go to System Preferences
Click on NTFS for Mac OS X (Paragon)
Paragon Ntfs For Mac 14
3. You may need to click on the Lock logo at the lower-left conner to be able to delete Paragon NTFS
4. Select Setting tab, click on uninstall…

Paragon Ntfs For Mac 17
You may need to delete all components related to Paragon NTFS still existing in the following folders:
/Library/Application Support/
/Library/Caches/ folders
/Library/Preferences/
1 note
·
View note