
Don't wanna be here? Send us removal request.
Statistics
We looked inside some of the posts by furmark6-blog and here's what we found interesting.
Average Info
Notes Per Post
0
Likes Per Post
0
Reblog Per Post
0
Reply Per Post
0
Time Between Posts
3 days
Number of Posts By Type
Text
17
Last Seen Tumblr Blogs


Fun Fact
Tumblr was the first site to host the blog for President Barack Obama in 2011.
Text
Parmesan Crusted Salmon Filet Recipe
This crispy Parmesan Crusted Salmon is so delicious and easy to make! A flavor packed salmon fillet with a crispy panko and parmesan topping.
This salmon recipe is so family-friendly! We also love this Sheet Pan Salmon Dinner and Sheet Pan Shrimp Fajitas.
Parmesan Crusted Salmon
My kids can be picky, but salmon is always a favorite and they just loved this recipe! It’s basically like a giant gourmet fish stick. 😄 A whole salmon fillet topped with garlicky lemon mayo and a crispy panko and parmesan breadcrumb topping. I like to serve this salmon with:
Instant Pot Mashed Potatoes
Slow Cooker Mashed Potatoes
Roasted Broccoli
Cheesy Roasted Asparagus
How to Make Parmesan Crusted Salmon
Start by buying a whole salmon filet.
Season the salmon with kosher salt and freshly ground pepper.
Layer with mayo mixture, then parmesan and panko mixture.
Bake at 400 degrees until golden brown.
How to Cook Salmon with Skin On
This salmon fillet recipe can be made with the skin on, which makes things so much easier! Just bake the salmon with the skin side down. Then once the salmon is baked, it easily pulls away from the skin. I use a thin spatula to cut the salmon portions and lift them off, leaving the skin behind. This is so mush easier than trying to remove the skin before cooking!
Can I make this salmon recipe with salmon fillet portions?
Yes, this recipe works great for salmon portions too! I love buying these big salmon fillets, I usually pick one up when we go to Costco, but my local grocery store often has sale prices on salmon portions. Just top each portion and decrease the cooking time. If they are skinless salmon portions, make sure you spray the baking sheet with non stick cooking spray first.
Parmesan Crusted Salmon Fillet Recipe
A whole salmon fillet topped with a crispy mix of panko breadcrubs and freshly shredded parmesan cheese.
Course: Dinner
Cuisine: American
Keyword: Parmesan Crusted Salmon, Salmon
Servings: 8
Calories: 337 kcal
Ingredients
2.5 pound salmon fillet skin on
1 teaspoon kosher salt
1/2 teaspoon freshly ground black pepper
1/4 cup mayonnaise
3 teaspoon freshly squeezed lemon juice plus more for topping
2 cloves garlic minced to paste
1/2 cup panko bread crumbs
1/2 cup parmesan cheese freshly grated
3 tablespoon olive oil
2 tablespoons parsley chopped
Instructions
Preheat oven to 400 degrees. In a small bowl, combine mayo, lemon juice and garlic. In another bowl, combine breadcrumbs, parmesan cheese and olive oil.
Lay salmon skin side down on a baking sheet and season with salt and pepper. Brush on mayo mixture, then sprinkle on parmesan and breadcrumb mixture. Bake for about 20 minutes, or until breadcrumb mixture is toasted and golden brown and salmon begins to flake. For best results, don't overcook salmon fillet.
Finish salmon fillet with a squeeze of fresh lemon juice and a sprinkle of parsley. To serve, cut salmon into portions and gently lift off salmon skin.
Recipe Notes
To use salmon portions instead of fillet, decrease cooking time depending on size of portions.
Nutrition Facts
Parmesan Crusted Salmon Fillet Recipe
Amount Per Serving
Calories 337 Calories from Fat 189
% Daily Value*
Total Fat 21g 32%
Saturated Fat 4g 20%
Cholesterol 85mg 28%
Sodium 526mg 22%
Potassium 713mg 20%
Total Carbohydrates 3g 1%
Dietary Fiber 1g 4%
Sugars 1g
Protein 31g 62%
Vitamin A 3.8%
Vitamin C 2.8%
Calcium 10.1%
Iron 8.1%
* Percent Daily Values are based on a 2000 calorie diet.
5 Easy Dinner Ideas for Busy Weeknights
My five FAVORITE recipes for busy families!
Quick to make
Light on your budget
Easy to clean-up
and...most important...absolutely DELICIOUS
<![CDATA[/* Layout */ .ck_form /* divider image */ background: #fff url(data:image/gif;base64,R0lGODlhAQADAIABAMzMzP///yH/C1hNUCBEYXRhWE1QPD94cGFja2V0IGJlZ2luPSLvu78iIGlkPSJXNU0wTXBDZWhpSHpyZVN6TlRjemtjOWQiPz4gPHg6eG1wbWV0YSB4bWxuczp4PSJhZG9iZTpuczptZXRhLyIgeDp4bXB0az0iQWRvYmUgWE1QIENvcmUgNS41LWMwMTQgNzkuMTUxNDgxLCAyMDEzLzAzLzEzLTEyOjA5OjE1ICAgICAgICAiPiA8cmRmOlJERiB4bWxuczpyZGY9Imh0dHA6Ly93d3cudzMub3JnLzE5OTkvMDIvMjItcmRmLXN5bnRheC1ucyMiPiA8cmRmOkRlc2NyaXB0aW9uIHJkZjphYm91dD0iIiB4bWxuczp4bXA9Imh0dHA6Ly9ucy5hZG9iZS5jb20veGFwLzEuMC8iIHhtbG5zOnhtcE1NPSJodHRwOi8vbnMuYWRvYmUuY29tL3hhcC8xLjAvbW0vIiB4bWxuczpzdFJlZj0iaHR0cDovL25zLmFkb2JlLmNvbS94YXAvMS4wL3NUeXBlL1Jlc291cmNlUmVmIyIgeG1wOkNyZWF0b3JUb29sPSJBZG9iZSBQaG90b3Nob3AgQ0MgKE1hY2ludG9zaCkiIHhtcE1NOkluc3RhbmNlSUQ9InhtcC5paWQ6MUQ5NjM5RjgxQUVEMTFFNEJBQTdGNTQwMjc5MTZDOTciIHhtcE1NOkRvY3VtZW50SUQ9InhtcC5kaWQ6MUQ5NjM5RjkxQUVEMTFFNEJBQTdGNTQwMjc5MTZDOTciPiA8eG1wTU06RGVyaXZlZEZyb20gc3RSZWY6aW5zdGFuY2VJRD0ieG1wLmlpZDoxRDk2MzlGNjFBRUQxMUU0QkFBN0Y1NDAyNzkxNkM5NyIgc3RSZWY6ZG9jdW1lbnRJRD0ieG1wLmRpZDoxRDk2MzlGNzFBRUQxMUU0QkFBN0Y1NDAyNzkxNkM5NyIvPiA8L3JkZjpEZXNjcmlwdGlvbj4gPC9yZGY6UkRGPiA8L3g6eG1wbWV0YT4gPD94cGFja2V0IGVuZD0iciI/PgH//v38+/r5+Pf29fTz8vHw7+7t7Ovq6ejn5uXk4+Lh4N/e3dzb2tnY19bV1NPS0dDPzs3My8rJyMfGxcTDwsHAv769vLu6ubi3trW0s7KxsK+urayrqqmop6alpKOioaCfnp2cm5qZmJeWlZSTkpGQj46NjIuKiYiHhoWEg4KBgH9+fXx7enl4d3Z1dHNycXBvbm1sa2ppaGdmZWRjYmFgX15dXFtaWVhXVlVUU1JRUE9OTUxLSklIR0ZFRENCQUA/Pj08Ozo5ODc2NTQzMjEwLy4tLCsqKSgnJiUkIyIhIB8eHRwbGhkYFxYVFBMSERAPDg0MCwoJCAcGBQQDAgEAACH5BAEAAAEALAAAAAABAAMAAAICRFIAOw==) repeat-y center top; font-family: "Helvetica Neue", Helvetica, Arial, Verdana, sans-serif; line-height: 1.5em; overflow: hidden; color: #000000; font-size: 16px; border-top: solid 20px #3071b0; border-top-color: #3071b0; border-bottom: solid 10px #3d3d3d; border-bottom-color: #1d446a; -webkit-box-shadow: 0px 0px 5px rgba(0,0,0,.3); -moz-box-shadow: 0px 0px 5px rgba(0,0,0,.3); box-shadow: 0px 0px 5px rgba(0,0,0,.3); clear: both; margin: 20px 0px; .ck_form, .ck_form * -webkit-box-sizing: border-box; -moz-box-sizing: border-box; box-sizing: border-box; #ck_subscribe_form clear: both; /* Element Queries — uses JS */ .ck_form_content, .ck_form_fields width: 50%; float: left; padding: 5%; .ck_form.ck_horizontal .ck_form_content border-bottom: none; .ck_form.ck_vertical background: #fff; .ck_vertical .ck_form_content, .ck_vertical .ck_form_fields padding: 10%; width: 100%; float: none; .ck_vertical .ck_form_content border-bottom: 1px dotted #aaa; overflow: hidden; /* Trigger the vertical layout with media queries as well */ @media all and (max-width: 499px) .ck_form background: #fff; .ck_form_content, .ck_form_fields padding: 10%; width: 100%; float: none; .ck_form_content border-bottom: 1px dotted #aaa; /* Content */ .ck_form_content h3 margin: 0px 0px 15px; font-size: 24px; padding: 0px; .ck_form_content p font-size: 14px; .ck_image float: left; margin-right: 5px; /* Form fields */ .ck_errorArea display: none; #ck_success_msg padding: 10px 10px 0px; border: solid 1px #ddd; background: #eee; .ck_label font-size: 14px; font-weight: bold; .ck_form input[type="text"], .ck_form input[type="email"] font-size: 14px; padding: 10px 8px; width: 100%; border: 1px solid #d6d6d6; /* stroke */ -moz-border-radius: 4px; -webkit-border-radius: 4px; border-radius: 4px; /* border radius */ background-color: #f8f7f7; /* layer fill content */ margin-bottom: 5px; height: auto; .ck_form input[type="text"]:focus, .ck_form input[type="email"]:focus outline: none; border-color: #aaa; .ck_checkbox padding: 10px 0px 10px 20px; display: block; clear: both; .ck_checkbox input.optIn margin-left: -20px; margin-top: 0; .ck_form .ck_opt_in_prompt margin-left: 4px; .ck_form .ck_opt_in_prompt p display: inline; .ck_form .ck_subscribe_button width: 100%; color: #fff; margin: 10px 0px 0px; padding: 10px 0px; font-size: 18px; background: #0d6db8; -moz-border-radius: 4px; -webkit-border-radius: 4px; border-radius: 4px; /* border radius */ cursor: pointer; border: none; text-shadow: none; .ck_form .ck_guarantee color: #626262; font-size: 12px; text-align: center; padding: 5px 0px; display: block; .ck_form .ck_powered_by display: block; color: #aaa; .ck_form .ck_powered_by:hover display: block; color: #444; .ck_converted_content display: none; padding: 5%; background: #fff; /* v6 */ .ck_form_v6 #ck_success_msg padding: 0px 10px; @media all and (max-width: 403px) .ck_form_v6.ck_modal .ck_close_link top: 30px; @media all and (min-width: 404px) and (max-width: 499px) .ck_form_v6.ck_modal .ck_close_link top: 57px; .ck_powered_by display: none !important; ]]> Source: https://www.number-2-pencil.com/parmesan-crusted-salmon-filet-recipe/
0 notes
Text
The Evolution of K2FC, a.k.a. Kenji's Kimchi Fried Chicken Sandwich
[Photographs: Vicky Wasik, except where noted. Video: Serious Eats Team]
I visited the Serious Eats test kitchen in Brooklyn back in October of 2018 to shoot this video about my Korean fried chicken recipe. The date is relevant because now, over half a year later, the fried chicken I cook in the video bears only a slight resemblance to the one I currently serve at my restaurant, Wursthall.
Nor is it very similar to the one I served four years ago at a strip mall in the San Gabriel Valley, during a pop-up event for my first book tour. Or the one you may have seen me make a couple years ago on Guy's Grocery Games. In fact, I've been playing with some iteration of the concept of a kimchi-brined fried chicken sandwich for many years now, so what you're seeing in this recipe and video are really just a snapshot of a dish that's still evolving. Heck, there are two distinct versions in the video alone!
First things first: Calling it "Korean fried chicken" is a misnomer. Korean fried chicken is an actual, defined thing: chicken fried with an eggshell-crisp coating of cornstarch slurry. I even have a recipe for it.
The recipe I'm talking about today is more like Southern-style fried chicken with Korean flavors. It takes some influence from Nashville hot chicken and fast food chicken sandwiches as well. On the menu at Wursthall, we've been reluctantly calling it "K2FC"—Kenji's Korean fried chicken. I get embarrassed seeing my name printed in the menu like that, but my partner insists.*
* Strangely, it's a secondhand kind of embarrassment. I look at the menu and think, Ooohhh, who's that Kenji guy who decided to name a dish after himself? Yikes.
The very first time I made this sandwich, it was at a friend's house in Jamaica Plain, near Boston. The idea of marinating chicken in kimchi brine had just struck me. I already knew that pickle juice makes a great brine for fried chicken—aside from adding flavor, the high salt content alters the protein structure of the chicken so that it retains more moisture as it cooks, and the acidity has a tenderizing effect. The same should work with kimchi brine.
So we tried it. It was a pretty quick-and-dirty affair—essentially my Five-Ingredient Fried Chicken Sandwiches, made with kimchi in place of pickles—but it was promising.
The next batch was a little more involved, using my buttermilk fried chicken recipe as the base. I brought that version to an event my old boss Ken Oringer was throwing for the 15th anniversary of his restaurant Clio (which has since been taken over by his sashimi bar, Uni), featuring a 20-course tasting menu cooked by alumni of the restaurant. Nineteen of the world's leading chefs, and me with a fried chicken sandwich.
I'd been planning on serving it with a mayo spiked with gochujang (Korean fermented chili paste) on mini Martin's potato rolls, but Alex Talbot, half of the husband-and-wife team behind Curiosity Doughnuts and the seminal blog Ideas in Food, suggested making a dill-pickle mayonnaise instead, so I went with that, and boy, was it delicious. My friend Jamie Bissonnette, the chef at Little Donkey in Cambridge, Massachusetts, and Toro in Boston and New York, was at the dinner and texted me mid-service to proclaim the sandwich "totally craveable." High praise!
I decided to keep working on the sandwich, serving it at a series of pop-ups in New York, Boston, Los Angeles, and San Francisco during my book tour, each time offering a slightly different version.
This rendition features Stella's classic biscuits with black sesame seeds folded into the dough.
By the time I brought it to Serious Eats, this was where we were: chicken thighs brined in kimchi juice, along with buttermilk, eggs, garlic, salt (just enough to account for the added liquid from the buttermilk), and soy sauce (soy sauce contains proteases that can help tenderize meat), as well as ground black pepper and gochugaru, a Korean chili flake that offers a lot of floral aroma and a bit of heat. You can read about more Korean pantry staples right here.
The sauce starts out like a Nashville hot chicken–style hot oil. I combine oil with chilies (more gochugaru), along with black pepper and garlic, then heat it up until it's sizzling and toasty-smelling.
If you want to keep it real simple, this is a good place to stop. The fried chicken dipped in hot chili oil is delicious all on its own.
But I decided to continue by emulsifying that chili oil into a sauce with gochujang, honey, cider vinegar, and a little soy sauce. It comes out with a sweet-hot-vinegary flavor profile—not unlike Buffalo sauce, but with a deeper, toasty chili flavor.
Next, it's time to dredge and fry the chicken. My standard fried chicken dredge is a mixture of flour and cornstarch, along with a dash of baking powder. The cornstarch and baking powder help the chicken to fry up extra light and crisp.
To this base, I add some more gochugaru and black pepper, along with black sesame seeds and garlic powder. (Garlic powder works well in dredges and spice rubs, where fresh garlic is likely to clump or burn.)
The real trick here (and in literally every single one of my fried chicken recipes) is to drizzle some of the liquid brine into the dredge and massage it in with your fingertips, creating little clumps of breading that add texture and surface area to the chicken as it fries.
Some folks like to rest their chicken after dredging and before frying. I find that the flour over-hydrates this way, producing a crust that's a little leathery. Instead, I prefer to fry immediately after dredging.
My frying vessel of choice at home is a flat-bottomed wok. The wide, flared sides make it easy to flip and maneuver the food inside, while also catching spatter before it hits your stove or countertop.
Peanut or soybean oil is excellent for deep-frying, delivering crispy crusts and neutral flavor. Canola or vegetable will work, too, though the chicken won't end up quite as crisp. I aim to keep the oil at 275 to 300°F (135 to 149°C) the whole way through.
Once the chicken is fried, I drain it, brush it with the sauce, and sprinkle it with a spice blend containing gochugaru, black pepper, black sesame seeds, and a touch of sugar.
Serve the chicken on a toasted potato bun, with a smear of kimchi mayonnaise (which is just drained kimchi, chopped and mixed with mayonnaise); plenty of dill pickles; and a pile of shredded cabbage. It's pretty tasty!
Even tastier is the version we made on Stella's biscuits. You can find the basic recipe in her book, BraveTart; here, she tweaked it by folding black sesame seeds into the dough.** For that version, I went extra light on the sauce, omitted the kimchi mayo, and instead added a drizzle of honey.
** Another version of these biscuits involves adding sliced scallions along with the sesame seeds, which you'll hear Stella mention in the video. Her final recipe doesn't include the scallions, but you can go ahead and add a handful if you want.
[Photograph: J. Kenji López-Alt]
Folks who've been to my restaurant know that the dish in this video is pretty strikingly different from the fried chicken and waffles we serve daily. But, in fact, the Wursthall fried chicken was directly inspired by the black sesame biscuit sandwich!
The chicken starts out essentially the same, though we also add some gochujang to the brine. I've written previously about double-frying chicken—that is, frying it, letting it completely cool, then frying a second time before serving—and that's the technique we use here.
The idea is that after the first fry, moisture from the inner layers of breading eventually starts to spread out, causing the whole crust to soften a little. The second fry drives out moisture a second time, leaving you with an extra-crisp crust. We fry our chicken in 225°F (107°C) soybean oil, to an internal temperature of 155°F (68°C), then chill it and re-fry it to order, at 300°F (149°C), until it's crisp.
After coming out of the fry oil, it goes for a dunk in chili oil, which we flavor with gochugaru, black pepper, cumin, garlic, and ginger. Then it gets a heavy dry dusting of gochugaru, black pepper, cumin, salt, and sugar.
Instead of a bun, we make scallion cornbread waffles, a modified version of my brown butter cornbread—we increase the ratio of regular flour to cornmeal a bit, and reduce the amount of fat, for a little more structure—to which we add scallions, cilantro, and black sesame seeds, before baking in a Belgian waffle iron.
To finish the dish, we spread the waffles with kimchi butter (kimchi, butter, and gochujang combined in a food processor); place the chicken on top; drizzle it all with honey; and add a pile of our lacto-fermented dill pickles and a big splash of our house hot sauce (which is simple: Fresno chilies, fermented for two weeks, then blended and adjusted for seasoning).
[Photograph: J. Kenji López-Alt]
All the same basic flavors and techniques are there; they're just rearranged a bit to fit a restaurant menu and production schedule.
So that's the current State of the Fried Chicken, and it's gonna keep changing. We're now discussing changing our current chicken schnitzel sandwich to a pork schnitzel sandwich and adding a spicy fried chicken sandwich to our menu, which will no doubt start with some past version of this one as a jumping-off point.
Since I'm not really one to keep recipes secret, attached to this article you'll find a recipe for the version of the sandwich shown in the video, plus another recipe for Stella's black sesame buttermilk biscuits. For the restaurant version, if you own Ed's book, Serious Eater, you've already got that recipe in your hand as a thank-you gift. If not, you can probably piece it together from my description here—or just wait. Eventually we'll publish the full recipe publicly, too.
This post may contain links to Amazon or other partners; your purchases via these links can benefit Serious Eats. Read more about our affiliate linking policy.
Source: https://www.seriouseats.com/2019/07/kimchi-fried-chicken-sandwich.html

0 notes
Text
Doenjang Jjigae (Korean Soybean Paste Stew)
A staple Korean stew made with fermented soybean paste, doenjang! Learn a few basics to make this hearty Korean favorite the most authentic and delicious way.
Doenjang jjigae (된장찌개) is a staple Korean stew made with doenjang (된장), fermented soybean paste. It is one of the most representative dishes of everyday home-cooked Korean meals. Depending on the other ingredients added, you can make endless variations of the stew. This recipe is made with fatty pork, which is the most common version.
This recipe was originally posted in April 2010. I’ve updated it here with minor changes to the recipe and new photos.
Doenjang is essential in Korean cuisine, and every Korean home has it all year round along with other staple condiments such as gochujang (fermented chili pepper paste). Its deep, rich flavor is created by several months of fermentation and aging. Doenjang is traditionally homemade, but there are many commercial brands available at Korean markets. If you’re lucky, you may be able to find locally made home-style doenjang that’s sold at some Korean markets.
Tofu is typically added along with some vegetables. For vegetables, I usually use Korean white radish (mu, 무), zucchini, onion, and fresh green and/or red chili pepper. It adds flavor and helps create a clean, refreshing broth. You can also add potatoes if you like slightly thicker stews. Mushrooms will be a good addition as well.
Tips for delicious doenjang jjigae
By now, you know Korean home cooks save the water used to rinse rice (ssalddeumul, 쌀뜨물) and use it as a stew or soup base. The rice water adds starch to the stew and works as a binding agent between the soybean paste and the broth. It also enhances the flavor of the doenjang. If you didn’t have to make rice, or forgot to save the water, add a little bit of flour or rice powder to tap water.
Use a small amount of vinegar at the end to make doenjang jjigae even more delicious! It will brighten the doenjang taste in the stew.
This hearty stew is my husband’s all-time favorite meal and my go-to dish when I want to make a quick satisfying meal. The distinct aroma of sizzling doenjang makes my mouth water every time I make this dish!
Try these other variations
Seafood doenjang jjigae Beef doenjang jjigae
Did you make and love this doenjang jjigae recipe? Please rate the recipe below in the recipe card or in the comment section! And make sure to share your creations by tagging me on Instagram! Stay in touch by following me on Pinterest, Twitter, Facebook, and Instagram.
Doenjang Jjigae (Korean Soybean Paste Stew)
A staple Korean stew made with fermented soybean paste (doenjang)
3 ounces pork (preferably fatty pork) shoulder, or loin (or use beef, clams or shrimp if desired)
9 ounces tofu
1/2 medium zucchini
2 ounces Korean radish (mu)
1/4 medium onion
1 chili pepper green or red
1 scallion
2 tablespoons Korean soybean paste doenjang
1 teaspoon Korean chili pepper flakes (gochugaru) gochugaru
1 teaspoon minced garlic
2 cups water see note
1 teaspoon vinegar
Cut the tofu and zucchini into about 1-inch cubes. Cut the radish into thin small squares. Thinly slice the onion and pepper. Roughly chop the scallion. Slice the meat into thin strips.
Preheat a small pot with a little bit of oil. Sauté the meat, soybean paste, and chili pepper flakes, over medium heat for 3 to 4 minutes.
Add the water (or anchovy broth) and stir well to dissolve the soy bean paste. Add the radish. Boil over medium high heat for 4 to 5 minutes.
Add the onion, garlic, tofu, zucchini, and chili pepper. Boil for an additional 5 to 6 minutes. Throw in the scallion with a minute or two remaining.
Serve with rice while it is still bubbling from the heat.
Use the water used to rinse rice, ssalddeumul for jjigae/stew.
Originally posted in April 2010 and updated here with an improved recipe and new photos.

Source: https://www.koreanbapsang.com/doenjang-jjigae-korean-soy-bean-paste/
0 notes
Text
Grilled Salmon with Lemon Garlic Sauce
Loaded with Omega 3’s and ready in under 30 minutes this grilled salmon with lemon garlic sauce is sure to please any palette.
My husband and I first discovered wild sockeye salmon during a trip we took to Seattle years back when we were dating. Our vacation just so happened to take place in May, right as the wild sockeye season was in full swing.
What’s the difference between wild and farmed salmon?
Color: Wild salmon has a darker red color over farmed salmon
Taste: Wild salmon has a deeper flavor than farmed salmon
Nutrition: Farmed salmon has similar nutritional benefits but is typically fattier.
To our delight, we dined on the most flavorful, rich and tender salmon of our lives. The recipe I’m sharing with you today brings back so many great memories of Seattle.
No sockeye salmon available? No worries – this recipe works well with any type of salmon or fish. When possible, always purchase wild salmon but don’t skip the fatty fish if it’s not available. In fact, studies show that the health benefits of wild salmon out weigh the potential risks of purchasing farm raised salmon.
Here are some of my other amazing salmon recipes:
Your fork is waiting.
<![CDATA[.wprm-recipe-rating .wprm-rating-star.wprm-rating-star-full svg * fill: #343434; ]]>
Course: Entree, Main Dish
Cuisine: American
Keyword: grilled salmon
Prep Time: 10 minutes
Cook Time: 15 minutes
Total Time: 25 minutes
Servings: 4
Calories: 302kcal
Loaded with Omega 3's and ready in under 30 minutes this grilled salmon with lemon garlic sauce is sure to please any palette.
Questions / Comments? Print Recipe
Ingredients
20 oz salmon cut in 3-4 oz filets
2 tablespoons olive oil
2 cloves garlic grated
1 zest and juice of lemon
1/4 cup fresh parsley chopped
1 teaspoon sea salt
1/2 teaspoon pepper
Instructions
Pre-heat a grill (or grill pan) on high heat.
Season flesh side of the salmon with a sprinkle of salt and pepper.
When grill is hot, spray with non-stick grilling spray.
Place salmon on the grill and cook about 5-6 minutes per side until you reach your desired level of doneness. (I like mine a little pink, especially when it's high quality sockeye.)
While fish is cooking, whisk together olive oil, garlic, lemon juice/zest, parsley, salt and pepper.
Drizzle sauce over the fish before serving.
Nutrition Facts
Grilled Salmon with Lemon Garlic Sauce
Amount Per Serving
Calories 302 Calories from Fat 170
% Daily Value*
Total Fat 18.9g 29%
Saturated Fat 3g 15%
Cholesterol 88mg 29%
Sodium 634mg 26%
Total Carbohydrates 2.2g 1%
Protein 30.4g 61%
* Percent Daily Values are based on a 2000 calorie diet.
DID YOU MAKE THIS RECIPE?If you tried this recipe I would love to to see it and have you share! Tag me @thelemonbowl using the hashtag #thelemonbowl!
Questions or Comments?Click Here to send me a note or rate the recipe!
Want more HOT grilled meal ideas? Check out my Pinterest board!
Source: https://thelemonbowl.com/grilled-salmon-with-lemon-garlic-sauce/
0 notes
Text
Crunchy Chopped Salad with Asian Dressing (Gluten-Free, Paleo)
With a big bowl of this crunchy salad in your fridge, you’ll be ready to tackle lunches for the week. Toss it in flavorful Asian-inspired dressing and grab a different topping every day to keep things new and exciting.

There aren’t a lot of healthy lunch options near my office – and buying something every day gets expensive very quickly – so I try to pack my lunch as often as I can.
In the winter, I usually make a big pot of soup and eat that all week. In the spring and summer, I’m all about a crunchy chopped salad like this one. I love using cabbage for the base because it holds up really well throughout the week and doesn’t get soggy. That means you can mix a big salad up ahead of time and top it different ways throughout the week to keep things interesting. Bacon one day, grilled chicken another. You can even defrost a few pre-cooked shrimp to throw on top. Or, keep things vegetarian with chopped peanuts and chow mein noodles.
It’s as close to meal prep as I ever really get.

I usually have a few grab-and-go dressing options in my refrigerator, but nothing beats homemade dressing. To keep the salad from getting soggy, I always pack it separately in a small squeeze container like this one, then add it right before I eat.
Lately, I’ve been loving Asian-inspired dressings. This recipe uses almond butter and coconut milk to give the dressing body and creamy texture and soy sauce and sesame oil for tons of flavor. Think of it almost like a thinned out version of peanut sauce. Once you taste it, you’ll want to put it on everything.


Yield: 8 servings
Prep Time: 10 minutes
Total Time: 10 minutes
This basic salad is easy to personalize with your favorite toppings. Try adding bacon, steak or shrimp, boiled eggs, or chopped peanuts and chow mein noodles.
Ingredients
For the salad:
6 cups coleslaw mix
1 bunch kale, shredded
1 bunch romaine lettuce, chopped
1/4 cup parsley, chopped
6 green onions, white and green parts thinly sliced
1 cup cherry tomatoes, halved
1/2 cup sunflower seeds
For the dressing:
1/4 cup coconut milk
1/2 cup almond butter
1 lime, juiced
3 Tablespoons rice wine vinegar
2 Tablespoon sesame oil
1 Tablespoon tamari (gluten-free soy sauce)
1/4 cup honey
2 garlic cloves, minced
Salt and pepper
Instructions
Combine the salad ingredients in a large mixing bowl. Cover loosely with paper towels and keep refrigerated.
Combine the dressing ingredients in a blender; blend until smooth. Season to taste with salt and pepper.
Dress the salad immediately before serving.

Source: https://www.healthy-delicious.com/crunchy-chopped-salad-with-asian-dressing-gluten-free-paleo/
0 notes
Text
Rosalie's Tom & Jerry Cake
I guess it must have been a few months ago, my friend Noelle (who lives in Nova Scotia) was talking on Facebook about her mother's recipe for a Tom & Jerry Cake that she was baking in the oven and how lovely it smelled while it was baking.
I was instantly intrigued. I had never heard of a Tom & Jerry Cake and my family goes way back in Nova Scotia's history to its very earliest days.
The fact that it was one of her family recipes really interested me. I love recipes with a family history. Taste (in my opinion) is a really important part of the fabric of a family. It seems to me that food and recipes with a family history taste all the better for that fact.
I asked her about the recipe and she very generously shared it with me and I know she will be really pleased that I finally baked it and am sharing it with you. Recipes shared in friendship are really special indeed. I have a whole big blue vinyl binder filled with such things and let me tell you it is a family treasure . . .
A real treasure trove of friendship and family and love in the form of recipes just like this one . . . with a touch of special love built into each one. I Published a volume of some of the best of those a number of years back in a book I called, what else but . . . Recipes From the Big Blue Binder.
I finally got around to baking the cake today and let me tell you it did not disappoint! Not one whit!
It smelled like pure heavenly bliss when it was baking. The batter is broken into two layers. You make a vanilla batter and then you remove some of it and add molasses, cocoa powder and warm baking spices to it, which creates a lovely spiced batter that you fold sultana raisins into.
This spicy batter gets spooned into a prepped bundt tin and then the vanilla batter gets spooned over top. I used the full amount of spice that Noelle recommended, but if you are not overly fond of spice you can cut them back a bit if you like.
When baking the vanilla batter sinks a bit into the spiced batter making a lovely pattern in the cake as you can see.
I dusted the finished cake with icing sugar . . . but that is just be, because . . . I like plain cakes prettied up a bit with a dusting of sugar.
If you are not fond of raisins, you could leave them out I guess. We like raisins so I had no problem with them being in there.
This truly is a lovely cake . . . with a moist and delicious crumb . . . somewhat dense . . .
This is a cake that goes well with hot drinks . . . or cold glasses of milk . . .
I also think for special occasions a nice scoop of vanilla on top would go down a real treat! Thank you so much for sharing with me Noelle!
Rosalie's Tom & Jerry Cake
Print
With ImageWithout Image
Yield: 16
Author: Marie Rayner
A beautiful two toned cake which you can bake in either a bundt tin or a deep 9 inch cake tin. Two batters, a spicy gingerbread type studded with sultanas and a lovely vanilla cake are baked together to give you a moist and delicious cake that the whole family will enjoy. A gift from my good friend in Nova Scotia, Noelle. It is a lovely dense & delicious cake that is well enjoyed with a hot cuppa or a glass of milk.
ingredients:
Tom Layer:
220g butter (1 cup)
380g sugar (2 cups)
1 1/2 tsp vanilla
3 large free range eggs
420g plain flour (3 cups)
1 tsp baking powder
1 tsp salt
240ml milk (1 cup)
Jerry Layer:
2 TBS dark cocoa powder, sifted (not drinking mix)
3 TBS mild molasses
1 tsp ground cloves
1 tsp ground cinnamon
1/2 tsp ground ginger
115g sultana raisins (3/4 cup)
instructions:
Preheat the oven to 180*C/350*F/ gas mark 4. Butter and flour a large Bundt pan or a deep 9 inch round tin.
Cream the butter, sugar and vanilla for the Tom layer together until very light and fluffy. Beat in the eggs one at a time, beating well after each addition. Sift together the flour, baking powder and salt. Beat into the creamed mixture alternately with the milk, making 3 dry and two wet additions.
Remove 1/3 to 1/2 of the batter to another bowl. (The amount depends on your preference of how much spice batter you want. I removed 1/2 of the batter.) To this batter beat in by hand the molasses, spices, cocoa powder until well incorporated and then fold in the raisins.
Spoon the spice batter into your prepared pan. Spoon the vanilla batter on top and smooth out. Bake for 1 1/2 hours until the cake tests done. You may need to cover the top with some aluminium foil for the last 15 minutes or so if you think it is getting too brown.
Let sit in the tin for 15 minutes before tipping out onto a wire rack to cool completely.
I dusted mine with icing sugar.
NOTES:
Noelle's Notes - Mom always used canned milk. My sister uses less of the molasses, spices and cocoa but I like my spice batter to be dark and rich. (I used it all and it was lovely.) I have written the recipe not as mom wrote it because as you know, the best recipes are just jotted down and never include what to do with the ingredients. At 350*F I find the cake in my oven usually bakes in about 1 1/4 hours. I have lowered the temperature to 325*F (165*C/gas mark 3) and baked it for 1 1/2 successfully.
Noelle probably doesn't know this, but when I was a small child my father used to read to me every night. One of my favourite stories was a book I had about Tom & Jerry. If I close my eyes I can still hear my father's voice in my head reading it to me. He would affect different voices for each character. I think the high squeaky one he did for Jerry Mouse was my favourite! In the book it was a really fine day, and Jerry and his little friend Tuffy decided it was the perfect day for a picnic. Of course this involved stealing food from the big people's kitchen. I am quite sure if this cake was there it would totally be on their menu!
Source: https://theenglishkitchen.blogspot.com/2019/05/rosalies-tom-jerry-cake.html

0 notes
Text
16 S'mores Dessert Recipes for Summer—No Campfire Required
Welcome to Camp52, where we're recapturing the fun of summer as a kid. All month long, you'll find playful, carefree ideas for snacks (s'mores and popsicles, anyone?), drinks, crafts, games, field trips, packing tips, and more.
When it comes to s'mores, there's no denying that the whole is greater than the sum of its parts: marshmallows, graham crackers, and chocolate. Sure, each component is good on its own, but with an open flame (or stovetop burner, broiler, or kitchen torch) and a bit of layering, you've got yourself a treat that's gooey, sweet, summertime perfection.
The classic version is a camping favorite, and rightly so: The ingredients are extra simple and don't spoil, although they might get a little bit melty if you leave them out in the sun for too long.
But whether or not you plan on pitching a tent this summer, there are plenty of creative ways to bring all those s'mores-y flavors straight to your kitchen—no bonfire necessary. Think: icebox cakes, cookies, brownies, tarts, and more. Here are 16 of our best s'mores-inspired dessert recipes that take the classic version up a few notches, and then some.
1. S'mores Icebox Cake
Get all that toasty nostalgia of s'mores without a campfire—or even an oven, for that matter—with this easy icebox cake that's perfect for summer.
2. S'mores Cookies
There's nothing not to love about these moist, super-fudgy dark chocolate cookies with gooey pockets of melted marshmallows, graham cracker crumbles, and a sprinkle of shredded coconut.
3. S'mores Pop-Tart Slab Pie
This kid-friendly slab pie is a masterpiece, plain and simple. Why? Well, it's basically a sheet pan-sized s'mores Pop-Tart you can cut into huge slices and share with the whole family.
4. Strawberry S’mores Sundae
Take two summer favorites—quality strawberry ice cream and melty s'mores—and combine them to make the ultimate sundae.
5. S'mores Semifreddo
Semifreddo is almost exactly what it sounds like: a semi-frozen dessert that's kind of like ice cream, but doesn't require any churning. This six-ingredient shortcut version is fast, tasty, and has that classic s'mores-y flavor.
6. S'mores Layer Cake
If you're throwing a big get-together this summer, you've absolutely got to make this showstopping layered graham cake with chocolate ganache and fresh marshmallow fluff.
7. Cinnamon Spice Rice Krispies Treat S'mores
Fact: Homemade Rice Krispies treats taste even better when you bring cinnamon, nutmeg, marshmallows, and lots and lots of chocolate chips into the equation.
8. S'mores Ice Cream
The s'mores chunks in this fun, simple recipe would make a delicious treat all on their own, but they undoubtedly taste best when mixed into fresh burnt marshmallow ice cream.
9. Big Kid Hot Day S'Mores
These flame-less s'mores might seem kid-friendly, but the rum in the marshmallow fluff, plus the cayenne and espresso powder in the melted chocolate, make them a delicious, adults-only dessert.
10. Sheet-Pan S'mores
Think of these sheet-pan s'mores kind of like sweet nachos. Simply sprinkle the graham crackers over the pan, top them with mini marshmallows, and toss the whole thing under the broiler to brown. Then, finish it off with your favorite toppings, like chocolate sauce and coconut flakes.
11. S’mores Pudding Cake
A rich chocolate custard is the star of this luscious, layered pudding cake, while a thick marshmallow crème and soft, crumbly graham crackers step in as the supporting cast.
12. S'mores Croissants
We always love a warm, flaky chocolate croissant for breakfast (or even dessert), but we love this s'mores-inspired twist on the traditional French pastry even more.
13. S'mores Tart
This easy tart brings all those campfire flavors indoors with its graham cracker crust, chocolate ganache, and a thick layer of homemade marshmallow that becomes golden-brown with a kitchen torch or quick stint under the broiler.
14. Homemade Moon Pies
These handheld moon pies are much less of a mess to eat than a batch of your typical, oozy s'mores and—thanks to a trip to the refrigerator—far better for a hot summer day.
15. Grandma Joan's Marshmallow Brownies
These rich, nutty, and, most importantly, Grandma-approved brownies taste great on their own, but are absolute heaven when slathered with a chocolatey marshmallow frosting.
16. Burnt Cinnamon Toast & Chocolate S'more
These luxed-up s'mores are just like the originals, only with cinnamon swirl bread instead of graham crackers, and a sprinkle of flaky salt to balance out the sweetness.
What's your favorite type of s'more? Tell us in the comments below! Source: https://food52.com/blog/24329-best-smores-dessert-recipes

0 notes
Text
White Flourless Chocolate Cake
This white flourless chocolate cake is the perfect blond version of the most decadent, easiest dessert you can imagine. And it’s even naturally gluten free!
I find that white chocolate can be sort of a divider, rather than a uniter. The creamy texture is mostly universal, but the flavor tends to be love-it-or-hate-it. Maybe it’s the richness or the fact that many commercial white chocolates tend to be rather waxy and overly sweet?
I’m not really a white chocolate lover or a white chocolate hater. I’ll eat and enjoy nearly anything, and I find that the way a dessert or food is prepared and the quality of the ingredients can make all the difference. This white flourless chocolate cake, of course, is prepared in just the right way, with just the right ingredients.
How to prepare a flourless chocolate cake
Flourless chocolate cake is traditionally made by melting chocolate and butter, mixing them with granulated sugar and egg yolks and, then folding in whipped egg whites. Sometimes, for a bit more chocolate flavor, the egg whites are beaten with unsweetened cocoa powder.
White chocolate is unique, though, so it tends to behave differently than dark or even milk chocolate in baking. I’ve tried baking a white flourless chocolate cake by replacing only the dark chocolate with white chocolate in my easy flourless chocolate cake recipe. It was a total flop.
Baking a white chocolate cake using the same sort of ingredients as a dark chocolate flourless cake, I couldn’t get the cake to bake properly without burning on the bottom. It didn’t matter whether I separated the eggs and whipped the egg whites or not. Everything turned around when I added cream cheese to the mix, though.
White versus dark flourless chocolate cake
Since there’s no flour to stabilize a flourless cake as it bakes, often flourless baking recipes contain a nut butter or something like black beans or cooked quinoa. A traditional flourless chocolate cake has little more than chocolate, butter, sugar, and eggs.
In making a white chocolate cake recipe, I found it even more difficult to make a batter that was fluffy enough to bake into a cake, not a pudding. Adding cream cheese to the batter made all the difference.
This cake is not a cheesecake. I had originally planned to make a dark chocolate flourless cake and just swirl in some cheesecake batter. I do think that would taste amazing. But I was dying to see whether or not I could make a white version of a flourless chocolate cake.
Since there’s also a tremendous amount of variation from one white chocolate brand to another, I do have to recommend using the best quality white chocolate you can. In this recipe, I used Ghirardelli’s white chocolate baking bar, which I find to be of consistently good quality.
(If you’re gluten free, though, please be sure to check the packaging. I understand that there have been times in the past when Ghirardelli’s white chocolate baking bar has stated that it may contain wheat.)
Do you need to use a water bath?
A water bath, or “bain marie” is simply a method for baking a cake in a larger pan with hot water that rises about halfway up the sides of the pan with the cake batter in it. It provides moist heat that otherwise isn’t possible in a traditional oven. It also maintains a more even, consistent temperature to the cake during baking.
I don’t really care for baking anything at all in a springform pan. Add in the trouble of a water bath, and I’m even more annoyed. Happily, although this recipe requires the springform pan, the water bath is entirely optional.
When I baked this cake with a water bath, I found that the cake rose and baked more evenly (no higher, browner “crust” around the edges). The texture was creamier, too.
When I baked the cake without a water bath, I did place a shallow pan of simmering water on the bottom rack of the hot oven during baking. That helps the cake bake more evenly and in a nice, moist environment. But it doesn’t slow the baking like submerging the pan in an actual water bath does. I found that the cake didn’t rise as evenly, but the texture was more cake-like.
Ingredients and substitutions
If you have other dietary restrictions beyond being gluten free, I’m afraid I don’t have very good news for you about this recipe. But here’s all the explanation I’ve got:
Dairy-free: You simply can’t successfully make this recipe dairy-free, at least not by making the usual substitutions. I have tried and tried (and tried!), and there just isn’t any proper dairy-free substitute for cream cheese. Some of them are able to nail the texture, but none of them has the proper taste.
The closest sub is probably Tofutti, but even that just doesn’t cut it for me. Personally, I’d rather have something else entirely than a near-miss. The butter should be able to be replaced with Melt, my favorite vegan butter replacement, but eliminate the salt in the ingredient list as it’s already plenty salty.
Dairy-free white chocolate that actually tastes good can be hard to find commercially prepared. But I do have a recipe for vegan white chocolate that I think would work just fine.
Egg-free: There are 4 whole eggs in this recipe, and they do some serious heavy lifting. For that reason, I know of absolutely no egg substitutes that would work.
Prep time: 15 minutes Cook time: >45 minutes Yield: 1 9-inch cake
Ingredients
8 ounces white chocolate, chopped
8 ounces cream cheese, at room temperature
8 tablespoons (112 g) unsalted butter, at room temperature
1/2 cup (100 g) granulated sugar
1/4 teaspoon kosher salt
2 teaspoons pure vanilla extract (with vanilla seeds, if possible)
4 eggs (200 g, weighed out of shell) at room temperature, beaten
Whipped cream and berries, for serving (optional)
Directions
Preheat your oven to 325°F. Grease a 9-inch springform pan with nonstick cooking spray. Line the bottom of the pan with a 9-inch round of parchment paper. If using a water bath, cover the bottom and sides of the pan tightly with heavy-duty aluminum foil. Set the pan aside.
In a small, heat-safe bowl, place the chopped white chocolate. Melt either in the microwave (90 seconds at 50% power, and then for 30 seconds at a time at 50% power, stirring in between until melted and smooth) or over a double boiler (position the bowl over barely simmering water and stir occasionally until melted and smooth). Set the melted chocolate aside to cool while you prepare the other ingredients.
In the bowl of a stand mixer fitted with the whisk attachment or a large bowl with a handheld mixer, place the cream cheese, butter, sugar, salt, and vanilla. Whip on medium speed and then on high speed until light and fluffy (about 5 minutes). Lower the speed of the mixer to medium-low, and add the eggs one at a time. Increase the mixer speed to medium-high and continue to whip until well-combined (about 2 minutes). Reduce the speed again to medium-low, and drizzle in the melted white chocolate. Increase the speed to high and continue to whip for at least 5 minutes or until the mixture is smooth, but fluffy. The whisk should leave a visible trail in the batter.
Transfer the batter to the prepared springform pan and smooth into an even layer with an offset spatula. If using a water bath, place the pan in the center of a large roasting tin and place the pans in the center of the preheated oven. Pour hot water into the roasting pan while the pan is already in the oven (it’s much easier to move a pan around that doesn’t have hot water in it!) until the water reaches about halfway up the sides of the springform pan. Bake until the top is lightly golden brown and the cake doesn’t jiggle more than very slightly when moved from side to side. That will take about 45 minutes if you’re using a water bath, and about 5 to 10 minutes less without a water bath.
Turn off the oven and prop the door open slightly. Allow the cake to cool in the oven for at least 15 minutes and up to an hour. Remove the cake from the oven, allow it to cool in the pan to room temperature, and then place in the refrigerator for at least an hour, or up to 3 days. Run a knife around the edge of the pan to ensure that the edges aren’t sticking before unmolding the chilled cake. Rinse a large knife under hot water, then dry it off before making each cut in the cake. The knife should glide right through the cake. Garnish with whipped cream and berries, and serve chilled.

Source: https://glutenfreeonashoestring.com/white-flourless-chocolate-cake/
0 notes
Text
Healthy Vegetarian Meal Plan 01.20.2019
On this week’s healthy vegetarian meal plan: Dairy-Free Potato Soup, Vegan Alfredo Pasta with Crispy Chickpeas, Loaded Lemony Greek Salad, Creamy Vegetable Chickpea Curry, and Sweet Potato Parsnip Fritters.
Happy meal prepping, and have a great weekend!
Sunday
Dairy-free Potato Soup from Making Thyme for Health
Prep Ahead Tip: Recipe comes together fairly quick. Entire soup can be made up to 2 days in advance, if desired.
Vegan/Gluten-free Substitutions: Recipe is already vegan and gluten-free.
Monday
Vegan Alfredo Pasta with Crispy Chickpeas from She Likes Food
Prep Ahead Tip: Cauliflower alfredo sauce can be made up to 2 days in advance.
Vegan/Gluten-free Substitutions: Recipe is already vegan. Use gluten free pasta to make gluten free.
Tuesday
Loaded Lemony Greek Salad from Eats Well With Others
Prep Ahead Tip: This recipe comes together quickly, no need to prep ahead.
Vegan/Gluten-free Substitutions: Omit the feta cheese to make this vegan. Substitute quinoa or millet for the bulgur to make it gluten free.
Wednesday
Creamy Vegetable Chickpea Curry from Hummusapien
Prep Ahead Tip: Veggies can be chopped ahead of time.
Vegan/Gluten-free Substitutions: Recipe is vegan and gluten-free.
Thursday
Sweet Potato Parsnip Fritters from The Roasted Root
Prep Ahead Tip: Parsnip and sweet potato can be boiled up to 3 days in advance.
Vegan/Gluten-free Substitutions: Recipe is gluten-free and vegan.
Click HERE to print the shopping list!
Source: https://www.theroastedroot.net/healthy-vegetarian-meal-plan-01-20-2019/
0 notes
Text
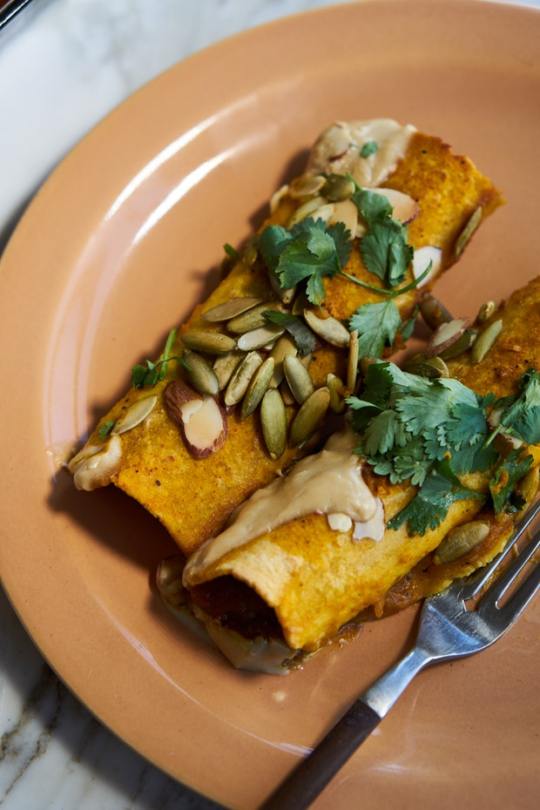
Quick Vegan Enchiladas with Sweet Potato Sauce

A weeknight-friendly enchilada has to check a lot of boxes for me. You ready for the short list? Here we go. These enchiladas need to be knock-out delicious AND: easy to assemble, free from pre-cooking any components, a healthful alternative to all the heavy cheese versions out there, and, ideally, in the oven in less that ten minutes. That's the dream scenario. After some experimentation, I offer you these - quick, vegan enchiladas.
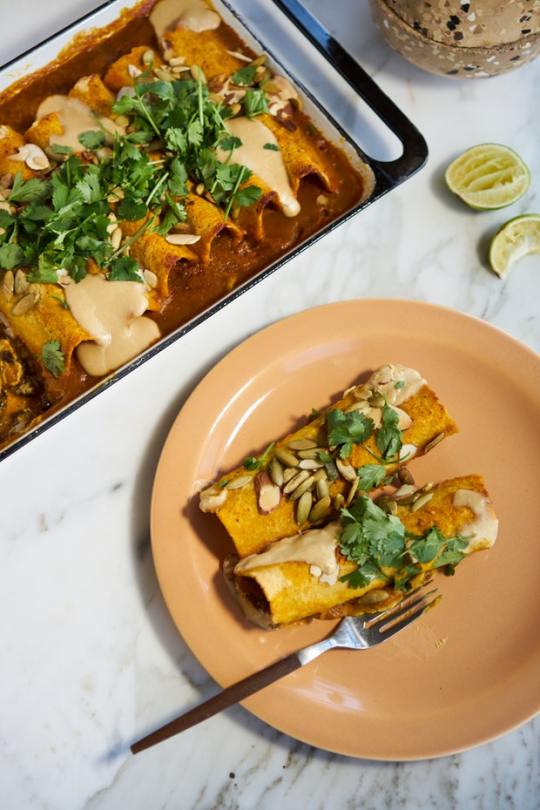
They're tender enchiladas made with black beans, sweet potatoes, and a stealthy turmeric boost. There was also a focus on making a version that was plant-based and vegan (which is what you see here), but also easily adaptable. If you want to add a bit of feta to the filling here (if you're not vegan, of course) then go for it. It's a recipe that should be able to accommodate much of what you might dream of rolling into a tortilla and baking until bubbly and golden.

This recipe is similar in spirit to the Last Minute Lasagna a bunch of you have been making. In fact, I started working on both of those around the same time, so if you like one of them, give the other a try as well.
Variations
A couple of notes, I wrote the recipe calling for canned winter squash - anything like pumpkin, sweet potato, or another winter squash will work. Whatever you and your family tends to like. I stumbled on a canned butternut squash during a spin through Trader Joe's, a while back, stocked up, and that is what you see pictured here. You can, of course, use squash you've roasted at home in place of canned - it just makes the process less quick ;)...
browse more:
bean Recipes
turmeric Recipes
Vegan Recipes
Quick Vegan Enchiladas with Sweet Potato Sauce
PRINT RECIPE
4.25 from 12 votes
A couple of tips - you want to use flexible, pliable tortillas, at room temperature or warmer. If you're tortillas are on the stiff side, place them in a baking dish, covered, in a warm oven for a few minutes to soften up. Or if you have a microwave, give them a quick hit. Play around with fillings here - a small amount of crumbled feta (if you're not vegan), or plant-based equivalent, added along with the black beans adds a nice creamy component to the filling, a nice accent without needing to be the main event. ;)
Ingredients
1 tablespoon extra virgin olive oil
1 15- ounce can sweet potato puree, butternut squash puree, or pumpkin puree
1/2 teaspoon turmeric powder
2 medium cloves garlic, grated on microplane
1 tablespoon taco seasoning
3/4 teaspoon fine grain sea salt
1 lemon, zest and juice
8 corn tortillas (6-inch), room temperature or warm
1 15- ounce can black beans, drained and rinsed
1/3 cup chopped black olives
1/3 cup tahini
1/2 cup sliced almonds
1 1/2 cups chopped cilantro leaves
to serve (optional): oven-roasted tomatoes, serrano vinegar & chiles*, a favorite salsa, etc.
Instructions
Preheat oven to 425F.
Make the Filling
In a large mixing bowl combine the olive oil, sweet potato puree, turmeric, half of the grated garlic, taco seasoning, salt, zest of the lemon, and 1 1/2 cups of water. Stir well.
Assemble the Enchiladas
Ladle a cup of the sweet potato mixture into the bottom of an 8 x 12-inch (or larger) baking dish, or equivalent. Lay the tortillas on a work surface, and divide the black beans equally between them, sprinkle equally with olives. Roll up tortillas, and place seam side down in baking dish. Pour the remaining sauce on top (it will thicken).
Bake and Make Sauce
Bake the enchiladas for 30-35 minutes, or so. Half way through, sprinkle with sliced almonds, and finish baking - until golden and bubbling. While the enchiladas are baking, thin the tahini with 1/4 cup warm water. Whisk in the remaining garlic, a pinch of salt, and squeeze of lemon juice. Top the enchiladas with dollops of the tahini sauce, and the fresh cilantro when they come out of the oven. Serve hot!
Notes
*Serrano Chile Vinegar & Chiles: Combine 8 serrano chiles, sliced 1/8th-inch thick with 2 cups white vinegar in a Mason jar, and refrigerate. Use the chiles w/in a week or two. You can use the vinegar for weeks after that in dressings, etc.
Serves
6
Prep Time
10 mins
Cook Time
30 mins
Total Time
40 mins
PRINT RECIPE
nutrition info nutrition info
December 11, 2018 permalink icon
Per Serving: Calories 426
Total Fat 17g
Saturated Fat 2g
Cholesterol 0mg
Carbohydrates 55g
Sodium 491mg
Fiber 13g
Sugars 5g
Protein 15g
instagram icon
If you make this recipe, I'd love to see it - tag it #101cookbooks on Instagram!
Share this...
Pinterest
0Facebook
130
Google+
0email

WEEKNIGHT EXPRESS features 10 Vegetarian, Plant-centric Recipes for Feel-Good Food — Fast!
Subscribe to get 32-pages of recipes to view on your tablet, e-book reader or phone.


Follow Me:
Instagram
Youtube
Facebook
Pinterest
Related Recipes

Last Minute Red Lasagna
Everyone needs a go-to lasagna recipe. A great one. This is a true weeknight lasagna. No pre-cooking sauces, no pre-cooking noodles. You, literally, stir the first five ingredients together into a vibrant crushed tomato sauce, and start layering.
The Ultimate Vegan Nachos
Oozy, cheesy, loaded vegan nachos everyone loves. When you need a nacho fix, this is how you should roll. At least once. Nachos are always a crowd pleaser, and this is no exception.
Instant Pot Mushroom Stroganoff with Vodka
Make this stroganoff your dinner tonight, seriously! Made with caraway-spiked vodka, and a hearty mushroom base, you get all of what you love about mushroom stroganoff, without the all the butter and cream.
Fourth of July Roasted Tomato Salsa
A deliciously vibrant, earthy, and slightly smoky-tasting salsa recipe. Different from salsa fresca, the deep, caramelized flavors of the roasted tomatoes and onions alongside the smokiness of the chipotles make for a richly beautiful and balanced salsa.
More Recipes
Whole Grain
WFPB
Vegetarian
Vegan
Soups
Side Dishes
Sandwiches
Salads
Pasta
Quick
Main Course
Low Carb
Instant Pot
Holiday
High Protein
Gluten Free
Drinks
Dinner Ideas
Desserts
Cookies
Chocolate
Breakfast
Baking
Appetizers
Follow Me:
Instagram
Youtube
Facebook
Pinterest
Popular Ingredients
avocado
egg
herb
kale
lemon
lentil
quinoa
pasta
tomato
turmeric
yogurt
zucchini
arugula
asparagus
basil
broccoli
buttermilk
cauliflower
chickpea
chocolate
curry
tempeh
tofu
ALL
© 101 Cookbooks 2018
Use of this site constitutes acceptance of its User Agreement and Privacy Policy.
Source: https://www.101cookbooks.com/quick-vegan-enchiladas/
0 notes
Text
Healthy Vegetarian Meal Plan 01.20.2019
On this week’s healthy vegetarian meal plan: Dairy-Free Potato Soup, Vegan Alfredo Pasta with Crispy Chickpeas, Loaded Lemony Greek Salad, Creamy Vegetable Chickpea Curry, and Sweet Potato Parsnip Fritters.
Happy meal prepping, and have a great weekend!
Sunday
Dairy-free Potato Soup from Making Thyme for Health
Prep Ahead Tip: Recipe comes together fairly quick. Entire soup can be made up to 2 days in advance, if desired.
Vegan/Gluten-free Substitutions: Recipe is already vegan and gluten-free.
Monday
Vegan Alfredo Pasta with Crispy Chickpeas from She Likes Food
Prep Ahead Tip: Cauliflower alfredo sauce can be made up to 2 days in advance.
Vegan/Gluten-free Substitutions: Recipe is already vegan. Use gluten free pasta to make gluten free.
Tuesday
Loaded Lemony Greek Salad from Eats Well With Others
Prep Ahead Tip: This recipe comes together quickly, no need to prep ahead.
Vegan/Gluten-free Substitutions: Omit the feta cheese to make this vegan. Substitute quinoa or millet for the bulgur to make it gluten free.
Wednesday
Creamy Vegetable Chickpea Curry from Hummusapien
Prep Ahead Tip: Veggies can be chopped ahead of time.
Vegan/Gluten-free Substitutions: Recipe is vegan and gluten-free.
Thursday
Sweet Potato Parsnip Fritters from The Roasted Root
Prep Ahead Tip: Parsnip and sweet potato can be boiled up to 3 days in advance.
Vegan/Gluten-free Substitutions: Recipe is gluten-free and vegan.
Click HERE to print the shopping list!

Source: https://www.theroastedroot.net/healthy-vegetarian-meal-plan-01-20-2019/
0 notes
Text
How To Make An Antipasto Salad Platter
posted December 7, 2018 by Gina
For fuss free entertaining, nothing is easier (and prettier) than creating an antipasto salad platter!
And that is why I’m so excited to share this Skinnytaste Fuss-Free Dinner Gift Collection filled with all my DeLallo Foods favorites, all hand picked by me! I love giving the gift of food, it’s the perfect gift box for someone special in your life, I plan on giving these to all my friends and family members that have “everything” and don’t need more “stuff” (like my in-laws)!
Now, if you have been following me for a while, then you know how picky I am about Italian food, and how much we LOVE Delallo Foods. Growing up in New York, we are spoiled with great Italian salumerias and know good quality pasta, cheese and meats. So when I first went to the Delallo Store in Jeanette, Pennsylvania I thought I was in Italian heaven. The great thing is, you can buy most of their stuff online, so you don’t have to travel all the way to Jeanette, PA.
When I came up with this Fuss-Free Dinner Party in a Gift Box I remembered an event my friend Heidi of Foodie Crush hosted, where she threw together a salad platter similar to this that was pure genius. Turns out, her idea came Guiliana who works at Delallo, and always makes entertaining seem so effortless. Just add the greens and veggies, everything else for the platter is in included in the box, plus a package of pasta and a jar of sauce.
Here’s what you will get:
DeLallo Mezzi Rigatoni Pasta 1 lb. DeLallo Pomodoro Fresco Tomato-Basil Sauce 25.25 oz. DeLallo Modenacrem Balsamic Glaze 8.5oz DeLallo Imported Chickpeas 14oz DeLallo Pitted Castelvetrano Olives 10.6 oz. DeLallo Sun-Dried Tomatoes 6.7 oz. DeLallo Grilled Artichoke Halves 12 oz. DeLallo Feta Wedge 8 oz. DeLallo Parmesan Cheese Wedge 8 oz. DeLallo Sweet Sopressata Mini 9 oz. DeLallo Extra Virgin Olive Oil Gift Box
And, if you use the code: SKINNYTASTE you will get 25% off!
You can use any combination of your favorite Antipasto, such as marinated mushrooms, eggplant, etc, your favorite olives (you can use a variety), and your favorite meats and cheese, the possibilities are endless. Once you have all your ingredients, arrange this just before you’re ready to serve, it won’t take long. You can pre-cut everything ahead to save time.
Start with a very large platter.
Pick up some salad greens, such as baby arugula, and some tomatoes and fresh cucumbers.
Arrange the greens in the center of the platter.
Cut up the vegetables and cheese, and slice the sopressata.
Arrange them around the arugula, keeping them all separate.
Open the chickpeas, olives, sundried tomatoes and artichokes and drain, arrange them on the platter.
Set out olive oil, balsamic glaze and your favorite dressings.
Set out some serving spoons or tongs and let everyone help themselves.
Recipe created in partnership with Delallo Foods, a brand I love and use in my kitchen.
posted December 7, 2018 by Gina

Source: https://www.skinnytaste.com/how-to-make-an-antipasto-salad-platter/
0 notes
Text
Ultimate Snickers Ice Cream Pie
Ultimate Snickers Ice Cream Pie
Easy1 hour 30 minsQuick
This Snickers Ice Cream Pie recipe is a 100% indulgent and irresistible dessert that is sure to be a crowd fave. Feel free to use Snickers or whatever favorite candy bars you love.
Expat craving alert.
We couldn’t let our first summer abroad go by without making at least one decadent ice cream pie to celebrate. And as you can see, we went all-out with every favorite American goodie that we could get our hands on here in Spain. Then layered everything high into one scrumptious, summer-celebrating, show-stopping masterpiece that we humbly call…
…the Ultimate Snickers Ice Cream Cake. ♡
It’s pretty much exactly what you think it is. We’re talkin’ an Oreo crust (classic), chocolate and vanilla ice cream (double the fun), two layers of chopped up Oreos and Snickers (because ‘Merica), a generous drizzle of caramel and chocolate sauce (pretty and delish), plus a sprinkle of flaked sea salt on top if you’re feeling fancy. And if you make it that far, I sure hope you’re in for fancy.
Friends, this cake is roughly 0% healthy. But I can assure you that it is fully 100% happy and nostalgic and delicious. And when you’re halfway around the world feeling a bit homesick — or hey, maybe spending Labor Day outside right in the heart of the USA this weekend — I can assure you that this one will hit the spot and taste just like home.
Let’s do this.
Ultimate Snickers Ice Cream Pie Ingredients:
How can you go wrong with this ingredient list?! You’ll need:
Snickers: Or Butterfingers, Twix, Health, Reese’s, Milky Way, you pick.
Oreos + Butter: For the crust, a classic.
Ice Cream: I went with half chocolate, half vanilla. But feel free to just pick one, or use whatever flavor(s) you love.
Magic Shell: Easily homemade with just chocolate chips and coconut oil. Or you can use store-bought chocolate syrup or hot fudge sauce.
Caramel Sauce: Either homemade or store-bought.
Flaky Sea Salt: An optional touch, but it is absolutely delicious and really balances the sweetness perfectly.
How To Make An Ice Cream Pie:
This is about the easiest kind of pie in the world to make, but it does require a bit of waiting/freezing in between steps. So plan ahead accordingly. Simply…
Make your crust. Blitz the Oreos in the food processor (or crumble with a rolling pin). Then combine with the melted butter, and press evenly into a 9-inch pie dish. Freeze for at least 15 minutes to let the crust firm up.
Create the first layer. While the crust is freezing, let your chocolate ice cream thaw on the counter for a bit until it is partially softened. (You don’t want it totally melted, but soft enough that you can spread it around with a spoon.) Once the crust is ready to go, spread the ice cream out in an even layer on the bottom half of the crust. Sprinkle evenly with diced Snickers and Oreos, and drizzle generously with the caramel sauce and chocolate magic shell, then sprinkle with a pinch of flaky sea salt. Freeze for at least 30 minutes, or until firm.
Create the second layer. Repeat with the vanilla ice cream, diced Snickers and Oreos, caramel sauce and magic shell, and flaky sea salt. Freeze for at least 30 minutes, or until firm.
Serve. Then slice, serve, and oh my word…enjoy. ♡♡♡

Print Recipe
Did you make this recipe? Leave a review »
Yield: 12-16 servings
Ultimate Snickers Ice Cream Pie
This Snickers Ice Cream Pie recipe is a 100% indulgent and irresistible dessert that is sure to be a crowd fave. Feel free to use Snickers or whatever favorite candy bars you love.
Total Time: 1 hour 30 mins
Prep Time: 1 hour 30 mins
Cook Time: 0 mins
Ingredients:
1 (39-count) package Oreos, divided
4 tablespoons melted butter
2 (or 3!) Snickers bars
3 cups chocolate ice cream
3 cups vanilla ice cream
caramel sauce, homemade or store-bought
chocolate magic shell, homemade or store-bought
optional: flaky sea salt
Directions:
To Make The Crust: Add 30 Oreos to the bowl of a food processor. (Or you can do this step by hand.) Pulse until completely crumbled. Drizzle in the melted butter and puree until evenly combined, stopping to scrape the sides of the bowl down once if needed. Press the mixture evenly into the bottom of a 9-inch pie pan. Freeze for at least 15 minutes before adding ice cream.
To Make The First Layer: Dice the Snickers bars and remaining Oreos and set aside. While the crust freezes, set the chocolate ice cream out on the counter to thaw until slightly softened. Then remove the crust from the freezer, and gently spoon the ice cream into the pie crust to fill it up about halfway, smoothing the top so that it is nice and flat. Sprinkle half of the Oreos and Snickers pieces evenly on top of the chocolate ice cream layer. Then drizzle with caramel sauce and magic shell, and sprinkle with a pinch of flaky sea salt. Return to the freezer and chill until firm, at least 30 minutes.
To Make The Second Layer: Set the vanilla ice cream out on the counter to thaw for about 10-15 minutes, until slightly softened. Gently spoon the vanilla ice cream on top of the chocolate layer, smoothing the top with a spoon. Sprinkle the remaining Oreos and Snickers pieces evenly on top of the vanilla ice cream layer. Then drizzle with caramel sauce and magic shell, and sprinkle with a pinch of flaky sea salt. Return to the freezer and chill until firm, at least 30 minutes.
Then slice, serve and enjoy!
Difficulty: EasyCategory: Quick
All images and text ©Gimme Some Oven
If you make this recipe, be sure to snap a photo and hashtag it #gimmesomeoven. I'd love to see what you cook!
posted on August 30, 2018 in Desserts, Pies
0 Comments »
Share this Post
You May Also Like...
Chocolate Avocado Hot Fudge Cake
How To Make Whipped Cream
My Favorite Sour Cream Coffee Cake
« Previous Post
Next Post »

Source: https://www.gimmesomeoven.com/ultimate-snickers-ice-cream-pie/
0 notes
Text
The Importance of Culturally Sensitive Nutrition Advice
Although we have seen more people of color enter the field since I started practicing dietetics five years ago, the diversity rates are still abysmal and the inclusion needs to be happening at a faster pace. People often think of diversity as obligatory checkboxes without realizing that it actually enhances our organizations and makes us better providers. When more cultures are represented, we’re able to connect with patients on a more meaningful level. Because of the lack of diversity in the field, health and nutrition resources are not always inclusive.
I think that when it comes to food and nutrition media, the problem is worse. Wellness is typically equated to a naturally thin, able-bodied, blonde woman striking yoga poses or drinking a green smoothie in a remodeled white kitchen. This is unfortunate because it excludes so many people who don’t identify with that narrative. We need to do a better job of including practitioners of color in the healthcare conversation by being inclusive when deciding who to invite to speak on panels or who to feature on our platforms.
Head on over to SELF right now to read the full article on Your Nutrition Advice Won’t Help if It’s Not Culturally Sensitive
Source: https://foodheavenmadeeasy.com/culturally-sensitive-nutrition-advice/

0 notes
Text
How To Make the Creamy, Toasted Coconut Milk of Your Dreams

Let me start by saying, if you already make your own nut milks at home, you have to try this. I mean - walk to your kitchen, turn the oven dial, and get some coconut in there. You have to trust me here. I started making homemade toasted coconut milk a few months ago, and it has become one of my favorite things. It's creamy, rich, nutty, and intense. I enjoy it immensely on its own, and as an ingredient in other preparations as well. It's a real flavor punch. Imagine all the ways you can use it to make some of your favorite preparations even better. It's great in chai, in morning oatmeal, baked oatmeal(!). You can use it in a wild range of sweet preparations, but it's also good as a way to add a little je ne sais quoi, to broths, soups, and weeknight curries.
You can see how it comes together in a video of the process here, and you can find the recipe down below, as well as a few notes. Let me know if you make it, and if you do, please let me know how you're using it!
SUBSCRIBE TO VIDEOS
A couple notes. If you want to totally geek out on this, play around with the toastiness of your coconut. If you toast coconut deeply, you're going to have a different profile than a more lightly toasted coconut. I tend to ride the dark side of the spectrum, but it's wild the difference between a milk made with lightly toasted versus dark. Both delicious, just different.


Also, like all pure coconut milk, it will separate. And it solidifies in the refrigerator. Use it as you would canned coconut milk, and expect it to behave similarly (i.e. you might need to warm it up a bit, and give it a good stir before using)...
browse more:
coconut milk Recipes
Drink Recipes
Creamy, Toasted Coconut Milk
PRINT RECIPE
4.25 from 4 votes
Be sure to toast your coconut well (but not burned!) if you want the flavor to be extra pronounced.
Ingredients
1 1/2 cups toasted coconut
4 cups water
fine grain sea or Himalayan salt
natural sweetener to taste, optional
Instructions
In a blender, combine the coconut, water, and salt. Blend, and then blend some more. Strain through a nut bag (makes it easy!) or fine strainer. Sweeten to taste if you like, I usually use a few drops of liquid stevia, or maple syrup. Refrigerate.
Notes
Makes 3 cups.
Serves
4
Prep Time
5 mins
Cook Time
5 mins
Total Time
10 mins
PRINT RECIPE
nutrition info nutrition info
March 19, 2019 permalink icon
Per Serving: Calories 106
Total Fat 10g
Saturated Fat 8g
Cholesterol 0mg
Carbohydrates 4g
Sodium 18mg
Fiber 2g
Sugars 1g
Protein 1g
instagram icon
If you make this recipe, I'd love to see it - tag it #101cookbooks on Instagram!
Share this...
Pinterest
0Facebook
131
Google+
0email

WEEKNIGHT EXPRESS features 10 Vegetarian, Plant-centric Recipes for Feel-Good Food — Fast!
Subscribe to get 32-pages of recipes to view on your tablet, e-book reader or phone.


Follow Me:
Instagram
Youtube
Facebook
Pinterest
Related Recipes

Coconut Baked Oatmeal
An extra special baked oatmeal - banana, coconut, vanilla, coconut milk, and some winter citrus, all baked into fragrant, golden-topped magic.
13 Inspiring Instagrammers to Follow for Healthy, Feel-Good Food
My hope is that they'll all inspire you to want to jump into the kitchen. They tend to celebrate lots of plants and vegetables, and generally integrate food, cooking, balance, and wellness into their lives in a way that inspires others.
A Glow-promoting, Luminizing Breakfast Beauty Bowl
Highlighting a few skin-friendly superstars in this Luminizing Breakfast Beauty Bowl - a mixed berry and chia smoothie base topped with a rainbow of seasonal ingredients.
40 Essential Instant Pot Links
All the helpful, essential Instant Pot links in one list. Links to accessories, videos, water test how-to, recipes, guides, etc.
More Recipes
Whole Grain
WFPB
Vegetarian
Vegan
Soups
Side Dishes
Sandwiches
Salads
Pasta
Quick
Main Course
Low Carb
Instant Pot
Holiday
High Protein
Gluten Free
Drinks
Dinner Ideas
Desserts
Cookies
Chocolate
Breakfast
Baking
Appetizers
Follow Me:
Instagram
Youtube
Facebook
Pinterest
Popular Ingredients
avocado
egg
herb
kale
lemon
lentil
quinoa
pasta
tomato
turmeric
yogurt
zucchini
arugula
asparagus
basil
broccoli
buttermilk
cauliflower
chickpea
chocolate
curry
tempeh
tofu
ALL
© 101 Cookbooks 2019
Use of this site constitutes acceptance of its User Agreement and Privacy Policy.

Source: https://www.101cookbooks.com/toasted-coconut-milk/
0 notes
Text
La Fresa Cocktail + Shrimp Tacos with Strawberry Salsa
Ok so today I’m sharing a super fun cocktail + taco pairing prepared in partnership with Exotico Tequila.
Let’s start with the drink. My La Fresa cocktail is a fresh and vibrant libation made with Exotico Reposado, strawberry puree, cilantro syrup and lime juice. It’s bright and juicy with undertones of vanilla, oak and spice from the reposado. The cilantro syrup enhances the sweetness of the strawberries while adding a subtle grassy note. For the taco pairing, I used many of same flavors to create a punchy Shrimp Taco with Strawberry Salsa.
The taco recipe starts with fresh shrimp marinating in lime juice, lime zest, olive oil, garlic and cilantro. After just 20 minutes, the shrimp are roasted until plump and blushing. To assemble, pile up shrimp in a charred flour tortilla, then top with a sweet-tart salsa made with strawberries, lime, serrano chile, red onion and chopped cilantro. Each bite is bold in flavor, but light texture-wise. A perfect dinner for a warm late summer evening. Continue reading for the recipes.
This La Fresa cocktail has a couple of handmade ingredients:
Strawberry puree
Cilantro simple syrup
The first is made by warming up a bunch of halved strawberries in a skillet just until tender. After that, they get blended and strained into a smooth puree. One pound of strawberries makes about 1 cup of puree (8 drinks). I’d recommend making a little more, because the puree is also delicious poured on top of vanilla ice cream or swirled into Greek yogurt!
The simple syrup is prepared by simmering water and sugar with coriander seeds and lime zest. Once the sugar is dissolved, you take the mixture off the heat and let cool a bit before adding a bunch of cilantro sprigs. Let the mixture steep for several hours and then strain before using in this cocktail. You can make both of these items several days in advance and store in the fridge until you are ready to use them.
Exotico Tequila’s reposado is aged six months in white oak bourbon barrels, resulting in a smooth spirit warm with notes of vanilla, dried fruit, spices and caramel. And the oakiness is on the mellow, approachable side. I’d have to say that Exotico’s reposado is definitely a quality tequila for the price point (under $20), and it really blends well into cocktails!
Next, let’s talk tacos. I just love seafood tacos during the summer months, and these Shrimp Tacos with Strawberry Salsa are a real treat on a hot summer day. The shrimp marinate in just 20 minutes. Make sure you don’t leave them in the acidic liquid for too long or you’ll end up with ceviche! I’ve prepared these shrimp in the oven, but you could certainly cook them on the grill or stovetop instead.
My Strawberry Salsa is sweet, tart and just a little spicy. Once you are done mixing everything together, be sure to taste and adjust seasonings. The flavor can vary depending on the ripeness of the strawberries, so you may need to add a bit more honey for sweetness or lime juice for tartness.
La Fresa Cocktail
Author Brandon Matzek
Yield 1 drink
Ingredients
For the Cilantro Simple Syrup:
1 cup water
1 cup sugar
1 tablespoon coriander seeds
Zest of 1 lime
1 small bunch (15 to 20 sprigs) cilantro
For the cocktail:
1 1/2 ounces Reposado Tequila
1 ounce strawberry puree (recipe below)
3/4 ounce Cilantro Simple Syrup
1/2 ounce fresh lime juice
Cilantro sprig, for garnish
Notes
* To make strawberry puree give 1 pound (ish) of strawberries a good rinse. Do not dry. Hull and half the strawberries. Quarter any extra large strawberries. Add strawberries to a large saucepan and warm over medium heat, stirring occasionally. Cook until strawberries start to soften and release juices. Remove from heat and transfer to a small food processor. Add a dab of water and process until smooth. Pour mixture through a fine mesh basket strainer into a clean bowl (you can use a spatula here to help press the liquids through strainer). Discard the solids. Let cool before using.
Shrimp Tacos with Strawberry Salsa
Author Brandon Matzek
Yield 4 servings
Ingredients
For the shrimp tacos:
1 pound large or medium shrimp, peeled and deveined
Juice of 3 limes
Zest of 1 lime
2 garlic cloves, finely grated or minced
2 tablespoons chopped fresh cilantro, plus more for sprinkling
1 tablespoon olive oil
Kosher salt
4 medium (or 8 small) flour tortillas, for serving
For the strawberry salsa:
Juice of 1 lime
Zest of 1 lime
1 teaspoon honey
Kosher salt
12 ounces ripe strawberries, hulled and diced
Heaping 1/3 cup chopped red onion
Handful chopped fresh cilantro
1 serrano chile (with seeds and ribs*), finely chopped
Instructions
Add shrimp to a large zip-top bag with lime juice, lime zest, garlic, cilantro, olive oil and a couple pinches of salt. Seal the bag, then mush the ingredients around evenly mix everything up. Let marinate in the fridge for 20 minutes.
While the shrimp are marinating, prepare the strawberry salsa. Add lime juice, lime zest, honey and a couple pinches of salt to a medium bowl, whisking to combine. Stir in strawberries, red onion, cilantro and serrano chile. Season to taste with additional salt, honey and lime juice if needed. Flavors should pop! Cover and store in the fridge until ready to use.
Preheat an oven to 400°F and line a baking sheet with parchment paper. Transfer shrimp from the marinade to the baking sheet, then bake until the shrimp are firm and blushing (about 4 to 6 minutes). Don't over cook here.
To serve, warm flour tortillas over an open burner, allowing the flame to char the tortilla in spots. Divide shrimp between warm tortillas then top with strawberry salsa and a final sprinkling of cilantro.
Notes
* Remove seeds and ribs if you don't want the salsa spicy.
This post was written in partnership with Exotico Tequila. Thoughts, opinions and recipes are my own.
0 Source: https://www.kitchenkonfidence.com/2018/08/la-fresa-cocktail-shrimp-tacos-with-strawberry-salsa
0 notes
Text
Instant Pot Pot Roast with Vegetables
I love a classic pot roast, but I am not always a fan of the veggies. Sometime they end up not being super flavorful. I usually end up eating the potatoes with ketchup and dousing the carrots in salt. Sometime the texture can also be off. They can end up overcooked.
This instant pot pot roast and veggies is my new favorite way to make that classic dish. The roasts cooks in juices making a flavor gravy. However, before making the gravy, the vegetables cook in the juices. They cook just long enough to be the perfect tenderness.
After the veggies cook, you remove them with a slotted spoon and toss them in butter. No more issues with veggies with no flavor or overcooked texture.
At this point, the juices are then turned into an awesome gravy to drizzle over that tender roast. Give this version a try in the instant pot. I think it will be a hit.
Instant Pot Pot Roast with Vegetables
3 pound chuck roast
Salt and pepper
1 Tbsp canola oil
1 cup diced onion
14.5 oz beef broth
1 Tbsp tomato paste
2 bay leaves
½ of a 16 oz bag of baby carrots
6 red potatoes, cut in half, then each half into quarters
4 Tbsp butter
1 Tbsp finely chopped fresh parsley
½ cup flour
½ cup water
browning sauce
Pat dry with a paper towel and season liberally with salt and pepper on all sides.
Set your Instant Pot to saute. Once heated, add the oil. Add in the roast and sear on each side until browned. Remove the roast set aside on a plate.
Add in onion and cook for 3 minutes until softened. Stir occasionally, scraping the brown bits off the bottom of the pan.
Add the beef broth, tomato paste, and bay leaves. Stir until the tomato paste is incorporated. Place the roast back to the pot. Cover and lock the lid in place. With the valve on sealing, set the Instant Pot to manual for 75 minutes.
Once the cooking is done, allow the pressure release naturally for 15 minutes. Then do a quick release of the remaining pressure
Remove the roast from the pan. Place it on a plate and cover with foil.
Remove the bay leaves from the juices. Add in the the carrots and potatoes. Cover and lock the lid in place, with the valve on sealing. Set to manual for 3 minutes. Then do a quick release of the pressure.
Using a slotted spoon, transfer the vegetables to a bowl. In in the butter and parsley, the gently toss. Cover with foil.
In a medium bowl or blender bottle, mix together the flour and water until smooth. Strain the juices from the instant pot and discard any solids.
Pour 1-2 cups of the cooking liquid back into the instant pot. Slowly whisk in half of the flour mixture and turn on to saute. Bring the gravy to a boil, whisking often. If needed, slowly whisk in more of the flour mixture to reach the desired thickness of the gravy. If too thick. thin with a little water. Add a splash or 2 of browning sauce and taste. Salt and pepper as needed. Transfer the gravy to a gravy boat.
Uncover the pot roast and slice. Serve slices drizzled with gravy and vegetables on the side. Serves 4-6.
Recipe adapted from Bread Booze and Bacon.

Source: https://www.realmomkitchen.com/26504/instant-pot-pot-roast-with-vegetables/
0 notes