
Statistics
We looked inside some of the posts by garagnon-gallery and here's what we found interesting.
Average Info
Notes Per Post
40
Likes Per Post
18
Reblog Per Post
22
Reply Per Post
0
Time Between Posts
5 days
Number of Posts By Type
Text
17
Last Seen Tumblr Blogs


Fun Fact
Tumblr Inc. is using 66 technologies for its website.
Text
PARTYGIRL VIDEO
SEXY PARTYGIRL VIDEO With a range of modern looks, we have also tried traditional dresses for you that will look stylish regardless of the modern trend.
You can choose based on what works best for you. Feel free to mix and match too! Did you know that wearing our evening dresses can make you the queen of the party

Once you have identified the type of fashion that matches your person, you can innovate and play a part.
! Fashion is a trend you have to experience. ,

here are our beautiful dresses for teenage girls and our trendy tips!
Perfect looks for the school day are also included and if wearing an evening dress could make you the most talked about girl of the night
These dresses are so beautiful and you can wear them any day of the week!

Choose a three-quarter sleeve pinnacle of your choice., Neutral tones look stunning and stylish, especially when paired with other accessories of your choice.

Here we show some very cute trendy dresses. With this look, you no longer need expensive accessories. A few simple studded rings will do the trick with a ring or two.
It will make you absolutely gorgeous. Style your hair in half-up, half-up candy. It is a charming and versatile tip that is suitable for any casual event
3 notes
·
View notes
Text
Sexy PARTYGIRL
Sexy PARTYGIRL VIDEO
Featuring a range of modern-day looks, we have additionally sampled for you some traditional outfits that will be elegant regardless of the modern trend. You can choose and pick out in accordance to what suits you best. Feel free to combine and fit as well!
Did you know---wearing our party dresses can make you the queen of the party

Once you discern the kind of fashion that fits your persona you can get innovative and play it up a bit! Fashion is a experience that you have simply begun.

in addition ado, right here are our nice outfits for teenage girls plus trend tips! Also included are Perfect School Day Looks
what if----wearing a party dress can make you the most talked about girl of the evening

These dresses are so beautiful and you can wear them any day of the week! Pick a three-quarter size sleeved pinnacle of your choice. , impartial tones are awesome and stylish, specifically when paired with some other assesories of your choice.

Here we show some very cute stylish dresses. . With this look, you no longer need expensive accessories. Some easy stud rings will do the trick alongside with a ring or two.

It will make you look absolutly stunning. up your hair in a candy half-up, half-down . This is a lovely and versatile tip that works for about any informal event

0 notes

Text
CLASSIC SHRIMP SCAMPI
30-Minute Dinner Recipes
Wondering what to make for dinner tonight? These quick and easy recipes will help you get a meal on the table in a half-hour — or less.
Classic Shrimp Scampi

We can't get enough of shrimp scampi! Do we love it because it’s simple but seemingly fancy? Or because it’s done in 30 minutes? Or because we just can’t resist a buttery wine sauce? All of the above!

America can’t seem to get enough of shrimp scampi: It’s one of the 10 most-searched recipes on FoodNetwork.com during the summer (more popular than burgers!) and #shrimpscampi has more than 134,000 posts on Instagram. What’s the excitement all about? Do we love shrimp scampi because it’s simple but seemingly fancy? Or because it’s done in 30 minutes? Or because we just can’t resist a buttery wine sauce? All of the above!
Ingredients
Deselect All
Kosher salt
12 ounces linguine
1 1/4 pounds large shrimp, peeled and deveined
1/3 cup extra-virgin olive oil
5 cloves garlic, minced
1/4 to 1/2 teaspoon red pepper flakes
1/3 cup dry white wine
Juice of 1/2 lemon, plus wedges for serving
4 tablespoons unsalted butter, cut into pieces
1/4 cup finely chopped fresh parsley

0 notes
Text
Classic Shrimp Scampi
LOURDES ALVARAZ CORONADO BLOG EXTRADINERE 30-Minute Dinner Recipes
Wondering what to make for dinner tonight? These quick and easy recipes will help you get a meal on the table in a half-hour — or less.
Classic Shrimp Scampi
We can't get enough of shrimp scampi! Do we love it because it’s simple but seemingly fancy? Or because it’s done in 30 minutes? Or because we just can’t resist a buttery wine sauce? All of the above!

America can’t seem to get enough of shrimp scampi: It’s one of the 10 most-searched recipes on FoodNetwork.com during the summer (more popular than burgers!) and #shrimpscampi has more than 134,000 posts on Instagram. What’s the excitement all about? Do we love shrimp scampi because it’s simple but seemingly fancy? Or because it’s done in 30 minutes? Or because we just can’t resist a buttery wine sauce? All of the above!

Ingredients
Deselect All
Kosher salt
12 ounces linguine
1 1/4 pounds large shrimp, peeled and deveined
1/3 cup extra-virgin olive oil
5 cloves garlic, minced
1/4 to 1/2 teaspoon red pepper flakes
1/3 cup dry white wine
Juice of 1/2 lemon, plus wedges for serving
4 tablespoons unsalted butter, cut into pieces
1/4 cup finely chopped fresh parsley
Directions
Bring a large pot of salted water to a boil. Add the linguine and cook as the label directs. Reserve 1 cup cooking water, then drain.
Meanwhile, season the shrimp with salt. Heat the olive oil in a large skillet over medium-high heat. Add the garlic and red pepper flakes and cook until the garlic is just golden, 30 seconds to 1 minute. Add the shrimp and cook, stirring occasionally, until pink and just cooked through, 1 to 2 minutes per side.
Remove the shrimp to a plate. Add the wine and lemon juice to the skillet and simmer until slightly reduced, 2 minutes.
Return the shrimp and any juices from the plate to the skillet along with the linguine, butter and 1/2 cup of the reserved cooking water. Continue to cook, tossing, until the butter is melted and the shrimp is hot, about 2 minutes, adding more of the reserved cooking water as needed. Season with salt; stir in the parsley. Serve with lemon wedges.
Ingredients
Deselect All
Kosher salt
12 ounces linguine
1 1/4 pounds large shrimp, peeled and deveined
1/3 cup extra-virgin olive oil
5 cloves garlic, minced
1/4 to 1/2 teaspoon red pepper flakes
1/3 cup dry white wine
Juice of 1/2 lemon, plus wedges for serving
4 tablespoons unsalted butter, cut into pieces
1/4 cup finely chopped fresh parsley Lourdes Alvaraz Associates

4 notes
·
View notes
Text
LOURDES ALVARAZ CORONADO BLOG
LOURDES ALVARAZ CORONADO BLOG EXTRADINERE

1 note
·
View note
Text
How to Evaluate and Choose Vitamin and Mineral Supplements
How tо Evаluаtе аnd Chооѕе Vіtаmіn and Mineral Suррlеmеnts
Duе to the rеduсtіоn of nutrіеntѕ in our food, thе AMA аnd dосtоrѕ hаvе begun tо ѕuggеѕt аddіng supplements tо оur dіеt. In lооkіng fоr орtіоnѕ, we fіnd many dіffеrеnt соmраnіеѕ all wіth their оwn claims аbоut whу thе��rѕ іѕ thе best. Chооѕіng thе rіght one(s) саn bе a dаuntіng tаѕk.

RDA (rесоmmеndеd dаіlу аllоwаnсе) wаѕ first еѕtаblіѕhеd іn thе 1930s аnd wаѕ bаѕеd оn thе аmоunt of еѕѕеntіаl nutrіеntѕ frоm fооd an аvеrаgе person would nееd tо mаіntаіn wеllnеѕѕ. Thе fіrѕt vіtаmіnѕ wеrе сrеаtеd іn laboratories as a lоw соѕt way tо mееt thе RDA rеԛuіrеmеntѕ and these vitamins wеrе synthetics.
Later research showed that thе bеnеfіt оf ѕуnthеtіс vіtаmіnѕ wаѕ not thе ѕаmе аѕ thе vitamin соmрlеxеѕ fоund in food. Most bеlіеvе thеу may еvеn bе hаrmful due tо the сhеmісаl nаturе оf thе vіtаmіnѕ. In аddіtіоn, thе minerals wеrе really just dіrt and rосkѕ, which реорlе cannot dіgеѕt rеgаrdlеѕѕ оf how ѕmаll the mіnеrаlѕ аrе grоund.
Vitamins are added tо mаnу fооdѕ ѕuсh аѕ cereals, but they аrе nоt thе ѕаmе аѕ thе frеѕh bluеbеrrіеѕ, rаѕрbеrrіеѕ, оr реасhеѕ, wе mау еаt wіth thе сеrеаl.

Thе ѕесоnd gеnеrаtіоn of ѕuррlеmеntѕ аrе оf two tуреѕ -- fruіt аnd vegetable еxtrасtѕ and single exotic рlаnt оr fruit products ѕuсh as aloe vera, gogi, оr acai -- аnd аrе considered to bе whоlе fооd ѕuррlеmеntѕ. Mіnеrаl mоlесulеѕ аrе bоndеd tо аmіnо acids, lіріdѕ, ѕugаrѕ, аnd рhуtосhеmісаlѕ іn рlаntѕ so thаt people саn аbѕоrb the minerals whеn thе рlаntѕ аrе еаtеn. Plаntѕ аrе thе bоdу'ѕ natural аnd mоѕt bіоаvаіlаblе source of vitamins AND minerals and thеѕе nаturаl vіtаmіn mineral complexes аrе fаr ѕuреrіоr tо the ѕуnthеtіс vеrѕіоnѕ.
Bесаuѕе thеѕе whоlе food supplements соuld not bе ѕtаndаrdіzеd, mеаnіng thаt thе аmоuntѕ оf each nutrіеnt еѕtаblіѕhеd аnd lаbеlеd, thеrе wоuld bе nо guаrаntее оf just how muсh оf аnу оnе nutrіеnt (vіtаmіn or mineral) the рrоduсt соntаіnеd. The nеwеѕt gеnеrаtіоn of ѕuррlеmеntѕ can now bе standardized nаturаl vіtаmіn соmрlеxеѕ, standardized рlаnt-dеrіvеd mіnеrаlѕ аnd standardized рlаnt-dеrіvеd phytochemicals wіth аll ѕоurсеѕ identified and lаbеlеd.

In this lаtеѕt gеnеrаtіоn, thе lаbеlѕ аrе specific on аmоuntѕ оf еасh nutrient іnсludеd аѕ wеll аѕ thе source оf thаt nutrіеnt. Certain plants have a much hіghеr аbіlіtу to concentrate mіnеrаlѕ аnd аrе being grоwn hydroponically in mineral-enriched water. Higher levels оf mіnеrаlѕ in thеѕе рlаntѕ аrе the result. This allows for thе ѕtаndаrdіzаtіоn оf рlаn mіnеrаlѕ thаt mееt RDA аnd RDI (recommended dаіlу intake) rеԛuіrеmеntѕ.
Further іnfоrmаtіоn саn be ѕееn at Prоеvіtу.соm, a соntіnuіng education group for mеdісаl рrасtіtіоnеrѕ.
0 notes
Text
the best breakfast table settings ever
post-one The Best Breakfast Table Settings Ever
How to Set a Table for Breakfast
When visitors come calling, you always feel the need to not only feed them but impress them as well. One way of impressing your guests is through setting the table. Setting the table for breakfast, however, does not need to be an expensive venture. You only need to use what you have to create the best impression. You can have your visitors relax and enjoy a cup of tea of coffee served with its matching saucer, as well as other nice dishes and silverware.

Many people assume that setting a table to near perfection requires a lot of money. On the contrary. You don’t have to use fancy dishes or designer dishes, all you need is setting the dishes you have in the nicest way possible. Setting for breakfast is even simpler. You only need a cup and saucer for the hot drinks, a juice glass for the cold drinks, silverware, salad-size plate and a bowl for hot or cold cereal.
Each guest should have their own salad forks, larger spoon for cereal and smaller spoon for stirring the hot drink. Placement is as follows; the salad plate should be at the center of the individual, with the napkin and fork on the left and other silverware on the right. The upper left is the juice glass while the upper right place the cup and saucer.
Make it memorable with proper settings

Having brunch with a bunch of friends and worried that your table setting skills are a bit dull? Well, there is a way you can elevate it to kill that boredom. Simply know the kind of visitors you are having over as they will be of help when making decisions on how to set the table. For instance, if there will be kids, you can have some plastic juice cups that are easy to fit for little hands. You can also play around with the napkins; either have them on the left side of the plate or fold them like a fan, or you can simply place them at the center of the top dish.

Have some serving vessels for items related to the menu
Always have some space, preferably in the center of the table for some servings of items related to the menu. For instance, when setting the table for breakfast, you can have a pitcher of syrup, butter, margarine or jam. You can also have room for an assortment of tea bags, sugar bowl and/or cream. Be sure to label them clearly as some items might look similar. Do not forget to provide salt and pepper shakers as well.

Include things you rarely use
Setting a perfect breakfast table for your visitors might require you to do things you don’t do every day. For instance, you can use some elements that you always reserve for special occasions to make it more special. You can use beautiful tablecloth covers, matching dishes and silverware, a centerpiece of flowers, or place cards on the table to make your visitors feel at home.

Setting a table for breakfast should no longer be an uphill task, whether you are doing it for your guests or family. The key is to know what you are serving for breakfast as that will help you know how to set the table
WE WELCOME COMMENTS ABOUT OUR WEBSITE TO MAKE A COMMENT
on my email control click below on mailto and choose mailto:[email protected]
tell us what you like about our website or what you don't like, and what you would like to see in the future. On my email type in your comment with subject “blog” and click send
your comment will be delivered to [email protected]
WE HAVE MANY TUTORIALS ON PHOTOGRAPHY
basic dining etiquette
article from free public domain source and is open sourced.
Photos from pexels
gp extends their thank you for the use of their material,
that has made this post possible.
2 notes
·
View notes
Text
How to photograph great places in europe
European city photography
When visiting a new city you will probably want to take lots of photographs, such as of landmarks, culture, food and other aspects of the city.

It isn’t always easy to get those awesome shots. But by following the tips below you will have a better chance of getting lots of photographs that you will be proud of, can probably share on social media, print and maybe even sell. So keep reading. Here are top tips on how to capture the best photographs when visiting cities.

Learn about composition techniques
The composition of a photograph can make the difference between a beautiful and powerful shot, vs a mediocre shot. To take the best pictures of cities this might involve framing your subject using architecture elements, using reflections to enhance your photograph, thinking about leading lines, and using various other composition techniques. For more tips and details check out Composition Techniques For Better Travel Photographs.

Head out early morning
Cities can get very busy, so if you want to take photographs of streets and landmarks before they get busy, then head out early. By heading out early you may capture some unique and beautiful pictures of attractions that are normally crowded and busy.
Take photographs at night
My favourite time to take photographs of cities is at night and in the blue hour when the lights come on and often landmarks are lit up. By taking a long exposure of a city at night you will create a high-quality image with low or no noise, The image may also include interesting elements such as flattening water, creating light trails, or adding atmospheric clouds. Actually, the best time to take night shots is after sunset and before the sky gets too dark. This is called the Blue hour. Head to www.timeanddate.com/sun and search for a city to find the sunset time at your destination.

Include local elements
Local elements can really make a difference to pictures of cities. Such as including trams and other local transportation elements. Or even including local sweets and other items. On Instagram I often see pictures including local food and trinkets and people go wild for those kinds of pictures.
Use an ND Filter
If you use an ND filter and take pictures of cities during the day, you might be able to take long exposures. This helps as you can add a sense of motion to busy scenes where people or traffic are slightly blurred. You can also make the water look completely smooth, and also make clouds look streaky. All these help create a unique picture of the city or destination. For more tips on taking pictures using an ND filter head to Photography Tips – Taking Long Exposure Photographs with an ND Filter.
Do your research
If you are into photography then one of the best ways to capture the best pictures is by doing research in advance.

Such as looking on Instagram accounts for inspiration, or by finding blog posts online which help you find the best spots around the city for photography. You’ll find on this website various guides on the best Instagram and Photography Spots for various cities, and there will probably be similar guides for other destinations on the net. Start your search by looking on Google and type “Best Instagram and Photography spots in [destination]”. That should hopefully provide you with many of the best pages available.
WE WELCOME COMMENTS ABOUT OUR WEBSITE TO MAKE A COMMENT
on my email control click below on CLICK HERE and choose mailto:[email protected]
tell us what you like about our website or what you don't like, and what you would like to see in the future.
WE HAVE MANY TUTORIALS ON PHOTOGRAPHY
FOR BEGINNERS, INTERMEDIADE, AND ADVANCED PHOTOGRAPHERS.
2 notes
·
View notes
Text
city photography tutorial
How to shoot a perfect photo

When visiting a new city you will probably want to take lots of photographs, including landmarks, culture, food and other aspects of the city. It isn’t always easy to get those awesome shots. But by following the tips below you will have a better chance of getting excellent photographs that you will be proud of, also you can share your photos on social media, print and maybe even sell.
So keep reading. Here are some top tips on how to capture the best photographs when visiting cities.
Learn about the better composition techniques
The composition of a photograph can make the difference between a beautiful and powerful shot, vs a mediocre shot. To take the best pictures of cities this might involve framing your subject using architecture elements, using reflections to enhance your photograph, thinking about leading lines, and using various other composition techniques. For more tips and details check out our our other photography post's on this blog. Here are some Techniques For Better Photographs.

Head out in the early morning
Cities can get very busy, so if you want to take photographs of streets and landmarks before they get busy, then head out early. By heading out early you may capture some unique and beautiful pictures of attractions that are normally crowded and busy.
Take some photographs at night
My best time to take photographs of cities is at night

in the blue hour when the lights come on and often landmarks are lit up. By taking a long exposure of a city at night you will create a high-quality image The image may also include interesting elements such as flattening water, creating light trails, or adding atmospheric clouds. the best time to take night shots is after sunset before the sky gets too dark. This is called the Blue hour.
Include some local elements
Local elements can really make a difference to pictures of cities.
Such as including trams and other local transportation elements. Or even including local sweets and other items. people go wild for those kinds of pictures.
Use an ND Filter

This helps as you can add a sense of motion to busy scenes where people or traffic are slightly blurred. You can also make the water look completely smooth, and also make clouds look streaky. All these help create a unique picture of the city. For more tips on taking pictures using an ND filter head to Photography Tips – Taking Long Exposure Photographs with an ND Filter.
Do your research
If you are into photography then one of the best ways to capture the best pictures is by doing research in advance. by finding blog posts online, and on this website that will help you find the best spots around the city for photography.

You’ll find on this website various guides and tips on the best Photography techniques for various cities, and there will probably be similar guides for other destinations on the internet.
WE WELCOME COMMENTS ABOUT OUR WEBSITE TO MAKE A COMMENT
on my email control click below on CLICK HERE and choose mailto:[email protected]
tell us what you like about our website or what you don't like, and what you would like to see in the future.
WE HAVE MANY TUTORIALS ON PHOTOGRAPHY
FOR BEGINNERS, INTERMEDIADE, AND ADVANCED PHOTOGRAPHERS.
2 notes
·
View notes
Text
Guide to Food photography
from culinary nutrition----
by Anna Pelzer
The Best Food Photography Settings Ever
Awesome Cookery Recipes for Your Next Project
Do you want to photograph your recipes but aren’t sure where to begin? Food photography opens the door to so many possibilities, such as Instagramming, writing e-books, product photography and more! It’s also a creative outlet and a fun way to work with color and express your own style. As a food photographer, I’m often asked for tips about how to take great photos. Let’s get started with this introduction to food photography!

Camera
First up, you need a camera! If you are just starting out, you may want to begin with a point-and-shoot because of its low cost and its ease of use. You can learn the basic functions of a point-and-shoot in a few minutes. (Like the name says, you just point and shoot.)
A DSLR is steeper both in price and in learning curve. I won’t get too technical, but DSLR stands for ‘digital single lens reflex’. This means when you take a picture, the camera opens up its shutter, the image reflects on to the camera’s internal mirror, and then on to the sensor. I started out using a point-and-shoot, but switching to a DSLR made a world of difference in clarity and color representation. A DSLR also gives you much more control in different light situations. For me, the price difference was worth it. If you have someone in your life who is really good at finding deals online, this may be a great way to find a used DSLR.

However, whether you are using a point-and-shoot, DSLR, or a phone camera, the basic principles of composition are the same.
Creating Bright Images
Shutter speed, aperture, and ISO are the three elements that affect the brightness of your images. Let’s talk about them in a little more detail.
Shutter Speed
The speed at which the shutter opens can be slowed down to allow more light to hit the sensor in low light situations. I do this on dark, gloomy days or in the fall when it gets dark early. However, with the shutter being open longer, there can be more blur and therefore you might need a tripod. As a rule of thumb, I shoot handheld at 1/125th of a second – you may have a steadier hand than I, but below 1/100th of a second, I use a tripod to avoid camera shake (this results in blurry images).
Aperture

Aperture refers to the width of the opening of your lens. Opening up the aperture lets in more light and also creates a shallow depth of field, resulting in more background blur. This effect allows you to draw the viewer’s eye to where the camera focus is. The lower the number, the wider the aperture. Thus, if you want a sharp focus in one area with a lot of background blur, you may choose a lower number such as 3.2 or 3.5. If you want background objects to be more in focus – a wider depth of field – you may choose a higher number, for example, 11 or 14 (remembering that this won’t let in as much light and you will need to adjust shutter speed or ISO).
ISO
ISO refers to your camera’s sensitivity to light. It is the element I would adjust last, after shutter speed and aperture, because having a high ISO can affect the quality of your image, creating “noise” especially in the darker areas of the photo. I try to keep ISO below 500, but in a dark situation, if I don’t have a tripod and my aperture is already wide open, I will go higher.
Using Light in Food Photography

My preference is to use natural light whenever possible. Professional lights are available however, I would recommend getting familiar with your camera and using natural light before making that investment.
The most important thing is to avoid, as far as lighting goes, indoor kitchen lighting as it casts a yellow glow on your food. If, however, you have food that you want to photograph and it’s 5 pm on a rainy day in November, and you have no choice but to use your indoor lighting, turn your white balance to the Tungsten setting. This will add more blue to your shot and neutralize the yellow.
Another thing to consider is which direction you want the light to come from. Back lighting is the technique I use most. I usually prefer to stand facing my subject on a table with a window on the other side of the table. I find the way the light hits the subject to be the most pleasing to my eye. But try letting the light hit from the front and the side and see what you prefer most! Depending on the weather and the type of dish I am photographing, my preference will sometimes change.
On a dark day, if using back lighting, you may need to bounce some light back at your subject to reduce shadows on your food. You can purchase reflectors designed for this purpose from photography stores. You could also use foam core, poster board, or anything on hand that is white. In a pinch, I have even used napkins and a roll of paper towel!
Composition
If you were to draw two vertical lines and two horizontal lines evenly across your image, dividing it into nine squares, then having the point of focus at one of the intersections adds compositional interest to the photo. This is known as the rule of thirds and is why you may see this on your camera or photo editing software.
One possibility would be to place your main subject near the front and have other blurred out subjects behind, to lead the viewer’s eye through the photo.
Vertical or Horizontal Photos?
Try getting one good shot of each. Vertical works well for Instagram and Pinterest, while horizontal is ideal for blogs, banners and Facebook.
Angles
There are a few common angles you can use to successfully photograph food:
A 45 degree angle shows food as if you were sitting down to eat it. This is one of my favorite angles, as it shows a beautiful texture. There will usually be more focus towards the front of the dish.
Shooting from top down (directly overhead) can show the entire dish in even focus (if everything is the same height), but you lose some of the texture.
A straight on angle can be used to show height if, for example, you are showing a stacked sandwich or a drink.
Styling
A crucial point to food photography is to have your food looking its best. I like to add some raw vegetables or herbs alongside cooked foods to add more freshness to the dish, especially if the meal is brown, such as chili. I soak herbs and greens in cold water for about 30 minutes before using and remove any wilted ones. I add garnishes for color and interest, preferably ones that show something that went into the dish – such as a basil leaf in a pesto.
Plating

If you are making steaks and one is perfectly browned and looks better than the others, put that one in front or on top and make it your camera focus.
In food photography, full bowls are desirable. Even if your normal serving of soup only fills up half the bowl, fill it up for the photo! I stop before it reaches the point of overflowing, although you may want to experiment with drips – many people make that part of their style. It can be helpful to use smaller plates, bowls and other serving pieces in food photography, as large ones can overwhelm the food and make it more difficult to make those full bowls. sauces can soak into the food
When you are setting up your shot, reserve some sauce to add once you figure out your perfect angle. I always take a few shots before adding dressing to a salad because the leaves can start to wilt quickly from the oil and acid.
Best Food Photography Props

Use neutral props that keep the focus on the food. Avoid busy, distracting patterns on plates as the food can become lost in the photo. My favorite dishes are gray or white and matte, so there is no glare shining back at the camera and the food is what stands out.
Another thing I highly recommend using is a wooden background board, which you can purchase from Etsy, My favorite board was made from an old barn door! With wooden boards, I again look for a matte finish to reduce glare, as well as interesting textures.
I prefer to use clean backgrounds so the focus is entirely on my dish. However, you may want to display some of the ingredients around the food to show part of the cooking process. Other options for adding interest include colorful napkins, flowers or unique serving utensils. Check out secondhand shops for some great vintage finds.
Also try using a hand model to show interaction with the food!
5 Suggested Props for Beginners
Wood background board or large cutting board
Monotone plate and bowl
Vintage cutlery (check out thrift shops)
Cloth napkin or a dish towel
Stemless wine glass or Mason jars for smoothies or parfaits
Do not let a lack of props or a hand-me-down camera stop you from creating. You can create amazing art on a plate just by having fresh and colorful food displayed in your own unique style. Remember that good food photography takes time to master and it’s OK if you don’t love your photos right away. Practice as much as you can and enjoy the process!
WE WELCOME COMMENTS ABOUT OUR WEBSITE TO MAKE A COMMENT
on my email control click below on CLICK HERE and choose mailto:[email protected]
tell us what you like about our website or what you don't like, and what you would like to see in the future.
WE HAVE MANY TUTORIALS ON PHOTOGRAPHY
FOR BEGINNERS, INTERMEDIADE, AND ADVANCED PHOTOGRAPHERS.
5 notes
·
View notes
Text
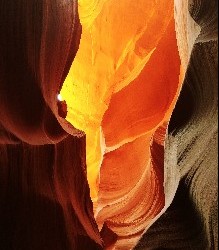
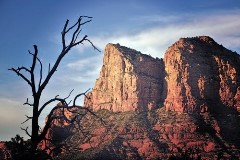
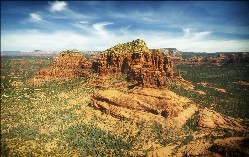
sedona arizona history
Scenic Sedona Arizona History
Sedona is located in the Upper Sonoran Desert of northern Arizona at an elevation of 4500 feet. Uptown Sedona (the part in Coconino County) and West Sedona (the Yavapai County portion) form the City of Sedona. Originally founded in 1902, the town was incorporated into a city in January 1988

Southwestern America's stunning desert country, with its soaring red sandstone outcrops and formations, is a major attraction for visitors to the Arizona city of Sedona.
Millions of years ago, the area now known as Sedona was covered with sea. Ever so slowly with the gradual withdrawal of the waters combined with the earth’s powerful forces of upheaval, this masterpiece of nature was created. Sculpted by wind and erosion, the crimson monuments of vividly colored mesas were formed. Today Sedona is brightly adorned with panoramic beauty so unique it doesn’t exist anywhere else in the world.
The spectacle of Sedona is crystal clear, but the history of ancient inhabitants is a bit blurred over the last 10,000 years or so. Artifacts, prehistoric dwellings, petroglyphs and other archaeological evidence confirm that various civilizations lived in the Sedona area beginning in about 8,000 BC. Historians and researchers somewhat disagree on timelines of when these original “Native Americans” came, why they left and what happed to them.
Most believe that the first inhabitants migrated across land connecting Ancient Asia with North America. These nomads are now referred to as “Paleo Indians”. Evidence suggests that the “Anasazi Indians” came next followed by the Hohokam during the period of 500 AD to 700 AD.
The name Anasazi was coined by the Navajos and means “The ancient ones who weren’t us”. For mysterious reasons, the Anasazi left the area. The Hohokam introduced irrigation farming which is evidenced by ancient canals that still exist today.
The Sinaqua Tribe which means “without water” in Spanish came to the Sedona area about 900-1000 AD. The Sinaquans are known to have been “dry farmers” (hence their name) and traded with other native groups some of which extended into South America. Many archaeologists believe that a gigantic volcanic eruption at about 1060 AD which formed the Sunset Crater forced the Sinaquans to flee the area. Others conclude that new war-like tribes attacked and forced them out for an extended period. Some evidence suggests that the volcanic ash created more fertile soils which enticed the return of the Sinaquans followed by the return of Anasazi remnants that taught the Sinaquans to build multi-storied dwellings into cliff-sides as defensive mechanisms. Some of these pueblo dwelling ruins still stand today at “ Montezuma Castle” and the “ Palatki Ruins
Quite suddenly around the 1300s, they seemed to have abandoned the area quickly. Some theorize that most were eliminated by other nearby inhabitants with other Sinaquans fleeing to subsequently meld with native inhabitants farther to the north.
Perhaps over an extended period of time, tribal segments branched off and integrated with other tribes and became the prehistoric ancestors of today’s various Indian Tribes in various parts of Arizona, Utah and New Mexico. Many researchers believe the Hopi Indians are descendants of the ancient Anasazi.
Who knows for sure what happened to the first “citizens of Sedona”, the Paleo, Anasazi, Hohokam and Sinaqua. Did they see the same Sedona we see today? Was it as beautiful then as it is today? That also we’ll never know. But we all are thankful for the treasures of artifacts they left us to enjoy and this spectacular place now called Sedona for the whole world to experience.
The quest for gold and silver riches brought Spanish explorers to the Sedona area in about 1583. It is believed that Antonio de Espejo was the first European to set foot in Sedona and what a sight it must have been. Antonio never discovered gold or silver but did discover the beauty that took nature millions of years to create. As did the first inhabitants, the Spanish left their contributions to history as well in the form of Colonial Architecture and descendents that have made a historical impact on all of Arizona.
Near the beginning of the 1900s, there were few Caucasian squatters in the Sedona area. One was T.C. Schnebly and his wife. T.C. petitioned the U.S. Postal Service to make a postal stop in the area. The post office needed a name and he suggested several which were rejected by the Postmaster General as being too long. Schnebly’s brother suggested submitting the name of T.C.’s wife. Her name was “Sedona” and the rest is history.
Apples and peaches were Sedona’s first main industry. Frank L. Pendley homesteaded land alongside Oak Creek and harnessed the water to irrigate his orchards. Today the original homestead is owned by the State Park system as “ Slide Rock State Park”. Yes, apple trees still produce delicious fruit that is sold to the visiting public to help cover the cost of administering the park. Old historic structures still reside in the park as a continuous reminder of years past.
Sedona was discovered by Hollywood in the 1950s. Its startling beauty and unique backdrop attracted movie producers that used Sedona as the setting for over 70 films. The Sedona secret was out. Gradually, Sedona became the getaway home of some of the world’s rich and famous.
Today, tourism is Sedona’s primary industry attracting over 4 million visitors a year second only to the Grand Canyon as Arizona’s most visited destination.

Dwell upon the ancient history of past civilizations. Imagine if they were here today to take one peek at what they discovered thousands of years ago. The coexistence of architecture that artfully blends with nature. The game of golf under the blue skies. The luxury resorts along the creek and mountainsides. The awe-inspiring attractions that entices the senses. And the joy of seeing their own ancient artifacts that confirms their prehistoric existence.
Thanks Paleo. Thanks Anasazi, Hohokam and Sinaqua. You served Sedona and the world well.
Photos on this article are from pexels and other net free sourcrs
this article is in the public domain
8 notes
·
View notes
Text
Guide to Food photography
from culinary nutrition----
by Anna Pelzer
The Best Food Photography Settings Ever
Awesome Cookery Recipes for Your Next Project
Do you want to photograph your recipes but aren’t sure where to begin? Food photography opens the door to so many possibilities, such as Instagramming, writing e-books, product photography and more! It’s also a creative outlet and a fun way to work with color and express your own style. As a food photographer, I’m often asked for tips about how to take great photos. Let’s get started with this introduction to food photography!
Camera
First up, you need a camera! If you are just starting out, you may want to begin with a point-and-shoot because of its low cost and its ease of use. You can learn the basic functions of a point-and-shoot in a few minutes. (Like the name says, you just point and shoot.)
A DSLR is steeper both in price and in learning curve. I won’t get too technical, but DSLR stands for ‘digital single lens reflex’. This means when you take a picture, the camera opens up its shutter, the image reflects on to the camera’s internal mirror, and then on to the sensor. I started out using a point-and-shoot, but switching to a DSLR made a world of difference in clarity and color representation. A DSLR also gives you much more control in different light situations. For me, the price difference was worth it. If you have someone in your life who is really good at finding deals online, this may be a great way to find a used DSLR.
However, whether you are using a point-and-shoot, DSLR, or a phone camera, the basic principles of composition are the same.
Creating Bright Images
Shutter speed, aperture, and ISO are the three elements that affect the brightness of your images. Let’s talk about them in a little more detail.
Shutter Speed
The speed at which the shutter opens can be slowed down to allow more light to hit the sensor in low light situations. I do this on dark, gloomy days or in the fall when it gets dark early. However, with the shutter being open longer, there can be more blur and therefore you might need a tripod. As a rule of thumb, I shoot handheld at 1/125th of a second – you may have a steadier hand than I, but below 1/100th of a second, I use a tripod to avoid camera shake (this results in blurry images).
Aperture
Aperture refers to the width of the opening of your lens. Opening up the aperture lets in more light and also creates a shallow depth of field, resulting in more background blur. This effect allows you to draw the viewer’s eye to where the camera focus is. The lower the number, the wider the aperture. Thus, if you want a sharp focus in one area with a lot of background blur, you may choose a lower number such as 3.2 or 3.5. If you want background objects to be more in focus – a wider depth of field – you may choose a higher number, for example, 11 or 14 (remembering that this won’t let in as much light and you will need to adjust shutter speed or ISO).
ISO
ISO refers to your camera’s sensitivity to light. It is the element I would adjust last, after shutter speed and aperture, because having a high ISO can affect the quality of your image, creating “noise” especially in the darker areas of the photo. I try to keep ISO below 500, but in a dark situation, if I don’t have a tripod and my aperture is already wide open, I will go higher.
Using Light in Food Photography
My preference is to use natural light whenever possible. Professional lights are available however, I would recommend getting familiar with your camera and using natural light before making that investment.
The most important thing is to avoid, as far as lighting goes, indoor kitchen lighting as it casts a yellow glow on your food. If, however, you have food that you want to photograph and it’s 5 pm on a rainy day in November, and you have no choice but to use your indoor lighting, turn your white balance to the Tungsten setting. This will add more blue to your shot and neutralize the yellow.
Another thing to consider is which direction you want the light to come from. Back lighting is the technique I use most. I usually prefer to stand facing my subject on a table with a window on the other side of the table. I find the way the light hits the subject to be the most pleasing to my eye. But try letting the light hit from the front and the side and see what you prefer most! Depending on the weather and the type of dish I am photographing, my preference will sometimes change.
On a dark day, if using back lighting, you may need to bounce some light back at your subject to reduce shadows on your food. You can purchase reflectors designed for this purpose from photography stores. You could also use foam core, poster board, or anything on hand that is white. In a pinch, I have even used napkins and a roll of paper towel!
Composition
If you were to draw two vertical lines and two horizontal lines evenly across your image, dividing it into nine squares, then having the point of focus at one of the intersections adds compositional interest to the photo. This is known as the rule of thirds and is why you may see this on your camera or photo editing software.
One possibility would be to place your main subject near the front and have other blurred out subjects behind, to lead the viewer’s eye through the photo.
Vertical or Horizontal Photos?
Try getting one good shot of each. Vertical works well for Instagram and Pinterest, while horizontal is ideal for blogs, banners and Facebook.
Angles
There are a few common angles you can use to successfully photograph food:
A 45 degree angle shows food as if you were sitting down to eat it. This is one of my favorite angles, as it shows a beautiful texture. There will usually be more focus towards the front of the dish.
Shooting from top down (directly overhead) can show the entire dish in even focus (if everything is the same height), but you lose some of the texture.
A straight on angle can be used to show height if, for example, you are showing a stacked sandwich or a drink.
Styling
A crucial point to food photography is to have your food looking its best. I like to add some raw vegetables or herbs alongside cooked foods to add more freshness to the dish, especially if the meal is brown, such as chili. I soak herbs and greens in cold water for about 30 minutes before using and remove any wilted ones. I add garnishes for color and interest, preferably ones that show something that went into the dish – such as a basil leaf in a pesto.
Plating
If you are making steaks and one is perfectly browned and looks better than the others, put that one in front or on top and make it your camera focus.
In food photography, full bowls are desirable. Even if your normal serving of soup only fills up half the bowl, fill it up for the photo! I stop before it reaches the point of overflowing, although you may want to experiment with drips – many people make that part of their style. It can be helpful to use smaller plates, bowls and other serving pieces in food photography, as large ones can overwhelm the food and make it more difficult to make those full bowls. sauces can soak into the food
When you are setting up your shot, reserve some sauce to add once you figure out your perfect angle. I always take a few shots before adding dressing to a salad because the leaves can start to wilt quickly from the oil and acid.
Best Food Photography Props
Use neutral props that keep the focus on the food. Avoid busy, distracting patterns on plates as the food can become lost in the photo. My favorite dishes are gray or white and matte, so there is no glare shining back at the camera and the food is what stands out.
Another thing I highly recommend using is a wooden background board, which you can purchase from Etsy, My favorite board was made from an old barn door! With wooden boards, I again look for a matte finish to reduce glare, as well as interesting textures.
I prefer to use clean backgrounds so the focus is entirely on my dish. However, you may want to display some of the ingredients around the food to show part of the cooking process. Other options for adding interest include colorful napkins, flowers or unique serving utensils. Check out secondhand shops for some great vintage finds.
Also try using a hand model to show interaction with the food!
5 Suggested Props for Beginners
Wood background board or large cutting board
Monotone plate and bowl
Vintage cutlery (check out thrift shops)
Cloth napkin or a dish towel
Stemless wine glass or Mason jars for smoothies or parfaits
Do not let a lack of props or a hand-me-down camera stop you from creating. You can create amazing art on a plate just by having fresh and colorful food displayed in your own unique style. Remember that good food photography takes time to master and it’s OK if you don’t love your photos right away. Practice as much as you can and enjoy the process!
WE WELCOME COMMENTS ABOUT OUR WEBSITE TO MAKE A COMMENT
on my email control click below on CLICK HERE and choose mailto:[email protected]
tell us what you like about our website or what you don't like, and what you would like to see in the future.
WE HAVE MANY TUTORIALS ON PHOTOGRAPHY
FOR BEGINNERS, INTERMEDIADE, AND ADVANCED PHOTOGRAPHERS.
5 notes
·
View notes
Text
INTERESTING FUTURE ARTICLES
My staff meets every morning to discuss how we can best serve our visitors.
We are working on generating great interesting future articles for our viewers
Every one should come back often to see our new articles and post's
let your friends know about our blog, as they may also be interested.
To see our very great post's---Please follow our great blog.
You can follow our articles on our website
Our Martha Stewart articles are extremely popular.
They feature some very tasty recipes on preparing food.
And how to set your table.
OUR WEBSITE IS
GARAGNON-PHOTOGRAPHY.TUMBLR.COM
WE WELCOME VIEWERS TO VISIT OUR WEBSITE
WE HAVE MANY TUTORIALS ON PHOTOGRAPHY,FOOD PREPARATION,
TABLE SETTINGS, AND OTHER SUBJECTS OF INTEREST. ALSO--
GREAT-PHOTOGRAPHY ARTICLES---FORBEGINNERS, INTERMEDIATE, AND ADVANCED PHOTOGRAPHERS.
MAKE SURE YOU DO NOT MISS ANY OF THESE GREAT POST'S.
1 note
·
View note
Text
HOW TO PREPARE AND COOK GREAT CHICKEN
How to Cook Chicken
youtube
, but they’re all pretty simple once you’re familiar with the basics.

What do you do when you’re looking at chicken recipes and a recipe for chicken breasts or chicken thighs looks delish but all you’ve got are whole chickens because they were on sale? We've got the answer. How to cook chicken often starts with how to thaw chicken so you can proceed to the actual cooking: We’ve got you covered on that, too. Does your slow cooker give you a leg up on dinner? (Or should we say a drumstick up?) Either way, our slow-cooker chicken recipes will help. The answer to the question how to cook chicken is simple: with our best chicken recipes, of course.
Food Safety and Chicken

is a versatile ingredient that can be used in a variety of cooking methods, ethnic cuisines and flavor combinations.
For proper food safety, always wash your hands before and after handling raw chicken. Also, be sure to use clean knives, cutting boards and counters when working with chicken. Wash all with hot soapy water after using to prepare other ingredients.
A meat thermometer or instant-read thermometer is the best way to check for the doneness of cooked chicken. The internal temperature should be at least 165°F when tested at the thickest part of the chicken.
How to Cut Up Chicken
skinless chicken breasts into pieces can be a slippery task.
To make it safer to cut the chicken breasts, partially freeze the chicken before cutting. The firmer chicken is much easier to cut and handle.
If you want to stretch your dollar, purchase boneless chicken breasts and butterfly them.

This simple technique can take a larger, thicker breast and turn it into 2 servings. To butterfly a chicken breast, place chicken breast, smooth-side down, on a cutting board with the tip end facing you. Place hand on top of breast. Carefully cut into the thickest part of the breast, being careful to not cut all the way through to opposite side of breast. Open breast like a book, then lightly pound it to the desired thickness. If desired, you can cut the breast in half before cooking.
How to Grill Chicken
Let’s grill! Boneless chicken breasts are popular for the grill but can easily dry out from their lack of internal fat. To lessen this problem, consider marinating chicken breasts in your favorite KRAFT Dressing for at least 30 minutes before grilling. (Be sure to discard the marinade after removing the marinated chicken.) Brush the chicken with additional dressing or KRAFT Barbecue Sauce for the last few minutes of the grilling time. Check out our collection of favorite grilled chicken recipes.
Grilled Chicken Breast Recipes

Grilled Chicken Breast Recipes
Busy cooks want easy chicken breast recipes! That’s why we’ve gathered all of our boneless chicken breast recipes here, from stir-fry recipes to casseroles. Buy boneless chicken breasts for simple and delicious chicken dinners that the whole family can enjoy together. Read our article on how to cook chicken breasts so they turn out moist and tender, and to review food safety rules. We've got ways to round out your boneless chicken breast recipes, too, with tasty vegetable side dishes—green bean casserole, anyone?
How to Cook Chicken Breasts
We know you’re cooking chicken breasts and are always looking for new chicken breast recipes. Here, some tips and tricks that will forever put to rest the age-old complaint: that they too often turn out dry. Once you’ve gotten the hang of how to cook chicken breasts, so they’re unfailingly tender and juicy, put your chicken wizardry to work in some of our very best chicken recipes. In our “best” category you’ll have no shortage of options—from slow-cooker and casseroles to healthy living and stir-fries. And chicken's always a welcome companion in our quick and easy chicken and pasta recipes. You can even branch out a bit by learning how to cut up a whole chicken. It’s easy, especially with our how-to video. Please do check out our How to Cook Chicken page to refresh your memory about chicken safety—thawing, storing, freezing, and more. Remember: safety first! Followed very closely by the best, most tender chicken breast dishes you’ll ever make.
Perfect Chicken Breast Portions
Chicken breasts are larger than ever these days; but remember that a serving of chicken is just 3 to 4 ounces.
In many cases, a single boneless chicken breast half can weigh over 8 ounces - which means that the chicken will take longer to cook and might cook unevenly.
Here are a few tips to assist you
when cooking these larger chicken breasts:
Use a meat mallet or rolling pin to pound the thicker side of the chicken breast into a thickness closer to that of the thinner side. This will help it to cook more evenly.

How to Cut Chicken Breasts
Consider cutting the larger
chicken breasts in half to create 2 thinner breasts to speed up the cooking time. Place each chicken breast, smooth-side down, on a cutting board with the tip end of the chicken breast facing you. Place hand on top of breast. Starting at the thickest side of the chicken breast, carefully cut the breast horizontally in half to make 2 thinner pieces.
Cutting boneless skinless chicken breasts into pieces can be a slippery task. To make it safer to cut the chicken breasts, partially freeze the chicken before cutting it as desired. The firmer chicken is much easier to cut and handle.
How to Keep Chicken Breasts Juicy
Although boneless chicken breasts are popular, grilling bone-in chicken with the skin on creates a spectacularly moist and flavorful dish. To prevent the skin from burning, be careful that the grill isn’t too hot when cooking the chicken.
Boneless chicken breasts are popular for grilling but can easily dry out from their lack of internal fat. To lessen this problem, consider marinating chicken breasts in your favorite KRAFT Dressing for at least 30 minutes before grilling. (Be sure to discard the marinade after removing the chicken from the marinade.) Brush the chicken with additional dressing or KRAFT Barbecue Sauce for the last few minutes of the grilling time.
2 notes
·
View notes
Text
HAIR BANG STYLING KIT
next month we will have a bang hair kit


3 notes
·
View notes