
Statistics
We looked inside some of the posts by gatehub and here's what we found interesting.
Average Info
Notes Per Post
0
Likes Per Post
0
Reblog Per Post
0
Reply Per Post
0
Time Between Posts
9 days
Number of Posts By Type
Text
17
Last Seen Tumblr Blogs


Fun Fact
Tumblr.com is the 103rd most visited website in the world.
Text
Ending BCH Claim from August 2017 Fork
It has been well over a year since the first major Bitcoin fork, which GateHub decided to support and grant users BCH in 1:1 ratio.
There were specific instructions on how to claim BCH (enabling BCH trust line) at that time.
If users did not follow these instructions in the first couple of months, a BCH claim could only be made by requesting a manual credit via our customer support channels.
This required a special process that involved several departments and working hours to resolve due to the complexity of the issue.
We will stop accepting and resolving requests for BCH IOUs from the August 2017 Bitcoin fork on April 1st, 2019.
Requests for crediting BCH from the fork, made after March 2019, will be rejected.
GateHub Team
0 notes
Text
Web Monetization
What is website monetization?
Website monetization is the process of making revenue from traffic coming to the website having website monetization enabled. At this moment the most popular way to make money with the help of web monetization is with PPC - pay per click and CPI/CPM - cost per impression. Different providers act as webmasters in placing advertisements or an extension on websites to benefit from the traffic the site gets.
How can you monetize your website?
Pay per click advertising
Cost per impression advertising
Banner advertising
Affiliate programs
Data monetization
Paid subscriptions
Donations
Web Monetization
How does Web Monetization work?
Web Monetization is a new way to pay creators in real-time through an API that uses Interledger Protocol micropayments to monetize a website or streaming channel. Users can enable web monetization for payment streaming through polyfill or an extension. Content creators are able to implement it by adding a line of code to their website or specifying a streaming channel for web monetization.
The Interledger vision is to be able to send, receive, and monetize anything in any currency.
Content creators and websites that are making revenue from web monetization can provide rewards or special offers for users that have Web Monetization enabled, therefore creating a self-sustaining economy.
Why use Web Monetization?
Easy to set up - all you need is a <meta> tag
Simple to use
Secure
No action required from users
Traffic equals payment so quality content is rewarded
Want to see how it works?
You can try Coil, which is the first service that uses Web Monetization to pay websites and content creators.
GateHub Team
0 notes
Text
Interledger
What is Interledger?
The vision of the Internet of Value is to make sending value as easy as sending information.
Interledger is an open source protocol used for payments across payment networks. It connects all types of ledgers: from digital wallets and national payment systems to blockchains and others. It makes it easy to transact with anyone, no matter the location or currency. Interledger allows you to receive money from any ledger, without setting up accounts on lots of different services. Interledger is not tied to any one company, blockchain, or currency.
How was Interledger invented?
Stefan Thomas and Evan Schwartz invented Interledger in 2015. In October of that year, the whitepaper and the first implementation were released and Interledger W3C Community Group was formed. Many individuals and companies from different backgrounds are now involved and working on the project.
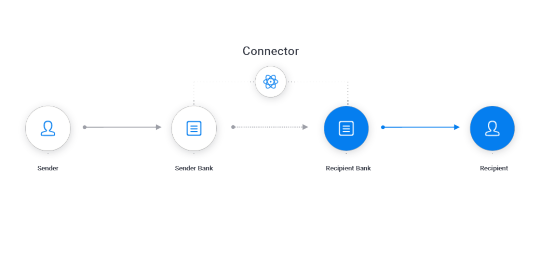
How does Interledger work?
Interledger uses connectors to route payments across different ledgers. Conditional transfers are used to secure multi-hop payments so funds cannot be lost or stolen in flight. In conditional transfers, funds are put on hold at the source while the best route to the destination is determined and confirmed. If the conditions are met, the transfer is executed, otherwise, the transfer times out and funds are released at the source. Interledger pulls inspiration from the packet and address format of the Internet Protocol to instruct connectors where to forward payments.
For more detailed information see the Interledger Docs here.
What are the benefits of Interledger?
Simplicity
Speed
Reduced cost
Trustworthiness
Packetizing Value - splitting up larger transfers into many lower-value packets which increases the network’s efficiency, security, and interoperability
How to build on Interledger?
Interledger is focusing on supporting developers and projects building both infrastructure and applications in the Interledger ecosystem. They’re specifically interested in new connectors and wallets as well as micropayment services and decentralized exchange applications. If you are interested in connecting ledgers, building with micropayments or getting involved in the protocol development you can join the Interledger W3C Community Group here.
Which infrastructure and application companies are building with Interledger?
Coil - Micropayment app that integrates XRP and the InterLedger protocol to pay out to any website using Web Monetization, a new standard for how browsers can pay websites using Interledger.
XRP Tip Bot - A bot that enables users on Reddit, Twitter and Discord to tip one another using XRP and ILP.
StrataLabs - a Ripple backed company powered by Interledger Protocol, enabling micropayment services like Coil.
Kava - Running an Interledger connector and developing ILP technology. The first provider creating interoperability and liquidity for blockchains, wallets, and exchanges.
The Bill & Melinda Gates Foundation - Partnered with blockchain startup Coil as part of its mission to provide payment services for the unbanked. Working on an open source payment system for emerging markets, using Interledger to increase financial inclusion through interoperability.
Ilp.ix - a Mlab project XRP peering exchange that helps connectors find and connect to one another.
And more to come
GateHub Team
0 notes
Text
Connect a gateway
Please make sure your identity information is correct before connecting a gateway in order to avoid being rejected:
Go to Home page
Click Connect a Gateway
Enter your account password
Select Asset (XRP, USD, EUR...)
Review selection and click Confirm
You will be notified by email once the gateway accepts or denies your connection request.
GateHub Team
0 notes
Text
Import a Wallet
To import an existing XRP account
Go to "WALLET"
"New Wallet" (+ icon to your upper left)
Select "Import"
Type in your GateHub password if prompted
Insert your wallet secret key.
The secret key is a ~29 character long alphanumeric string starting with the letter “s”.
Do not share your secret key with anyone and keep it in a safe place (paper copy or offline storage).
To retain access to your current XRP account
Go to "WALLET"
Click "Advanced"
Click "Show secret key"
Type in your GateHub password
Store your key in a safe place
Do not share your secret key with anyone and keep it in a safe place (paper copy or offline storage).
Note that the Ripple Trade migration feature has been discontinued. The only way to import an existing Ripple wallet to GateHub is by following the instructions above.
GateHub Team
0 notes
Text
Advanced Wallet Settings
To access advanced wallet settings:
Go to “WALLET”.
Click “Advanced” at the bottom-right corner of your screen.
Each wallet has separate advanced settings.
Advanced wallet settings
Ripple address.
Ripple options (unavailable in hosted wallets)
“Set Trust” - allows you to set custom trust lines.
“Show Trust Lines” - allows you to manage and disable trust lines.
“Show Secret Key”*
Wallet created - creation date of your wallet.
Wallet options
“Rename”
“Set as primary” (unavailable in your primary wallet)
“Delete” (primary wallet can not be deleted)
Wallet options
A wallet can be renamed at any time.
Any wallet can be designated as primary and this choice is reversible.
*Do not disclose your secret key to anyone and keep it in a safe place (offline storage or paper copy).
GateHub Team
0 notes
Text
Support requests
How can I solve issues on my own?
Our support portal covers topics related to using our platform and common problems that may occur.
Most FAQ questions can be answered quickly by reading our support portal.
GENERAL - for information about GateHub, the Ripple protocol, updates, and archive
NEW USERS - for questions related to account registration and verification
YOUR ACCOUNT - for questions regarding security, account settings, and wallets
YOUR MONEY - for questions regarding your funds on GateHub
How can I request help?
A new support request can be opened via our request form.
Please follow these guidelines to receive the fastest possible assistance:
Review our support portal and suggested articles/sections to see if the resolution can be found there.
Do not submit duplicate tickets, as these will slow down our agents’ ability to assist customers quickly.
Choose the proper request category when submitting a support request. The “Category” drop-down menu has several options. Please choose the category that most closely resembles your issue so we can provide the most accurate immediate response.
How does GateHub support work?
A new support request will always receive an automated reply which involves the most common solution and FAQ suggestions.
Most categories require you to reply to our email in order to reopen your request.
This is to ensure that our support system does not get spammed and our support agents overwhelmed with requests. GateHub does not require you to create a support account to manage your requests.
GateHub team
0 notes
Text
GateHub Stance on Blockchain Forks
To Our Valued Customers:
GateHub has decided not to support any newly created tokens from upcoming forks and is not responsible for access to any tokens created during a chain split. Our primary focus is to ensure any funds stored in GateHub is kept as secure as possible, and we continue to monitor such blockchain events closely to ensure all GateHub customer funds are safe. GateHub reserves the right to change our stance on any specific forks as we deem appropriate. In this case, our users will be informed about it in a timely manner.
Blockchain forks do not affect digital currency balances within GateHub accounts. Transactions will not be disrupted in the time of the forks.
GateHub Team
0 notes
Text
Wallet Type and Switching Between Wallets
GateHub supported wallet types
Your account can hold Ripple wallets and GateHub hosted wallets (up to 20).
A Ripple wallet (also called Ripple address or Ripple account) exists on the Ripple network and is publicly visible. Ripple wallet is not tied to your GateHub account and can be exported elsewhere.
A Ripple wallet allows you to receive and send funds, as well as trade funds on the Ripple network through GateHub “TRADE” or “EXCHANGE” interfaces (note that FIAT deposits/withdrawals are only available to verified GateHub accounts).
In order to gain functionality, a Ripple wallet must be activated with at least 20 XRP and it must hold that amount of XRP at all times as required by the Ripple protocol. This is called XRP reserve and its purpose is spam protection. You can read more about XRP reserve here.
GateHub hosted wallets are stored on GateHub private servers and are not publicly visible.
Hosted wallet allows you to receive and send funds and does not need to be funded (note that FIAT deposits are only available to verified GateHub accounts).
A trade and exchange option is currently not available in hosted wallets.
Switching between your wallets
You will occasionally need to switch between wallets in order to perform actions with a specific wallet like deposit and withdraw funds or trade your funds.
Wallets can be switched multiple ways:
In “HOME” by clicking on the name of your desired wallet.
In “WALLET”, “TRADE” and “EXCHANGE” through the drop-down menu in the top left corner.
GateHub Team
0 notes
Text
Wallet Balance and Wallet History
Wallet balance
Wallet balance shows current amounts of funds in a wallet by currency. In “HOME” you can see all your wallet balances. In “WALLET” you can see balances of a specific wallet.
Transactions and open orders
In “WALLET” you can access wallet history and currently open orders by clicking “Transactions” and “Open orders”.
Wallet history
Wallet history can be downloaded in “WALLET” - “Transactions.
A .csv file export can be opened by most spreadsheet programs. Within this document, all wallet activity can be seen. This includes trades and exchanges, trusts set and disabled, payments sent and received and fees charged for each transaction on the Ripple network.
GateHub Team
0 notes
Text
Create and Delete a Wallet
GateHub allows you to add and remove wallets from your account.
In order to gain functionality, a new Ripple wallet has to be funded with 20 XRP which cannot be withdrawn.
Please see our support article about the XRP reserve and other Ripple network features.
GateHub discourages creating new Ripple wallets unless entirely necessary*.
To create a new Ripple or hosted wallet:
Go to "WALLET".
"Add Wallet" (+ icon to your upper left).
Enter your account password if prompted.
Choose “New”.
Type in your wallet name (can be changed later) and choose wallet type.
Click “Create”.
To remove a wallet from your account:
Go to “WALLET”.
Click “Advanced”.
Click “Delete” - confirm by clicking “Delete”.
The primary wallet cannot be deleted.
Further information about your wallets on GateHub is available here.
Information about the Ripple protocol and Ripple wallets is available here.
* All created Ripple wallets (accounts) are permanently stored on the XRP Ledger. Every new version of the XRP Ledger's public ledger chain contains the full state of the ledger.
GateHub Team
0 notes
Text
XAU Facts
What is XAU
1 XAU is the right to redeem 1 gold gram bar (fineness 999,9). The XAU is issued to your wallet by BPG Kovine.
How to purchase XAU
You can purchase the XAU on the Gatehub trade section where you can place a buy order to buy XAU.
How to sell XAU
On the trade section of the platform place a sell order. You can decide to exchange XAU for EUR, USD, ETH, BTC, ... The fiat currencies can be wired to a bank account of your choice or you can choose that the gold bars are sent to your address.
How to Redeem / Withdraw XAU
Choose our withdrawal option and we will Fedex you your gold bars. Minimum redemption amount is 10 XAU = 10 g in its multiples (e.g. 10 g, 20 g, 30 g, etc.). We will Fedex you a Good Delivery bar.
Why hold XAU
Gold has held its value forever. Use gold to hedge against inflation, currency failure, and controls. 100% backing
There is a lot of paper gold (see Comex Gold Cover Ratio - 293 ounces of paper per ounce of registered physical). We operate on a 100% backed basis. We assign 1 g of gold bullion to every single XAU.
Is gold real
We own a precious metal refinery and our storage is regularly audited by Bureau Veritas.
Delivery of gold
You can pick up your gold at our premises in Ljubljana, Slovenia or you can have the gold bars delivered to your address via Fedex or by regular post worldwide.
Customer's Obligations
A customer is Obliged to submit the registration and identification documents (EIN, SSN, GST, etc.) upon the request of Customs Control.
GateHub Team
0 notes
Text
Company Account Document Requirements
You will be prompted to submit your login passphrase prior to uploading any documents.
Please upload the following documents, preferably in the order listed below:
Founding documents: Certificate of incorporation and Memorandum & Articles of Association or any other equivalent or relevant documents.
Company structure - a schematic structure of relevant company bodies.
Annual return which details who the directors and the beneficial shareholders of the company are, as of the last fiscal year or any similar documents which confirm the ownership structure of the company.
Resolution to open an account by the Board of Directors, Management, CEO or equivalent body and identification of those who have authority to operate the account.
A recent company bank account statement per each account registered (IBAN/SWIFT must match the bank account entered in the account profile).
High-resolution images of the international passports and proofs of residency of any person with significant control, at least two members of the board of directors, and any owners with an ownership share of 10% or more*.
Additional documents**
* If the owner of the entity is another entity collect entity documentation leading up to the final beneficial owners or signed declaration of beneficial ownership – 2 authorized signatories of the company need to sign a declaration in which the beneficial owners are disclosed.
** Additional documents might be required due to the nature of the business that the company plans to run (resellers need to be registered as MSB in certain jurisdictions such as the USA).
We kindly ask you to upload a single set of documents.
Please open a support request if you experience any issues or have any questions about your company account verification.
GateHub Team
0 notes
Text
Register a Company Account
Before the registration
We highly recommend you to enable 2-Factor Authentication (2FA) for the email account*, designated as GateHub login address.
* Instructions apply to Gmail. if you are using a different email provider, please find relevant instructions online.
Navigate to https://gatehub.net/. We advise you to bookmark the URL (why is this relevant?). Click on Sign Up button.
1 - Register an account
Enter your email and type in your new password.
Choose a unique and complex password (ideally composed of upper and lowercase letters, digits and symbols).
Check “I’m not a robot” and solve the task.
Click “SIGN UP”.
Save your “Recovery key” and store it in a safe place (offline storage or paper copy). The Recovery key is generated only once and can not be recovered later.
Go to your email inbox and look for our “Welcome to GateHub!” email and click “Activate account”. Click here if you are not receiving emails.
2 - First login
Sign in with your login email and password.
Click “Corporate”. Account type cannot be changed.
Validate your mobile phone number
3 - Verification process
Upload specified documents.
You will be prompted to submit your login passphrase prior to uploading.
4 - GateHub account security
OPTIONAL - Enable 2-Factor Authentication (2FA).
GateHub Team
0 notes
Text
Wallet Funding and First Deposit
In order to activate a wallet, a deposit of at least 20 XRP has to be made. The first 20 XRP deposited to a Ripple account are reserved and cannot be withdrawn. This is called the XRP reserve.
Activate your wallet with XRP
Deposit at least 20 XRP to your Ripple wallet address from another service or wallet.
Wallet address can be found in “WALLET”.
Note that 20 of the XRP used to activate a wallet cannot be withdrawn. Read more about XRP reserve here.
Alternative method - GateHub funding
Make a non-XRP deposit to your disabled Ripple wallet.
Only verified accounts can deposit FIAT currencies.
Cryptocurrency deposit tutorial
FIAT deposit tutorial
Once your first deposit arrives, GateHub will fund the destination wallet with 20 XRP and send you an email with instructions to enable the deposited currency in your wallet. This process is called setting a trust line.
Your Ripple wallet should be activated within 24 hours after your first non-XRP deposit arrives.
When your Ripple wallet is active and the proper trust lines are established, your first deposit should get credited within a few hours.
Note that GateHub will only fund one Ripple wallet per account.
GateHub Team
0 notes
Text
Update Personal Info and Documents
Your profile information and documents can be updated in “Account settings”.
The “Account settings” (wrench icon) button is located in the upper-right corner of the screen, next to the log out button.

Update personal information
Click on “Update profile” to update home address, name, date of birth etc.
Update documents
Click on “Update documents” to update KYC documents.
Choose the type of ID you are about to upload and enter ID number.
Make sure to provide a color photo or scan where the whole document is clearly visible, not visually obstructed, cropped or manipulated in any way.
Maximum file size is 5MB. Supported formats: .jpeg, .jpg, .pdf, .png.
KYC requirements are available here.
GateHub
0 notes
Text
Cryptocurrency Withdrawal
To withdraw via INSTANT:
Applies for any currency on the Ripple network that the receiver is able to receive (has corresponding trust line enabled) and transferring to GateHub hosted wallets.
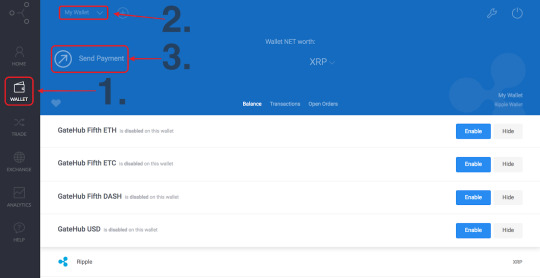
Click WALLET on the left.
Select the wallet you want to send funds from.
Click Send Payment
Enter your GateHub password if requested
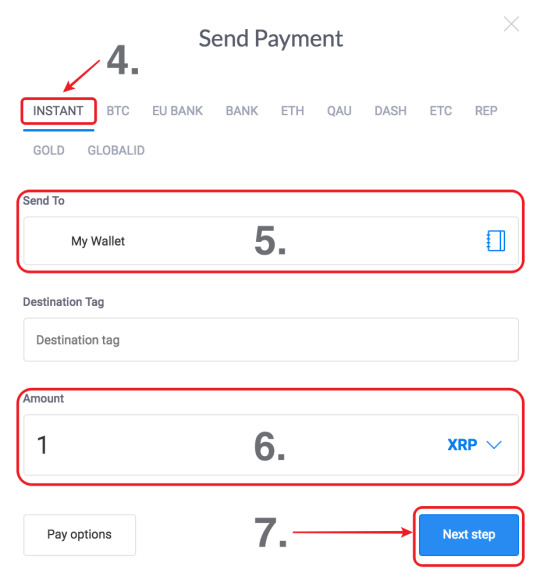
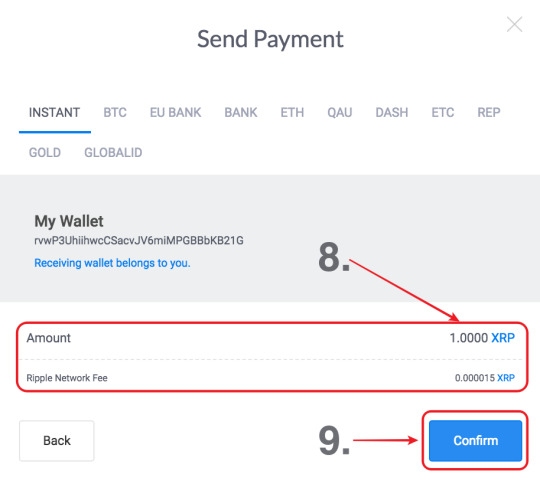
Select INSTANT for Ripple IOU/XRP transfers.
Enter the receiver address or select contact.
Input destination tag if needed.
Select the currency and amount.
Select the funds you wish to use for conversion by clicking Pay Options.
Your funds will be converted by creating a market order on the Ripple exchange market. This allows you to send payments in a currency you do not currently hold.
Click Next Step.
Verify that you accept the fees and amounts transferred.
Click Confirm.
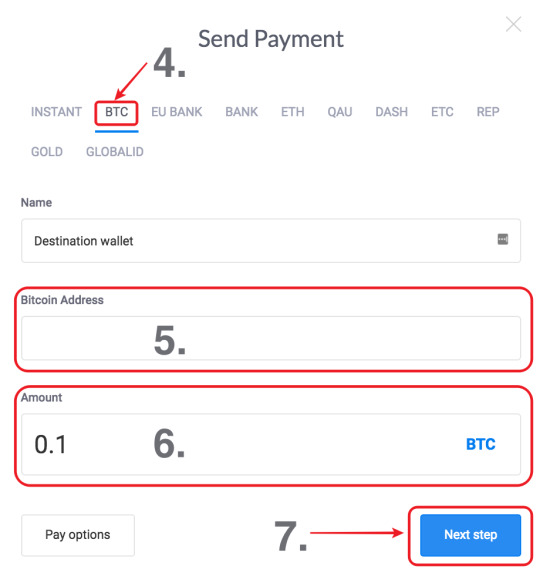
To withdraw crypto IOUs from your wallet:
Important: You can only withdraw GateHub issued IOUs ( BTC, ETH, ETC, DASH, and REP).
Click WALLET on the left
Select the wallet you want to send funds from.
Click “Send Payment”.
Enter your GateHub password if requested.
Select the currency you wish to withdraw.
Enter the receiver address (select existing contact or add a new contact).
Enter amount.
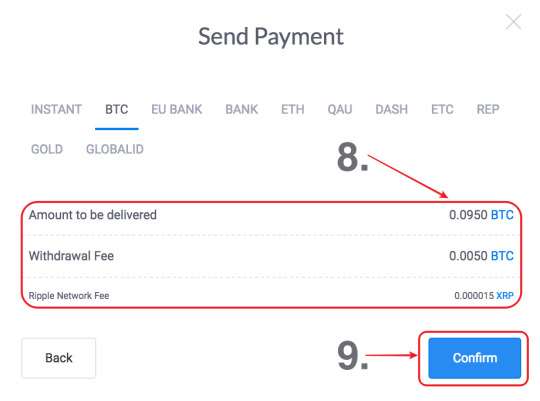
Click Next Step.
Verify that you accept the fees and amounts transferred.
Click Confirm.
GateHub Team
0 notes