
We are here to transform your photo into a handmade portrait with 100% satisfaction guarantee and free worldwide shipping.
Don't wanna be here? Send us removal request.
Statistics
We looked inside some of the posts by graphcoalportrait and here's what we found interesting.
Average Info
Notes Per Post
1
Likes Per Post
1
Reblog Per Post
0
Reply Per Post
0
Time Between Posts
8 days
Number of Posts By Type
Text
17
Last Seen Tumblr Blogs


Fun Fact
The most popular pages on Tumblr are about Minecraft, GIFs, and David J. Peterson.
Text


#painting#portrait#oil painting#acrylic#portraiture#drawings#woman portrait#portrait art#portrait drawing#portrait painting#custom painting#original art#sketch#christmas gifts#unique gifts#gifts for her#holiday gifts#gift ideas#christmas shopping#gifts#valentines day#valentines gifts#valentines cards#best gifts#pet portrait#pet painting#dog portrait#hand painted#charcoal#charcoal portrait
0 notes
Text
Exploring the Artistry of Graphite Portraits :
A Journey into the World of Graphcoal Portraiture
Introduction :
Welcome to the captivating realm of graphcoal portraiture, where the subtle dance between graphite and charcoal creates stunning visual narratives. In this blog, we will delve into the artistry, techniques, and the unique charm that graphcoal portraits bring to the world of fine art.
The Fusion of Graphite and Charcoal : Graphcoal portraiture is a marriage of two classic drawing mediums—graphite and charcoal. Artists harness the contrasting qualities of these materials to craft portraits that are rich in depth, texture, and emotion. Graphite provides precision and delicacy, while charcoal adds boldness and a sense of drama. The interplay between light and dark, achieved through the combination of these mediums, gives graphcoal portraits a distinct visual allure.
Techniques and Tips : Creating a compelling graphcoal portrait requires a delicate touch and a keen understanding of both graphite and charcoal properties. Artists often begin with a graphite underdrawing to establish the basic structure and details. Charcoal is then strategically applied to enhance shadows, add depth, and evoke a sense of three-dimensionality. Blending techniques, erasers, and various tools become the artist's allies in achieving a harmonious fusion of these two mediums.
Featured Artists : Explore the works of renowned artists who have mastered the art of graphcoal portraiture. From hyper-realistic renditions to expressive and emotive pieces, these creators showcase the versatility and expressive potential of this unique technique. Learn about their artistic journeys, inspirations, and the challenges they overcome to bring graphcoal portraits to life.
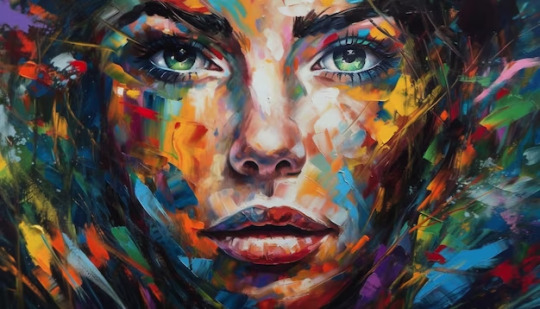
The Emotional Impact : One of the most remarkable aspects of graphcoal portraiture is its ability to convey profound emotions. The contrast between the softness of graphite and the bold strokes of charcoal allows artists to capture the complexity of human expression with incredible nuance. Whether it's the subtle curve of a smile, the intensity of a gaze, or the play of light on skin, graphcoal portraits have a way of drawing viewers into the emotional core of the subject.
Tips for Beginners : Are you intrigued by the idea of creating your own graphcoal portraits? This blog wouldn't be complete without some practical tips for aspiring artists. Discover essential techniques, recommended materials, and step-by-step guides to help you embark on your own graphcoal portraiture journey.
Conclusion :
As we wrap up our exploration of graphcoal portraiture, we hope you've gained a newfound appreciation for this captivating art form. The delicate balance between graphite and charcoal, the emotional depth achieved, and the skill required to master this technique make graphcoal portraits a truly mesmerizing genre within the world of fine art. Whether you're an artist or an art enthusiast, let the allure of graphcoal portraiture inspire your creative spirit.
0 notes
Text
The Artistry Behind Portrait Painting: Capturing the Soul on Canvas
Introduction
In the vast and diverse world of art, portrait painting stands as a timeless and revered genre. Portrait artists, with their exceptional talent and creativity, have the unique ability to capture the essence of a person's character, emotions, and identity on canvas. This blog delves into the captivating world of portrait artistry, exploring the techniques, history, and significance of this fascinating medium.
The History of Portrait Painting
Portrait painting has a rich history dating back to ancient civilizations, but it gained significant prominence during the Renaissance era in Europe. Artists like Leonardo da Vinci, Rembrandt, and Johannes Vermeer immortalized their subjects with meticulous attention to detail, bringing forth an era of realistic and emotionally charged portraiture. Over the centuries, portrait painting evolved, adopting various styles, from the grandeur of formal portraits to the spontaneity of impressionism and the raw emotion of expressionism.
The Role of a Portrait Artist
A portrait artist's primary role is to capture the unique essence of their subject, whether it be a person, animal, or even an object. This entails not only a keen eye for detail but also a deep understanding of human psychology and emotion. Portrait artists must establish a connection with their subjects to bring out genuine expressions and emotions, which are then translated onto the canvas.
Techniques and Styles
Portrait artists employ a wide range of techniques and styles to achieve their artistic vision. Some may opt for classical realism, using meticulous brushwork and attention to detail to create lifelike representations. Others may embrace a more abstract or impressionistic approach, focusing on capturing the essence of their subjects through color, light, and brushwork. Watercolor, oil, acrylic, and charcoal are just a few of the mediums portrait artists may choose to work with, each offering its unique challenges and opportunities.
The Importance of Lighting
One of the key elements in portrait painting is lighting. Lighting can dramatically affect the mood and atmosphere of a portrait. Artists often use natural light, studio lighting, or dramatic chiaroscuro lighting to create depth, highlight features, and convey emotion. The interplay of light and shadow can enhance the three-dimensionality of the subject and create a sense of volume.
The Evolution of Portraiture in the Digital Age
With the advent of digital technology, portrait artistry has taken on new dimensions. Digital artists use tablets and software to create stunning, hyper-realistic portraits, often blurring the line between traditional and digital art. The digital medium offers convenience and versatility, allowing artists to experiment with various styles and techniques without the need for physical materials.
The Emotional Impact of Portrait Art
A well-executed portrait possesses the power to evoke a wide range of emotions in viewers. Whether it's the solemn expression of a historical figure, the joyous laughter of a child, or the pensive gaze of a model, portraits can resonate with people on a deeply emotional level. They serve as visual reminders of the human experience, preserving moments and personalities for generations to come.
Conclusion Portrait artistry is a timeless and revered form of artistic expression. Portrait artists play a crucial role in capturing the essence of individuals and subjects, providing us with a window into their souls. With a rich history, diverse techniques, and the evolving landscape of digital art, portrait painting continues to thrive as a medium that speaks to the human condition and the intricacies of our existence. Through the skill and creativity of portrait artists, we are able to cherish and celebrate the beauty, diversity, and complexity of the world around us.
#acrylic#oil painting#portrait#portrait art#portrait painting#portrait drawing#portraiture#painting#woman portrait#sketch#drawings
0 notes
Text
Mastering the Art of Color Pencil Portraits: A Step-by-Step Guide
Introduction
Color pencil portraits are a captivating and versatile medium for artists of all skill levels. They allow for intricate details, vibrant colors, and a sense of realism that can bring your subjects to life. Whether you're a seasoned artist looking to explore a new medium or a beginner taking your first steps into the world of portraiture, this blog will guide you through the process of creating stunning color pencil portraits.
Materials You'll Need
Before diving into your color pencil portrait, it's essential to gather the necessary materials:
Color Pencils: Invest in high-quality color pencils. Brands like Faber-Castell Polychromos, Prismacolor, and Derwent Coloursoft are renowned for their rich pigments and smooth application.
Paper: Choose a heavy-weight, acid-free paper with a smooth surface. A textured paper may affect the pencil's ability to blend and layer.
Erasers: You'll need a kneaded eraser for gentle, precise corrections and a white vinyl eraser for more substantial erasing tasks.
Blending Tools: Blending stumps, tortillons, or even tissue paper can be used to blend and soften pencil strokes.
Reference Photo: A clear, high-resolution reference photo is essential. Ensure good lighting and sharp details in your chosen image.
Getting Started
Select Your Subject: Choose a subject that inspires you, whether it's a family member, a friend, or even a famous personality. Make sure your reference photo is well-lit and has clear features.
Prepare Your Workspace: Set up a clean, well-lit workspace. Good lighting is crucial to accurately judge colors and values as you work.
Sketch the Outline: Begin with a light sketch of your subject's basic shapes and proportions. Use a light color pencil or a graphite pencil for this initial outline.
Building Layers
Start with Base Colors: Begin by laying down light layers of color to establish the base colors of the different areas of the portrait. Pay attention to skin tones, hair, eyes, and clothing.
Build Up Layers: Gradually build up layers of color. Start with lighter shades and gradually move to darker ones. Use light pressure to avoid damaging the paper's tooth.
Blend and Shade: Use blending tools to smooth transitions between colors and create realistic shading. Experiment with different techniques, such as cross-hatching and stippling, to achieve various textures.
Focus on Details: As you progress, pay close attention to details like wrinkles, freckles, and highlights in the eyes. These details add depth and realism to your portrait.
Troubleshooting Tips
Avoid Overworking: It's easy to get carried away with color pencils, but overworking can result in a waxy buildup. Use a light touch and take breaks to assess your progress.
Use a Fixative: Consider using a color pencil fixative spray to prevent smudging and protect your artwork.
Experiment: Don't be afraid to experiment with different techniques and color combinations. This is how you'll discover your unique style.
Patience is Key: Creating a color pencil portrait can be time-consuming. Be patient and embrace the process of layering and blending.
Finishing Touches
Final Details: In the final stages, add the smallest details, such as catchlights in the eyes, fine facial lines, and stray hairs.
Sign Your Work: Once you're satisfied with your portrait, sign it discreetly in the corner.
ConclusionColor pencil portraits are a beautiful and rewarding form of art that allows you to capture the essence of your subject with stunning detail and vibrant colors. Whether you're creating portraits for personal enjoyment or as a professional artist, mastering this medium takes practice and dedication. With patience, practice, and a willingness to experiment, you can create stunning color pencil portraits that will leave a lasting impression on viewers. So, gather your materials, choose a subject, and embark on your journey to create captivating color pencil portraits.
#acrylic#oil painting#painting#portrait#portrait art#portrait painting#portraiture#portrait drawing#woman portrait#colour palette#colour#colour pencils#artwork#art#drawings
0 notes
Text
The Art of Portrait Painting: Capturing the Essence of Humanity
Introduction
Portrait painting is a timeless and captivating art form that has been practiced for centuries, transcending cultural boundaries and evolving with the changing artistic trends. Whether you're an art enthusiast, a budding artist, or simply curious about the world of visual arts, exploring the world of portrait painting can be a fascinating journey. In this blog, we will delve into the history, techniques, and significance of portrait painting as a means of capturing the essence of humanity.
The History of Portrait Painting
Portrait painting has a rich history dating back to ancient civilizations. The Egyptians, Greeks, and Romans all created portraits as a way to immortalize their rulers, heroes, and loved ones. However, it was during the Renaissance in Europe that portrait painting truly flourished. Artists like Leonardo da Vinci, Raphael, and Titian pioneered new techniques that allowed them to depict their subjects with unparalleled realism and emotion.
During the 17th and 18th centuries, portrait painting became a popular form of portraiture among the wealthy elite. Artists like Rembrandt and Diego Velázquez elevated the genre to new heights, showcasing the power of light and shadow to convey depth and personality in their subjects.
The 19th and 20th centuries brought new movements and approaches to portrait painting. The Impressionists, for example, focused on capturing the fleeting moments of everyday life, while Expressionists like Egon Schiele sought to delve into the inner emotions of their subjects through distorted and intense portrayals.
Today, portrait painting continues to evolve, incorporating various styles and mediums, from traditional oil paintings to digital art and beyond.
The Significance of Portrait Painting
Portrait painting serves as a visual record of individuals, families, and societies throughout history. It not only captures the physical likeness of the subject but also offers insights into their personality, emotions, and the cultural context of their time. Portraits often reflect societal values, political ideals, and evolving artistic trends.
Furthermore, portrait painting has a profound emotional impact on both the artist and the viewer. It allows artists to connect with their subjects on a deep level, fostering a sense of empathy and understanding. For viewers, portraits can evoke a wide range of emotions, from nostalgia and admiration to curiosity and introspection.
Portrait painting also holds a unique place in the art world as a form of self-expression. Artists use their skills to interpret and convey the essence of their subjects, imbuing their work with their own creative vision and style. This blend of subjectivity and technical skill is what makes portrait painting such a powerful and enduring art form.
Techniques and Approaches in Portrait Painting
Portrait painting requires a combination of technical skill, observation, and artistic creativity. Here are some key techniques and approaches commonly used by portrait artists:
Capturing Likeness: Achieving a strong likeness to the subject is crucial in portrait painting. Artists must pay close attention to proportions, facial features, and subtle nuances that make each individual unique.
Understanding Light and Shadow: Mastering the interplay of light and shadow is essential for creating depth and three-dimensionality in a portrait. Artists often use techniques like chiaroscuro to achieve this effect.
Emphasizing Expression: The eyes, mouth, and body language of the subject can convey a wealth of emotion. Skilled portrait artists focus on capturing the subject's personality and mood.
Choosing Mediums: Portrait artists can work with various mediums, including oil, acrylic, watercolor, charcoal, and digital tools. Each medium offers its own unique qualities and challenges.
Composition: The arrangement of elements within the portrait, such as the pose, background, and framing, contributes to the overall impact of the artwork.
Style and Interpretation: Portrait artists often develop their own distinct style and approach to capturing their subjects, ranging from hyper-realistic to abstract and everything in between.
Conclusion
Portrait painting is a dynamic and ever-evolving art form that continues to captivate and inspire both artists and viewers alike. It serves as a powerful means of preserving the essence of humanity throughout history and provides a unique platform for artistic expression.
Whether you are an aspiring artist seeking to hone your skills or simply an art lover appreciating the beauty and depth of portrait painting, the world of portraiture offers a rich and rewarding experience. As you explore this timeless art form, you may find yourself gaining a deeper understanding of the human condition and the boundless possibilities of creative expression.
#acrylic#oil painting#painting#portrait#portrait art#portrait drawing#portrait painting#portraiture#woman portrait
0 notes
Text
Capturing Life in Vivid Hues: The Artistry of Acrylic Portraits
Introduction
Portraiture has been a beloved genre in the world of art for centuries, allowing artists to encapsulate the essence of their subjects in a single frame. Among the myriad of mediums available to artists, acrylic paint stands out as a versatile and vibrant choice for creating stunning portraits. In this blog, we will delve into the world of acrylic portrait painting, exploring its unique characteristics, techniques, and the artists who have mastered this captivating medium.
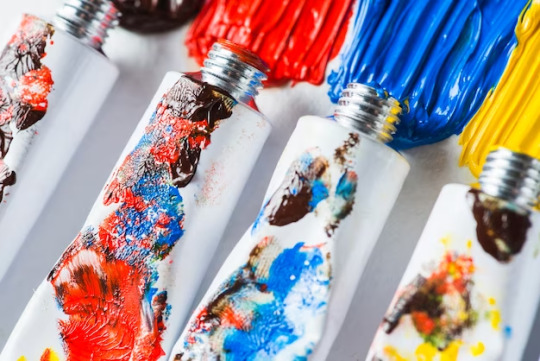
The Versatility of Acrylic Paint
Acrylic paint is celebrated for its versatility, making it an excellent choice for portrait artists. Unlike oil paints that require a lengthy drying time, acrylics dry quickly, enabling artists to work in layers and achieve depth and detail in a relatively short period. This fast-drying nature allows for a dynamic creative process, making it possible to layer, blend, and experiment with textures more readily.
The Vibrant Palette of Acrylics
One of the defining features of acrylic paint is its vibrant color palette. Acrylics come in a wide range of hues, and artists can easily mix them to create custom shades. This extensive color selection allows artists to capture the subtleties of human skin tones, the brilliance of sparkling eyes, and the richness of hair textures. The ability to blend colors smoothly and build up layers of translucent glazes contributes to the lifelike quality of acrylic portraits.
Techniques for Acrylic Portrait Painting
Creating a compelling acrylic portrait involves mastering a variety of techniques. Here are some key aspects to consider:
Underpainting: Many artists start with an underpainting, a monochromatic layer that establishes the composition and values. This foundation helps in achieving accurate proportions and shading.
Layering: Acrylics' fast drying time allows for layering to create depth. Artists often work from dark to light, building up layers to capture the subtle transitions in skin tones and shadows.
Blending: Blending in acrylics can be done with brushes, sponges, or even fingers. Smooth transitions between colors are crucial for realistic portraits.
Texture: Artists can experiment with texture by using various tools, like palette knives or impasto techniques, to add depth to elements like hair or clothing.
Details: The final touches in a portrait often involve adding fine details like eyelashes, wrinkles, or freckles. Acrylic paint's versatility makes it possible to achieve these intricate details.
Artists Who Excel in Acrylic Portraiture
Numerous artists have made their mark in the world of acrylic portrait painting. Some notable names include:
Chuck Close: Renowned for his large-scale, hyperrealistic portraits, Chuck Close's use of acrylics has garnered international acclaim. His meticulous attention to detail and unique grid-based technique make his work instantly recognizable.
Lucian Freud: While primarily known for his portraiture in oils, Freud occasionally used acrylics in his later works. His bold and unflinching depictions of his subjects are both captivating and intense.
Jolene Lai: A contemporary artist known for her dreamy and surreal portraits, Jolene Lai's acrylic paintings often incorporate intricate patterns and whimsical elements that add a unique dimension to her subjects.
Conclusion Acrylic portrait painting is a dynamic and captivating medium that allows artists to capture the essence of their subjects in vivid hues and intricate detail. Its versatility, vibrant color palette, and quick drying time make it an excellent choice for both aspiring and seasoned portrait artists. Whether you're drawn to hyperrealism, surrealism, or any other style, acrylics provide the perfect canvas for bringing your creative visions to life. So, grab your brushes, select your colors, and embark on a journey to create compelling acrylic portraits that tell the stories of your subjects with vivid brilliance.
#acrylic#oil painting#painting#portrait#colored pencil#portrait drawing#portrait painting#portraiture#woman portrait#portrait art
0 notes
Text
Mastering the Art of Watercolor Portraits: A Step-by-Step Guide
Watercolor portraits are a captivating form of art that combines the subtle transparency of watercolors with the intricacies of portraiture. Creating a beautiful watercolor portrait can be a rewarding and fulfilling experience, but it does require some patience and practice. In this blog post, we will explore the world of watercolor portraits and provide you with a step-by-step guide to help you master this exquisite art form.
Materials You'll Need
Before diving into the process of creating watercolor portraits, gather the necessary materials:
Watercolor paper: Choose a high-quality watercolor paper, preferably one with a weight of 140 lb or more, as it can handle the wetness of the paint without warping.
Watercolor paints: Invest in a set of professional-grade watercolor paints, which offer a wider range of colors and better pigmentation than student-grade ones.
Brushes: Have a variety of brushes on hand, including round brushes for fine details and larger flat brushes for backgrounds and washes.
Water containers: You'll need two containers of water—one for cleaning your brushes and another for mixing colors.
Paper towels or a sponge: These are essential for blotting and controlling the amount of water on your brush.
Pencil and eraser: Use a soft pencil for sketching and a kneaded eraser for corrections.
Reference photo: Choose a clear and well-lit reference photo of the subject you want to paint.
Step 1: Sketching
Begin by lightly sketching the outlines of your subject on the watercolor paper using a pencil. Pay close attention to proportions and facial features. It's essential to get the sketch right, as watercolors can be less forgiving when it comes to corrections.
Step 2: Mixing Colors
Watercolor portraits often require mixing colors to achieve the right skin tones and other nuances. Start with a basic palette of primary colors (red, blue, and yellow) and mix them to create the desired shades. Experiment with color combinations until you achieve the right hues for your subject's skin, eyes, and hair.
Step 3: Applying Base Washes
Once you have your colors mixed, apply a light base wash of the skin tone over the entire face. Be mindful of preserving highlights and shadows. Let the first wash dry completely before adding more layers to build up the color and depth gradually.
Step 4: Building Layers
Watercolor portraits are all about layering. Continue adding layers of paint to define facial features, such as eyes, lips, and nose. Work from light to dark, allowing each layer to dry before adding the next. Use a fine brush for delicate details and a larger one for background washes.
Step 5: Paying Attention to Details
Portraits are all about capturing the unique details of the subject. Pay close attention to the eyes—the windows to the soul—adding highlights and shadows to make them appear lifelike. Fine-tune the skin tones, hair, and other facial features as you progress.
Step 6: Adding Background
Consider the background of your portrait. A simple wash or a subtle, abstract background can enhance the overall composition without distracting from the subject. Ensure that the background complements the colors and mood of the portrait.
Step 7: Final Touches and Corrections
Before finalizing your watercolor portrait, take a step back and assess it for any necessary corrections or enhancements. Use an eraser to remove any stray pencil marks and make any last-minute adjustments.
Conclusion
Watercolor portraits require patience, practice, and a keen eye for detail, but the results are often breathtakingly beautiful. Remember that mistakes can be part of the learning process, so don't be discouraged by initial setbacks. With dedication and practice, you can master the art of watercolor portraits and create stunning works of art that capture the essence of your subjects in a unique and captivating way. So, grab your brushes, paint, and paper, and embark on a creative journey that will allow you to express yourself through the mesmerizing world of watercolor portraits.
#portrait#painting#oil painting#acrylic#portrait painting#portrait art#portrait drawing#woman portrait#portraiture#realism#watercolor#watercolour portrait
0 notes
Text
Mastering the Art of Oil Painting: Techniques, Tips, and Inspiration
Introduction:
Oil painting is a timeless and captivating art form that has been cherished by artists and art enthusiasts for centuries. The rich, vibrant colors and textures achieved through oil paints make this medium a favorite among artists seeking to express their creativity and emotions on canvas. In this blog post, we will delve into the world of oil painting, exploring its techniques, providing valuable tips, and offering a dose of inspiration for both beginners and experienced artists.
Essential Oil Painting Supplies:
Discuss the basic supplies every aspiring oil painter should have, such as brushes, canvas, oil paints, solvents, and easels. Explain the importance of quality materials and their impact on the final artwork.
Choosing Your Colors:
Explore the vast range of oil paint colors available and how to select a palette that suits your style and subject matter. Explain the significance of color theory in oil painting.
Understanding Oil Painting Techniques:
Introduce fundamental techniques like glazing, impasto, scumbling, and alla prima. Describe each technique's unique characteristics and when to use them in your artwork.
Brushwork and Texture:
Discuss the role of brushwork in oil painting and how it can influence the mood and style of your artwork. Provide examples of different brushstroke techniques and their effects on texture.
Composition and Design:
Share tips on how to create balanced and visually engaging compositions in your oil paintings. Explain the rule of thirds, focal points, and other design principles.
Working with Layers:
Explain the process of layering in oil painting, including underpainting, building up layers, and adding finishing touches. Share insights on achieving depth and luminosity in your artwork.
Troubleshooting Common Issues:
Address common challenges in oil painting, such as drying time, color mixing problems, and brush care. Provide solutions and tips for overcoming these obstacles.
Famous Oil Painters and Their Styles:
Highlight renowned oil painters throughout history, such as Leonardo da Vinci, Vincent van Gogh, and Frida Kahlo. Discuss their unique styles and contributions to the medium.
Finding Inspiration:
Share strategies for finding inspiration for your oil paintings, from nature and personal experiences to art movements and other artists' work. Encourage readers to keep a sketchbook for ideas.
Oil Painting as Therapy:
Explore the therapeutic benefits of oil painting, including stress relief, self-expression, and mindfulness. Share personal anecdotes or stories of artists who have found solace in their art.
Conclusion:
Oil painting is a versatile and rewarding artistic pursuit that offers endless possibilities for creative expression. Whether you're a beginner looking to embark on your oil painting journey or an experienced artist seeking new techniques and inspiration, this blog post has provided valuable insights to help you master the art of oil painting. Embrace the medium's rich history and let your imagination flow onto the canvas, creating timeless works of art that speak to your soul and captivate viewers for generations to come.
0 notes
Text
Portrait Painting: A Celebration of Diversity and Cultural Identity
Portrait painting, as an art form, has long been a powerful means of capturing the essence of an individual or a group. Beyond its aesthetic appeal, it serves as a reflection of cultural heritage, identity, and diversity. In this blog, we embark on a journey to explore how portrait painting celebrates the rich tapestry of human culture and the profound significance it holds in representing diversity and cultural identity.
The Universality of Faces
Faces are a universal language. Regardless of where we come from, the expressions, emotions, and stories etched onto human faces are relatable to people worldwide. Portrait painting, as an artistic medium, harnesses this universality to bridge cultural gaps and create a shared appreciation of the human experience.
Cultural Diversity in Portrait Art
Portrait artists, across generations and geographies, have sought to encapsulate the unique aspects of cultural identity within their work. Here's how portrait painting celebrates cultural diversity:
Traditional Attire: Artists often depict subjects in their traditional clothing, which reflects the historical, social, and cultural aspects of their heritage. These details offer viewers a glimpse into the rich tapestry of traditions and customs.
Symbolism: Colors, patterns, and symbols within portraits can carry profound cultural meanings. For instance, a particular color may symbolize a season, a tribe, or a religious affiliation. These symbols are like hidden treasures, waiting to be uncovered by the observer.
Facial Features: Different cultures have distinctive facial features, such as hairstyles, jewelry, and tattoos, which contribute to their uniqueness. Portrait painters carefully capture these features, celebrating the diversity of human appearances.
Famous Cultural Portrait Paintings
Many renowned portrait paintings have celebrated cultural diversity. Here are a few notable
Examples:
Mona Lisa by Leonardo da Vinci: The Mona Lisa's enigmatic smile and the landscape in the background offer insights into Italian culture during the Renaissance.
Girl with a Pearl Earring by Johannes Vermeer: This Dutch masterpiece highlights the beauty of a young woman adorned with a pearl earring, showcasing Dutch fashion of the 17th century.
Portrait of Madame X by John Singer Sargent: Sargent's portrait of a Parisian socialite reflects the elegance and sophistication of the Belle Époque era.
Portrait of an African American Woman by Charles White: This powerful portrait symbolizes the resilience and strength of African American women during a challenging period in American history.
Contemporary Portraiture and Diversity
In contemporary portrait painting, artists continue to celebrate diversity in innovative ways. They challenge traditional notions of beauty, identity, and cultural stereotypes. Contemporary portrait artists often blend different cultural influences, creating a fusion of identities that reflects the globalized world we live in.
Conclusion Portrait painting is a testament to the beauty of human diversity and cultural identity. It captures the essence of individuals and communities, preserving their stories and traditions for generations to come. As we admire these portraits, we celebrate not only the visual beauty but also the cultural heritage that makes each subject unique. Portrait painting serves as a reminder that our differences are what make the world a vibrant and fascinating place, deserving of recognition, appreciation, and celebration.
0 notes
Text
Personalized Gifts and Beyond: The Magic of Custom Portrait Painting
In a world of mass-produced items, personalized gifts hold a unique charm. They convey thoughtfulness, sentimental value, and a personal touch that transcends the ordinary. Among the many ways to create personalized gifts, custom portrait painting stands out as a timeless and treasured option. In this blog, we'll explore the enchanting world of custom portrait painting, delving into its history, significance, and how it brings cherished memories to life.
A Brief History of Portrait Painting
Portrait painting has a rich history dating back centuries. Traditionally, portraits were reserved for royalty and the elite, serving as a way to immortalize their likeness. However, as art became more accessible, portrait painting expanded to include everyday people. Artists captured not only the physical appearance of their subjects but also their personalities and life stories.
The Significance of Custom Portrait Painting
Custom portrait painting holds a special place in the world of personalized gifts for several reasons:
Capturing Memories: A custom portrait allows you to freeze a moment in time. Whether it's a family portrait, a couple's first dance, or a beloved pet, it immortalizes the emotions and memories associated with that moment.
Expressing Love and Appreciation: Giving someone a custom portrait is a heartfelt way to show your love and appreciation. It demonstrates that you've put thought and effort into creating a unique and meaningful gift.
Preserving Legacy: Custom portraits become family heirlooms. They tell the story of generations, preserving the faces and stories of loved ones for future generations to cherish.
Decorative Art: Beyond sentimental value, custom portraits are beautiful pieces of art. They can enhance the aesthetic of any space, adding a personal touch to home decor.
The Process of Creating a Custom Portrait
1)Creating a custom portrait painting involves collaboration between the artist and the client. Here's a simplified overview of the process:
2)Select an Artist: Begin by choosing an artist whose style aligns with your vision for the portrait.
3)Consultation: Have a consultation with the artist to discuss your ideas, preferences, and the size of the portrait.
4)Reference Photos: Provide high-quality reference photos that capture the subject's likeness and any specific details you want to include.
5)Artistic Interpretation: The artist will interpret the photos and bring them to life on canvas or paper, often adding their artistic flair.
6)Feedback and Revisions: You'll have the opportunity to review the work in progress and request revisions if needed.
7)Finalizing the Portrait: Once you're satisfied with the portrait, the artist will complete it, ensuring it meets your expectations.
The Magic of Personalized Gifts
Custom portrait painting is more than just a personalized gift; it's a testament to the power of art to connect us to our emotions, memories, and loved ones. Whether it's a wedding anniversary, a family reunion, or a tribute to a beloved pet, a custom portrait painting tells a unique story that words alone cannot convey.
Conclusion In a world filled with fleeting digital images, custom portrait painting stands as a timeless and enduring form of personalized gifting. It's a magical way to celebrate life's special moments, preserve cherished memories, and express love and appreciation. So, consider the gift of a custom portrait for your next special occasion, and let its beauty and sentimentality create lasting memories for you and your loved ones.
0 notes
Text
Personalized Gifts and Beyond: The Magic of Custom Portrait Painting
In a world of mass-produced items, personalized gifts hold a unique charm. They convey thoughtfulness, sentimental value, and a personal touch that transcends the ordinary. Among the many ways to create personalized gifts, custom portrait painting stands out as a timeless and treasured option. In this blog, we'll explore the enchanting world of custom portrait painting, delving into its history, significance, and how it brings cherished memories to life.
A Brief History of Portrait Painting
Portrait painting has a rich history dating back centuries. Traditionally, portraits were reserved for royalty and the elite, serving as a way to immortalize their likeness. However, as art became more accessible, portrait painting expanded to include everyday people. Artists captured not only the physical appearance of their subjects but also their personalities and life stories.
The Significance of Custom Portrait Painting
Custom portrait painting holds a special place in the world of personalized gifts for several reasons:
Capturing Memories: A custom portrait allows you to freeze a moment in time. Whether it's a family portrait, a couple's first dance, or a beloved pet, it immortalizes the emotions and memories associated with that moment.
Expressing Love and Appreciation: Giving someone a custom portrait is a heartfelt way to show your love and appreciation. It demonstrates that you've put thought and effort into creating a unique and meaningful gift.
Preserving Legacy: Custom portraits become family heirlooms. They tell the story of generations, preserving the faces and stories of loved ones for future generations to cherish.
Decorative Art: Beyond sentimental value, custom portraits are beautiful pieces of art. They can enhance the aesthetic of any space, adding a personal touch to home decor.
The Process of Creating a Custom Portrait
1)Creating a custom portrait painting involves collaboration between the artist and the client. Here's a simplified overview of the process:
2)Select an Artist: Begin by choosing an artist whose style aligns with your vision for the portrait.
3)Consultation: Have a consultation with the artist to discuss your ideas, preferences, and the size of the portrait.
4)Reference Photos: Provide high-quality reference photos that capture the subject's likeness and any specific details you want to include.
5)Artistic Interpretation: The artist will interpret the photos and bring them to life on canvas or paper, often adding their artistic flair.
6)Feedback and Revisions: You'll have the opportunity to review the work in progress and request revisions if needed.
7)Finalizing the Portrait: Once you're satisfied with the portrait, the artist will complete it, ensuring it meets your expectations.
The Magic of Personalized Gifts
Custom portrait painting is more than just a personalized gift; it's a testament to the power of art to connect us to our emotions, memories, and loved ones. Whether it's a wedding anniversary, a family reunion, or a tribute to a beloved pet, a custom portrait painting tells a unique story that words alone cannot convey.
Conclusion
In a world filled with fleeting digital images, custom portrait painting stands as a timeless and enduring form of personalized gifting. It's a magical way to celebrate life's special moments, preserve cherished memories, and express love and appreciation. So, consider the gift of a custom portrait for your next special occasion, and let its beauty and sentimentality create lasting memories for you and your loved ones.
0 notes
Text
Creating Your First Abstract Painting: Easy Steps and Tips
Abstract art offers a world of creative freedom, allowing you to explore your emotions and imagination without being bound by the constraints of realism. If you're new to abstract painting and eager to create your first masterpiece, this blog is your guide. We'll walk you through some easy steps and provide valuable tips to help you embark on your journey of creating your first abstract painting.
Step 1: Gather Your Materials
Before you start, ensure you have the right materials on hand:
Canvas or Paper: Select a canvas or heavy paper as your surface. The choice depends on your preference and the desired size of your artwork.
Acrylic or Watercolor Paints: Choose your preferred type of paint. Acrylics are versatile and easy to work with, while watercolors offer a more translucent, delicate look.
Paintbrushes: A variety of brushes in different sizes and shapes to give you control over your strokes.
Palette: Use a palette or a disposable plate for mixing colors.
Water or Paint Medium: If you're using watercolors, you'll need water for mixing and thinning the paint.
Paper Towels or Rags: These are handy for wiping brushes and controlling paint.
Step 2: Prepare Your Workspace
Find a well-ventilated area and cover your workspace to protect it from paint splatters. Lay out all your materials within easy reach. Make sure you have a clean cup of water for acrylics or clean water for watercolors.
Step 3: Find Your Inspiration
Think about what emotions, colors, or shapes you want your abstract painting to convey. Abstract art often stems from feelings or personal experiences, so tap into your creativity and let your imagination flow.
Step 4: Start with a Base Color
Select a base color to cover your canvas or paper. This color will serve as the background for your abstract artwork. It can be a single color or a blend of colors. Apply it evenly and let it dry completely.
Step 5: Experiment with Shapes and Lines
Now comes the fun part! Dip your brush into a color that speaks to you and start making shapes and lines on your canvas. Don't overthink it—just let your brush move freely. Experiment with different brushstrokes, swirls, dots, or even palette knife techniques. Remember, there's no right or wrong in abstract art.
Step 6: Layering and Texture
As your first layer dries, consider adding more layers or textures to your painting. You can do this by layering different colors on top of each other or by introducing new elements like splatters or drips. Texture can be created by applying paint thickly or by adding other materials like tissue paper or sand.
Step 7: Balance and Harmony
Step back and assess your work. Look for balance and harmony in your composition. Make adjustments as needed by adding or altering elements until you're satisfied with the overall feel of your painting.
Step 8: Finishing Touches
Once you're happy with your abstract creation, allow it to dry completely. Depending on the paint you used, this may take a few hours or longer. Once dry, you can add final details or highlights if desired.
Conclusion Creating your first abstract painting is a wonderful journey of self-expression and experimentation. Remember that abstract art is all about freedom and personal interpretation. Don't be afraid to make mistakes or try new techniques. Every stroke and color choice is a reflection of your unique perspective. So, embrace the creative process, enjoy the journey, and let your imagination soar as you embark on your abstract art adventure.
1 note
·
View note
Text
The Evolution of Abstract Art: A Journey Through Colors and Shapes
Abstract art is a captivating realm where colors, shapes, and emotions intertwine to create a unique visual language. It's a genre that has evolved dramatically over the years, challenging traditional notions of art and inviting viewers to explore the depths of their own perceptions and emotions. In this blog, we'll take a journey through the fascinating evolution of abstract art, from its early beginnings to the diverse forms it takes today.
The Birth of Abstraction
The roots of abstract art can be traced back to the late 19th century when artists like Wassily Kandinsky and Kazimir Malevich began to experiment with non-representational forms. They believed that art should not merely replicate the physical world but should also tap into the spiritual and emotional realms of human experience. Thus, abstract art was born as a bold departure from the figurative traditions that had dominated for centuries.
Cubism: Breaking Down Reality
In the early 20th century, the Cubist movement, led by Pablo Picasso and Georges Braque, revolutionized abstract art. Cubism fragmented and reassembled objects and figures into geometric shapes, challenging the viewer to perceive multiple viewpoints simultaneously. This radical approach shattered the conventional notions of space and representation, setting the stage for further experimentation.
The Rise of Suprematism and Constructivism
Kazimir Malevich's "Black Square" in 1915 marked a watershed moment in abstract art. It was a declaration that art could be reduced to its most basic form—a black square on a white canvas. This minimalist approach gave birth to Suprematism, emphasizing pure geometric shapes and primary colors. Similarly, Constructivism embraced abstraction as a means to express the social and industrial ideals of the Russian Revolution.
Abstract Expressionism: Emotion on Canvas
In post-World War II America, abstract art underwent another transformation with the emergence of Abstract Expressionism. Artists like Jackson Pollock, Willem de Kooning, and Mark Rothko prioritized emotion and spontaneity. Their "action painting" techniques and large, expressive canvases conveyed deep, raw emotions, reflecting the tumultuous times in which they lived.
Minimalism: Less is More
In the 1960s, Minimalism emerged as a reaction to the emotional intensity of Abstract Expressionism. Artists like Donald Judd and Dan Flavin focused on simplicity, reducing art to its elemental forms. Minimalist works often consisted of geometric shapes, sleek lines, and a limited palette, inviting viewers to contemplate the purity and clarity of form.
Contemporary Abstract Art: Diversity and Innovation
Today, abstract art continues to evolve, with artists exploring a wide range of styles, techniques, and mediums. Some embrace digital technology, while others experiment with mixed media or three-dimensional installations. Contemporary abstract artists push boundaries, challenging our perceptions and inviting us to see the world in new ways.
Conclusion The evolution of abstract art is a testament to the boundless possibilities of human creativity. From the early pioneers who dared to break free from representational art to the diverse range of contemporary artists pushing the envelope, abstract art remains a dynamic and ever-evolving genre. It invites us to explore the power of color, shape, and emotion, reminding us that art is not just about depicting the world as it is but also about capturing the essence of what it can be. As we journey through this captivating realm of colors and shapes, we discover that abstract art has the unique ability to transcend the visual and touch the depths of our souls.
0 notes
Text
Understanding Color Mixing for Realistic Skin Tones: A Simple Guide
Painting realistic skin tones can be a bit like solving a colorful puzzle. With a basic understanding of color theory and a little experimentation, you can create lifelike skin tones that bring your portraits to life. In this easy-to-follow guide, we'll demystify the process of color mixing for realistic skin tones using oil paints.

Color Basics: The Primary Players
Before diving into mixing, let's revisit the primary colors: red, blue, and yellow. These colors are like the building blocks for creating all other colors. When it comes to skin tones, we'll be working with various shades of reds, yellows, and blues.
Warm vs. Cool Tones: The Warmth of Skin
Skin tones can range from warm to cool, depending on the lighting and complexion. Warm tones lean towards reds and yellows, while cool tones have more blues in them. Consider your subject's lighting conditions to determine whether you're aiming for a warmer or cooler skin tone.
Building the Base: Start with a Primary
Begin by selecting a primary color that represents the undertone of the skin. For a warm undertone, start with a red or orange. For a cool undertone, choose a blue or green. Mix a small amount of your chosen primary color with white to create a base color.
Adding Depth: Introducing Secondary Colors
To add depth and richness, introduce secondary colors. For example, to achieve a warm skin tone, mix a bit of yellow and red into your base color. For a cooler tone, mix a touch of blue and a bit of red. These secondary colors will help you achieve the nuanced variations of skin.
The Power of White: Highlights and Shadows
White is your secret weapon for creating highlights and shadows. Mix a dab of white into your base color to create highlights, and mix a bit of the base color into white for subtle shadows. This technique helps you capture the natural play of light on the skin.
Blending is Key: Smooth Transitions
Smooth transitions between different shades are crucial for realism. Use a clean brush to gently blend colors together, creating soft transitions between the different tones. This technique mimics the natural gradation of color on the skin.
Practice Makes Perfect: Experiment and Learn
Don't be discouraged if you don't get it right on the first try. Color mixing for realistic skin tones takes practice. Experiment with different ratios of colors, test various undertones, and observe how light interacts with skin. Over time, you'll develop an intuitive sense for achieving the perfect skin tone.
Conclusion:
Color mixing for realistic skin tones is an artistic journey that combines the magic of color theory with the precision of observation. By understanding warm and cool tones, blending techniques, and the power of primary and secondary colors, you're well on your way to creating lifelike skin tones that add depth and authenticity to your portraits. So grab your paints, mix with confidence, and watch your portraits come to life with vibrant and natural skin tones.
0 notes
Text
From Doodles to Gallery Walls: Exploring the Journey of Urban Artists
Urban art, often associated with vibrant graffiti, street murals, and captivating stencil work, has transformed from being considered "vandalism" to becoming a recognized form of contemporary art. The journey of urban artists, from scribbles on city walls to the walls of prestigious galleries, is a testament to their dedication, innovation, and influence on the art world. In this blog post, we'll delve into the evolution of urban art and the remarkable journey these artists embark upon to bring their creations from doodles to gallery walls.
The Birth of Urban Art
Urban art emerged from the streets of major cities, characterized by its rebellious spirit and outsider status. Graffiti, one of the foundational elements of urban art, began as a form of self-expression for marginalized communities. Artists would use spray paint to leave their marks on walls, often hidden in the shadows to evade authorities. Over time, these street scribbles evolved into intricate artworks that conveyed powerful messages and unique styles.
Transformation through Creativity
As urban artists honed their craft, they started experimenting with different techniques and mediums. Stencils, wheat-pasting, and mixed media became integral to their repertoire, allowing for greater precision and detail in their creations. What was once seen as mere vandalism began to transform into a powerful means of commentary on social, political, and cultural issues.
The Rise of Urban Art in Galleries
The journey from the streets to the galleries was not without challenges. Urban artists faced skepticism and resistance from the traditional art establishment, which struggled to define their work within established artistic categories. However, pioneering artists persisted, breaking down these barriers and demanding recognition for their innovative contributions. Galleries began to open their doors to urban artists, showcasing their pieces alongside more conventional forms of art.
Impact and Influence
Urban art's transition into galleries brought it into the mainstream consciousness. The captivating juxtaposition of raw, urban aesthetics against the polished backdrop of a gallery setting garnered attention and intrigue. This fusion of unconventional creativity with the traditional art world led to a reevaluation of artistic norms and preconceptions.
Community and Collaboration
One of the most remarkable aspects of urban art is its emphasis on community and collaboration. Urban artists often work together on large-scale murals, engaging with local communities and reflecting the culture and identity of the area. Through these collaborative efforts, they establish a sense of belonging and create art that resonates on a personal level.
The Global Movement
The journey of urban artists from doodles to gallery walls is not confined by geographical boundaries. This movement has spread across continents, adapting to various cultural contexts while maintaining its core essence. Today, urban art can be found in every corner of the world, from the streets of New York to the alleys of Berlin and beyond.
Conclusion The journey of urban artists from creating anonymous graffiti to showcasing their work in galleries is a testament to the power of artistic expression and innovation. Their ability to challenge societal norms, advocate for change, and breathe life into neglected spaces has reshaped the artistic landscape. As urban art continues to evolve, its journey serves as a reminder that creativity knows no bounds and can transform even the most unconventional beginnings into masterpieces that grace the walls of galleries, captivating audiences worldwide.
0 notes
Text
Painting Flowers Made Easy: A Beginner's Tutorial
Flowers have long been a favorite subject for artists, and for good reason. Their vibrant colors, delicate petals, and varied shapes make them an ideal choice for both seasoned painters and those just starting out. If you're new to painting and eager to try your hand at creating beautiful floral artwork, this beginner's tutorial is here to guide you through the process step by step. Grab your brushes, paints, and a canvas, and let's dive into the world of painting flowers!
Materials You'll Need
Acrylic or watercolor paints
Paintbrushes
Canvas or watercolor paper
Palette for mixing colors
Water
Paper towels or a rag
Choosing Your Flower
Start by selecting a flower you'd like to paint. Keep in mind that simpler flowers with fewer petals, like daisies or tulips, might be easier for beginners. Once you've chosen your flower, find a reference image to work from. This could be a photo, a picture in a book, or even a real flower in front of you.
Step-by-Step Tutorial
Step 1: Sketch the Basic Shape
Using a light pencil, lightly sketch the basic outline of your flower on the canvas or watercolor paper. Don't worry about perfection at this stage—this is just a guide for your painting.
Step 2: Paint the Background
If you'd like a background, paint it first. Use light colors to avoid overwhelming your flower. Allow the background to dry completely before moving on.
Step 3: Mix Your Colors
Before you start painting the flower, mix the colors you'll need. Flowers have various shades and gradients, so having a range of colors ready will make the process smoother.
Step 4: Paint the Petals
Start with the petals. Work from the outer edge of the flower toward the center. Use broad brushstrokes for the larger petals and smaller strokes for the inner ones. Remember, petals aren't perfect—variations in color and shape add realism.
Step 5: Add Details
Once the petals are dry, add details like shadows and highlights. This is where your flower starts to come to life. Use lighter shades for highlights and darker shades for shadows.
Step 6: Paint the Center
If your flower has a center, paint it next. Mix the appropriate colors and use small, controlled brushstrokes to capture the intricate details.
Step 7: Final Touches
Inspect your painting and make any necessary adjustments. Add small touches, refine edges, and enhance colors as needed. This step is all about fine-tuning your artwork.
Conclusion Painting flowers can be a rewarding and enjoyable experience for beginners. Remember, practice makes perfect. Don't be discouraged if your first attempts aren't exactly what you envisioned. With each painting, you'll refine your skills and develop your own unique style. So, grab your brushes, embrace the beauty of flowers, and let your creativity blossom on canvas!
0 notes