
Don't wanna be here? Send us removal request.
Statistics
We looked inside some of the posts by greecechef4-blog and here's what we found interesting.
Average Info
Notes Per Post
0
Likes Per Post
0
Reblog Per Post
0
Reply Per Post
0
Time Between Posts
3 days
Number of Posts By Type
Text
17
Last Seen Tumblr Blogs


Fun Fact
Total funding amounts to $125.3M.
Text
Braised Red Cabbage with Apples and Onions
Braised red cabbage with apples and onions is sweet, sour, buttery and tender. I love serving it along side roasted chicken or baked salmon.
The first time I ate braised red cabbage was at Houston’s (a very delicious restaurant) over ten years ago. I immediately fell in love with this tender, flavorful side dish and have been making it at home ever since.
I also love that braised red cabbage gets better with time. It’s a great recipe to add to your weekend meal prep.
Red cabbage, also known as purple cabbage, is a cruciferous vegetable that’s delicious both raw and cooked. Think coleslaw in the summer and braised cabbage in the winter.
Rich in Vitamins K, A and C; red cabbage is a powerful immunity booster that has also been said to fight inflammation and arthritis.
And the color! Did you know that antioxidants are concentrated in brightly colored foods? So the bright, beautiful magenta color of your red cabbage is also fighting free radicals in your body.
Red cabbage is very easy to work with.
Start by rinsing under cold water. Next remove any outer leaves that look bruised or torn. Then, trim the stem off of the cabbage, stand it up straight and cut in half.
Next, use a sharp knife to cut down on an angle on each side of the core. The core is tough and will pop right out.
Finally lay your cabbage flat side down and cut into thin ribbons. Easy peasy!
The secret to cooking tender braised red cabbage, is to cook it low and slow.
Melt one tablespoon of butter in a cast iron skillet
Add onions and a pinch of salt and saute for 6-8 minutes
Toss in apples and garlic, season with salt and pepper, stir and cook for 2 minutes
Next, add in the red cabbage, balsamic vinegar, honey and a splash of water
Slowly simmer the cabbage for 30 minutes, stirring every so often.
Turn off the heat, adjust seasonings and top with goat cheese and fresh parsely to a serving dish and top with dollops of goat cheese and fresh chopped parsley. Enjoy!
Serve and enjoy!
I love serving braised red cabbage with savory dishes roasted chicken and mashed potatoes. It’s also delicious along side baked salmon or cast iron chicken thighs.
Source: https://cleananddelicious.com/braised_red_cabbage_and_apples/

0 notes
Text
Coffee-Glazed Baked Chocolate Doughnuts
The only thing better than coffee and doughnuts is Coffee-Glazed Baked Chocolate Doughnuts! This easy baked doughnut recipe is made with dark chocolate and rich, bold coffee — perfect for coffee lovers! This post is brought to you in partnership with illy.
With the holiday rush nearly behind us and just the thought of relaxing mornings dangling like a carrot in front of my nose, I am starting to feel that familiar senioritis (or is it holiday-itis?) feeling when a break is up ahead. Vacation!
The thing is, we don’t have any trips planned for this winter break, and quite frankly, that is just fine with me. I have vacation dreams of sleeping in, and fireplaces, and movies, spending time with family, baking, and maybe finally finishing the book I’ve been reading for the past three years.
But the thing with me is wanderlust is in my genes, and I’m craving a trip. Seems like my son inherited our love for travel, and on the way home from school the other day, we were bouncing around ideas of where to go next year.
“Italy?” he suggested? Ah, Italy. Italia would be perfetto. It was the first European city I traveled to with my family growing up, and I have so many happy memories — delicious memories of good food, warm souls, and cozy sips. I remember marveling at the coffee culture in Italy, intrigued with the rituals behind a cappuccino and espresso. It was nothing like I had seen back home, even when coffee shops began to pop up on every corner in NYC.
Coffee in Italy seemed as religious as a papal viewing, and when you’re a young kid sipping your parents’ coffee for the first time, you notice more than just the taste. I remember the little red illy brand on white ceramic mugs, and the gorgeous cylindrical coffee cans, which looked like works of art on their own. When illy opened its first illy caffé here in San Francisco, it brought me back to that trip to Italy, and those life-changing sips of coffee!
So, we’ll see. Perhaps we will start planning a trip so the kids can experience the wonder on their own, but in the meantime, we can embrace our own illy-inspired coffee culture here at home. After our most recent trip to Europe, my husband grew accustomed to an afternoon espresso or coffee, depending on the day. So I’m not the only one especially excited that I get to work with illy to share with you their newest illy Arabica Selection of coffees, each one perfectly roasted to reflect the unique tastes of each Arabica!
Without even tasting it, the minute you crack open the vacuum-sealed canister, the aroma greets you: floral notes from Ethiopia, caramel notes from Brazil, fruity notes from Columbia, and my personal favorite, the chocolate notes from Guatemala. Each so distinct, just like their countries of origin, with each coffee transporting you, without a plane ticket.
Now that I am well stocked with illy coffee, I am ready for the break ahead, and perhaps the best part is I get to share it with my friends and family. Aunties and uncles, great aunts and great uncles, and cousins, too, will be dropping by, and we always make time for coffee and merienda, so I baked up some Coffee-Glazed Baked Chocolate Doughnuts — the perfect snack for a houseful of coffee lovers! You will love this easy baked doughnut recipe — the chocolate flavor is enhanced by chocolate notes from the Guatemalan Arabica coffee in the doughnut itself, but it’s the coffee glaze that will make your coffee loving heart swoon! It’s just the right bit of sweetness to pair with a dark cup of coffee!
And since everyone loves coffee, I am already tying bows on Arabica Selection coffee to pair with something homemade — it will be the perfect gift for our neighbors (spoiler alert to any neighbors reading this!). illy actually has two Arabica Selection bundles that are perfect for gift giving, one for Keurig users (like my mother-in-law!) and the other whole bean (for people like my dad!).
I’m excited that illy is sharing a special discount code for you! Use the code HOLIDAY25 for 25% off your order on illy.com when you use the code at checkout!
So hurry up, Christmas, I’m ready! Are you?
Disclosure: This post is brought to you in partnership with illy. Thank you for supporting brands that matter to me; sponsored posts such as this help behind the scenes at Kitchen Confidante. All opinions in this post are, as always, my own.
The only thing better than coffee and doughnuts is Coffee-Glazed Baked Chocolate Doughnuts! Try this easy baked doughnut recipe made for coffee lovers!
Course Breakfast, Brunch, Dessert
Cuisine American
Keyword baked, chocolate, coffee, donut, doughnut
Prep Time 10 minutes
Cook Time 15 minutes
Total Time 25 minutes
Servings 10 doughnuts
Author Liren Baker
Baked Chocolate Doughnuts
Preheat the oven to 350° F. Prepare a standard doughnut pan by lightly spraying with baking spray.
In a large bowl, whisk together the flour, sugar, cocoa powder, baking powder, coffee, and salt. In a small bowl, whisk together the buttermilk, oil, egg, and vanilla. Gently stir in the buttermilk mixture into the flour mixture, until just combined.
Fill the doughnut pan about 2/3 full – I use a pastry bag to make this easier, but it is not necessary. Bake for about 12-15 minutes or until a toothpick inserted into the doughnuts come out clean. Let the doughnuts cool for a few minutes before gently remove the doughnuts from the pan.
Make the glaze by brewing the coffee in the boiling water for 5 minutes. Strain into a bowl, and stir in vanilla and salt. Whisk in the powdered sugar in 1/2 cup increments until smooth and you achieve your desired consistency, using a little more or less as necessary. Dip the doughnuts in the glaze and let the excess drip off. Let it cool on a wire rack…or enjoy immediately.

Source: https://kitchenconfidante.com/coffee-glazed-baked-chocolate-doughnuts
0 notes
Text
OATMEAL BREAKFAST COOKIES
We have this “breakfast cookie” recipe going out to our Cooking Club members this week and I wanted to put the recipe here too. The feeding babies section is a crowd favorite, and my kids plow through these. Healthy-ish, grab n’ go, and what not - that’s what ya’ll seem to love about the kids recipes I’ve included around here. It’s tough to find a cookie or muffin that hold together that are both gluten and egg-free, but these work. Report back if you make them, or let me know what you changed. I love seeing your photos!
Our son turned FIVE this weekend. It felt like a big birthday - every increment of five does to me for some reason. My mom always made a big deal of birthdays and I thought it was so fun - I love making him feel like the star of the weekend and the one to make all the calls. We packed the weekend with Legoland, camping with cousins in San Clemente, rocket launching in a field, Chuck-e-Cheese with grandparents, meals of his choice, sprinkle cupcakes etc. etc. It sounds like a lot because it was :)
I feel like we were chin deep in both baby and toddler-hood at the same time for the past few years, and seeing Curran now as an almost-kindergartener is wild. Like we’ve been treading water, and now we can swim. He is thoughtful and emotional and smart and empathetic - LOVES his dad, lights up with the company of friends, is ALWAYS the first person to wake up in the morning with a full tank of energy, very into building things, collector, can recall specific memories in full detail from way before I thought was possible (“remember when I choked on that frozen mango?”…you were one, how do you remember that?!?!). He has figured out that throwing clothes in the hamper is quicker than folding and putting them away which I find both annoying and clever - for some reason it’s a nod from toddler to kid - those little things that feel different.
Curran and I had a tough time with each other during his 2-4 age because he is pretty sensitive, and it would touch on an insecurity of my own - both of us then upset, neither bringing calm to the situation. I thought I was self-aware enough to not ride my toddlers emotions but I did… do, sometimes still. He’s better lately, and I am too, far from perfect, but it feels like we’ve grown in that area together. Perhaps that makes me sound like an immature parent, but little refines us and highlights our weak spots like our own children. Anyway, finding a better rhythm with him has been so special. I used to want time to speed up, I didn’t want to tread water anymore, but the swimming? Now I want to stop time! Curran and I have put together more lego sets in the past four days than I care to have floating around the house but he LOVES them, both the building and the company, so bring on the Legos.
-
SIDENOTE: Hugh made a short pdf of quick food photography tips which is now available on our SHOP page. For a limited time, it is available for $1.99, which will be the best couple bucks you’ll spend this week. It is not a full photography course, but the concise and simple tips will absolutely make a difference in the way you capture your food. I’ve learned so much from Hugh, and this guide boils down the handful of important things to think about when you take and edit a photo of your food. Let us know if you have any questions!
Makes 18 small
These are delicate, as there is no gluten or egg helping to bind them. If you are looking for something to pack in a lunchbox, and can tolerate eggs, add one in to the mashed banana step to help make them more sturdy. Raisins feel slightly more virtuous, but chocolate chips feel slightly more delicious. Take your pick. Keep them small either way.
I do not usually stock quick-cooking oats, but you can blitz old-fashioned oats in a food processor for a similar texture, or I’ve used Seven Sundays muesli with success (Target or Costco sell the big bags). If you need these to be nut-free, I have a report that sunflower butter works fine.
Ingredients
1 medium, extra extra ripe banana, mashed 1/2 tsp. sea salt 1/2 tsp. vanilla extract 1/2 tsp. cinnamon 1/4 cup coconut oil, warmed 1/4 cup maple syrup 1/3 cup smooth, natural nut butter (almond, cashew, peanut) 2 Tbsp. chia seeds 1 1/2 cups quick-cooking oats (or old-fashioned oats you’ve blitzed in the food processor a few times to get smaller bits) 1/2 tsp. baking powder 3 Tbsp. flaxmeal 1/2 cup raisins (chop if they’re jumbo), or mini chocolate chips
Instructions
In a large mixing bowl, combine the mashed banana with salt, vanilla, cinnamon, coconut oil and stir to combine. Add the maple, nut butter, chia seeds and stir again until smooth. Let the chia seeds absorb for a moment.
Stir in the oats, baking powder, flaxmeal, raisins and let the mixture chill in the fridge for at least 30 minutes. Preheat the oven to 350’ and line a rimmed baking sheet with parchment.
Roll the dough into balls of about 2 Tbsp. worth of dough. Arrange them on the baking sheet with a little space between, give them a gently press down, they don’t spread much.
Bake on the middle rack for 12-13 minutes. Remove to cool completely - they’ll hold together better once cooled.
Store in an airtight container. Cookies will keep for three days.

Source: https://www.sproutedkitchen.com/home/2019/5/23/oatmeal-breakfast-cookies
0 notes
Text
Unstuffed Cabbage Roll Casserole
Hearty and comforting unstuffed cabbage roll casserole with all the ingredients you’d find in the classic stuffed version. Seasoned ground beef, shredded cabbage, rice, diced tomatoes, sour cream, gooey mozzarella, and sharp white cheddar cheese. Because every casserole should include cheese.
<![CDATA[ @media screen and (min-width: 1201px) .myfji5b99f3670b895 display: block; @media screen and (min-width: 993px) and (max-width: 1200px) .myfji5b99f3670b895 display: block; @media screen and (min-width: 769px) and (max-width: 992px) .myfji5b99f3670b895 display: block; @media screen and (min-width: 768px) and (max-width: 768px) .myfji5b99f3670b895 display: block; @media screen and (max-width: 767px) .myfji5b99f3670b895 display: block; p margin-bottom: 15px; ]]><![CDATA[ @media screen and (min-width: 1201px) .uzpmm5b99f3670b58c display: none; @media screen and (min-width: 993px) and (max-width: 1200px) .uzpmm5b99f3670b58c display: none; @media screen and (min-width: 769px) and (max-width: 992px) .uzpmm5b99f3670b58c display: block; @media screen and (min-width: 768px) and (max-width: 768px) .uzpmm5b99f3670b58c display: block; @media screen and (max-width: 767px) .uzpmm5b99f3670b58c display: block; ]]>
Unstuffed Cabbage Roll Casserole
Total time
1 hour 15 mins
Hearty and comforting "stuffed" cabbage roll casserole with all the ingredients you'd find in the classic only faster and easier to make but every bit as delicious.
Author: Reeni
Recipe type: Entree
Cuisine: Italian
Serves: 8 servings
Ingredients
1 pound ground beef
2 tablespoons olive oil
1 small diced onion
4 cloves minced garlic
2 cans (14.5 ounces) diced tomatoes
1 teaspoon Italian seasoning
1 teaspoon ground paprika
½ - 1 teaspoon red pepper flakes, optional
1 teaspoon salt, plus more to taste
¼ teaspoon black pepper, plus more to taste
4 cups shredded savoy or green cabbage
3 cups cooked rice (I use Minute rice)
1 + ¼ cups shredded mozzarella cheese, divided
1 + ¼ cups shredded sharp white cheddar cheese, divided
1 cup sour cream
grated Parmesan cheese, for serving
Instructions
Preheat the oven to 400 degrees F. Butter a 9x13-inch baking or casserole pan.
In a large frying pan over medium heat brown the ground beef breaking it apart as it cooks. Remove
to a bowl and drain off the grease.
In the same pan heat the oil over medium-low heat and cook the onion and garlic until soft about 5 minutes.
Add the ground beef back into the pan with the diced tomatoes (with the juices), Italian seasoning, paprika, the optional red pepper flakes, salt, and pepper. Turn the heat up and bring to a simmer.
Simmer 5 - 10 minutes then remove from the heat - let cool to just lukewarm.
Mix in the cabbage, rice, 1 cup each of the mozzarella and cheddar cheese and the sour cream. Taste and season with more salt and pepper if needed.
Spoon into the casserole dish and cover with foil. Bake 25 minutes.
Remove the foil and sprinkle the remaining cheese over top. Bake 20 - 25 minutes longer until cheese is melted and golden.
Let the casserole sit 5 minutes before serving with grated Parmesan.
Notes
©Cinnamon Spice and Everything Nice by Reeni Pisano All Rights Reserved
3.5.3251
Ground beef is browned first followed by onion and garlic then combined together with diced tomatoes, Italian seasoning and paprika. If you like it hot & spicy you can add red pepper flakes.
The combination is briefly simmered then mixed with savoy or green cabbage, cooked rice, shredded mozzarella and white cheddar, my new favorite cheese mix. Sharp white cheddar adds a little bite to the mild mozzarella while still getting the stringy goodness it’s loved for.
<![CDATA[ .tnzog5b99f36709dc9 margin: 10px; padding: 0px; @media screen and (min-width: 1201px) .tnzog5b99f36709dc9 display: block; @media screen and (min-width: 993px) and (max-width: 1200px) .tnzog5b99f36709dc9 display: block; @media screen and (min-width: 769px) and (max-width: 992px) .tnzog5b99f36709dc9 display: block; @media screen and (min-width: 768px) and (max-width: 768px) .tnzog5b99f36709dc9 display: block; @media screen and (max-width: 767px) .tnzog5b99f36709dc9 display: block; ]]>
Sour cream helps hold everything together and gives it a touch of creaminess.
The entire thing is baked, covered with aluminum foil to start and finished with more cheese sprinkled on top – about 45 minutes total baking time.
<![CDATA[ .cuqmu5b99f3670aced margin: 5px; padding: 0px; @media screen and (min-width: 1201px) .cuqmu5b99f3670aced display: block; @media screen and (min-width: 993px) and (max-width: 1200px) .cuqmu5b99f3670aced display: block; @media screen and (min-width: 769px) and (max-width: 992px) .cuqmu5b99f3670aced display: block; @media screen and (min-width: 768px) and (max-width: 768px) .cuqmu5b99f3670aced display: block; @media screen and (max-width: 767px) .cuqmu5b99f3670aced display: block; ]]>
If you love cabbage rolls but hate all the work you’ll find this version much easier with all the same delicious flavors! Perfect for a cold fall or snowy day.
Source: https://www.cinnamonspiceandeverythingnice.com/stuffed-cabbage-roll-casserole/
0 notes
Text
Where To Find The Best Vegetarian And Plant-Based Food In Barcelona
When you think of Spanish cuisine, chances are that most of the dishes involve animal products. Known worldwide for their love of ham, fish and cheese, the Spanish didn’t seem particularly welcome to meat-free consumers. For years, vegans had to rely on plates of Padrón peppers, grilled vegetables and patatas bravas (hold the mayo!) to get by in Spain — but things are changing. Like most cosmopolitan cities around the world, Barcelona is experiencing the same transitions, and here the plant-based movement is not only growing but exploding. Here are my picks for the best plant-based restaurants in Barcelona.
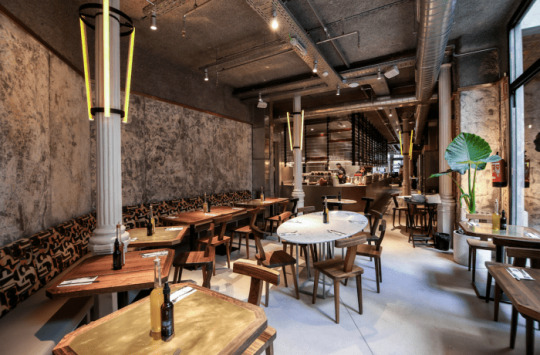
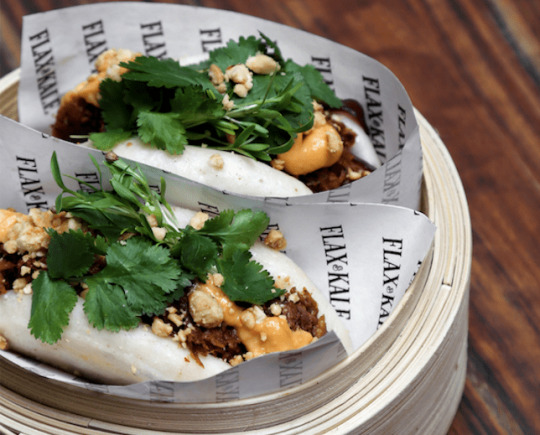
FLAX & KALE
Teresa Carles is known throughout Spain as a veggie restaurant pioneer, and her latest Barcelona restaurant has set the bar even higher. Flax & Kale isn’t actually a vegetarian restaurant, it’s ‘flexitarian’: while 80% of the menu is vegetarian or vegan, the remaining 20% contains some form of oily fish, be it cod, salmon or anchovies. There are three Flax & Kale restaurants in Barcelona, although the newest (and, I think, the best) is Flax & Kale Passage, which offers gluten-free vegan pizzas, healthy Asian fusion cuisine and even boasts its very own Kombucha Lab.
Let’s start with the pizza, because it was the pizza that first blew me away. The crux of a good plant-based pizza is usually the “cheese,” but despite its rapidly improving taste and texture, this can still sometimes be hit-or-miss. Not at Flax & Kale. Here I had my first ever vegan four cheese pizza: plant-based cheddar, blue cheese, mozzarella and a Parmesan-style cheese cutely dubbed “parmigiano teresiano.” The cheeses were melted over a bed of San Marzano tomatoes, and it was gooey, creamy, stringy; I just wish I had a slice to present those who laugh at the very idea of vegan pizza. The gluten-free dough was also exceptional: crisp, light and chewy, it’s a blend of whole grain and non-wheat flours.

Also on the menu is “My Vegan Japanese Girlfriend Bowl,” something I ordered just because I loved the name so much. But happily, the dish itself was delicious: black rice and quinoa topped with jackfruit, green soybeans, onions and tomato, and innovative vegan “scrambled eggs” made from ackee. Another standout dish was the “BBQ Pulled Pork Bao,” where tender braised jackfruit perfectly replaced slow-cooked pork; the texture and taste really has to be experienced to be believed. Drizzled with vegan mayonnaise, chilli jam and fresh cilantro, these delightfully squidgy steamed buns were so satisfying that I had to order a second portion.
“Eat better, be happier, live longer” is the motto at Flax & Kale, and after dining here I can confirm that I left feeling very happy indeed – so happy that I’m wondering whether it’s foolish to fly to a different country just to eat at a restaurant there?
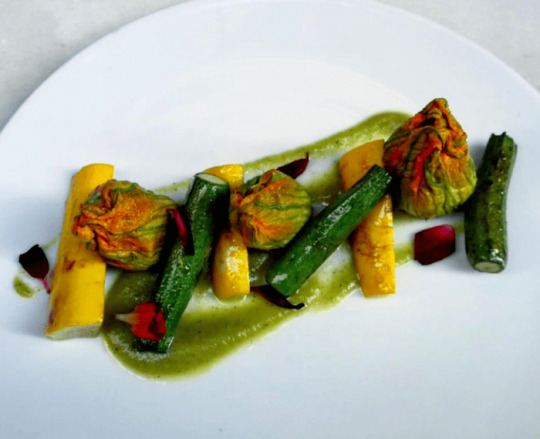
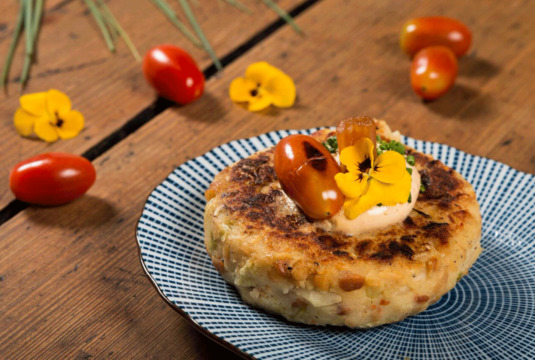
RASOTERRA
Tucked away in the narrow streets of Barcelona’s Gothic Quarter, vegetarian bistro Rasoterra is focused on slow food made with seasonal and local produce. On the menu, beside each dish, are denotations telling you which dishes are vegan, which are locally sourced and which are gluten-free. The best way to eat here is to share. You’re advised to choose five small plates between two, and the standout for me was the huitlacoche mushroom and avocado taco with bean cream, picked onion and green pepper. Nicknamed the Mexican truffle due to its earthy, pungent taste, huitlacoche isn’t really a mushroom: it’s actually a fungus that grows on corn, and it’s absolutely delicious.

The spinach croquettes with pine nuts, sultanas and vegan aioli were crispy on the outside and soft and fluffy on the inside, and packed with rich, piquant flavours. Zucchini also features heavily during the summer months, be it in soups, pastas or salads, but the stuffed zucchini flowers are exceptional. This Italian staple has been given a Catalan twist, and locally grown zucchini is steamed til perfectly firm-yet-tender, and their delicate flowers stuffed with parsley and a creamy almond pesto.
Other popular dishes include the Trinxat — a traditional potato and leek mash (with the addition of tempeh), that’s shaped into little cakes, lightly fried and then topped with hot mole and charred cherry tomatoes. Rasoterra is a principled restaurant (it even has its own manifesto: “Behind each of our dishes, behind each and every one of our ingredients, there is a story. Stories about traditions, cultures, places, secrets, arts and crafts. Stories of love, dedication and passion….”) and it’s clear that extreme care is taken with both the preparation of the food and presentation of dishes.
BARCELONETA SANGRIA BAR
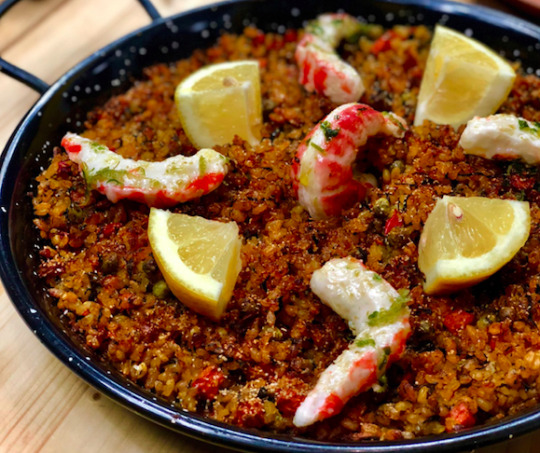
You can’t visit Spain and not sip some sangria, and luckily for those following a plant-based diet, one of the best vegan restaurants in town is BarCeloneta Sangria Bar. Just steps away from the beach, this cool bar serves up vegan versions of Spanish tapas, as well as plenty of raw food dishes. The selection of sangria is large, multicoloured and varied, and there’s a great selection of local organic wines, too. The most popular dish is the aromatic plant-based paella, which comes with succulent yet chewy soy-based ‘shrimps and prawns’, artichokes and mushrooms; it’s excellent — and the first time I’ve encountered a paella with mock-meat and not just veggies.
There’s also an array of traditional Catalan tapas that have been veganised: Las croquetas – mushroom croquettes with sun dried tomato sauce, Patatas BarCeloneta – grilled sliced potatoes with romesco sauce and curried lentil cream, and “Langostinos” a la plancha – veggie “langoustines” (made with soy, wheat and konjac) and baby onions in balsamic, grilled with fresh lime and truffle. Another delicious dish was the organic chickpea and tempeh skewers with eggplant and sundried tomatoes, sauteed and seasoned with tomato jam and sesame.

TERESA CARLES
I can’t write about the veggie food scene in Barcelona without including Teresa Carles. As mentioned, Teresa Carles is the brainchild behind Flax & Kale, and the original pioneer of Spain’s vegetarian restaurants, but it was her eponymous restaurant that kicked things off in Barcelona back in 1979. Located in the buzzing El Raval neighbourhood, close to Plaça de Catalunya, today the restaurant is the epitome of modern style, with exposed brickwork, wooden floors, and a stainless-steel station where you can grab quick juices or salads. It’s usually packed out (you’ll need to reserve a table in the evening) and the weekly changing menu includes plenty of vegan options.

The menu is varied: from home-made cakes and pasta dishes to seitan hamburgers, risottos and soups, there’s something for everyone. Favourites include the Teresa Goes to Tokyo Salad, (wakame, cucumber in asazuke, turnip daikon, tofu, mirin, golden sesame and soy), the Red Devil Raviolo (bicollo ravioli stuffed with aubergines and dried tomatoes, layered on baked eggplant towers with a soft leek cream), and tofu marinated with beetroot, mushroom scallops, spinach, wild asparagus, and mushroom and thyme sauce. Many of the vegetarian dishes can be veganized if you ask, and most of the desserts are plant-based: save room for the vegan black forest cake with coconut cream, chocolate pearls and cherry jam.

Selene Nelson is a UK-based food and travel writer. Follow her foodie adventures here.

Source: http://www.foodrepublic.com/2018/08/09/find-best-plant-based-food-barcelona-spain/
0 notes
Text
A Chocolate Snacking Cake for Any & Every Occasion
A snacking cake is, for the unfamiliar, a one-layer cake, typically baked in an 8-inch round or square cake pan (I’m partial to square). It's the sheet cake’s little sister. But where a sheet cake can be a big production, often baked for a special occasion (be it a birthday party, a potluck, or the school bake sale), a snacking cake is for any day and everyday.
I have been loving on snacking cakes for as far back as I can remember (not just since Melissa Clark memorialized them in The New York Times earlier this year). In fact—and yes, I am dating myself here—my earliest snacking cake memory is Betty Crocker’s now defunct Stir 'n' Frost boxed cake mix (RIP), the one that came with its own 5x7-inch disposable pan and squeeze packet of frosting. My favorite was the chocolate cake with vanilla frosting—what all of my snacking cake dreams are made of, and the inspiration for this one:
The snacking cake’s attributes are many, beginning with its name: Who doesn’t want to eat a cake with the word “snack” in its title? But it's also the ultimate user-friendly baked good: Snacking cakes are easy to make, even for the novice baker, as they call for only one pan, a handful of ingredients, and are often not even frosted.
Moreover, the fact that you can decide you want a slice of cake, and within an hour or two find that you’re eating one, is nothing short of remarkable. This is particularly true if your snacking cake is oil-based (my favorite kind—sorry, haters), as assembling it does not require bringing butter to room temperature or pulling out the stand mixer.
Such cakes are as good on Saturday nights when you're feeling all festive as they are on Wednesday nights when you're binge-watching Dead to Me solo. They're consumed as quickly as they are assembled—except when they're not! (Then, they're the perfect breakfast with a cup of coffee.)
Finally, though frosting can elevate a simple snacking cake—as the billowy, tangy cream cheese icing does for the chocolate-carrot number featured here—no cake travels as well as a naked snacking cake. A mere unfrosted slice, usually square-shaped and tall with a dusting of confectioners’ sugar, wrapped in wax paper and brought to the office, transforms even the saddest desk lunch into something special.
Cake for lunch? I mean, come on.
Why You Should Add Carrots to Your Snacking Cake
If there ever were a good snacking cake for breaking up the workday, chocolate-carrot with cream cheese frosting might top the list, and for a variety of reasons:
Adding finely grated carrots to chocolate cake makes for the moistest of cakes, with the softest of crumbs. (The texture is best if the carrots are grated with a Microplane, as they easily incorporate into the batter when processed so fine and practically disappear once baked.) The carrots impart no true flavor of their own, but combined with the Dutch-process cocoa powder (for its deep color and taste, I’m fond of the brand Valrhona) and a smidge of espresso, make for a deliciously dense and fudgy cake, one that tastes intensely of chocolate.
I use cream cheese here as a tribute to a carrot cake’s traditional frosting, and because I love it combined with chocolate. Its tanginess cuts the sweetness of the cake nicely. And although I am a big fan of sweet, I know many who feel differently—and anyway, the beauty of the snacking cake lies in its versatility, both in flavor and in occasion. To each snacking cake their own.
Chocolate-Carrot Snacking Cake With Cream Cheese Frosting
View Recipe
Ingredients
Snacking cake
1 cup all-purpose flour 1/2 cup Dutch-process cocoa powder 1 1/2 teaspoons baking powder rounded 1/4 teaspoons baking soda 3/4 teaspoon table salt 1 cup granulated sugar 3/4 cup light brown sugar 3/4 cup neutral oil, preferably a mild olive oil, not extra-virgin 1 1/2 teaspoons pure vanilla extract 2 large eggs, plus 1 egg yolk, room temperature 1/4 cup buttermilk, room temperature 1 1/2 teaspoons espresso powder 2 tablespoons boiling water 2 cups finely grated carrots (about 3 1/2 regular-sized carrots), lightly packed
1 cup all-purpose flour 1/2 cup Dutch-process cocoa powder 1 1/2 teaspoons baking powder rounded 1/4 teaspoons baking soda 3/4 teaspoon table salt 1 cup granulated sugar 3/4 cup light brown sugar
3/4 cup neutral oil, preferably a mild olive oil, not extra-virgin 1 1/2 teaspoons pure vanilla extract 2 large eggs, plus 1 egg yolk, room temperature 1/4 cup buttermilk, room temperature 1 1/2 teaspoons espresso powder 2 tablespoons boiling water 2 cups finely grated carrots (about 3 1/2 regular-sized carrots), lightly packed
Cream cheese frosting
1 stick unsalted butter, room temperature 1 (8-ounce) package cream cheese, room temperature 1 tablespoon pure vanilla extract 1/4 teaspoon table salt 2 1/2 to 3 1/2 cups confectioners' sugar, sifted if lumpy
1 stick unsalted butter, room temperature 1 (8-ounce) package cream cheese, room temperature 1 tablespoon pure vanilla extract
1/4 teaspoon table salt 2 1/2 to 3 1/2 cups confectioners' sugar, sifted if lumpy
What's your favorite time of day to eat cake? Let us know in the comments below.
Jessie Sheehan is a cookbook author, food writer, recipe developer, and baker. She is the author of The Vintage Baker and the co-author of Icebox Cakes (both published by Chronicle Books). She has developed recipes for many cookbooks, besides her own, and has contributed recipes/and or written for Epicurious, Food52, Fine Cooking, TASTE, Little Sous, and Main Street Magazine, among others. She blogs at jessie sheehan bakes and can be found on Instagram at @jessiesheehanbakes. She likes layer cakes with lots of frosting and cookies that are thick and chewy. Oh, and she has a soft spot for chocolate pudding. She lives in Red Hook, Brooklyn, with her husband and two boys, not far from her beloved Baked, the bakery where she got her start.
Source: https://food52.com/blog/24343-what-is-a-snacking-cake
0 notes
Text
How to Eat Conveniently While Gluten Free
About fifteen years ago a friend of mine from Canada came to stay with us for a few nights at our cottage down south. I remember being a bit worried at the time about what I was going to feed her. She actually brought her own bread and cereal with her, so it ended up being not too bad.
People who are gluten free can sometimes find it difficult to eat out at restaurants, and making meals at home often takes a little more work and planning than cooking a normal meal. In the past, there have been certain types of food that gluten free dieters typically had to avoid, and these included pasta, sandwiches and pizza. This can be tough when your family is searching for the cheapest pizza specials and you know you cannot join in.
These days however, more and more places are catering to this gluten free lifestyle. If you are looking for some gluten free alternatives to your favorite foods, it is now becoming much easier to dine out and eat while in a hurry, with a lot more options being available!
Why Some People Are Gluten Free
Gluten is a protein that is found in products such as wheat, rye and barley. People with celiac disease suffer from a disorder in which gluten affects the immune system in a way that it harms the lining of the intestine. These people must avoid gluten, or they can get really sick.
Others may not have celiac disease, but are gluten sensitive. This can cause bloating, constipation and other abdominal issues. Some people stay away from gluten because they are allergic to wheat, while others simply try to avoid it as part of a healthy diet.
Favorite Foods That Now Have Gluten Free Options
Eating gluten free can be difficult, especially if you have always loved to eat foods that contain gluten. You may find yourself occasionally craving your favorites. Thankfully, many companies and restaurants are now using other grains as an alternative to wheat. For example, pasta can be made with quinoa, corn, rice and lentils. You can also find a wide variety of gluten free bread options for sandwiches as well as for your morning toast.
I adore Pizza, its one of my favourite foods. I cannot imagine living in a world where I could not eat pizza! Fortunately, there are now pizza crusts that are gluten free. Some are made with cauliflower while others are made from potato starch, rice flour and ancient grains such as quinoa, sorghum and teff. If you have written off pizza, it is time to start the search for the best tasting gluten free pizza.
Eating Gluten Free While on the Go
Whether you are running errands all day, or you are transporting the children to and from activities, eating healthy and, especially, gluten free can be really tough to manage. However, there are numerous options for keeping you satisfied and on track with your eating plan. Some good gluten free on-the-go items that you can snack on throughout the day include:
• Nuts • Yogurt • Dried fruit • Beef or turkey jerkey • Hardboiled eggs • Fresh fruit and vegetables • Cheese
Making a trip through a drive thru? Ask for a grilled chicken breast or burger on lettuce leaves instead of the bun, or ask what other gluten free options they might have. You will find that most places are quite accomodating these days and will have at least one gluten-free option available.
Sometimes, on really busy days, the last thing you want to think about when you get home is cooking. What do do when all you want to do is sit down and kick back but you have a ravenous family nipping at your heels??? Those are the perfect times to order in delivery such as a gooey, delicious gluten free pizza. You can even throw in a salad to improve the nutritional benefits. With the best pizza tracking app, you can also keep tabs on your order so you know when it is ready.
Enjoy Gluten Free Anytime
Its really nice to know that people who eat gluten free now have many more feasible options at their behest than they did years ago. The availability of gluten free items in a variety of cuisines make it easy to avoid gluten yet still eat great tasting food. Having to keep to a gluten-free diet need no longer be the landmine that it used to be, and that makes me happy.
Source: https://theenglishkitchen.blogspot.com/2019/07/how-to-eat-conveniently-while-gluten.html

0 notes
Text
Vegan spinach and ricotta pierogi
I’ve had several requests for another pierogi recipe and, while I was dragging my feet a bit, I finally rolled up my sleeves (metaphorically and literally) and made a mountain of spinach and tofu ricotta pierogi. They are not difficult to make, just a bit time consuming.
As I get to watch how quickly a massive plate of pierogi disappears down Duncan’s mouth with seemingly limitless appetite for more, I realise that it’s both a compliment and a nuisance. I guess it’s the realisation how long it took me to make them versus how few meals (i.e. just ONE meal unusually) they translate into is what puts me off making them more often.
If I still lived in Krakow, I don’t think I would ever bother to make pierogi at home as there are so many takeout places that specialise in every flavour of pierogi possible that it would be just plain silly. Not all of them are good, of course, but if you know where to go you’ve got your pierogi cravings covered for the rest of your life!
Having said that, nothing beats well made pierogi at home and being vegan narrows down the choices available to you quite drastically, so sometimes homemade is indeed best. Plus, when I am not rushing and there is a good podcast or music going on in the background and sunshine peaking through my kitchen window, like today, pierogi making can be quite therapeutic actually.
These spinach and vegan ricotta pierogi (it’s not ‘pierogis’, btw as ‘pierogi’ is already plural) combine wilted and dried out spinach and a quick, vegan take on ricotta into a delicious filling. I served mine with some crisped up shallots, a pinch of mild chilli (just because) and a smattering of fresh, minced parsely. If you are after a healthier version, have them straight after they’ve been boiled, but I love my savoury (for some reason sweet ones do not benefit from the same treatment) pierogi pan fried in a little olive oil after they’ve been cooked and cooled (that’s important). It’s makes them look and taste a whole lot nicer!
PS: If you make my vegan spinach and ricotta pierogi, don’t forget to tag me on Instagram as @lazycatkitchen and use the #lazycatkitchen hashtag. I love seeing your takes on my recipes!
makes: 45
prep: 90 min
cooking: 30 min
Ingredients
FILLING
olive oil
1 medium shallot (+ 2 more for serving if desired), diced finely
2 garlic cloves, diced finely
300 g / 10.5 oz fresh spinach
200 g / 7 oz firm (cotton) tofu
2 tbsp lemon juice
zest of 1 unwaxed lemon
1 tbsp nutritional yeast
½ tsp salt, adjust to taste
¼ tsp nutmeg powder
black pepper, to taste
DOUGH
250 g / 2 cups all purpose flour
1 level tsp sea salt
30 ml / 2 tbsp reduced aquafaba* (optional)
15 ml / 1 tbsp olive oil
120 ml / ½ cup hot water
Method
FILLING
Heat up the olive oil in a medium pan. Gently fry diced shallots until translucent and lightly caramelised. Some of them will go into the filling and the rest will be used as topping. If using 3 shallots, remove 2/3 of the fried shallots and set aside for the topping.
Next add in garlic cloves and fry on a gentle heat for a few minutes, stirring the whole time.
Remove the aromatics from the pan, fill the pan with a cup of water and add washed spinach. Allow the spinach to wilt, moving it around frequently. Once wilted, lift it off the pan with tongs and place it on a sieve to cool.
Meanwhile, place tofu in the food processor together with aromatics, lemon juice, lemon zest, nutritional yeast, salt, nutmeg and pepper. Process until smooth, adjust seasoning to taste remembering that spinach that will get mixed into the ‘ricotta’ does not have any salt in it. Place the ricotta in a mixing bowl, but don’t wash your food processor yet.
Once the spinach is cold, squeeze all the water out it it – I find that placing it in the middle of a muslin cloth and squeezing the water out gives the best result. Go over it more than once if necessary to ensure that it’s a dry as possible.
Place dry spinach in the food processor and mince it well.
Add minced spinach to the ricotta and mix the two really well.
DOUGH
In a mixing bowl, combine flour and salt. Add aquafaba (if using) and olive oil. Mix well and add about 120 ml / ½ cup of hot water. Once combined roughly with a wooden spoon, start bringing the dough together with your hands. If after a little bit of kneading the dough isn’t holding together (initially it’s supposed to be a bit dry to the touch but hold together), it may need a bit more hot water. It is very important to add the water in very small amounts as too much water will negatively affect the dough. Knead it for about 5-10 minutes with your hands (after kneading, the dough should become very smooth and elastic, but not sticky) and then set aside for 30 minutes under a damp kitchen towel so that the dough doesn’t dry up.
Once the dough has had a chance to rest, grab ¼ of the dough and roll it out with a rolling pin on a lightly floured surface. You want it to be about 1-2 mm thin; the thinner the dough, the tastier the dumplings. With a cookie cutter or an upside down glass, cut out circles in the dough. Place less than a teaspoon of the filling in the centre of each circle, fold the circle in half and press the edges of the semi-circle together with your fingers. Go over each dumpling twice to make sure everything is sealed completely. Put the finished dumplings on a lightly floured surface and cover them with a damp kitchen towel while making the rest so that they don’t dry out. Continue in the same way until you’ve used up all of the dough or the filling.
Bring a medium pot of water to boil. Once the water is boiling, throw in 10 dumplings at a time and from the moment the water comes to the boil again cook for 5 minutes (depending on how thick your dough is). Once the time is up, fish them out with a slotted spoon and place on a clean plate. Put a new batch in until you have cooked them all.
OPTIONAL STEP: Heat up a little olive oil in a pan and place the cooled-down (they should be cold!) dumplings in the pan. Turn them after they’ve browned on one side. Make sure you don’t overcrowd the pan and do not turn the dumplings too early as they may start falling apart.
Whilst you are frying your dumplings, warm up the rest of your sauteed shallots, season them with salt and pepper and serve with your dumplings.
Notes
*This is totally optional, I prefer my pierogi dough with it as it’s a bit more tender, but feel free to sub with more water.
If you want more info on some of the ingredients that we use in our recipes, check out our glossary.
Join our mailing list
and get a sweet e-book
Source: https://www.lazycatkitchen.com/vegan-spinach-ricotta-pierogi/
0 notes
Text
Lemon Chiffon & Rhubarb Fool Cake
It’s rhubarb season and that means it’s time for new rhubarb recipes!
I’ve been intrigued lately with the idea of a rhubarb fool serving as a frosting for a light as air chiffon cake (I’ve been on a bit of a light and fluffy cake kick, as of late).
A fool is an old fashioned dessert that combines whipped cream with sweetened fruit, all swirled together. You can use any fruit to create a fool and rhubarb is just perfect for this as it’s tart flavor is sweetened up to make the perfect foil for all of that thick, rich cream. The color rhubarb turns when cooked (red rhubarb only, green will not turn pink!) is so gorgeous when swirled amongst all of that white.
Other pretty rhubarb treats include this Rhubarb Infusion and this Rhubarb upside down cake!
Chiffon cake is a very light, airy cake that is leavened mostly with whipped egg whites. It’s different from an angel food cake in that it has the egg yolks added into the batter where angel food has no egg yolks at all.
I use cake flour for an extra tender crumb, but you can use all purpose flour, if you desire.
Take care to carefully fold your batter so that you do not overdevelop the gluten in the flour, or deflate the egg whites. Those two things are key in turning out a light, airy cake.
I added a bit of lemon zest to the cake to give it a lemon scent, more than a powerful flavor. If you would like a more strongly flavored cake in the lemon department, feel free to add 1 teaspoon of lemon extract.
This cake will sit on top of the cream easier if you make sure that the fool is very well chilled before assembling the cake. Chilling it for several hours before cutting will help, as well.
.
.
.
.
.
.
Lemon Chiffon & Rhubarb Fool Cake
Author: Kayley McCabe
Recipe type: Dessert
Serves: Serves 12
Ingredients
FOR THE CAKE:
7 large Eggs, separated
1 teaspoon Lemon Juice
1½ cups Sugar, divided
2 cups Cake Flour
2½ teaspoons Baking Powder
¾ teaspoons Salt
½ cup Vegetable Oil
¾ cup Whole Milk
1 teaspoon Vanilla
zest of 1 Lemon
FOR THE FOOL:
4 cups (1 quart) Heavy Whipping Cream
6 medium-sized Rhubarb Stalks, sliced
⅔ cup Sugar, divided
2 tablespoons Lemon Juice
1 teaspoon Rosewater
Instructions
FOR THE CAKE:
Preheat the oven to 325 degrees.
Line the bottoms two 8" round baking pans (preferably 3" high - if your pans are only 2" high use 9" round pans) with parchment paper. Do not grease.
Place the egg whites and lemon juice in a large bowl and beat with an electric mixer until foamy. Slowly beat in the ½ cup of sugar, then turn the speed up to high and beat until stiff peaks form.
Set aside.
Place the remaining 1 cup of sugar in a mixing bowl and whisk in the flour, baking powder, and salt.
In another bowl, whisk together the egg yolks, milk, oil, vanilla, and lemon zest until combined.
Add the dry ingredients to the wet ingredients and whisk together until just combined.
Gently add the stiff egg whites to the mixture and very gently fold together until combined, scraping the bottom to make sure the batter and eggs are fully mixed together.
Divide the batter between the two prepared baking pans.
Bake in the preheated oven for 35 minutes. Increase the heat to 350 degrees and bake for another 10 minutes.
Remove and let cool upside down (cakes should not fall out as the sides are not greased).
Once cool, run a sharp knife around the sides of each cake and remove from pan. Peel away the parchment paper on the bottoms of the cakes.
Place one cake layer on a serving dish, top with half of the chilled rhubarb fool, top with the remaining cake layer, then spoon the remaining rhubarb fool on top. Garnish with fruit tree blossoms. Refrigerate until ready to serve.
FOR THE FOOL:
Place the rhubarb, ½ cup of the sugar, and lemon juice in a saucepan.
Set aside.
Place the cream and remaining sugar in a large mixing bowl. Beat on high speed with an electric mixer until the cream forms stiff peaks. Place in the fridge while you make a rhubarb compote.
Place the pan of rhubarb over medium heat, stirring occasionally until the rhubarb breaks down and the sugar dissolves. Once the rhubarb has broken down into a slightly lumpy, pink sauce, remove from heat and stir in the rosewater. Place in the refrigerator for 1 hour.
Once the sauce is chilled, spoon it into the bowl of cream and gently fold in until the rhubarb is swirled thru the cream.
Use to fill the chiffon cake layers.
3.2.2925
Cake recipe adapted slightly from King Arthur Flour

Source: https://www.thekitchenmccabe.com/2019/06/09/lemon-chiffon-rhubarb-fool-cake/
0 notes
Text
Fabric Yo Yo Christmas Tree
When you visit any web site, it may store or retrieve information on your browser, mostly in the form of cookies. This information might be about you, your preferences or your device and is mostly used to make the site work as you expect it to. The information does not usually directly identify you, but it can give you a more personalised web experience. Because we respect your right to privacy, you can choose not to allow some types of cookies. Click on the different category headings to find out more and change our default settings. However, blocking some types of cookies may impact your experience of the site and the services we are able to offer.

Source: https://www.positivelysplendid.com/yo-yo-christmas-tree/
0 notes
Text
New Japan Series Part 1: Totoro, Fall Foliage, Tofu Kaiseki
We begin a new series on Japan! In fact, this series will be divided into two parts, mostly because I visited Japan TWICE since moving to Hong Kong. Ha ha, Japan is quite close now, only a 4-5 hour flight away, so I’ve taken the opportunity to visit as often as I can (since I do love visiting Japan so much). My first visit to Tokyo was in November 2017. I had only been living in Hong Kong for about two months by that point in time. However, it was the first time ever that I would be missing the beautiful fall foliage for which Boston is famous.
I vowed I would see foliage somewhere, even if I couldn’t fly back to the US. I was thrilled to find out that Tokyo’s fall foliage season is later than Boston’s, and would peak right around Thanksgiving holiday! When a friend told me she needed to go to Tokyo over Thanksgiving for work, I jumped at the opportunity to hop along for the ride.
The foliage in Tokyo is stunning this time of year. I highly recommend visiting places like Shinjuku Gyoen, Hibiya-koen Park, the grounds around the Imperial Palace, or Inokashira Park (right next to Studio Ghibli). Though I didn’t get to see cherry blossoms this spring, I got to see this unique flower that only blooms for one month in the fall! I decided to visit Studio Ghibli again (my second time!) because I knew the studio was playing the 15-minute short movie sequel to My Neighbor Totoro, called Mei and the Kittenbus. This movie is super, super cute. If you’re a Totoro fan, especially if you love the catbus, you will absolutely love this movie.
You can’t see this movie anywhere else in the world. They only show it at Studio Ghibli periodically, rotating it among many other short films that they show. You need to purchase tickets for Studio Ghibli in advance because they easily sell out. The easiest way is to get them at a travel agency outside Japan. I bought mine in Hong Kong and it was pretty easy.
After visiting the museum, you can eat at the cafe or wander around Inokashira Park, which had gorgeous foliage during the fall. I wandered through the park and walked all the way back to the subway station, where I took the train back to Shinjuku Station.
I spent an afternoon hanging out with Marc Matsumoto from No Recipes exploring the depachika (underground food halls) at Isetan in Shinjuku. Marc recommended his favorite seasoning salts, dashi powders, and other things (like fresh yuzu kosho!!!!). It was great hearing about his life living in Japan as a TV host (!) and private chef. \ One evening, we experienced a true farm-to-table Japanese izakaya called Potsura Potsura that has been getting a lot of recognition lately. I’ll share my whole meal here in a separate post. We sampled Maisen‘s famous tonkatsu deep fried pork cutlet sandwich for lunch one day, and enjoyed a traditional Japanese teppanyaki another night.
Another evening I visited Tokyo Shiba Tofuya Ukai, a lovely tofu house that makes its own tofu and serves it as part of a kaiseki meal. The restaurant is nestled in a Samurai house enclosed by Japanese gardens at the foot of the Tokyo Tower. The surrounding gardens are beautiful and the Tokyo Tower looks majestic at night. I had a multi-course kaiseki meal, which I’ll share more in detail in a future post. Highlights? The tofu in soy milk broth was out of this world.
We ended the trip with a simple and *very* reasonably priced sushi lunch at Sushinigiri right next to our hotel in Ebisu. Our lovely 10-course lunch was the perfect amount of food and only cost USD $33 per person, all-in (we just drank green tea for beverage).
All in all, I HIGHLY recommend coming to Japan for fall foliage. The weather is crisp and cool, the colorful leaves are so pretty, especially in Japan’s many well-manicured gardens or alongside old, traditional buildings.
Up next, detailed posts from this first trip!

Source: http://www.tinyurbankitchen.com/new-japan-series-totoro-fall-foliage-tofu-kaiseki/
0 notes
Text
Great Big Dark Chocolate Chip Truffle Cookies
August 12, 2018
Great Big Dark Chocolate Chip Truffle Cookies
These cookies are colossal and studded with dark chocolate chips and stuffed with a melted dark chocolate truffle inside. So melty. So mega good.
I used Lindt Lindor dark chocolate truffles but you could also make them with milk chocolate morsels and truffles if you prefer.
Now gather all the players to get going on the dough. Flour, butter, sugar, brown sugar, eggs, vanilla, baking soda, baking powder, and salt.
Glorious! If only I could eat it all just like this.
Once the dough comes together, mix in 2/3 of the chocolate morsels. Scoop 12 even mounds of cookie dough onto wax paper. Wrap each truffle with a mound of cookie dough and seal together. Place on a parchment paper lined baking sheet and then use the remaining morsels to stud the tops of the cookie dough balls. Place them four at a time on a baking sheet because these beauties bake up big.
Bake those babies into big beautiful cookies. Like 5 inches big.
Break into them when they are still warm for a melty mouthful.

Print Recipe
Yield: 12 5-inch cookies
Great Big Dark Chocolate Chip Truffle Cookies
Ingredients:
2 1/2 cups all purpose flour
1 teaspoon baking soda
1/2 teaspoon salt
1/2 teaspoon baking powder
1 cup butter, room temperature
3/4 cup light brown sugar
3/4 cup granulated sugar
2 eggs
2 teaspoons vanilla
2 cups dark chocolate morsels
12 Lindt 70% Extra Dark LINDOR Truffles
Sea salt
Directions:
Line two baking sheets with parchment paper and preheat oven to 350 degrees Fahrenheit.
Whisk together flour, baking soda, baking powder and salt in a medium bowl and set aside.
Cream butter and both sugars in a stand mixer until light and fluffy. Add eggs, mixing one at a time until combined. Add in vanilla and mix until combined. Slowly add flour mixture until just combined.
Stir in 2/3 of the morsels and then divide cookie dough on wax paper into 12 equal mounds. Flatten each mound slighty in your hand, place a truffle inside and wrap dough around sealing the edges together into a ball.
Place cookie dough balls one of the parchment paper covered baking sheets and then use remaining morsels to stud the tops. Sprinkle the cookie dough balls with sea salt and chill for about 20 minutes before baking.
Bake 4-6 cookies at a time on the second prepared baking sheet so they don’t bake into each other. Bake for 12-16 minutes and repeat with remaining cookie dough balls. Note: These cookies also spread less on dark coated baking sheets.
Enjoy!
Categories: Cookies
15 Comments »
don’t miss a recipe!stay connected
Previous PostPuppy Love
You May Also Like:
Sweets for People
Vintage Valentine Cookies
Cookie Kisses
Almond Cherry Chocolate Chip Cookies

Source: http://www.bakerella.com/great-big-dark-chocolate-chip-truffle-cookies/
0 notes
Text
40 places in LA where you’re likely to spot celebrities
People come to Los Angeles in search of fortune, fame, and celebrity sightings. Unfortunately, the old celebrity haunts are just not bringing in the A-listers like they used to. The Tinseltown crowd is flocking to new spots to eat, drink, and shop.
40 Places in LA Where You’re Likely to Spot Celebrities Gallery
From Silverlake to Tarzana, your favorite stars are frequenting new hot spots that you may or may not know of but are soon to be on your list of LA destinations whether you are trying to people-watch or score an autograph.
We have the inside scoop on all the best places you are most likely to spot celebrities in the wild. From restaurants to flea markets to crystal shops, we have compiled a list of the 40 places in LA where you’re likely to spot celebrities.
Source: https://www.thedailymeal.com/entertain/places-la-where-you-re-likely-spot-celebrities/110217
0 notes
Text
The Palak Paneer Recipe You Should Cook Tonight
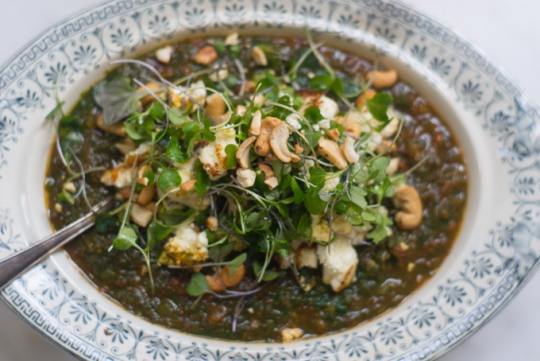
Palak paneer is power food. When translated literally it means spinach (palak) and cheese (paneer) - the two primary components. But there is a lot more to celebrate here. It's the kind of dish that when prepared with care and good ingredients, can shift perspectives. It's delicious, dynamic food to feed and power your body. The opposite of simply eating to fill up. With a spinach and tomato base, and range of spices, you're getting all sorts of nourishing goodness in each bite.
This version of palak paneer is inspired and adapted from one of my favorite new cookbooks Studio Olafur Eliasson: The Kitchen. I made some tweaks based on the spices I had on hand, and it's a great recipe to tackle on a weekend afternoon. It's also a recipe to consider doubling. Leftovers are great throughout the week, and fresh, homemade paneer never goes unappreciated.

Palak Paneer is filling, nutritious, adaptable, and nourishing, and the kind of food we should all be eating more of.
I've made this version a few times since picking up the book in New York. Serve the palak paneer with brown basmati rice, or the paratha from the India chapter in Near & Far. Enjoy!
browse more:
spinach Recipes
turmeric Recipes
Main Course Recipes
Palak Paneer
PRINT RECIPE
5 from 2 votes
One note - a couple of you have had trouble getting the milk to curdle when making fresh paneer. It's an issue I've never run into in the many times I've made paneer (or ricotta) over the years. I suspect it might have something to do with some dairy being ultra-pasteurized, so please avoid that if possible, and you should be fine.
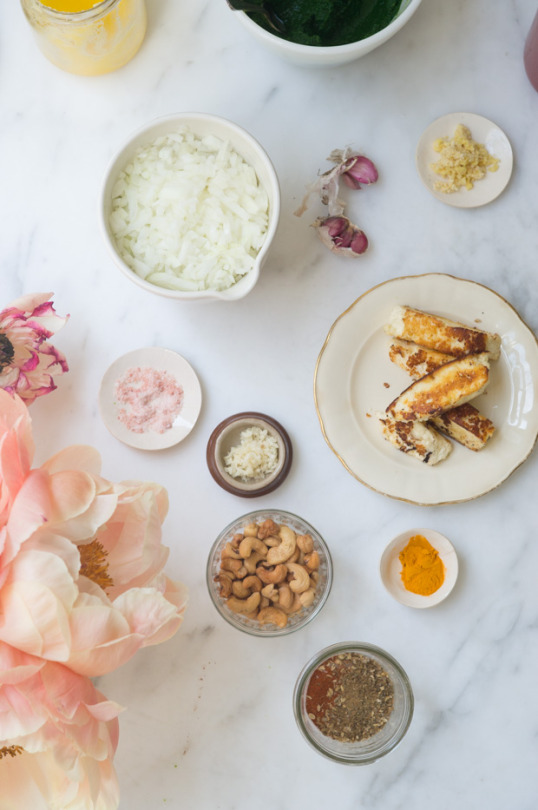
Ingredients
1 quart whole full-fat milk
3-4 tablespoons fresh lemon juice
1 pound spinach, rinsed
3 + tablespoons ghee or clarified butter
2 medium yellow onions, chopped
1 tablespoon black mustard seeds
2 medium cloves garlic, chopped
1 thumb peeled ginger, grated
scant 1 teaspoon crushed red pepper flakes
1 teaspoon cumin seeds, crushed
1 teaspoon coriander seeds, crushed
1 teaspoon ground turmeric
1/2 teaspoon fine grain salt
1 28- ounce can crushed tomatoes
1 tablespoons garam masala
To serve: basmati rice or paratha bread, toasted cashews, and/or micro greens
Instructions
Pour the milk into a large pot, and place over medium heat. Bring barely to a simmer and add the lemon juice, stir well, and continue to heat. The milk should begin to curdle, and if it doesn't, add more lemon juice a splash at a time. Drain using a fine strainer, or cheese cloth, press out as much moisture as possible, and allow to cool.
Place another pot of water over high heat, and bring to a boil. Salt well and add the spinach to the boiling water, and blanch for just a flash, 15-20 seconds. Drain, run under cool water - it should be bright green. Use a blender or food processor to puree, and set aside.
In the meantime, cut the paneer into small pieces, and, in a frying pan over medium heat, fry the cheese in a generous splash of ghee or clarified butter until golden brown. Set aside.
Heat the remaining ghee in a heavy-bottomed pot, and gently sauté the onions until golden. Add the mustard seeds and cook until they pop. Dial back the heat a bit, and add the garlic, ginger, chile flakes, cumin, coriander seeds, turmeric, and salt. Fry until fragrant. Add the tomatoes and simmer for 10-20 minutes. Add the garam masala and spinach and cook for another ten minutes. Serve topped with the paneer, some cashews, and micro greens with some rice or paratha on the side.
Notes
Serves 6.
Adapted from the the Palak Paneer recipe in Studio Olafur Eliasson: The Kitchen.
Serves
6
Prep Time
45 mins
Cook Time
15 mins
Total Time
1 hr
PRINT RECIPE
nutrition info nutrition info
December 18, 2018 permalink icon
instagram icon
If you make this recipe, I'd love to see it - tag it #101cookbooks on Instagram!
Share this...
Pinterest
0Facebook
0Google+
0email

WEEKNIGHT EXPRESS features 10 Vegetarian, Plant-centric Recipes for Feel-Good Food — Fast!
Subscribe to get 32-pages of recipes to view on your tablet, e-book reader or phone.

Follow Me:
Instagram
Youtube
Facebook
Pinterest
Related Recipes

A Really Good Chana Masala
There are a lot of chana masala recipes out there that are perfectly good, but this is the chana masala you should make tonight - a Technicolor version of chana masala.
A Really Good Saag Paneer
This is how I like to cook saag paneer - chopped spinach, golden-crusted paneer cheese, assertively spices, and finished with toasted sesame seeds and fresh lemon juice.
Instant Pot Chickpea Cauliflower Korma
An Insta-friendly riff on the Chickpea Cauliflower Korma recipe in Jennifer Iserloh's The Healing Slow Cooker - chickpeas, cauliflower, combined with a not-shy simmer sauce.
More Recipes
Whole Grain
WFPB
Vegetarian
Vegan
Soups
Side Dishes
Sandwiches
Salads
Pasta
Quick
Main Course
Low Carb
Instant Pot
Holiday
High Protein
Gluten Free
Drinks
Dinner Ideas
Desserts
Cookies
Chocolate
Breakfast
Baking
Appetizers
Follow Me:
Instagram
Youtube
Facebook
Pinterest
Popular Ingredients
avocado
egg
herb
kale
lemon
lentil
quinoa
pasta
tomato
turmeric
yogurt
zucchini
arugula
asparagus
basil
broccoli
buttermilk
cauliflower
chickpea
chocolate
curry
tempeh
tofu
ALL
© 101 Cookbooks 2018
Use of this site constitutes acceptance of its User Agreement and Privacy Policy.

Source: https://www.101cookbooks.com/palak-paneer/
0 notes
Text
Butter Brickle Cake
Sharing is caring!
Butter Brickle Cake has all the flavor of the much missed Butter Brickle Cake mix that Betty Crocker used to make. It is loaded with butterscotch and toffee flavors!
Betty Crocker’s Butter Brickle Cake mix hasn’t been available since the 90s, but if you are one of the many people who miss it, this cake is the real deal. It’s an easy recipes that is made from a doctored box of yellow cake mix. The cake batter has both butterscotch pudding mix and toffee bits added in for maximum flavor.
The cake is finished with a whipped cream frosting covered with tons and tons of toffee bits. The buttery, sweet flavor is irresistible and the toffee bits add a fantastic crunch.
Since a box of cake mix is used, the cake batter can easily be prepared in under 10 minutes. It’s divided into 2 9-inch pans and baked for about 30 minutes.
Be sure to use a box of Instant Pudding Mix, NOT the kind that needs to be cooked.
Be sure to let the cake layers cool completely before frosting.
Because of the frosting, this cake needs to be refrigerated. Cakes with whipped cream frosting are not great for serving in the heat. If you plan on bringing it to a cookout or potluck, be sure it can be kept in the air conditioning.
Your whipping cream will thicken more readily for the frosting if the bowl and the beaters are chilled before using them.
More Easy Cake Recipes:
Butter Brickle Cake has all the flavor of the much missed Butter Brickle Cake mix that Betty Crocker used to make. It is loaded with butterscotch and toffee flavors!
1 box super moist Yellow Cake mix I use Betty Crocker
1 small box butterscotch instant pudding mix
1 cup water
1/2 cup butter, melted
4 large eggs
2 (8-ounce) bags toffee bits, divided
1 tablespoon all-purpose flour
1 3/4 cups whipping cream
3 tablespoons packed brown sugar
Preheat oven to 350 degrees and spray 2 9-inch cake pans with baking spray. (or you can butter and flour them.)
With an electric mixer, beat cake mix, pudding mix, water, melted butter, and eggs on low speed for 30 seconds. Increase to medium speed for 2 minutes.
In a small bowl, combine 3/4 cup toffee bits and flour. Add to batter and stir to combine.
Divide batter evenly between the two cake pans. Bake for 30 to 35 minutes. Cool 10 minutes in pans and then remove from pans and place on a cooling rack.
Beat whipping cream and brown sugar until thick and spreadable.
Place 1 cake layer on a cake stand or serving platter. Spread a little less than a cup of whipped cream on top. Sprinkle with 2/3 cup of toffee bits.
Place second cake layer on top. Cover top and sides with remaining whipped cream.
Press remaining toffee bits onto sides of cake and sprinkle a few on top.
* Percent Daily Values are based on a 2000 calorie diet.
Disclosure: This post contains affiliate links.

Source: https://spicysouthernkitchen.com/butter-brickle-cake/
0 notes
Text
Indian Butter Chicken (Chicken Makhani)
Indian Butter Chicken (Chicken Makhani)


We love butter chicken so much, so it’s nice to be able to make a big batch and freeze some for a quick dinner the following week. I love making stew-y things that are really easy to reheat. It’s also really nice that all you really need to complete this meal is some rice, and bonus if you have some pita or naan (like trader joes frozen naan! So good!). This is definetly a comfort meal, the chicken is a little rich, but soooo good. This is one of my favorite things to make lately. Enjoy :) ♥ Teri


include a photo
print
include a photo
save
Indian Butter Chicken (Chicken Makhani) Serves 3 to 4
Ingredients: 1 pound boneless, skinless chicken thighs 1 1/2 teaspoon cumin 1 teaspoon coriander 3 1/2 tablespoons unsalted butter, divided 1 shallot, minced 2 garlic cloves, minced 1 1/2 teaspoons minced ginger 1 1/2 teaspoons garam masala 1 teaspoon chile powder 1 teaspoon smoked paprika 1 (28 ounce) can tomato puree 2/3 cup heavy cream (or 2/3 cup plain yogurt) salt and pepper to taste chopped cilantro, garnish
Directions: 1. Place chicken thigh pieces in a mixing bowl, add 1 teaspoon cumin, 1/2 teaspoon coriander, a sprinkle of salt, and some cracked black pepper and toss together until chicken is well coated. 2. Place a large skillet over medium-high heat and add 1 1/2 tablespoons butter. 3. Add chicken and sauté for 3 to 4 minutes. 4. Using a slotted spoon, transfer chicken to a plate and set aside. 5. Add remaining butter to skillet. Add shallot, garlic and ginger and sauté 3 to 4 minutes. 6. Add remaining spices and continue to sauté for an additional 3 to 4 minutes. 7. Stir tomato puree into skillet and lightly season with salt and pepper. 8. Lower heat to medium-low and simmer for 5 minutes. 9. Add chicken back into skillet, season with salt and pepper and continue to simmer for about 10 minutes. 10. Stir cream or yogurt into chicken mixture and simmer for an additional 3 to 4 minutes or until sauce is thick (enough to thoroughly coat chicken) and creamy. Adjust seasonings. 11. Top with chopped cilantro and serve over basmati rice, with a side of grilled pita bread.

Source: http://www.spoonforkbacon.com/2018/09/indian-butter-chicken-chicken-makhani/
0 notes
Text
Hawaiian Ground Beef
I am always on the look out for new ways to use ground beef. This is a tasty change that is basically a sweet and sour version of ground beef.
The sauce is super simple to make. My husband asked that next time I make more sauce, so I plan on doubling it for us on the next go-around.
I also used canned pineapple chunks for this and used the included with that when making this. However, if I had some fresh pineapple laying around it would be excellent to use instead.
1 lb ground beef
½ chopped onion
2 cloves minced garlic
2 Tbsp ketchup
2 Tbsp brown sugar
2 Tbsp rice vinegar
2 Tbsp soy sauce
½ cup pineapple juice
1 cup pineapple chunks
½ red bell pepper cut into 1" chunks
½ green bell pepper or other color pepper cut into 1" chunks
hot cooked rice
In a skillet, add the beef and onion until the beef is fully cooked. Drain off any excess grease. Add in the garlic and cook for 1 minute.
Add in ketchup, brown sugar, rice vinegar, soy sauce and pineapple juice. Mix well and cook for 3-4 minutes.
Add in the pineapple chunks and bell peppers. Mix well and cook for an additional 3-4 minutes to soften the bell peppers. Serve over cooker rice. Serves 4-6.
Recipe adapted from Cooking Make Healthy. Source: https://www.realmomkitchen.com/hawaiian-ground-beef/

0 notes