
Don't wanna be here? Send us removal request.
Statistics
We looked inside some of the posts by haryobhamee and here's what we found interesting.
Average Info
Notes Per Post
1
Likes Per Post
1
Reblog Per Post
0
Reply Per Post
0
Number of Posts By Type
Text
1
Last Seen Tumblr Blogs


Fun Fact
Tumblr has been banned in Indonesia for providing people with access to pornographic content.
Text
CST3135 Week-to-Week Blog activities
Week 1: Introduction to Digital media
We began the course by converting images files in the formats of “Png, Jpeg, Jpg” to bitmap- “bmp” for a more higher file size to be used for editing and other important contents, and we did this using the software “Gimp,”
Lab work:
Converting an image (Jpeg) to bitmap file format (bmp) and comparing the difference in the file sizes.
LW1:
Original image file size (4284x5712) 2.8Mb.
Image after conversion file size (4284x5712) 70.0mb.
Lab work:
After converting said image to bitmap we then experimented with converting images to audio using the software “Audacity” then we altered the sound to produce echoes. And finally, we converted the sound back into an image then we noticed the image had some distortion in the middle of it because of the altering that was done when the image was a sound file.
LW2:
Image converted.
Image converted back original media type and the distortion from the effect applied when in audio format.
Week 2: Sampling Theory and Compression Theory
We had several tasks to do during this week these included.
Lab work:
Extracting the contents of a zipped file and find the difference between the different states of the file.
Image Compression: This involved getting an image, saving it as a bitmap and comparing the size to the original file and then finding the compression ratio.
Sound compression: This task involved getting an audio file and converting it into a “.WAV” file and comparing the sizes and calculating the compression ratio and then converting it back to “.MP3” file with the highest compression ratio and testing out the sound quality.
Unexpected: This task involved compressing an ".AVI" file into a YouTube MP4 file and then decompressing it with adobe premier and discussing the results.
LW1:
Compressed size: 169kb.
Uncompressed size: 200kb, the difference between them is 31kb.
Compression ratio: 1.18kb.
LW2:
Original size:
Bitmap size:
Compression ratio:
LW3:
Original Size:
.Wav file size: _, the difference between them is_.
Compression ratio:
Highest quality MP3 size:
LW4:
.Avi file size (Original):
.Avi file size (YT Compressed):
.Avi file size (uncompressed):
Week 3&4: Stenography
This week was about "Stenography" which is the act of hiding messages inside images and audio, but we focused primarily on images this week.
Lab work:
Using Gimp to change the file type: To begin we got an image from the web, and we then converted it into bitmap file type either by changing the file extension or using “Gimp.”

Hiding a text inside an image: We then used an already provided software “Winhip_en” to hide the message in the picture by launching the software and opening the image with the software and selecting the option hide file which will allow us to implant an already created text file into the image and it will be then secured with password and if we want to retrieve the file we will input the password and open the file.
Extracting the information from the image: To extract the information that was hidden in the file we use the software to select the image, and then we select the retrieve file option in the menu and input the password use to secure the text file and extract the file.

Implications:
With hiding of heavier files is causes disruption in the image
File size does not change with the embedding of the text file
Continuous embedding of files to the image causes the quality of image the lowered.
Image with hidden information.
Week 5: Haas and Anaglyph
3D sounds and Images: Can our perception of images and sounds cause us to see and hear when special effects have been added to it? The answer is yes, and we can test this with basic activities like.
Holding a finger to the nose and without blinking or losing focus close one eye and alternate between each eye the result is that your finger looks like it is moving while it is not,
OR,
Play music and cover one ear at a time and notice how the sounds different when it comes into different ears. Thus, we can come up with the conclusion that we experience sounds through our bodies, then to the ears and finally to our head (Brain).
Lab work:
Week 6&7: Audio Synthesis
For this week we focused on creating a synthesizer- which is a electronic machine that generates audio signals using waveforms
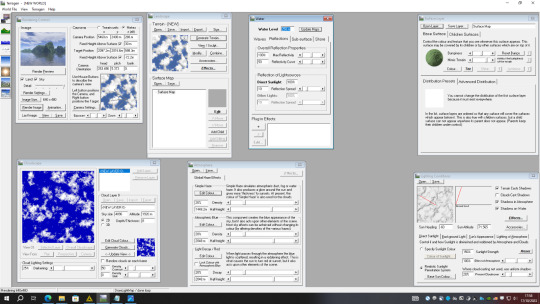
Week 8: Image Synthesis
This week we focused on image generation with the software - “TerraGen” which is a scenery generating software used for rendering and animating of landscapes we used it to generate an image of a landscape and by playing around with the software I was able to generate the following images.
Lab work:

My first generated image using TerraGen.
And it was generated using the following settings:
First after opening the software, I used the landscape menu to specify the features of the terrain I wanted to generate. By using the “Perlin noise” feature, I set the Cannonism to 59% and the Glacerism to 29%
I added water by increasing the water level to –20m.
I used the 3d feature to help me position the terrain so I will be able to get the position that I needed for my image.
I also fiddled with the cloud settings to increase the cloud density and the cloud color.
I changed the surface color to white to give the image effect of snow.
Lastly, I changed the position of the sun.


My second generated Image with TerraGen.
My second image was generated a bit differently from the first image in these settings I used “Perlin noise “and reduced cannonism and increased the glacerism to give the image the effect of a land surrounded by sea
And I positioned the camera with the 3d feature to get it from aa wider perspective
I increased the cloud density to give a heavier feel in the image
The landscape was color was changed to green to represent a vegetative land setting

My Third generated image using TerraGen.
For my third image I still made use of “Perlin noise” to set the canyonism and the glaciation
I changed the background color and added a child feature to the surface to give the grains of sand effect
I adjusted the sun for a noon effect
I made some adjustment to the clouds to reduce it

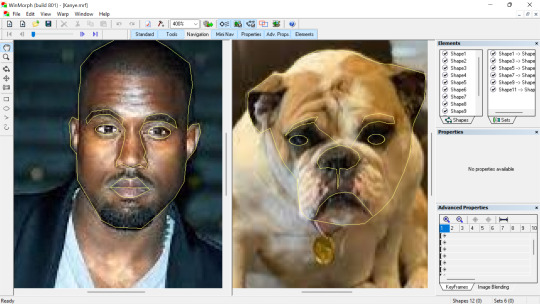
Week 9: Morphing
Morphing is the processing of changing something or someone from a state to another gradually and in image morphing this is changing of an image to another and with certain software's we can demonstrate the transitioning between the two Images.
Lab Work:
First, we selected two images that where to be used for the editing and we opened the software “Win morph” clicked on create new morph and we started highlighting certain features of the first image and trying to trace it on the second image to create the transitioning effect.
LW1:
For the first morphing I had an issue with the tracing in the first image and it gave me a distorted transitioning video, so I had to clear all the tracing and did it from the beginning and this is what came out.

youtube
LW2:
For the second video I decided to transition a human to a creature.
Week 10: Image Filter
Filters are used for image editing, and helps for image sharpening, noise reduction, and color correction and so on.
Lab work:
open photoshop, insert image, click on filter, other, custom and make changes to values in the kernel.
Original image
First image (Edge detection)
Second image (Gaussian blur)
Third image (Sharpen)
Using Filter forge to create filter.
open filter forge, select filter, click on new filter.
Original Image
Image after applying first filter.
Original Image
Image after applying second filter.
Original image
Image after applying third filter.
Week 11: Visual Jockey
This week we are focusing on the visual effects and displays.
Lab Work:
Open up the software visual jockey and begin by selecting generic resource and picking an effect to use with the selected generic resource and also working with Mavrick to use the effects for
LW1:


Week 12: Arduino And Processing
Week 23: Sonification
1 note
·
View note