
Don't wanna be here? Send us removal request.
Statistics
We looked inside some of the posts by hedgeradish9-blog and here's what we found interesting.
Average Info
Notes Per Post
0
Likes Per Post
0
Reblog Per Post
0
Reply Per Post
0
Time Between Posts
3 days
Number of Posts By Type
Text
17
Last Seen Tumblr Blogs


Fun Fact
In Q3 of 2020, 31% of US users access the Tumblr app daily.
Text
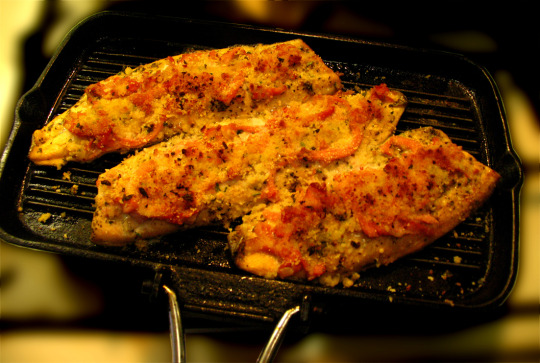
Honey Garlic Sauce Salmon
Honey Garlic Sauce Salmon – Crispy, tender and SO DELICIOUS salmon fillets pan-fried in the most wonderful honey garlic sauce. One pan, 20-minutes, and a handful of ingredients stand in the way of you and this incredible salmon dinner recipe.
HONEY GARLIC SAUCE SALMON
A simple sauce prepared with honey, soy sauce, garlic and lime juice adds a ton of flavor to this simple salmon recipe. Quick, easy, and super addictive, this tasty fish is perfect for a busy weeknight, but fancy enough for an elegant dinner.
Judging by the popularity of my Garlic Butter Baked Salmon, it is no secret that you all LOVE salmon and garlic. AMIRIGHT? I hope so because that combo is like regular food meets magazine-food meets my mouth.
HOWEVER, there’s just something EXTRA about food that’s sweet and salty plus perfectly browned into a caramelized perfection. Examples: we have this Crock Pot Honey Garlic Chicken, Honey Garlic Baked Pork Chops, Honey Garlic Steak Bites… there’s more, but you see where I’m going with this. Honey Garlic is my JAM.
HOW TO MAKE HONEY GARLIC SALMON
Honey Garlic Salmon is seriously easy to make, using minimal ingredients you already have in your kitchen. In addition to being awesomely sauced, this garlicky salmon and its sticky honey glaze go perfectly with brown rice or cauliflower rice.
We start with seasoning our fillets; I use a mix of ground cumin, paprika, garlic powder, Italian Seasoning, salt and pepper.
Add the fillets to warm oil in a cast iron skillet. If you do not have a cast iron skillet, use any other heavy steel pan that you do have.
Cook the fillets for around 4 to 5 minutes, or until cooked three quarters of the way. Flip over.
Add butter, minced garlic, honey, soy sauce, and lime juice. Cook for 2 more minutes, or until cooked through and sauce is thickened.
Garnish with lime wedges and sliced green onions; serve.
COOK’S NOTES
To make this cooking-fish-job easier, cook 2 salmon fillets at a time. It’s much easier to flip them over when the pan isn’t crowded.
When it’s time to add the sauce, just return all the fillets to the pan and continue.
On a personal fish preference note, I love salmon because it is a perfect excuse to work up an Asian-inspired sauce. I also love my saucy, sweet and savory fish served on top of a pile of rice or next to a big green salad.
Annnnd now I’m hungry. Again.
HOW TO STORE LEFTOVERS
Keep cooked salmon refrigerated in airtight containers for up to 3 days.
MORE SALMON RECIPES
ENJOY!
TOOLS USED IN THIS RECIPE
Honey Garlic Sauce Salmon
Crispy, tender and juicy salmon fillets pan-fried in the most delicious honey garlic sauce.
Course: Dinner
Cuisine: American, Asian
Keyword: easy salmon recipe, fish, glazed salmon recipe, honey garlic sauce, salmon dinner recipe, salmon fillets, seafood, skillet salmon recipe
Servings: 4 serves
Calories: 317 kcal
Ingredients
FOR THE SALMON
1 tablespoon olive oil
2 tablespoons butter, divided
4 skin-on salmon fillets, each fillet should be around 4-ounces
1/2 teaspoon ground cumin
1/2 teaspoon smoky or sweet paprika
1/2 tablespoon Italian Seasoning
salt and fresh ground pepper, to taste
FOR THE HONEY GARLIC SAUCE
4 cloves garlic, minced (about 1 tablespoon minced garlic)
1/4 cup honey
1 tablespoon low sodium soy sauce (For a gluten-free option, use Tamari sauce)
2 tablespoons fresh lime juice
sliced green onions for serving
lime wedges for serving
Instructions
Heat olive oil and 1 tablespoon butter in a large (10 to 12 inches) cast iron skillet over medium-high heat.
In a small bowl combine cumin, paprika, Italian Seasoning, salt, and pepper; mix until incorporated.
Season salmon fillets with prepared seasoning and transfer to skillet, skin side down. (PLEASE SEE MY NOTES)
Cook the fillets for 4 to 5 minutes, or until cooked three quarters of the way through.
In the meantime, combine honey, soy sauce, and lime juice in a bowl; whisk until well combined.
Flip the fish over and add 1 tablespoon butter to the skillet. (If working in batches, at this point you want to place all your fillets back in the skillet.)
Wait until butter melts and add minced garlic over the fish.
Pour the prepared honey soy sauce over the fish and continue to cook for 2 more minutes, or until cooked through and sauce has slightly thickened. Spoon the sauce over the fillets while cooking.
Remove from heat.
Garnish with sliced green onions and serve with lime wedges.
Recipe Notes
WW FREESTYLE POINTS: 8
COOK’S NOTES
For best and easiest results, cook 2 salmon fillets at a time. It’s much easier to flip them over when the pan isn’t crowded. When it’s time to add the sauce, just return all the salmon fillets to the pan and continue with the recipe.
HOW TO STORE LEFTOVERS
Keep cooked salmon refrigerated in airtight containers for up to 3 days.
Nutrition Facts
Honey Garlic Sauce Salmon
Amount Per Serving (1 salmon fillet + sauce)
Calories 317 Calories from Fat 144
% Daily Value*
Total Fat 16g 25%
Saturated Fat 5g 25%
Cholesterol 77mg 26%
Sodium 235mg 10%
Potassium 578mg 17%
Total Carbohydrates 19g 6%
Dietary Fiber 0g 0%
Sugars 17g
Protein 23g 46%
Vitamin A 4.4%
Vitamin C 3.9%
Calcium 2.9%
Iron 8.5%
* Percent Daily Values are based on a 2000 calorie diet.
Want To Save This Recipe?
SUBSCRIBE TO GET FREE UPDATES & A FREE ECOOKBOOK!
GET AN EMAIL WHEN THERE'S A NEW RECIPE
Source: https://diethood.com/honey-garlic-sauce-salmon/

0 notes
Text
St. Nick’s Drop It Like It’s Hot Party Nuts
Dec 19
Santa’s sweet and spicy party nuts are not your average nuts. They’re sweet with maple syrup, spicy thanks to cayenne — the perfect mix of naughty and nice. Make them for someone this holiday season and have a jolly good time.
Pretty sure Snoop Dogg would approve of dez nutz.
Santa might even too.
Party nuts are one of my favorite things to snack on during the holiday season. *takes a sip of wine, eats a handful of nuts*
You know how it goes.
The more I write this, the more punny it’s getting.
Truth be told, I’m always making a fun version of candied maple pecans for our salads and that’s how these nuts came to be. I had a ton of extra nuts in my pantry and decided to try and roast them in the oven for a crunchy version drizzled with maple syrup and dusted with spicy cayenne pepper.
To jazz it up a bit, I decided to add a few different nut varieties: cashews, pecans, walnuts and almonds. Everyone has their favorite. Then I added maple syrup, a tiny little bit of butter, chia seeds, cayenne, chili powder, cinnamon and salt. Toss together, spread on a pan and roast until perfectly golden and crunchy.
Trust me, you’re gonna love Santa’s nuts. They’re a great gift during the holiday season and will last two weeks or longer if you place them into an airtight jar or container.
Enjoy! xo.
St. Nick's Drop It Like It's Hot Party Nuts
Author: Monique of AmbitiousKitchen.com
Nutrition Information
Serving size: 1/16 of recipe
Calories: 301
Fat: 27.0g
Saturated fat: 3.3g
Carbohydrates: 12.7g
Sugar: 4.4g
Fiber: 4.0g
Protein: 7.3g
Recipe type: Nuts, Gluten Free, Grain Free, Dairy Free, Paleo
Prep time: 5 mins
Cook time: 15 mins
Total time: 20 mins
1 ½ cups raw cashews
1 ½ cups raw walnut halves
1 ½ cups raw pecan halves
1 ½ cups raw almonds
1 tablespoon melted butter (or melted coconut oil or vegan butter)
3 tablespoons pure maple syrup
1 teaspoon salt
1 teaspoon chili powder
3/4 teaspoon cayenne pepper*
1/2 teaspoon ground cinnamon
1 tablespoon chia seeds
Preheat oven to 350 degrees F. Line a large baking sheet or two small baking sheets with parchment paper.
Add nuts to a large bowl. Drizzle melted butter and maple syrup over the top. Toss to combine and coat the nuts. Sprinkle on the salt, chili powder, cayenne pepper, cinnamon and chia seeds. Toss again to coat the nuts with the spices and chia seeds. Bake nuts for 15-20 minutes total, stirring the nuts with a spatula every 5 minutes. Nuts are done once they are slightly golden brown and have a very nutty aroma. Remove from oven and allow to cool completely on pan before dividing into airtight containers.
Feel free to leave out chia seeds if you don't like them. Nuts should be stored in an airtight container and will stay good for at least two weeks.
3.5.3251
Source: https://www.ambitiouskitchen.com/sweet-and-spicy-nut-mix-recipe/
0 notes
Text
How to Make Vegan Cheese Sauce
This flavorful and creamy non-dairy sauce is the perfect replacement for a classic cheese sauce. It’s simple, nutrient-dense and hard-to-believe it’s not actually cheese. We’re sharing all the tips you need to know for How to Make Vegan Cheese Sauce today.
How to Make Vegan Cheese Sauce
We’ve been on a dairy-free “cheese” kick here over on LCK, and today we’re doing another one with How to Make Vegan Cheese Sauce. This recipe is oh-so-versatile! It can be used as the backbone for a classic tasting Mac and cheese or other recipe using a creamy cheese sauce or, just as easily, served as a dip! All you need are a handful of ingredients and a blender.
To make it, we take the base of our cashew cream that you all have been loving, and add in a few other flavor components. We add in butternut squash for a little flavor and color base, plus we use nutritional yeast to make it taste truly cheesy and finally we add in a touch of apple cider vinegar to help balance it all out. Trust us, you’re going to love this one!
Here’s what you need to make it:
unsalted raw cashews
diced butternut squash
salt
nutritional yeast
garlic powder
onion powder
black pepper
apple cider vinegar
How long will this vegan cheese sauce last?
This non-dairy “cheese” sauce lasts about 5 days in the refrigerator, assuming all the whole components were made fresh. However if you used leftover roasted butternut squash when making this recipe that was already a few days old, then the cheese sauce may last only a few days.
You can freeze vegan cheese sauce for up to 3 months! Store in an air tight container or bag. When ready to use, defrost overnight in the refrigerator and once thawed you may need to blend, or whisk it up again to make it smoothy and creamy.
What can this be used on?
We love the versatility on this non-dairy cheese sauce alternative!
As a dip
As a sauce for a classic Mac and Cheese
In other pasta dishes
Over a baked potato
For nachos
Over broccoli
As a creamy pizza sauce
On enchiladas
Watch the video:
These are the tools we used for this recipe:
Medium Pot
Blender
Spatula
If you like this dairy-free recipe, check out these others:
How to Make Vegan Cheese Sauce
Ingredients
1-1/4 cups unsalted raw cashews
1/2 cup peeled and diced butternut squash (see note)
1 teaspoon salt
1/2 cup water, to blend
2 tablespoon nutritional yeast
1 teaspoon garlic powder
½ teaspoon onion powder
1/2 teaspoon pepper
1 teaspoon apple cider vinegar
Directions
Place cashews and butternut squash in a small pot and add enough water to cover by 1".
Bring to a boil and cook for 15 minutes or until the butternut squash is tender. Turn off heat, cover and let sit for 1 hour.
Drain water and rinse cashews and squash. Place in the basin of a blender with 1 teaspoon salt.
Blend with ½ cup water. You may need to scrape down the mixture several times. Continue to blend until the cashews and squash are a creamy smooth consistency. Add up to ¼ cup more water if needed to get a creamy consistency.
Add in the remainder of the ingredients and blend until smooth and creamy.
Store in a container for about 5 days.
Recipe Notes
Alternatively you can roast the butternut squash separately. It will add more depth to the flavor of the cheese sauce, but also adds considerable amount of time so we opted to just boil with the cashews. If using the roasted squash add in when blending the cashews in step 4.
Loading nutrition data...
There may be affiliate links in this post! By clicking on them, or purchasing recommended items I may receive a small compensation, at no cost to you! However, I only recommend products I absolutely love and use in my own home! Thank you for supporting Lexi's Clean Kitchen when you shop! See my privacy policy for more information about this, the information we save, and more!

Source: https://lexiscleankitchen.com/vegan-cheese-sauce/
0 notes
Text
Sweet and Sour Fish- Whole Fish
Home style Chinese sweet and sour fish –Tang Cu Yu (糖醋鱼).
If you ever enjoyed a Chinese Spring Festival eve dinner with a Chinese family, you may have tasted this fish already. Chinese people loves to cook fish as a whole for holidays. The pronunciation for the Chinese character “鱼”(fish) is the same as “余”(remain), which is meaning we have things left after the whole year’s hard work.
Chinese home cooking is very different from restaurant style. For home cooking version, we want to simplified the process and achieve a good taste. However, in restaurants, chefs are talented at all types of techniques (cutting, presentation, tuning flavors) and they will present those skills via different types of dishes. Artistic conception is extremely important to famous Chinese dishes. So you can find the fish cut into lots of smaller strips (extend the surface so we can have more shells), looks like chrysanthemum. If you ever visit China, I highly recommend trying that lovely version in a restaurant and you will know what I am talking about.
However, it is possible to achieve a quite satisfying result at home without the advanced cutting technique and professional tools.
Cook’s Note
When marinating the fish, do not ignore the inside part of the fish. If your fish has a black tissue attached, remove them.
The sauce should be prepared simultaneously with the frying process of the fish, otherwise the fish may turn moist again and lost the crispy texture.
Eat it up as soon as possible.
Ingredients
1 smaller fish (750g around)
leek onion shreds, for decoration
1 tbsp. Chinese cooking wine or beer
1 tsp. salt
2 scallions
1 thumb ginger, shredded
1/4 cup of cornstarch
oil for deep-frying
4 tbsp. tomato ketchup
1/2 tbsp. vegetable cooking oil
4 tbsp. sugar
2 tsp. rice vinegar or 1 tbsp. lemon juice
1/4 tsp. salt
1/2 cup water
1 tsp. chopped scallion
1 tsp. chopped ginger
1/2 tbsp. cornstarch + 1 tbsp. water
Instructions
Clean the fish and then make 3- to 4 vertical cuts on the fish firstly. And then turn over the cuts and make 2 smaller cuts on the chunk. We are doing this for better flavoring and more crsipy shells.
Spread salt and cooking wine on the fish both on the surface and inside. Then place scallion and ginger shreds inside the fish cuts and marinate for 30 minutes.
Clean the fish and remove scallion and ginger sections.Heat oil in a wok until 160 degree C. Coat the fish with cornstarch. Remember to coat the smaller cuts we made in step 1 too. Set aside for 5 minutes.
(optional) Hold the fish tail and let the head down, and then drizzle the hot oil on the fish meat to help fix the shape.
Place the fish in and fry until golden brown. Turn over twice. Keep slow fire all the time. This process may take 6-8 minutes depending on your fire.
During the process of deep-frying, prepare another smaller pot, add all the ingredients for sweet and sour sauce expect starch water and simmer for 2 minutes. Stir in starch water and cook until the sauce is well thickened.
Transfer the fish to a serving plate and then drizzle the sweet and sour sauce. Enjoy as soon as possible.
Sweet and Sour Fish
Sweet and sour fish
Ingredients
1 smaller fish (750g around)
leek onion shreds, for decoration
1 tbsp. Chinese cooking wine or beer
1 tsp. salt
2 scallions
1 thumb ginger, shredded
¼ cup of cornstarch
oil for deep-frying
Sauce
4 tbsp. tomato ketchup
½ tbsp. vegetable cooking oil
4 tbsp. sugar
2 tsp. rice vinegar or 1 tbsp. lemon juice
¼ tsp. salt
½ cup water
1 tsp. chopped scallion
1 tsp. chopped ginger
½ tbsp. cornstarch + 1 tbsp. water
Instructions
Clean the fish and then make 3-4 vertical cuts on the fish firstly. And then turn over the fish and make 2 smaller cuts on the chunk. We are doing this for better flavoring and more shells.
Spread salt and cooking wine on the fish both on the surface and inside. Then place scallion and ginger shreds inside the fish and marinate for 30 minutes.
Clean the fish and remove scallion and ginger sections.
Heat oil in a wok until 160 degree C.
Coat the fish with cornstarch. Remember to coat the smaller cuts we made in step 1 too. Set aside for 2-3 minutes.
(optional) Hold the fish tail and let the head down, and then drizzle the hot oil on the fish meat to help fix the shape. Place the fish in and fry until golden brown. Turn over twice. Keep slow fire all the time. This process may take 6-8 minutes depending on your fire.
During the process of deep-frying, prepare another smaller pot, add all the ingredients for sweet and sour sauce expect starch water and simmer for 2 minutes. Stir in starch water and cook until the sauce is well thickened.
Drizzle the sweet and sour sauce after the fish is transfer to serving plate.
Place some leek onion shreds for decorating.
3.5.3229
Source: https://www.chinasichuanfood.com/sweet-and-sour-fish/
0 notes
Text
Gluten-Free Peach Crisp Recipe
Peachy Goodness.
Your plucky gluten-free goddess at large has been conjuring egg-free disasters- one after another- in her tiny blue-tiled cocina. And tossing said disasters (affectionately known as drek) into the trash bin left and right, developing quite an aim despite her gloomy disposition.
She shoots- she scores!
In fact, the greenbacks spent on the alternative flours, gluten-free casein-free mixes, tiny allergen-free chocolate chips and organic bananas could have bought said Gluten-Free Goddess a lovely bottle of Lavanila Summer. The big bottle, not the purse size.
And by the way, don't believe what they tell you about subbing eggs with bananas in a chocolate recipe, Babycakes, unless you have a taste for tacky, gummy brownies that have a faint but distinct Eau de Baby Food top note.
But in every third act... there's a moment.
You know, that pregnant pause, where our bruised but glistening heroine turns- damp and tendrilled, emotionally raw, soy-free chocolate smears artfully adorning her noble apron- and tucks an errant wisp of hair behind her left ear as she squints into the radiating oven, inhales a whiff of cinnamon-laced peachy heaven and senses deep in her fragile loyal heart she's got a winner.
Cue music.
Darling, this summery vegan treat is so luscious your gluten-eating wiener-chomping friends will scrape their plates shiny clean and beg for more. They will. Promise.
So you may as well make two. One for them.
And one for you.
Gluten-Free Peach Crisp Recipe
By Karina Allrich July 2007. If oats don't agree with you (some folks have trouble digesting oats), see my other crisp recipes featuring quinoa flakes or simple flour-and-sugar crumble toppings. They're equally tasty! Ingredients: 1/2 cup certified gluten-free rolled oats 3 tablespoons organic gluten-free vanilla rice or non-dairy milk 3 cups organic sliced peaches A quick drizzle of organic raw agave syrup 1/2 cup gluten-free baking mix and pancake mix 1/2 cup organic light brown sugar 1 teaspoon ground cinnamon 3-4 tablespoons organic coconut oil Instructions: Pre-heat the oven to 350ºF. Grease a 9-inch glass pie plate and set aside. Place the gluten-free oats in a bowl and soak them in the rice milk for ten minutes. Toss the peaches with a drizzle of agave and arrange them in the bottom of the pie plate. Add the gluten-free baking mix, brown sugar, and cinnamon to the oats. Mix well. Add the coconut oil in pieces. Rub the oat/flour mix into the shortening between your palms until the mixture gets crumbly and moist. If you by chance need another tablespoon of rice milk to moisten the mixture, go ahead and add it. Top the peaches with the crisp and crumble topping. Bake on a center rack for 30 to 40 minutes, until the crisp is bubbling and golden brown, and the peaches are tender and not too soft. Serve warm or cooled. Try not to lick the empty pie plate. Okay. If no one's looking darling, go ahead. Lick. Serves 4-6.
Recipe source: Gluten-Free Goddess Recipes. All images & content are copyright protected, all rights reserved. Please do not use our images or content without prior permission. Thank you.
Source: https://glutenfreegoddess.blogspot.com/2007/07/peach-crisp.html
0 notes
Text
Cauliflower & Pomegranate Salad with a Yogurt Dressing
I’ve got a super tasty recipe that will switch things up for you in the salad department. I really need to keep our salads interesting to ensure I enjoy them enough to eat, so I’m excited about this new combo—cauliflower and pomegranate! I served it with homemade chicken nuggets, some of which ended up just getting mixed into the salad…yum. This one was great leftover (in a lunch box or straight out of the fridge) so double the recipe if you want extras on hand!
Pomegranate Arils (a.k.a. Seeds)
You can buy pomegranates already seeded for you, but don’t be afraid to try to open one yourself—it’s not hard! I like to cut a slit and then open mine up in a bowl of water to avoid the red juices splattering everywhere. They can stain so it’s an easy way to be extra careful.
It’s hard to describe how fresh and tasty the little arils are as they pop in your mouth. They’re of course great on salads, as shown in this recipe, but also tasty in a bowl of yogurt, or even just eaten plain by themselves. Pomegranate season is in the winter so enjoy them while you can. What’s your favorite way to eat pomegranates?
Cauliflower & Pomegranate Salad with a Yogurt Dressing
Inspired by Food & Wine Magazine
Print
Ingredients
For the Salad
1 head cauliflower, trimmed and sliced into 1/2" florets
1 tablespoon olive oil
salt and pepper
lettuce mix, of choice
1 cup pomegranate seeds
For the Dressing
1 cup plain yogurt
1 tablespoon lemon juice, last time used 1
1 garlic clove, minced
Instructions
Preheat oven to 425 degrees F. Trim cauliflower and cut florets into 1/2" pieces. Toss on a baking sheet with the olive oil, salt, and pepper, and roast until tender when pierced with a fork and golden brown, 20 to 25 minutes.
Meanwhile, whisk together the yogurt, lemon, and garlic.
Arrange a layer of lettuce on a large platter and then sprinkle the pomegranate seeds and cooked cauliflower on top. Finish with dollops of dressing and salt and pepper.
Posts may contain affiliate links. If you purchase a product through an affiliate link, your cost will be the same but 100 Days of Real Food will automatically receive a small commission. Your support is greatly appreciated and helps us spread our message!
Source: https://www.100daysofrealfood.com/cauliflower-pomegranate-salad-yogurt-dressing/

0 notes
Text
Peanut butter caramel chocolate mousse
Hope the sun is shining for you this weekend! Our weather is not too bad, which is a miracle as it’s a Bank Holiday here in the UK and that’s usually a fire sure recipe for rain. We are not planning on doing much as we both need to recharge our batteries a little. I am working today to bring this delicious weekend dessert to you, but once I hit ‘publish’, I shall chill in the garden with a book and my cat, Tina.
I’ve been feeling a bit unwell the past few days, which is why I’ve had to shoot this recipe pretty last minute. I took an antihistamine for the first time ever in my life (turns out it did not really help) and I guess because I am not used to them at all, it has knocked me out completely. I could not keep my eyes open yesterday. Luckily, today I am much better…
It’s a touch ironic that I’ve decided to post such an indulgent recipe right now as I am in the middle of trying to curb my sweet tooth again (probably in vain, but one can dream!) I must love torturing myself. It’s been a while since I’ve made a vegan mousse with aquafaba so I’ve decided that I need to rectify that to make sure I don’t lose my skills (that’s the party line anyway…) and yup, all good. The mousse came out beautifully and so did the peanutty caramel layer.
They are a match made in heaven, one airy and not that sweet (although feel free to override me), the other silky, sweet, nutty and a touch salty. They go together so perfectly! If you are hosting, I wholeheartedly encourage you to make it this long weekend (if you live in the UK) and your dessert will be the talk of the dinner party, I can promise you that!
PS: If you make my peanut butter caramel chocolate mousse, don’t forget to tag me on Instagram as @lazycatkitchen and use the #lazycatkitchen hashtag. I love seeing your takes on my recipes!
makes: 4
prep: 10 min
cooking: 10 min
Ingredients
PEANUT CARAMEL
120 ml / ½ cup maple syrup + optionally more to sweeten the mousse
80 ml / 1/3 cup crunchy peanut butter (I use Sun-Pat) or almond butter
45 ml / 3 tbsp almond milk
a fat pinch of salt (optional)
CHOCOLATE MOUSSE
150 g / 5.3 oz dark vegan chocolate, broken into pieces
15-45 ml / 1-3 tsbp almond milk
120 ml / ½ cup aquafaba / chickpea brine
¼ tsp lemon juice or white vinegar (optional)
Method
Place maple syrup in a small pot and slowly bring it to a gentle boil (it takes about 3 minutes).
Once it starts foaming, add peanut butter and start whisking it in until it all dissolves into the maple syrup.
Allow it to come to a gentle boil again and add almond milk and salt. Mix well and allow it to cool. Caramel will thicken as it cools, if it’s too loose, bring it back to a gentle simmer again and simmer for a few minutes to thicken. If it’s too runny, add a splash more almond milk.
Divide caramel between 4 glasses and set aside for it to cool down completely before topping it up with chocolate mousse.
Place the chocolate and 1 tsbp of almond milk in a glass or metal bowl over a pot of gently simmering water. Simmer on low heat until the chocolate is almost melted – err on the side of caution as it is important for the chocolate not to overheat. Take the bowl off the pot with hot water and let it sit there.
Gently and slowly whisk chocolate until smooth. You may want to add a bit of maple syrup to the mixture at this point. I did not as I feel that caramel provides enough sweetness to this dessert, but it’s down to personal preference. If your chocolate seizes, which happens sometimes, bring it back by whisking in another 1-2 tablespoons of room temperature almond milk. Allow this mixture to cool down a little.
While the chocolate is cooling, whisk aquafaba and a few drops of acid (it helps it stiffen) with an electric whisk until you achieve stiff peaks. Aquafaba needs to be so stiff that you should be able to invert the bowl over your head.
Gradually (start off with 1/3 of whipped aqauafaba) and gently fold whipped aquafaba into the chocolate mixture until the two are well incorporated. The mixture will deflate a little, don’t worry, that’s normal, but you don’t want it to deflate too much by knocking too much air out of the mixture, which is why a gentle and slow folding motion is key here.
Spoon the mousse on top of the cold caramel and chill the dessert in the fridge until the mousse is fully set (I recommend for 8 hours / overnight). Decorate if you wish and serve.
Notes
This recipe makes 4 x 120 ml / ½ cup portions.
If you want more info on some of the ingredients that we use in our recipes, check out our glossary.
Join our mailing list
and get a sweet e-book

Source: https://www.lazycatkitchen.com/peanut-butter-caramel-chocolate-mousse/
0 notes
Text
Spicy Stir-Fried Tofu
Hi! Long time no see. I’m sorry that I have not been able to upload videos for a couple of weeks due to my Internet issue. Did you miss me and my recipes? I hope you did. 😉 Anyway, it is so nice to upload a video after a long time. Today I prepared a delicious recipe that vegetarians and everyone else will love. It is a spicy stir-fried tofu dish called “kkanpung dubu” in Korean. This spicy, sweet, sour crispy tofu dish changed Bryson’s thoughts about tofu. If you are not a big fan of tofu like him, then please watch this video and try it someday. So, let’s get started.
Yield: 2 Servings
Short Korean Lesson
JungGuk (중국) = China
IlBon (일본) = Japan
Video Instructions
Main Ingredients:
1 Pack Firm Tofu (16 oz)
½ Cup Onion
¼ Cup Green Onion
2 Tbsp Dried Hot Pepper Pieces
1 Tbsp Garlic
1 Tbsp Hot Pepper Oil
½ Tbsp Cooking Oil
1 tsp Sesame Seeds
Tofu Ingredients:
½ Cup Cornstarch
¼ tsp Salt
⅛ tsp Black Pepper
3 Tbsp Cooking Oil
Sauce Ingredients:
3 Tbsp Soy Sauce
1½ Tbsp Water
1½ Tbsp Sugar
½ Tbsp Vinegar
1 tsp Sesame Oil
Directions
First, get a pack of firm tofu (16 oz). I like to use a Korean brand of tofu, but you can use whatever brand you like. Tap the tofu gently with a paper towel to remove some liquid from the tofu.
Cut the tofu into cubes slightly smaller than ½ inch. Once again, pad off the tofu with a paper towel lightly to remove the water. To make crispy tofu, we have to fry the tofu and then mix it with the sauce. So, while I prepare the rest of the ingredients, I’ll set the tofu aside for a while.
Next, put ½ cup cornstarch, ¼ tsp salt, and ⅛ tsp black pepper into a food storage bag. Shake the food storage bag to get the powder mixed up well enough.
To make a delicious sauce, put 3 Tbsp soy sauce, 1½ Tbsp water, 1½ Tbsp sugar, ½ Tbsp vinegar, and 1 tsp sesame oil in a small bowl and stir it until the sugar dissolves.
Finally, let’s prepare some vegetables to add great flavor to the sauce. One is dried hot peppers (chilies). It’s easy to get these in an American grocery store. Wipe the peppers with a wet paper towel to remove the dust. Cut the top off and shake the peppers lightly to remove the seeds inside. Then cut the dried peppers into small thin strips with scissors. In addition to the dried chilies, prepare ½ cup onions, ¼ cup green onion, and 1 Tbsp garlic chopped into very small pieces.
Okay, it’s time to fry the tofu. Put all the tofu into the powder mix bag and shake the bag carefully. It only takes a few shakes to cover the tofu well enough.
Pre-heat a nonstick pan to medium-high. Then put about 3 Tbsp of oil in the pan.
Place the tofu in the pan and fry for about 10 minutes. Occasionally flip the tofu in multiple directions so that all the sides can be evenly fried.
After 10 minutes, you will have these nicely golden brown tofu pieces.
Quickly transfer the tofu to a plate covered with paper towels.
Put 1 Tbsp hot pepper oil and ½ Tbsp cooking oil in the preheated wok.
Put the prepared garlic in the oil and fry it for about 20 seconds on high. The smell of the garlic penetrates into the oil and helps to make this dish more flavorful.
After 20 seconds, put the remaining vegetables and sauce into the wok.
Reduce the temperature to medium-high and boil the sauce for 2 minutes.
After 2 minutes, add the tofu into the sauce and mix everything together well.
Stir fry the tofu for about 5 minutes. After 5 minutes, you will see that the sauce is almost absorbed into the tofu. Now, this dish has finished cooking.
Turn off the stove and sprinkle 1 tsp of sesame seeds over the tofu.
This dish is easy to make and it is convenient to eat and delicious, so it is good for party food and children’s snacks. Do you like tofu? Are you a vegetarian? Do you also like spicy food? Then I will strongly recommend today’s dish, kanbu tofu. Please try it some time. If you want to watch our boy’s Muckbang (Eating show) video for this recipe, please check it out. Here is a link for you. https://www.youtube.com/watch?v=CfmENyYjW3c&t=7s

Source: http://aeriskitchen.com/2018/05/spicy-stir-fried-tofu/
0 notes
Text
11 Memorable Dishes from the Great Tastes Britain trip – What I ate (and drank)
11 Memorable Dishes from the Great Tastes Britain trip - What I ate (and drank) | Saffron Trail
We use cookies to ensure that we give you the best experience on our website. If you continue to use this site we will assume that you are happy with it.OK

Source: https://www.saffrontrail.com/great-tastes-britain/
0 notes
Text
Chicken and Black Bean Tostadas
When I need a surefire hit for dinner I don’t have to look any further than tostadas topped with chicken and black beans.
Everyone in my family is a big fan of Mexican and Tex Mex, and tostadas are always happily greeted by guests—it’s lively food that instantly turns dinner into a party.
WHAT IS A TOSTADA?
A tostada can refer to a fried tortilla by itself, though often (as in this case) it refers to the Mexican dish made with a fried tostada at its base and toppings piled on top.
Corn tortillas provide great flavor and crunch, and are usually gluten-free (but check the label to be sure). There are also some tortillas on the market that are made with a combo of corn and flour, which I really like. Straight flour tortillas would also work, if you prefer (you may have to reduce the frying time), but corn are more traditional.
Tostadas typically involve layering ingredients on top of the fried tostada: meat or protein such as chicken or beans, salad components like shredded lettuce and diced tomato, and maybe some of the toppings that you’d expect to see on top of a taco, such as cheese or sour cream.
I’ve picked a combo of chicken and beans along with an assortment of classic Tex-Mex toppings such as tomatoes, avocado, and cheese. But the main points of interest really come in the form of the vinaigrette, a zippy dressing with a little optional heat from chipotles in adobo, and then the crema topping—a creamy mix of sour cream, lime, and cilantro.
How to Make Easy Poached Chicken
The chicken for this recipe is quickly cooked in water, an easy technique called poaching. You can poach in plain water, but for more flavorful chicken, try adding seasoning to the poaching liquid.
For this recipe, try whole peppercorns, sprigs of fresh thyme or oregano, bay leaves, whole garlic cloves or halved shallots, and lemon slices. (When poaching chicken for different recipes, you might change up the seasonings to match the flavors in that recipe.)
The liquid left from cooking the chicken breasts won’t be flavored deeply enough to act as chicken stock on its own, but you can use it for things such as cooking rice or grains to infuse them with a bit of brothy flavor. Or freeze it, and use it to poach again another day!
HOW TO SERVE THE TOSTADAS
This recipe is a combo of hot and cool, with the beans warm from the pan, and the rest of ingredients at room temperature or chilled. If you prefer you can serve the whole thing at room temperature, allowing the beans to cool before assembling. This is also useful if you are making the tostadas for a party.
Tostadas are usually piled fairly high, so they call for a knife and fork, especially because you want to try and get some of everything, including the crispy tortilla at the base, in every bite.
But if you’re eating with family or good friends, I think there’s nothing wrong with using those last few pieces of tortilla to scoop up the rest of the toppings that surely be strewn across your plate.
MORE EASY WEEKNIGHT MEXICAN RECIPES!
Source: https://www.simplyrecipes.com/recipes/chicken_and_black_bean_tostadas/
0 notes
Text
Air Fried Chicken Cordon Bleu Salad
All the flavor of chicken cordon bleu in a giant salad! The chicken is air fried, so it’s extra-crispy.
When I was a kid, I used to beg my mom to buy frozen chicken cordon bleu for dinner. I’d always pick it when I was allowed to choose a special dinner. When I got older, it was one of the very first meals that I made from scratch. I mostly wanted it because it was French and therefore “fancy” and that just about sums up who I’ve always been as a person.
Chicken cordon bleu is a little fussy to make, and it seems to have fallen out of style over the last few decades – but I think it’s making a comeback! I had an amazing chicken cordon bleu sandwich at a farm to table restaurant a few months ago, and I’ve seen it mentioned on menus a few times recently. It shouldn’t be surprising – the classic combination of chicken, ham, and creamy Swiss cheese is comfort food at it’s best. Plus we’re wearing “vintage” high waist jeans and scrunchies again so it only makes sense that 90s food is back in style, too.
Of course, these days I don’t really have the time or patience to painstakingly roll the chicken around the fillings or deep fry it. Plus with traditional cordon bleu there’s the matter of having to make sides at the same time.
Meh.
I’d rather dump everything on top of a giant salad, drizzle some honey mustard dressing over the top, and call it a day.
How to make air fried chicken cordon blue salad
The trickiest part of this salad is making the chicken. To start, dredge boneless chicken breasts in flour, then egg, Next, coat the chicken with panko breadcrumbs and spritz it with oil to help it brown. You can add regular oil to a spray bottle for this – that way it’s one less product to buy and you know exactly what kind of oil you’re using. Arrange the chicken in your air fryer and cook for 8-10 minutes at 400F until browned and crispy.
While the chicken cooks, you can chop your produce, roll ham and Swiss into cute little pinwheels, and make the honey mustard dressing.
Can I make this without an air fryer?
I cooked the chicken for this salad in the air fryer because I love how crispy it gets that way. Plus doesn’t heat up the house the way the oven does, so it’s perfect for summer. If you don’t have an air fryer, you can definitely bake it! Arrange the chicken in a single layer on a sheet pan and bake it at 450F, turning it once, until the breading is deep brown and crispy. If you’re feeling ambitious, you can also use my baked buttermilk chicken tenders recipe.
What is honey mustard dressing made of?
Honey mustard dressing is the perfect match for this chicken cordon bleu salad. I love how the tangy mustard cuts through the rich flavors of the meat and cheese. To make it, combine Dijon mustard with honey, Greek yogurt, white wine vinegar, and olive oil. Season to taste with salt and pepper.
Can’t get enough of the ham-Swiss-mustard combo? Give my cubano stuffed pork loin recipe a try!
Air Fried Chicken Cordon Bleu Salad
Yield: 4 servings
Prep Time: 10 minutes
Cook Time: 12 minutes
Total Time: 22 minutes
All the flavor of chicken cordon bleu in a giant salad! The chicken is air fried, so it's extra-crispy.
Ingredients
2 boneless, skinless chicken breasts
2 tablespoons flour
1 egg, beaten
1/4 cup seasoned bread crumbs
4 tablespoons white wine vinegar
2 Tablespoons nonfat plain Greek yogurt
2 Tablespoons Dijon mustard
2 Tablespoons honey
4 tablespoons olive oil
8 slices deli ham
4 slices Swiss cheese, cut in half
12 cups lettuce
1 seedless cucumber, chopped
1 cup tomatoes, halved
1/4 cup thinly sliced red onion
Instructions
1. Lightly coat the chicken with flour, then dip it into the egg. Dredge in bread crumbs to coat. Spritz with oil.
2. Air fry at 400 degrees for 12 minutes, or until cooked through. Slice into bite-sized pieces.
3. Meanwhile, make the dressing by whisking together the vinegar, yogurt, mustard, and honey until smooth. Drizzle in the olive oil. Season with salt and pepper.
4. Layer together one piece of ham and one piece of cheese. Roll together, then slice into 4 pinwheels. Repeat with remaining ham and cheese.
5. Pile the lettuce onto a platter. Top with cucumber, tomatoes, onion, chicken, and ham and cheese pinwheels. Drizzle with dressing.
Notes
To cook in the oven, arrange the breaded chicken on a baking sheet in a single layer. Bake at 450, turning once, for 20 minutes or until golden brown and cooked through.
Nutrition Information
Yield 4 Serving Size 1 Amount Per ServingCalories 511 Total Fat 28g Saturated Fat 8g Trans Fat 0g Unsaturated Fat 17g Cholesterol 139mg Sodium 909mg Carbohydrates 27g Fiber 5g Sugar 13g Protein 39g
Source: https://www.healthy-delicious.com/air-fried-chicken-cordon-bleu-salad/
0 notes
Text
The Sunday Dish 12.30.18: New Year’s Eve Entertaining
Are you ready to ring in the New Year? I certainly am! Here are some delicious drinks, apps and desserts for a NYE Bash.


This is my last article for 2018. It’s been a fun, crazy year, and I want to thank you all for your likes, loves, questions, comments and support. I just love hearing from readers who have made my recipes, so thanks for sharing your feedback and results.
Next up, I’ll be sharing my Top 10 Recipes for 2018, and then we can dive into a new year with plenty of new recipes! I hope you all have wonderful NYE celebrations. Happy New Year from Brandon, Jorge, TiVo and Federico!!
0
Source: https://www.kitchenkonfidence.com/2018/12/the-sunday-dish-12-30-18-new-years-eve-entertaining
0 notes
Text
Acer Chromebook 11 Laptop Giveaway
posted by Jaden

*Congrats to Jessica Wurtz in Saskatchewan for winning our last Acer Chromebook giveaway that ended Dec 27, 2018. Not a review, just a giveaway featuring Acer Chromebook! – jaden
Best Value Chromebook
As the best value 11.6″ Chromebook – the Acer Chromebook 11 ($189.00) has everything you need. The fast wireless connection keeps you closer than ever, no matter where life takes you. Long-lasting battery life gives you all day to run your favorite Google apps or access your photos, videos, music and documents. Acer Chromebook 11 makes life on-the-go easy.
Intel Celeron N3060 Dual-Core Processor (Up to 2.48GHz)
11.6″ HD Widescreen ComfyView LED-backlit IPS Display
4GB DDR3L SDRAM Memory & 16GB Internal Storage
Two Built-in Stereo Speakers
802.11ac WiFi featuring MIMO technology (Dual-Band 2.4GHz and 5GHz)
1 – USB 3.0 Port & 1 – USB 2.0 Port
1 – HDMI port with HDCP Support
3-cell Li-Ion Battery Pack (3490 mAh), Up to 10 Hour Battery Life
Google Chrome Operating System
Because Performance Matters
The Acer Chromebook 11 with Intel Inside delivers the performance you need on the web. It loads content-rich webpages quickly, provides brilliant video playback, and lets you multitask effortlessly while delivering amazing battery life.
Anti-Glare Display
The Acer Chromebook 11 has Acer ComfyView display, an anti-glare panel that is designed to minimize the amount of light that reflects off the display. Less glare results in less strain on the eyes, even after long hours of use.
Fast Everything
With the latest MIMO 802.11ac wireless technology under the hood, this Chromebook boasts very fast wireless connection speeds and longer signal ranges. Unplug and stay connected — to the net, to wireless devices, and to the world.
All Day Battery Life
‘All day’? Could mean a lot of things depending on who you talk to. We figure with up to 10 hours of battery operation, you’ll agree, whatever you call a day, we’ve got you covered.
Get More!
In addition to the existing apps in Chrome Web Store, you can now get access to more than 2 million Android apps from Google Play Store to learn and do more.
Light, with an HDR webcam
At just 0.73 inches thin and weighing less than a mere 2.43 lbs, this stylish notebook floats like a butterfly and slips into your bag with ease. The Chromebook built-in webcam supports High Dynamic Range imaging, for clearer photos and brighter video chats.
** Please add [email protected] to your contacts to help prevent email notifications from going into spam folders.
Never miss another Steamy Kitchen Giveaway!
Subscribe to our Giveaway Notifications to keep up to date on all of our giveaways! We will even throw in a special gift when you confirm your subscription!
List of Past Winners.
DISCLAIMER & OFFICIAL RULES: The giveaway product is provided by the sponsor of the giveaway and will be shipped from the sponsor directly. No purchase necessary to enter or win. Giveaway is open to people who are 18 years of age at time of entry and open to people worldwide. Steamy Kitchen and its sponsors only ship physical prizes to United States addresses. However, Steamy Kitchen reserves the right to provide an Amazon.com or Amazon.ca gift card for the value of the prize (at time of publishing) in lieu of shipping physical product due to shipping costs and logistics, especially for our international winners. Steamy Kitchen assumes no responsibility for late or misdirected entries due to SPAM, technological, or e-mail filtering issues or for prizes lost in transit. Winner will be notified by email, and must respond within 5 business days, otherwise winner will forfeit the prize and another winner may be drawn. For this giveaway, entrants can enter the designated number of times per e-mail address per day. The use of any system, robot, agent, or software to automatically submit entries in connection with this Giveaway is prohibited. Winners of giveaways are published on Steamy Kitchen, and winner's name and city/state/country are announced in Steamy Kitchen email newsletters. See rest of the Official Giveaway Rules.
Comments Off on Acer Chromebook 11 Laptop Giveaway

Source: https://steamykitchen.com/47423-acer-chromebook-11-laptop-giveaway-3.html
0 notes
Text
Here’s How to Avoid Five Spring Cleaning Kitchen Mistakes
If January was all about tidying up by purging your belongings, folding your sweaters and “sparking joy” in every room, then March is about freshening up— deep-cleaning your fridge, revitalizing your countertops and re-invigorating your junk drawers.
But don’t just spin your wheels spring cleaning—a smart strategy for exactly what to tackle and how can help you create organizational systems that stick, says Ashley Murphy, co-founder of The Neat Method.
Here, the five most common mistakes people make when spring cleaning their kitchens — and exactly how to fix them.
1. Taking Shortcuts
If it doesn’t look worse before it looks better, than you’re probably not doing it right. “The biggest mistake in kitchen organizing is neglecting to completely empty out your cupboards and drawers,” says Murphy. Getting everything out of drawers before you start re-organizing does two things. First, it lets you sort items into groups to start the foundation of your organizational strategy. Second, it lets you determine whether you have any unnecessary doubles or triples that are taking up vital space.
2. Allowing a Junk Drawer to be . . . Junky
Clutter that starts in a simple junk drawer seems to somehow be able to take over the entire kitchen in a matter of days. Keep it in control by making the drawer space more purposeful. “The simplest way to organize drawers is by creating boundaries,” says Murphy. Divide drawer storage into groups – measuring cups, frequently used tools, pens and notebooks, storage essentials like twist ties or rubber bands, etc. “Then, implement drawer organizers so each category has its own space.”
3. Embracing a Shelving Strategy
Open shelving is such a trend now, but making it look neat and cohesive is the real trick to a Pinterest-worthy kitchen. “First, you’ll want to determine a color scheme or theme then “collect” items from around your kitchen and home that work,” says Murphy. Then, organize shelves by frequency of use. Higher shelves can hold stand-out items that are occasionally used, such as oversized pieces of Le Creuset or vases. Lower shelves should hold multiples of matching everyday items. Think stacks of cereal bowls or wine glasses.” And remember: Not everything has to be displayed on open shelves. A few closed-door cabinets are the secret to success. “Keep your beloved, mismatched coffee mugs behind the cabinet doors,” advises Murphy.
The biggest mistake in kitchen organizing is neglecting to completely empty out your cupboards and drawers,” says Murphy.
4. Keeping Too Many Appliances Out on the Counter
Of course you love your Instant Pot to pieces and couldn’t live without your food processor, but appliances can pile up on the countertop and leave your kitchen feeling smaller than it actually is. Instead, store countertop machines together in a cabinet, putting frequently used appliances front and center so they’re easy to get out (and put away). Then, and this is the real trick, implement small labeled bins for appliance parts, suggest Murphy. So, your Instant Pot steamer insert can live alongside the instruction booklet and the extra sealing rings!
Interior Designer: Kate Raffetto Interior Design. Photographer: Anna-Alexia Basile.
5. Forgetting the Fridge Factor
It may exist behind closed doors, but organizing your refrigerator can offer a huge return on organizational investment. The sight of a super-organized fridge can soothe your soul on the most frantic of mornings and food won’t spoil inside just because you can’t see it. When it comes to keeping your refrigerator organized, visibility is key. “Use transparent, stackable containers to store leftovers and implement clear, labeled bins to corral items like cheese or lunchmeat,” says Murphy. Since you access the fridge every day, it’s an ongoing project, not a one-and-done moment. “Don’t forget to do a quick reorg before you put away your weekly grocery haul.”
Read on for more spring-cleaning tips here.
Source: https://blog.williams-sonoma.com/heres-how-to-avoid-five-spring-cleaning-kitchen-mistakes/
0 notes
Text
5 Highly Makeable Salads You'll Want to Eat for Every Lunch & Dinner
When we kicked off our latest recipe contest, Your Greatest Salad of All Time, we can't say our motives were entirely altruistic. Because, c'mon, who doesn't love a brilliant new salad formula?
In the summer months, there's nothing more valuable than meeting your new favorite sal-pal. Bonus points if it comes drizzled with a dressing you just can't stop thinking about.
And so, we set out to find our 2019 Salad Star. We asked for the salad recipes you can't stop eating for lunch, dinner, and—promise not to judge—sometimes breakfast. The more produce, the better, we said.
Well, let's just say you delivered—and then some. We received more than 120 submissions for salads of all shapes and sizes, packed full of seasonal fruits, vegetables, and just the right amount of cheese.
And now, the time has come to announce the top five submissions. Without further ado:
1. Early Summer Panzanella by Sarah
Fresh veg panzanella meets a bright and punchy garlic scape pesto in this hearty summer salad. Grilled bread, you ask? Oh yes, there's grilled bread.
2. Tricolor Salad by drbabs
The only thing this juicy, perky number has in common with a traditional tricolore is radicchio. It's a medley of charred peach, avocado, smoked cheddar, and toasted pecans, plus a dressing that stars fresh orange juice.
3. Spicy Korean Buckwheat Noodle Salad by Lauren
This cold noodle salad manages to be creamy and satisfying, with just enough tang and spice to keep it light. The crunchy chopped vegetables are a perfect complement.
4. Melon, Bacon & Spinach Salad by inpatskitchen
We adore the unconventional melon juice dressing that ties this dish together: It has the perfect level of sweetness against the savory bacon, acerbic onion, and funky blue cheese.
5. Kale Salad with Minced Egg & Spiced Almonds by The Right Recipe
This salad is dead simple—yet it tastes anything but, thanks to a mix of textures, a perfectly balanced vinaigrette (no small feat!), and the clever addition of finely minced hardboiled eggs, which get sort of smooshed into the dressing.
Thank you, thank you, and thank you again to everyone who submitted a salad recipe.
Next up, some homework: Help us select the top two by taking these recipes for a spin in your kitchen and letting us know what you think. Rate the recipes, write comments, or reaching out to us directly at [email protected] We're headed to do another round of recipes tests ourselves, and we'll be back with two finalists on July 1.
Share your congrats for the finalists in the comments!
Source: https://food52.com/blog/24253-your-greatest-salad-of-all-time-contest-top-five
0 notes
Text
Harissa Chickpea Stew with Sweet Potato
Harissa Chickpea Stew with Sweet Potato. 1 Pot. This stew is my fridge clean up version of a Moroccan Chickpea Stew. Use seasonal veggies and lentils for variation. Vegan Glutenfree Soyfree Nutfree Recipe Instant Pot option Jump to Recipe
Sometimes I head to the kitchen, look at what needs to be used up and whip up a fusion meal. This stew happened the same way. I remembered bits of a Moroccan chickpea stew from somewhere and also had made Isa’s harira soup before. so the stew started from there.
I didn’t have harissa paste, so I made my own from Everyday Kitchen book. Some caramelization of the onion and garlic with the harissa spice mix, then tomato paste and mint, some chickpeas, sweet potatoes and simmer and done. Change it up to preference. Use other spice mixes (baharat, berbere from Everyday Kitchen book), or use whichever spices you have.
This stew is flavorful, hearty, versatile and quick.
More stews from the blog
This Chickpea Sweet Potato Stew is very versatile. Use (1 to 2 tsp) any spice blends such as Berbere, Baharat, Taco blend, cajun, garam masala, or curry powder instead of the harissa mix. You can also use 1 to 2 tbsp red curry paste or green curry paste and add a cup of coconut milk instead of water. Add some more tomatoes for tomatoey stew. Lots of options! You can use store bought spice mixes and curry pastes or make your own. Recipes for all the above in my Everyady Kitchen cookbook
Harissa Chickpea Stew with Sweet Potato
Harissa Chickpea Stew with Sweet Potato. This stew is my fridge clean up version of a Moroccan Chickpea Stew. 1 Pot 30 Minute Use seasonal veggies and lentils for variation. Vegan Glutenfree Soyfree Nutfree Recipe
Course: Main Course
Cuisine: Gluten-free, Moroccan, Vegan
Keyword: harira soup, moroccan chickpea soup
Servings: 4
Calories: 227 kcal
Author: Vegan Richa
Ingredients
Harissa Mix:
1/2 tsp red pepper flakes
1 tsp paprika or smoked paprika
1/2 tsp guajillo or new mexico or other mild chili powder
1 tsp ground cumin or caraway
1 tsp ground coriander
zest of 1/2 a lime
Stew:
2 tsp olive oil
1/2 medium onion chopped
5 cloves of garlic finely chopped
2 cup cooked chickpeas
7 to 8 oz cubed sweet potato , about 1 large
2 tbsp fresh mint
3/4 tsp salt (less or more depending on if the chickpeas are salted)
1 cup water
2 tbsp tomato paste or use 1/4 cup thick puree/sauce
Cilantro mint, lime and avocado for garnish
Instructions
Heat a skillet over medium heat. When the skillet is hot, add the red pepper flakes and toast them until they change color or get fragrant.
Add the paprika, cumin, coriander and mix for a few seconds. Add zest and oil and mix in. Add onion, garlic and a good pinch of salt and cook for 3 minutes, stirring occasionally. If the spices start to burn or stick, add a splash of water and mix in. (Or use 1 tbsp or more harissa paste instead of the spices (pepper flakes to coriander). Cook the onion, garlic Add to the oil after the onion and garlic are starting to golden.)
Add the chickpeas, sweet potato, mint and salt and mix in. Cover and cook for 5 mins. Add water, tomato paste and mix in. *Cover and cook for 15 mins or until sweet potato is cooked through, stir once in between. Uncover and cook for a minute to reduce liquid if needed. *(add other veggies like red bell pepper, zucchini, eggplant for variation).
Taste and adjust salt and flavor. If the stew is too hot, add in some coconut milk or cashew cream and serve with avocado. If you used premade harissa paste, add more if needed and mix in(flavors vary with brand). Add some smoked paprika for smokyness, black pepper or cayenne for heat, cinnamon for flavor variation.
Garnish with cilantro, mint, a good splash of lime juice. Serve with crusty bread or flatbread.
Recipe Notes
Add some tomatoes with tomato paste, add coconut milk instead of water for variation.
Instant Pot: Follow Steps 1 & 2 in Instant Pot on Saute mode. Add the chickpeas, sweet potato, mint and salt and mix in. Add 3/4 cup water, tomato paste and mix in. Close the lid and cook on Manual for 3 mins. Let the pressure release naturally. Taste and adjust salt, flavor.
Nutrition is for 1 serve
Nutrition Facts
Harissa Chickpea Stew with Sweet Potato
Amount Per Serving
Calories 227 Calories from Fat 36
% Daily Value*
Total Fat 4g 6%
Sodium 442mg 18%
Potassium 579mg 17%
Total Carbohydrates 39g 13%
Dietary Fiber 9g 36%
Sugars 8g
Protein 9g 18%
Vitamin A 174.8%
Vitamin C 9.1%
Calcium 7.5%
Iron 19.6%
* Percent Daily Values are based on a 2000 calorie diet.
Source: https://www.veganricha.com/2018/08/harissa-chickpea-stew-with-sweet-potato.html
0 notes
Text
Jicama-Mango Salsa with Chipotle ♥
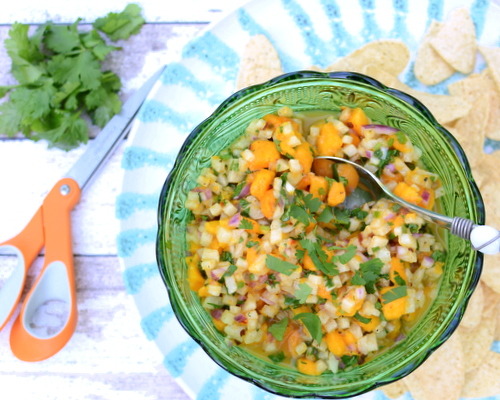
Say hello! hello! hello! to the summer's new salsa, an alluring combination of crunchy jicama and sweet mango, all bound up with a little lime juice and chipotle and brightened with cilantro. Add a few chips? Summer's sweet spot.
Great for Meal Prep. Low Carb. Low Fat. Raw. Weight Watchers Friendly & Freestyle Friendly. Not just vegan, Vegan Done Real. Naturally Gluten Free. Whole30 Friendly. And of course? Delicious!
Skip Straight to the Recipe
Can You Judge a Salsa By Its "Cover"? Not This Salsa!
GOOD TASTE First bite, I was disappointed with this salsa but put it in the refrigerator, thinking the flavors might meld. Then while jotting down a few recipe notes (that's where ALANNA'S TIPS come from!), oops, I realized that I'd forgotten an important ingredient, chipotle. So out came the salsa and in went the chipotle. Wow, what a huge difference! Just one teaspoon adds a small touch of heat but an intoxicating measure of smokiness.
GOOD LOOKS And no doubt, I expected this salsa to be prettier in the looks department. Again: it's the chipotle. It makes all the difference, muddling the fresh colors of jicama-white and mango-orange. But still: that single teaspoon of chipotle is totally worth it taste-wise.
And besides, if my book club is any guide, Jicama-Mango Salsa isn't going to last long anyway.
Kathy: "I can't stop eating this!" Ann: "What's in this? It's great!"
And the next night, I made another batch, this time using a mini food processor in an attempt to shave off some prep time. My husband and I polished it off, just the two of us, on a pretty spring evening sitting outside. He was half-surprised to learn that "dinner" was to follow!

This recipe is so quick and easy that I'm adding it to a growing collection of easy summer recipes published all summer long ever since 2009 at Kitchen Parade, my food column. With a free Kitchen Parade e-mail subscription, you'll never miss a one!
JICAMA-MANGO SALSA with CHIPOTLE
Hands-on time: 30 minutes Time to table: 30 minutes Makes 3 cups
3 cloves garlic 1 teaspoon kosher salt or sea salt 1/2 medium jalapeño, minced tiny-tiny (about 7g) 1/2 cup red onion, minced tiny-tiny (about 55g) 3 tablespoons lime juice 1 teaspoon chipotle 1 small jicama (about 12oz/340g), skin sliced off and diced very small (about 8oz/225g) 2 mangoes, diced very small (about 225g) 1 cup finely chopped cilantro Freshly ground pepper
TO CHOP & MIX BY HAND Grate the garlic on a microplane, you want to yield about 1-1/2 teaspoons. (No microplane? With the flat of a knife, smash the garlic and salt together until it forms a garlicky-salty mush.) Collect the garlic and all remaining ingredients in a bowl. Serve and savor!
TO USE A MINI FOOD PROCESSOR (saves about 5 minutes) Chop the garlic and kosher salt together in the mini food processor until very fine, you may have to scrape the sides a time or two. Roughly chop the jalapeño, add it to the processor and chop until fine. Roughly chop the red onion, add it to the processor and chop until fine. Transfer the chopped mixture to a bowl and add the remaining ingredients. Serve and savor!
MAKE-AHEAD For maximum freshness, make and eat the salsa within about 4 hours. Still, it's definitely remains fresh enough to enjoy the next day, it won't go to waste.
RESOURCES A mini food processor is a real workhorse in my kitchen, especially for small batches and chopping things that would just get lost in a bigger food processor. My Disclosure Promise
ALANNA'S TIPS & KITCHEN NOTES With a sharp knife, dice both the jicama and mango as small as you can manage. I tried doing the jicama in the food processor, nope, it just turns to mush. And besides, jicama is super-easy to dice up. WHAT IS CHIPOTLE? Chipotle are smoked poblano peppers. Buy them in small cans labeled "chipotle in adobo sauce" or something similar. Inside, you'll find pieces of chile in a brown adobo sauce. Some recipes just call for just the chile or just the adobo sauce, they're both really spicy. But I like to run the contents of a just-opened can through a mini food processor to combine the two, then it keeps in the refrigerator for a long while (my current container is a year old) to use a teaspoon or two at a time. Oh! And while there's still a bit of the combined mixture in the food processor, make a chipotle version of My Everyday Creamy Herb Salad Dressing, so so good! IS THIS SALSA SPICY? Just a little bit, though to my taste it's more smoky than spicy: and that's a good description because my heat-averse husband didn't even mention it. Real heat seekers might want to amp up both the jalapeño and chipotle. ONION Red onion is perfect for this salsa. White onion is a little harsh, a sweet onion would probably be fine. I served Jicama-Mango Salsa with Trader Joe's Longboard Tortilla Chips for my book club one night (excellent non-greasy chips with a high ratio of salsa:chip, 3 chips per SmartPoint) and alongside chicken enchiladas another. It would also be great alongside fish, tucked into tacos, draped over cream cheese for an appetizer, etc. Very handy, this!
NUTRITION INFORMATION Per Quarter Cup: 23 Calories; 0g Tot Fat; 0g Sat Fat; 0mg Cholesterol; 7mg Sodium; 6g Carb; 1g Fiber; 3g Sugar; 0g Protein. WEIGHT WATCHERS Old Points 0 & PointsPlus 1 & SmartPoints 1 & Freestyle 0 CALORIE COUNTERS 100-calorie serving = 1 cup (2g protein).
SHORTHAND RECIPE Jicama-Mango Salsa with Chipotle Equal parts jicama & mango diced small + garlic + salt + chipotle + jalapeno + red onion + lime juice + pepper. (Once upon a time, I kept "shorthand recipes" for my most-cooked simple recipes, more reminder than prescription, easily followed by intuitive cooks. Is this useful? Let me know!)

Still Hungry?
NEVER MISS A RECIPE!
For "home delivery" of new recipes from A Veggie Venture, sign up here. Once you do, new recipes will be automatically delivered straight to your e-mail In Box.
MORE SUMMERY SALSA RECIPES
~ Creamy Cucumber-Tomato Salsa ~ ~ Roasted Nopalito Tomatillo Salsa ~ ~ Cauliflower Steaks with Warm Corn & Poblano Salsa ~ ~ more salsa recipes ~ from A Veggie Venture
~ Strawberry Salsa with Sweet-Cinnamon Baked Tortilla Chips ~ ~ Green Chili Sauce (Salsa Verde) ~ ~ Avocado, Cucumber, Mango Salsa ~ from Kitchen Parade, my food column
SEASONAL EATING: THIS SAME WEEK ACROSS THE YEARS
Fresh Kohlrabi Spinach "Jelly Roll" Pancake Butter-Simmered Carrots Chutney-Glazed Carrots Pied Piper Refrigerator Pickles Roasted Asparagus with Browned Butter Pasta with Shrimp, Asparagus & Sun-dried Tomato Eggplant Caviar Kalyn's Roasted Asparagus & Mushrooms Arugula Salad with Smoked Trout & Peach Preserve Dressing Pimm's Originals for a Mother-Daughter Weekend Spinach Burgers Barely Roasted Asparagus Warm Black-eyed Peas with Yogurt & Ginger Easy Coleslaw with Blue Cheese & Apple Easy Easy Radish Appetizer Afghan Eggplant & Tomato Casserole (Borani Banjan) Deep Mexico Carrot Soup with Tomatillo & Lime
A Veggie Venture is home of "veggie evangelist" Alanna Kellogg and the famous asparagus-to-zucchini Alphabet of Vegetables.
© Copyright Kitchen Parade 2019
Source: https://www.aveggieventure.com/2019/05/jicama-mango-salsa-with-chipotle.html
0 notes