
how-do-i-cosplay
Cosplay Resources
Queue-based cosplay tutorial blog. Submissions and asks are open.
550 posts
Don't wanna be here? Send us removal request.
Last Seen Blogs

boundbymemories
Echoes of the Past

wankymcmon
Untitled

thecandystorerock
Everybody must get stoned!

katiazamolodchikova
what the fuck is going on in here on this day
katiazamolodchikova
what the fuck is going on in here on this day
Text
teru cactus/haystack wig tutorial
an anon asked me how i made my wig so here’s my writeup. disclaimer: this is only the way i chose to do it, but there are tons of other ways out there as well! also, i don’t have pics of allll the steps i used so i hope that’s ok.
the wig:

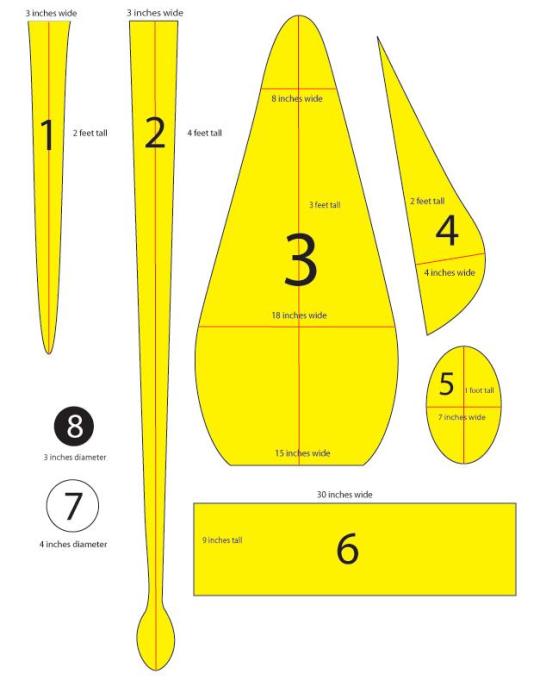
i first started off with a base wig and 2 packs of wefts. i think it was a magnum from @ardawigs in fairy blonde, and two packs of their short wefts also in fairy blonde. i actually ended up needing like 4 or 5 packs of wefts so this was a major oversight by me since i had some troubles with the wefts i need constantly being on backorder.
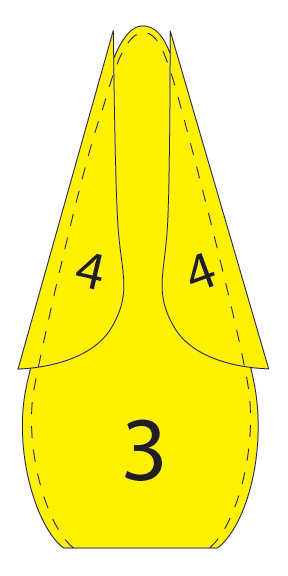
using a seam ripper, i took off the skin top and a lot of the wefts on the top, leaving a roughly 5″x5″ square of the open net. Then, i used craft foam and hot glue to make a kind of cage. the cage was circular and made up of roughly 1.5″ or 2″ strips of craft foam. if i had to do this wig again, I’d add more horizantal bars than I did, but for now this seems to be ok structurally. on 4 points, i left the vertical bars lower to cover the corners on the empty square of the wig. after my cage was complete, i handsewed it onto the wig base (didnt want to use hot glue since it would stiffen up the cap and I didnt want that). then i put a lot of polyfill into the empty cage. You can get a better idea of what I did in the picture below as well. I was using 12″x18″ craft foam, but it wasn’t long enough to reach around the entire circumference of the circle, so I had to frankenstein some of the strips together. Also note that I padded out the polyfill on the areas around the corners, and the bars are closer together at the bottom for more structural stability.

then, i took my wefts and started hot gluing them on in a spiral. i started with the wefts i took from the wig, and then when i ran out, i used my long strings of short wefts, which i applied in approximately 18″ sections so i didn’t have to deal with the full 8′ long strand. the spiral had ~1 inch of spacing between the rows. i set aside the skin top so it could be put on top of the wig when i was done. since the wefts were still very long for being short wefts, at a hefty 19″ long, when i ran out of the strands i would go through and trim sections off, and then using fabric glue, glue them together into clumps that i could hot glue onto the wig. i’ve made a shitty diagram so you can see what i mean because i suck at explaining things

and here’s a picture of the wig halfway done

you can see the glued wefts at the top of the progress line here! i continued this process until the wig was done! i would periodically go back and trim the hairs so they looked nice and werent chunky, and i added onto sections that seemed too thin or had gaps between the wefts.

(it looks like an uncircumcised penis here rip)

after fluffing and styling the wig with the help of got2b glue hairspray and a handy dandy hairdryer.
the wig is flexy and sturdy, and isnt as heavy as i anticipated. i looked through some other writeups before i did this and a lot of them used just one big cylinder of craft foam, but it seemed like it would be very stiff and i kinda wanted the ability to have it move (since it does in canon for a lot of comedic effect). i’m sewing wig clips into the front and sides so it doesnt come off since it is very heavy.
i hope this helps and im sorry if my shitty tutorial-writing skills are painful and confusing!!!
277 notes
·
View notes
Text
Cyber Modification Tutorial
REUPLOAD BECAUSE APPARENTLY TUMBLR THINKS A SEWING TUTORIAL IS NSFW
Original Dress Measurements:
Bust: 94 cm
Waist: 78 cm
Hips: 92.5 cm
My Measurements:
Bust: 104 cm
Waist: 93 cm
Hips: 114 cm

Start off with drawing and cutting out your two black panels! I made mine 6 cm+ seam allowance each, giving me an extra 12 cm in total


Split the seam attaching the lace up panel to the dress, while KEEPING the “loops” on the corset panel. We still want to be able to lace it up like normal after the modification

Repeat on the other side

At this point I went in and removed the petticoat, since it’s even smaller than the actual dress. I wore it separately, that way I can pull it down further to cover my ass, since the actual dress is super short

Carefully remove the whole panel

Now you should be left with this hole in the back!

You see these loose stitches holding the pleats together? Open them up with your seam ripper!
Each pleat gives you 6 extra cm to work with, so I opened two to match my panels. If you need more space - open up another pleat! It’s always better to make it too big and then tighten it with the corset than it is to make it too small and have to redo the whole process

I kept the centre back pleat and opened the two around it

Attach your extra panels to the corset panel! I just used a basic straight stitch

Carefully sew your new back piece onto the dress! I started with the sides and did the bottom seam (attaching it to the skirt) last. Then you just gotta make sure it fits!

BOOYAH

Now all you have to do is turn the petticoat on and you’re glowing, bby!!
207 notes
·
View notes
Photo

Lately I’ve been seeing a lot of decoden and polymer clay questions about what to use to as a gloss/glaze. Almost every time the first response is “Clear nail polish, duh!”.
This needs to stop if people want to be creating quality items. Sometimes I’m afraid to buy handmade things for fear that they have been sealed with clear nail polish and they will deteriorate over time. I want to buy things that will last!
86K notes
·
View notes
Text
How to make puff sleeves

Making a puff sleeve is not so difficult as it may seem. There are different ways how you can make it but this is how I usually do it. You can use this technic on both short and long sleeves.
Start of with a normal pattern of a normal sleeve in your measurements and draw a cross across the pattern.

Cut among the lines and separate the four pieces so you get space between them.

With this pieces you can make different kinds of patterns depending what kind of puff sleeves you are going to make.

A) By separate the four pieces like this you will get a pattern of the classic puff sleeves.
B) By connecting the upper tips of the pattern pieces you will get a sleeve that is only puffed on the lower part and normal (un-puffed) on the upper.
C) By connecting the middle tips of the two lower pattern parts you will get a pattern that is puffed on your shoulder and normal (un-puffed) on the lower part of the sleeve.

Place your pieces on your fabric like you want them, draw it out and cut your sleeve out.

Zigzag around the edges and then sew the sides of the sleeve together.

To make the puff effect on the upper part of your sleeve take needle and thread and start to sew two set of lines among the markings with big stitches.

Pull the ends of the threads on both sides to get the sleeve wrinkled.
To make the lower part of the sleeve puffed I usually use elastic band.
The elastic band will make it easier to take the sleeve on and off.

Measure your arm and make a ring out of the elastic band. Needle it to the lower part of the sleeve and sew it on. Remember to pull the elastic band as you sew.
Sew the sleeve on to your blouse and you are done!
~Firefly
2K notes
·
View notes
Video
youtube
Red blood cell’s hat tutorial - Cells at work! / Hataraku Saibou
Tutorial by: Jenny Desu
Tutorial Link: https://www.youtube.com/watch?v=QEjMULSrx3c
74 notes
·
View notes
Photo

8-foot giant squid pillow.
You’ll need:
2 yards of felt
1 yard of patterned fabric (I suggest a polka dot-type pattern so it looks like suction cups)
1 medium piece of black felt, 1 medium piece of white felt (for the eyes)
white thread, black thread and thread of the same color as the felt you’re using
pins
about 5 lbs. of stuffing
a couple big sheets of paper to draw your pattern
First, you need to draw out your patterns. Here’s a basic template to get you started, although most of the measurements are reasonably fudgeable. If in the likely event you don’t have any four-foot-long pieces of paper lying around, just tape a few pieces together.
Once you’ve drawn out your eight patterns, it’s time to cut the fabric. Pin the pattern to the fabric, laid flat, and cut out the following, leaving a half an inch or so of extra fabric around the edge of the pattern:
FOR THE ARMS: 8 felt and 8 fabric cutouts of piece 1
FOR THE, UH, LONGER ARMS: 2 felt and 2 fabric cutouts of piece 2
FOR THE BODY: 2 felt cutouts of piece 3
FOR THE FIN: 4 felt cutouts of piece 4
FOR THE HEAD: 1 felt cutouts of piece 6
FOR THE EYES: 2 white felt cutouts of piece 7 and 2 black felt cutouts of piece 8
So now you’ve got all your pieces ready, it’s time to start sewing them together. I did mine by hand because my sewing machine is busted and I get a kind of Zen buzz from sewing by hand, but if you have a non-busted one I recommend that you use it as it will be MUCH EASIER. You’re going to be sewing everything with the nice side of the fabric facing in, then turning it inside out to stuff it.
THE ARMS: (To make a quilted pattern that looks like suckers, see this other post). Pin together one patterned fabric piece 1 and one felt piece 1 (with the nice sides facing the inside). Sew down around the U-shape and back up, leaving the top open. Then turn the arm inside out, stuff it (it’s easiest to do both of these things if you sort of scrunch it up like you’re trying to put on a pair of tights, excuse the non-dude-friendly reference) and sew the top closed. Do the same for the other seven arms and rejoice in the fact that this is the most tedious part. Same deal with the two long arms, they’re just harder to stuff.
THE FINS: Pin together two of your piece 4s and sew together the curvy outer edge. Turn the piece inside out, so the seam you just sewed is on the inside, and start sewing up the other side, stuffing gradually as you go along. You should end up with a triangle-ish puffy thing. Repeat for the other two piece 4s.
THE BODY: Put down one piece 3, then place the two fins you have down with the point up and the curvy side pointing in, then make a sandwich by putting the other piece 3 down on top. Pin it all together and sew around the edges with the two fins still inside, as shown. Turn it inside out and move on to…
THE HEAD: So take piece 6 and the ten arms you’ve already done. Lay the arms, fabric side facing you, out with the arms’ top seams in a line half an inch from the top of piece 6. The order should be arm arm arm arm BIG ARM arm arm arm arm BIG ARM. The legs should be almost entirely covering piece 6. Pin them in place and sew a straight line through the individual legs seams to attach the legs to piece 6.
When you pick up the other side of piece 6, you now have something resembling a really weird untied hula skirt. Sew together the two 9-inch ends of piece 6 with the fabric side of the arms on the outside, and keep it inside out for the moment.
PUTTING IT ALL TOGETHER: Fit the open end of the body through the arms (still fabric side facing out) and pull the edge all the way through the felt cylinder so it’s even with the edge that DOESN’T have arms attached to it. Sew around the diameters of the head cylinder and the body cylinder to attach them, then pull the legs down over the head and you’re almost done!
Stuff the body, then seal it off by sewing piece 5 over the open end (even if you do have a functional sewing machine, you’ll probably have to do this part by hand).
THE EYES: Sew the black circles on the white circles and whipstitch the eyes onto the head. You do this last because you can’t tell where they’re going to end up on the end product if you put them on before stuffing the body.

162K notes
·
View notes
Text
How to: Make San’s Mask from Princess Mononoke
Looking to make a Princess Mononoke cosplay? You are in the right place! In the movie Princess Mononoke the main character, San, wears two different kinds of mask one full face mask and a half mask. This tutorial will cover how to make the half mask but the concepts could easily apply to the full mask.
Supplies:
•Newspaper
•Mod Podge (or similar glue)
•Air Dry Clay
•Modeling Paste (optional but recommended)
•Acrylic Paint (you can also use spray paint if you want to ensure a smooth finish)
•Gesso

You’ll want to begin with a bowl covered with plastic wrap to prevent sticking. Create the half mask base by building up the shape with layers of newspaper dipped in a mixture of water and Mod Podge. Let each layer dry before applying another one. After achieving a good thickness, remove the dried mask shape from the bowl. To create a realistic edge roll out a snake of Air dry clay and glue it to the underside of the mask, then layer newspaper over the clay like this:

After the mask is totally dry you can add a layer of modeling paste over top of the entire piece. This serves to create a more sturdy mask and also smoothes the surface, however this step is optional. This is a good time to make the 3D elements of the mask such as the eyes and middle band. I made these with air-dry clay and allowed them to dry on a rounded surface. You can also make the jewelry elements such as the teeth for San’s necklace.

Wait for the clay elements to dry and then cover them with a few thin layers of gesso to create an even, no porous surface for the paint to stick to. After the gesso has dried you can begin to paint! My mask after painting:

It looks sort of artificial and boring at this point right? That’s where aging comes in! Use distress ink or watered down paint and a foam dapper around the edges of the mask where dirt would naturally gather. You can also use this method to age the jewelry!

To seal all of your hard work you can use a coat of thinned out matte Mod Podge over top of the mask and teeth. Here is what my finished mask and necklace looks like:

And here it is in the finished cosplay:

I’m still improving this cosplay myself but hopefully this was helpful to anyone making a Princess Mononoke cosplay.If you have any tips, questions or concerns feel free to send a comment my way!
215 notes
·
View notes


Text
Tutorial: Fabric Painting - Freezer Paper Stencils
I had written a basic guide for fabric painting a long time ago. But it was pretty basic and I felt like it could be more detailed and improved upon. So I made a more detailed guide on using freezer paper for fabric painting!

Keep reading
1K notes
·
View notes
Photo

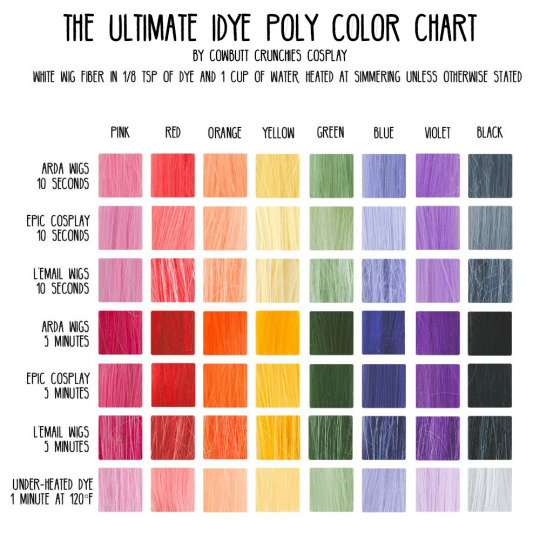
Ready to get dyeing? Using a polyester dye is a great way to permanently color any synthetic wig. IDye Poly and Rit’s new line of synthetic dye called Dyemore are two great options for wig-coloring - click below the cut for a more in-depth Dyemore review, as well as instructions to jump start your journey into wig dyeing.
Keep reading
4K notes
·
View notes

Video
youtube
This stovetop method with Rit Dye’s Dyemore works great on heat-resistant synthetic wigs such as our Classic and Silky fibers!
http://bit.ly/ArdaDyemore
220 notes
·
View notes
Photo

10 Ways to Attach Armor
Tutorial by: Valkyrie Studios
Tutorial Link: http://valkyriestudios.net/10-ways-to-attach-armor/
1K notes
·
View notes
Photo


I’m cosplaying Kazuichi Souda soon, and realized there are no good references for the patches and insignia he has, so I drew these up. Feel free to use them if you’d like!
EDIT: I’d forgotten one patch! It’s been added now
#kazuichi souda#danganronpa#kazuichi souda cosplay#cosplay resource#danganronpa cosplay#danganronpa 2 goodbye despair#danganronpa 2
261 notes
·
View notes
Photo

[TUTORIAL] Morrigan Aensland: Head Wings
Tutorial by: Hachi Cosplay
Tutorial Link: https://hachicosplay.wordpress.com/2017/06/29/tutorial-morrigan-aensland-head-wings/
165 notes
·
View notes
Photo
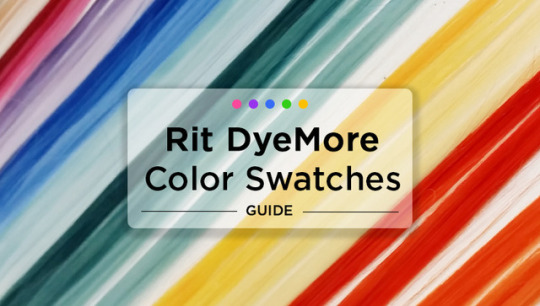


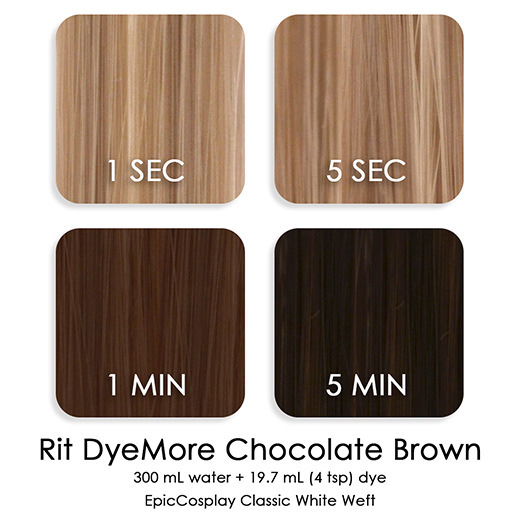
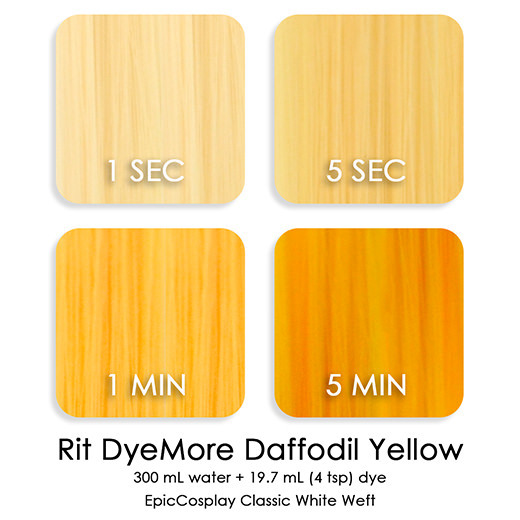
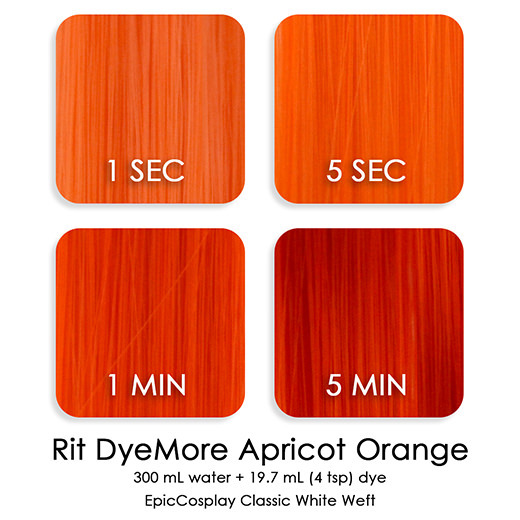

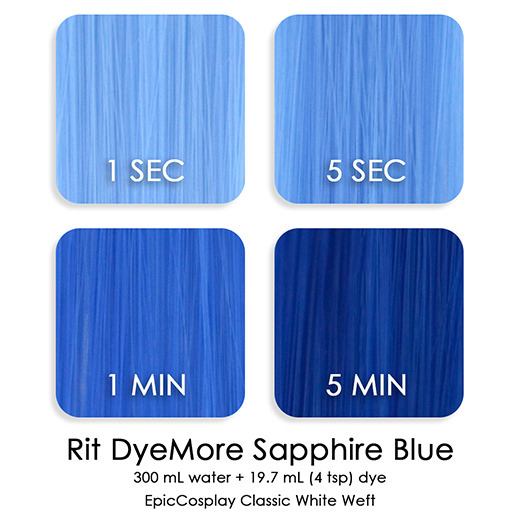
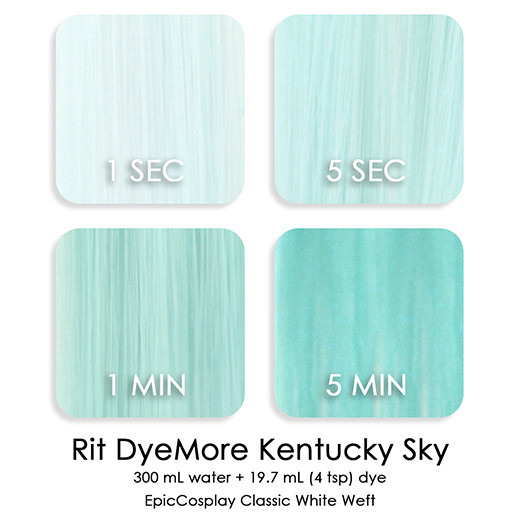
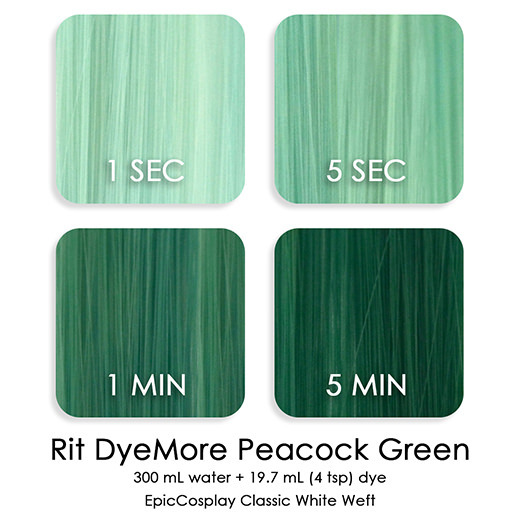
Full guide here.
You guys have asked for a dye guide and here it is! We used Rit DyeMore fabric dye, Rit’s line for polyester/synthetic materials (not to be confused with just Rit Dye). It is far more pigmented as a wig toner than their standard blends since it was developed for plastics.
Swatches were made using our Classic White wefts (keep in mind that if you’re dyeing a wig other than white, the dye will not cancel out the original color but mix with it. ex: If you dye a yellow wig with blue dye, you will get a green wig).
300 mL (1.3 cups) of water was used with 19.7 mL (4 tsp) of dye. Water was kept at a LIGHT SIMMER (180F/82C), NOT rolling boil (212F/100C). Color took more evenly when water was at a simmer.
Individual swatches were placed in the simmering water at 1 second, 5 seconds, 1 minute, and 5 minutes.
Colors may turn out differently for you depending on concentration of dye, heat, time boiled, and how the wig gods are feeling that day.
It’s important to ALWAYS do swatch tests before dying your full wig. In addition, in the event that your fibers become curly after dyeing them, please use a regular flat iron (avoid chi irons) on low heat setting to straighten them.
Happy dyeing!
800 notes
·
View notes
Note
I am very sorry, but I did not get it. Maybe send it again if possible? I'm very sorry if this is causing you trouble.
Oh snap, yeah i figured. My internet was super truper slow. My apoligies.
I’ll try to explain it as well as i can.First off, the bass is not in working order as it’s just a cosplay prop. Before making it i spent atleast 2 or 3 months researching and looking on the internet.I stumbled upon this website:http://2storyprops.blogspot.be/2013/03/marcelines-axe-bass-adventure-time.html
This gave me an initial idea as to how to start making it. I did the same thing with the insolation board and wood inbetween as he did. Also i couldn’t get “bondo” so i used some sort of putty instead and only to fix small mistakes and uneven things, not all over like he did.Here’s an album with my progress pictures in it. Wich i hope will give you more of a visual of a process.http://imgur.com/a/PNUAD#0I had to improvise on alot of materials because i couldn’t blindly copy everything he did. Also where i live i can’t get certain materials wich is otherwise easily accesible in america.So just know that if you’re going to make this, you’re gonna spend around 100 dollars on materials. Because that’s how much i had to spend too.
I highly recommend measureing everything in detail and making sure proportions are correct. I’ve seen alot of bass axes on the internet wich look like shit, only because the person didn’t spend time on this step.Draft out your pattern onto thin cardboard or paper so your can trace it onto your foam later
First i made a pattern of the bass axe based upon images from the animation. I compared the “axe body” with the neck and measured out how long i wanted it. You can see that in the first photo in the album (everything is in metric though)You can also see there’s two sheets of the cutout body out of the foam with very thin wood inbetween, i’d say that’s about 3mm thick.For the neck i used one sheet of foam and the wood on one side. Keep the neck and body seperate, also the coffin shape on top of the neck is seperate. I had to do the neck in two pieces also, just to fit out of one sheet of foam.Glue your body layers together with sillicone. Don’t use regular glue. Sillicone gets hard as balls and is totally worth it. Use clamps (and board to protect the foam) and sandwich it together and leave to dry overnight. Also do this with the neck and the wood. but keep the neck and body seperate for now.After that you can give them at least 3 layers of paper maché. Leave each layer to dry completely.Then you’re gonna use a white paint called “Gesso” so protect and harden everything. Give it at least 3 layers, and wet-sand inbetween. This is important if you want a smooth finish afterwards. Wet sanding with a fine grit paper is going to prevent gesso dust from flying everywhere and makes your surface baby-smooth. You can see there are 2 scratches and 2 cut-outs in the body. now is the time to do those. Use regular sanding paper for the scratches and cut out the ones on the side with a wood cutter (i asked my dad to do this though) Also i had to ask him to cut out a part of the body to then glue the neck in.I then used the putty to fix any irregularities. Sanded and painted again.
Now it should go more smoothly. The guitar looks almost done, but isn’t. Time to get them details. You can see in the photo somewhere, all the things i used. So for everything seen on the bass, get something in real life that looks like it. Screws, bolts, the end of a curtain pole to shape into a spike, for volume buttons i used tap water faucet thingies. Also for the strings i bought elastic and spreay painted them silver. I spent quite a few headaches over the making of the “snarebox”. Wich will hold the snares tightly, make sure this is made with detail or you’ll have a hard time trying to fix it. It’s made out of wood and for each snare it holds, theres a tunnel, inside the elastic gets a knot to keep it from coming out of the box. Um i lost track of where i was with explaining. I’m terrible at explainging stuff.But i think the photos point out the obvious.If you want more intricate details just ask. I was trying to explain as simple as i could. I’m here to help you.Anyway let me know how it’s gonna turn out!
32 notes
·
View notes