Don't wanna be here? Send us removal request.
Text
Blogpost 15: Our Conclusion
HARSHAVARDHAN REDDY DHARMA: In conclusion, our group project has been a collaborative effort that has not only enhanced our individual skills but also resulted in a comprehensive and well-rounded outcome. Throughout this project, we encountered challenges, navigated through uncertainties, and ultimately emerged with a product that reflects the dedication and synergy of our team.
Theodor Obreja: This project was the perfect opportunity to enhance our teamwork skills while working on a type of project that was new for all of us. We used our best abilities to help each other overcome obstacles and learn new things. Overall, even when faced with a totally new type of challenge, we managed to use our creative thinking and combine our ideas to create an immersive experiences.
Mica Rowson: With a unique team of artists from different backgrounds and skillsets, we were successful in creating a project that could connect to each other's work. The overall result of our dome experience proved that despite the differences of the 2D and 3D fields, it is not impossible to create a compatible environment for both to thrive in. Thus, this project has allowed us to learn about the creative practices that are new to us, as well as learn more about ourselves in our capabilities to contribute to such practices.
liuchang wang: Working with artists from other disciplines was a very new and valuable experience for me, in which I learnt about the strengths and abilities of students from different disciplines, as well as the different abilities of others from the same discipline. In this process, I learnt how to cooperate with others, help each other and work together to make 2D and 3D works, which I believe will give us a better understanding of the future cooperation between different majors.
0 notes
Text
Blogpost 14: The Final Product
With both the renders done, it was time to put them together and make the transition animations in AfterEffects. For the transition between the two scenes, the group found it fit to make a bubble transition, resembling the air bubbles that form when you dive.
To make this transition, Theodor used a particle animation effect which he adjusted to resemble the realistic bubbles.
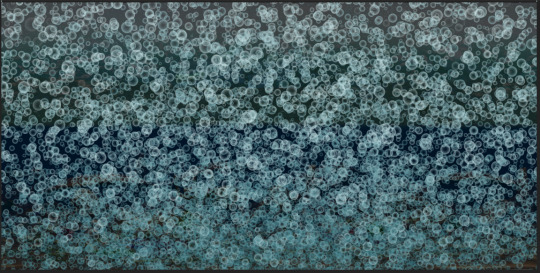
In addition, he created an intro transition resembling dripping paint, keeping the same liquid theme.

With all the transitions done, it was time to add the MP3 with the music and sound Mica created.
While producing the final version of the music, Mica referred to the version of Theodor's render prior to the final within her vegas file. This was used for the purpose of properly syncing the music with the story of our dome experience.

Thus, the final version of our music includes relevant sound effects that work with the transitioning effect animated by Theodor. Sounds such as sea waves, underwater bubbles and underwater ambience can be heard from the audio.

While the animations were being finalised as well as the renders of the environments, Mica had taken the opportunity to improve on the sky background she had drawn beforehand for the boat scene.

The final version of the sky background consisted of a fully starry image, with clouds no longer appearing to block them.
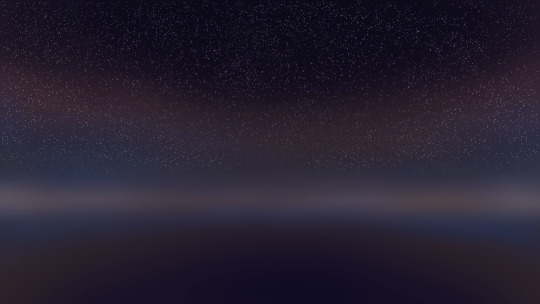
This had seem to fix the previous issues regarding the wraparound of the image within Theodor's recent render. While barely visible, the edge of the HDRI no longer shows a wide 'gap' or clashing of sides.

Overall, it appears quite pleasant in the scene, and so marks the final fix of the once ongoing issue revolving around the flawed sky.
To render and preview the final video, we used the 4K resolution with the recommended adjustments.

For the final export of the video in the dome VR format, we increased the render resolution of the project to 8K and used the provided After Effects guide. The final result is a 8192x4096 equirectangular 2:1 render, transformed in a 1200x1200 VR monoscopic dome format.

Final links for the video:
Screen recording - preview available (51MB):
Final Video 4K (2.64GB):
VR Dome View:
Final version of music below:
Features sound effects - sources below:
Sources:
AUDIO BOOK (2021) sea waves [calm sound of waves in the sea] NO COPYRIGHT. 14 January 2021. Available at: https://www.youtube.com/watch?v=2S68vLYRGkU (Accessed: 9 February 2024).
Free Audio Zone (2022) Underwater Bubbles Sound Effects - Deep Water Bubbles SFX. 5 September 2022. Available at: https://www.youtube.com/watch?v=7eR3cNJgbPI (Accessed: 9 February 2024).
Sound CFX (2023) Underwater Ambience Sound Effect (No Copyright) [Free Copyright]. 4 April 2023. Available at: https://www.youtube.com/watch?v=C7b6g-mQjXo (Accessed: 9 February 2024).
0 notes
Text
Blogpost 13: The Rendering Processes
Throughout the process we made multiple render tests so we can keep track of how the environments look at the end. To render the scenes from Unreal Engine, we used the settings we were given.
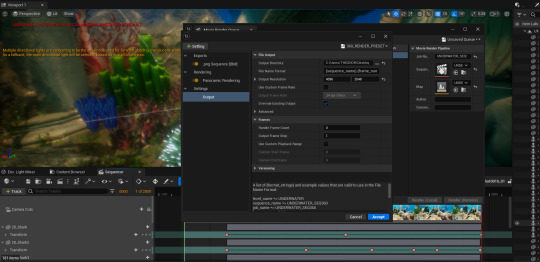
However, we bumped into some small problems with rendering the underwater scene. Because of the complex blueprint that we used for the environment, it seemed like the post processing would not render in the panoramic export. This resulted in a overexposed render with missing water effects.
After multiple tries to fix it, we still could not figure out how to solve the problem, even after reaching out to more experienced people. As a result, we came up with another solution which was to adjust the colours using curves in AfterEffects.

Theodor also worked on a displacement effect in After Effects to mimic that underwater distortion, bringing back some of that realism that was lost during the rendering process.
Water distortion map:

Water distortion after render:
0 notes
Text
Blogpost 12: Music and Animatic Stages
Regarding the audio properties of our project, Mica took the role of composer and sound editor. This process features phases of decision-making and beat-boarding that occurred throughout the production of the project's music.

Firstly, Mica searched on YouTube for royalty free music and pasted them onto Discord for feedback of the group. She ask which songs did her team members like, to which Theodor replied with 'Deep Sea' and 'Dystopia', though not separately:

Due to the contrast between two music pieces, as well as their tones risking a mismatch with our project's environments, Theodor suggested to combine these two songs and find a way to edit the "dancy" elements of Dystopia to better fit our immersive experience.
Mica used Vegas Pro 17.0 to successfully integrate both 'Deep Sea' and 'Dystopia' in a composed audio, which captures both the calmness and awe of our dome experience.
Overtime, the music was reviewed and later refined. The second version involved a video production to further support the 'narrative' drive of the music, which Mica acquired the help of Liuchang.

Both artists held a Discord meeting together in discussing about the storyboarding of the group's project, since the one prior was now outdated. Mica quickly sketched out 'test' storyboard panels above to help instruct Liuchang on what was required from the new storyboarding presentation.


Soon after, Liuchang sketched out a variety of panels to help Mica depict the scene in sync with her composed music. Using Liuchang's storyboard, Mica edited the panels to add into Vegas Pro, producing an animatic video.

This proved to be successful, and later useful in directing Theodor and Harsha on how to present and animate their Unreal environment scenes later on.
Exports of animatic and music V1 and V2 below:
Sources:
BreakingCopyright - Royalty Free Music (2019) 'Dystopia' by Neutrin05 | Calm Dark Electronic Music (No Copyright). 21 August 2019. Available at: https://www.youtube.com/watch?v=_1ThytX4ZiA (Accessed: 5 February 2024).
Fez Sound (2021) Deep Sea | Cinematic Underwater Music | Royalty Free. 11 February 2021. Available at: https://www.youtube.com/watch?v=r-52I5Goos4 (Accessed: 5 February 2024).
0 notes
Text
Blogpost 11: The Unreal Engine Process
Creating an underwater world in Unreal Engine has been a thrilling journey filled with creativity and discovery.
The collaborative synergy between the online blueprint and Mega Scans assets demonstrated the power of community-driven resources and the potential for creating something extraordinary by combining existing elements. The result is a captivating underwater scene that not only showcases the wonders of the deep but also stands as a testament to the collaborative and accessible nature of the game development community.
Below is a step-by-step process to creating an underwater environment using Unreal Engine:
Step 1: Setting Up the Project Open Unreal Engine and create a new project. Choose the appropriate project template (e.g., First Person, Third Person, or Blank).
Step 2: Importing Blueprint for Underwater Effects Search for underwater Blueprints or effects on online platforms, such as the Unreal Engine Marketplace or community forums. Download the Blueprint or effect that suits your project. Import the Blueprint into your project.
Step 3: Placing the Underwater Blueprint on the Level Drag and drop the underwater Blueprint into your level. Adjust the placement to cover the area you want to be underwater.

Step 4: Configuring Underwater Settings Open the Blueprint editor for the underwater asset. Customize settings such as watercolour, density, fog, and underwater post-processing effects. Adjust parameters for lighting to simulate underwater conditions.
Step 6: Adding Underwater Elements Integrate underwater assets, such as rocks, plants, and marine life, into your scene. Adjust the placement and scale of these assets to create a realistic underwater environment.
Step 7: Testing and Iterating Playtest your scene to ensure the underwater effects are visually appealing and the player controls feel natural. Iterate on the Blueprint settings, asset placements, and player controls if needed.

Step 8: Fine-Tuning Visuals Adjust lighting and post-processing effects to enhance the underwater atmosphere. Experiment with materials to achieve the desired visual style for the underwater world.
Step 9: Optimization Optimize your project for performance by using LODs (Level of Detail) for distant objects. Consider using occlusion culling and other optimization techniques to maintain a smooth frame rate.
These were the steps followed to create the underwater scene in Unreal Engine.
Bibliography:
(UNDERWATERBLUEPRINT):https://lynkolight.gumroad.com/l/raiev?layout=profile (Accessed: February 2, 2024)
(PLANTS) :https://quixel.com/megascans/home?category=3D%20plant&category=aquatic&category=submerged (Accessed: February 2, 2024)
(SAND) :https://quixel.com/megascans/home?search=sand&assetId=xd0mda1 (Accessed: February 2, 2024)
(STATUE AND PILLARS) :https://quixel.com/megascans/home?search=Roman (Accessed: February 2, 2024)
0 notes
Text
Blogpost 10: The 3D Animation Process
For the fish animation, Theodor created a base rig in Blender and animated a short swim looped animation. The next step was to find a way to control the fish. As a result, we created a spline in Unreal Engine.
To learn how to make the spline, Theodor followed a tutorial and experimented with the blueprint, adjusting it for the project.
youtube
Fig.1 Follow Spline tutorial
It was something new to learn, as neither of us had experience with using blueprints before. But following the blueprint, we managed to get the desired result.


After the spline blueprint was functional, Theodor and Harsha implemented it in the underwater scene and made the required adjustments so the spline follows the camera animation and matches the environment.
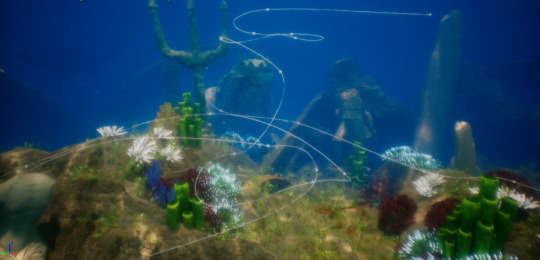
In addition, Theodor animated a sea anemone to add life to the scene and make the environment look more dynamic.
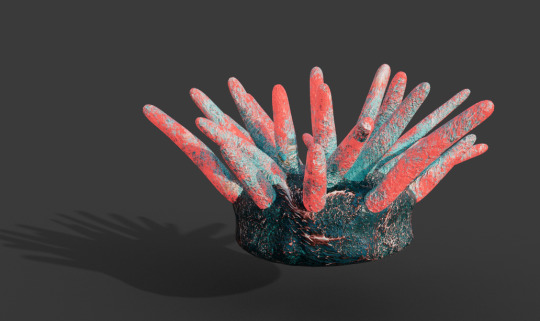
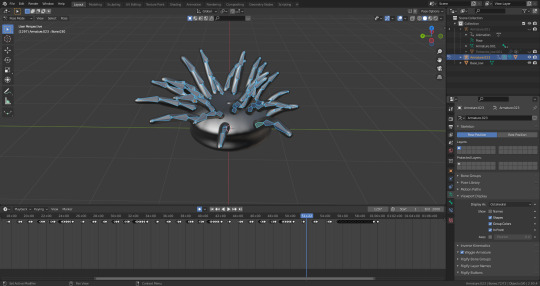
After importing the animation in Unreal Engine, we matched the fish swimming spline with the closing animation of the anemone, making it look like all the anemone close when the fish go through them.
To make the anemone close at different times, we duplicated the animation file and modified in Unreal the speed of the animation, to match the moment the fish reach their position.
Blibliography:
Fig.1: Dragonplayer (2022) UE4/5 Move actor along spline (no timeline). Youtube. Available at: https://www.youtube.com/watch?v=qKIJMQJsx2Y&list=PLmNLrfKMXuOwWtUVn-w4_IUUgeHQFwLaL&index=14 (Accessed: February 10, 2024).
0 notes
Text
Blogpost 09: 2D Inclusion to 3D
For everyone to have some of their art shown into the final projects, we decided to incorporate the 2D designs into the 3D environment. This brings variety in style and makes the final result unique.
Liuchang's part of the project was to draw silhouettes of large sea creatures on an ocean background, and after discussing this with her teammates, she chose whales and sharks.
Liuchang added a second colour to the silhouettes to add detail, as he was worried that the silhouettes alone would be too monotonous.


Because the whale itself has an elaborate pattern on its belly, more effort was put into the pattern, and not too much detail was added to the back to achieve a balance.


The shark had fewer lines and it was difficult to show detail with lines, so several composite layers were used to enrich the image.
(The shark has fewer lines and it is difficult to express details with lines, so several composite layers were used to enrich the picture.)

After receiving the PNGs from Liuchang, Theodor imported the images and used the array modifier to give them thickness. The FBX aircraft were then exported into the Unreal Engine environment and integrated with the other props.
(After receiving the PNGs from Liuchang, Theodor imported the images and used an array modifier to give them thickness. The FBX aircraft was then exported into the Unreal Engine environment and integrated with other props.)

Because of the water environment, the colour of the silhouettes had to be darken, in order to be more visible.

A few counts of issue revolving around the whale image's colour occurred through previous versions of the underwater environment, though this had been eventually fixed through recent renders.
In addition to the background of the seabed giant creatures, liuchang also needed to draw in the seabed 2D corals and added their colours.


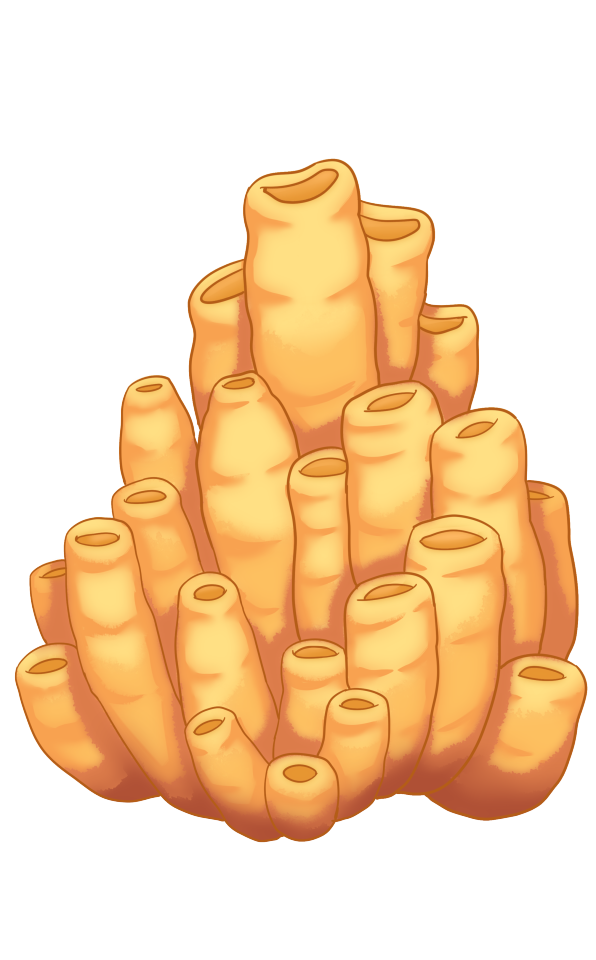
As the overall environment of the 3D is darker, the vividness of the 2D corals' colours offer more saturated colours, in hopes to make the underwater colours appear more rich.
0 notes
Text
Blogpost 08: from 2D to 3D - 3D Models
Following the concept art Mica created, Theodor started sculpting the statues and the boat.
In ZBrush, starting from a base model of a male torso, Theodor sculpted the head of Poseidon and the torso of Poseidon holding the trident. To make the sculpt, there were used multiple base clay brushes to give the statue look.


After the sculpts were finished, the Theodor retopologised and UV unwrapped the models in ZBrush, using functions such as ZRemesher.

With the low poly and high poly meshes ready, Theodor textured the models in Substance Painter. The textures were made using a marble smart material on top of which it was generated effects such as seaweed and rust.

Using the same workflow, Theodor also modeled the fish which were then animated and controlled to swim around the camera.

Moreover, he modeled different types of corals to be added in the environment, using the same workflow.

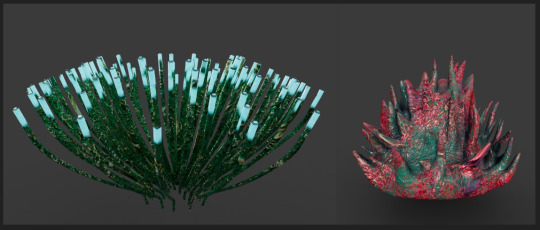
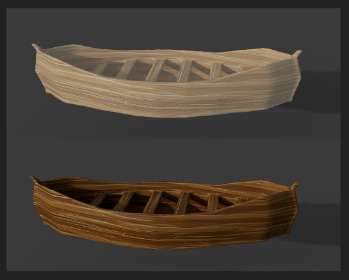
Following the concept design made by Mica, Theodor also modeled in Blender the boat that would go into the galaxy environment. He textured and integrated the boat following the same workflow previously mentioned.
It was a really interesting opportunity to have fun with different kind of coral designs, colours and textures. We also thought it would look more intriguing to give some of them emissive lights.
0 notes
Text
Blogpost 07: Atlantis Concept Art
For the text task, Mica helped Theodor with deciding on a prop design for the underwater environment; the group agreed on its setting to resemble the ruins of an Atlantis habitat.

Using a helpful free app, Mica utilised Pureref to create quick mood boards, which consist of images and concepts depicting the Atlantis myth. A few of the images above are environment works produced for Disney's relevant film, Atlantis: The Lost Empire (2001).

Mica also looked further into the statues that would occupy Atlantis, and noticed a particular theme - its environment predominantly revolved around Poseidon's statue. With this, the focus of prop included designs pertaining to Poseidon's existence.

Both artists used their Discord group server to relay to each other on the progress of the concept arts. After showing potential designs, Theodor liked the top and bottom right statue ideas, which Mica refined on accordingly. The final design both artists agreed on was the large, mid-body statue of Poseidon:

The initial design was tweaked to add more 'detail' to Poseidon's features, as well as illustrated more reasonably to fit a more 'realistic' appearance of the sea god.
Below are the finished first and second stage of statue designs:

1st Stage

2nd Stage
While drawing the second stage of the Atlantis statue, Mica used a broad reference for Poseidon's appeal. She wanted the sea god's mass to appear similar to character King Triton's, as featured in one of Disney's film, The Little Mermaid (1989).

Fig.1 King Triton
The next task after the statue designs was caused by a reconsideration of our final project idea; due to speculation of underwater being a common concept within our year group, we had decided to improvise by combining our two previously tested ideas together in making an animated experience of 'submerging' underwater into Atlantis.
Since the 'galaxy sky' idea resurfaced, Theodor and Mica had also prioritised on refining it by designing a boat for its scene. Mica produced another mood board for boat ideas - particularly row boats.

After googling and obtaining the relevant angles and types of boat, Mica went ahead to sketch out all boats within the images above. The shapes of these boats were considered first before any detail.

Eventually, Mica picked out four boats for Theodor to choose from.

This was where she added details that were unique to the boats she decided on. However, this is more of an idea on variety in design, rather than a straightforward reference for Theodor to model from.
Sources:
Atlantis: The Lost Empire (2001) Directed by G. Trousdale. [Feature film]. Burbank, CA: Buena Vista Pictures Distribution.
Fig.1: The Little Mermaid (1989) Directed by J. Musker. [Feature film]. Burbank, CA: Buena Vista Pictures Distribution.
0 notes
Text
Blogpost 06: The Chosen Idea - Planning
We decided to make a Gantt Chart in order to be able to visualize and organize our tasks, while also keeping track of the time. Because of the time pressure and the complexity of the projects, it was essential for us to have a guide plan to see how far we could stretch our ideas.

Besides the Excel file with the Gantt chart created by Theodor, Mica also posted on the Discord group updates and tasks. While the chart helped us follow the time frame, the Discord updates helped us keep track of the progress regarding our tasks.
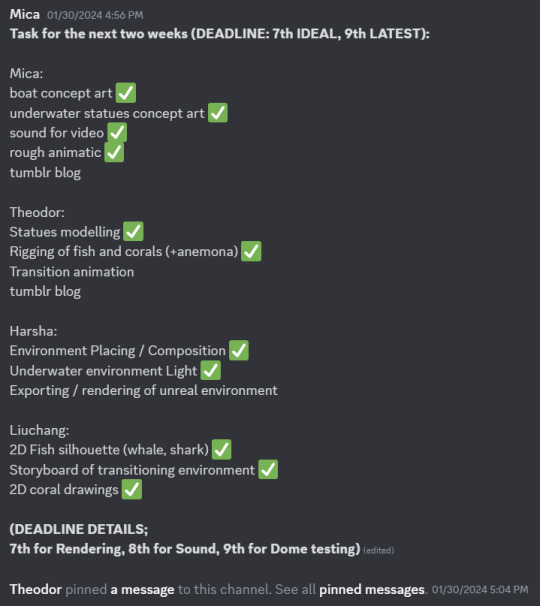
It was also much convenient to check Discord, where we constantly discussed and helped each other. Additionally, we had frequent meetings to talk about progress and the problems that we had to overcome.
0 notes
Text
Blogpost 05: Reach for the Sky - Idea #2
For the second idea that the group favoured, Theodor and Mica handled the task to produce an initial concept for it. Theodor handled the 3D aspect of this idea, while Mica focused on the 2D aspect. Both artists decided to integrate the fields of work together in this, by creating a 'hybrid' environment that can be just as immersive as a 'solely 3D' environment.
Theodor envisioned this galaxy sky idea as a setting of a calm sea surrounded by luminescent objects, such as fireflies and a starry night. He initially planned a modelled boat to be the animated focus of the experience, which would be drifting around the viewer within the dome exhibition.

To create the environment in Unreal Engine 5, Theodor made a terrain, which he then carved to create the space for the water. The water was made using a simple plain with a water material Theodor made following a simple tutorial. Adjustments were made in order to match the concept.
youtube
Fig.1 Water material tutorial
The sky was build using Mica's HDRI. To light the environment, Theodor used a directional light, combined with the HDRI Mica created. To amplify the immersive experience and make the environment more active, we also decided to add "fireflies" which are emissive particles that float around the camera.
For Mica's task, a background was required for this idea to portray a starry night setting. She produced a 2D sky painting inspired by nightly illustrations from a renowned artist who goes by the username of 'Yuumei'. The example below is a direct inspiration for Mica's work on the galaxy sky idea.

Fig.2 In Your Twilight
Mica also took inspiration from real photos on Google in panoramic form; these photos happen to 'skew' objects within from the sides to support its dimensions in a 360 degrees environment, which was something to look out for in producing an appropriate background.

With the two sources above as direct reference to work from, Mica created a PNG of 4k resolution (3840 x 2160) as preparation to export a HDRI file:

This is the first version of the starry sky background. Mica later experimented with Adobe Photoshop in merging multiple files of the same background with altered lighting into a HDR version of PNG.

As a precaution, the clouds in her painting were bent to create an illusion of perspective to the background, though this proved difficult to execute when included into Unreal, as there was a risk of the sides aligning incorrectly.
This issue was found within the first version implemented to Theodor's 3D environment:

The quality of the HDRI file proved successful, as the stars in the 'sky' are apparent and its lighting well-suited for the sea environment. However, the 'clipping' of edge caused by the clouds meant that the background had to be reworked. In response, Mica went ahead to adjust the size and positioning of the clouds, as well as altering their transparency towards the sides to reduce any obvious clashes of the edge.

This refined version of the background worked out better, with the clouds wrapping around the Unreal environment nicely. Mica also took the opportunity to add extra 'stars' within the updated background version, thus making the immersion of the sky more suited to a galaxy theme rather than just a starry night.
Still, an issue with the edge appears in this second version of background. Nonetheless, the clipping is no longer obvious, despite the empty spot in the area. This served as a future opportunity to correct, should this project idea be followed through in the end.

Regarding the overall process, this concept of the galaxy sky idea was a success; the idea was simple to execute, along with the compatibility between 2D and 3D proven as possible.
With both of our ideas tested, the team was set on regrouping and deciding on which idea to go forward with in the production stage.
Bibliography:
Fig.1: Games, G. (2023) How to make a simple water material in Unreal Engine 5. Youtube. Available at: https://www.youtube.com/watch?v=o6f7n4UhYq0 (Accessed: February 9, 2024).
Fig.2: Yuumei (2022) Available at: https://www.yuumeiart.com/#/in-your-twilight/ (Accessed: 25 January 2024).
0 notes
Text
Blogpost 04: Testing the Waters - Idea #1
As result of our designated tasks, our team was able to produce two potential concepts from our ideas as discussed prior from Miro.
Harsha and Liuchang was responsible for testing out the underwater idea. To figure out if this concept was doable in Unreal Engine 5, Harsha created a 'blueprint' of the underwater environment, featuring usable assets taken from a marketplace provided by Epic Games.
Finding an underwater blueprint online was a game-changer; it laid the groundwork for creating an enthralling underwater scene, which in turn propelled the project.
A game-changer was discovering an appropriate blueprint, and the internet is a huge treasure trove of tools for game makers. The underwater physics, lighting, and general atmosphere that would bring the picture to life were all laid out in this blueprint.

Once the blueprint was in hand, the Unreal Engine could be customized and personalized to one's liking. Quick iterations and testing made possible by the blueprint system's user-friendliness transformed the original idea into an interactive and immersive aquatic experience.

Harsha went ahead to test out a small animation loop of these fish assets, in order to see if the blueprint would turn out well. This was a successful product of the underwater idea!
Harsha then went ahead to further add more assets to the blueprint, such as including plants to the underwater grounds as illusions of seaweeds and general aquatic life. This helped bring together a cohesive idea of what the underwater experience would look like if we were to go ahead with this for our immersive dome project.
Liuchang created a storyboard for the underwater idea, which was a tricky job to pull off in 2D. Since the group hoped to implement more 'abstract' elements to this idea, Liuchang was tasked to represent this in the starting panels, showing a transition between rain and into the deep sea experience.

These panels inform a variety of angles involving the perspective of a dome layout - with the first three offering a first- person view of 'looking up' to the pouring rain and sea waves from below.
Liuchang also made a point to include more diversity of marine life to the underwater idea, which she communicated through the drawings of whales inhabiting the environment. The last panel features a collective concept of involving ancient relics hidden beneath the sea, where we want to implement Atlantis tones within this idea.
Due to fascination with the ocean's allure and mystique, we all came up with the idea to develop an underwater world using Unreal Engine. Bringing this underwater realm to life with vibrant marine life, breath-taking sceneries, and interactive components was the objective of this project, accomplished through the utilization of the powerful capabilities provided by Unreal Engine. This choice was motivated by our aspiration to provide an experience that is both visually captivating and immersive, thus making the most of the capabilities of Unreal Engine in terms of producing realistic images and creating dynamic settings. Furthermore, exploring the depths of the virtual ocean and sharing that sense of amazement with users is a thrilling enterprise that makes for a stimulating experience.
Overall, the initial works produced for the underwater idea were successful, with the potential in creating a dome experience that would be exciting to exhibit in the future!
0 notes
Text
Blogpost 03: Planning the Experience
To commence our first week as a team, we created a Discord server to help us communicate with each other and work on the production of our dome project.
Theodor added multiple channels in our server to help us keep track on all of our sources and tasks in the future, such as 'research', 'tumblr' and 'work-in-progress'. Within research, we all agreed to include inspiration of exhibition works showing immersive experience and unique concepts. As result, we gathered an array of immersive experiences and decided to delve into brainstorming on what our potential dome concepts could be.
Liuchang picked out this exhibition as inspiration for an 'integration' of environment simulation as a potential concept for our experience. Similar to the 'integration' animation found in any Assassin's Creed gameplay throughout its loading screens. This marked the first type of idea we established in our first Discord group call.
youtube
The second idea we came to stemmed from Theodor's research into aquatic simulations; this particular experience was picked as a strong source of abstract 'immersion', which Theodor suggested as a good focus of experimentation in our project.
youtube
For our third idea, Mica picked out planetarium videos detailing a dome experience of space and the universe. The obscurity of this concept leaves room for creativity to be filled in, as we all racked our brain to plan an interesting execution to delivery such an idea.

During our group call, we used the Miro site to brainstorm our ideas. We managed to come up with the three ideas based on our individual research. Thus, we went into further detail of these ideas by branching them into specific ways to portray them all.

Lots of interesting ways to represent these concepts were formed and discussed about, so we had decided to start testing out two of these ideas, as we couldn't decide between the 'underwater' and 'galaxy sky' environment ideas.
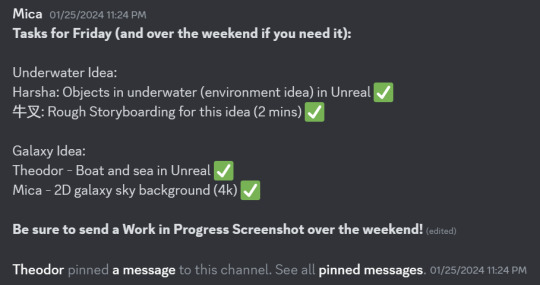
This commenced our first assignment of individual tasks, which Mica and Theodor managed a pinned comment in the Discord server in reminding each of our roles throughout the first week of production. During the brainstorming sessions, we used multiple Harnad's types of creativity (Harnad S, 2007) such as analogy, preparation, intuitive and aesthetic factors, constraints, and the most important, complementarity. We made connections between our fields, did strong research, managed to overcome new 360 VR workflow, and collaborated to create a complex immersive experience.
Sources:
Adler Planetarium (2020) Planetarium Sky Shows | Official Trailer | Adler Planetarium. 25 February 2020. Available at: https://www.youtube.com/watch?v=0ec2OhBVbVY (Accessed: 25 January 2024).
Limelight (2021) Circle of Life / Breathtaking Immersive Experience of Nature and Light. 24 November 2021. Available at: https://www.youtube.com/watch?v=Q3iIOpijMV4 (Accessed: 24 January 2024).
Shaw, C. (2022) Wallpaper*. Available at: https://www.wallpaper.com/art/sheer-will-artist-do-ho-suhs-ghostly-fabric-sculptures-explore-the-meaning-of-home (Accessed: 24 January 2024).
Harnad, S. (2007) Creativity: Method or Magic? [Online]. In: Cohen, H. & Stemmer, B. ed., Consciousness and Cognition: Fragments of Mind and Brain. Rodopi, pp. 127–137. Available from: http://cogprints.org/1627/1/harnad.creativity.html
0 notes
Text
Blogpost 02: First Session Outcomes
In our first activity, we made the critical error of cutting the provided piece of paper incorrectly; we had cut from two separate halves of the paper instead of strictly cutting from one half.
This is because we panicked - especially towards the end of our activity. This task, while simple as cutting paper, required the team's balance of planning and practicality; individuals may struggle little in executing their own ideas within a tight timeframe, but this is not the case when in groups. From this exercise, one trait that sticks out of great importance is communication, which is fundamental for our team to have in order to progress smoothly.
The second activity afterwards was an improvement, as well as a chance to see how we interacted with each other. Through more effort in communication, each of us handled our task differently, which was quickly resolved with each other's reassurance.
While our ability to produce and communicate with one another was relatively smooth, our panic seemed to strike again the closer we came to finishing up. This did not necessarily ruin our plan, though it had added further pressure to each of our tasks, which was not ideal. This weakness of ours had later on become a focus on correcting within our dome production together.
Despite our improved group dynamic...Physics did not agree with our plan, as we ended up having our egg cracked from the dropping test!
Perhaps a few aspects could have been improved to further ensure the safe fall of our egg - either inflating our balloons more, or perhaps adding more papers inside the cube to cushion the egg within.
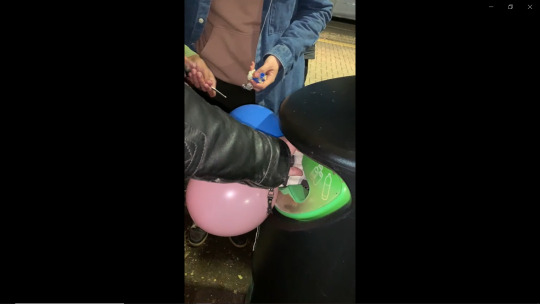
Nonetheless, we had to throw our cracked, dripping egg plan into the bin. This activity was a step-up from the previous one, though this allowed us some reflection time to consider more thought into our future production.
As well as our first few activities together, each of us completed professional tests that helped determine our work ethic, as well as our strong suits and personal weaknesses.
Mica's results:

Harsha's results:
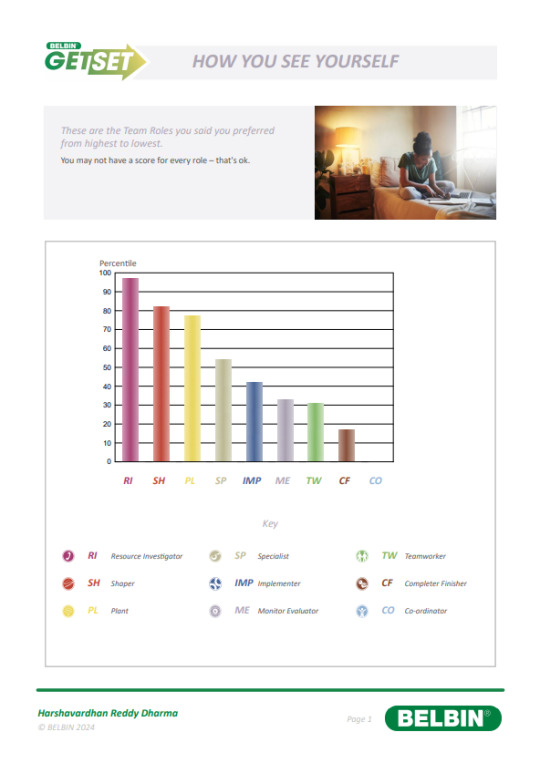
Liuchang's results:

Theodor's results:

Theodor also completed Myers-Briggs' personality test below:

These results show a wide variety of attributes that could prove a beneficial and interesting group dynamic. The different properties we all exhibit could therefore be used to our advantage, so long as we continue to communicate with one other.
The next post will explain our first Discord group meeting, as we set forth plans for our dome production!
0 notes
Text
Blogpost 01: First Lesson in Teamwork!
Starting off our new assignment, titled 'Interdisciplinary Project', our team was tasked with short activities that involved us planning and discussing our solutions to various issues.
The first activity was about halving a piece of paper into many smaller sizes in the most effective way possible. We thought about the best way to go about cutting the paper; horizontally, vertically or diagonally. This was to help us decide on which type of cut would be the most efficient in reserving enough space to further halve the remaining piece of paper.
This is the recording of our first activity, showing how we had communicated while cutting the large piece of paper.
The second activity revolved around a task in building a craft that would carry an egg from a first floor height to the ground from outside. We had an estimate of 7 minutes as a group to form a plan of succeeding in the task. We were given a variety of materials to use for our plan, and so had many ideas regarding how the egg could be placed in our practical 'device', as well as how this supposed device could safely bring our egg to the ground.

Liuchang Wang offered her idea and drew her initial plan in the middle, which involved the papers provided as a taped wraparound for the two balloons inside, holding the egg in place from within. In addition, Theodor also proposed his idea of a cubic case to plant our egg in, attached by tapes with strings and balloons to represent a parachute box. After considering both ideas, we eventually went ahead with Theodor's idea, as it seemed more likely in ensuring the egg's safety from the dropping test.
The next post will detail our outcomes from the first and second activities, as well as how each of us scored on the Belbin and Myers-Briggs personality tests!
1 note
·
View note