
Don't wanna be here? Send us removal request.
Statistics
We looked inside some of the posts by igme470 and here's what we found interesting.
Average Info
Notes Per Post
1
Likes Per Post
1
Reblog Per Post
0
Reply Per Post
0
Time Between Posts
17 days
Number of Posts By Type
Text
4
Last Seen Tumblr Blogs


Fun Fact
Tumblr was created by web developers David Karp and Marco Arment.
Text
Final Project
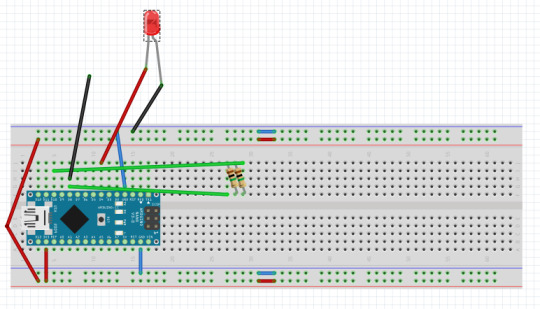
For this project, my goal was at first to create a robot that would get angry when the user bumped its nose. When I read through the project requirements thoroughly and saw that I needed to relate my project to the pandemic, I realized that my idea would still work quite well with some minor adjustments. An object easy to associate with both my idea and the pandemic is a mask, so the obvious direction to take my project was to make the robot get angry when the user took off its mask and bumped its nose. My project seeks to inspire humor in the viewer, both through the slightly cheesy look of the robot and the idea of a robot being worried about catching covid.
My project consists of a robot made primarily of cardboard and duct tape, with a mask made from paper, rubber bands, and duct tape. There is also a simple Unity app that the Arduino communicates with. To interact with my project, the user can take off the robot’s mask and bump its nose. After this, the robot’s eyes will glow red, and the background in the Unity app will turn red and display a message about the robot getting angry at the user.
For this project, I had a few issues. First, I didn’t have very many alligator clips from the materials I had. I may have been able to replace them by doing something like wrapping a wire to an led leg and duct taping it there, but I was somewhat worried that that would become a fire hazard, so I refrained from doing that. This wound up limiting the complexity of the circuit within the robot’s head: I had wanted to make both eyes LEDs, instead of just making 1 LED shine out through both eyes. I think that it was inherently a bit hard to be complex with my project idea, though, since the space within the robot’s head was very limited.
Another issue I had was connecting my Arduino and Unity. At first, Unity was throwing an error, saying that the System.IO.Ports name did not exist in the System namespace. I searched for solutions to this, and the most common one was to change Unity’s API compatibility level to .NET 2.0. However, this is the default in new versions of Unity - that advice was old. Other comments said the same thing was happening with .NET 2.0, like it was with mine, and that it could work to change it to the other option within Unity, .NET 4.x. This also did not work at first, but once I restarted Unity, it ran (although it still showed errors for the same thing in the compiler - but it worked, so I’ll take it). A final error with Unity was that the port input was functioning weirdly when I actually built the project; in the Unity editor, the port input was extremely responsive, but when I built it, it was lagging seconds behind and not behaving properly. Ultimately, I didn’t find a fix for this, so I just wound up using the Unity editor to display my final app.
I think that my project turned out quite well - the robot looks quite good in my opinion, and the circuit and app work the way I envisioned them.
Video:
https://www.youtube.com/watch?v=4jtE4jXHAu8
Circuit Diagram:
(The black wire leading to nowhere actually leads to the copper cloth in the robot’s nose)
Sources:
Nano 33 IoT Documentation: https://docs.arduino.cc/hardware/nano-33-iot
Unity with Arduino Tutorial: https://www.youtube.com/watch?v=SD3iUnLNjY0
Robot image: https://www.hiclipart.com/free-transparent-background-png-clipart-mngra
System.IO.Ports debugging: https://forum.arduino.cc/t/arduino-to-unity-system-io-ports-does-not-exist/381272
Code:
Arduino code -
#include <CapacitiveSensor.h>
int ledPin = 4; CapacitiveSensor cs_10_8 = CapacitiveSensor(10,8); void setup() { Serial.begin(9600); pinMode(ledPin, OUTPUT); } void loop() { long total1 = cs_10_8.capacitiveSensor(30); delay(10); // arbitrary delay to limit data to serial port int scaled = map(total1, 0, 90000, 0, 255); //analogWrite(ledPin, scaled); Serial.println(total1); if(total1 > 5000) { digitalWrite(ledPin, HIGH); } else { digitalWrite(ledPin, LOW); } }Unity code -
using System.Collections; using System.Collections.Generic; using System.IO.Ports; using UnityEngine;public class Communicate : MonoBehaviour { public SpriteRenderer background; public GameObject text; SerialPort data_stream = new SerialPort("COM3", 9600); public string receivedString; // Start is called before the first frame update void Start() { data_stream.Open(); //Initiate the serial stream } // Update is called once per frame void Update() { receivedString = data_stream.ReadLine(); int receivedInt = int.Parse(receivedString); if (receivedInt > 5000) { int alphaValue = (int)(255.0 / 15000.0 * (receivedInt - 5000)); Debug.Log("Value: " + alphaValue); background.color = new Color(background.color.r, background.color.g, background.color.b, alphaValue); text.SetActive(true); } else { background.color = new Color(background.color.r, background.color.g, background.color.b, 0); text.SetActive(false); } } }
0 notes
Text
Game Challenge
Team: Michael Hrehocik, Keegan Lebeau
For our simple game pitch, we discussed using some soda cans and CDs to make a simple rhythm game. The player would tap the cans and spin the cds in tune with the music in order to score points and progress through the game. Tapping a can would represent a short note, and spinning a cd would represent holding a longer note over a period of time. By accurately timing inputs to the beat of the song, the player would be able to amass points and challenge high scores from other players. There could be various different levels based around different songs, with different difficulties based on how fast the player has to move between inputs and how many inputs there are simultaneously. The soda can inputs would theoretically allow for one input per finger, as long as they are not too far apart, so the inputs are not limited to just 2 at a time (although more would be a high difficulty, and a very high amount is probably not feasible).
In order to implement the tapping mechanic we could set up each soda can as a capacitive sensor, thus being able to detect human touch. We would set a threshold on the value read from the sensor to determine if the can is slightly being touched, or if it's actually being tapped with some force. We don’t know exactly how we would implement input for the CDs, but our main idea was to attach some sort of friction sensor to the bottom of the CD that can tell when the disc is being spun, similar to a turntable. Alternatively, we could use some sort of motion or speed detection to determine whether or not the CD was rotating, and its speed if it was.
0 notes
Text
Project 2: Move
For this project, I decided to try and encapsulate a universal human concept - that of time, and how we interact with it. I thought that this concept was something that could easily be made poetic, and was easily relatable to the average user.
In my project, when the user does nothing, 6 LEDs alternate between off and on, in order to simulate breathing or walking. Over time, they switch faster and faster, as I attempt to give the user an anxious feeling akin to hyperventilating. This is meant to represent time if a person takes it for granted - it will seem to move faster and faster, as that person becomes anxious at the thought of losing out on that time.
When the user holds the copper strip, however, the lights slow down again, and move in a rhythm similar to a heartbeat. This is meant to calm the user down, and remind them that if they occasionally take a moment to slow down and focus on the small things in life, perhaps their heartbeat or the sights around them, that it is much easier to be calmer and appreciate the time they have more.
I had a few issues with my project. First, I had messed up the circuit for the transistors and LEDs at the beginning. I had wired the LEDs to ground and the transistor, rather than to power and the transistor. This meant that that entire part of the circuit did not work, and caused me many hours of confusion.
Another issue I had was coming up with a concept in the first place. I am very far from a poet or artist, so an integration of poetry with electronics was difficult to conceptualize for me. In the end, I wound up working to represent a universal concept, since I felt that it would be relatively clear and relatable.
A final issue was getting the LEDs to turn off and on as I wanted them to. At first, one would constantly be on, while the other worked properly. I then switched them to analog outputs, which made it so that each of them could be turned on and off, but made them have opposite inputs necessary for each to turn on and off, which was confusing. I never wound up figuring this out, but it worked, so I just went with it.
I think that, in the end, my project turned out relatively well: it represents the concepts that I wanted it to, and invokes the emotions that it was meant to.
Video of Project:
https://www.youtube.com/watch?v=hT2p4aIZJko
Circuit Diagram:
(Note - the black wire going to nowhere is an alligator clip connected to the copper cloth)

Sources:
- https://docs.arduino.cc/hardware/nano-33-iot
- https://create.arduino.cc/projecthub/SBR/switching-using-transistor-c9114a
- Class presentations
Code:
#include <CapacitiveSensor.h> int ledPin = 21; int ledPin2 = 20; int state = 0; float timePassed = 0; float lastTime = 0; float timeTillNextState = 500; int partLastFrame = 1; int initMarchTime = 300; int currMarchTime = initMarchTime; boolean ledState = LOW; // 1M (fast/touch only) - 40M (within range) resistor (last stripe green - blue) // between pins 10 & 8 (8 is sensor pin), add a wire or foil or fruit ;) CapacitiveSensor cs_10_8 = CapacitiveSensor(10,8); void setup() { Serial.begin(9600); pinMode(ledPin, OUTPUT); pinMode(ledPin2, OUTPUT); pinMode(13, OUTPUT); lastTime = millis(); } void loop() { timePassed += millis() - lastTime; lastTime = millis(); long total1 = cs_10_8.capacitiveSensor(30); delay(10); // arbitrary delay to limit data to serial port int scaled = map(total1, 0, 90000, 0, 255); //analogWrite(ledPin, scaled); if(total1 > 12000) { //If the state just changed if(partLastFrame == 1) { currMarchTime = initMarchTime; state = 0; } Serial.print(state); switch(state) { //Simulating a heartbeat //Turn both lights off at first case 0: analogWrite(ledPin, 512); //Off analogWrite(ledPin2, 0); //Off if(timePassed > timeTillNextState) { timePassed = 0; state = 1; timeTillNextState = 100; } break; //Then turn red light on, yellow light off case 1: analogWrite(ledPin, 0); //On analogWrite(ledPin2, 0); //Off if(timePassed > timeTillNextState) { timePassed = 0; state = 2; timeTillNextState = 100; } break; //Turn red light off, then yellow light on case 2: analogWrite(ledPin, 512); //Off analogWrite(ledPin2, 512); //On if(timePassed > timeTillNextState) { timePassed = 0; state = 0; timeTillNextState = 1000; } break; } partLastFrame = 0; } else { //If the state just changed if(partLastFrame == 0) { state = 0; } //Simulating marching or hyperventilating switch(state) { //Red light on, yellow light off case 0: analogWrite(ledPin, 0); //On analogWrite(ledPin2, 0); //Off if(timePassed > timeTillNextState) { timePassed = 0; state = 1; timeTillNextState = currMarchTime; } break; //Red light off, yellow light on case 1: analogWrite(ledPin, 512); //Off analogWrite(ledPin2, 512); //On if(timePassed > timeTillNextState) { timePassed = 0; state = 0; timeTillNextState = currMarchTime; if(currMarchTime > 200) { currMarchTime -= 10; } } break; } partLastFrame = 1; } }
0 notes
Text
Project 1 - Blink

The first video game ever created was Pong, a simple ping-pong imitation. In my project, my goal was to imitate a simple version of Pong using LEDs and buttons. I thought that this idea would work well because it’s simple enough to be represented with a circuit board, and pays homage to the start of video games.
When finished, my project turned out pretty well: it functions as a simple Pong game where the players must press the buttons to deflect the ball (represented as the lit LED) back and forth. The ball moves faster and faster the more times it is deflected, making the difficulty increase over time. When one player fails, the game resets.
I experienced a couple of issues working on the project. One issue was that I didn’t use the space on my breadboard very well - there was a lot of empty space on the left of the LEDs, and I should have flipped the LEDs so that the wires wouldn’t have to cross the center of the board (this also made it very difficult to see the first button in the Fritzer diagram). Because of this issue, I wound up not adding a scoring indicator - my breadboard was already pretty messy, so adding more LEDs for that would have been pretty awkward.
Another issue I had was in getting a portion of my code meant to make it so that players could not just hold down the buttons in order to make the ball automatically bounce back. I was trying to test the time since the button had initially been pressed against a constant time to see if it had been too long. This code wound up making it so that the player could never deflect the ball. I tried to debug it, but couldn’t figure out the problem, so I eventually commented it out. While this functionality would have been nice to have, ultimately, it’s a game balance issue - the concept of the game is still there, and players can still play, but they’ll just have to agree not to hold down the button to make the game interesting.
Video of project:
https://www.youtube.com/watch?v=XY21Xz7Uhzw
Sources:
Arduino Nano documentation - https://docs.arduino.cc/hardware/nano-33-iot
Presentations from class

Code:
//Michael Hrehocik
//Arduino Pong
//Pin info const int ledPins[] = {5, 6, 7, 8, 9, 10}; int numPins = 6; //Button closer to Arduino const int buttonPin1 = 3; //Button farther from Arduino const int buttonPin2 = 4;
//Button info int buttonState1 = 0; //State of button 1 last frame int buttonState1LF = 0; //Time since the button press started - used to make sure the player can't just hold down the button to make the game go on forever. unsigned long press1Start = 0; //How long has it been since the player pressed the button? unsigned long press1Timer = 0; int buttonState2 = 0; int buttonState2LF = 0; unsigned long press2Start = 0; unsigned long press2Timer = 0; //How long ago can the player hold the button and have it still be valid? unsigned long recencyTimer = 1000;
//Game variables //Time it takes for the 'ball' to move in milliseconds const int initMoveTimer = 500; const int minMoveTimer = 50; //How many fewer ms it takes for the ball to move from led to led each time it is deflected const int moveTimerDecrement = 25; //Current time it takes the 'ball' to move - decreases over time to increase difficulty unsigned long currMoveTimer = 500; unsigned long lastMoveTime = 0; int currPin = 7; int currDirection = 1; // the setup function runs once when you press reset or power the board void setup() { // initialize digital pin LED_BUILTIN as an output. for(int i = 0; i < numPins; i++) { pinMode(ledPins[i], OUTPUT); } //pinMode(ledPin, OUTPUT); }
// the loop function runs over and over again forever void loop() { buttonState1 = digitalRead(buttonPin1); //I tried to make it so that the player couldn't hold the button, but it wasn't behaving properly, so I'm just commenting it out /*if(buttonState1 == LOW) { buttonState1LF = LOW; press1Start = 0; press1Timer = 0; } else { if(buttonState1LF = LOW) { press1Start = millis(); buttonState1LF = HIGH; press2Timer = 0; } else { buttonState1LF = HIGH; press1Timer = millis() - press1Start; } }*/ buttonState2 = digitalRead(buttonPin2); /*if(buttonState2 == LOW) { buttonState2LF = LOW; press2Start = 0; press2Timer = 0; } else { if(buttonState2LF = LOW) { press2Start = millis(); buttonState2LF = HIGH; press2Timer = 0; } else { buttonState2LF = HIGH; press2Timer = millis() - press2Start; } }*/
unsigned long timeSinceLastMove = millis() - lastMoveTime;
//Move the 'ball' if(timeSinceLastMove > currMoveTimer) { lastMoveTime = millis(); if((currDirection == 1 && currPin == ledPins[numPins - 1]) || (currDirection == -1 && currPin == ledPins[0])) { currPin = 7; currMoveTimer = initMoveTimer; currDirection = 1; } currPin += currDirection; }
//Reverse the ball's direction if it's at one edge of the field and the button is pressed if(currPin == ledPins[0] && buttonState1 == HIGH && currDirection == -1 && press1Timer < recencyTimer) { currDirection = 1; if(currMoveTimer > minMoveTimer) { currMoveTimer -= moveTimerDecrement; } } else if(currPin == ledPins[numPins - 1] && buttonState2 == HIGH && currDirection == 1 && press2Timer < recencyTimer) { currDirection = -1; if(currMoveTimer > minMoveTimer) { currMoveTimer -= moveTimerDecrement; } } for(int i = 0; i < numPins; i++) { if(ledPins[i] == currPin) { digitalWrite(ledPins[i], HIGH); } else { digitalWrite(ledPins[i], LOW); } } }
1 note
·
View note