
Statistics
We looked inside some of the posts by imthepaladin and here's what we found interesting.
Average Info
Notes Per Post
10
Likes Per Post
8
Reblog Per Post
2
Reply Per Post
0
Time Between Posts
17 hours
Number of Posts By Type
Text
17
Last Seen Tumblr Blogs


Fun Fact
In 2020, Tumblr had 29.4 million users in the US.
Text
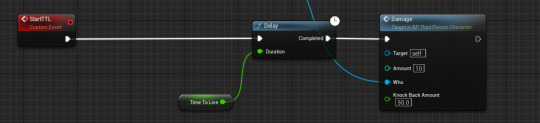
Giving my player a time to live
This is the the last mechanic I needed to add in my game. The idea is that the player has a countdown that only ticks down after the have started moving, and when it hits zero, they die. This timer is also on the player's HUD.
I had three designs for this code, all of which were triggered of a custom event that is called when the player has any movement.
#1:
This simply started a delay equal to the time to live. While this did work, the TimeToLive variable wasn't updating as the timer was it's own thing. This meant I couldn't have a countdown on the HUD, as the text that was bound to TimeToLive wasn't changing.
#2:

This blueprint would update TimeToLive, but Unreal Engine wouldn't run this code as the while loop node was seen as an infinite loop, for some reason.
#3:

I'm glad that #2 didn't work as this blueprint is much simpler and elegant. The premise is still the same, but instead of a while loop the event is simply called again at the end. This works and displays exactly how I want it to.
1 note
·
View note
Text
Changing to a static camera
I wanted a static camera in my game to let the player digest all of the level at once before making a move.
To do this, I added a camera actor and wrote the following code in the level blueprint:
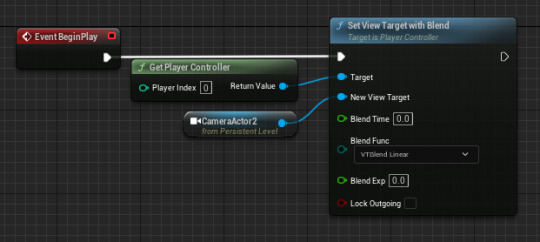
Something useful I learned about the level blueprint is that you can reference any actor by just clicking them in the viewport and then right clicking in the event graph.
This was the final result:


This also fixed an annoying bug with the other camera:
0 notes
Text
Fixing a bug
My player was still able to collide with the win block after dying, meaning this could happen:
I tried a bunch of nodes to fix it, but turns out I needed to turn off context sensitive searching and use the 'set generate overlap events' node.

1 note
·
View note
Text
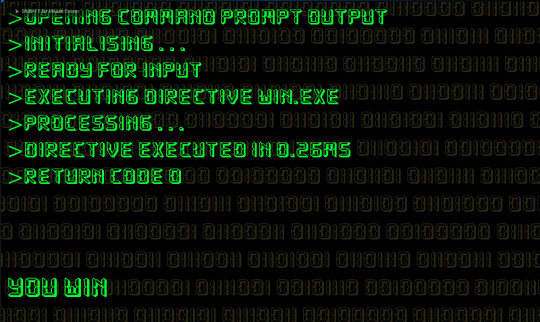
Making my title/win screens in unreal
After designing the screens, I had to put them into unreal as widgets.
The way I did this was by having separate levels for the screens, and making the widgets display via the level's blueprint, something I hadn't used before but it worked like a normal event graph.
I also had to create a game mode blueprint to prevent my character from spawning in the title/win screens. I set 'Default Pawn Class' to 'None' to stop the PC from spawning unless a player start is placed.

Title screen:
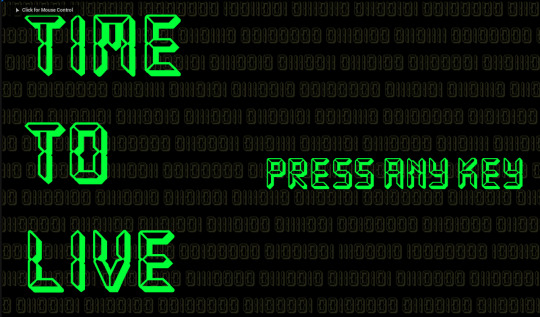
My start screen has the text 'press any button to start', and the code to make that actually happen in the levels blueprint looks like this:

My win screen had a slight issue, as it was the wrong dimensions and looked like this:

after making it 1920x1080, this was the final result (again, using widgets and the level's blueprint)
While these work as I intended, I think it would be better if there was a smoother transition between the screens. It would also be cool if the text on both screens could be printed out character by character.
1 note
·
View note
Text
Research: lose screens
Risk of Rain 2

This screen shows a lot of stats- which is cool to see, but i don't think i have enough to show in my game to do that. It also has a score, which is something simple but again- don't think it translates into my game. Finally, the time it takes to restart from here is quite long (~15 seconds) so it wouldn't work for a game like mine where you die repeatedly. Great game though.
Celeste

This is something I like more for my game. There's no option to restart, you're just thrown right back into the action after a very brief animation.
Friday the 13th (NES)

This is just a bit grim. I also wouldn't have a whole separate screen for my lose screen, at most there would be an overlay (like RoR2) or just an instant reset (like Celeste).
In conclusion, I don't think my game will have a 'death screen'. It will be an instant reset after the death animation plays. This helps to keep the pace of the game up despite the many deaths the player may have.
However, I may force the player to press a key to restart, and have the level still running in the background after the player dies. This will allow the player to analyze the level and help them find where they went wrong.
0 notes
Text
My win screen
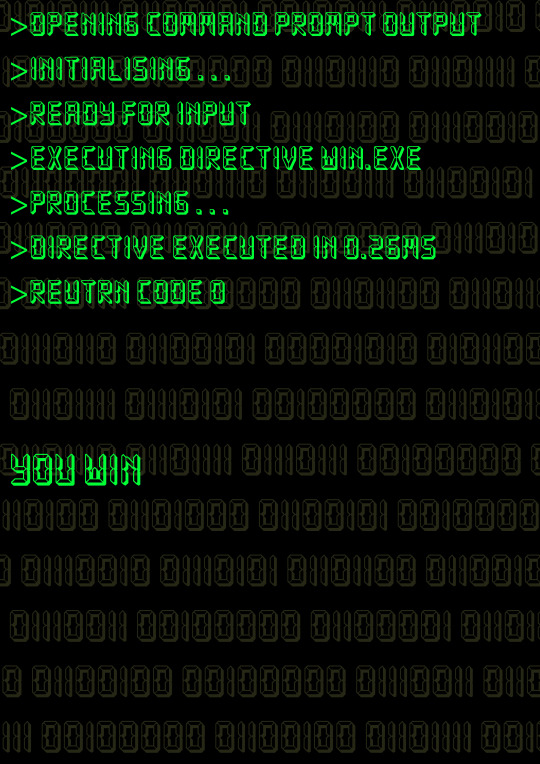
Something that would be really cool is if I could make the text appear character by character, to give it some character- this is something I would do in Unreal.
0 notes
Text
Process of creating a win screen
After importing my desired font into Photoshop, I played around with some tools to change the text's appearance.

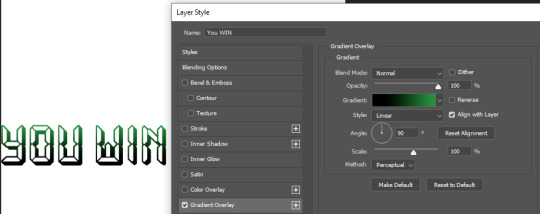

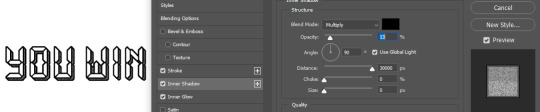

In the end I didn't change it much, just adding some noise to the black outline as I wanted to keep it simple.
Here are my final outcomes:

I think the bottom three are the best, as the lime green would pop out against a black screen/HUD. Also, it reminds me of the pip-boy from Fallout.
0 notes
Text
Fonts I could use

DS Digital fits the circuitry theme of my game, but could be hard to read.

Game Over is basic and pixelated, so it could work.

Arcade reminds me of something you would see on the Atari, and could be a could pick, but the letters are a bit wide.

Bombardier is easily readable, and has a sort of futuristic theme, so it's probably the safest pick.

Fake Hope is my favorite out of these 5, it's got the same theme as DS Digital but is much easier to read. This will be the first font I try in my game.
3 notes
·
View notes
Text
The construction script in Unreal Engine
The construction script works like an event graph, but the code inside of it is executed live in the editor.
I don't know a lot about it past that, but I have used it in my game to make:
My wire actor be able to change sprites in the editor

Allow myself to toggle a kill block on/off in the editor, allowing for some unique puzzles.

3 notes
·
View notes
Text
Maps in Unreal Engine
A map in unreal is sort of like an array, but instead of items being indexed with numbers (e.g. lsit[0], list[1]), they have corresponding keys of the same data type that tell them what item to be.

In my game, I have used a map where the key is an enumerator made of strings and the items are different paper sprites.
I then use this map to change the individual sprites of my wire actor in the editor, using a new 'FIND' node, that searches an array for a specific value.

0 notes
Text
Arrays and For loops in Unreal Engine
Arrays are simply are variable that stores multiple variables.
A For Loop node will iterate through every value in an array and execute code with that value.
I use them in my code to make a list of every object connected to a button, and toggle them all off.

0 notes
Text
Enumerators in Unreal Engine
An enumerators is basically just thing that holds a list of names. you can add it in the content drawer.

The names don't inherently have meaning or purpose, but you can give it to them in your code.
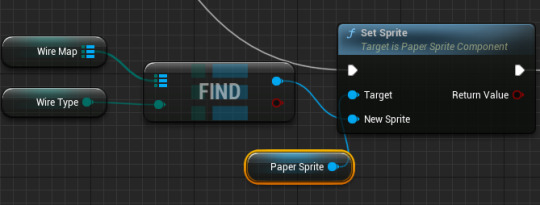
In this code, Wire Map is an array of all the names in the enumerator. Wire Type is a single variable that can be set to any value in the enumerator via the editor.
I then use a FIND node to find the matching name in the enumerator, and then that is used to set the sprite of the wire.
This helps my game by reducing the amount of actors I need for my wires down to just one.
1 note
·
View note
Text
I made a switch
I have made a switch that the player can interact with when they are colliding with it, and pressing E.

This code also turns the name of the switch I press into a variable, which allows me to have individual switches activate different things- very useful!
I am happy with the mechanics of the switch, but the vfx need an overhaul. I think changing the sprite when the switch is on and adding a white outline to it when the player is overlapping it would be good additions.

0 notes
Text
A simple enemy with patrol points
From the content drawer, I made a Character Blueprint and gave it a simple walking flipbook animation. I also made an Actor Blueprint called PatrolPoint. I made it into a sphere and ticked a box to have it appear in the editor, but not in game.
In the enemy's event graph I gave it two variables- MoveRight and MoveSpeed.

This code tells the enemy to change directions when it collides with a patrol point.
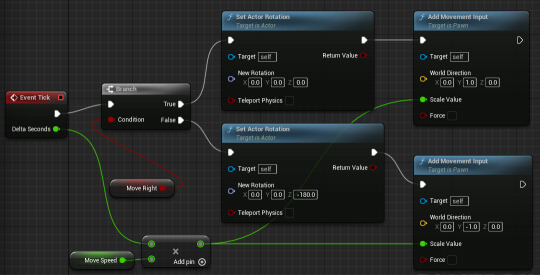
This code rotates the enemy and tells it to move at the speed defined by MoveSpeed either left or right, depending on the value of MoveRight.
This is the final result. I am happy with it, although I don't think I'll be adding an enemy like this into my game. I could however, repurpose this patrol point code into a moving platform or something like that.
0 notes
Text
I made a button work using box traces
In unreal, traces (both line/box) are essentially just a shape shot out by something. If it hits something of interest, it can signal that back to the event graph.
This code shoots out a box graph below the player every tick to see if they are on a button. If they are, it sends a custom event to the button.

Before the button even gets the 'Switch' custom event, it is checking what sprite it should be showing every frame:

When making this I learned about the select node. This works like a switch statement by taking in multiple possible inputs and returning a different value based on the input. Here it is used to decide what sprite the button needs to show.
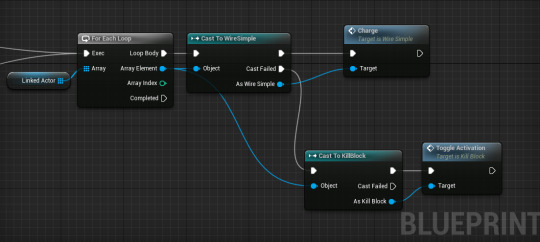
When the button does receive 'Switch', it does the following:
If the button is powered on (toggleable in the editor):
--then 0 sequence start--
Iterate through it's 'Linked Actors' array
If it finds any toggleable actors (only wires and kill blocks at the moment)- send a custom event to toggle them.
--then 0 sequence end--
this is only done twice. when the player steps on the button, and when they step off. This is thanks to the Do Once node (and it being reset when the player steps off).
--then 1 sequence start--
Set ButtonPressed to true
start a 0.05 second timer. If it ends, continue with the code. If it get retriggered in 0.05 seconds (which is longer than a tick), the code doesn't continue and the timer resets.
--then 1 sequence ends--
--then 0 sequence starts--
this resets the do once node.
--then 0 sequence ends--
--then 1 sequence starts--
this runs the same code as the first 0 sequence, toggling all the linked actors.
--then 1 sequence ends--


0 notes
Text
Every iteration of my wires
In my game, the main mechanic is that the player can interact with buttons/switches to toggle on/off environmental objects and hazards. I think I have finally found a system I am happy with, so this is a log of every iteration up to that.
multiple actors

The idea here was to rotate the 2 actors CornerWire and StraightWire to get every possible combination of wire, and somehow get them to link with each other and be responsible for their own states. However, this was scrapped as I found a method to do something similar with 1 actor.
Box Collisons, using 1 actor with an enumerator

This is the same wire talked about in my last blog post about wiring: https://www.tumblr.com/imthepaladin/730351723278909440/attempts-at-creating-a-wiring-system?source=share
I also used an enumerator to swap between different sprites. This is better than the first method as I can have all possible wires in one actor. Additionally, each wire would be able to tell itself what state it should be in via it's own event graph, making for much cleaner code.
The wires would have been connected by having box collisions at each end of the wire, with a positive/negative polarity. Negative wire ends would connect to positive wire ends, and wires would be able to be turned on by buttons and switches. This may have worked but there were too many error points and even with the help of a teacher, I could not get it to work.
Because of this- I decided to change to a third (and hopefully final) system:
Linking Actors and toggling them
By giving an array called 'Linked Actor' to my interactable, I can give them a list of objects that can be toggled when the interactable receives input. This is finicky and doesn't work the way I initially hoped. It's fine though as it still gives the same end result!
This also uses an enumerator to stay as a single actor.

The code for this involves the construction script and maps, which I learnt and will talk about in another blog post. The blueprints are as follows:


0 notes
Text
Creating a HUD in Unreal Engine
First, I created a Widget Blueprint from the right click menu, User Interface>Widget Blueprint.

This brought up a blank canvas panel, and from here I could add images and text from the left hand panel.

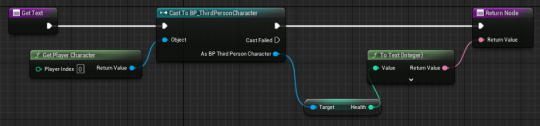
I can also bind variables to text, by clicking "bind" on a text box's details and making the following blueprint (I used my players health in this example, although I think I'll be using something different in the final build as one HP seems fitting for my gameplay).
The last thing to do is to actually add the UI to the players viewport, using the following nodes (starting from the EventBeginPlay node)

The final result:

0 notes