
Don't wanna be here? Send us removal request.
Statistics
We looked inside some of the posts by interdisciplinaryproject03 and here's what we found interesting.
Average Info
Notes Per Post
0
Likes Per Post
0
Reblog Per Post
0
Reply Per Post
0
Time Between Posts
20 hours
Number of Posts By Type
Text
17
Last Seen Tumblr Blogs


Fun Fact
There are dozens of funny blogs to kill time on Tumblr.
Text
Production Process Record 2-2 Making Forest - Kora (Demakova Ekaterina)
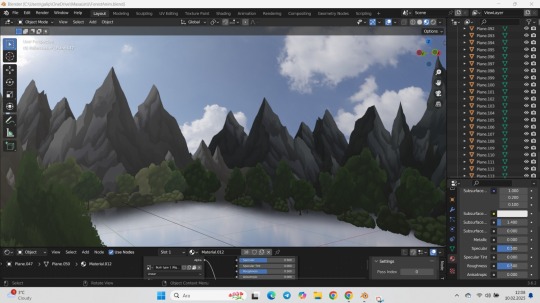
After finishing the work with the mountains, I started working on the forest itself. This time the task was not so difficult because I can draw trees more or less beautifully, so it should be fast.
To begin with, I came up with and drew 4 different types of trees for a change. They could be completely mixed together and, if there was time, create a sufficiently dense and good forest.


Initially, the idea was to have mountains in front and behind, a forest on the right and a lake on the left. However, due to the fact that the floor is not visible on the dome, we had to abandon the idea of a lake and replace it with the other side of the forest.
To do this, I drew another version of the trees, but now with a different lighting, which we could place on the left in place of the lake


Also, so that the forest doesn't look empty, I also decided to draw a couple of bushes so that they can also be thrown here and there. Of course, I did not forget to make variations of both shapes and shadows for these bushes so that they can be placed from different sides.


Finally, I decided to draw the sky as well, but in order not to complicate the task for Galip, I immediately drew the sky so that it could be stretched into a dome. Since I didn't know what it would look like, I drew several options: without clouds, with a small number and with a bunch of clouds, respectively.


0 notes
Text
Production Process Record 1-2 Making Mountains - Kora (Demakova Ekaterina)
Initially, after talking with my groupmates, I took on the task of designing the background of the forest because I was confident in my abilities. However, everything turned out to be much more complicated and confusing than I expected. Firs of all makind 2d art into 3d seemed a bit impossible and after some comunication I and another person from our group decided to combine efforts. I make the assets and Galip will put everything into 3d space for render.
Starting with the most difficult one, namely the mountains, I had to devote some time to studying and testing how various artists paint mountains.
The first option is purely mine and it was an attempt to draw at least something without much study. It turned out quite well, but it could have been better because the mountains feel kind of flat and it doesn't look good. Although they are still a little shaded and vaguely resemble mountains. But I can't leave them like that, can I?

In my second attempt, I decided to use the tactics of other artists, but it also turned out to be very difficult. Professional artists could make mountains with simple brushstrokes, and this was definitely not the style for me. Having tried to improve my first version a little, I only added a little more colors. I don't know about others, but in this picture, apart from the colors, I don't see any special differences. So I had to try to figure it out further.

Finally, in my last attempt, I managed to draw decent looking mountains. Having found the advice of one of the artists, I decided to make the shadow and light more pronounced, as if in comic style. This creates the necessary contrast to make the mountains appear voluminous.
This option went as the final work. That's why I made two mountains. The first one was supposed to be the one we're heading to, and the second one contains the cave we're driving through at the beginning of our animation.


In general, I think it turned out well for the first attempts at drawing mountains, but in the future I will definitely try to improve the quality of their drawing.
0 notes
Text
3D Space Scene Creation Process B1- Lakshay Gaur
I went ahead and started experimenting with Nebulas which was my first time working with volumes... I went ahead and created some samples for volumes while I was experimenting with the textures...


I wanted to crunch it down so it was able to render the whole animation. I wanted to work with Eevee but the problem with eevee is that there is no equirectangular camera for eevee. I couldn't go with eevee. I was stuck with cycles the above shots are in cycles and they took around an hour or so for the quality they had. I was hesitant in using these... but then I managed to create some form of volume clouds without having too much render time. After a lot of experimenting around... I was satisfied with the result and after asking around in the team... they approved it so I was like job well done..
Then onto the opening shot with the earth and how we space jump through the wormhole... I went ahead and played with the textures for earth I followed a bunch of tutorials and I came up with this... I also added asteroids and some glowing flares...

I was satisfied with it as I wanted to work on the wormhole now which was going to be all textures... I follow RuiHuang who creates all the futuristic stuff and he had made the wormhole thing. I took inspiration from it and I went ahead in experimenting with the textures to create this look.

I wanted to create an ending for the segment... so I went with creating a black hole... and I took inspiration from AlaskanVFX

With this I was done with my scene creation.
0 notes
Text
Production Process Record - 3D City scene -Mariya Mavli Wala
For our group project, after discussing with my group, I took on the task of creating a 3D city scene that would serve as the starting point of the journey before transitioning into a surreal space environment. I used Blender for the entire process, making use of different tools and techniques to build a dynamic and immersive setting.
I was confident in my ability to build the scene, but as I started working, I realised that setting up an engaging and dynamic cityscape was more complex than I had expected. I had the idea of using curves to create roads and make the camera follow them. I then started experimenting with the curves, and it gradually started coming together.

In simpler words, To create the roads which felt organic, I used curves in Blender and applied an Array modifier to generate roads that followed the curves smoothly. This made it easier to create a structured yet natural-looking city layout. Once the roads were in place, I moved on to the buildings which I sourced online.
However, during my first attempt at building the city, I made the path way too long, which increased my render time and the total number of frames. My animation, which was supposed to be around 40 seconds, extended to over a minute and more. And at the end my .blend file became too heavy that my software started to crash.
To fix this issue, I decided to start over and keep optimizing my file along the way. In my second attempt, I created a completely new road using curves again, but this time I made it shorter to keep the animation within the intended duration. I then again manually re-positioned all the buildings again. Initially, my tunnel was a simple straight path and I was quiet unhappy with it so during my second attempt, I experimented with adding twists and turns to the tunnel to make the transition feel more dynamic and engaging.


At this stage, the city was beginning to take shape, but it needed something to connect it to the next scene, which was "The Space". That’s where the tunnel came in. The tunnel was a key transition point between the city and space, so I paid special attention to its details. I even added a small destination display inside that read, Next stop: Wormhole Junction. Even though it’s barely noticeable in the final render, I liked how it added a subtle storytelling element.


With the scene built, I moved on to animation. I set up a camera path along the curved roads to create the illusion of movement through the city. The idea was to make the viewer feel like they were traveling through a modern urban landscape, taking in the sights before entering the tunnel.
As the journey progressed, the lights inside the tunnel gradually starts to fade, leaving the viewer in complete darkness for a brief moment. This pause was meant to build suspense before the final reveal. Suddenly, the viewer finds themselves in space, marking a dramatic shift in environment and tone.
Throughout the project, communication played a crucial role in our creative process. My group and I frequently shared progress, exchanged feedback, and adjusted our work to ensure everything felt cohesive. Collaborating with my teammates and brainstorming ideas together, helped me see different perspectives and approaches that I might not have considered on my own. On second note, their feedbacks also allowed me to refine my work and improve my work over all. At last, working on this project was pretty fun and helped me refine my technical skills in 3D modelling through experimentation and feedback.
Final Renders:


youtube
0 notes
Text
Work Distribution Table
Galip – 3D cave scene creation, 3D spherical roller coaster pod, integration and animation of 2D-3D forest scene, video editing & music
Kora – 2D forest scene asset design
Lakshay Gaur – 3D space scene creation
Mariya – 3d City scene creation
TzuWei Huang – Storyboarding & scene concept art, 2D animation production, team production process documentation
0 notes
Text
Production Process Record 3-3-2Danimation-TzuWeiHuang
0 notes
Text
Production Process Record 3-2-2Danimation-TzuWeiHuang
0 notes
Text
Production Process Record 3-1-2Danimation-TzuWeiHuang
0 notes
Text
Production Process Record 3 – Scene Creation, 2D Background Design, and Video Editing – TzuWei Huang
After completing the cave and roller coaster, the city scene was also finished. (The city scene was created by Mariya.)


Next, the space nebula scene underwent further modifications and testing. (The space scene was created by Lakshay Gaur.)

At this point, the mountains and forest elements needed for the 2D forest scene were also completed. (Forest scene assets were created by Kora.)


Adjusting the 2d assest in 3d environement and specifially for 360 dome perspective was both challenging and time consuming. Thats where i struggled and spent most my time. When we tried the video on the dome, it turned ot i should have put the assets a bit higher up even but unfortunately we didnt have time to do that. The animation part was also took long to get the final output as 1000+ frame long action. Overall, it has a great experience to combining 3D-2D assets together in an environment where they seem harmiously blended. (The forest scene was assembled by Galip.)


After all the scenes were completed, the final step was to place the spherical roller coaster into each scene, render the footage, and then edit everything together in Premiere Pro, adding music. In video editing part the complicated parts are the transitions and make the animation 360 dome friendly. To do that I followed a tutorial regarding how to make equirectangular animations into 360 dome resolution which I have newly learned a plug in called ''VR Converter'' in Adobe After Effects. It took me around an hour to combine 3 animations in one video and made them dome friendly. After that, I browsed a music which I thought it would go nicely with the video on Envato where it can be founded a lot of loyality free assets from. (The final editing and music were done by Galip.)


The music used in our video is
0 notes
Text
Production Process Record 2-2-2Danimation-TzuWeiHuang
0 notes
Text
Production Process Record 2-2-2Danimation-TzuWeiHuang
0 notes
Text
Production Process Record 2-1-2Danimation-TzuWeiHuang
Since only one video can be uploaded per blog post, the videos will be presented separately.
0 notes
Text
Production Process Record 2 – Scene & Animation Production – TzuWei Huang
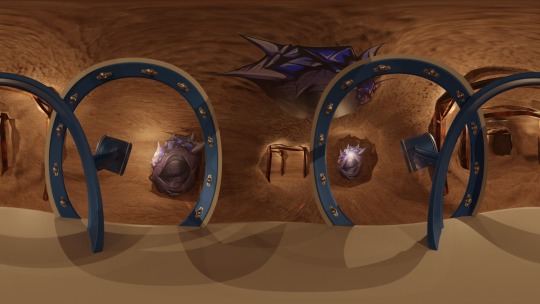
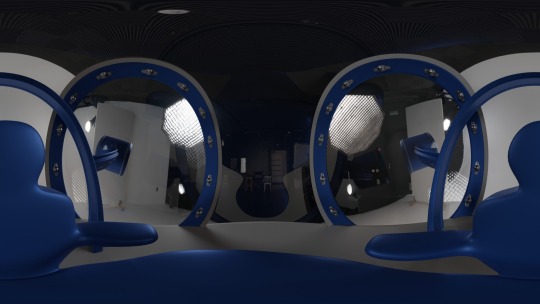
At the very beginning, we started by creating the cave scene. To contrast with the more open environments that follow, the cave was designed to be smaller and more enclosed. The displacement modifier is mostly used for modelling this kind of geometry. We tried to give as the most natural and realistic looking cave as possible to start the animation in a right foot. We firstly had modelled 2 kinds of caves and then with all team members we decided to choose this one as it was more big and curvy where we thought we could we give the best idea to the audience. It took us 2-3 days to model it from scratch and texturized it. (This cave was created by Galip.)


Next, we created the spherical roller coaster pod. At the beginning we discussed to model a more convetional rollercoaster with a railway underneath. Then we decided if we made more sci-fi rollercoaster model with all glass coating outside it would be both more interesting and feasible for audience to follow up the 2 min long video inside of the dome. It took us 2-3 days to complete that geometry as well as adjusting the camera inside and texture process. We arranged a parenting system for the roller coaster where everyone in the group could give animation and play with it as easily as possible. Once we adjusted everything we started to get test renders from inside of the rollercoaster to see how it looks at the end. We could have added a smoke or fire effect behind the engines that would have been more interesting but sadly we didnt have time to do that but other than that we quiet happy with the last output regarding rollercoaster. (which was made by Galip).


After a team discussion, we decided to add thrusters on both sides of the spherical pod to make the roller coaster design look more logical and functional.

This is a 360-degree view test image in Blender.

At the same time, a concept sketch version of the 2D animation to be used in the video was also created. (Animation by TzuWei Huang.)

At the same time, the first version of the space nebula test image was also completed. (The space scene was created by Lakshay Gaur.)

0 notes
Text
Production Process Record 1 – Dome Idea Discussion, Finalization & Task Distribution, Storyboard Discussion – TzuWei Huang
Our team held its first online meeting on January 27th, with the main goal of discussing what kind of Dome video we wanted to create.
For specific ideas from each group member, please refer to other blog posts.
In the end, we decided to create a roller coaster-themed video, allowing the audience to experience four different scenes from inside a roller coaster cabin. Throughout this two-minute immersive video, we aim to evoke feelings of surprise and excitement.
Additionally, considering that our team members specialize in either 2D or 3D, we decided that the four scenes will be designed using a combination of both 2D and 3D elements.
Our initial concept for the four scenes includes:
Cave (15s)
Forest (30s)
City (34s)
Space (25s)

After finalizing the scenes, we began discussing the storyboard (storyboard and some scene concept art were created by TzuWei Huang).

During our second online team discussion, after completing the storyboard and gathering various reference images, we finalized the following decisions:
The video will be in first-person perspective, looking outward from the roller coaster, without showing the rider’s limbs.
The roller coaster track will be removed, and the video will start with the audience already seated inside the roller coaster. This allows the focus to remain on the scenery while maximizing the use of the two-minute duration.
The roller coaster design will be inspired by the spherical tour vehicle from Jurassic World.
The cave scene will feature a dinosaur eye appearing.
The forest scene will have a bright, daytime atmosphere.
The city scene will depict a modern urban environment.
The space scene will focus on nebulae.
After finalizing the production direction, we proceeded with task distribution. (For a detailed breakdown of task assignments, please refer to other blog posts.)
0 notes
Text
Idea Proposal - TzuWei Huang
Advance Notice Sorry for the delay—I’m only now posting the blog entry that was supposed to go up in the first week.
Brain Rot – Proposal
(Inspired by the 2024 Oxford Word of the Year)
Concept
In this two-minute video, I aim to let viewers experience the anxiety and unease caused by information overload and then transition to a feeling of calm and presence by putting down their phone.
Story Flow
Information Overload
The video starts with an increasing flood of short videos, sounds, and posts gradually appearing.
As the overload peaks, the visuals mimic a signal glitch with shaky footage.
The Transition
The screen displays a single word: "Breath."
The word transforms into a butterfly that appears on the top of an oval-shaped screen.
The butterfly scatters in all directions—forward, backward, left, and right.
Interactive Moment (If Possible)
If the timing is well-coordinated, viewers may be able to "touch" the screen to interact with the butterflies.
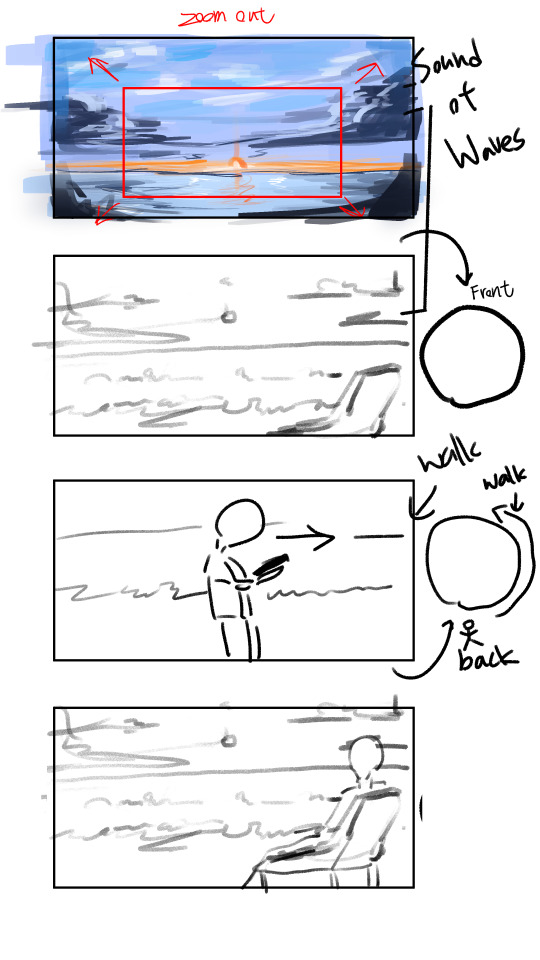
When touched, the scene transitions into a sunrise at the beach.
Final Scene – Finding Peace
The camera pulls back, revealing a beach with lounge chairs.
In the background, a hand holding a phone walks toward the lounge chair, places the phone into the sand, and gazes at the sunrise.
The phone remains stuck in the sand as the video concludes, symbolizing letting go of digital overwhelm and embracing the present moment.


0 notes
Text
Preliminary Research - TzuWei Huang
Advance Notice Sorry for the delay—I’m only now posting the blog entry that was supposed to go up in the first week.
After learning that our group project would be a 360-degree immersive video, I quickly organized my thoughts on the different types of immersive videos that exist today, as well as the types I personally think would best suit this project.
I hope that by collecting and organizing this information, I can help generate ideas later in the brainstorming phase.
Video Types & Emotional Experiences
First, in terms of video types and emotional impact, I think they can be categorized into the following:
Video Formats
Looping Playback Format
Non-Looping Playback Format
Video Emotional Experience
(e.g., happy, sad, scary, humorous, etc.)
Consistent Emotional Experience
Transformative Emotional Experience
Then, regarding the Looping Playback Format, it can be further divided into four categories:
Irregular Line and Geometric Patterns
Nature-inspired Themes
Single Geometric Form
Realistic Photograph Style
youtube
youtube
youtube
youtube
Next is the Non-Looping Playback Format, which is more narrative-driven. There are fewer immersive videos of this type, so I found a short film of around two minutes as an example.
youtube
Next is the emotional experience in the video.
I believe that although a two-minute runtime is relatively short, there is still an opportunity to create either a consistent emotional experience or a transformative emotional experience within the video.
To illustrate this, I have selected two example videos.
youtube
(consistent emotional experience)
youtube
(transformative emotional experience)
Through this research, I discovered that most 360-degree immersive videos tend to have less narrative-driven content. This piqued my interest, and I would like to explore this aspect further.
Moving forward, I hope to continue brainstorming ideas in this direction.
0 notes
Text
Ideas and Inspirations
Kora (Demakova Ekaterina)
Inspirations:
Example 1
In this video the idea is simple, since it is just a tunnel with music visuaisation. It can be a very interesting and mesmerizing thing to watch. This might be a good idea to use in the project
youtube
Example 2
This video shows one of exibitions int the mseum of ArtScience in Singapore. I was there so I can tell that this way of making exibitions is very entertaining and people are happy to participate in interactive nature of this museum. In this project we probably cannot create something interactive, however, it might be a good example of what we could have made if we had a lot more time
youtube
Example 3
All in all this museum is mostly interactive and shows many illusions, but the part that i want to look at is the tunnel. Same as tunnel in vr with music visualisation, this one can be a good idea of what we can make. However, this typeof tunnel is more disorienting than visualazing which makes it interesting to be in and experience it. As a person who was there I can say that it is easy to lose balance there
youtube
Ideas
Since we decided to combine 2d and 3d in our works I thought of some ideas which we can use
Idea 1:
Since people are going to lie underneath the dome we can make it black, then the floating lights will decend from above, slowly becoming a flash of light. After that the dome would show the forested area where people can see maybe animals running around. All of this forest can be made by 2d artists of our group. After a bit there would be another flash of light and viewers would be transported into space. This part can be made by 3d artist people in our team.
Idea 2:
2d artists create the enviroment like the inside of a rocket ship, but windows are see through. Enviroment outside will be created by 3d artists and we can show how the rocket flies out to space. We can show some interesting space scenes
0 notes