
Don't wanna be here? Send us removal request.
Statistics
We looked inside some of the posts by jacksstudioblog and here's what we found interesting.
Average Info
Notes Per Post
0
Likes Per Post
0
Reblog Per Post
0
Reply Per Post
0
Time Between Posts
3 days
Number of Posts By Type
Photo
12
Text
4
Video
1
Last Seen Tumblr Blogs


Fun Fact
When “GIF” was named word of the year in 2012, Oxford Dictionaries U.S.A. credited Tumblr for pushing the word.
Photo
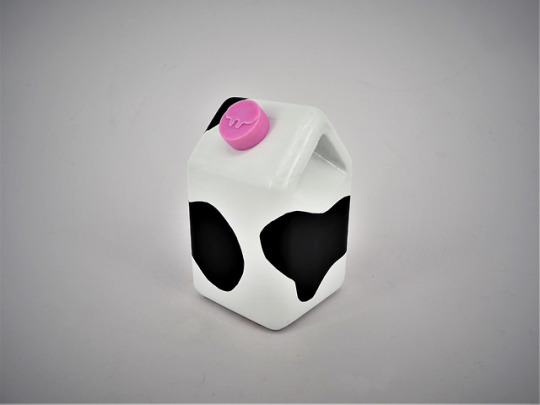

Finally, I created my engineering drawing of the cap and took a bunch of pictures, both in the photo booth and my dining hall. I took my two favorites and cleaned them up in photoshop.
If I could do anything differently, it would be have more time, but that’s my fault. It would have been nice to clean up the finish more on the paint, but I was a little tight on time. Either way, I am still very pleased with how the carton came out, and it was very cool to cad a thread, print it, and have it fit just right.
0 notes
Text
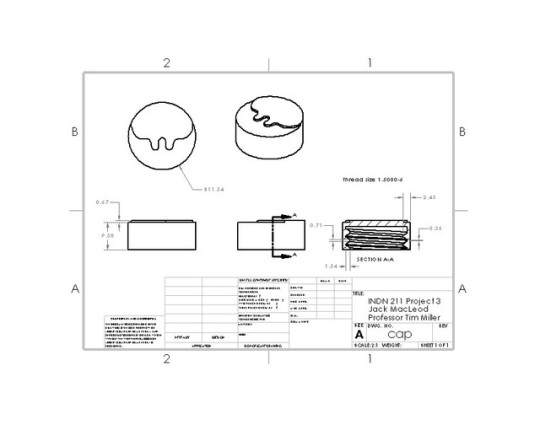
The Cap
Since I had to hand this project in early, I had to print my cap on the J750. It still came out perfectly, with the threads meshing very nicely. I sanded the cap to smooth it out and glued the inside end to my bottle. My prototype was complete.
0 notes
Photo
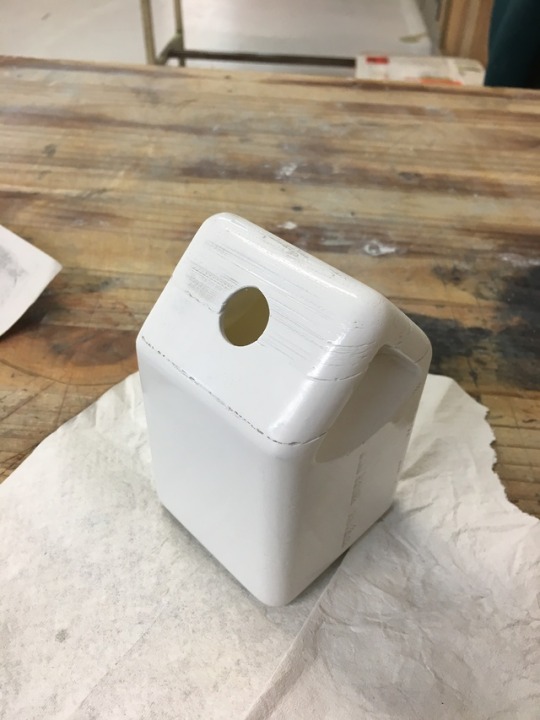


Once I had the two parts glued together, I sanded the whole thing a lot to try and work out the imperfections from the printing. This proved to be nearly impossible, but I figured I could mask some it with the black spots (and photoshop). I started applying the white layers and sanding in between, which I did several coats of.
Once that was dry, I covered the whole thing in painters tape and cut out the spots that I would paint black. When I put on the first coat, it did this weird thing where it started cracking, and I didn’t think I but on a heavy coat. I think the reason for this was a combination of the fact that I bought the cheapest black spraypaint at Bunnings and that it probably didn’t adhere well to the other paint. After more sanding and a couple coats though, it was good enough and I peeled off the tape ( which was fun). The black only bled through in a couple places and I was able to sand it off with a fine grit sandpaper.
0 notes
Photo


Now I started printing, which proved to be a lot of trouble. For the first try (top left) it printed on its side and failed early on when the layers stopped sticking to each other for some reason, but luckily I caught it before too much filament was wasted. One good thing was I realized this model was awkwardly large, so I scaled the next one down significantly.
For attempt 2 (top right) I printed it upright, which was going really nicely until my filament decided to stop extruding completely. At this point I thought maybe the 1 degree draft angle was messing with the geometry maybe so I eliminated it.
For attempt 3 (bottom left) I did the same thing but without the draft angle. I nearly made it through the whole print until the layers started separating again. This whole time I had been changing printers so that wasn’t the issue. I was so frustrated by now, and running low on filament, that I chopped my model in solidworks and printed the rest separately. That came out nicely, and I sanded both ends down and glued them together.
0 notes
Photo
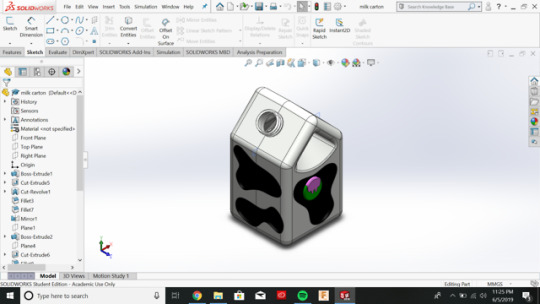
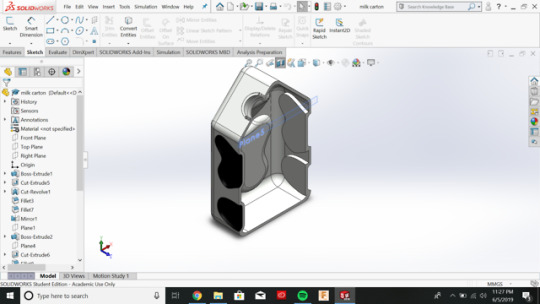

Next, I went to solidworks and started modeling up my ideas. I ran into a couple issues here. First, I created the carton out of two halves and created a draft angle of 1 degree towards the center to stay accurate to vacuum forming needs. However, this caused a lot of issues with creating a shell and 3D printing, so I removed that feature.
Also, I had incorporated a cowhide pattern that was indented in all the sides, but realized this would created undercuts. I took it out and decided to paint them on afterwards. I also removed the logo from the side of the bottle and chose to only feature it on the cap.
The reason the inner thread is separated from the body is because I printed it on the J750 instead of the UP printers.
0 notes
Photo

I started by doing some thumbnailing. The approach I took was thinking of different types of bottles that are small because the limit was 220 mL in volume. My favorite idea ended up being making a milk carton and decided to move forward with that.
0 notes
Text
Project 3
For project 3 we were tasked with designing a bottle. The parameters were that a threaded cap be included in the design and that the bottle be designed in such a way that vacuum forming would be possible (i.e. no undercuts, constant wall thickness, etc.)
0 notes
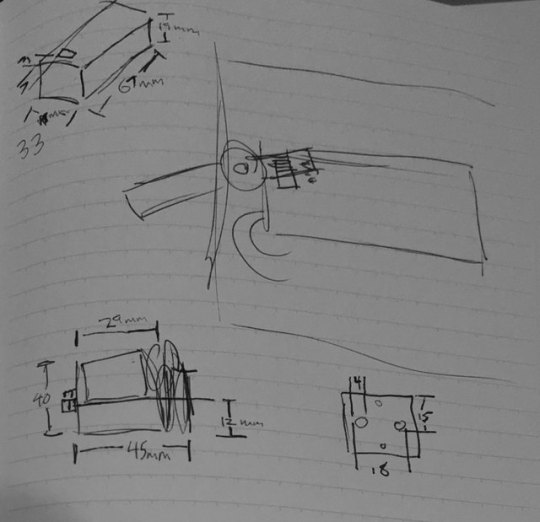
Photo
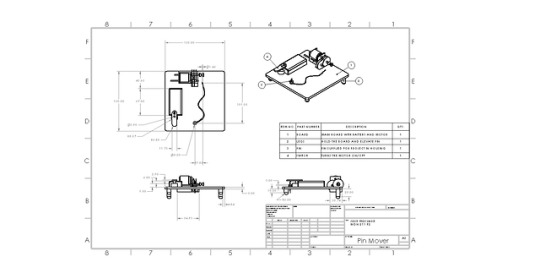
Here is the final technical drawing of my pin mover in 1:2 scale
0 notes
Video
tumblr
Here is my 10 second video of the motion. I shot it on a camera checked out of the workshop, and it took me a little while to figure out how to use it. I still don’t quite think I completely figured out how to use it to its full potential, but came close enough.
0 notes
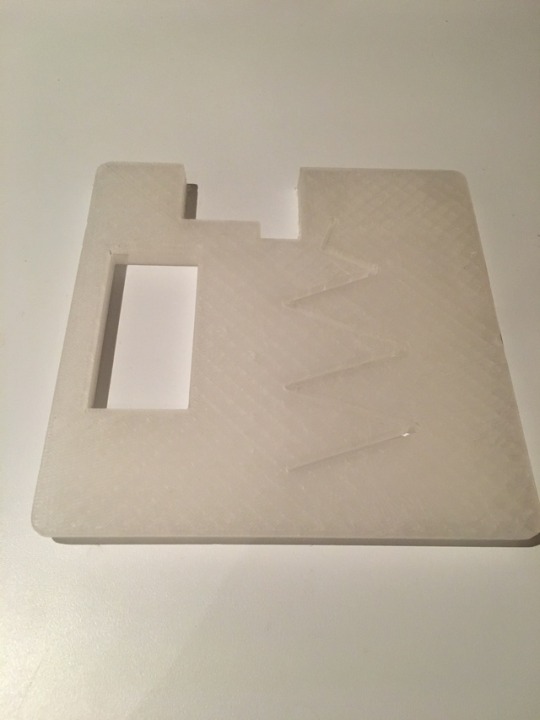
Photo


The print came out well, and I got to assembling the final model. Once I got all the support material off (which took a while), I glued on the switch mechanism and the offset legs, which gives the pin its 4 mm vertical displacement. For the string, I used dental floss because it isn’t very bulky.
0 notes
Photo

For the final version I changed to path to be much more flowing to ensure that the pin would get reeled in smoothly by the motor I also designed a switch mechanism that is slightly more glamorous than the switch on the battery pack.
I considered laser cutting, but I decided to 3D print it mainly because I bought a whole roll of filament and am trying to use it all instead of buy other materials, since I am only here until the end of the trimester when I home to the states. I’ve also laser cut in the past, and want to get more comfortable with 3D printing.
0 notes
Photo

Once I was happy with my Solidworks model, I printed it. The first time, the print failed early on because my filament got tangled. The second time around, it failed again, but enough of the board was printed for me to be able to use it. When I set it all up with the motor, The pin still couldn’t make it around the corner because it was a shorter string distance from the motor to the pin at the middle of one of the straight portion than at the corner. So I went back to the drawing board.
0 notes
Photo

I decided to simplify from the first iteration and incorporate the track into the board. I also realized such a wide track like was on the previous version would not work because the string would get stuck going around the corners. So for this one I narrowed down the track, hoping the string would be able to pull the pin in.
I also went to Jaycar and picked up a motor, gear box, and battery pack. I measured them to create housings in the board to fit these parts.
0 notes
Photo

Over mid-trimester break I got an internship for the Summer (humble brag), and realized one of the job requirements is knowing Solidworks, which also happened to be a skill listed on my resume because I planned on learning it. So, I decided this project would be a good place to start. I started modeling my idea on the software and watched some tutorials when I got stuck. I found it is similar to Fusion 360, but there is definitely a learning curve. So far I haven’t found it to be more powerful or useful, but that is probably because I am still learning.
0 notes
Photo

I started with some ideation and thinking about how I could move this pin. I thought it would be pretty straightforward to create some sort of rail system for the pin to slide along and pulled by a string. I also thought it could be cool to make some kind of rollercoaster, but creating some sort of elevator to get the pin up in the air could get very complicated.
0 notes
Text
Project 2
For Project 2 we have to design a contraption to move a pin across three planes using a motor.
0 notes
Text
The Finished Product

I finally achieved a finish that I was satisfied with on the printed parts, so I proceeded with super gluing them to the metal part of the pen. This was fairly stressful, but I did a good enough job with it. Finally, it was time to take pictures. I took a bunch, and decided these three were my favorites to show off the pen.
0 notes