
Don't wanna be here? Send us removal request.
Statistics
We looked inside some of the posts by jb-fmp-year-two and here's what we found interesting.
Average Info
Notes Per Post
4
Likes Per Post
2
Reblog Per Post
0
Reply Per Post
2
Time Between Posts
3 days
Number of Posts By Type
Text
17
Last Seen Tumblr Blogs


Fun Fact
Celebrities use Tumblr as well.
Text
• Final Thoughts
• Why I chose Unity
Out of every game engine in existence, why did I choose Unity? Simply because I know it best. I find Unreal Engine to be limiting, and I'm not too big of a fan of their recent additions, and how unoptimised they really are. As for Godot, it's still quite a new game engine and doesn't have nearly the amount of online support and features as some of the other game engines. I could talk about all the other ones I know, but those are the most well-known. I do not doubt I could have created the same core gameplay in any of the game engines I talked about, Just not to the same quality as what I came up with.
• What PEGI rating is my game?
Violence: There is no realistic or graphic violence shown, and the combat system is abstract and unrealistic.
Fear: The game contains no common fears in any realistic or intended sence.
Language, Drugs, Discrimination, Gambling, Sex: There are no mentions of these.
Visually the game is "silly" and stylized, making this game probably somewhere around a PEGI 7.
To further solidify my evaluation, here are some other games that are quite similar to my own, in terms of gameplay, and their ratings:
Splatoon (1, 2 & 3) : PEGI 7
Party Animals : PEGI 7
Gang Beasts : PEGI 7
Mario Kart : PEGI 3
Overall, these games have many similarities with my own, and all have the same rating I came up with, or lower.
• The Audience
Having taken insparation from this type of game, it is fair to say the intended audience for my project is a family audience. The outcome is designed to be acceptable for a younger audience, while remaining enjoyable for an older audience.
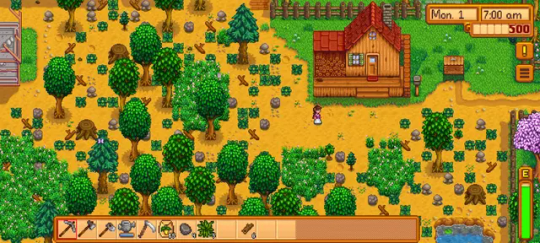
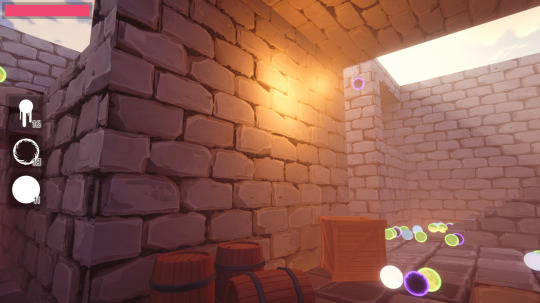
• The Map
While in my proposal I stated I wanted to have multiple different maps, all with different and unique themes, I only managed to create the one map. So, here's how it turned out:
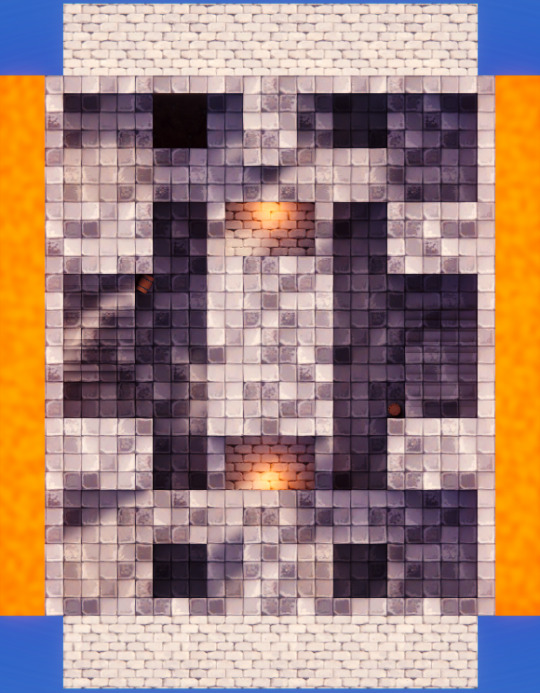
Top Down view showing the top and middle floors

A side view showing the verticality (a little hard to tell the different floors)
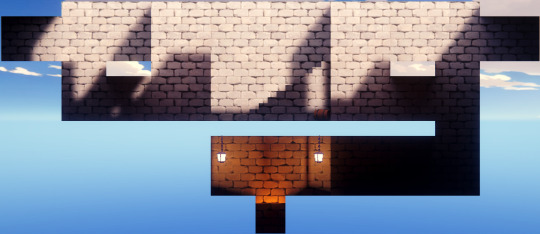
The other axis side view
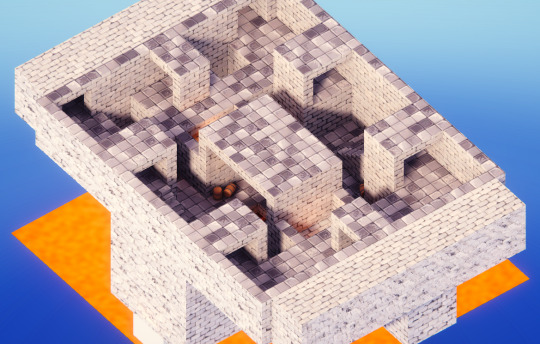
An Isometric view
As for how it plays, it plays just as I wanted it to. In every playtest I had with other players, the entire map was utilized and everyone was running around as I had hoped. If anything, players were less likely to go down to the bottom level, though that was initially supposed to be sort of like a "trap", so I'm not too surprised.
Overall, it works well as a map and is almost perfect for this project. If I had to re-do it, I'd add more interest in terms of curved and diagonal walls, but ProBuilder (the Unity addon I used to make this) doesn't really support curved surfaces, and diagonals can be tricky to get right, so for the tools I was using, it works well.
0 notes
Text
• The Outcome
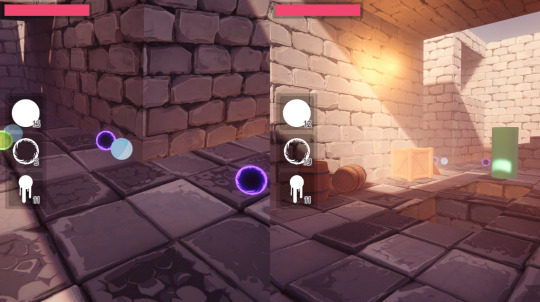
As with most projects I've done, this project has been uploaded to itch as a downloadable Windows game. But first, here's a short gameplay video:
youtube
I played this with one of my friends, I'm on the left screen, my friend is on the right. Anyway, here's the Itch page:
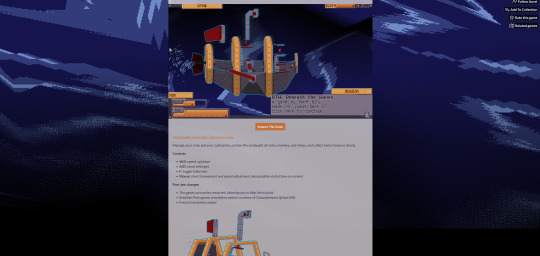
I definitely think I could've made this itch page a little bit better, it doesn't really show the game how it's supposed to: fast-paced and fun. Rather, everything's very static. Though I think I did well on the overall theming of the website:
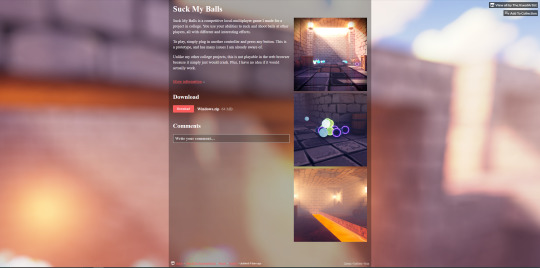
Itch pages are generally quite difficult to make feel your own, all you can really do is change the background. This is because everything is designed to work on all devices, and this verticality is just an easy way to make it work on phones. However, along with the images, adding gifs and videos can definitely make the thing feel more alive. Unfortunately, I don't have anyone on me in order to make more videos, so I'll just upload the gameplay video.
As for the font I used, Itch has a very restrictive set of fonts. And while yes, you can use Google fonts, unfortunately their system of picking a font only goes by the name of the font, which either means you'd have to try out every individual one (because fonts are never named well and most of the time tell you nothing about the font itself, take Caviar Dreams, for example), or you would have to search up every single font and then do it. It simply wasn't something I felt like doing, and overall it's not too bad of a font. It's incredibly basic, but it fit in with the rest of the page well enough. Unfortunately, it's not the most dyslexia friendly font out there. However, the option to use a dyslexia friendly font on every itch page, no matter what font the developer picked, should probably be implemented by itch themselves as an accessibility option, just like as it should in my own game. The difference being that my game is a college project, and itch is a website used by a lot of people daily.
Dyslexia friendly fonts refer to fonts like Sans Serif, which are more easy to read by people with dyslexia. According to the British Dyslexia Association, fonts should be simple, have larger character spacing and italics and underlining should be avoided as it fundamentally changes how the text is read.
• What others have done
It's good to see how other people do things so I can get inspiration, so here's some popular itch pages I like the look of:
Cheese is the Reason:

This page allows you to play the game in the browser, meaning you don't have to have as many words to fill up space. It's simple in concept, but works quite well, with the logo bold above everything, and the text aligned to the centre. Unfortunately, I don't have a logo for this game, but I will be taking notes.
REPOSE:
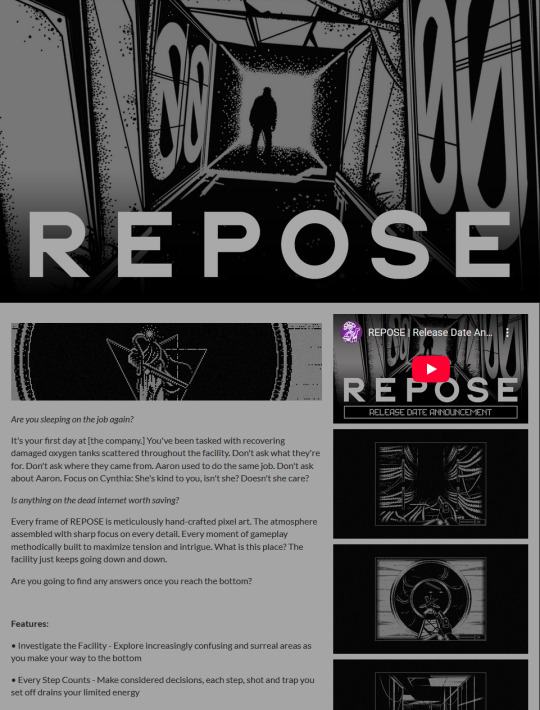
Repose uses a 1-bit art style (meaning it's all black and white), and their page is incredible. Everything fits in and just works really well, with the large image at the top to make up for space, and the overall well laid out and evenly spaced images and text. It's very professional and fits the game's art style.
Beneath the Waves:
This is a similar one to both mine and REPOSE's page, but this one showcases the game as playable in the browser, as opposed to just an image. It makes the page feel very dynamic, and the water/gradient background works very well.
Overall, this shows that, despite the limitations of Itch pages, it is still possible to create great designs, and I will especially be taking note from REPOSE for another game I've been working on.
0 notes
Text
• Playtesting
• Introduction
Playtesting is an essential part of game development. As you develop the game, you have a full understanding of every feature you add, which may not be the case for those playing your game. Playtesting allows you to gather information and make gameplay desicions before anything drastic happens.
Playtesting is not only for gameplay, however, and can be used as an oppertunity to get information and opinions of your projcet as a whole. And so, that is what I did.
• Results

I'm happy with this, I spent a bit of work getting the artstyle to work in a way that I liked, and its nice to see other people like it.
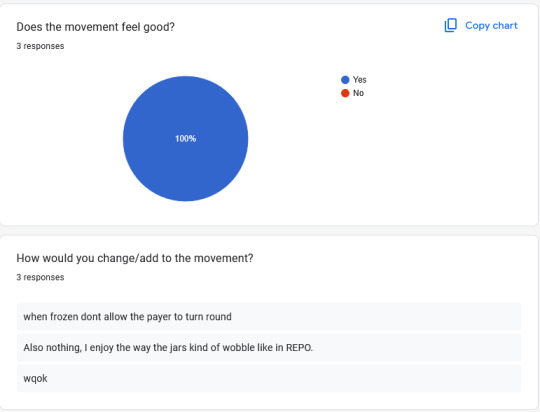
It's also good to see that people liked the movement. Regarding the first change somebody asked, I personally disagree as completely freezing the player would feel a little unfair, but I'll test it out anyway.
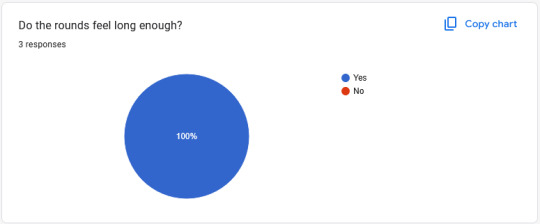
That's pretty good too, I'm happy with the one minuite long rounds.

Not much I can say about this.

I agree that the health bar is a little hard to see, so I'll definately fix that.

The idea of a pellet that reverses movement could be interesting, but I'm not sure how it'd actually feel in-game. I'll still try it anyway.
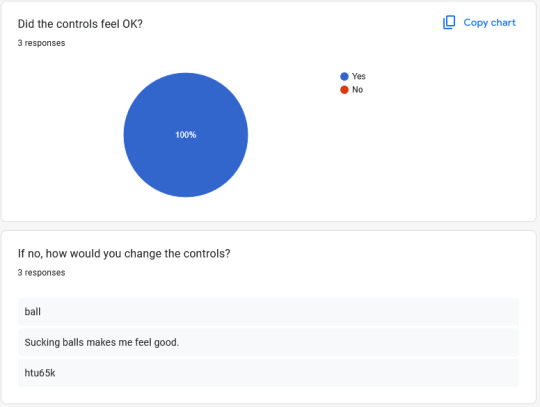
That's good too.

The fact that the player can fall out of bounds is an issue I probably should have fixed ages ago, so that's fair.
• Final Thoughts
All in all, its good that people enjoy this game and their concerns/ideas are totally valid. I might not have enough time left to add them all, but I'll try to do what I can.
0 notes
Text
• Anthropomorphism in Characters
• Introduction
As I have stated previously, my character is a glass jar with legs.
Despite this being incredibly unserious and having absolutely no real decision-making or thought behind it, other than "that would be funny" (seeing as it is the whole point of the game), It wouldn't be too out of the question to talk a bit about anthropomorphism. Basically, it's giving human-like qualities to things/objects that aren't human. In this case, legs. In some cases, it can help the player get a deeper connection with who they're playing as, and a sense of familiarity, though for some reason I doubt that'd be the case in my game. Still, it's an interesting thought.
Humanizing inanimate objects can invoke many different feelings when done in different ways. In my case, it's supposed to make it feel more silly due to the sheer absurdity of it, but in some cases it can be used in cases like horror. Many more recent horror games have jumped on the theme of "mascot horror", which originated with games like Five Nights at Freddy's, where the game is centred around animatronics (robots) designed in a cartoon-y manner that have essentially come to life. I've never played the game, nor do horror games particularly interest me, but earlier iterations of the franchise definitely did it well. Though, I don't think a glass jar can be considered scary, unless I fill it with spiders and show it to someone with arachnophobia or something.
0 notes
Text
• Designing The Character - Part Two
• Introduction
In the last post, I described why I'll be designing the character myself, so it's about time I designed the character.
• Ideas
The player sucks in a bunch of pellets, and is able to shoot them out at other players. Immediately I think of something like a hoover, but that just doesn't feel "silly" enough for my game. I described previously that I want this game to feel unserious and, while having four hoovers zooming around a map is quite a silly concept, on the surface level it is quite boring.
So, instead of the player being a sentient vaccum cleaner, one of my friends had the idea of the player being a sentient glass jar. Once I actually started to think about this idea, I began to quite like it: the player could have some tube-like limbs and the number of pellets the player has could be reflected by showing inside the player itself. I could also have it so that, when the player is hit, its like the glass shatters and the player loses some of their pellets.
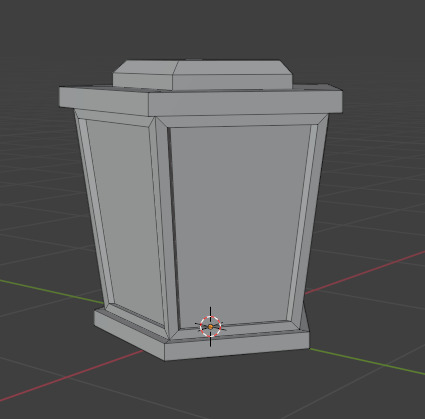
• Actually Making It
I started by making the base model in Blender, as it is my preffered 3D moddeling program. The model is simply two cylinders that I have shaped using extrusion, loop cuts and beveling.

In order to test some simple lighting, I used Blender's built in renderer: Cycles. Obviously It's not going to look anything like it ingame, but it's good to see if the lighting works anyway:
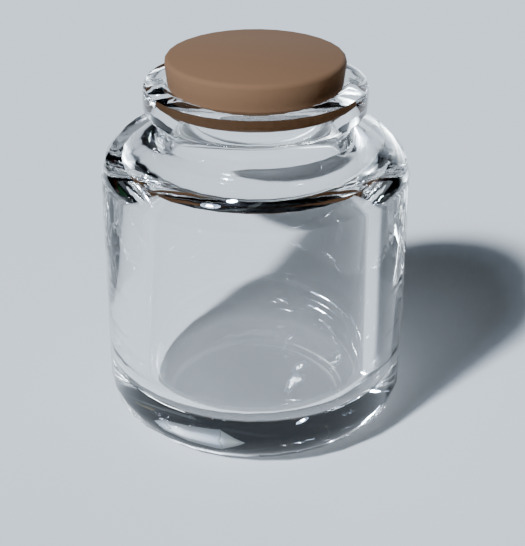
As you can see, all lighting is working as it should and there are little to no issues with normals or anything that I can see.
I imported the model into Unity and gave it the custom lighting shader I made, and it looks quite nice:

(Don't mind the dithering, it's barely visible in game)
Now for the limbs.
The jar can't just hop around, it needs limbs so that it may walk and collect the pellets, and I know just how to do it. For the legs, I'll use Inverse Kinematics to bend the knees while keeping the feet on the ground, and for the arms, ill use a rope simulation.
The idea behind inverse kinematics is to get a bunch of 3D points be connected, while keeping a fixed distance. It's often used to make a character hold something, or to align a player's feet to the ground.
The method I used for the legs is quite simple: I have a foot point, and a target for the foot point. If the foot point is far enough away from the target, it moves to the target, mimicing leg movement:
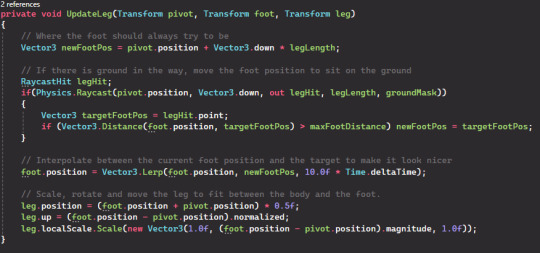
This creates some alright-looking leg movement and, while extremely goofy, I think it works well enough for now.
youtube
In the end, this isn't really inverse kinematics, rather a part that's often used in inverse kinematics for leg movement, even then, I definately messed up somewhere. Here's a great video that introduced me to the concept:
youtube
At this point, I came across an issue.
Replacing the original cylinder graphic that I used for testing with the new jar model, the camera lies inside the jar, meaning the player is able to see the inside, which is quite displeasing:
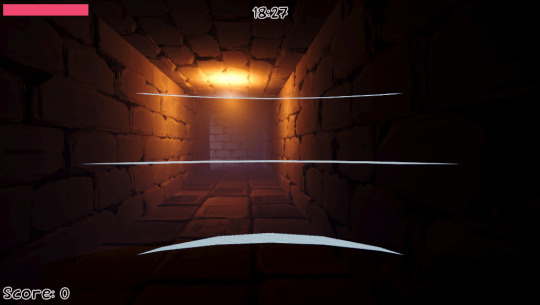
The three lines seen are the top parts of the jar, including the rim.
Unity has many ways to make cameras not render a specific thing. I thought, at first, to just move the camera out of the way or change its clipping planes, but they all come with their own issues. I then remembered that you can apply a layer mask to the camera, which defines what objects are rendered, but setting that to the player would mean that no players are rendered, which defeats the point of having a character in the first place.
I then remembered about the "OnPreRender" and "OnPostRender" functions, that run before the frame is rendered and after the frame is rendered. They both provide you with a camera varible, which is the camera that is currently doing the rendering, so I can just check if the camera is the same as the current player's and disable and re-enable the graphics object before and after the frame is rendered, making it invisible to the current player but not to others:

As you can see, the lines are gone.
There's one issue with this, and that's that the character also doesn't cast shadows (for the player's camera), but that can be easily faked with either a copy that only renders shadows, or just faking it.
0 notes
Text
• Updating the Volumetric Fog
• Introduciton
In my previous post about the lanterns, I didn't entirely explain the whole "light cookie" part. That was because it also involved modifying the volumetric fog slightly. But because of this modification, I realised I also needed to give it a little re-write, so here's how that went.
• What I Did
Unity's Universal Render Pipeline makes things quite a lot easier than with the built in render pipeline, so much so that all I needed to do to get light cookies to work with my fog was to add this single line:

This is because the light cookie texture is sampled alongside the light's colour, meaning where I include the additional lights:

I don't actually have to change anything, because the colour also contains the light cookie.
Now here's the issue. Repeatedly sampling textures is generally not very efficient, and volumetric fog isn't exactly a fast rendering effect in the first place. And this is where I decided to use the standard method of making volumetric fog run faster, and just lower it's resolution.
Previously, I was using Unity URP's built-in "Full Screen Pass Renderer Feature", which just applies a post processing material to the screen at full resolution. This meant I had to make my own renderer feature to render the fog at a lower resolution. The method of doing this has changed over the years, with Unity 6 using the Render Graph system, but this project uses an older version, meaning I'm using the "Blitter" system.
In short, we need a render pass and a renderer feature. The feature basically makes the pass run, and the pass controls how the effect is rendered.
My system's not too different to the sample effect shown on Unity's website, but its also a little different.
As well as assigning the source and destination texture, I need to define another texture to render the fog to, using RTHandles.Alloc. When doing this, it is EXTREMELY IMPORTANT that you use [texture name].Release(), otherwise very bad things will happen.
Anyway, now that we have the texture, I can just use a bunch of blits to render the material to different textures, eventually putting it back onto the original image:

The numbers at the end of the functions refers to the shader's pass we want to use. Shaders can have multiple passes, which is basically an extra shader inside another. Pass 0 is the pass where the actual fog texture is rendered, and pass 1 is where the fog texture is denoised and applied to the screen.


And now, the difference is not too noticable, but having the fog render at a quater resolution definately increased performance significantly, and I can afford to render the fog with more samples.
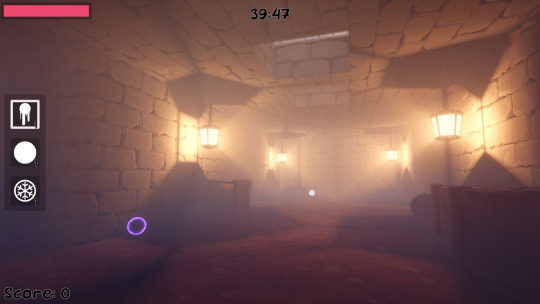
Of course, I could do much better in terms of denoising, as a 3x3 gaussian blur isn't exactly going to do too much, but it's clear enough and there aren't too many artefacts.
0 notes
Text
• Environment Design - Lantern
• Introduction
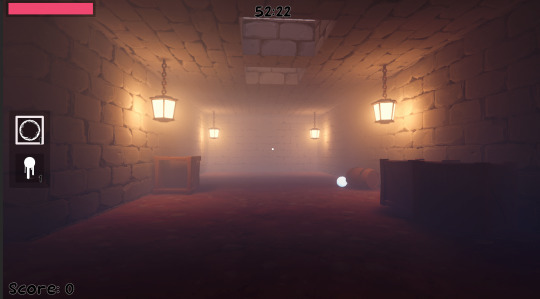
You may have noticed, but despite there being multiple lights in the game's environment, there isn't actually a visible source for any of them.
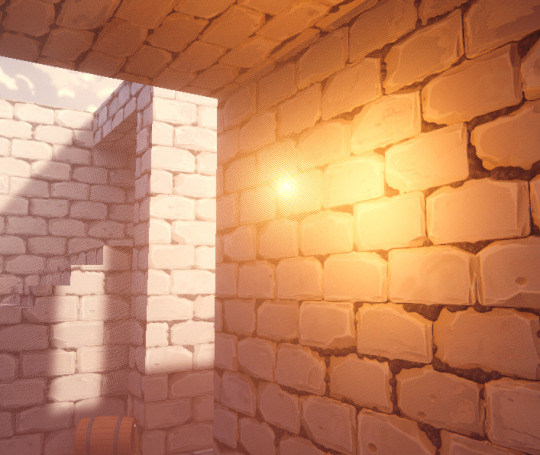
The only indication of a light source is from the volumetric fog.
• Making The Lantern
A lantern is a great choice for this environment, it fits in with the castle-like environment quite well, and can be placed in the air by using a chain. I searched online for some lantern examples, and found this shape I quite liked:

I started off in blender by creating the base shape, using a cylinder with 5 points to create a pentagon, I then used various extrusions and scaling to create the shape:
Then, using a torus with four points, I extruded it a little to create this chain link:

Using the Array modifier, I could make an entire chain:
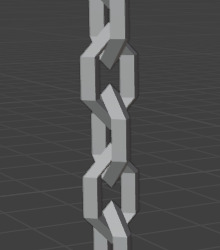
And combining it together, I had this:

• Rendering It
We have a good shape, but it still needs materials. Blender's shader editor has a bunch of procedural textures we can use to make a texture that looks similar to the rest of the environment.
Using the bevel node, we can create a blurred version of the normal vectors. If you know anything about edge detection, you'd know a blurred image can be subtracted from the original to find high differences between pixels, which can be used as outlines. In 3D, we can use this to create an edge highlight effect.

Combining it with a bunch of nodes, I eventually came up with this:

I thought a rusted wrought iron look would work pretty well for this project, but other materials are quite easy to create, like oxidised copper:

But I think I'll stick with the original.
Here's how they look in-game!
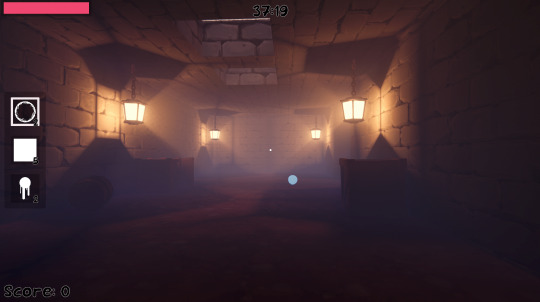
I lied, here's how they actually looked when I first added them:
I used a method to "fake" the shadows called "Light Cookies", which are textures used to give texture to a light source, like making a flashlight look like a flashlight, or to create caustics underwater. In this case, I'm using a grayscale texture to mask out where the light should be able to exit, instead of actually calculating the shadows for every light source.
Was there much of a point in this? Yes, not only is it more performant than calculating the shadows, it also fixes issues with backface culling (because the inside of the lantern has no geometry), and allows me to slightly blur the texture to give the impression of a softer shadow. In reality, the shadow would be a lot blurrier, but I chose not to.
0 notes
Text
• Research - Non-Human Characters
• I Am Bread
I am bread is a physics based game where you play as a slice of bread, where you control every individual corner to wriggle and move the bread to the end goal, shown as a toaster. As you play, you need to dodge things that decrease your "edibility", which show on the bread itself as dirt, mold and bugs. With my game's glass jar character, I'd like there to be a similar effect, where cracks appear on the glass as the player loses health.
youtube
• I Am Fish
I am fish is a game in a similar vein to I Am Bread, in which the player controls a physics based character and must reach a goal, The main difference being that you play as a fish in a fishbowl and roll around. This is slightly more similar to my glass jar character, in that the difference between a fishbowl and a glass jar is pretty slim. In I Am Fish, the player must take care to not crack the fishbowl (or whatever they're contained in), which is sort of similar to my idea, where the player could lose "pellets" when they get cracked.
youtube
• Toy Story / Beauty & The Beast
These don't have as much of a connection to my game, so I've grouped them together into one. Both of them also are movies, so its easier to talk about them as one to keep from repeating myself or just saying that I've already said something.
Toy Story takes place from the perspective of a child's toys. The plot does not matter in this context. The main characters all toys, and while most of them are still humanoid in some sense, others are not. As for Beauty & The Beast, I'm mainly talking about the moving furnature. In both of these cases, the characters are non-human, but given human-like features, whether it be as simple as a voice, or as drastic as eyes and limbs. In my game, the player is a glass jar with legs, so it would be good to take insparation from both of these to see how they humanized these usually static objects, though perhaps a glass jar should not be wobbling about like a jelly.
0 notes
Text
• Designing The Character - Part One
• Introduction
All games need some sort of recognisable character to act as their mascot, but there are a few different ways to go about making them, here's what I discovered, and what I think will work best for my game.
• Pre-Designed Characters
This referes to characters created by the developers, in games like Super Mario Bros and Legend of Zelda, where the player always plays as a set character. This is good because it guarantees it will fit in with the story, increasing immersion, and you don't have to worry about players making innapropriate characters (unless your game is based around that).
• Player-Designed Characters
This refers to games that include some sort of character creator, where the player is allowed to make their own character. It could be something where the player picks different parts from a list and combines it, like in Geometry Dash or Terraria, or that the player physically creates the character themselves and imports it in, like in VRChat or Minecraft. This provides an extra layer of creativity to the player, so it's understandable why the examples I showed are all quite creativity-based games.
• What's best for me?
I personally think the pre-designed character route will work best for me, though maybe with some sort of customisation as in hats or something. Making potentially hundreds of 3D models and making them fit together perfectly is just something I don't think I can do with the time we have, but I also just don't think it'd fit the game very well.
0 notes
Text
• Making The Movement Better
• Introduction
Up until now, people have felt the movement was unsatisfactory. While it felt quite smooth to use (in specific cases), in most cases, it ended up feeling quite clunky. This was especially noticable with the stairs, where the player would have to jump up the first step, this was because of a different thing, but it was implemented in the first place to try help with the movement, which obviously didn't really work.
• What's Going On?
I was using a (pretty standard) movement system that uses rigidbody physics and colliders to interact with the world. This is fine in most cases, but its also quite rigid (hence, the name "rigidbody"). This essentially meant that any movement (especially vertical movement) was like sliding a slippery rock over concrete.
• How Did I Fix It?
When someone jumps in real life, they don't remain perfectly static, they'll generally flex their legs once they land.
A while back, in a personal project I was working on a while ago, I wanted a hoverboard-type object. I searched online to see if anyone had done similar, but they all used Unity's vehicle physics system, and I wasn't planning on simulating wheels for movement that wouldn't even look realistic. So, I did it myself.
This system essentially works by shooting a ray from a defined point where the base (or legs, in this case) start, and getting the distance that ray had to travel down. I then use a function to get an upward force so that the player stays in the air in a somewhat natural way, and can smoothly react to changes in height.

This takes the distacnce the ray had to travel, and puts it in a 0-1 range.

This accelerates the player up based on that force, multiplied by a lot to counter things like gravity.

The actual ray (shown as the yellow line) is actually slightly longer than the player, this is because the strength of the upward force is negligable at further distances, and, on average, this is where it should be to keep the player from sinking into the ground.
I've also used this (slightly modified) system to add jiggle physics to a slime enemy in a few projects, and could be used for even more things like stylized hair. This is essentially a very simple spring physics system.
0 notes
Text
• More Textures
• Introduction
I've been using the website: FreeStylized to get some textures and models for my game, its all Royalty Free for both commercial and non commercial, but its still quite a new website, and they don't have everything I need.
• What I Did
There's another website I use quite a lot called CC0 Textures (AmbientCG) and, based on the name, you can probably guess everything is CC0. Unfortunately, these are all meant to be used in realistic cases, like 3D renders and such.

But there's an app called FotoSketcher, which is able to make images look like they've been made with various different methods (like sketching, watercolour, etc...). This is not AI. I am extremely against the use of AI for anything, no matter how small that thing is. FotoSketcher is essentially a library of Post-Processing effects, which use maths to create the final outcome, using things like the Difference of Gaussians, the Bilateral filter and the Sobel Operator.
Anyway, I decided to try it out to make the ice texture fit in a little more with my game's artstyle, using one of their paint filters:

Honestly, It doesn't really fit in very well. It probably could with the right filter and paramaters, but this just isn't it for me.
• Other Methods
I've made loads of stylized textures using Blender3D, its library of procedural textures and functions make it very easy to do it.
0 notes
Text
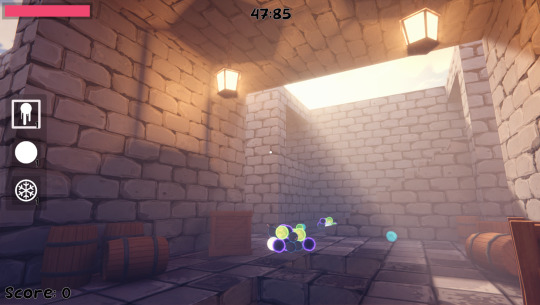
• The Pellet System - Part Three
• Introduction
If you don't remember, in the previous part of this little "series" of changing the pellet system, I created some simple UI at the bottom of the screen to show what pellet the player is currently using, as well as the two pellets next to that pellet in the player's inventory.
While this was interesting to try and figure out, It didn't end up working very well (in my opinion) and, with more and more pellets, it just ended up getting more confusing. So, I re-did it again.
• What I Did
As is with every time I re-write something, I completely removed the old code and its references from my game. I find that keeping in old bits of code you think might be useful can hinder your ability to make something new and potentially even better, which is why I always do it: keeping old code will only make your new code messier.
I then re-designed the inventory. I wanted the player to always be able to see what pellets they have, and how many of them they have, so I went with a Minecraft / Stardew Valley / Terraria - style inventory / hot bar, but on the side of the screen instead:

Minecraft's hotbar - 9 rows, on the bottom of the screen, quite easy to navigate and see - easily customizable for mods etc...
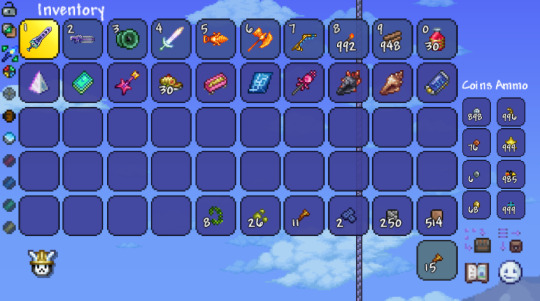
Terraria's hotbar - top left of the screen, opens down into the extended menu shown - does not obstruct gameplay - similar to Minecraft's.
Stardew Valley's hot bar. Either on the left of the screen or on the bottom. Similar to the others but with more inventory slots. You can only select slots with items in them.
These three games both have quite good inventories / hot bars and, while they are quite similar, they all do something slightly different that works well for their own games.
In my game, you need to easily see what pellets you have, without it taking up much of the screen, as well as it needing to be easily modular due to the game being split-screen and having varying screen-sizes.
So, here's the idea: You have a hot bar on the side of your screen which dynamically changes size to fit every different pellet, along with a counter at the bottom left of each icon to show how many the player has. It'll be on the left of the screen so that it stays out of the way, while allowing me to easily add more UI elements without taking up too much of the screen or having to completely re-arrange the screen.
With the three pellets I have so far. It feels a little lop-sided at the moment, but I have plans for the right side of the screen. Also, the lop-sidedness feeling is mitigated in split-screen.
Due to a little glitch, I'm able to show that the system can dynamically scale to fit almost any number of pellets:
• How I Did It
Surprisingly, this new system is much simpler than the previous one, despite looking more complex at first.
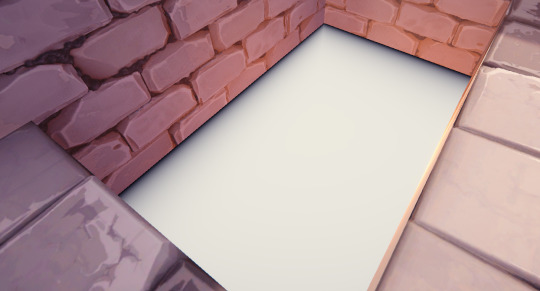
First off, I created an area in which the icons can fill up:

The "Vertical Layout Group" makes all the objects' children order themselves in a vertical grid, Unity's "Horizontal Layout Group" does the same thing, but horizontally, which would make it look more like Minecraft, or any of the other games I showed. Next, the "Content Size Fitter" makes sure the object It's applied to scales to fit the size of its children, which is how there's that lighter box around all the slots.
I then created an "Inventory Icon" which is an object with an image and text, the text being for showing how many of that pellet there are in the player's inventory:
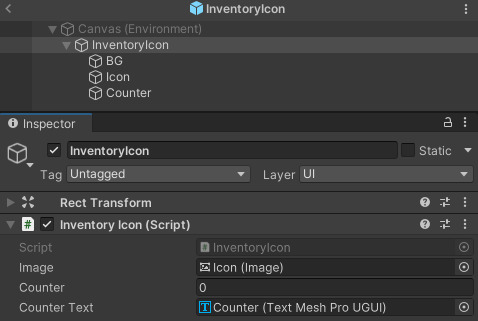
The "Inventory Icon" script is basically just a container for the icon's data, so I can easily reference it.
Now for the programming part.
The player already has a list of "Inventory Slots", which is every type of pellet the player has, along with its count. I can then use a Dictionary with a key of inventory slots and a value of inventory icons. Dictionaries basically allow me to dynamically assign two completely different things to each other, in my example, every inventory slot the player has, has a corresponding inventory icon on the UI.
It doesn't just do this by default though, so I created this little bit of code:
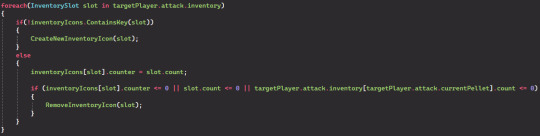
I loop through every inventory slot in the player's inventory and check if there's already an icon for that slot, if there isn't, I use this code to create one:
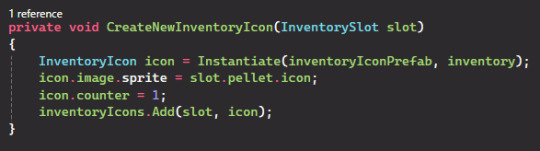
This creates a new icon in the scene, sets its sprite to the pellet's icon, default's its count to one and adds it to the dictionary, assigned to that specific slot.
Then, if the player already has an icon for that slot, I update it's counter to be the same as the one in the player's inventory, so the player doesn't have to select the specific pellet in order to see what they have, unlike the previous method.
• Other people's work
My game is slightly more unique compared to most first-person shooters as you are able to hold and pick whatever "ammo" you want at any time, whereas most other games generally only let you use one weapon at a time, either with their own ammo or with a single ammo, which is why I showed games like Minecraft in the beginning, as their system is much closer to mine.
By this, I mean the ammo in most first person shooters is not a fundementally different thing that physically changes the gameplay, that is for the gun to do. In my game, the different pellets all have different features. While games can have different types of ammunition, they are generally for different types of gun only, and do not change the fundemental "idea" of the gun.
Nevertheless, there's a website that lets you see any game's UI for reference:
Using this, I can look at games with the "shooter" tag, and see how they did certain aspects of their UI.
From what I've seen, the health bar system I've used is pretty standard, with a long bar showing the percentage of health left. Sometimes they'll have a number next to them, but most of the time it's not needed.
Just as mine is, most of the UI is also placed to the side of the screen, with the exceptions being around the borders, leaving the screen open. Perhaps my UI would look better on the bottom or top of the screen, as (especially with two players) the UI can get very messy as it doesn't scale properly.
0 notes
Text
• Making The Lava Better
• Introduction
I wasn't quite happy with how the lava turned out in the previous post (visually), so I spent a little more time on it to help make it fit in more with my game's theme.
• What I did
I'll start off by showing the final result:

The main focus of this shader are the waves.
In a previous graphics-related post, I talked about different coordinate spaces. Well, the screen-space position's z-axis contains depth information, but not as you may think. Depth information is basically the distance from the camera to the geometry in the scene, its a bit more complicated than that, but its a good enough explanation for this post's purpouses.
The depth information stored in the screen-space position's z axis is non-linear, an optimisation used to store depth information in higher quality closer to the camera than further away. By setting a material in Unity to transparent, you can also use the depth texture to get the depth information of every object (ignoring the object's surface).
You may be seeing where i'm going with this, and would probably expect that, by subtracting the two depth values, you can get the difference, and thus, a gradient that sort of looks like the distance from the areas of the surface that intersects with other geometry. But there's one step before that, which is transforming from non-linear space to linear space. Other than that, that's exactly what happens:
By then using a combination of sine-waves and noise functions, I was able to get this ripple effect:

And then by doing a bit more stuff to it, I got the final effect.

The nodes are quite a bit of a mess, but is basically everything I just said.
Compared to the other lava shader I did, while you could argue the other one was more realistic, I wasn't a fan of it, and it didn't really feel like it fit in. This new shader, while not as realistic, feels like it fits better in the world, and less like a texture pasted on top.
1 note
·
View note
Text
• Sound Effects
• Introduction
Most games will need sound effects. Otherwise, the game can seem quite boring. However, something that is perhaps a bit worse than no sound, is sound that repeats itself too often.
There are two fixes: use multiple different but similar sound effects and randomly pick which one, or you can randomly offset the pitch and volume when you play it.
I wasn't just going to download a bunch of audio and spend ages referencing every piece myself, so I went with the second option (also because it works better at breaking it up because its much more random, ideally you'd use both together, but I'm not downloading a bunch of audio for every little thing). Unity doesn't have this feature built in, so I made it myself. It's really not difficult to do, but I decided to overcomplicate it again.
• How I Did It
I created a new script: the Sound Effect Player. In short, this uses a custom Object Pooling method to create a bunch of audio sources that play a sound effect, only to then become hidden again once they're done.
Originally, I had every object with its own audio source for sound effects, but once I turned on Unity's Gizmos, I realized this might not be a very good decision.
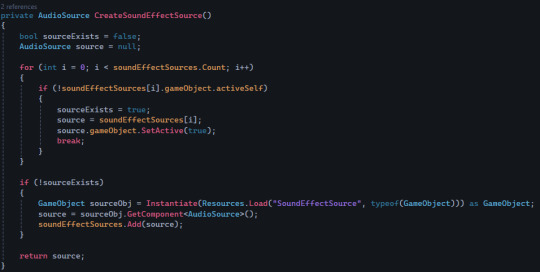
This function checks if there are any available audio sources, if there are, it returns that one, otherwise it creates a new one.

I then have this function to first create the source and then play the clip provided, to then either hide it or destroy it.
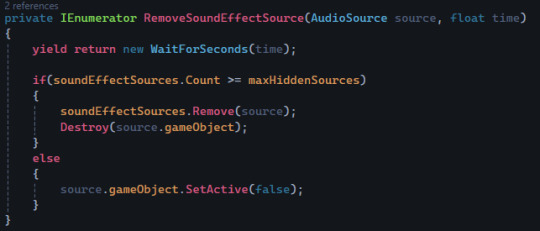
This function then waits for the time provided to either destroy the source or hide it again, just because I don't want too many of these deactivated audio sources in my scene, things are messy enough with all the pellets.
You many be wondering, "but where's the pitch shifting?"

Here.
This first offsets the pitch and volume by the variation, creates the sound effect source, applies the pitch and volume and then does the rest. Not sure why Unreal Engine developers need this built in to their game engine, but I'll refrain from asking.
Anyway, that's how I did it. It's much more performant than having around 200 audio sources for every object and works quite well. Playing a sound effect is now as easy as writing this line of code:

0 notes
Text
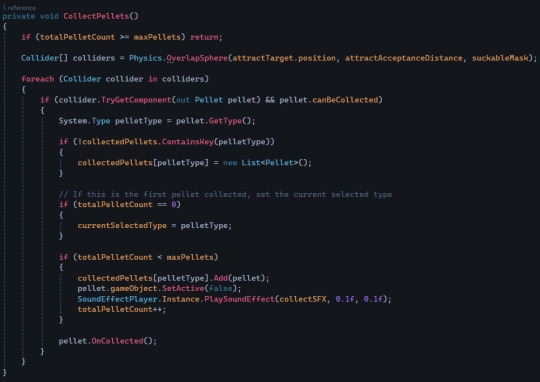
• Creating Pellets
• Introduction
I've made the process of adding new pellets to my project extremely simple. In fact, all I need to do is create a new script, apply it to an object, turn that into a prefab, and then it'll full work with every other system I've made.
• How I Did It
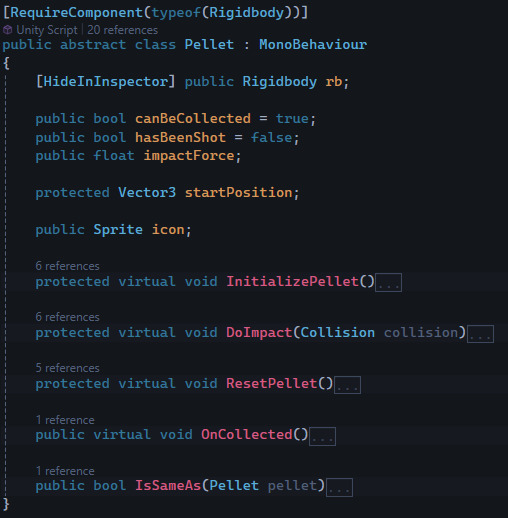
The C# programming language is based around classes. These simply hold information for different things, like a Character class, for example, would hold something like the player's name, birthday and interests. C# also allows you to make classes inherit from things called abstract classes.
An abstract class holds generic data for any class that inherits from it. In my case, the Pellet class holds information like how to initialize the pellet. Unique to abstract classes are virtual functions. In my case, the "DoImpact" function is virtual, so that pellets do different things on impact.
There are also "protected" variables that are only accessible to classes that inherit from the abstract class, but that isn't as important.
Inside the sticky pellet, for example, that would then inherit from the Pellet class, and stick to any object on impact:
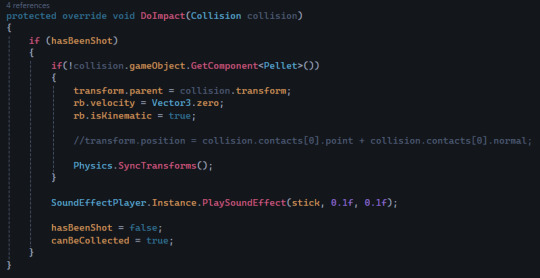
It doesn't entirely work properly, and you can end up falling outside of the map, but it's a proof of concept.
So long as the class inherits from the Pellet class, every single system that utilizes pellets will work without issue.
0 notes
Text
• The Pellet System - Part Two
• Introduction
As I said, I'd do in the previous post, I've changed the pellet system again, specifically the storing of the pellets.
The first attempt was simply one large list containing references to each individual pellet. The second attempt was a dictionary containing a type of pellet and a list of references to that specific type of pellet.
Honestly, I'm pretty embarrassed that I even considered these ideas, let alone implement them, but I've fixed it now, and it works better than ever.
• What I Did
First off, I ripped out any code relating to storing the pellets, it isn't needed and created a new class called "InventorySlot" that contains both the type of pellet and an integer for how many of that type the player has.
When I actually want to collect a pellet, I first loop through every pellet to see if I already have that pellet. If I do, I increment its count. Otherwise, I add a new "InventorySlot" to the list, with the type being the pellet I want to pick up, and a base count of one.
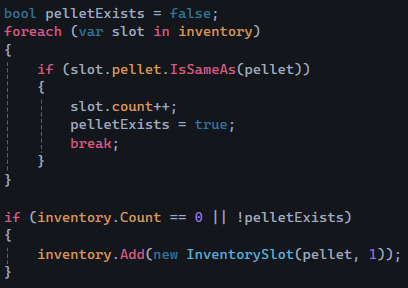
The "IsSameAs" function was something I also made, simply to check if two pellets are of the same type:

The "GetType" function is something built in to C#, the programming language used by Unity.
Now when I want to shoot a pellet, I can just use an index for which type I want to shoot, and decrement from the count until there isnt any more of that type, in which case, I remove the inventory slot from the inventory.
• Object Pooling
Object pooling is a method in which, rather than destroying an object, you hide it and reset its data when you want to create it again. This is usefull for things like procedural infinite worlds, in which you can generate a chunk once and then disable and re-enable it, rather than destroying that data and then re-generating the chunk every time.
I had a custom object pooling system for the old methods, It worked because I had a reference to every individual collected pellet in the list, which I could just use that to enable and disable the pellets, but here's the issue: Now I am no longer storing actual references to the pellets, instead I'm storing a reference to the type of pellet, and how many of them there are.
This means, whenever I would try to shoot a pellet, it would only reset the first pellet I collected (as that's what I use to reference the pellet), meaning you can't actually shoot anything.
And so, I created an actual object pooling system, centralized at one script so that any script can now "create" and "destroy" a pellet:
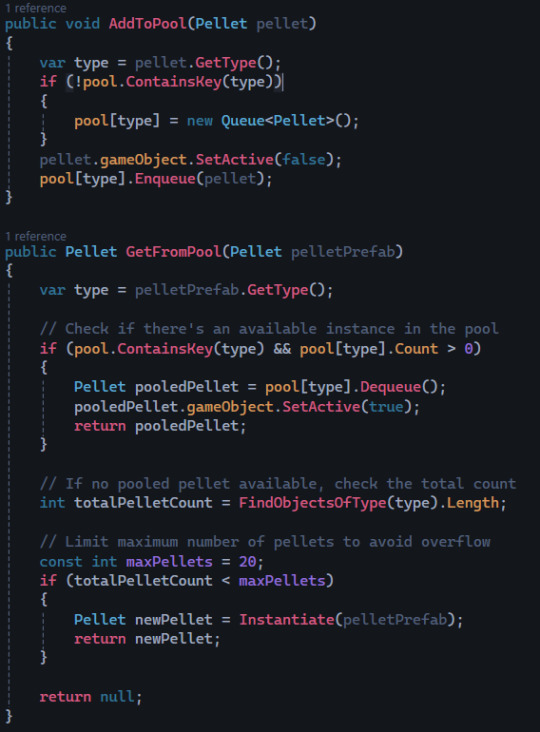
And now it works as though nothing ever happened.
What was the point in doing this? Because it makes programming everything a whole lot easier. Instead of having to do essentially black magic to get a specific pellet, whereas I can now just use a single integer value to pick which one I want.
• UI
As I said, I wanted this to be an inventory, but what's the point in an inventory if the player can't see it?
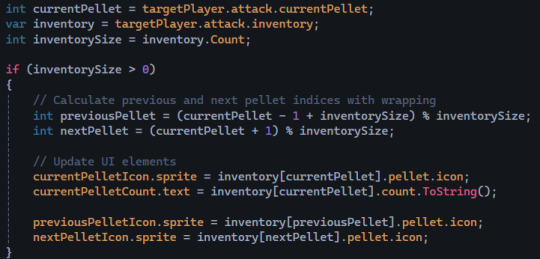
Using the "sub-canvas" system I made a while ago, I created a little panel at the bottom of the screen to show three things: the current pellet, the previous pellet and the next pellet.
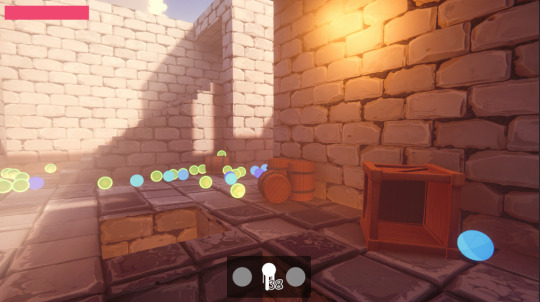
Then I also made some very simple (and quite awful) placeholder sprites to show what one the player is holding, as well as the number in the bottom left. The player can then press Q or E (left shoulder and right shoulder for controller) to go left and right through the pellets. Seeing as there are only two at the moment, the previous and next pellets are the same, due to the fact that I made them wrap around, so that pressing left enough times will eventually cause you to end up where you started.
And here's how that works:
0 notes
Text
• The pellet system
• Introduction
The pellet system is the system the whole game is based around. You pick up pellets and use them to shoot your opponents. Sounds simple enough? Well, I decided to massively overcomplicate this, as usual.
I decided to take inspiration from the game: Slime Rancher for its system of attracting and shooting slimes:
youtube
It looked quite a lot like what I had in mind, so it makes sense I would take inspiration from it.
• What I Did
In order to attract the pellets, I simply needed to loop over all of the physics objects in an area and increase their velocity towards the player. Here's the problem. I'd doubled the gravity in the game to make things feel less floaty, but this means it takes double the effort to get the pellets off the ground, but increasing the force makes them slam into the player before being collected, so that wasn't going to work.
The idea now would be to turn off gravity for things being attracted towards the player, so that I don't have to worry about opposing forces, but this is where it got complicated. I could turn off gravity for anything that was in range, but turning it back on when it left the range, or when the player stopped attracting them was going to be an issue.
So, I create a HashSet of Rigidbodies for the objects currently being attracted, as well as another HashSet of rigidbodies for the rigidbodies effected this current frame. these two HashSets are then compared to see what rigidbodies are no longer being attracted, but are still in the first HashSet, to then turn their gravity back on and remove them from the HashSet. I use a HashSet instead of a List or Array because its much faster to search through and, when I've got quite a lot of pellets being attracted at once, this optimisation is quite nice.

I can then pull the affected rigidbodies towards the collection as usual.
To then collect the pellets, initially I had a list of pellets that would be added to when the player collects a pellet, and removed from when the player shot a pellet. The pellet in game would never be destroyed, just hidden and reset.
This is essentially a custom-made Object Pooling system, where I save on actually destroying objects (which uses the garbage collector, which can get quite slow when used in bulk) and just hide them, which makes them no longer effect anything but retain their data.

I actually ended up changing this, however, and plan to change it once again. Currently, I now use a Dictionary of pellets based on their type, so then the player can cycle through each type of pellet they have and shoot that specific one. I later want to change this to an actual inventory system (like in Minecraft) where the player can see all the types they have and switch through themselves.
3 notes
·
View notes