
Don't wanna be here? Send us removal request.
Statistics
We looked inside some of the posts by jc-fmp-2025 and here's what we found interesting.
Average Info
Notes Per Post
0
Likes Per Post
0
Reblog Per Post
0
Reply Per Post
0
Time Between Posts
22 hours
Number of Posts By Type
Text
17
Last Seen Tumblr Blogs


Fun Fact
Tumblr has 4 main sources of revenue.
Text
Building the game in UE5
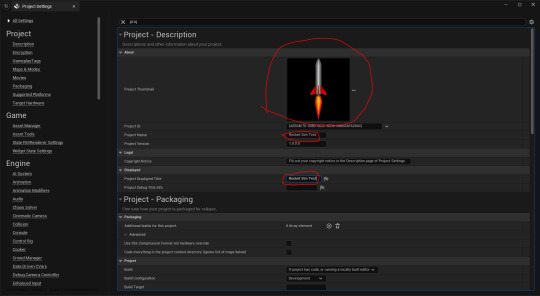
Here, I began to set up the settings that I needed and wanted for building the game. I opened up the 'Project Settings' and set the thumbnail for the project file. After that, I changed the 'Project Name' and 'Project Displayed Title' to 'Rocket Sim Test'.
Next, I had set the 'Build Configuration' to 'Shipping' and ticked the 'For Distribution' box.
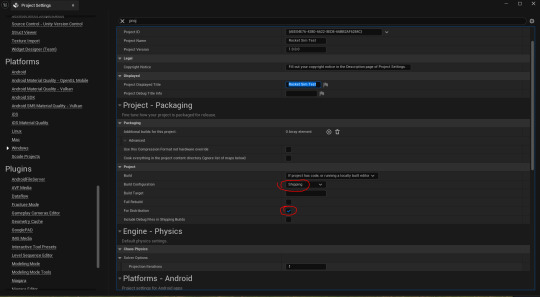
I then selected 'Windows' under 'Platform'. After that, I set the icon to the 'ICO' file I made.

Lastly, I set the list of levels to be featured in the build. I had only set the 'BlankLevel' level.

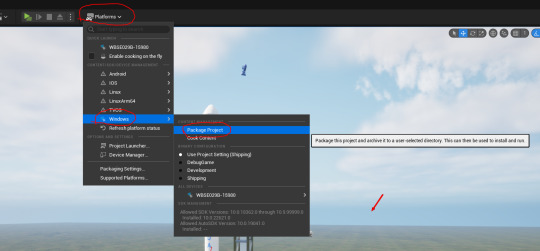
Here, I clicked on 'Platforms', 'Windows' and then 'Package Project'. This is to build the game.
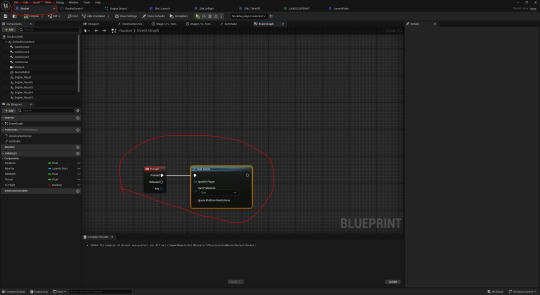
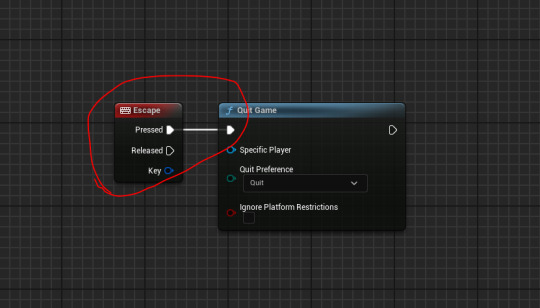
I found the game to have packaged successfully. The only thing I realized that I forgot to add was a quit button feature. I added the following code into the 'Rocket' blueprint event graph. After that, I re-packaged the game.
It still didn't work. I asked Jake why this is. He suggested that I test another key first as 'Esc' works in the editor by default which may give me a false result. I tried the key 'Q'.

Jake pointed out that I put the code into the wrong blueprint. I then cut and pasted the code into the 'UIController' tab.

Finally, this worked. I then set it to trigger by pressing 'Esc' and then re-built the game again.
0 notes
Text
Making a game icon for my game:
First things first, I made a new canvas that was 192x192 pixels in photoshop.

I found an online image that I wanted to use for the icon.

Here, I copied and pasted it onto the canvas and resized it. However, despite this, it just appeared as a black box. As a result, I deleted it.

I then tried this image I found.

So far, it seemed to have worked.

Here, I used the 'Eyedropper' tool to clone the black coloured background of the image. I then used the 'Paint Bucket' tool to paint the white background the same colour.

I then exported it as a 'PNG'.

After that, I went to this website to convert the 'PNG' into an 'ICO' file.
0 notes
Text
Last changes in UE5:
Here, I entered the 'RocketControl' widget and deleted the text that displays the world location of the rocket blueprint. This is because I simply don't need it as it was only there for bug testing.

Next, I added a translucent box for where I display the engine status.

After that, I made the outline to the camera boxes black by dragging down the slider. I did this to increase visibility.

After that, I copied and pasted the green hexadecimal colour code into the 'Tint' box for all the camera boxes.

I added a new textbox that says "First Stage Engine Status:". I also resized the translucent box. After that, I added an image box. I tried to find an inbuilt texture of a 2D circle to represent each engine. However, it kept saying this error.

As a result, I abandoned that idea and tried something else instead. I instead added multiple text boxes that say each engine is nominal.

Next, I had set the anchor points for the different boxes on the UI widget.

Lastly, I wanted to adjust the sunlight's direction.

0 notes
Text
Creating my Unreal Engine 5 project P2:
Jake had found a free 3D girder model file that features multiple girders that are different sizes.

I opened it in Maya and separated them while still being in the same file. The next thing I did was have the girder pieces in the center. To help me achieve this, I looked from 4 different view panels to be as accurate as possible. After that, I exported the file as an 'FBX' file and then imported it into UE5.

Here, I used these models for the launchpad.

After that, we wanted to use images on google for a small assembly building.


For this image I used 'Snipping Tool' to cut out the door image to remove unnecessary details.


In the material blueprint for the doors. I had set the 'Material Domain' to 'Deferred Decal' and the 'Blend Mode' to 'Translucent'.

I dragged these decals into the world and put them against the cubes representing the Vehicle Assembly Building.

Here, I got textures of tarmac for the ground.

I made two different materials for the ground. However, at this point I felt that it wouldn't look that good in the short amount of time I have left. to work on the project.

This code here makes the rocket slowly accelerate to its max speed.

This code is used to create a camera shake effect.

0 notes
Text
Adding sound effects to Unreal Engine 5:
Here, I collected some audio for the game on the website shown below.


Next, I imported these audio files into UE5.

After that, I ticked the 'Looping' box for the military radio audio file.

Here, I added some 'Play Sound 2D' boxes to play the selected audio. The reason as to why I used the 2D variant is so that the player can hear them all the time.

However, there was a problem. The problem was that the sound duplicates every time I was to click on 'Launch'. I asked Jake how I could solve this. His answer to this was to add a 'Do Once' box. This had fixed the issue.

0 notes

Text
Improving the full rocket model presentation sheet:
I received feedback from Chris about the presentation sheet for my rocket model. He suggested that I light up where the engines are to make them more visible. As a result, I opened up the blender file I used and added a point light. From there, I moved it into position and increased it's 'Power' from 10W to 50W.

For some reason, the original 95th frame is missing from my files. I wasn't sure why this was.

Before I rendered the 95th frame. I checked that the render settings were right.

I then rendered the frame by clicking 'Render' and then 'Render Animation'.

Rendered frame:

Here, I opened the photoshop file and deleted the original frame. Like I did with the old frame when I imported it, I clicked on 'Remove Background' so I could resize the layer without potentially covering the rest of the sheet up with the blue background.

Once I was done editing, I saved the file as a new one.

Lastly, I exported it as a 'PNG'.

Exported 'PNG':

0 notes
Text
Targets for the day (12/05/2025):
Finish my project.
Build my Unreal project.
0 notes
Text
Presentation sheet for the full rocket model:
a

a
0 notes
Text
Project feedback (23/04/2025):
Daniel N:
I think making a full rocket beforehand allows you to get the bigger picture and allows you to get a personal opinion, after which you can separate it into detachable parts, and add further details. Overall, I'd say the old models lacked and weren’t properly optimised so I rate them a 3/10 but I can see the new model is more optimised and overall it looks better performed. So I'd rate it a 7.5/10.
0 notes
Text
Rendering hero shots for the my full rocket model.
Firstly, I opened up my latest blender file for the model and saved it as a new one.

After that, I entered the 'Shading' window to fine the background colour boxes. I copied and pasted the hexadecimal colour code from the top 'Background' box into the bottom one. I did this to get a basic background. However, it was hard to see the model, so I changed it back.

Next, I pressed 'RMB' on the timeline and pressed 'LMB' on 'Delete Keyframes'. After that I made new key frames for the camera instead.

Here, I made sure that the settings were correct. Firstly, the 'Frame Rate' box still shows '30 fps'. I then set the 'End' frame to 94 frames. Next, I had reset the output location for the renders to be saved. Meanwhile, I had checked that the 'File Format' was set to 'PNG' which it already was. Lastly, I unticked the 'Sequencer' box as I am just rendering the frames right now and then I re-ticked the 'Compositing'.

Next, I clicked 'Render' and then 'Render Animation'.

Once, the frames have rendered, I clicked on the 'Video Editing' window to use the sequencer.

However, I noticed that the old image strip still remained. As a result I deleted it.

Once I did that, I pressed 'Shift' + 'A' to open up the table of options shown below. From there, I clicked on 'Image/Sequence'.

Here, I pressed 'A' to select all the frames of the animation. Next, I held down 'Ctrl' while clicking on the first three frames as I don't need them. I then clicked on 'Add Image Strip'.

Next, I set the 'End' frame to 91 frames.

After that, I changed the render settings for the file so that I could compile an animation from the frames. I changed the 'File Format' from 'PNG' to 'FFmpeg Video'. Here, I set the 'Container' from 'Matroska' to 'MPEG-4'. Next, I had set the 'Output Quality' to 'Perceptually Lossless' for the best image quality, while setting the 'Encoding Speed' to 'Slowest' for a good compression ratio. Finally, I unticked 'Compositing' and tick 'Sequencer'. This is because I already rendered the frames.

Lastly, I clicked on 'Render' and then 'Render Animation' to compile the frames into an animation.

After receiving feedback from Chris, I noticed that none of these frames feature a hero shot. As a Result I went back to render a 95th frame that features a hero shot.

I even added keyframes for the rocket model.

Here, I set the 'Frame Start' and 'End' box to 95 so that blender only renders the 95th. I changed the 'File Format' to 'PNG'. I then ticked the 'Compositing' box while I unticked the 'Sequencer' box.

Rendered hero shot:

Rendered animation:
0 notes
Text
Targets for the day (07/05/2025):
Finish my project.
Finish the presentation of the models.
0 notes
Text
Targets for the day (30/04/2025):
Render the full rocket model in blender with Niagara effects.
Fix potential issues in Unreal Engine 5.
0 notes
Text
Targets for the day (29/04/2025):
Render in Unreal Engine 5.
Work on my final render of the full rocket model.
0 notes
Text
Targets for the day (28/04/2025):
Complete and animate my remaining two models that are yet to be completed for rendering.
Render all my models out in blender.
Create a Project file in Unreal Engine 5.
Begin rendering in Unreal Engine 5.
0 notes
Text
Weekly Targets (28/04/2025):
This is a screenshot I took from my Project proposal document. Adding onto the old proposal. I want to use this week as my opportunity to render all my models in blender and import them into Unreal Engine 5.

Overall, I feel that I have achieved it. However, one model file was not imported as it kept crashing UE5 every time I did it. I have rendered them all in Blender at least. Due to timing reasons, I feel that I don't have enough time to render all the models out. This is why I want to prioritise the full rocket model.
0 notes