
Don't wanna be here? Send us removal request.
Statistics
We looked inside some of the posts by joel5371125 and here's what we found interesting.
Average Info
Notes Per Post
60
Likes Per Post
33
Reblog Per Post
0
Reply Per Post
27
Time Between Posts
6 days
Number of Posts By Type
Text
11
Last Seen Tumblr Blogs


Fun Fact
Tumblr Inc. has $15.1M in annual revenue.
Text
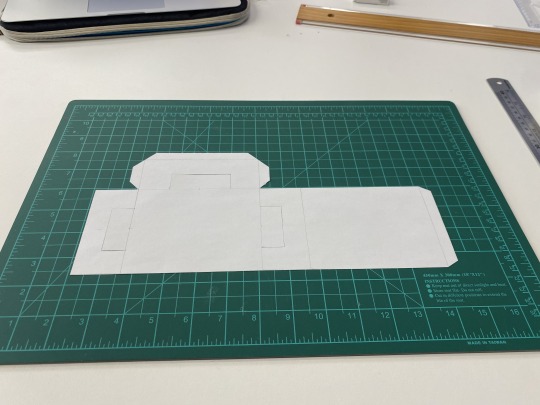
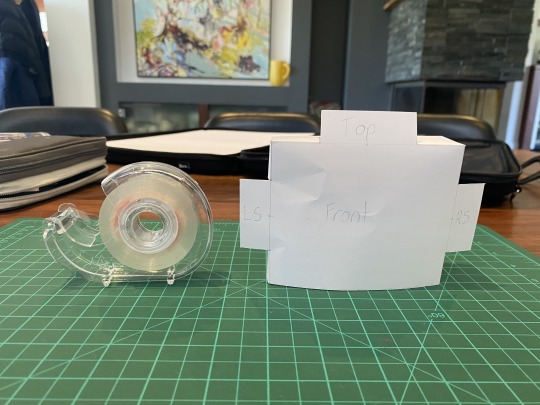
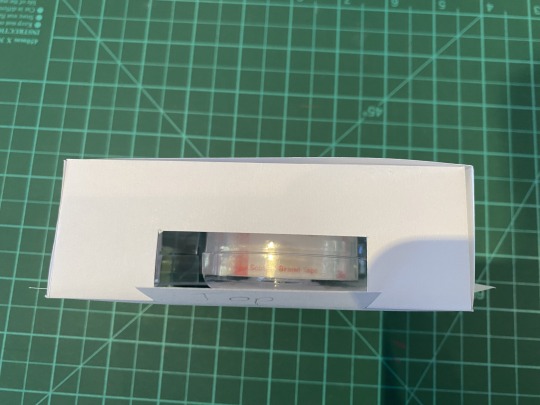
Week 10 - Completing the loop
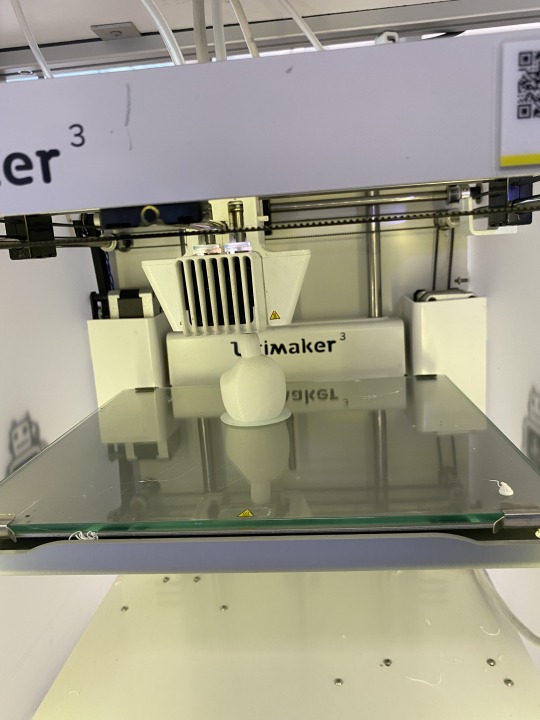
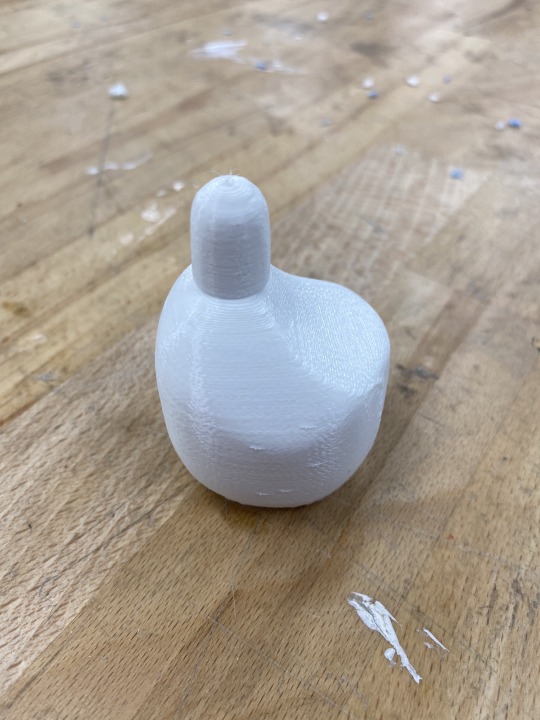
For the tenth and final week we were tasked with 3D printing our concept models. Having gone to the MCIC last week, I had the opportunity to scan my bottle. Though I struggled with this process, James was kind enough to lend me a helping hand when developing a quality scan. With the scan complete and converted into an STL file, I moved onto working in Cura. With the file ready to go on a USB, it took absolutely no time to begin 3D printing in the DFL. Though the 3D printing process itself was long and tedious, I thoroughly enjoyed seeing my design come to life.

With the week 10 task complete, it meant that I had successfully finished IDES1262. Originally setting out to complete this course, I had no idea what to expect and what the course content would contain. As the week’s progressed and I began to learn various new skills, I believe I achieved the learning objectives set for this course. With each week’s task focusing on either digital platforms, hand sketching, and physical making, there were many aspects that I did enjoy and dislike. A standout was the opening weeks of the course which focused on areas of sketching various views, orthogonal projection and AS1100 standards. These tasks remain my least favourite of the lot, the tedious and lengthy nature of each sketch made each week painful (they really tested my patience!). That being said, I do believe valuable learning opportunities were provided as I can now successfully understand and complete sketches such as auxiliary views and 2 point perspectives. This was language I had never known prior to the tasks. I found the tasks complete on digital platforms enjoyable to a certain standard as they were very systematic. The week 6 task on Photoshop remains to be my favourite. Programs such as Photoshop, and Rhino I had worked with previously, however, programs such as 3ds Max and Cura tested my technological capability. In future I will continue to hone and perfect my ability on these programs. Working practically on my concept models provided lots of enjoyment as well due to the physical nature of the task. Within all of the tasks throughout the term, the notion ‘practice makes perfect’, seems to apply for all the exercises. Overall, despite the up’s and down’s of certain task’s within the course, I believe they all provided a valuable learning opportunity which I will aim to use in future.
4 notes
·
View notes
Text
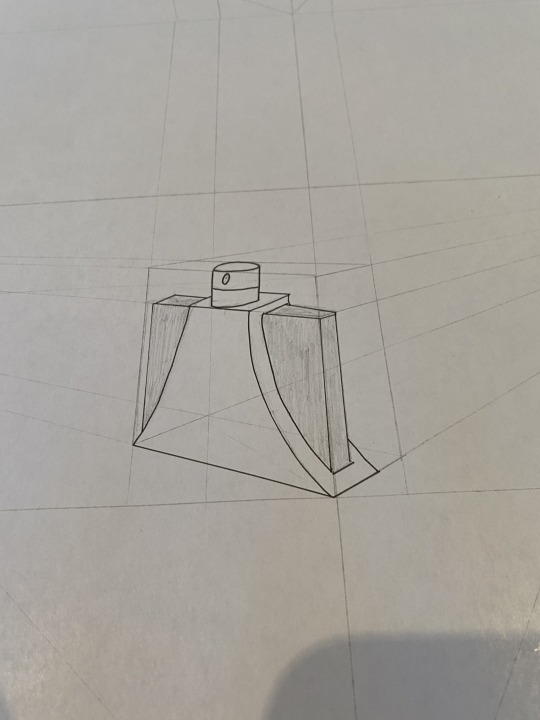
Week 9 Studio Tutorial – Preparing a 3d scan for printing
Continuing with the digitally focused exercises, this week ensures that we are able to use a 3d scan of an object for digital iteration and 3d printing. During the in-person tutorial, the class was introduced to 3D scanning in the MCIC in order to help with the coming week's tasks. Though the 3D scanning process was explained to be very simple, I still struggled to comprehend how it all worked. Having the bottle scan file from the tutorial, I was able to begin working in Rhino.
With the STL file uploaded to Rhino, I followed the steps in order to use the Quad Remesh tool. As we had focused on using Rhino in the previous BENV course, I found navigating Rhino was stress-free. With this complete, I exported the file as a .3ds file so I could continue workshopping the shape in 3ds Max.

Before exporting to 3D print, a few touch ups to the model were required. After re-orientating the bottle shape, modifications including fixing dents, creating symmetry, smoothing imperfections, and property analysis were completed.


Though completing the process for this week's task, I wasn't satisfied with what I had learnt. Following step-by-step from the exercise, I was not able to understand what each tool performed. For example when using the Quad Remesh tool, I had no idea what the result was after using the tool. In future this is something I will have to explore for myself when using programs such as Rhino and 3ds Max. In comparison to the other digital tasks completed, this was my least favourite.
6 notes
·
View notes
Text
Week 8 Studio Tutorial – Digital Iteration
Moving away from the practical nature of last week's task, we once again moved to a digital environment so that we could continue developing our computer skills. The digital program selected for week 8 was 3ds Max. Having never utilised or heard of 3ds Max, I was a complete novice entering this week's task.
After following the task's instructions on setting up the required units, and simplifying the interface, I could begin to construct objects on the platform. With extreme ease, the 'create' tab allowed me to make a sphere from the required dimensions. Being unlike any of the previous programs I have utilised, I experimented with various aspects of the program such as transforms, pivot point/gizmo, primitives, and modifiers. By playing around with 3ds Max it allowed me to gain a basic understanding of the program.

Having this newfound knowledge of the program, the second part of the exercise required us to use these techniques in order to to come up with some sculptural forms. My first sculptural form takes an abstract approach from which I began from a cylinder in the 'create' tab (I also noticed a 'teapot' object which I thought was hilarious). With this cylinder I then went to the 'modify' tab, I then proceeded to 'stretch' and 'bend' the object into an unnatural form. For my second sculptural form I wanted to do something more ridged. Aiming to construct a basic table, I extruded multiple 'box' shapes and moved them in position to construct a table.


Having never used a program like 3ds Max, I was pleased with what I accomplished in such a small learning period. Though some aspects of the program were apparent in most design applications, majority of 3ds Max was unfamiliar as the program is utilised for 3D printing amongst other things. For this reason I will aim to become more familiar with the program in future so I can expand my options when utilising computer design programs.
4 notes
·
View notes
Text
Week 7 Studio Tutorial – Physical Model Making (foam)
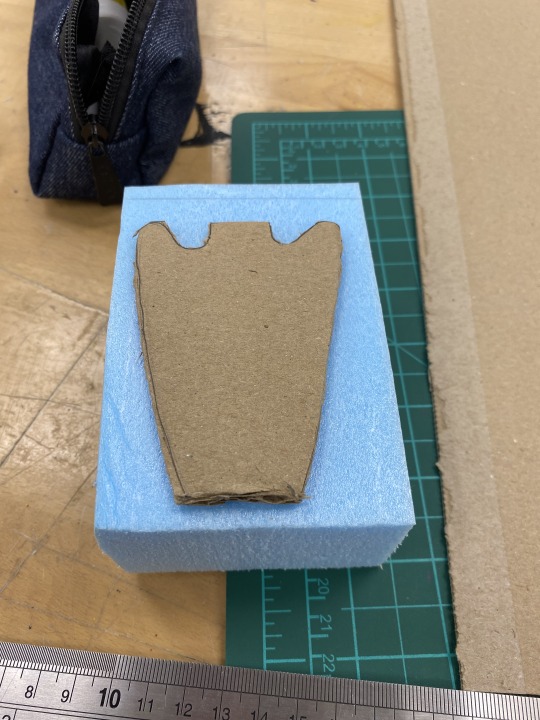
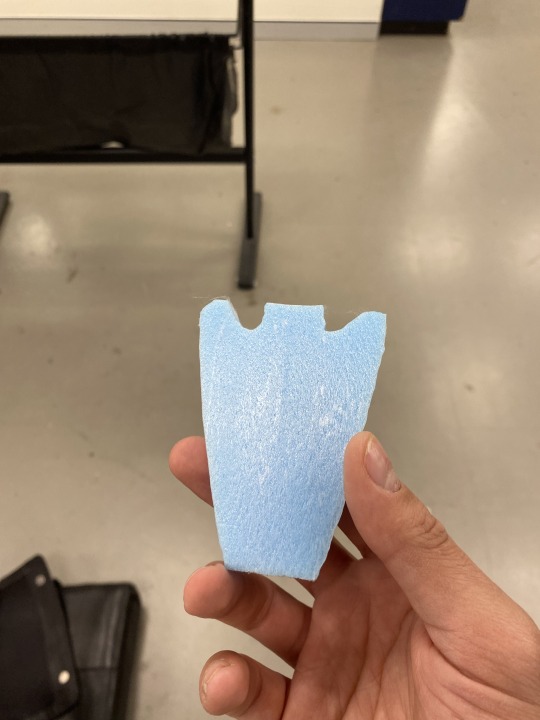
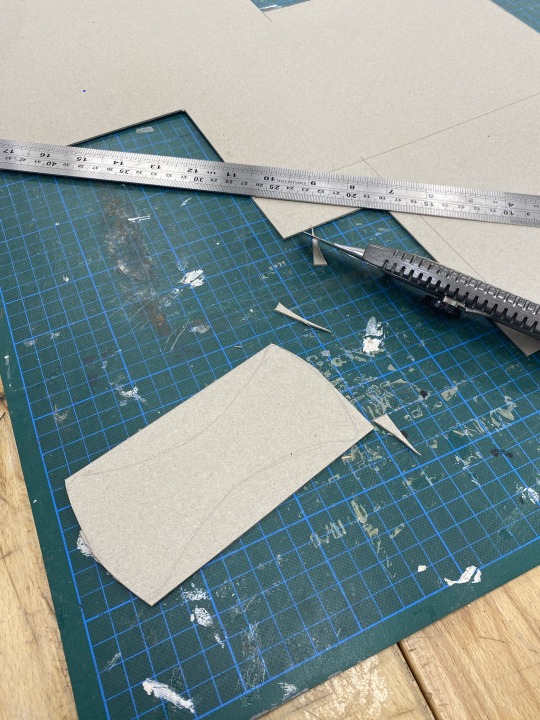
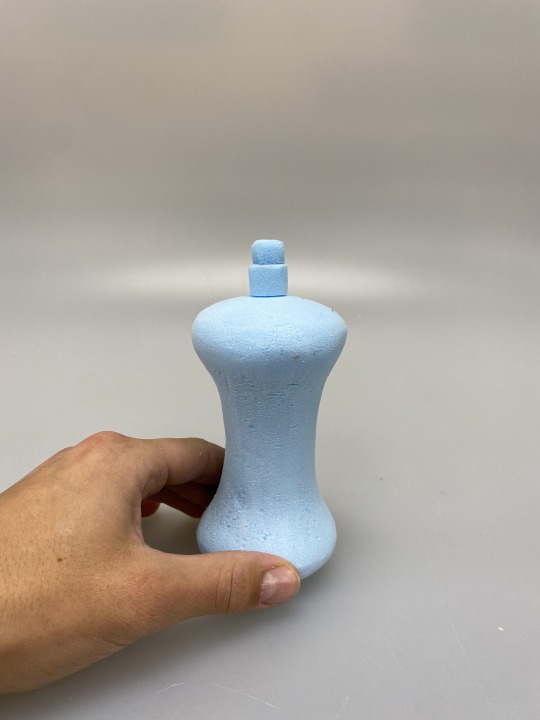
Building off last week’s exercise, we continued with the development of our Olay Moisturiser bottle by moving to physical model making. Tasked with constructing our concepts from blue foam, there were various techniques and learning experience that were required in order to produce a high quality model. Starting with a cardboard template of the concept’s profile, I used the cut-out to shape the foam into my desired form utilising the hot wire cutter. Having this rough shape, I moved onto sculpting my shape and producing curved edges. With a file and high grit sandpaper, I was able to achieve this. Upon completion of my first model, I was extremely dissatisfied with my final product.
Though my skills in foam model making were at a rookie level, I still expected a higher quality from my model. With these new found model making skills, I continued to practice and refine my second design. Following a similar process, however, spending more time on each step, I was successfully able to complete a foam model to a higher standard. Despite the tedious work of this week’s task, I thoroughly enjoyed the practical nature of the exercise as I got to see the construction of my model through all stages of development.
6 notes
·
View notes
Text
Week 6 Studio Tutorial – Digital Rendering
This week’s task saw us move to the computer program of Photoshop as a continuation of the previous week’s exercise. Having done a year of landscape architecture prior to starting this course, I was fairly well versed in utilising Photoshop. Though navigating the program came back to me quickly, I struggled to recall what each tool’s use and purpose was. As I began to watch each of the videos step-by-step, I slowly remembered certain aspects that I had forgotten while also learning new functions that I could utilise for future use. Continuing to develop off the thumbnail concepts from last week, it was challenging but rewarding to see my concepts come into 3D. Electing to complete more curved-based concepts, I made it difficult for myself to make all the designs symmetrical and provide a ‘clean’ aesthetic. If given another opportunity to complete this task again, I would focus on developing my more squared-based designs. Despite that minor issue, the overall ‘in-development/sketchy’ feel of my design is something I am very happy with. My decision to include an orange back drop is also something that helps to make the designs pop. Like last week, this has become my new favourite task so far as it continues with the theme of creativity. In the coming weeks, I hope that we will continue to utilise photoshop as it is something I enjoy.


5 notes
·
View notes
Text
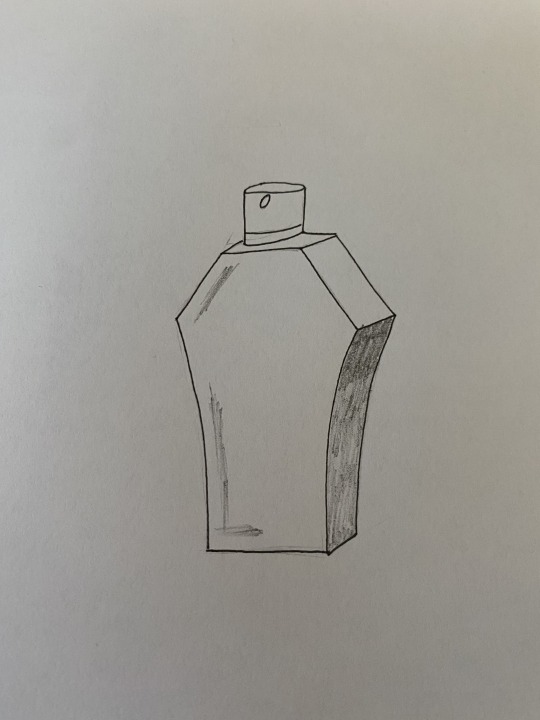
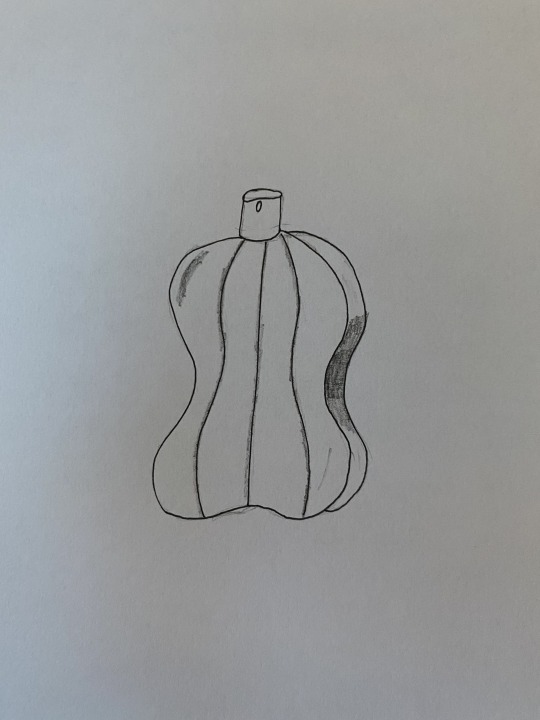
Week 5 Studio Tutorial – Sketching
With week 5’s tutorial taking a focus on sketching, we began the task by completing various sketching drills that served as a warm up opportunity. Following instructions, the exercises made us practice tasks such as straight lines, joining dots, circles and ellipses, and ellipses in perspective. With an aim of being free-flowing, I thoroughly enjoyed this minor task as there was no right or wrong way of approaching it. The calming and therapeutic nature of sketching was also a nice break from the previous tasks.
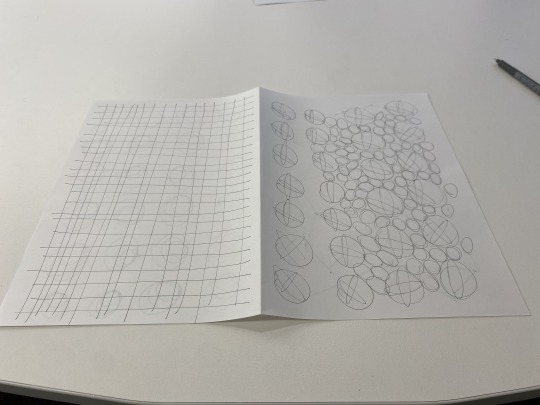
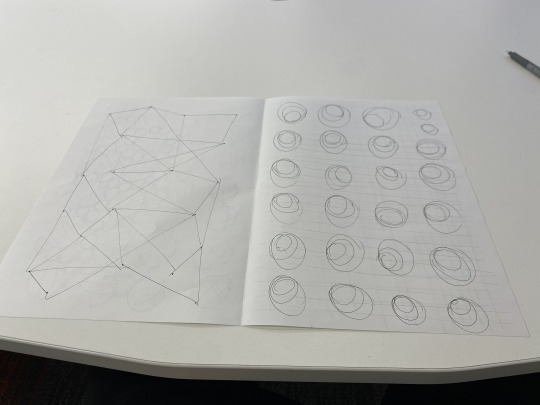
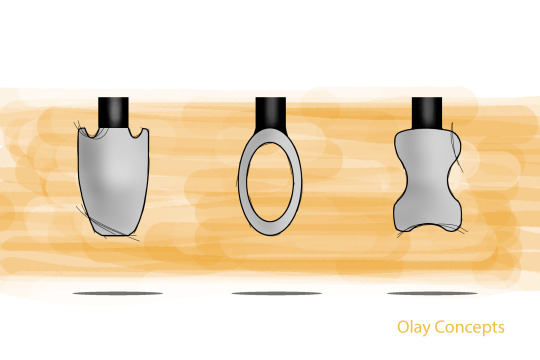
After reading the brief for the Olay Moisturiser bottle, I began developing my 12 thumbnail sketches. Not having a clear idea of how I wanted my bottle to look like, I began sketching multiple shapes in order to gain an idea of what worked to best and had the most aesthetic appeal. Completing the thumbnails, I was satisfied with the variation amongst my bottles. As I continued and began refining the bottles with tone and shade, I struggled to add onto my designs in order to make the more sophisticated. This is something I would go back and change if given a second chance. Re-reading the brief, I also realised that my designs were lacking in special features. Despite these concerns, this was by far the most enjoyable task to date as it allowed me to think creatively while also practicing the skills I have developed.
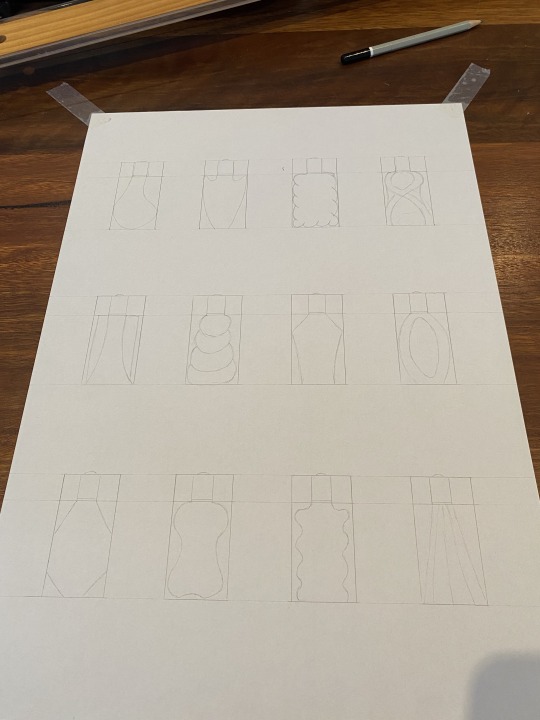
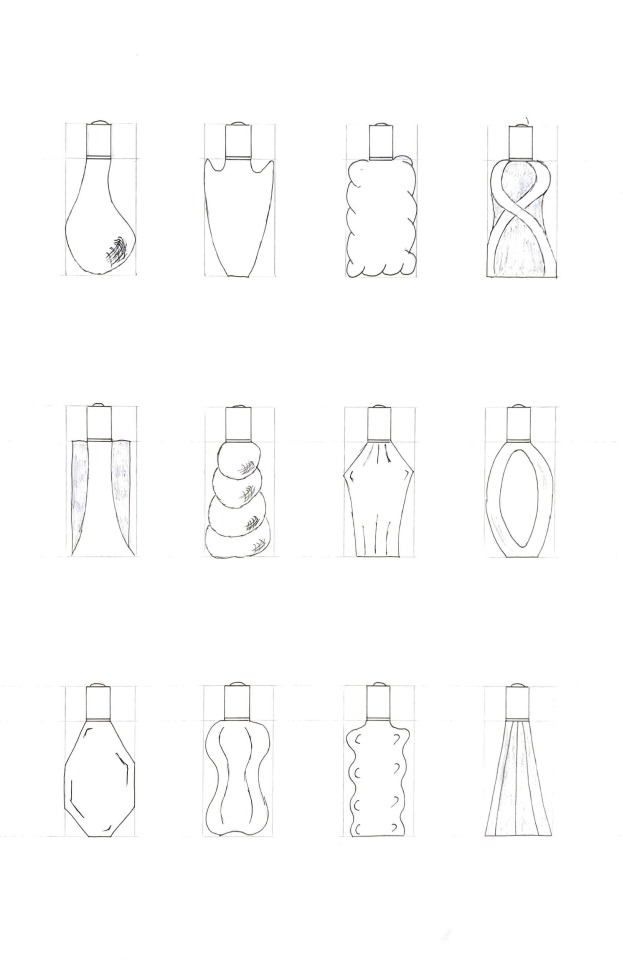
Continuing on with the development of my thumbnail sketches, I selected three designs to draw into 2 point perspectives. With practice from the previous week’s task, these drawings were much easier to complete. Sketching these designs out, I was pleased with the final look of my two sharp edged designs. The curved design, however, I was very dissatisfied with as it was difficult to portray the curved nature of its design. This issue comes down to my shading of the design, with this in mind I will strive to improve my tone/shading capabilities in the coming weeks.
As mentioned previously, this has been my favourite task to date due to the creative and free-flowing nature of the task.
6 notes
·
View notes
Text
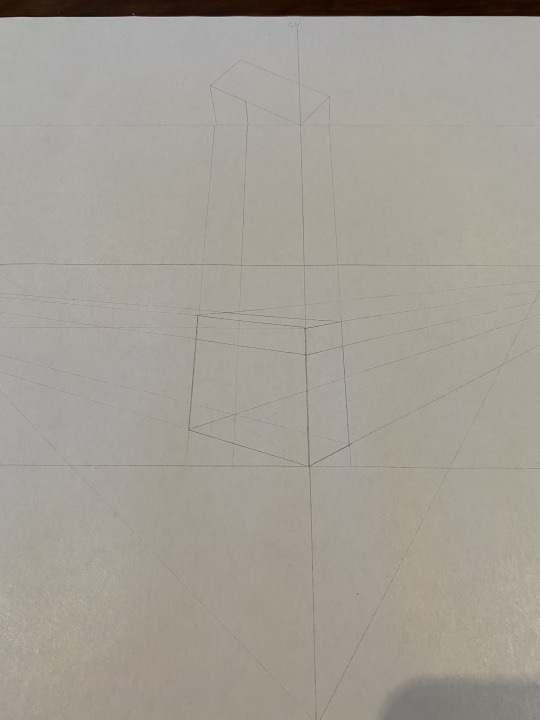
Week 4 Studio Tutorial – Perspective Drawing
This week’s studio task focused on applying the principles of technical perspective drawing through practicing the 2 point perspective method. Split into three components, this task greatly improved my knowledge and process of developing perspective drawings.
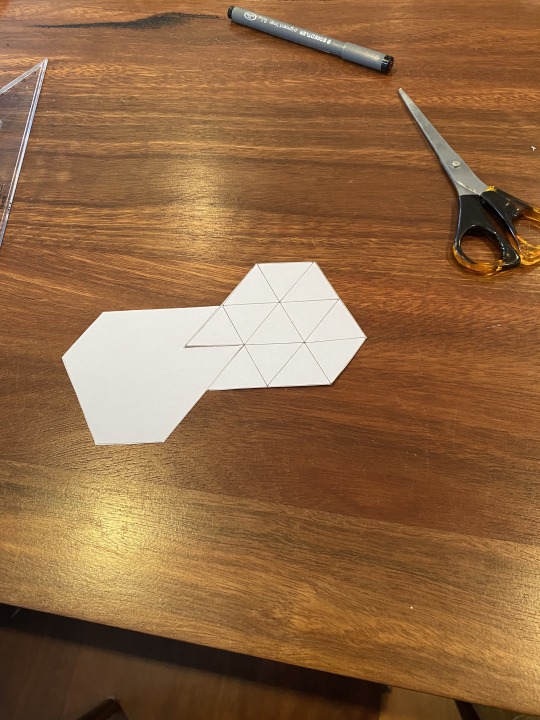
Before beginning the task, we were required to physically construct a chamfered box with the net provided to us. This physical box would serve as the basis for this task.

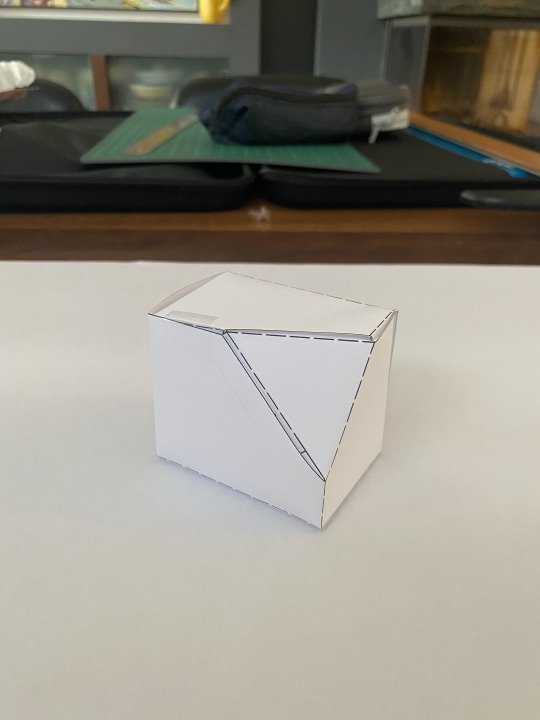
Not being able to attend in-person or online for the tutorial this week, I missed out on crucial information in relation to the completion of this task. Visiting this task with a lack of knowledge made it extremely difficult when attempting to understand the task in it’s entirety. Going back to the readings and lecture slides, I eventually came to understand the steps in developing the 2 point perspectives. Though I struggled with achieving an accurate angle of 30 degrees, I was satisfied with my first 2 point perspective drawing. However, the accuracy of my drawing is questionable in comparing to the provided image as my chamfer is slightly smaller than the other. I found the drawing process to be very systematic and tedious as each step needed to be accurate. The definition of certain words such as Picture Plane (PP), Centre of Vision (CV) is also something that I did not fully comprehend.
2. The next component of the task I found to be a lot easier as I had practice in completing a 2 point perspective from the previous drawing. This 2 point perspective drawing required an extension of the three visible faces so that each has another matching box joined to it. I found these boxes to be greater in size and slightly contorted, this may be due to me making a mistake within the task.

3. The final component for this task was something I did not understand. Following the same steps as before I constructed a perspective cube that was required. From there, a circle was to be drawn on each face of the cube showing the major and minor axis. Though I gave the component my best attempt, I believe I got it entirely wrong. I struggled to understand what the major and minor axis was, as a result, I failed in completing this final component.
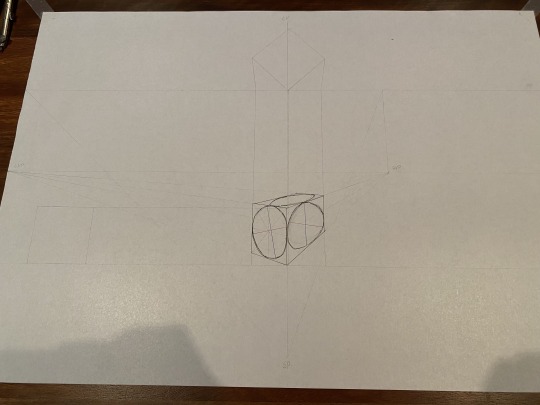
Throughout this task I recognised the importance of accuracy, planning ahead, and understanding the information provided to us in the lectures and readings. As a result of missing the tutorial, I believe I made the task more difficult to complete. This mistake will not be made again in future.
9 notes
·
View notes
Text
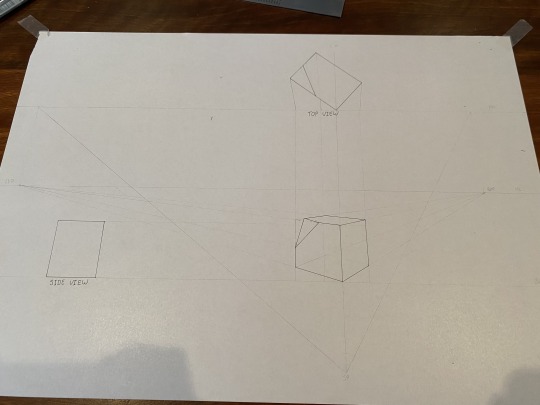
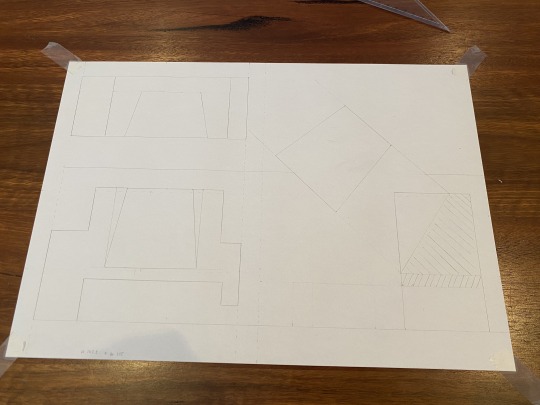
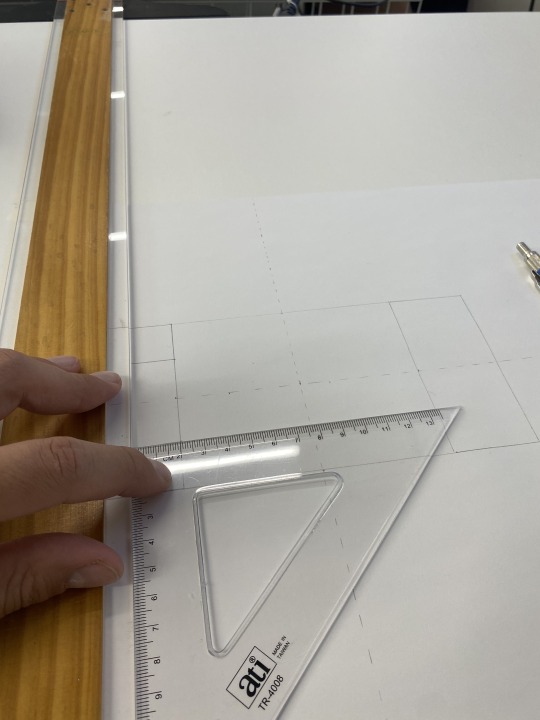
Week 3 Studio Tutorial – Section and Auxiliary Views
Continuing with applying the principles of orthogonal projection, the task for this week focused on capturing alternative views such as section and auxiliary views.
To capture these new views, the task required a scale third angle orthogonal drawing of the unique shape provided. To begin the exercise, planning the layout of each view was essential in ensuring that everything fit on the page. The task's emphasis of planning ahead was something I did not fully acknowledge until the completed product. Once the front, top, section, and auxiliary view had been plotted out on the page, I carefully began transferring the presented measurements into constructing the desired shape. Unlike week 2, I did not enjoy this task as much. With so many measurements and crucial details, I once again found this task very time consuming and tedious. The unnatural shape of the object also continued to make me second guess my measurements consistently, forcing me to take up more time.

Looking at my final product, I am fairly satisfied with how it turned out. My previous mention of putting more of an emphasis on planning ahead is something I will consider for next time as there was minimal space on the page. My appreciation for the drawing equipment has also grown as for the first half of the lesson I did not have a tri-square (I forgot it!), this made achieving straight/square lines very difficult.
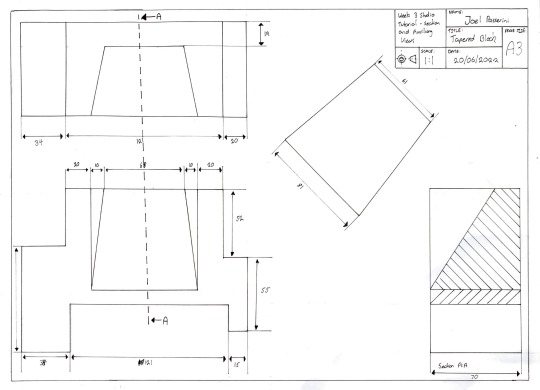
Overall this task was greatly beneficial to my learning.
8 notes
·
View notes
Text
Week 2 Studio Tutorial – Orthogonal Projection & AS1100 Standards
This week's class continued the focus of engineering drawings, applying the principles of orthogonal projection was our task for the week. Before the task could begin, we were asked to outsource a simple object. Selecting a tape dispenser for my object, the task was then split into three parts.
Being provided with a template, we were asked to construct a five sided box that fit over our chosen object. After finding the required measurements needed, and struggling to build the flimsy paper box, I was successful in developing an accurately cut box. From the get go, I vastly enjoyed the beginning of this task in comparison to last week's, this was due to the instructions being straight forward and clear. Another observation of mine also highlighted the accuracy required for all of these tasks in order to be successful.
2. Upon photographing all the angles required to continue the task, I moved along to the second part of the task. With my newfound knowledge from this week's reading, I understood how I could achieve a basic structure for my third angle orthographic drawing. Carefully plotting out where on the page each view was required to be, I successfully freehand sketched my tape dispenser with various measurements. A key piece of information I learnt from this part was the importance of using construction lines in order to layout my page/views, without this, the layout would look untidy. I also enjoyed capturing the finite details of my tape dispenser.
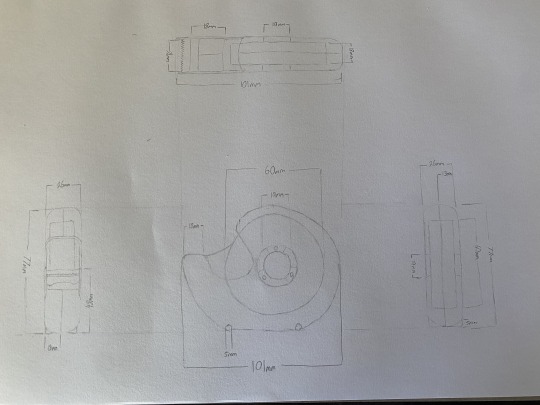
3. The final part of the task required the construction of an accurate orthogonal drawing utilising drafting equipment. Right off the bat, I hated how tedious this part of the task was. Needing to capture every minute measurement, and slight curve, I should have left myself more time to complete the task. Eventually I achieved the final product and was satisfied with how it turned out. Utilising various pen weights for specific areas of the drawing is something I will have to understand more in future tasks.
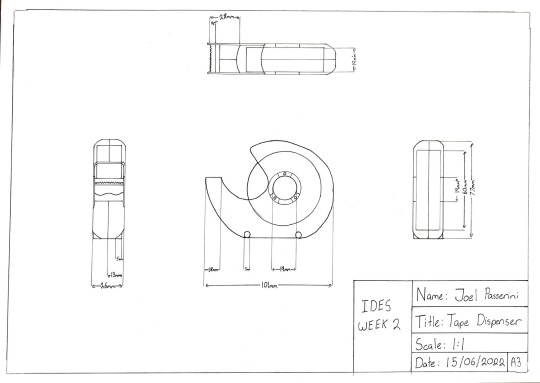
Overall, I enjoyed the straight forward nature of this task. Though tedious and lengthy at times, I found it a rewarding experience.
7 notes
·
View notes
Text
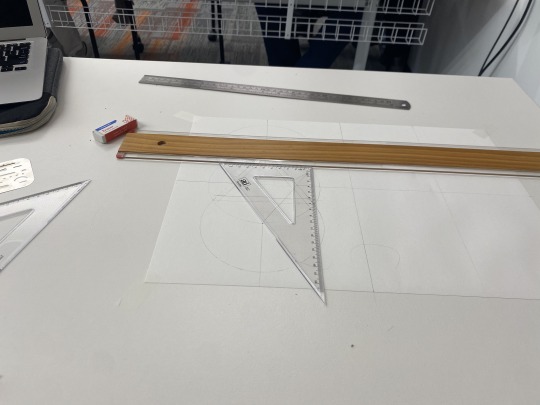
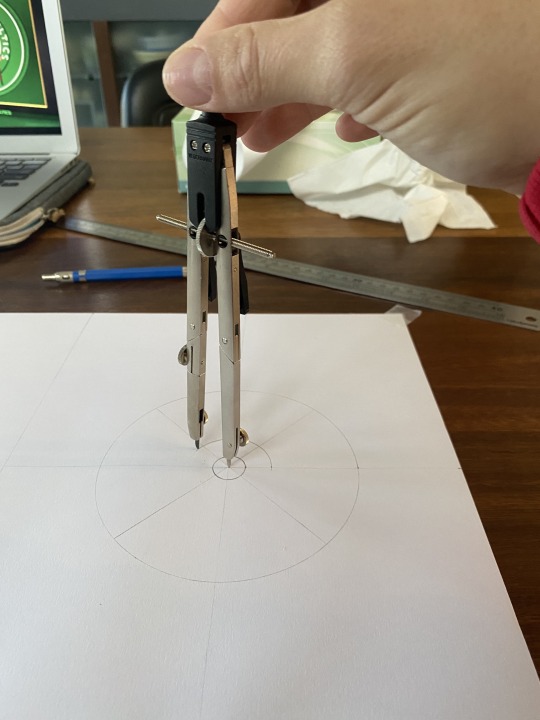
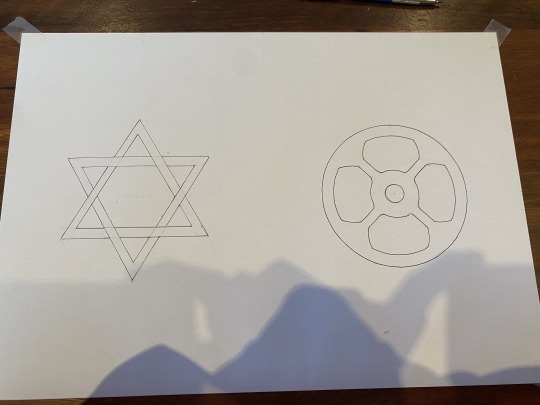
Week 1 Reflection/Images - Drawing Instrument Exercises
Beginning the term with a general look into certain drawing instruments, the presented task required us to precisely sketch two unique shapes. Utilising equipment to accurately portray these shapes, the task gave an insightful idea of how precision is vital in diagrams such as engineering drawings. Overall, I was successful in completing the task, however, I struggled with certain elements. I was able to gain an understanding of the common tools such as T-squares, compasses, and set squares, these could be used to improve my own sketches in future. Throughout the task, I found it difficult to achieve certain angles or curves with the tools provided as the process of when and how to use them was confusing. I enjoyed how accurate the entire process was, though, the time spent achieving the final shapes was extremely long, tedious, and something I did not enjoy. If I had my time again, I would complete the steps of the task in a different order that would help me to create a more time-efficient and accurate final shape. With this second opportunity, I would also redo my second shape as the internal curves are not representative of the original shape. Using the variety of tools given to us in different manners, I learnt that there were many methods of achieving the final outcome despite everyone having the same tools.

4 notes
·
View notes
Text
O Week Introduction
Hi everyone! My name is Joel Passerini and I've recently changed my degree to study industrial design. Originally doing a bachelor of landscape architecture, I instead wanted to pursue a smaller scale of design, this then led me to the discovery of industrial design! I enjoy all sorts of sports in my spare time, such as AFL and basketball. I look forward to seeing everyone’s work!
1 note
·
View note