
Last Seen Blogs

possessingtheproperspirit
possessing the proper spirit


whatev-i-guess
ever

en-camino-a-tu-amor
En camino a tu amor
Text
How to Make Crunchy Chickpeas
Crispy, crunchy chickpeas are an addicting little snack, and quite simple to make! We’re talking the basics on How to Make Crunchy Chickpeas that are perfect as snack, salad, or soup topper, and they’re gluten-free, dairy-free and vegan!
How to Make Crunchy Chickpeas
Chickpeas, or garbanzo beans are one of those pantry staples that are so versatile in how they can be used. Chickpeas are great in soups, stews, salads and even baked goods but quite possibly the best way to eat them may be simply baked on their own with a little olive oil and salt until their nice and crunchy! You can optionally add in a little spice (and we suggest you do!) and they’re the best salty and savory snack out there. There are a just a few tricks you need to know How to Make Crunchy Chickpeas that we’ll be sharing today!
What kind of chickpeas?
We use the canned version! They’re so cheap and typically, unless you have a dietary restriction against beans (and in that case you probably would not have gotten this far into a bean post), they can be found already in your pantry! Likely this would work with beans cooked from dry as well, so long as the chickpeas haven’t been overcooked and still hold their shape.
How do you prep the chickpeas?
This is the most tediuos part of the recipe! The chickpeas need to be:
rinsed
drained
dried
take off any loose skin
What that means is that after you’ve rinsed and drained the chickpeas you’ll want to rub them dry between two clean kitchen towels. When you do this most of the skins from the chickpeas will come loose. Discard those. If you feel so inclined you can take a minute or two to take off the rest of the skins from the chickpeas that didn’t come loose. You pick up the chickpea and lightly pinch it and the skin will come loose. This isn’t strictly necessary but it does allow the chickpea to get ultra crispy in the oven.
Save the seasoning for later!
Roast the chickpeas with just oil and salt, and once they’re crispy add the seasoning and return to the oven for a few minutes. If you season them first, they spices can burn in the oven.
How to Store Crispy Chickpeas
They’re best the day that they are made, hot out of the oven! But they have the potential to get crispier as they cool. We’ve experimented with storing them a few different ways. We have found the best way to store them is to cool them outside of the oven and then once the oven has cooled a bit, leave them on the baking sheet uncovered inside of the closed oven overnight. The reason you take them out of the oven and then put them back inside is because you don’t want to keep cooking them, you just want to leave them inside of the closed oven to dry out. This isn’t essential, but a trick we accidentally discovered.After that overnight you can place them in a storage container. Otherwise you can store them for a few days at room temperature in a breathable container. This means a brown paper bag or a storage container with a loose seal. They become chewier (but still delicious) after they are cool. If you want to leave them in a sealed container they will soften slightly.
We used these tools in this recipe:
strainer
2 clean kitchen towels
rimmed baking sheet
If you liked this how to recipe, check out these others:
How to Make Crunchy Chickpeas
Ingredients
2-15oz cans chickpeas
2 tablespoon oil, divided
1 teaspoon salt
1/2 teaspoon ground black pepper
1/2 teaspoon cumin (optional)
1/2 teaspoon garlic powder (optional)
Zest from 1 lemon (optional)
Directions
Pre-heat oven to 350 degrees.
Drain and rinse the chickpeas well. Place on a clean kitchen towel and rub the chickpeas dry. The skins will start to loosen. If desired you can remove any leftover chickpea skins still intact, but this is optional.
Place dried chickpeas on a rimmed baking sheet. Add 1 tablespoon oil, salt and pepper and move around to evenly coat this chickpeas. Bake for 40 minutes.
Add remaining 1 tablespoon oil, cumin, garlic powder and lemon zest. Continue baking for 5 minutes and remove from oven.
Let cool.
Store at room temperature in a breathable storage container (like a brown paper bag, or in a jar with a loose seal) for 3-5 days.
Recipe Notes
Read post for extra tips.
We've experimented with storing them a few different ways. We have found the best way to store them is to cool them outside of the oven and then once the oven has cooled a bit, leave them on the baking sheet uncovered inside of the closed oven overnight. The reason you take them out of the oven and then put them back inside is because you don't want to keep cooking them, you just want to leave them inside of the closed oven to dry out. This isn't essential, but a trick we accidentally discovered. Otherwise you can store them for a few days at room temperature in a breathable container. This means a brown paper bag or a storage container with a loose seal. They become chewier (but still delicious) after they are cool. If you want to leave them in a sealed container they will soften slightly.
Loading nutrition data...
There may be affiliate links in this post! By clicking on them, or purchasing recommended items I may receive a small compensation, at no cost to you! However, I only recommend products I absolutely love and use in my own home! Thank you for supporting Lexi's Clean Kitchen when you shop! See my privacy policy for more information about this, the information we save, and more!
Source: https://lexiscleankitchen.com/crunchy-chickpeas/
0 notes
Text
10 Cozy Things to Make in July
10 Cozy Things to Make in July
Adventures
Admittedly I missed the whole 10 cozy things to make in June because my life was insane around the end of the month last month and I completely forgot. BUT I’m bizzack with a lil’ round-up of dishes and desserts you should def make in the month of July.
Are you doing anything for the 4th? I’m always confused as to how to celebrate this holiday when it lands smack dab in the middle of the week. And like most freelancers, I’m just working, trying to get everything in order for my life/work.
I am going to a bbq on Friday and still figuring out what to bring. One of these is bound to end up on my to-make list!
Lemon Berry Meringue Trifle – I made every component in this trifle from scrigedy scratch. Do I recommend this? Absolutely not. Just buy the dang pound cake from the store and cube it up and layer it with the curd and whipped cream. And add those fresh berries from the farmer’s market. It’s a dreamy dessert.
Blistered Tomato Shrimp Scampi – Sungold and cherry tomatoes blistered and then tossed into a classic shrimp scampi, inspired by the greatest place on earth: Olive Garden. I made garlic bread, too, that maybe I left in the oven for a bit too long and it got kinda toasty. But it tasted VERY good.
Sabiches – These sandwiches are my jam. I actually like to make it deconstructed for a super healthy option. I like to eat all of the components on a plate—it is literally one of my favorite summer lunches.
Tomato Confit with Burrata and Basil – If you’ve ever wanted to face bunt a bowl of burrata, then this appetizer is for you! Tomatoes slowly roast in olive oil. And then it’s spooned over pesto and burrata. It’s like a beautiful pillow of comfort and acidity and freshness. Summer at its best.
Aperol Spritzes, Every Which Way – There was this New York Times article that came out about how Aperol Spritzes suck and it really shook me to my core because there where else are we supposed to get happiness from?! The world is trash and this brings people happiness—let us live! They’re delightful. I also love straying away from the traditional spritz and shaking it up a bit. Hello!
Grilled Summer Squash Gyros with Herbed Tzatziki – I love my grill (you probably know this by now) and these are ideal for grilled squash. Throw it in the center of a soft pita with lots of herbed tzatziki. It’s glorious and vegetarian.
Aguas Frescas – Hello, if it’s hot this is something you have to make. It’s an absolute must. It couldn’t be more simple and more delicious. I’ve already made exactly five batches of watermelon aqua fresca and this years watermelon is so easy that it requires ZERO sugar. ZERO. So sweet and tasty.
Peach Maple Yogurt Cake – This cake is so pretty. But it’s also V delicious. It’s inspired by summer in Vermont. The cake is yogurt based, giving it this lovely tang. And the sweetness is from maple syrup. Those two go very well with each other. And then peaches!
The Ultimate B.L.T. – Simple things need to be done correctly. This applies to the very simple B.L.T. Every component needs to be bangin’. This means delicious, juicy tomatoes, crisp lettuce and thick-cut bacon. And perfect white bread. It’s simple.
Breakfast Tacos – Is there anything better than a breakfast burrito? Absolutely not. These breakfast tacos take a swift move from the breakfast burrito and apply it to tacos. They have a hash at the base that is SO delicious.
July 1, 2019 by Adrianna Adarme
Adrianna Adarme
A Cozy Kitchen is a blog written by Adrianna Adarme. Adrianna likes corgis, pancakes and cute things.
Previous Post
You Might Also Like
April Stuff!
April 29, 2013
Fall Dinner Party (and Three-Cheese Lamb Lasagna & Persimmon Gallette!)
November 14, 2014
The Year of Cozy, Cover and Pre-Order!!!
July 20, 2015

Hi! This is my lil’ corner on da internets called A Cozy Kitchen. I live in Los Angeles, California with my husband Joshua and my corgi Amelia.
Read More
Cozy Cooking Playlist!
Cookbook!

Privacy Policy
Click here to read our Privacy Policy at A Cozy Kitchen
Stay Up To Date
SUBSCRIBE
Fun Brand Partnerships


Source: https://www.acozykitchen.com/10-cozy-things-to-make-in-july-2/
0 notes
Text
Vegan Irish Soda Bread
March 13, 2019
My mom (hi Mom!) used to make Irish Soda Bread every Saint Patrick’s Day. That and Reuben sandwiches. I’ve yet to create a vegetarian Reuben (and I’m not sure I could duplicate that one successfully if I tried), but Vegan Irish Soda Bread? Completely, utterly doable, as it turns out! Talk about luck. (Get it? Luck? Saint Patrick’s Day? Moving on …)
This Irish Soda Bread tastes just like the real thing – or at least just like my previous go-to recipe. My go-to was this Irish Soda Bread recipe, based off of Ina Garten’s recipe, which is prettttty dang perfect.
But now that I’m a dairy-avoider, I wanted to come up with a dairy-free version. So I swapped in vegan buttermilk and vegan butter and decided to see what would happen if I left out the egg while I was at it.
And guess what? It’s still totally delicious! Which I guess makes sense because the most traditional Irish Soda Bread is actually made of a very simple list of ingredients – baking soda, flour, buttermilk, and salt.
I’m pretty fond of this version, though, with its added sugar and a nice bit of (vegan) butter. Plus, a nice handful of currants for a bit of sweetness studded here and there.
Look at that loaf. All golden brown, tender, flaky … just waiting for a big ‘ol smear of butter. And maybe marmalade, if you’re so inclined.
This Vegan Irish Soda Bread comes together in minutes. It’s so easy!
First, you create your vegan “buttermilk.” Add one cup of non-dairy milk to a 2-cup liquid measuring cup, then stir in some vinegar. Set that aside to do its thing. Meanwhile, toss the currants in a bit of flour. Doing this helps to keep the currants evenly distributed throughout your loaf.
Next, you stir together your dry ingredients. Then cut in your vegan butter. I like to use a pastry blender, then my hands to really get the butter distributed, because what the heck. Next, you’ll stir in the buttermilk situation, then turn your wet dough out on your floured surface. Then incorporate the additional flour – just enough so the dough’s no longer sticky – and knead 4-5 times for good measure.
Round your loaf, place on your baking sheet, and cut the signature “X” in the top of the loaf with a sharp knife.
Plop it in the oven, brew up a pot of coffee, and worry not – your Irish Soda Bread will be baked up piping hot, golden brown, and truly delicious before you know it.
Pinch me.
Yield: 1 medium loaf
Prep: 10 minutes
Cook: 35 minutes
Total: 45 minutes
Just because you’re vegan or dairy-free doesn’t mean you can’t enjoy a little bread-o-the-Irish! Whip up this vegan Irish soda bread and never go soda-bread-less on St. Paddy’s Day again.
Ingredients:
1 cup unsweetened plain oat milk or other non-dairy milk + 1 tablespoons white vinegar*
1/2 cup dried currants
2 cups all-purpose flour, plus another 1/2 cup or so for the light kneading and another 1 teaspoon for the currants
2 tablespoons granulated sugar
1/2 teaspoon baking soda
1/2 teaspoon fine-grain salt
1/4 cup (1/2 stick) vegan butter (I use Earth Balance), cut into squares
Directions:
Get ready. Preheat oven to 375 degrees Fahrenheit. Line a medium baking sheet with a silicone mat or parchment paper. Make sure you have a surface – clean countertop or pastry board – to use when it’s time.
Make buttermilk. Add the milk to a 2-cup liquid measuring cup or small bowl. Stir in 1 tablespoon vinegar. Set aside for at least 5 minutes.
Prep currants. In a small bowl, toss the currants with the 1 teaspoon flour. Set aside.
Stir together dry ingredients. Add flour, sugar, baking soda, and salt to a large bowl. Mix together until combined. Add the buttermilk and currants and stir with a spatula or wooden spoon until combined. The dough will be wet and sticky.
Finish prepping the dough. Sprinkle 1/4 cup flour on your surface and turn the dough out onto the surface. Sprinkle a little more flour on top of the dough. Fold the dough onto itself, adding more flour as needed, just until the dough is no longer super sticky (a little sticky is okay). Knead about 5 times then fold the corners underneath to form a ball. Set the dough on your baking sheet and, using a sharp knife, cut a large “X” into the top.
Bake. Place in your pre-heated oven and bake for 35-45 minutes, until golden brown and a toothpick inserted into the middle comes out clean.
Cool. Remove from oven and place the loaf on a rack to cool.
Eat. Slice, slather with vegan butter, and enjoy! Makes excellent toast, too. Keeps at room temp for a good 3-4 days (keep wrapped with plastic wrap or beeswax cloth).
* I’ve only made this with oat milk, as that was the only non-dairy milk I had in my fridge as I was testing this recipe! But I’m certain that almond milk or soy milk would work just fine too.
All images and text ©Kare for Kitchen Treaty.
Kare
Kare is a vegetarian home cook living among carnivores. She loves creating irresistible and flexible recipes that help multi-vore families like hers keep the peace - deliciously.
Source: https://www.kitchentreaty.com/vegan-irish-soda-bread/
0 notes
Text
Korean Grandma’s Soy Sauce Noodles
I’m excited to share this noodles recipe with you today. I got inspiration for it from a video by the Korean grandma Youtube channel. She introduced this tasty noodle dish to her fans (I’m one of them. lol), and it looked very good. I wanted to share it with my fans too. haha I didn’t follow the exact same recipe she shared, but my recipe is pretty good too. It is a common simple noodle dish Koreans enjoy daily, but Korean grandma revealed her secret ingredient to enhance the flavor of this dish: vinegar. Interestingly, I usually add a little bit of vinegar to my sauces too. I bet you will love it because I got big thumbs up from my 3 boys and myself. 😉👍🤣
Yield: 2 Servings
Short Korean Lesson
HanGuk (한국) = Korea
HalMeoNi (할머니) = Grandmother
Video Instructions
Main Ingredients:
6 oz Thin Korean Noodles A.K.A SoMyeon (8 Cups Water, 1 tsp Salt)
1 Cup Zucchini
½ Cup Carrot
¼ Cup Green Onion
1 tsp Cooking Oil
Sauce Ingredients:
Garnish (Optional):
Directions
Cut 1 cup zucchini, ½ cup onion, and ¼ cup green onion into about 2-inch long thin strips.
Mix all the ingredients for the sauce in a small bowl: 2 Tbsp soy sauce, 1 Tbsp green onion, 1 Tbsp sesame seeds, 2 tsp sugar, 1 tsp minced garlic, 1 tsp sesame oil, and ¾ tsp vinegar.
These are Korean thin wheat noodles. If you don’t have them, you can try angel hair spaghetti instead.
We need about 6 oz of the noodles. You can measure it by holding the noodles like this or using a scale with a cup like this.
In 8 cups of boiling water, add 1 tsp of salt to give some flavor to the noodles.
Then, put the noodles in the boiling water and cook them for about 5 minutes on high.
Meanwhile, drizzle about 1 tsp of cooking oil in a heated pan and fry the carrot for 1 minute on medium-high.
After 1 minute, add the zucchini to the pan and fry for 2 minutes with the carrot.
After 2 minutes, add the green onion and fry for 1 more minute, and then the vegetables are ready.
By now, your noodles will be cooked too.
Drain out the water and rinse them in cold water several times.
It is important to remove as much liquid from the noodles as you can.
In a large mixing bowl, add the cooked noodles, the prepared sauce, and the fried veggies.
Mix everything gently and it is done. Korean grandma served the noodles as it is. Trust me – it is very good as a simple dish.
However, I added some garnish for mine such as well fermented kimchi, cucumber, and roasted dried laver. You can skip them if you want. In my opinion, a few garnishes make the dish even more flavorful and nutritious.
Put the noodles in a pretty serving bowl or on a plate before garnishing them. You can also sprinkle more sesame seeds on top to make it more appetizing. Invest little bit of your time to try this amazing dish – you will be very satisfied with the result. Enjoy!
Source: http://aeriskitchen.com/2019/03/soy-sauce-mixed-noodles/
0 notes
Text
Equipment & Gear: GastroMax Slotted Turner (Spatula)
These days when I reach for a spatula to turn food in a pan, I've been finding myself grabbing the GastroMax Slotted Turner more often than not. Tina bought this spatula for me after months (or maybe years) of listening to me complain about our various spatulas. After buying the GastroMax Turner, my complaining has stopped. My previous go to spatula was the Matfer Bourgeat Exoglass Pelton Spatula (what a mouthful!) which I still find to be very useful. The Matfer spatula has a very thin edge that curves up to the main thickness of the spatula (like a fillet edge instead of a chamfer edge) and is a little flexible/bendy which allows it to curve under delicate items like fish fillets. There is almost no angle between the blade of the spatula and the handle which is my chief complaint. Technically, the front 1.5 inches of the blade are angled at 10°, but the rest of the blade is completely in line with the handle. Because there isn't really an angle, scooping under something delicate is harder and potentially limited by the angle with which the sides of the pan allow. Sure, since the spatula is a little flexible, I can press down with some force to cause it to bend a bit more, but when working with delicate food (and over a flame) applying unnecessary force to cause a utensil to flex seems like more of a design flaw than anything else. Also, because of the angle which I have to slide the spatula under the ingredient, sometimes I can't get more than an inch and a half of the ingredient onto the front of the spatula (due to that small 10° angle that starts at that point in the blade) and when I attempt to turn it, the food will slide off either by itself or because the spatula flexs a little. Don't get me wrong, the Matfer spatulas are great (I still use them to flip pancakes and turn delicate fish filets - mine are bright blue), but I like the GastroMax Slotted Turner quite a bit more. Tina and I also use our Matfer spatulas for rapidly transfering food from a pan or sheet pan because it is wider than the GastroMax.
The GastroMax Slotted Turner is a bit more rigid than my Matfer spatulas which comes in handy when picking up more weighty ingredients. Since it is rigid, there isn't the flex and bounce that can cause the food to fall or slide off. Perhaps most important is the fact that there is an offset and 27° angle between the blade and the handle which allows me to come in at an extremely shallow (or even flat) angle and slide nicely under the food. The entire blade slides nicely under the food since the blade itself is almost completely flat. The edge of the spatula is very thin (1/32-in) and chamfered (a straight slope from the edge to the thickness of the blade of the spatula [1/16-in]). The slope is also at an extremely shallow angle (less than 5°) and seems to accidentally catch on food less than my other spatulas (often I can get a spatula under some food because the edge is so thin, but where the spatula thickens it will catch on the food and either tear it or make it difficult to get the rest onto the spatula - with the GastroMax this problem doesn't seem to exist). The turner is also heat resistant up to 500°F (260°C).
The only real drawback for the GastroMax is that the turner is relatively narrow at 2-1/8 inches at its widest. With a 5-1/2 inch blade, the spatula is long enough for most applications, but wide floppy things (like large or normal sized pancakes) will probably need something a little wider.?>
The GastroMax Slotted Turner is available in white, black, and grey. For those few of you who are curious, Tina bought me a grey one.
?>
Source: http://www.cookingforengineers.com/article/346/GastroMax-Slotted-Turner-Spatula
0 notes
Text
5 Juicy, Flavorful Burger Recipes
These juicy burgers are inspired by bulgogi, the well-known Korean specialty of marinated slices of beef grilled on a barbecue or on a stove-top griddle. Topped with a spicy chili mayo, they're easy to make, packed with flavor, and family-friendly to boot.
Source: https://www.onceuponachef.com/articles/5-juicy-flavorful-burger-recipes.html
0 notes
Text
Randoms 2.1.18
I have been on a real Stella Parks kick lately and that combined with my lifelong inability to settle on a granola recipe meant that I tried her buttermilk granola. It is super good, though not exactly what I am looking for. I think one thing I have learned is that I don’t care as much about clumps as I am supposed to. They are written about as if they are the holy grail of granola recipes but I kind of don’t care if I have clumps. Anyway, hers does have clumps and some nice light crispness and tang thanks to a buttermilk soak. The recipe is definitely worth trying, but a little too fussy to be a regular in my kitchen. I want to be able to just dump a bunch of stuff in a bowl and run. Also maybe I hate dried fruit? The quest continues.
*
I’ve been thinking a lot about thinking. Specifically about how it feels like there is no longer the time and space to do the hard work of thinking. The speed of the internet has it all coming at us quick and we’re developing these fast triggers responding to things before we have even had the time to think them through. Tavi Gevinson touches on this, and a bunch of other important ideas in her latest editors letter on Rookie.
Whatever you need to do to create that space for yourself, do it this year. Do it now. Fight the new pace of thinking designed to keep us in Facebook fights and make Facebook more money. Resist getting so wound up by every story that you accelerate off a cliff into apathy. Lengthen the circuit between a candid thought and your anticipation of how it will be received, a circuit constantly shrinking in fear. Try your ideas out with people you are not desperate to impress, so there’s less ego clouding your discussion.
**
I was super late to the party, but the My Dad Wrote a Porno podcast is officially the funniest, stupid/dirtiest, most wonderfully British thing I have ever heard. For the uninitiated, three friends read aloud and discuss a series of erotic novels that one of their dads wrote. Few things have brought me more laughs in these dark times.
Alice Levine is one of the three friends and (for me) the star of the show. She also happens to be a food and “lifestyle” writer and along with business partner Laura Jackson works under the moniker Jackson & Levine. The two have hosted pop-up dinners, written for magazines, and designed a capsule collection for Habitat. They also published their first cookbook Round to Ours (great title!), which is super good-looking, if a little toothless. But you gotta love that bizzarro Pennsylvania Dutch cover!
***
Curious about the dining basics available through Year & Day. Simple, good-looking and (sort-of?) reasonably priced. I especially like the shape of their tumblers, which can be hard to make feel special. I was into the matte black flatware but it seems like hand washing is probably best for them and who wants to worry about spots.
****
Alicia Kennedy writing about loss and oysters is some peak food writing, in case you missed it back in November: The First Time I Ate an Oyster
*****
Kim Severson covers Medieval times like only she could. It lead me to some truly bonkers reviews for Medieval Times.
******
We tried KP! Toffee (no idea what is going on with that exclamation point) on our last trip to Madison, Wisconsin. It might have been the best toffee I have ever eaten. I ended up ordering a bunch for holiday gifts. The milk chocolate is where it is at.
Source: http://www.lottieanddoof.com/2018/02/randoms-2-1-18/
0 notes
Text
My Favorite Low-Carb and Keto Oven-Baked Fish Dinners
posted by Kalyn Denny on March 22, 2019
Fish cooks quickly when it’s baked or roasted, which makes My Favorite Low-Carb and Keto Oven-Baked Fish Dinners perfect for spring when so many people are eating more fish. Use Recipe Round-Ups for more low-carb round-ups like this one!
Click to PIN My Favorite Low-Carb and Keto Oven-Baked Fish Dinners!
I certainly didn’t start out the week planning to give you Low-Carb and Keto Oven-Baked Fish Dinners for my weekly round-up of low-carb recipes to try over the weekend! But after I posted Easy Low-Carb Baked Mayo-Parmesan Fish I was struck by all the reasons that baked or roasted fish is a great idea for spring! First, so many people are eating more fish this time of year, either for Lent or because they want lighter meals with bathing suit season approaching. Second, nights are mostly still cool in the spring so you don’t mind turning on your oven for a tasty fish dinner that cooks super-quickly. And finally, roasted or baked fish is the ultimate in easy! Nobody minds an easy dinner when there’s more daylight and you have a chance to spend time outside after dinner, do they?
When I started looking through the Seafood Recipes for favorites that were cooked in the oven, I was pretty surprised at how many favorites I had! And quite a few of these fish recipes are impressive enough that I’ve made them for guests. I’m including a couple of ideas using shrimp even thought I decided that I just couldn’t fit the word shellfish into the post title, and I also included some quick sheet pan meals with shrimp and salmon that I’ve really enjoyed.
And there are a few here from the very early days of my blog, so I hope the older photos are still good enough to show you how tasty they are. I’m also a fan of using a toaster oven when you want to baked or roast without heating up the kitchen, and that’s a trick that works well for some of these fish recipes if you’re not cooking for too many people. Enjoy some fish dinners everyone, because you know we all should be eating more fish, right?
Use Touch to Tell When Your Fish is Done:
All my fish dinner recipes have a suggested cooking time. But the best way to tell when fish is done is by touch. When the fish feels firm (but not hard) to the touch when you press on it with your fingertip or a fork, you’ll know it’s done. If you use this system regularly you’ll get better at judging the degree of doneness that appeals to you the most.
Side Dishes for Low-Carb and Keto Fish Dinners:
I’m calling these fish dinners, so I want to give you some side dish ideas and I’d love Easy Cheesy Baked Keto Cauliflower, Low-Carb Spicy Cilantro Peanut Slaw, or Lemony Green Beans as a side dish for any of these meals!
This Foil-Baked Salmon with Pesto and Tomatoes is always a wow, even when it’s not fresh basil season and you’re using pesto from a jar! If you prefer, for Keto you can cut the tomatoes even thinner to save a few more carbs!
Have you tried the uber-healthy fish variety called Barramundi? My niece Kara and I swooned over this Low-Carb Roasted Barramundi with Tomato and Olive Relish. In fact after made it, Kara even made it at home before I managed to get the recipe on the blog!
This Roasted Asian Salmon and Green Beans Sheet Pan Meal has been uber-popular on the blog, so if you haven’t made this yet, what are you waiting for?
I love the frozen Mahi Mahi fillets from Costco, and they’d be perfect for this Pan-Seared and Roasted Mahi Mahi with Mediterranean Salsa and Feta.
For those who like things a bit spicy, this Sriracha-Spiced Shrimp and Broccoli Sheet Pan Meal does take a bit longer to marinate the shrimp for a few minutes but this is still so easy and tasty!
This Baked White Fish with Onions, Peppers, Olives, and Feta has so many good flavors going on, and this is a great choice if you’re cooking for someone who might like a fish dish that doesn’t taste too much like fish, if you know what I mean by that!
I originally used Tilapia for this delicious Low-Carb Almond and Parmesan Baked Fish, but now I’d use one of the other fish varieties recommended in the recipe. And please don’t dismiss this one because of the old photo because it’s so tasty!
Everyone likes a dinner that’s quick and easy, right? And this Quick and Easy Low-Carb Pecan-Crusted Dijon Salmon is also ultra delicious!
I’m pretty sure this Low-Carb Baked Halibut with Sour Cream, Parmesan, and Dill Topping will be a hit with anyone you make it for! Use any thick mild white fish fillets if halibut is too much of a stretch for the budget!
Roasted Salmon and Asparagus Salad with Mustard Vinaigrette is perfect for a light meal!
Roasted shrimp cooks even more quickly than roasted fish and I love the interesting flavors in this Spicy Roasted Shrimp with Garlic, Sumac, and Aleppo Pepper!
Easy Spice-Rubbed and Roasted Fish Fillets is one of those oldie-but-goodie recipes that could really use new photos! (So many bad photos on good recipes; so little time!) I hope you don’t let that stop you from making this tasty fish with New Orleans flavors!
Okay, I admit that Brussels Sprouts aren’t exactly a spring veggie, but you can still get them in the stores and personally I’d enjoy this Low-Carb Roasted Asian Shrimp and Brussels Sprouts Sheet Pan Meal any time of year!
It’s the use of pine nuts that makes this Low-Carb Baked White Fish with Pine Nut, Parmesan, and Basil Pesto Crust such a wow for me! Who else is crazy over pine nuts? They’re pricey but I buy a big bag at Costco and keep them in the freezer, and use them sparingly for a treat!
You can’t go wrong with salmon and asparagus, right? And this Roasted Lemon Salmon and Asparagus Sheet Pan Meal is easy and delightfully lemony for my lemon-loving tastebuds!
And of course, Easy Low-Carb Baked Mayo-Parmesan Fish is the new recipe that got me thinking about how perfect baked and roasted fish recipes were for spring, and this is absolutely a MUST TRY recipe, especially for people who might not like the flavor of plain fish all that much.
More Ideas for Low-Carb Fish Recipes:
Low-Carb Shrimp Dinner Recipes ~ Kalyn’s Kitchen
12 Low-Carb Fish Recipes ~ Step Away from the Carbs
The BEST Low-Carb Fish and Seafood Recipes ~ Kalyn’s Kitchen
110 BEST Keto Seafood Recipes ~ I Breathe I’m Hungry
Are you a fan of oven-baked fish dinners? Let us know in the comments about what you’ve made!
posted by Kalyn Denny on March 22, 2019
Don’t Miss a Recipe!
subscribe to receive new recipes via email:
We are a participant in the Amazon Services LLC Associates Program, an affiliate advertising program designed to provide a means for us to earn fees by linking to Amazon.com and affiliated sites.

Source: https://kalynskitchen.com/my-favorite-low-carb-and-keto-oven-baked-fish-dinners/
0 notes
Text
10 Easy Instant Pot Chicken Dinner Recipes — Recipes from The Kitchn
Not only has my Instant Pot upped my meal prep routine, but this handy appliance has also been a game-changer on chicken-for-dinner night. Operating as an electric pressure cooker and slow cooker in one, it comes with the potential to speed up dinner, tackle still-frozen meat, and really take charge of the heavy lifting for getting dinner on the table.
From weeknight chicken tikka masala to quick cacciatore to slow-simmered soups, here are 10 ways your Instant Pot makes tonight's chicken dinner even easier.
1. Instant Pot Weeknight Chicken and Rice Burrito Bowls
This is my go-to Instant Pot dinner when I want something quick and comforting. The key to getting these burrito bowls just right is layering the ingredients in the pot, with the dry rice on the top, to prevent burning and ensure it cooks up tender and fluffy.
2. How To Cook Chicken Breast in the Instant Pot
This dinner staple cooks up perfectly every time in the Instant Pot. You can aim for firm but juicy chicken for cubing, or let it cook a little bit longer for tender shredded chicken.
3. How To Make Butter Chicken in the Instant Pot
Break out your Instant Pot, and just 35 minutes (including the prep time!) stands between you and this cozy, spiced bowl of saucy chicken. It's light on cooking time, but bursting with so much flavor.
4. Instant Pot Chicken Adobo
While this traditional tangy, salty, umami-packed braise can take over an hour of cook time, the Instant Pot can get this chicken adobo dinner to the table in a fraction of the time.
5. Freezer-to-Pressure-Cooker Chicken Curry
Thanks to the pressure-cooker function, this otherwise slow-simmered curry comes together fast without sacrificing any flavor. Want to get a head start? This recipe shows you how to prep the meal for the freezer, and then when it's time to cook, the whole thing goes straight from the freezer into your Instant Pot.
(Image credit: Colin Price)
6. Instant Pot Whole Chicken with Mushroom Sauce
Yes, you can even cook a whole chicken (with a silky sauce to match!) in your Instant Pot. While it won't pick up that crackly skin you get from the oven, it's hard to pass up the speed and convenience of this method.
7. 30-Minute Pressure-Cooker Cacciatore Chicken
You know that feeling of dread when you realize the chicken you planned to cook tonight is still frozen solid in the freezer? This is the saucy chicken dinner that eliminates that feeling once and for all since it starts with frozen thighs and drumsticks.
8. Kerala Coconut Chicken Curry
With the help of your Instant Pot, this wildly fragrant chicken curry could not be easier to bring to the dinner table.
9. How To Make Chicken Tikka Masala in the Electric Pressure Cooker
You can skip the take-out the next time your craving for creamy tikka masala calls. Using the pressure-cooker function on your Instant Pot, this ultra-tender, flavorful favorite hits the table with lightning speed.
(Image credit: Lauren Volo)
10. How To Make Slow Cooker Fajitas
Leaning on your Instant Pot's slow-cooker function, these chicken and veggie fajitas are the fun and easy way to give Taco Tuesday a totally delicious recharge.
Source: https://www.thekitchn.com/10-easy-ways-to-get-chicken-on-the-table-with-your-instant-pot-243369
0 notes
Text
Homemade Lemon Poppy Seed Dressing
You are here: Home / Recipes / Homemade Lemon Poppy Seed Dressing
5 · Jul 1, 2019·
After reposting The Red, White, and Blue Sweet Summer Salad folks immediately asked for my homemade poppy seed dressing, so I decided to whip up a batch for a quick photo.
A few years ago, I stopped using store-bought dressings. Nothing really against them, I just like the taste and flexibility of fresh better. I make what I need when I need it with whatever I happen to have on hand.
I’ve made variations of this dressing for a few dressed salads over the years on holidays. It’s a super versatile recipe, and my guests always compliment me on it.
Homemade Lemon Poppy Seed Dressing
Author Roni Noone
Yield 14 tablespoons
Homemade Lemon Poppy Seed Dressing is perfect for any summy salad or grilled veggies.
Ingredients
1/4 cup olive oil
1/4 cup lemon juice
2 tbsp honey (42g)
1 tsp dijon mustard
1 tsp poppy seeds
1/2 tsp onion powder
1/4 tsp kosher salt
1/4 tsp fresh ground pepper
Instructions
Whisk all ingredients together.
Enjoy!
Notes
This is best fresh with freshly squeezed lemon juice so I would make when needed. However, it will store for a few weeks in the fridge.
The recipe as written makes just about 15 tablespoons which I'm counting as 14 servings just to be safe on the nutritional info. I'd rather overestimate the macros.
If you don't have honey, maple syrup works!
If you don't have dijon mustard yellow mustard or mustard seed powder works great too.
This recipe can easily be halved it makes too much for you.
I save glass jars to reuse for homemade dressings. I'm not sure where this one came from but it's really similar to these.
Courses Any
Cuisine Any
Nutrition Facts
Serving Size 2 tbsp
Amount Per Serving
Calories 45
% Daily Value
Total Fat 4 g
6%
Total Carbohydrates 3 g
1%
Sugars 3 g
* Percent Daily Values are based on a 2,000 calorie diet. Your daily values may be higher or lower depending on your calorie needs.
5
Related
Dressing and Spice Ideas, Gluten-Free Ideas, Recipes, Vegetarian Ideas honey, lemon juice, mustard, olive oil, poppy seeds
Reader Interactions
Source: https://greenlitebites.com/2019/07/01/homemade-lemon-poppy-seed-dressing/
0 notes
Text
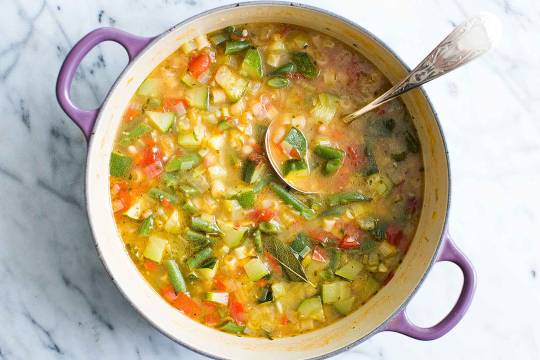
New Year Glow Meal Plan: Spaghetti Squash (Pho, Lasagna, Tacos, Pesto Noodles)
The New Year Glow Meal Plan is here! All kinds of carb-on-carb, dessert-every-day type of holiday indulgence happened for us over the past month, and at this point we are so ready to fill our plates with 99% plants. That’s what this meal plan is all about. We are employing the amazing, shape-shifting powers of spaghetti squash to create four distinctly different, plant-fueled dishes that will still keep us cozy in this frigid weather (no bone-chilling, cold salads or fully raw dishes here!). We’ve got special pesto ‘noodles’, pho, tacos, and lasagna. As usual, there is a step-by-step weekend prep guide, as well as a shopping list for your convenience :) Hope you enjoy this one!
Menu
Spaghetti Squash Noodles with Brussels Sprout Pesto
Kale Pho with Spaghetti Squash Noodles
Spaghetti Squash Kimchi Tacos
Portobello Spaghetti Squash Lasagna
*all recipes are vegan and gluten-free if needed, see the recipes for serving sizes
Shopping List
(Print)
Bring this list with you when you go food shopping, it’s got all the ingredients you’ll need for the recipes in this meal plan mini. All the items are separated by category, to make the shopping easier and more efficient. Take the time to look over this list beforehand and cross out any items you already have. The hope here is that you own some of the pantry staples, spices, and maybe even some of the produce required, which will help minimize the list. Add whatever other ingredients you’ll need for the week here, if doing shopping for the whole week.
Produce
2 large or 3 medium spaghetti squash
1 lb Brussel sprouts
1 medium yellow onion
2 large leeks
1 head of garlic
1-inch piece ginger
1 bunch kale
1/2 lb shiitake
8-10 portobello caps
2-3 avocados
1 bunch cilantro
1 lemon
3 limes
Spices
2 cinnamon sticks
2 star anise
black peppercorns
5 whole cloves
3 whole cardamom pods
1 teaspoon coriander seeds
Staples/Other
sea salt
olive oil
neutral avocado oil or other oil of choice
apple cider vinegar
brown rice vinegar
tamari
sriracha/chili sauce
24 oz marinara sauce
1 cup vegan kimchi
tortillas – gluten-free if needed
sea salt
Bulk
1 cup dried chickpeas
1 cup raw pumpkin seeds
1 cup raw almonds
nutritional yeast
Basic Prep
Complete these steps on the weekend (or whenever you have the time), and these meals will be a breeze to put together during the week, thanks to all the prepared components.
1) Roast The Spaghetti Squash
Spaghetti Squash, the beautiful yellow vegetable with flesh that turns into ‘noodles’ when roasted, will be the base for all our dishes in this meal plan. Here, we are roasting 2 large squashes, which we’ll be using for pesto noodles, pho, tacos, and lasagna throughout the week.
Roasted Spaghetti Squash
Ingredients
2 large spaghetti squash - halved, seeds scooped out
avocado oil or other neutral oil of choice
sea salt
freshly ground black pepper
Instructions
Preheat oven to 400° F (200° C). Prepare 2 baking sheets, lined with parchment paper.
Place the halved spaghetti squash on the baking sheets, face up. Oil thoroughly and sprinkle with salt and pepper. Turn the squashes face down, place in the oven, and roast for 30-40 minutes,until the flesh is soft, cooked through, and noodle-like when scraped with a fork. Take care not to overcook, as the 'noodles' can turn mushy. Let cool slightly. Scrape all of the 'noodles' out of the squash skins using a fork, and store refrigerated in an airtight glass container, until ready to use.
3.5.3226
2) Cook Chickpeas and Make Broth Base for Pho
In this step, we are cooking chickpeas for the pho and tacos, while also making the broth base for our pho. Making ingredients using the offshoots from other ingredients is one of the most gratifying and humbling things about cooking!
Pot of Chickpeas
Ingredients
1 cup dried chickpeas - soaked overnight in purified water with a splash of apple cider vinegar
sea salt
Instructions
Drain and rinse the chickpeas. Place the chickpeas in a pot and cover with about 8 cups of purified water. Bring to a boil. Lower the heat to a simmer and cook, covered, for 30 minutes. Test the chickpeas for doneness. Cook longer if needed, until completely soft. Add salt to taste at the end. Drain, reserving the cooking liquid for the pho broth (below).
3.5.3226
3) Make the Pho Broth
This pho broth gets its deep, comforting flavor from toasted spices, chickpeas (cooked in the same water, in the previous step), tamari, and any other vegetable scraps you have around.
Pho Broth
Ingredients
2 star anise
2 cinnamon sticks
1 teaspoon whole coriander seeds
1 teaspoon black peppercorn
5 whole cloves
3 cardamom pods
1 medium yellow onion - sliced into 8 wedges
3 garlic cloves - crushed with a knife
1-inch piece ginger, sliced and crushed with a knife
6 cups chickpea broth - from above
any vegetable scraps like leek tops, onion skins, etc. (optional)
½ lb shiitake - hard stems separated, caps reserved
3½ tablespoons tamari
1 tablespoon brown rice vinegar
¼ teaspoon sriracha/chili sauce
Instructions
Warm a soup pot over medium heat. Add the star anise, cinnamon, coriander, peppercorns, cloves, and cardamom. Toast, stirring, until fragrant, for about 2-3 minutes. Add the onion, garlic, and ginger and sauté for another couple of minutes, until fragrant, and until the onion begins to get some color.
Carefully add the chickpea broth (it may splatter), vegetable scraps (if using), shiitake stems, tamari, brown rice vinegar, and sriracha. Bring to a boil, lower the heat to simmer and cook, covered, for 30 minutes. Reserve the shiitake caps for when you make the pho (recipe below). Remove the pot from heat and let infuse further for at least 30 minutes, or as long as you have (overnight is best, refrigerate if letting infuse overnight). Strain the broth, discarding the solids. Keep the broth in the same soup pot, refrigerated, until ready to make the pho.
3.5.3226
4) Make the Brussels Sprout Pesto
This pesto is made with blanched Brussels sprouts, for a dose of cruciferous goodness, and pumpkin seeds, for a lighter alternative to nuts. The result is surprisingly delicious pesto, which will be used for the Spaghetti Squash Noodle dish, as well as the lasagna.
Brussels Sprout Pesto
Ingredients
1 cup raw pumpkin seeds
1 lb Brussels sprouts - ends trimmed off, sliced in half
sea salt
1 clove garlic - chopped
1 bunch cilantro, stems and leaves (reserve a handful of leaves for the pho and tacos) - torn
juice of ½ lemon
1 tablespoon nutritional yeast
freshly ground black pepper
½ cup olive oil
Instructions
Preheat the oven to 350° F (180° C). Spread the pumpkin seeds on a baking tray and toast in the oven for 5-7 minutes, until fragrant and slightly golden.
Bring a large pot of well-salted water to a rapid boil. Add the Brussels sprouts and blanch for about 8 minutes, or longer, until soft throughout, but not mushy. Drain and set aside.
Reserve a small handful of pumpkin seeds and set aside to use as a garnish for the pesto noodle dish. Place the rest of the pumpkin seeds into a food processor, followed by a large pinch of salt and garlic. Pulse to roughly break up the pumpkin seeds.
Divide the blanched Brussels sprouts in half. Save one half of them whole, to use later in the pesto noodle dish, keeping them refrigerated in an airtight container. Add the other half of the blanched Brussels sprouts to the food processor, along with the cilantro, lemon juice, nutritional yeast, another pinch of salt and black pepper. Process until well combined. Slowly poor the olive oil through the feeding tube on the lid, with the motor still running. Taste for salt, adjust if needed. Use the pesto right away or store refrigerated for up to 5 days.
3.5.3226
5) Make the Almond Ricotta
This easy almond ricotta is mainly meant for the lasagna, but you can use any of the leftovers in the tacos or in the Brussels sprout pesto noodles.
Almond Ricotta
Ingredients
1 cup almonds - soaked overnight in purified water
1 small garlic clove
pinch of sea salt
1 tablespoon nutritional yeast
generous squeeze of lemon juice - to taste
Instructions
Drain and rinse the almonds. Optionally, squeeze each almond to slip off the skin for a whiter, smoother ricotta.
Place the almonds into the bowl of a food processor, along with the garlic, salt, nutritional yeast, and lemon juice. Add 2 tablespoons water and pulse, until you achieve a ricotta consistency. Add another 1-2 tablespoons of water, if needed. Use right away or refrigerate for up to 3 days.
3.5.3226
Recipes
This is a meal that will take you minutes to prepare, thanks to all the weekend prep. Spaghetti squash ‘noodles’ go well with pesto of any kind, but they become something really special, when combined with the Brussels Sprout Pumpkinseed Pesto and silky, blanched Brussels sprouts.
Spaghetti Squash Noodles with Brussels Sprout Pesto
Ingredients
⅔ of the amount of the Brussels Sprout Pesto - from above
about 3 cups roasted spaghetti squash - from above
reserved ½ lb whole blanched Brussels sprouts - from the pesto recipe, above
reserved handful whole toasted pumpkin seeds - from the pesto recipe, above
Instructions
Warm a large sauté pan over medium heat. Add the pesto and let warm through, stirring, for about a minute. Add the spaghetti squash and toss to coat in the pesto. Add the whole Brussels sprouts and let everything heat through thoroughly, stirring. Serve right away, garnished with the whole pumpkin seeds and almond ricotta from above, if using.
3.5.3226
This Pho is incredibly cozy, but also very nourishing and light. The deep, dark broth holds the powers of various warming spices, shiitake, chickpeas, and veg. Spaghetti squash ‘noodles,’ chickpeas, and kale fill it out, and a scoop of avocado + a drizzle of chili sauce on top take it to that next level.
Kale Pho with Spaghetti Squash Noodles
Ingredients
pho broth - from above
1½ cups cooked chickpeas - from above
about 3 cups roasted spaghetti squash - from above
shiitake caps from ½ lb shiitake - sliced, reserved while making pho broth
2-3 kale leaves - stems removed, roughly chopped
juice from 1 lime, plus more for serving
handful of cilantro leaves - for garnish
ripe avocado - for garnish
sriracha/chili sauce - for garnish (optional)
Instructions
Bring the pho broth back to a boil, add the cooked chickpeas, spaghetti squash, sliced shiitake caps, and kale. Adjust the heat to a simmer and cook for about 10 minutes, until the kale is cooked through.
Remove from heat and mix in the lime juice. Taste for salt and adjust if needed. Serve warm, with more lime slices, garnished with cilantro leaves, cubed ripe avocado, and more sriracha/chili sauce, if desired.
3.5.3226
This is the wintery version of our Kimchi Tacos from the Summer Meal Plan. It’s hard to do them justice with words or photos, but they are really good. Proof: my ten year old, who strongly dislikes squash and doesn’t eat kimchi because it’s too spicy, ate them for dinner two nights in a row without any comment (silence during a meal is always a good sign around here :). They are also so, so quick!
Spaghetti Squash Kimchi Tacos
Ingredients
1 tablespoon avocado oil or other neutral oil of choice
2-3 kale leaves - stems removed, leaves torn
sea salt
1½ cup cooked chickpeas - all of the remaining from above
2 cups roasted spaghetti squash - from above
about 1 cup vegan kimchi
tortillas of choice - gluten-free if needed
1-2 ripe avocado - cubed
cilantro - for serving
lime slices - for serving
sriracha or hot sauce of choice - for serving (optional)
Instructions
Warm the oil over medium heat in a large sauté pan. Add the kale and salt, and sauté for about 7-10 minutes, until soft. Add the chickpeas to the pan and stir around to lightly toast. Add the spaghetti squash and toss to combine. Add the kimchi and stir to combine and warm everything through. Taste for salt and adjust if needed.
Serve the warm veg in tortillas, topped with avocado, cilantro, squeezes of lime juice, and hot sauce (if using).
3.5.3226
Does this dish of layered vegetables, mushrooms, and sauces actually taste like lasagna? It really does! The spaghetti squash ‘noodles’ replace the carb component of regular lasagna noodles, while the portobello mushrooms add substance, depth, and meatiness. The almond cheese and pesto from prep day, as well as good, store-bought marinara add just the right punch of flavor. It’s a higher vibe lasagna that will still leave you satisfied, with a bonus of not weighing you down.
Portobello Spaghetti Squash Lasagna
Ingredients
2 tablespoons avocado oil or other neutral oil of choice - divided, plus more for oiling the dish
8-10 portobello caps
2 large leeks, white and pale green parts only - sliced
sea salt
24 oz marinara sauce
about 7 cups roasted spaghetti squash - from above
almond ricotta - from above
reserved ⅓ the amount of Brussels sprouts pesto - from above
freshly ground black pepper
Instructions
Preheat oven to 375° F (190° C).
Warm 1 tablespoon of the oil in a large sauté pan over medium heat. Add as many portobello caps as the pan can hold and fry them on one side for a couple of minutes, until golden. Flip and fry the other side. Remove and continue with the rest of the portobellos. Set them aside on a plate and drain off any water that they release.
Add the remaining 1 tablespoon of the oil to the same pan. Add leeks and a pinch of salt and sauté for about 8-10 minutes, until soft.
Oil a 10 x 1o-inch, deep baking dish or a baking dish of a similar size. Spread half of the marinara sauce over the bottom. Add half of the spaghetti squash, spreading it into an even layer. Spread half of the almond ricotta over top, in little clumps. Arrange all the portobello caps in the next layer, overlapping them as you go. Next, add a layer of the pesto and sautéed leeks. Continue with layers as follows: the rest of the almond ricotta, the rest of the marinara, and the rest of the spaghetti squash. Sprinkle the top layer with salt and pepper, and drizzle with avocado oil.
Cover the dish, place in the oven, and bake for 30 minutes. Increase the temperature to 400° F (200° C), uncover and bake for another 15 minutes. Let the lasagna rest and cool slightly for 10-15 minutes before serving.
Store refrigerated, reheat in the oven or in a pan, covered, until warmed through. The lasagna gets even more flavorful after a day or two in the fridge.
3.5.3226
<![CDATA[ .yuzo_related_post .relatedthumb background: !important; -webkit-transition: background 0.2s linear; -moz-transition: background 0.2s linear; -o-transition: background 0.2s linear; transition: background 0.2s linear;;color:!important; .yuzo_related_post .relatedthumb:hoverbackground:#ffffff !important;color:!important; .yuzo_related_post .yuzo_text, .yuzo_related_post .yuzo_views_post color:!important; .yuzo_related_post .relatedthumb:hover .yuzo_text, .yuzo_related_post:hover .yuzo_views_post color:!important; .yuzo_related_post .relatedthumb acolor:!important; .yuzo_related_post .relatedthumb a:hovercolor:!important; .yuzo_related_post .relatedthumb:hover a color:!important; .yuzo_related_post .relatedthumb margin: 0px 0px 0px 0px; padding: 5px 5px 5px 5px; ]]>

Source: http://golubkakitchen.com/new-year-glow-meal-plan-spaghetti-squash/
0 notes
Text
Meat your new favorite candle, and it’s from KFC
Ah, the wonderful scents of household candles. Vanilla, pine, berry and … gravy? Yes, KFC in the U.K. and Ireland is pouring out a very limited-edition candle that both looks and smells like gravy.
The Best Food and Drink in Every State
Wait, what? Don’t chicken out, it’s a real thing.
“Nothing beats the sweet, soulful aroma of KFC gravy,” KFC UK boasts on its webpage. “So this January, why not fill your home with Finger Lickin’ good vibes thanks to our limited-edition KFC Gravy Candle?”
KFC didn’t immediately respond to a request for comment, but in a tweet, the company says, “Whilst the candle does include some of our infamous gravy, we wouldn't advise actually eating it.” (Not like this edible candle we wrote about in December.)
Even if you really do want your house to smell like gravy, it’s not as easy as just throwing KFC your hard-earned money. You can’t buy the candle — you have to enter to win one of the 230 that exist. (And you have to be a resident of the U.K. or Ireland, and enter the drawing by January 28. Sorry, Americans and Canadians who are drooling right now.)
If the smell of a gravy candle isn’t enough, check out KFChill, a webpage featuring audio of simmering gravy (or frying chicken, or falling fries). Both the candle and the audio samples promote the Gravy Mega Box, a KFC combo offering three kinds of chicken, french fries, and an ample serving of gravy.
Think gravy is a crazy candle scent? First off, you’re right, and secondly, check out these crazy candy-cane flavors you won’t believe exist.
Source: https://www.thedailymeal.com/kfc-gravy-scented-candle/012319
0 notes
Text
Homemade Pork Floss
One of my fondest childhood memories is visiting Grandma’s house on Sundays only to catch her and some of my aunties making pork floss. They would be making it in a huge cast iron wok with at least two pairs of hands stirring the shredded pork to avoid burning and making sure it would dry evenly. The big batch would be packed in containers for the children to bring home. The children and grandchildren are pretty much scattered everywhere now, but the favourite dish is still strongly present in our heart. Not until recently I have been reminded that we can do this. I have always stocked up on Lim Chee Guan’s pork floss when we travel to Singapore, but since it has been a while and the last time we were there, we couldn’t get to the store. I got the other brand at the airport and not too fond of it.
Pork floss is a great breakfast condiment when the kids need something quick for their rice breakfast. Yeah my children is the ultimate Asian kids. They have rice and soup before school. Mother strongly feels that the grandkids need a good filling meal of steamed rice and a couple of dishes (normally that would include fried eggs and leftover soup from the day before). If none of those available, they would have rice, egg and pork floss.
The first time we make it, it was nothing less than self torture. A big exaggerating, but it is. We did it late in the morning, and since then I decided that if I am to do this regularly, I will do it in the evening. Our kitchen is basically outdoor kitchen, so during noon, the sun would be straight on top and the idea of stirring a batch of meat to dry under scorching sun is absolutely crazy.
The second time (and more times after), the meat was prepared in the morning. When I came home from work, we stir fry for a couple of hours, the kitchen is nice and cool.
There are two variations of the recipe, but I will only share the simplest one.
To make good quality pork floss, very lean meat is needed. We got the butcher to clean off all fats. Only four ingredients are used. Lean pork, soy sauce, white peppercorn and sugar. Garlic is optional – the first time we used garlic, but the taste was a bit overwhelming. We choose to leave that out in the future.
Peppercorn can be lightly crushed or used whole. The first time I crushed them too hard, we ended up picking them up to avoid the floss being too spicy or peppery.
First thing is to prep the pork. Sprinkle generous amount of salt on pork. Let sit for 5 minutes before rinsing off.
Use lots of cold water to properly clean the pork.
Choose the heaviest pot you got. Make sure the whole thing fit.
Add meat, pepper and garlic (if using).
Add water and soy sauce. Start cooking over low heat for 1,5-2 hours. Stir once every 15 minutes or so, to flip the meat to ensure even cooking and marinade.
Halfway through cooking, the meat will give up a lot of juices, and then later when simmering, the juices will become thick and it will just be cooking in its own juices.
At the end of the cooking time, the pork will be thoroughly cook and very, very tender. Reserve the liquid for cooking or whatever.
Remove the garlic and peppercorns as much as you can. This is why I should not break those peppers. This batch was quite spicy.
Using pestle, pound away the meat to get thin shred of meat.
Shred the meat into thin strips. If you pound harder, it would be much easier and quicker to shred. This is quite tedious – the more hands you have the merrier.
Use the heaviest and the biggest wok you have. Add shredded pork and sugar. Start cooking over very low heat.
Keep doing it for the next 2 hours. If you have that extra pair of hands, this is the best time to use it. Keep stirring, for if you miss even 10 seconds, the bottom part will start burning and you will end up with uneven color floss. Use the fork, lift, turn and push method. Use the flat part of spatula to press the floss to the wok. Continuous lift and turn and flatten movement will result in cottony-textured floss.
Nearing the end, the floss will feel much lighter and the color will brown nicely evenly.
This is it! The end of the two hours, nicely dried and golden color. I left some parts a bit thick, hence you can see the thicker part dried up to be a bit hard. But still perfect to munch on.
This will keep nicely for a long time, but ours never pass two weeks. It would be gone much faster if we didn’t hide it from prying hands, big and tiny. Serve with warm bowl of rice porridge or slice of white toast. Perfect!
Homemade Pork Floss
Ingredients
1 kg lean pork meat
10 g whole white pepper
300 g soy sauce
300 g sugar
150 g water
salt for rinsing meat
Instructions
Rinse pork with salt and running cold water
Combine pork, white pepper, soy sauce and water in a heavy stockpot. Cook over low heat for 2 hours
Remove cooked meat, drain the liquid. Let cool to room temperature
Using pestle or meat pounder, pound on the meat to flatten it. Shred to small thin floss.
Cook the floss in big and thick wok. Add sugar. Cook and stir over very low heat for 2 hours. Use the back of spatula to press the floss to the bottom of the wok to get it dry quicker and to make it lighter.
When the color is nicely golden, it is ready. Remove and let cool. Store in airtight container.

Source: https://indochinekitchen.com/homemade-pork-floss/
0 notes
Text
Capsicum Cheese Paratha
1. Mix the wheat flour and salt together. I personally add only a little salt now and a little in my stuffing. But you can add it all in the bread as well.
2. Add enough water to make a dough. The amount of water will vary depending upon the type of flour/brand/weather etc. So I would suggest adding couple of tbsp of water at a time
3. until it comes together into a pliable dough.
4. Knead it for 5-10 minutes until soft and smooth.
5. Set aside, covered with a kitchen cloth or paper towel to avoid drying. A resting period of 10-15 minutes (at least) helps to get a nice texture.
6. While that's resting, chop the bell peppers. Refer my tip 2. Make sure to chop the peppers into very small pieces. It helps to roll out the flatbread later on.
7. Don't these multicolored bell peppers look beautiful? Make sure to drain any water, in case any in your chopped peppers.
8. Add rest of the ingredients for the stuffing together. Do a taste test and season accordingly.
Note:
If raw bell peppers do not appeal to you, I would suggest sauteeing it in a little oil (you can even add some onions to the mix), soften them a bit along with the spices, cool them before adding the cheese.
9. Make small balls of the dough - around 10-12 medium balls.
10. Roll them into a small circle. Flour them to avoid sticking.
11. Place some of the filling in the center.
12. Bring the edges together
14. flatten it with the palm of your hand into a circle
15. and roll it out into a bigger circle , with medium thickness.
16. Place it on a hot pan, cook for few seconds, drizzle a little bit of oil (or ghee/butter if you like). I don't add any 'cos of the cheese.
17. turn it when you see brown spots. Cook for another minute until the other side gets done.
Source: http://chefinyou.com/recipe/capsicum-cheese-paratha

0 notes
Text
La Cornue Range: A Factory Tour!
A few weeks back, I had the opportunity to visit the workshop where La Cornue stoves are manufactured. La Cornue is the French brand for luxurious kitchen ranges, and is this year celebrating the 110th anniversary of its famous vaulted oven, first created in 1908.
I’ve always loved factory tours, and this one lived up to my expectations. I’ve been dreaming of La Cornue ranges for a long time, and I was glad to confirm that the perception I had — that of a luxurious artisan brand — was indeed reflected in the high standards maintained in every step of production.
Come along and follow me backstage through these photos. They were all shot in Saint-Ouen l’Aumône, in the Val d’Oise, a département northwest of Paris, which has been the only manufacturing site since the 1970s. The enameling process, which requires specialized ovens, is the only step outsourced to a partner based in Strasbourg.
Each range is made to order for a given customer, and the purchase order follows the range throughout production, so that each craftsman knows whom they are working for, and where on the planet the range will be shipped and installed once finished.
Everything starts with the thick metal plates that the range will be made of, based on the customer’s preference: stainless steel or copper. The stove’s structure, but also every screw, every welding, will be made from the chosen material.
This punching machine is used to cut out the various parts that make up the stove.
The punched parts.
Here are the “hollowed out” sheets that have been punched.
This is a folding machine to fold the sheets of metal. The use of machinery at La Cornue aims at making the craftsmen’s work less strenuous, without replacing their know-how. Here, the craftsman is inserting the parts that need bending, and adjusts the pressure depending on the required result.
The frame of the range is taking shape.
The La Cornue logo is “punched” into the metal.
The company is looking to increase the number of women within its production team. Here is Sarah, who happens to be the best welder on the team.
Each welder has their own workstation outlined with curtains, so they can work without disturbing one another. Welding quality is paramount to a flawless enamelling.
The stoves are made from stainless steel or enameled copper, and each customer can choose the color of the enamel. French customers usually go for neutral colors, while foreigners often choose bolder, more colorful options!
The trims can be made from nickel, chrome, copper… and this sample helps visualize the result.
These “color palette” samples are sent to every La Cornue store or dealer around the world.
When the parts are back from enamelling in Alsace, they are examined closely to check the color against the sample, and check consistency of color among all the parts, so that the color of the stove is perfectly even.
Here are the trims that will be mounted on the range once all the parts are assembled.
The range is assembled “naked”, with all its technical elements: gas burner or induction cooktop, simmering hob and, of course, the exclusive vaulted oven (gas or electric), patented by La Cornue, which offers unparalleled heat circulation.
The “naked” range is then tested (power and gas supply) to make sure that everything is working perfectly.
The enameled parts and metal trims are then mounted on the stove.
The La Cornue logo will be engraved with a customized inscription as requested by the customer.
Gray looks great too!
La Cornue also creates complete kitchens, including counters, furnishings, etc. In that case, they are first assembled completely at the workshop, then dismantled, packaged, sent, reassembled and installed in the customer’s kitchen.
The very first vaulted oven models, over a century ago!
Are you dreaming of a La Cornue range too?
Source: https://cnz.to/tools-utensils/la-cornue-range-factory-tour/
0 notes
Text
Sweet and Sour Pork Stir Fry from my Healthy Eating One-Pot Cookbook
This One-Pot Sweet and Sour Pork Stir Fry recipe is from my new cookbook. It’s made with super simple ingredients and can be on the table in under a half hour. That’s what I call a weeknight win!
Did you see my huge announcement last week? I wrote a cookbook called Healthy Eating One-Pot Cookbook! It’s officially coming out next month, but you can pre-order it on Amazon now. I’m really excited about it – it’s chock full of easy, healthy ingredients and every single one of them is made in just one pot or pan. There are even recipes in there for your Instant Pot and air fryer.
I’ll be sharing a few sneak peeks on the book here on the blog and on my other social media channels over the next few weeks. For the first one, I took a poll over on facebook and instagram and asked readers to choose what they wanted to see: a sweet recipe (blueberry crisp) or a savory one (this sweet and sour pork stir-fry recipe). It was a super close vote – in fact, facebook users voted for sweet and instagram users voted for savory. Hmmmm. In the end though, savory has more votes.
This sweet and sour pork stir fry is based on one of my favorite meals growing up – my mom’s sweet and sour meatballs. I brought it into the 21st century by using fresh pineapple and ginger, and adding honey to help sweeten it. And, of course, I turned it into a one-pot meal that you can make in a skillet in under a half hour. This recipe is perfect for hectic weeknights!
The ingredients for the sauce look super simple – it’s just apple cider vinegar, honey, brown sugar, low-sodium soy sauce, and cornstarch – but it’s so delicious. It’s thick enough to cling to every bite and has a great balance of sweet and tangy flavor.
This sweet and sour pork stir fry is definitely hearty enough to enjoy on its own, but you can also serve it over rice (or cauliflower rice) if you want to stretch it into more servings.
Be sure to check out my new Healthy Eating One-Pot Cookbook for more recipes like this one!

Yield: 4 servings
Prep Time: 10 minutes
Cook Time: 15 minutes
Total Time: 25 minutes
As a kid, sweet and sour meatballs were one of my favorite dinners. I brought my mom’s sweet and sour sauce into the twenty-first century using fresh pineapple and adding ginger and honey. I further transformed it into a stir-fry sauce for easy week- night dinners. This stir-fry is substantial enough to stand on its own but is also great served over rice.
Ingredients
1 Tablespoon extra-virgin olive oil
1 Tablespoon grated peeled fresh ginger
1 pound pork loin, cut into bite-sized pieces
1 cup fresh pineapple chunks, cut into bite-sized pieces
1 green bell pepper, cut into bite-sized pieces
4 ounces green beans, trimmed
1/4 cup apple cider vinegar
2 Tablespoons packed light brown sugar
2 Tablespoons honey
2 Tablespoons low-sodium soy sauce
2 Tablespoons cornstarch
Instructions
In a large skillet over medium-high heat, heat the olive oil.
Add the ginger. Cook for 1 to 2 minutes until fragrant.
Add the pork. Coo for 3 to 4 minutes, stirring frequently, until browned but not fully cooked through.
Stir in the pineapple, green bell pepper, green beans, vinegar, brown sugar, honey, soy sauce, and cornstarch. Bring the mixture to a simmer. Cook for 5 to 7 minutes until the vegetables are soft and the pork is cooked though.
Notes
Substitution tip: Use boneless, skinless chicken breast instead of pork loin
Nutrition Information:
Yield: 4 Serving Size: 1
Amount Per Serving: Calories: 302 Total Fat: 12g Saturated Fat: 4g Trans Fat: 0g Cholesterol: 55mg Carbohydrates: 28g Fiber: 2g Protein: 23g
Source: https://www.healthy-delicious.com/sweet-and-sour-pork-stir/
0 notes
Text
Q&A Episode Part 2
In this episode, we’re back to answer more questions! We love to hear from you guys and this is such a fun way to bang out all your questions! Let’s get into it.
In this episode, we’ll talk about:
Why we decided to start our podcast
The low-down on intermittent fasting
Making your meal prep more exciting
MSG: yes or no?
Which oils are good to cook with
Our thoughts on health & BMI (for more, check out our recent pod w/ Rebecca Scritchfield!)
Career change later in age to nutrition…yes or no?
Foods that help us lower inflammation
Our routine for maintaining healthy natural hair & MORE!
Resources
SHOUT OUT TO OUR PODCAST SPONSORS
Tired of wearing uncomfortable bras? Take Thirdlove’s online quiz to find a bra with the perfect fit and a premium feel, among more than 70 sizes – including their signature half-cup sizes! Go to ThirdLove.com/FOODHEAVEN and get 15% off your first purchase!
Can you do us a huge favor?
If you enjoyed this episode, please do us a huge favor and leave us a review on iTunes ….right now. The more reviews we get, the higher we are ranked in iTunes, which means we reach more people!
Become a podcast sponsor:
Our podcast reaches thousands of engaged listeners each week. If you are a brand interested in becoming a sponsor, contact us to learn more about our affordable rates.
Connect with us online:
Our podcast is released every week. In each episode, we cover tips and tricks for making lifelong sustainable healthy living changes to upgrade your diet and health. We also interview leading experts in the field of health and nutrition. We hope you enjoyed this episode, and we’ll catch you next time!
Source: https://foodheavenmadeeasy.com/qa-episode-part-2/
0 notes