
Statistics
We looked inside some of the posts by joy-yyang and here's what we found interesting.
Average Info
Notes Per Post
0
Likes Per Post
0
Reblog Per Post
0
Reply Per Post
0
Time Between Posts
9 days
Number of Posts By Type
Text
10
Last Seen Tumblr Blogs


Fun Fact
Tumblr Inc. has $15.1M in annual revenue.
Text
Animated Shot w/ Audio
Because the previous thread is so long, I have included the final animation as well as the full view of Lucy, Grandma and a side view.
Note: Final is located at the bottom of this thread.
FULL JUST LUCY
youtube
FULL JUST GRANDMA
youtube
FULL JUST SIDEVIEW
youtube
FINAL ANIMATED SHOT W/ AUDIO
youtube
Overall, I’m pretty happy with the result. I think that Lucy’s movements and expressions worked well with the audio especially the beginning where she shows her interest and how deep she is getting into her grandma’s story. Some of her actions could be refined as it turns out a bit jerky in some parts so I could have done a better job with timing and spacing with the keyframes.
The grandma definitely could have used more movement throughout as she barely moves anything other than her head. As I found with Lucy, doing so would have made for a much more believable character and atmosphere so I do regret not being able to do that.
The lipsync aspect was also not as difficult or time consuming as i had anticipated and I thoroughly enjoyed being able to learn this important part in animation as it was something that I would have to learn in the industry. In the future, I will make sure to utilise this skill with better spacing and timing and perhaps more enhanced movements to make for a smoother outcome.
0 notes
Text
Animated Shot PLANNING
Going into the second part of the assessment I was mostly nervous about doing lipsyncs because I had not ever done it before even in 2D. I found the provided reference the most helpful when approaching the task but also found some additional ideas to get a better idea.


These websites were also helpful in regards to lip-sync in animation:
http://minyos.its.rmit.edu.au/aim/a_notes/anim_lipsync.html
https://www.pluralsight.com/blog/film-games/proven-tips-animating-believable-lip-sync
We were also provided with character introduction sheets and these also helped throughout the process of positioning and animating them with certain emotions.


I began brainstorming what kind of position I could put Lucy in, I wanted to put it in a way that would successfully show her innocent interest. Ideally I thought of crossed legs because that is a very childlike pose in my head but I couldn't really position the rig well and her arms were harder to animate.
I drew some below (mind the drawing skills):

I eventually went with the last one as i thought it was close to my original idea but wouldn't cause me much hassle. i also thought it showed comfortableness which was important as it was in her own room and with her grandma. She would lean forward with her arms to hold her weight in front of her.
I then went on to create a short storyboard just so I had a clear idea of what i was going to do and how to position the camera.

I did not make an animatic just because I felt that, because it was so short, my storyboard summed it up pretty nicely but I did reference the one given to us on blackboard just so I could see what kind of shots and emotions were showed.
Once I had imported everything into one project, I got rid of what I didn’t need in the room and began to position the characters for their first movements. I was able to clearly position Lucy as I had planned her to be in a position that was pretty open and spread out. The grandma I had a bit more struggle with because of the shape of her rig, especially the legs were harder to position but luckily they don’t move much throughout the clip so I wasn’t too concerned if they were overlapping the bed.
I put them in their beginning positions before I moved their lips just to make sure that it was able to be seen as their starting position was a foundation for what they would be like for the rest of the scene.

This was the starting position.

I really like how Lucy’s position came out with the rig, I was originally concerned that I wouldn’t be able to imitate 2D to 3D well but I felt that it showed Lucy ‘s age and interest quite well.

I then began animating Lucy first because she had more movements and expressiveness. The rig was pretty easy to locate around and therefore I didn't have too much trouble doing so. This was the first bits of movement I did:
youtube
I was pretty happy with the outcome but the part where she gets shocked by her Grandma, is a bit too jerky and the arms end in an awkward position. So I will be smoothing out that action and doing a more natural arm position.
I then began doing Lucy’s lipsync with the help of the images I had found earlier and was at first a bit troubled by the fact that I was key framing but couldn't really see the final product until i had done all of it. In the end, it did turn out pretty well and matched the audio quite smoothly.
youtube
I’m pretty happy with how Lucy turned out, she shows genuine interest and curiosity. The part where she moves back is a bit too abrupt still which I failed to ease into. I did however change the arms to a more comfortable position that smoothly transitions as she ponders.
I then began doing the grandma and I found her body to be a bit harder to function with as it was rounder and had more parts to avoid especially with the arm movement. I positioned her comfortably at first and while I had originally planned to animate her arms while scaring Lucy, I found I wanted her to look a bit more calm throughout it. I was pretty relieved that I wouldn't have the camera on the grandma mostly throughout the clip as I had more difficulty with her rig.
When i went onto animating her lips though, I found myself to be more comfortable as i had already just done some with Lucy. Plus her lines were simpler and shorter which made for a quicker job. Her movements turned out less smoother than Lucy’s and a bit jerky at times which is somethings that I couldn't really adjust well when animating her. (refer to Grandma video in separate thread)
I completed mine in greyscale as I had issues with the mental ray function with my home computer. Thankfully, it still turned out smooth and you can see the direction of the eyes for each character.
I have included a full version of Lucy, Grandma and the full side view just so the whole animation of each character can be seen throughout.
ALL FULL VIDEOS WILL BE POSTED IN SEPARATE THREAD ABOVE. Including FINAL Animation.
0 notes
Text
Heavy Weight Lift
The first exercise in Assessment 2 was to complete an animated weight lift, making sure that we were able to convey a sense of weight and effort/ strength within the rig.
I first began some research as I hadn’t approached this kind of exercise with 3D animation before. I had however completed it previously in Drawing for Animation 2 so I was able to bring in some references that helped me understand the action better.
youtube
These were the rough versions of my weight lift in KNB122 last semester. I included these ones rather than the final because I need to pay more attention to the line of action during my planning stage for this exercise. Because these ones lack a little understanding in regards to showing weight, I took more note of the line arching as it goes down and when it comes up.


I then searched for some references that would help me come up with keyframes and found plenty of good ones that gave an idea of keyframes and how a figure can show effort and strain.

After researching numerous ways that strain and weight is conveyed I proceeded to animate my rig but made the mistake of starting with the FK setting enabled.
FK VERSION
youtube
While the result was on track and looked quite good, it took a long time to complete. I had also run into many issues such as having to adjust it numerous times and weird elbow movements. It was my fault because I had completely forgotten about the option of IK and FK Handles, It wasn't until I went to my tutorial and my tutor mentioned it.
At this stage, I had the option to continue with my current FK one or start a new one in the IK option. I decided to start another one in the IK settings as I knew it wouldn't be as time consuming and there would be less adjustments along the way.
BLOCKING PASSES
youtube
FINAL WEIGHT LIFT
Front, Perspective & Side
youtube
0 notes
Text
JUMP
The last exercise we were required to complete was the jump over a distance. I had never done an exercise that involved a human jumping, however I had an idea as I had done a jumping flour sack animation previously. Therefore I was familiar with the idea of anticipation and contact poses. I took reference mainly from this image below and was able to analyse form through watching the video .

youtube
With these references, I planned out my poses for the jump and adjusted the timing for each in order to make sure it looked like my rig was using his muscles in order to move instead of just floating up and down. I sketched the poses out below.

When I was happy with the poses, I proceeded to do it on Maya. Completing this exercise was much easier and faster than the rest of the exercises, I do believe part of this reason was because I had gotten quite comfortable with Maya at this point and really knew how to work around things. I completed the blocking passes and was happy with the flow between the poses.
Blocking Passes
youtube
3D Jump FINAL
Perspective, Side &Front Views
youtube
The final of my jump turned out quite good as my rig was able to show weight and anticipation throughout the action. I edited the keyframes at the end as he originally came straight up again after making contact with the ground, so I mad e it that he stayed low for a moment before standing up again. This helped with making the action look more natural and believable.
As I kept looking at the result, I do think that it could still show more weight on the contact as the jump does look a bit lighter and floatier than normal. I could fix this next time by slightly adjusting the spacing and timing in order to make the jump shorter and therefore have more impact. Other than that, I was quite happy with the result and how simple it was to do this exercise in comparison to the rest. It was a nice finish to this first assessment.
0 notes
Text
Run Cycle (On Spot & Over Distance)
The next exercise was a 3D run cycle which is also an essential exercise to know how to do. I had also done this one previously as well so I was familiar with the process and poses. However I hadn't done any over a distance and while I initially thought there wasn't much difference between on the spot and over a distance, I found over a distance to be a bit more complex to complete. I referenced these images below as I was only going for a casual run for the first cycle.


Blocking Passes
youtube
These poses came together nicely to help me see that I was on track in the blocking passes. I then proceeded to bring it all together for the final.
3D Run Cycle FINAL
Front, Side & Perspective Views
youtube
I’m quite happy with this one as it turned out rather natural and organic. I will say that I may have bumped the head in rotation a bit too much but it adds a certain groove to it. I didn't realise until after I had completed it but the left arm jerks quite a bit in the final version as I failed to keyframe the first and last poses the same which resulted in a slightly wonky loop. I will make sure to keep an eye on that next time.
While I have done this before, it is so much fun as a growing animator to do it again and improve it each time with practice. I also learn many things each time I do it and notice things that make it a run cycle such as spacing and timing. I’m sure I will continue to do it again and again so I thoroughly enjoyed learning and being able to do it again.
3D Run Cycle Over Distance
For the Run cycle over a distance, I decided to still stick to the simple style but faster and a bit more fierce. I found this reference below and utilised this for my key frames and posing. Because it was faster, it required less key frames so this made my blocking passes have less flow than the previous ones.

Blocking Passes
youtube
The difference shortened the amount of keyframes so the blocking pass for this exercise came out quite abrupt and seemed like it didn't have much flow between the poses. However, when I played the time line through, it came together to create just what I wanted, a faster and fiercer run. However it was a bit too fast and failed to really show what was going on so I proceeded to space the keyframes a bit further apart in order to slow down the run. This succeeded but softened the run a bit which I preferred.
FINAL
Perspective, Side & Front Views
youtube
I wasn't extremely proud or disappointed in this one as it looked natural but it seemed like I had messed up on the timing and spacing. This cycle fails to really show weight in my rig as it kinds of glides through at some points. The smoothness of the cycle is inconsistent with small jerks happening with the arms, this was something I tried targeting but couldn't solve in the end.
That being said, I do believe I could have made it really well if I had paid more attention to the details such as timing with all the keyframes. In the future, I will continue to practice my ability to plan and keyframe correct poses.
I failed to plan a lot for this one which I believe is a huge part as to why this one lacked a bit of flow and organic movement compared to the rest. Planning is a huge part of any project so I regret neglecting that part of the process for this one and will make sure to prioritise it in the future.
0 notes
Text
Walk Cycle (On Spot & Over Distance)
The walk cycle is a popular exercise for animators and while I have done it myself, 3D and 2D, I am still struggling to master it. For this assessment, we were required to animate a walk cycle on the spot and over a distance with two different styles of walking. In order to continue my knowledge of doing the walk cycle, I found two references that I have found to be quite useful in the past:


I also brought back an exercise I did in the previous semester with the walk cycle in 2D form to familiarise myself with the keyframes and how to really capture an organic walk.
KNB122 REFERENCE:

As a refresher, I then proceeded to draw a front view of a walk, remembering the slight movements in the shoulders and the hips.

With this, I was confident to move on to animating it in Maya and proceeded to form the poses and crete a blocking pass to make sure I was on track.
Blocking Passes
youtube
The blocking passes turned out great and really came together to create a smooth final version of the walk cycle. I found that I really like how in 3D Animation, the keyframes come to create a smooth movement where as 2D animation requires us to draw all the movements, a much longer process.
3D Walk Cycle FINAL
Perspective, Front & Side Views
youtube
The walk cycle turned out good and I was pretty happy with it. One thing that I will have to continue working on in the future is the hands as I wasn't really sure how to properly animate the hands and fingers with the rig. In this cycle, they aren't as limp and organic as I would like them to be so I look forward to practicing this more in the future.
3D Walk Cycle Over Distance
For the next walk cycle, we are animating over a distance in a different style kind of walk. I wasnt too experienced with doing different styles of walks so I researched the kinds of walks there are and found many awesome examples. I found it really interesting how even the slightest change can make one walk a completely different one.

While I was looking, I found the image below and decided to give myself a small challenge to do a sneaky walk.

I didn't really know how I would approach coming up with my own keyframes and poses for this walk that I didn't really have any idea about so I decided I would look off a reference to complete this one. However, I didn't find the original image I found too reliable so I did a bit of searching and found this one:

It led me to a short tutorial on how to complete this walk and I found this to be extremely helpful while completing this exercise.
http://www.cgarena.com/freestuff/tutorials/max/walk-cycles/walk2.php
Sneak Walk Cycle Tutorial
After completing the keyframes and poses, i proceeded to make a blocking pass video to check that everything looked like it was coming together.
Blocking Passes
youtube
FINAL
Side, Perspective & Front Views
youtube
I was really happy with this exercise as the result was much better than expected. I struggled a bit with the feet as they failed to stay in their place between keyframes. I attempted to keyframe each frame to help and managed to fix the majority of it but it left some shaky bits in the legs throughout my final. In the future, I will be sure to correctly frame things over a distance so that I can achieve a much smoother outcome.
Other than that, I feel like this walk is really able to tell a story and correctly be interpreted as a sneak walk. It was my first time doing a style like this and I’m happy with the results so I am excited to continue these skills and try out numerous different styles int he future.
0 notes
Text
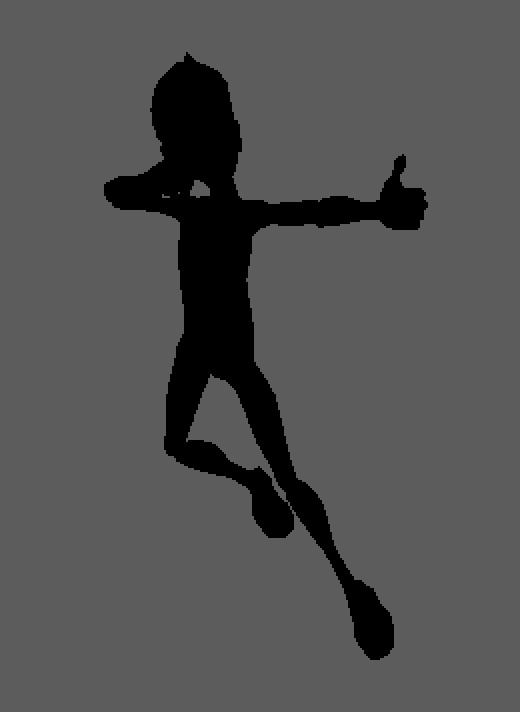
Silhouettes
Our second exercise was to complete a series of action and acting poses in the form of silhouettes. I wasn't too familiar with the concept of silhouettes in animation at this point but completely understood why it was a necessary exercise to complete as animation requires us to express emotions and communicate.

Action poses are when figures are in mid-action and going to do something. I wanted some dramatic poses for my set of action poses with some fighting and dancing figures in my head. I began brainstorming for some cool options.


Pose Sketches

Action Poses


Acting Poses
Acting poses are kind of a calmer set of poses as these are the ones that communicate feelings and help move stories along. Emotions in animation are exaggerated with big body movements and added gestures in order to really get those feelings across. This not only applies to emitting emotions but also when characters are moving generally. I found that, from the previous set of poses I created, the poses require more bends in the back and shoulders as these really do make a difference.
For this set, I wanted to do try out many different emotions that gave the figure a story. I planned some poses below:
Pose Sketches

I then proceeded to make my poses, selecting the ones i liked best. Each of the poses were pretty easy to come up with when I thought of what kind of emotion I wanted to portray but I kind of struggled to make a pose that looked really angry as I found it difficult when I couldn't show the face. The closest i got was a strict teacher/parent type pose (below). Apologies for the pixelation.


I’m quite happy with my silhouettes as they all turned out rather natural, emitting the emotions that I wanted them to. I do like my acting poses a bit better than my action poses as they were more fun to create. The fighting poses required a lot of shifting around and editing in order to avoid stiffness in the figure and show that my character had strength and skill. The results are good but as Morpheus’ figure was a very good choice for this exercise, I am excited to test and try different silhouettes on a more challenging figure in the future.
0 notes
Text
Bouncing Ball with Tail
The first exercise that we were required to do was the ball with a tail bounce, involving a variety of elements such as weight, timing and follow through and overlapping. I had completed a few exercises in Drawing for Animation 2 the previous semester that gave me a deeper understanding in how I should approach the ball and it’s timing.
These were the references that I collected from my previous semester to fresh my mind about timing and squash and stretch:


After analyzing the work and finding more information online about a moving bouncing ball in animation, I proceeded to sketch some timing and spacing references.
I wasn't too worried about the body of the squirrel as I had practice with it before but I was a bit nervous on how to approach the tail as I have struggled with follow through and overlapping in the past. It was also difficult to find proper references for the planning process and therefore I struggled to find the correct poses.
I mainly looked off of this image when I was planning my poses for each keyframe:

Timing and Tail Overlapping sketches:

I managed to come up with the poses That I thought were best suited and applied it to my ball.
With this, I finalized my key frames and proceeded to make a blocking pass for my animation in order to check the there was a flow within my work.
Blocking Passes
youtube
Ball with Tail Bounce FINAL
Side Views (Left&Right)
youtube
Perspective View
youtube
I was rather happy with the result as it turned out quite well, however, the tail still needed a lot of work. I struggled with positioning it as i would keep moving one section of the tail only to find that it didn't smooth out when I moved other parts. This lead to a lot of rigid poses that I attempted to fix multiple times. I was pretty relieved when the tail came together pretty nicely with some flow. I would also work on the overlapping when the squirrel hits the floor as the tail looks slightly rigid in the side views at those keyframes. I can say that i did improve my understanding of follow through and overlapping in regards to how its positions in keyframes allow that sense of swift movement.
The body was rather easy for me and I was happy with it as it successfully conveyed a sense of weight and strength within the character. I added a slight bounce at the end as the squirrel came to a halt in order for it to look more natural. All in all, I was glad I was able to apply previous knowledge and get to learn more about something I hadn't been able to fully understand.
0 notes
Text
Tutorial One
During the first tutorial, we were not able to test out Maya ourselves as there was an issue with the software in the labs so we watched our tutor guide us through.
Having started with Blender when I was first introduced to 3D animation, I found Maya to seem quite similar, it was just a matter of learning the new hotkeys and way to go about certain functions. However, easier said than done.

Blender

Maya
Once I gave Maya a go at home, I found it increasingly frustrating as I was so used to the Blender functions. This was expected though and since it is important to have fluidity with different softwares in the industry, I will continue to practice with Maya in order to get comfortable and quick with it. Additionally I will aim to increase my skills with Blender as well, as I did not get a chance to do a lot with that software yet either.
0 notes
Text
Lynda Certificate

PDF file on Google Drive:
https://drive.google.com/file/d/0ByWi-5MzfVN6dGpJVU85SUFZbm8/view?usp=sharing
0 notes