
My digital sketchbook or blog, however you want to call it. This is year 1 semester 2.
Don't wanna be here? Send us removal request.
Statistics
We looked inside some of the posts by jpowssbcu2 and here's what we found interesting.
Average Info
Notes Per Post
1
Likes Per Post
1
Reblog Per Post
0
Reply Per Post
0
Time Between Posts
4 days
Number of Posts By Type
Text
17
Last Seen Tumblr Blogs


Fun Fact
US Tumblr user growth rate is estimated to slow down to 4.1%.
Text
Centrala Exhibition Review
I had the chance to exhibit my work alongside with members from my Art and Design class, where we as a group voting to name our first exhibition, ‘No Place’. We broke up into 3 different teams to arrange the event. Curator, Social Media and Poster design. As part of the social media group, we created a facebook event and an Instagram account to promote the exhibition to the public as well as to our families. We created a group chat to communicate amongst ourselves which helped with feedback etc.


The day before the show, we took our work in for the curating team to display in the best possible way. Most of the works were displayed so well, but there was a room in the exhibition with a table. The table appeared to be a little overcrowded with work which appeared to look like a table top sale.

My work was exhibited better then I could imagine. The window with wild plants outside really complimented the theme to my work as well as the sun shining through the resin which created an eye-catching aesthetic. The other 3 were on a plinth on the floor which also looked really nice. Unfortunately the white blended in with my work and didn’t allow the work to stand out as much. If I could change this, I would have painted the plinth pink. Pink because it’s the colour of Fostair Inhaler and it will allow my heads to stand out.


Overall, I’m really happy with how this exhibition turned out. Loads of people turned up and gave me so much positive feedback on my work. People were taking photos of them and talking about them. It would be better if Centrala was located in a better position as it’s tucked away and limits the number of people that could possibly show up to the event -- Not many people know Centrala exists as it’s hidden amongst factories and closed units. It would be so much better if this would be located somewhere else in Digbeth such as the Custard Factory.
0 notes
Text
Botanical Gardens Birmingham
I’ve never been to Botanical Gardens Birmingham before, and I am looking for some plants for my projects which could possibly be exhibited alongside my heads. So, I decided to go with another plant lover to go see the gardens.

Entrance fee is usually around £5 per adult, but there’s currently an Ice Age exhibition so the entrance fee is £12. As we walk around, we just see some missed place, irrelevant Ice Age moving sculptures which makes this nice place look very tacky and annoying. Looking around the outdoor garden isn’t any better than other parks that we have in our local areas. The only difference is that there are caged birds and a free-roaming peacock. Walking around we see some lovely ponds with some beautiful common goldfish (carp) and some nice plantscapes. It’s still overall disappointing because there are not many plants and a variety of them. Most plants weren’t in bloom due to the season.


Towards the end, we found some caged parrots which were beautiful and friendly. We fed them some blueberries which they gently took from our hands through the cage. When we went to look at the indoor plants (to speak about after this paragraph) we wanted to come back and see the parrots again, but they both were hiding. One was in the little bowl cave-like structure, hiding like it was cowering in fear. I could only suspect that it’s scared of children banging the cage or something?


We found the indoor plants! My favourite section of the gardens. It was very hot and humid inside, but I saw all of my house plants, but monster sizes! The air inside felt so clean and breathable due to the number of plants in this room. This inspired me for my art practices and for my home to keep purchasing more plants to add to my home interior and to learn about them. At this point, we were excited to see what plants we could buy in the garden shop section.


As we enter the garden shop, we get excited and separate to see what plants we could get and to bring back to each other. But no, our excitement just disappeared. Plants looked like they were neglected. They dried up, leaves were frail and there were approximately 6 different types of plants. This is sad because you’d expect that such a beautiful place would take pride in their plants.
Overall, I feel let down by the Botanical Gardens Birmingham due to the number of plants they have; the level of maintenance; the exhibition that was currently on (Ice Age) and the plant shop. Would I go there again? No. I think it’s a waste of money when you could go to places like Sutton Park, Solihull and Cannon Hill Park for free.
0 notes
Text
Nature is my Fostair Evaluation
Working on this project has helped me understand more about the world and my asthma. Learning and researching about plants, pollution (indoor and outdoor) and my using my symptoms of asthma to make my project personal. I chose to use activism as a lens to help guide my outcome. I’ve researched artists, activists, and architectures that work relates to mine and how my idea is supported by these contextual studies. The aim is to make people aware of the impact that pollution and unhealthy air quality can cause symptoms of asthma and how we are suffocating in this closed container.

“The Earth is a sealed container. We drown in the gases; we choke on the tree of life we asphyxiate life. There’s no new air to refresh and cleanse our culture”. This is quote was created at the beginning of my project after my psychogeography visit to The Sea Life Centre. From a bad experience in The Sea Life Centre, the living conditions of the aquatic animals made me want to leave and do something about it. Aquariums were too small, overcrowded (by fish stock or decorations), no live plants and sections where you can pet starfish. This is where I knew my journey of this project will begin as an activist.

I opened my mind to develop ideas through some word associations and digging deeper. This helped me to develop my idea of suffocation. I then created some collages to visualise suffocation in a way that it’s personal to me. Dystopian collages using acrylic and acrylic medium to create a texturised piece that appeared to be mould, and some standard image collage. These helped me to visualise the discomfort of being an asthmatic in this polluted world.


I discontinued making the dystopian collages and began to collage with magazine cutouts to encourage more ideas and developed outcomes. At this point, I wanted to start illustrating some of these to go further and expand on my idea generation. This helped me to conclude working with sculpture for this project. I created a 3D digital drawing to visualise an inhaler which I could possibly 3D print into a planter for “Nature is my Fostair”. I finally got the inhaler printed, but I originally wanted a transparent material so that we could see the roots of the plant to symbolise health and sustainable living. However, colour was limited and I had to opt for blue (the colour of Ventolin).

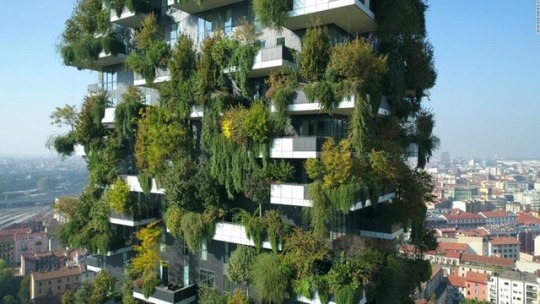
After printing, I discovered some implications for my design. The ‘gas canister’ was too snug and got stuck inside the inhaler shell. So, I had to file and wet sand it down to get a comfortable fit. I then rinsed it out and planted it with some ivy (a NASA approved plant). Unfortunately, due to the volume of the inhaler, the plant died. I suspect that the roots must have been too compact that they became suffocated and wasn’t getting enough water or oxygen. During my project, I investigated artists: Pierre Huyghe who created a biotope in a disused ice-rink; Liam Tickner that created a book from his psychogeography. Carlos Victor who illustrates based on his science fiction-influenced adventure story; Tuco Amalfi that has a spiritual vision creating soothing scenery; Michael Pinksy demonstrated how bad outdoor pollution can be around the world; Stefano Boeri has a mission to plant nature into concrete jungles. Vertical forests are buildings that are planted with trees, shrubs, and flowers to increase the green surface area in cities and improve local air quality and more. These all helped with my idea generation and helped me become more confident with my idea.
Documentaries/videos:
David Attenborough – Our Planet, a documentary that is spreading awareness of climate change, pollution and how we are destroying the planet. https://www.ourplanet.com/en/ And how humans are disasters to the planet… The Chernobyl Explosion https://www.youtube.com/watch?v=v40hu54fAvw These helped me to see with my eyes how over time (including historical events) humans are killing the earth, ourselves and everything else.
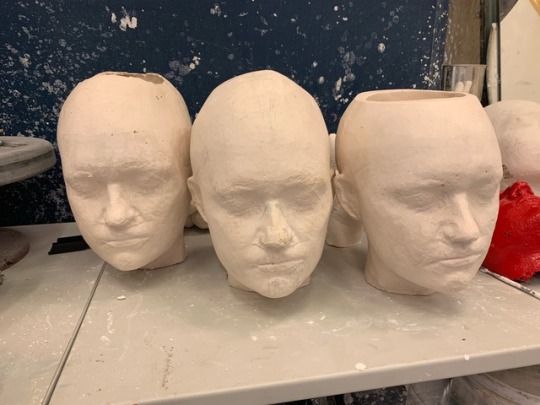
I moved on to developing my idea using the plaster workshop where I created a head cast to turn into a planter. I used resin and plaster, unfortunately, the resin made my project become very expensive as this material isn’t cheap. I managed to create 5 different heads with different materials to communicate my idea which turned out successful. Sharing ideas through group critiques helped me to see what direction I was going in and what changes I could possibly make. I like that there’s no right or wrong answer and I can always justify my making. If I had a bigger budget, I would have done some more experimentation with resin and other materials like concrete. It would be interesting to mix earthy materials with the resin layers to create a terrarium head or even one that could be used as a planter. If I had more workshop time, I would like to polish some of the heads that I would experiment with, using sandpapers to create a smooth perfect finish. The positives of using plaster to create work was that it was versatile; easy to work with, affordable and I didn’t have to worry about making mistakes. Plaster can also be finished with sandpaper and tools then sealing it or just leaving it raw and sealing it to lock it in place. I sealed my plaster works because it created a waterproof barrier and stopped the plaster from breaking away. I really liked the inhaler design I made, I just wished that It could be bigger and would allow the plants to thrive in. So possible creating a bigger 3D model and casting it in plaster to then make a mould and possibly into a bigger planter – But this is also a very timely process and due to the shape etc, making a mould would be extremely difficult. For the outcome of my project, I have received positive feedback from workshop technicians, people that follow my blog on Instagram and in group critiques. This gives me confidences meaning I would go back to the plaster workshop in the future to work on bigger and better ideas.

My next step is to decide how I want to exhibit these sculptures.
0 notes
Text
Since playing with plaster and resin, I realised how much I liked resin, but due to the cost, I had to discontinue using resin as I couldn’t afford to use it anymore. So, I decided to continue to use plaster to create a final head which was an experimental piece.


I decided to cast the head the same way I have been, but towards the end of the pour, I pushed some plastic carrier bags into the cast to create some weaker section of the head – which will then be broken away when tidying up the sculpture. This will create some interesting details but has a meaning to it. Suffocation isn’t just about having a plastic bag over you to limit your breathing to the point you can no longer breathe, but it’s also about chemical fumes, pollution, and particles that get into your airways and causes implications. The plastic bag symbolises the pollution and fumes that are created during the process(es) of the production.


Artists that use recycled/non-eco-friendly materials to create artwork in response to the world:
Clickable links: https://www.dezeen.com/2019/02/13/print-your-city-recycled-plastic-street-furniture/
https://vimeo.com/311304894
In Thessaloniki, Greece, you can now recycle your plastic waste which can be turned into 3D printed furniture for the city, using a new laboratory set up by Rotterdam studio The New Raw. The Zero Waste Lab is the latest edition of The New Raw's plastic recycling initiative, Print Your City, in collaboration with drinks brand Coca Cola.

Print Your City makes street furniture from recycled plastic waste.

Residents can use the recycling facility for their own plastic waste as well as being able to choose what the waste is turned into. The 3D printing robot will then transform the plastic into furniture. Residents are also able to customise the furniture via a website, selecting different colours, functions and which space in the city they would like to see it in. I believe that this technology is the way forward to help cut down plastic waste in the oceans and land as people will be excited to use the technology to turn their plastic into something beneficial for their city. Being able to turn it into plant pots is a great way to introduce more plants into the cities and even shopping malls; cutting down the carbon dioxide and to help purify the air.

This project reminds me of the inhaler project that I created at the start of my ‘suffocation project’. I 3D printed the inhaler and planted it with ivy. This was to express that being an asthmatic, I always feel suffocated. I must suppress my symptoms by using my inhaler which is chemicals and steroids. It’s depressing how I’m not able to breathe by myself and always need to rely on my inhalers which don’t always work for me because of the symptoms caused by pollutions, allergens, and other particles are just too much for me. So, by planting the inhaler model with a NASA approved plant ‘English Ivy’ to express breathing in better air which is purified by plants.

0 notes
Text
plants and their benefits and how they’ve helped me, others and for the future
Artist who use plants as part of their activism work
0 notes
Text

With this sculpture, I decided to remove the nose because we naturally breathe through our noses. It’s said to be abnormal to breathe through the mouth and it requires more energy. Also, as an asthmatic, breathing through my mouth causes more pressure on my lungs as there are no hairs to filter any particles. Aloe Vera is approved by NASA to be an air purifying plant and can also be used on the skin for burns.


Planted with Arabica Coffee Plant: Provides purified air to help take away pollutants that affect asthmatics and in the future, it will provide coffee which can be roasted, ground and brewed.


This sculpture is a mixed media creation. By using resin, I was able to create a transparent layer which allowed me to express clean lungs and easy breathing. I planted this with a ‘Peace Lily’ which helps identify peace of mind. Also, a NASA approved plant, it helps to clean and purify the air which helps us asthmatics with breathing and to reduce the feeling of asphyxiation. Also, the transparency allows you to see the root system which symbolises lungs being healthy and strong.

I coated my head platers using an Acrylic Polymer seal which will allow them to be used indoors and outdoors and protect them from water damage.

Here is a solid cast of a head which I felled half way with resin which also included my old inhalers, Ventolin and Fostair accompanied by cigarettes. Smoking affects me the most as an asthmatic and it’s a daily struggle to go out in public because I know that there’s always going to be someone near me smoking. During the process of making this, the resin got too hot during the layering process and almost caught on fire due to the heat the resin and catalyst were producing. I had to quickly take it outside to cool down and to make sure it was away from the workshop. As a result, the resin burn and turned yellow which worked really well for this peace as it helps the audience to quickly identify what’s going on. The yellowing reminds me of being congested with mucus on my lungs. I filled the rest with plaster, removed from the mould after 24 hours then I applied a thick cheesy layer of plaster to the facial area. This created a mucus like affect which helped to tell the story of the sculpture. In yesterday’s group crit, I mentioned that I was going to apply a layer of the acrylic polymer seal to strengthen and waterproof this sculpture which will also add a glossy finish. A few of the members told me not to as this would help show contrast within the pieces. However, I wanted to make the plaster to become a nicely finished piece rather than it looking like it just came straight out of the mould and to also look more like mucus. I took a before and after photo and I can happily say that this still helps to show contrast within my pieces, but also looks a lot better and more of a finished piece. (See below for before and after)
BEFORE & AFTER


0 notes
Text
More contextual studies based on air quality and environmental activism

An artist called, Michael Pinksy demonstrated how bad outdoor pollution can be around the world. By the method of installation, on Earth Day he made a five-geodesic set of domes that formed a ring in a courtyard of Somerset House. The Domes each represent different levels of pollution found in cities around the world. The best thing about these domes, you can access each dome to get an instant feeling of different air qualities. There is a dome in this installation which includes very pure air which is experienced in Taurta, the peninsula on the coast of Norway where the project originated. Each dome you can experience the air quality of London, Beijing, São Paulo, Norway, and New Delhi. Air pollution is raising many concerns in the art world. Artists and designers are finding ways to make this issue to become viral. Michael Pinksy is one of these artists who is looking to address the issue by creating the installation. This installation relates to my art in a way of promoting air quality and the idea of dystopia and utopia. Plants are a way of purifying bad air quality but in some cases… The air quality is so bad that there aren’t enough plants in that location to completely purify the air. This is why we need to replace our concrete world with nature to clean our air.

To continue from my point “we need to replace our concrete world with nature to clean our air”, an artist called Stefano Boeri (who I briefly mentioned in a previous blog post) has a mission to plant nature into concrete jungles. Vertical forests are buildings that are planted with trees, shrubs, and flowers to increase the green surface area in cities and improve local air quality. Stefano has designed towers in cities such as Milan, Utrecht, and Nanjing.


In relation to domes and creating a space for where people are able to breathe more freely, A pair of Iranian architects have won a competition to design a support centre for lung cancer sufferers in the Polish city of Kraków, where air pollution is at dangerously high levels.
Tehran-based Nima Nian and Behdad Heydari envision a translucent glass sanctuary being built in the city's Bror Hansson park, offering healthcare and social spaces for cancer patients, as well as their friends and families. "Since Kraków has some of the worst air pollution in all of Europe, the number of people with chronic lung diseases is significantly high," explained Nian and Heydari. "Therefore, the need for the Kraków Oxygen Home is ever more prevalent." "This is an opportunity to use architecture and design to create something to help heal a hurting community and spread a strong message of hope.” Details such as an apple tree was chosen as the centrepiece of the central courtyard because apples have been proven to improve lung health when eaten regularly with transparent glass that surrounds the haven, so it is visible from everywhere inside the building.
These artists contrast so well together and really share similar/the same interests in improving our living/health and protesting about cleaner environments.
0 notes
Text
Resin model 1
Creating this model started off differently. I had to use 2% of the catalyst thoroughly mixed with the Clear Casting Resin. But I could only pour just under an inch every 1hour. This allowed time for the resin to set just enough between each layer and without showing lines from each resin pour. I started off with a 200ml pour, slowly increasing it by 100ml each pour as the mould got wider. Pros: Creates a lovely finish; Great for transparency; Strong form Cons: Expensive; a very long process; not good to work with for a long duration as it gets on your lungs; makes a lot of mess.
After finishing with the resin, I had to wait approximately 1hour and 30 minutes before I could apply a flick coat of plaster. After applying the flick coat, I was able to pour in plaster.
Cleaning it up was easy, warm water, sponge and the resin quickly cleaned up. I filed the edges smooth so that it would no longer be sharp which could cut the plant or harm someone who touches the edges. I tidied up areas of the plaster that needed it using some plaster tools and a soft grit wet sanding paper.


Taking out the clay was a paint to take out at first because there were some pressure and resistance. However, I quickly become easy to remove and I was about to clean the excess out using a wet sponge and dry blue roll.


I could improve this by giving it a layer of protective varnish or something sort of coating which I have been thinking about when creating as they will need to be waterproof for when they become planted.

0 notes
Text
Further digging deeper
Further digging deeper:
Task 1: Select Select an artwork/installation/film/sculpture/book/article/soundtrack/object/thing
I decided to do a further digging deeper to discover new materials that I could possibly use to make my plaster heads more interesting.
Task 2: Respond Write a 200-word response to the work. This does not have to be written in an academic style. Make it personal; think about how the work made you feel or what it reminded you of instead of what it looks like.
I really like the plaster head sculptures; the process was timely but easy to do. However, they’re just hollow plaster heads ready to be sealed and possibly planted. I wish to make these heads more interesting whether I dig deeper into the materials that I could use and the purpose that these materials could have and the impact they share. The heads remind me of the busts that you’d see in an old fashion home – apart of the décor, possible mounted onto a wall or displayed on a fireplace. It would be interesting whether I can see inside the plant heads? Maybe a transparent material? Or to use a transparent material that could be mixed with items or plaster – or possibly layered with plaster?
Task 3: Research Research is more than finding out about the artist that made the work or how it was made. We want you to use these artworks as starting off points. We want you to dig deeper. Be curious! 3:1 Start by identifying key themes of the artworks. Make a list.
Plaster sculpture, Head, Plaster, Person’s head, bust, Material, Texture, Colour, Shape 3:2 Try some word association from the keywords.
Material – Plaster, Plastic, Acrylic, Polymer, Concrete, Resin, 3D Print, Vinyl, Fibre Glass, Silicone, Rubber, Latex, 3:3 You can now use these keywords to search in the library as well as various online sites. You can start by using websites such as… • bbc.co.uk • theguardian.com • moussemagazine.it • frieze.com • tate.org.uk • e-flux.com • itsnicethat.com What other sites can you dig in? Find your own resources relevant to your practice
I made my first search on tate.org.uk and found an artist, John Davies who used Polyester Resin with fiberglass to create a head sculpture. The sculpture is based on a life cast made of William Jeffrey’s head in 1972. A series of heads resulted from this cast, of which five were completed, all entitled ‘William Jeffrey with Device’. T01578 was the third in the series and had perhaps the most complex of the devices used. The ‘devices’ on the other four are: one, chicken wire, stretched over a wire frame, over a horn shape which covered the nose, forehead, and mouth but which left the eyes visible; two, a horn-like form from between the eyes covering the nose and part of the mouth, with feathers around the outer rim of the form; three, two pieces of dowelling, one resting horizontally on the bridge of the nose, the other parallel to this on the tip of the nose; both were fixed by wire around the ears, and the eyes look out in the space between the dowelling; four, a hat made of felt and coated with oil paint, a painted leaf-like structure over the nose with pieces cut out so that the eyes are visible. The artwork relates to mine so far as I started off with creating a series of heads to which I can experiment with. It will be interesting how I can use resin to create some works that could create an illusion of something or to layer up to create a mixed media head sculpture – possibly mixing found items into the resin.
I then started to search more into resin, but I couldn’t find many works that were relevant to mine so I just type ‘resin head casts’ into google. I found an artist called Richard Dupont who created a series of head casts that were filled with salvaged items and cast with resin. http://www.richarddupont.com/sculptures/resin-heads/featured-works#6

This gave me an idea that I can use found objects that are relevant to my idea suffocation and possibly put them into the resin as I pour it into my mould.
I then searched ‘Concrete’ into Tate.org.uk and found work by Henry Moore. https://www.tate.org.uk/art/research-publications/henry-moore/judith-collins-henry-moore-and-concrete-cast-carved-coloured-and-reinforced-r1172059 Henry Moore made in total twenty-one sculptures in concrete, all between the years 1926 and 1934. This was a period of experimentation and rapid development in his career in which he explored this new medium alongside stone and wood. As he later commented, he was then very interested in all types of sculptural media and took up concrete in part because it was becoming a more commonly used building material and he was hopeful of being commissioned to produce concrete sculptures to go with these new buildings. Perhaps equally important was its cheapness (he had little money then) and the different ways in which it could be worked: concrete could be cast in a mould, shaped and added to while soft, or carved when hard. It could also be colored by pigments and incorporate other objects. Carving was his preferred mode of making sculptures during the 1920s and 1930s: famously espousing the doctrine of truth to materials, he publicly championed the view that a sculptor should carve word or stone directly in order to be able to respond to its properties rather than attempt to disguise them. But the story of Moore’s engagement with concrete shows him also alive to the possibilities of a material that could be modeled, carved and cast, and creates a more nuanced understanding of his approach to material and technique in the interwar years.

3:4 Can you expand your research to find links that address… • What you think the artist would have researched when making their artwork?
Artists would have researched how the materials would work; how the materials respond when being mixed with other materials and the durability and whether the materials are versatile. Artists would have researched how other artists may have used these materials or artists who have created something similar.
• How the artwork relates to current news events? Artist Henry Moore relates to an artist Stefano Boeri ‘Forest cities’. Henry created concrete sculptures as a commission to go with some buildings. However, Stefano used concrete buildings to house people and a forest of plants to create a self-sustainable town. https://www.theguardian.com/lifeandstyle/gardening-blog/2013/feb/27/bosco-verticale-vertical-gardening

Richard Dupont created a collection of resin heads. One of his resin head creations ‘Pink Head, 2011 made with solid cast UV stable polyurethane resin with studio and personal detritus, found and salvage, recycled objects, and waste’ reminded me of a news article I found on The Guardian. It talks about how if we reuse/recycle materials, we could possibly create 200,000 jobs. To see Richard is using found, recycled and other types of materials in his resin heads is a way of using less resin (saving him a lot of money) and a way to create colourful art with a strong meaning.
https://www.theguardian.com/business/2015/jan/20/reusing-recycling-waste-materials-creates-jobs
• How the artwork relates to history? “Mould making is a 6000-year old skill. That means that our prehistoric ancestors were working in the same technique that we can pass on to our children and grandchildren.” “Archaeologists have also unearthed stone moulds used for making axes from about 3000 BC. They were probably made from an identical two-piece mould tied together with a rope, with a hole on top through which the liquid metal would have been poured. Many early weapons were fabricated through casting, making this technique key to the success of the hunting and gathering lifestyle of early humans. This shows the effect that fabrication techniques have on all aspects of life.” https://smartartbox.com/blogs/smart-art-blog/history-of-mold-making-and-casting
• Can you find any online articles that relate to each of your selected keywords?
Making concrete green: Reinventing the worlds most used synthetic material.
https://www.theguardian.com/sustainable-business/2016/mar/04/making-concrete-green-reinventing-the-worlds-most-used-synthetic-material
Golden resin highlights cracks in the floor of TANK's Xchange Apartment: Inspired by the Japanese Kintsugi method.
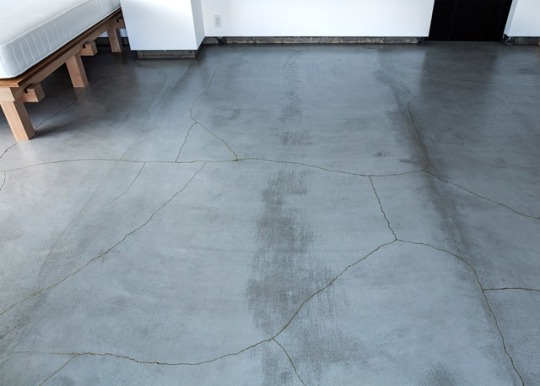
https://www.dezeen.com/2016/07/22/gold-resin-floor-cracks-tank-xchange-apartment-kyoto-japan/
• Can you find any books in the library that relate to your keywords? “This is an informative, inspirational, and highly illustrated introduction to the design potential of concrete and its vital role in contemporary architecture. It mixes key issues such as design, aesthetics, and sustainability, with useful technical content such as how to set out the design of a concrete structure, guides to the basic principles (column sizes, slab thicknesses, and types) and how to achieve many different concrete finishes. Accessibly written: this book will appeal to both students and junior practicing architects, and function as a handy guide for more senior architects too.”
https://www.waterstones.com/book/concrete/michael-stacey/9781859463345
Rachel Whiteread is one of Britain's most exciting contemporary artists. Her work is characterised by its use of industrial materials such as plaster, concrete, resin, rubber, and metal. With these she casts the surfaces and volume in and around everyday objects and architectural space, creating evocative sculptures that range from the intimate to the monumental.
https://www.whsmith.co.uk/products/rachel-whiteread/9781849764643
3:5 Identify the connections between the expanded research and the original artwork. Can you summarise and reflect upon the expanded research and how it relates to your initial artwork? Think about the connections between the various links - can this provide an alternative way of thinking about your project/concept/idea… How do you relate this to the work that you are making? How can this expanded research develop your own practice?
After doing my research, I’m particularly interested in resin. Resin seems to be the most exciting material to work with and will allow me to do many things with it. However, it’s very expensive and has many health and safety guidelines. Richard Dupont resin head collection has given me an idea for my project to help develop my head casts. The concrete works haven’t really interested me to the level that I would like to use concrete in my own practices, but maybe in the future, I could use concrete to create some interesting creations. I also feel that using concrete will have many implements for my work and cause problems.
0 notes
Text
Formative Assessment Feedback.
Formative assessment was very stressful for me to prepare for. I had been in the workshops all week trying to get my head casts done to a standard where I’m up to date with my project. Making a head cast isn’t a simple and quick project. Actually, it’s a very timely project and you cannot rush any step. Otherwise, there will be many problems. These problems can be leakages, weaker areas of the mould which can cause the mould to explode when filling it with the material.
So anyway... moving on, I presented my formative assessment from my blog because I know exactly where I'm at on my blog and this will allow me to man my time for the project effectively.
The feedback for my project had negative and positive comments such as:
"Experiment with plants" -- This comment was something I found quite annoying and unpractical due to the cost of plants and it's not good for plants to be moved around too much. I had my own plans for plants and wanted to find some that were appropriate for the project such as 'Nasa approved plants'.
"I want to see tall palms in these heads" -- Also another unpractical idea as of the size of the roots in comparison to the head(s). A standard 4ft Arcea Palm has a root system of 17cm. My heads are lucky to fit 10cm of planted space.
"Be careful with dioramas, focus on products" -- This is feedback that I was looking for because diorama was suggested to me, but I wasn't sure about it. I wanted something to place behind my sculptures to add some ambience. However, I feel like the plants in the heads will create the ambience.
"Contrast between two worlds in collage" -- In feedback, they wanted to see my collages that would show a clear contrast between the world of being unable to breathe (in asphyxiation) and a world of being able to breathe.
In conclusion, the feedback will allow me to continue with my projects knowing what steps I should and shouldn't take when working towards my final work. I'm just hoping that I will have enough time to create everything I want to. I am aiming to create up to 10 heads. However, the hours and cost of these might be what will prevent me from doing this.
0 notes
Text
Making my plaster heads: Also making room to add plants.

After creating a solid cast I had to figure out a way to create a head cast that would have a hollow inside with enough room to plant a medium size plant in. My first experiment was with a block of clay! Plaster doesn’t stick to it and it’s easy to remove. Clay will also wash off the sculptures if I will need to wash it off at any point.

Once happy with the size of the clay, I placed it to the bottom of my mould (the top of the head) to and hoped for the best.

Started the cast with flick coat. Allowed the first layer to dry. Poured a small amount and swirled it around the mould to ensure that the details of the head will be captured and to make sure that the clay is secure.


After tidying up the head cast, it turned out so well and I couldn’t be any more happier with a first attempt for making the head hollow.


I’m hoping to try and make the holes in the head bigger and possibly in different areas of the head.

0 notes
Text

After playing around with new methods of producing work, such as the 3D printed inhaler and digital collage. I decided that I would make use of one of the workshops. Plaster was the main one that came to mind. I wanted to make one of my collages come to life by thinking of a way to create something using this workshop. I didn’t think too much about the materials that I wanted to use as I know that I am not limited if I use the workshop. My first step was to choose a collage, so I chose my head with the plant growing out of it collage. I wanted to make my idea relevant to my project and cast the head of an asthmatic. Someone did say to me I should cast my own head. However, because I have severe asthma, I wasn’t allowed to have my own head cast. So I had to find another asthmatic. Luckily, my friend Nikolė was willing to help me.
I started the process off by cling filming her hair as nearly, and tightly as possible to her head; using petroleum jelly to ‘glue’ down any loose hairs; her eyelashes need to be stuck down to her cheeks; all of her skin needed to be oiled down using baby oil and her ears needed to be plugged with cotton wool.
The next step was then to use the cling film line as a starting point to use plaster bandage to go along her head to create half of the head cast at the back of her head and to do that twice. Then to do the front (her face), but first, I needed to use petroleum jelly along the seam I created with plaster bandage. Then I used plaster bandage on her face, leaving nose holes so that she could breathe. During this process, I and the technician had to keep asking her to signal if she was okay. This is just for health and safety guidelines and to simply know if she is still comfortable doing it.

After gently pulling the plaster pieces away from her head and face, I mixed up washing up liquid and vegetable oil to make a release (to allow the plaster to come away in the future steps) and thinly pasted it on both sides, wiping away any excess. Then joined the two parts together using more plaster bandage, checking for any soft spots (the weaker areas).

I created a flick coat of plaster to allow for details to be picked up, then poured in a small amount of plaster and swirled around evenly to ensure that all details will definitely be captured.

I placed my first mould into a small bowl to make sure that it is sturdy. I filled with plaster and allowed it to set for approximately 1hour. I then carefully peeled away the plaster bandage which easily came away due to the thin layer of release mixture I made.

Next step was to file down imperfections that I didn’t want on my first plaster head. This was a crucial stage as anything that could be missed, will affect the end result.

Time to create a second mould. Damp newspaper strips covered the plaster head, then even stips of clay came next, smoothing evenly over the product.

I then had to create keys, funnels, and a wall. The release was added to the board. Followed by a flick coat of plaster

When the plaster was a cheesy texture. I had to quickly push it onto the womb. I called it a womb because of the process after the mould was created: it was like the mould had given birth to new heads. I repeated the previous steps to the second half of the womb. When the mould had dried, I had to crack it apart from the other side and remove one side, take away the clay from the inside (not the funnels) and to prepare it to be filled with vinyl. I had to create a DIY form of plaster bandage using: Hessian bandage dipped in plaster and then tying it around the corners of the board and around the womb. I poured vinyl done the side that I cleared the clay from and waited 6hrs for it to dry. I then took away the side that wasn’t vinyl and left the head inside the vinyl side. Removed the inside clay and repeated the steps before to create the vinyl pour.


The head mould was created and the details were captured. It was then ready to be used to mass produce future heads.
0 notes
Text


So these are images I found on the internet related to a diorama. It’s a way of adding special effects, mood and/or personality to a photography shoot or videography. I want to use diorama so that when my work becomes finalised, it prevents my work from becoming this flat piece and will add a theatrical finish.
Here is an example of an artist who created a diorama piece of art.

The Tranquil Lake: Sunset Seen through a Ruined Abbey: Attributed to James Johnson 1803–1834 Oil paint on canvas.


Here are some examples of embroidery, I’m planning to take diorama to a different level of creating some embroidery illustrative pieces which will be explained into deeper detail in this blog.
EDIT: I have decided to not continue with the idea of using diorama to help make my work stand out because I feel that this will take away the attention from my sculptural works. However, a diorama is something that I can look into in the future.
0 notes
Text
In a group crit, I developed my idea and changed a few things. I decided that I will create a 3D print of my inhaler(s) using a clear material if possible. The clear material will allow us to see the root structure and the organic life structure of the plant that will live in the inhaler. The clear material is also symbolism for clear breathing and healthier air in indoor living.


I’ve created a 3D digital design for my inhaler planter and included drainage holes. However, I found that It’s not necessary to have drainage holes on the outer shell and to only have the holes on the canister. So, I decided to re-visit my design and change the drainage holes.

I also have a similar idea but for a head planter. Which could also be made with a clear material. I’m planning to make a cast of an asthmatic person’s head (keeping my work thorough) and creating resin planters and playing around with other materials to see what outcomes I can achieve.


While making and planning my works, I’ve been thinking about surrealism, diorama and sci-fi work and how I can bring some of these details into my pieces. I was referred to a website called www.visualmelt.com which is an archive of esoteric and contemporary culture. Contemporary culture today usually holds some form of sci-fi influences. I found artworks by Carlos Victor Ochagavia who designed for Robert Anton Wilson’s book series “The Illuminatus Trilogy”.


I also found Tuco Amalfi who was inspired by his time when he experimented with drugs as a teenager which was a point where he experienced his inspiration in spirituality. He believes that “there is beauty and mystery behind all things was much bigger than he thought was infinite. Seen not only in terms of an artistic or scientific way but far beyond was the spiritual vision revealing him, immense of God in all things and situations from a drop of water to a galaxy”. I love that these artworks all have this blue tone and calming utopian mind. I feel like creating a diorama with a similar concept will help to make my work stand out and create some form of a story which will help to conceptualise my project. I still want to look further into my idea of diorama rather than just settling with one idea.
1 note
·
View note
Text
Contextual Studies:
Pierre Huyghe https://www.youtube.com/watch?v=eWre6dlUAbo (A link to a video tour of the installation)


Project Münster is a futuristic “biotope” in a disused ice-rink. Featuring living animals, an incubator growing cancer cells and augmented reality, it is among the most ambitious works ever released at the Decennial Show in the north-west German city.
As well as the €35,000 given to each Münster participant, Huyghe has had help from his galleries: New York’s Marian Goodman, Hauser & Wirth in London and a few others. The show’s chief curator Kasper König says that the project ‘may cost more than €1M, so this is a total exception’.
After Alife Ahead (2017) installation resembles a sci-fi landscape. Pierre’s methods to create this environment included slicing into concrete floors, excavating the Earth beneath and automating pyramid shapes on the ceiling. The space housed genetic mutations of creatures “chimera Peacocks” and bees move around the landscape while an aquarium contains a Conus textile (a venomous sea snail species).
“The building is a haunted living organism, an enclosed place, porous to the outside”.

“Large enough to host a set of things, different entangled systems”.
Pierre Huyghe relates to my idea as he created a biotope which housed a variety of interesting and unusual things. My idea is some form of a terrarium/pot which I’m excited to experiment with.
Liam Tickner:


“While Liam was a student, he worked as an assistant in Amsterdam gallery, Annet Gelink. During his shifts at Frieze Art Fair, he couldn’t help but notice someone working in a booth in front of his. He decided to document this and reflect up the activity.” Upon reflecting on Liam’s work I came across so many interesting things. I like his take on “psychogeography”. I particularly like his unique simple organic approach and the idea of creating a book out of his psychogeography observations.


His website is pretty much a visual ASMR which I really like. I particularly like his moss and acrylic structure he created. I see it as an inside out greenhouse on an organic shape. His work comes across very commercialised which compliments his lush digital surface. He also has the phrase ‘Dirty Wellness’ – An idea of things that are grimy. He grows mold on digital images adding glue on them which creates some glossy appealing images.
Liam’s work relates to my idea in a sense of creating some form of the dystopian world on the internet which is inspired by his phrase Dirty Wellness. He created a platform to express his dystopia online, but I want to express my dystopia in the possible form of sculpture. Using sculpture as a way to host my plants.

0 notes
Text
Idea Generating Through Collage


I wanted to develop my ideas, but I was stuck with what to do. As I learned from semester 1… collage was the best way for me to start getting my ideas flowing. I created a series of collages using magazines and printed images from the internet which started to quickly develop into something interesting. I quickly started to like the use of text in my collages which give the collages some extra personality and some sort of caption. While making my collages, I quickly remembered some techniques such as folding, tearing, cutting, trimming and drawing which is my typical approach when making collages.


I attended a collage workshop which I learned how to take advantage of the screenshot and screen record facilities on Mac. The idea of digital collage was quite daunting at first. However, after playing around with it. I quickly became a fan of this method. Layering images; opening websites and desktop apps such as pages which allowed me to create some interesting images.

Full Video to digital collage is on my YouTube Channel: https://www.youtube.com/watch?v=z1e7gRmov6o&t=120s
I started to think more about my project and how I could express “suffocation”. I have the idea to use doll heads to express the human mind which will then be planted with live plants which will symbolise ‘Clear thinking’ due to the pure air that plants produce which also de-suffocates us. Our mind sometimes becomes so full of thoughts and overthinking that we become suffocated.
0 notes
Text
Suffocation Contextual Studies
Contextual Studies:


Georges Rouault – The Bride (Aunt Sallys), 1907. Original title: La Mariée (Têtes à massacre) https://www.tate.org.uk/art/artworks/rouault-the-bride-aunt-sallys-n04799 Oil Paint on paper on canvas. The collection is found at Tate. Details I like:
· Mark Making such as brush strokes
· The mood, expressionism and the relationship that the portraits have with the colour palette.
· The narrative

Raymond Lemstra https://www.raymondlemstra.nl/
He likes to refer to an illustrative nature of primitive drawings and sculptures. He finds distortion, emphasis and unimportant parts reduced or left out interesting. For a character this means they come out big headed, where the focus is on the face and the body is trimmed to its essential properties.
I really like the contrast between shapes, colour and mark making. The use of narrative in his work is also interesting. His work also contains objects such as cigarettes which becomes a relevant object when talking about my project – suffocation. Smoking is another main cause of my personal suffocations as I’m an asthmatic. For asthmatics, smoke is one of the main things that causes us to become asphyxiated which leads us to have an asthma attack or having to use our inhalers.
“In childhood, one encounters and experiences many things for the first time. Through curiosity and imagination, these moments are lifted to almost magical heights. As you get older, new impressions become scarce and it’s a rare experience to be surprised by anything. I try to bring back the sense of wonder we remember from being a child, bridging the young and mature, by creating a contained fantasy world populated by my characters” – Raymond Lemstra.

Jacek Kaczynski https://www.this-is-cool.co.uk/the-dark-surreal-art-of-wuwejo/
Jacek creates beautiful works that maintain a dark atmosphere. The artworks are full of lush details which form a narrative texture which gives you the visual feeling of suffocation. His art form comes across in an abstract way which holds a mysterious personality. His work is packed with symbolism and surrealism which allows you to open up your mind to create your own interpretation. For me, I really like the fact that his work isn’t in full focus and some details aren’t rendered to clear property. This allows you to question how far away the subject is? Is the scenery foggy? I particularly like the use of colour in a monochrome format. This helps to add personality, emotion, and narrative.
While searching the internet with the keywords ‘Suffocation, Asphyxiation and Choke’ I found a great selection of artists that grab my attention in different ways. This allows me to choose details that I like to help develop my idea for my suffocation project.
0 notes