
Basically a blog I made to post random Beyblade related things and maybe sometimes non-Beyblade-related things. These were popular a few years ago ok (RIP th!nkblargh and Ingulit's Cookbook). Generally walls of text about some of the finer details of the hobby as a competitive game if that's what you're into, but I'll try and throw the occasional picture in there to spruce it up. NOTE: Not really focused on the anime like most other blogs, but I might make a few posts about it. Familiar with all generations of Beyblade. Also, check out my YouTube Channel: www.youtube.com/user/NaughtWalter
Don't wanna be here? Send us removal request.
Statistics
We looked inside some of the posts by justwombatthings-blog and here's what we found interesting.
Average Info
Notes Per Post
18
Likes Per Post
16
Reblog Per Post
2
Reply Per Post
0
Time Between Posts
7 days
Number of Posts By Type
Text
13
Video
2
Photo
2
Last Seen Tumblr Blogs


Fun Fact
The Tumblr office adopted Tommy, an 11-year-old Pomeranian.
Text
The Road to El Dorago: Episode 9 - Circle Upper

Virgo was actually one of the Metal System Wheels I was looking forward to testing the most - I had always been interested in it, but the straw that finally broke the camel’s back and convinced me to buy it was JesseObre’s use of it to win a tournament. Back in the day, Virgo was the most popular option for Stamina until Earth took its place, though it was beatable with Libra if the Libra user launched hard enough. I only tested it for Stamina so far, but in the future I might go back and try it for Attack since it’s basically the HMS AR Circle Upper.
Now, way before perfect balance became a widespread phenomenon for how badly it ruins the Burst Stamina metagame it was an issue with Virgo - Some people would report Virgos that spun for 5 minutes, while others had bad ones that only spun for about 1 or 2. While people back then claimed this was due to a mold difference, no physical differences between the Virgos were ever observed, though I’m not sure if the existence of multiple molds was ever officially confirmed or debunked. So before I had to get into actual combos, I had to do some solo spin tests of my Virgo (on DF145B, since that was the Stamina setup of choice back then) to get a sense of where it stood balance wise.
3:08.74
3:21.46
3:11.94
3:10.24
3:15.21
Seems to be right above the 3 minute mark, so about average. Kind of a bummer, but I’m not enough of a whale to buy a bunch of Virgos until I get a 5 minute one - I don’t even do that for Burst, unless one of my parts is imbalanced to the point of being unusable. Oh well, time to try it on some Stamina combos.
MF-L Virgo AD145WD vs. MF-L Earth Sagittario AD145WD
At first, Virgo was tying Earth pretty consistently and occasionally beating it, until I swapped the AD145WDs... then it lost every time. It’s probably slightly worse than Earth in this setup considering that it needed the better parts to keep up. After that, I decided to test out one of the combos Jesse used.

MF-L Virgo 230MB vs. MF-L Earth Sagittatio AD145WD/230MB
As expected, Virgo 230MB dominated Earth AD145WD (MTSC is kind of at a bad unusable point since it loses to both LTSC and HTSC). Once I changed Earth to 230MB as well, it was more or less the same story as the AD145WD mirror match - whoever got the better 230MB tended to win. I tried Virgo 230MB against the Gravity Attack 90RB that Kei used during the tournament and it resisted it pretty well, aside from one “push KO”. Tried it against super-tall Flame setups and thanks to the slopes it was able to destabilize them all pretty easily. I can totally see how Jesse won with this.
Didn’t try the F230CF or 125BWD setups he used though, my Orange Takara Tomy F230 that I essentially spent over $100 to get actually ended up sucking (it comes unscrewed through normal use and doesn’t outspin the things it’s supposed to), and I think I have a better version of what I think he was going for with the 125BWD setup. For now, I wanted to try a Staller/Upper Attacker I had been interested in ever since I heard that Metal System Virgo was better than Night Kronos.

MF-L Virgo 90MF vs. MF-L Earth Sagittario II AD145WD
At first, I was having a hard time getting Virgo to outspin Earth, but after I changed to a better launcher (Stallers benefit from a stronger launch much more than stationary Stamina does) Virgo was winning just fine. When I tried other LTSC/MTSC it also won pretty handily, and it beat MTDC/LTDC just fine as well. The late-game destabilization really gives it the edge vs. 145 height stuff.
MF-L Virgo 90MF vs. tall stuff
So for all the tall combos, I tried MF-H Scythe Pegasis II TH220CS, Flame Cancer 230CS/MB/EDS, MF-L Scythe Pegasis 230MB, and MF-L Gravity Stamina F230GCF... it lost to all of them except Gravity. Maybe it’s just because of my F230 sucking, but whenever it would try to spin steal at the end of the match, Virgo would just use its slope to turn it so it was facing the wrong direction, and there were a few times where it straight up flipped it over. For the most part, short Stallers are able to beat Gravity F230, so this wasn’t a huge shock.
MF-H Virgo 90TB vs. Earth/Scythe AD145WD
Decided to try one last Virgo setup as a Destabilizer (I mean, with slopes like that, who wouldn’t think to try that), but it was as inconsistent as I usually find destabilizers in MFB - it was only able to OS Earth AD145WD about half the time. Scythe would probably beat it more consistently, if it and Virgo would stop KOing each other.
So overall, the best Virgo combos that I can recommend are MF-L Virgo 230MB and MF-L Virgo 90MF. Virgo isn’t a game-changing part like something like Libra was, but it’s still powerful enough to contend with most of the popular Stamina/Defense combos in the Limited meta. I missed out on a few chances to use it unfortunately (I chose Flame 230MB over it when Virgo would have gotten the job done just as well), but I’ll make sure to give it a shot in my next Limited event.
3 notes
·
View notes
Text
The Red Compact
Haven’t posted anything Plastics in a while so here’s just some anti-meta type of thing I made:
AR: Tiger Defenser
WD: 10 Heavy
SG: Neo Left SG (Heavy Metal Core)
SP: Defense Ring
BB: Customize Metal Change Base
While this combo isn’t really a brilliant new concept - compacts, or combos that use centered weight distribution for maximum RPM have been around for almost as long as I’ve been alive (lol) - it changes one important thing about the combo that seems like it was previously overlooked: the Spin Direction.
Most compacts spin Right, only due to the fact that most Beyblades are designed to be Right Spin. With Right Spin being the norm, it opened the door for Zombie combos (Defense/Stamina hybrids that overcentralize the Plastics meta) to dominate. Zombies generally only have 3 counters: Same Spin Stamina, which outspins their rubber-based tip, Circle Survivor (which doesn’t work against some of the higher end Zombies like Twin Saucer from what I hear), and Attack (only if the Attack user is really good).
This combo makes use of Left Spin to outspin Zombies, since Customize Metal Change Base has more Stamina than Defense Grip Base 2. Against Right Spin Attack types, you can either Weak Launch and that plus this combo’s weight will usually save you from a KO, or you can Tornado Stall for some semblance of Mobile Defense (which is kind of a sketchy strategy in and of itself tbh). Left Spin Attack is kinda rare, but you can either strong launch in a stationary position or try Stalling. If your opponent pulls some Stamina combo on you you can Sliding Shoot and make use of the small amount of Attack Tiger Defenser has in Left Spin to KO them. You’re screwed vs Circle Survivor though.
I tried this combo out at a tournament and found that Metal Change doesn’t catch the Tornado Ridge half as well as everyone says it does... maybe because the thing wears faster than Valkyrie’s teeth do. I’ve hardly used it since I got it half a year ago and the point is the center is already worn down to the point where it’s more like a semi-flat rather than a Metal Change.
4 notes
·
View notes
Text
MFB BeyBattle Revolution: Friday Night TK15
A month and a half after the qualifier, I was up in Toronto for the first tournament of the 2015 championship. This was the solo event, and it took place on the Friday night before the championship. At AN, the Friday night tournaments always have the reputation for being the most lit out of the three tournaments just due to the high concentration of top-tier players (just look at the participant list from 2013), and this one lived up to the reputation for sure. There was a pretty diverse crowd of high-level players - take a look at this Block list:
A BLOCK
Mitsu (Toronto, #31)
UltimateOrion (New York, #21ish)
Primus (North Carolina, #1000+)
1234beyblade (Toronto, #30)
The Sponge (Toronto, #45ish)
~Thunder~ (New York, #90ish)
B BLOCK
Kei (Toronto, #3)
LMAO (Toronto, #17)
geetster99 (Maryland, #4)
Cye Kinomiya (New York, #61)
Suntailhawk (Toronto, #120ish)
Leone 7 (New York, #87ish)
C BLOCK
Dark_Mousy (North Carolina, #14)
Stormscorpio1 (North Carolina, #16)
OnTheDL (Maryland, #130ish)
JesseObre (Toronto, #8ish)
Beyblader2323 (new player)
Wombat (North Carolina, #96)
Some of the rankings are a little off because Wayback machine isn’t cooperating with me, but I made some pretty close approximations. As you can see most of the players were in the top 100 (including myself at this point). Kei, the host, was taking the top 2 people from each Block for the the finals.
Wombat (MF Omega Horuseus 100RF) vs. JesseObre (Dark Knight Dragooon (Crystal Up) 100EWD)
So right off the bat, I got matched up against the highest ranked player in my Block, and my first Canadian. I had no clue what he was going to use, so I went with my safe option - Omega. Luckily I got a good matchup against him (not sure what he was going for with this combo, seems like an OK Spin Stealer but Meteo would probably be better?) and won 3-0. However, my L/R Launcher broke during this battle, and while OnTheDL let me borrow hers for the rest of this match, for the rest of the tournament I was stuck using my single-spin launchers, meaning I was stuck with my skipping Left Spin one.

Wombat (MF-H Lightning L-Drago CH120LRF) vs. Dark_Mousy (MF-F Burn Cancer 90MF)
Decided to go with a coverage pick against Dark - Lightning could beat the Meteo combo he had used against me the last time we battled, as well as the Burn Staller and tall Libra he was fond of using. He ended up using the Staller, and while he was able to outrun me once I still managed a 3-1 win.

Wombat (Jade Capricorne AD145WD) vs. Stormscorpio1 (MF-H Lightning L-Drago D125RB)
LLD CH120/D125RB was a popular combo that was going around quite a bit throughout the tournament - I think Jesse was the one who started using it, and other people started catching on, and if I remember correctly, this tournament happened slightly before Cake popularized RSF/RB Attack. Either way, I’m not sure what happened, whether Jesse’s RB just sucked, or SS1 had a bad launch, or Jade’s weight was just too much for Lightning to handle, but I somehow took this 3-0 and while also forgetting to Weak Launch.
Wombat (MF Omega Horuseus 100RF) vs OnTheDL (Earth Aquario 230D)
OnTheDL had been using this combo and an Earth Hades W145WD for the whole tournament so far, so I felt Omega was a pretty safe option here. Won 3-0.
Wombat (MF-L Earth Cancer B:D) vs. Beyblader2323 (Burn Wolf ED145WD)
Beyblader2323 had only shown up to the tournament with Burn Wolf SW145WD and Poison Virgo ED145ES, so before the event began I helped him with combos (though I was only arguably able to improve his Burn Wolf). Surprisingly he KOed me in one round, but my 7 minute B:D carried me to a 3-1 win.
At this point, I was 5-0, which made me BLOCK STRONG at my first ever Toronto event. Jesse also advanced, with a record of 4-1. In the A Block 1234beyblade (5-0) advanced and surprisingly so did The Sponge (4-1) after some upset wins against Mitsu and UltimateOrion. In the B Block geetster advanced with a 4-1 record with his only loss being to Suntailhawk, who lost to LMAO in the 3-2 tiebreak match for the second spot. After surprising losses to Leone 7 and Suntailhawk-o, Kei did not advance to the finals.
This made the Top 6:
1234beyblade (5-0, #30)
Wombat (5-0, #96)
geetster99 (4-1, #4)
JesseObre (4-1, #8ish)
The Sponge (4-1, #45ish)
LMAO (4-2, #17)
Wombat (MF-L Burn Cancer 90MF) vs. 1234beyblade (MF Libra TH170D)
Wasn’t quite sure what he would use, so I decided to go with the Burn Staller and change things up a bit... I should have won this match, but my Metal Flat self-KOed a few times after it had already settled (maybe it was a Sonokong Stadium, or maybe my MF was already coming loose and I just wasn’t aware), which caused me to weaken my launch so I stayed in the Stadium, and I was having trouble actually stalling properly - I was Sliding Shooting MF by accident. He missed the stadium once, but I still walked away with a 1-3 loss that left a bad taste in my mouth.
Wombat (MSF-H Dark Knight Zirago (Crystal Up) 85RF) vs. geetster99 (MF-F Burn Cancer 90MF)
I had a feeling he would be spamming Burn 90MF so I used Attack against him. With my higher-friction tip I aimed my launch so that I stalled into him head first and KOed him. Won 3-0.
Wombat (MF-H Bakushin Leone 90RSF) vs The Sponge (Libra 230RS)
The Sponge was LMAO’s younger brother (and the origin of the fan-made term Sponge Syndrome, btw), and LMAO had been using this combo (which he nicknamed the “Brick Wall”) a lot throughout the tournament, so I don’t know why I didn’t think The Sponge would use it as well. Switched to my Bakushin combo (which I had nicknamed “The Ousseiter”) and managed one freak KO while trying to stall him out, but ultimately ended up losing 1-3.
Wombat (MF Omega Horuseus 100RF) vs JesseObre (MF-H Lightning L-Drago D125RB)
Attack vs Attack is always pretty intense and most of the time anyone’s game, but I think Jesse’s RB was just too new to give him any real friction with the ground, which really hurt both his offensive and defensive abilities. Omega was just better at throwing around its weight and won the match 3-1.
Wombat (MF-H Lightning L-Drago CH120LRF) vs LMAO (Libra 230RS)
I knew he was going to use Libra 230RS, but I didn’t want to use Stamina against it - LTSC and MTSC would get outspun due to being too short, while HTSC stood a chance of being KOed by Libra’s aggression, and after my poor performance with Metal Flat earlier I didn’t feel comfortable using a Staller again. So I went with Lightning - it’s got more Upper Attack than Omega and Libra’s got a particularly recoily underside. You can watch the full fight here on UltimateOrion’s YouTube channel, but I ended up losing with a very close 2-3.
After a less-than-stellar performance (2-3) in the finals, I ended up with a 7-3 record overall and 5th place. 1234beyblade (9-1) won the whole event - his only loss in the whole event was to Jesse in the finals, while LMAO (8-3) took 2nd with losses to geetster and Kei in the Blocks and a loss to 1234 in the finals. Jesse was 3rd overall, with his only losses being to me (twice) and LMAO. Despite building up a pretty big win streak beforehand (I don’t have access to match history atm but I think coming into the weekend he had 20+ wins in a row?), geetster got totally wrecked in the finals: 0-5, with most of his losses there being 0-3. Pretty shocking after seeing him dominate the whole championship weekend last year and going 12-0 in the qualifier.
The combo to watch out for today was definitely the Brick Wall - it shut down almost everything in its way and did a pretty great job of keeping those damn Americans out of the top 3. Lightning RB saw pretty widespread use, Jesse, Kei, SS1, and I think Mitsu all used it but it wasn’t much of a game changer from what I could see.
Even though I lost a few times in the finals and didn’t place, considering the strength of the competition I still thought I had a decent chance in the main event the next day. The Canadians were good, but not as unbeatable as their 200-point inflated ranks and reputation made them seem.
1 note
·
View note
Video
youtube
Check out this new video that just went live on my YouTube channel: it’s about the Deck system the WBO uses to run the final stages of its Beyblade tournaments.
0 notes
Text
The Road to El Dorago: Episode 8 - Beyblade hates Capricorne
It seems like throughout history Beyblade has hated Capricorn-based Beyblades. Storm Capricorn is famous for its notoriously useless M145Q, and Capricorne Strike G from the Plastics era had its incredibly rare, top-tier Attack tip removed in exchange for an Engine Gear. While its TT counterpart, Uriel 2, kept the tip, it was a ridiculously fragile Beyblade known to break even while still in the box. Both Uriel 2 and Capricorne Strike G had the same top-tier Attack AR, however Uriel 2′s hits significantly harder (at least for the two battles you can use it before it shatters). Screw Capricorne had some good parts, but it was super weak in the anime. So let’s hope that the Metal System Capricorne also doesn’t suck in some way.

So far, it’s not looking good. With a relatively smooth and unaggressive shape, but also weighing in at a pretty light 31 grams, it seems like a lost cause for both Attack and Defense. It looks like the only thing it could be good at is Stamina.
Nope, it’s useless there too. Even with a MF-L and being launched second every time, Earth beats it in a mirror match on all heights (90WD, 145WD, 230D) with plenty of spin left. Capricorne’s weight distribution is pretty bad for Stamina too: with all of the weight in its “hooves” and “snout”, it made the Wheel noticeably unbalanced during the mid-to-late battle. I decided to try it on a Staller next.
To my surprise, MF-L Capricorne 90MF outspun stock Earth Eagle a few times. Nowhere near consistently, but it still got more outspins vs Eagle than Aquario did. When I Sliding Shot it, it got a few KOs, but some of them were pretty clean. Maybe it’s not such a lost cause for Attack after all?
Nope. Strangely enough, MF-H Capricorne 90RF struggled to KO stock Earth Eagle, somehow doing even worse than MF did. After being sidetracked, I went back to the Staller, since that was the most promising thing so far, and went to see what else it could OS.
OK so MF-L Capricorne 90MF OSes mid-height stuff (145+short tip/tall tip) semi-consistently (like 35-40% of the time), but loses hard vs anything short or tall. Even MF-H Jade Pisces 85RSF outspun it by a pretty embarrassing margin, considering it’s a Defense type.
As a last resort, I decided to try it as a Destabilizer, which is basically a semi-aggressive short combo that relies on super-weak Upper Attack to knock opponents off balance and outspin them. Personally, I’ve always found this type of combo to be really inconsistent even against the 145-height Stamina combos they’re designed to beat, but it was worth a shot. I tried a few different setups (90SF, 85/105TB, 90JSB) and they all ended up being as inconsistent as I remember.
Just to make sure I wasn’t missing anything, I tried MF-H Capricorne 90RSF as a Defense Type... it was pitiful haha. I could get Tornado Horuseus 105RF (random bad Attacker I made with parts just lying around) to KO it almost every time. I could only see it having success on like 230CS against a LTAC that can’t reach that high, and then again that’s 230 doing all the work.
----------------------------------------------------------------------------------------------------
So if you couldn’t tell by the lack of pictures, my results with Capricorne were pretty inconclusive. It pretty much sucks at everything; the only combos I tried that weren’t totally awful were MF-L Capricorne 90MF and Capricorne 85TB, neither of which I would consider using in a tournament even as a troll combo. I mean, so far most of the Metal System Wheels have found some way to make themselves useful, so there had to be one that wasn’t, right?
1 note
·
View note
Photo
AXE ME A QUESTION
So I just remembered that tumblr had an ask feature, and decided to enable the ask page. Feel free to ask me anything, Beyblade related or not! Obviously, I won’t be answering anything too NSFW - this is a Beyblade blog after all, lol
2 notes
·
View notes
Text
Drain Fafnir Ate Gyro
So recently, some guy on my YouTube channel (who I’m now like 80% sure is actually Rebel Blader) has been asking me questions on my Beyblade Burst Review videos (if you haven’t checked them out yet, they’re basically informal, opinionated video Beywiki articles) - with one of the most interesting being about the Gyro Driver.
Now this particular Greek Taco has never seen a lot of use - it was released right when Defense (the Driver) was popular for Stamina combos thanks to Odin Heavy Defense, and was promptly outclassed by the release of Revolve shortly after. However, due to its free-spinning nature the YouTuber wondered if it had any use for opposite spin. I thought that Revolve’s wider surface area would still be better for precession (in MFB, D and SD are outclassed by WD in opposite spin for that same reason, which reminds me I need to test tall WD vs opposite spin someday since FIREFIRE says it works), but I was also curious to see if Gyro’s free spinning tip would give it an edge over Revolve’s ring.
Coincidentally, when I was handspinning my Blaze Ragnaruk (he’s got stamina) stock, I noticed how well Flugel and 4C transitioned from precession to LAD, so naturally I put 2 and 2 together and decided to try Drain Fafnir 2C Gyro first (from what I hear from Toronto, 2 works better with Cross than 4).
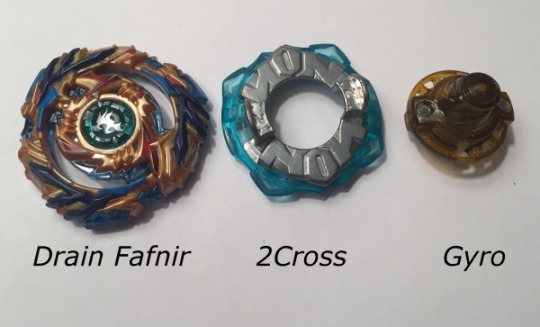
The first thing I put it up against was Blaze Ragnaruk Spread Revolve, which should present some problems to left-spin Stamina without shutting it out completely (I would have used bRYAt for that), especially since I didn’t bother taking the time to balance check bR. dF2CG came close to beating it, bur bRSR would always win by a rotation or 2 at the end of the battle. I tried 4Glaive next since it’s probably the best/second best LAD Disk for left spin (I still think Polish is better), and it fared about the same if not marginally better - most of the time it would lose to bRSR, but there were a few ties as well and a few questionable wins.
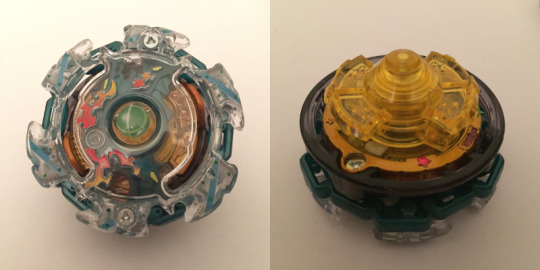
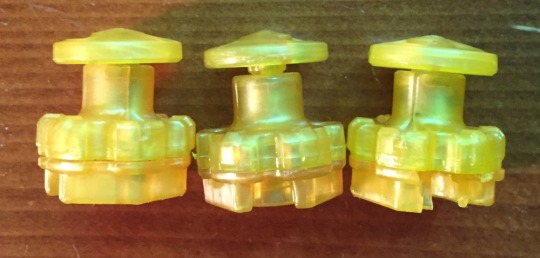
I did notice that both 2C and 4G were not providing as much LAD as I was expecting with Gyro, while they were performing better with Flugel - which led me to check the width of the tips because that would affect how well the combo would transition from Precession to LAD (see this WBO post for explanation). Sure enough, I discovered that contrary to what I had thought before, Gyro actually has a wider tip than Flugel/Survive/Claw.

(I didn’t take measurements in actual irl units of distance but you can clearly see from the picture that Gyro is a bit wider. also this picture took a long time to orchestrate)
Well this kind of threw a wrench in my plan since the whole concept of this post was to combine Gyro’s free spin with the synergy of _C + Flugel-sized tip. Despite this setback, I decided to test dF Gyro on all the rest of the LAD Disks to see if it somehow had the same synergy.
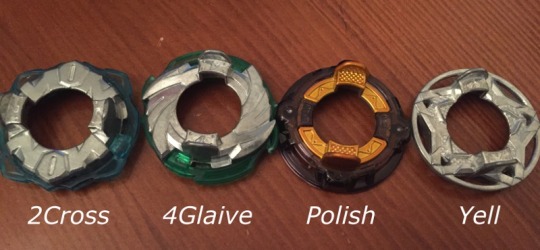
2C and 4G: Already went over these, Gyro’s weird width means that it doesn’t work quite as well as Survive or Flugel would (I’d imagine Claw’s claws get in the way but I didn’t test it). If anything 4G was better than 2C.
Polish: Since Polish Yielding has a nice Precession/LAD transition Polish was the next Disk I thought to try... it was awful. Yielding is a little wider than Gyro and has a steeper angle that allows it to work with Polish, whereas Gyro will just kind of fall on it early in the battle and spin out. bRSR beat it pretty bad.
Yell: about the same as 2C. Revolve works much better with Yell than Gyro does.
Didn’t bother with Spread/Ring/Infinity since dF is so wide that it will touch the ground before they do and nullify any LAD they have.
Side note: dFYR > dFSR because Yell is wide enough for dF, performs better vs opposite spin which is most matchups for dF, resists destabilization more which helps vs dF Atomic, and is also heavier so if someone tries to pull a cheeky L2/Legend Spriggan combo on you you’ll be a little harder to KO.
8: Mostly just tried this for the memes, but I did learn that 8 is probably the best for LAD out of all the naked Core Disks (though I don’t have 5 or 7 yet). It performed somewhere in between Polish and Yell/2C.
Conclusion:
dF 2C/4G/Y G is an ok left spin Stamina combo, but due to Gyro’s weird in-between diameter it can’t outperform Atomic or Yielding on any LAD setups. The reason I say it’s still ok is that it can probably beat a good amount of right spin things (like _HD or maybe _HR) - just nothing that’s designed to OS left-spin combos (which is most competitive right spin Stamina nowadays).
0 notes
Photo

Nerdy tool for analyzing bleyblades
So this past year in school I learned about the Diversity Index - it’s a type of chart that students use to measure the diversity of sample ecosystems in environmental science (I doubt it’s very useful outside of like textbook problems) by comparing how many times each organism appears relative to how often every other organism appears and the number of total organisms.
So naturally, being the beyblade nerd I am I thought this would be a good tool to measure the “diversity” of the Beyblade meta, since everyone seems to complain about how much Deathscyther/D2/Drain Fafnir/insert Stamina Layer here is being used.
Basically what I did was create 3 charts (one for each type of part) for each regional community (or all communities over X period of time). Each “species” was a different part, and the “number” was the amount of times that part appeared on the Winning Combos list. Then you add up the total of all the numbers, and then divide each part’s number to get its Pi. Square all the Pis, and then add up all the squares. Subtract that number from 1 to get the diversity index for that region/time period, with a closer number to 1 meaning more diversity (I don’t remember how high is considered ‘diverse enough’ but I have a feeling it’s probably a lot higher than I expected).
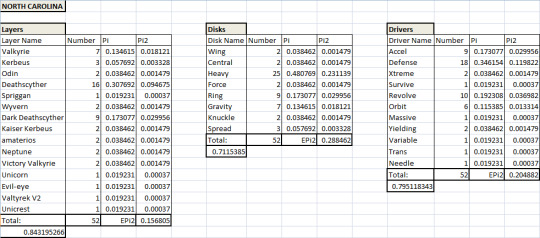
Using North Carolina as an example again, you can see that their Layers are the most diverse, followed by their Drivers and then Disks.
Now that I’ve actually used it a few times, I’m not sure how accurate the Diversity Index really is... it seems to put a little too much weight on the amount of “species” and not enough on the number - As you can see, Heavy was used almost more than every other Disk combined, yet NC still had a passable(?) Disk diversity. This is what makes me think the ‘diverse enough’ value needs to be like .9 or something (or maybe I’m just using the chart wrong).
Another error with this is that the Winning Combos list doesn’t take into account how many times a certain part or combo was used during a tournament, only that it was used at some point by a player who came in 1st, 2nd, or 3rd place. For example, there was one tournament where Thunder Dome spammed Deathscyther Ring Accel, went undefeated and got first place - in a 7 person tournament, that’s 8 matches played with DRA, yet it only gets counted once. Likewise, if ZachBob used Deathscyther Heavy Defense for all six of his round robin matches and then used Valkyrie Force Xtreme once in the finals, the two combos would be given the same weight in the chart, despite DHD being used much more heavily.
0 notes
Text
Team BeyBattle Revolution: North Carolina Qualifier
Every year since 2008, The WBO has held a North American championship in Toronto, Ontario towards the end of May. From the years 2013 to 2015, they were actually able to afford to host qualifier tournaments - with the winners having their travel expenses for the championship paid for by the WBO. However, due to Beyblade’s loss in popularity since MFB ended, there have been no qualifiers since then, and I wouldn’t expect there to be anymore until at least 2019 if Burst really kicks off in the U.S. Anyway, since NC was one of the most prominent NA communities at that time, they hosted one of the qualifiers in 2015. I attended with the hopes of maybe being able to go to Toronto, but little did I know this was going to be my last NC tournament.
There were 17 people at the tournament, making for 3 Blocks, 2 with 6 people and one with 5. I was with Angry Face, TheBlackDragon, and three kids that showed up only for this tournament: Jedi Blader, Orange Blader, and SamTheGeek.
Wombat (MF-H Bakushin Leone 90RSF) vs. TheBlackDragon (MF-H Earth Cancer 85CS)
The 3rd time this matchup came back to plague me. I had a really strong gut feeling he was going to use Omega and went with my best Defense type in order to stop it, but ended up having to go on the offensive instead. I think I managed one KO, but ended up losing overall.
At the beginning of the tournament, Dark had announced that only the top player from each Block would be advancing to the finals, and since it’s incredibly difficult to be the top player in a Block without having a perfect record, TBD had essentially crushed my dreams of going to Toronto with just the first match I played. rip me i guess

Wombat (MF Omega Horuseus 100RF) vs. Jedi Blader (Cosmic Leone W105R2F)
Between the three new kids, Jedi Blader seemed to be the best - he had a few Limited combos that could actually pose a threat, I’m pretty sure I saw him use Earth 230CS and Lightning CH120RF during the event as well. I decided to go with Attack since Omega was a safe option and ended up beating him 3-0, which is pretty rare for Attack vs Attack.
Wombat (MF Omega Horuseus 100RF) vs. Orange Blader (Screw Fox 85XF)
This was a pretty easy 3-0 win for me too - some time in between 2014 and 2015 I had learned how to “ridge watch” and was able to stall straight into his combo head on. XF has pretty high recoil so it was easy to KO him, but I think he might have lived the first attack and then scraped to death afterward one time.
Wombat (MF Omega Horuseus 100RF) vs. SamTheGeek (Scythe Crown SW145SD)
Stationary 145-height Stamina is at a pretty bad place in Limited - it’s easy enough to get under it with an Upper-based LTAC (which Limited has a ton of), and loses to both LTSC and HTSC (and sometimes tall Defense too) making it not a very safe option. I messed up my launch once, but still managed to win 3-1.
After going 3-1 in the Block, Dark announced that he had made a mistake earlier - he was actually taking the top two people from each Block into the finals. That meant that while TBD would advance uncontested, it was a battle between myself and Angry Face (who was also 3-1) to see who would get the second spot.
Wombat (MF-H Bakushin Leone 90RSF) vs. Angry Face (MF-H Scythe Escolpio 85RF)
The only combos I had seen him use were Screw H145 and Libra B:D, both of which I was confident I could defeat with my Bakushin LTDC. Unfortunately, he pulled out something completely unexpected - a preliminary version of his signature combo, Metal Face, using 85RF rather than W105MF (which in hindsight, made perfect sense from his point of view considering how much Omega I had been using earlier). This ended up being a really close battle - I know he KOed me once while I was close to an exit, but I ended up taking it 3-2 by a close OS in the last round. I’m actually really itching to play this matchup against him again some day now that our signature combos have been upgraded to full-on trash-mode.
After beating Angry, I had earned my spot in the finals and kept my chance of going to Toronto, along with TBD from my Block, Stormscorpio1 and Titan Tite from the A Block, and Dark_Mousy and geetster99 from the C Block.
Wombat (MF Omega Horuseus 100RF) vs. Titan Tite (MF Dou Cancer 230MB)
In the past few matches I had played with Tite, he had used B:D combos against me, and since he isn’t the best Attack user I had a strong feeling he would use Stamina. I was correct, and picked the appropriate combo, but must have just launched badly or something (maybe Omega needs to be on CH120 or something to really hit 230 effectively, but the other Omega 100 vs 230 matches I’ve played say otherwise) since I lost 1-3. Kind of a bummer.
Wombat (MF-H Libra 100RF) vs. geetster99 (MF-H Duo Cancer 230MB)
The last matches I played against geetster had him using Samurai Wyvang Attack, and I knew he had pretty much swept the 2014 championship using MF-H Lightning L-Drago CH120RF, so I had a pretty good feeling he was going to go with some Attacker. So I went with an Anti-Attacker. Originally I was going to use 85 to make absolutely sure he wouldn’t get underneath me with LLD, but decided to go with 100 instead on the off chance he decided to go with something a little taller. Going to 100 ended up being the right move, he beat me by pulling a totally unexpected Duo 230MB, but at least I somehow managed 2 KOs.
Wombat (MF Omega Horuseus 100RF) vs. Dark_Mousy (MF Meteo L-Drago TR145EWD)
I was already 0-2 in the finals so I knew I needed to win these next 3 matches if I wanted a shot at winning the whole tournament. Given Dark’s preference for Dragooon F230GCF in Standard format, I guessed he would use Meteo F230GCF against me and used Omega accordingly. I was close enough to correct that I was able to win the battle 3-0, even though Dark Weak Launched all three times.
Wombat (MF-H Quetzalcoatl 90R2F) vs. TheBlackDragon (Scythe Cancer B:D)
Prior to this event, I had bought and tested Quetzalcoatl in secret, and had found it to be a top-tier attacker on the level of Screw. I hadn’t used it at all during any of the tournaments so I figured now was a better time than any to use it. I got one of the best possible matchups for it, mid-height Stamina... and then choked and lost 0-3 somehow. My R2F wasn’t moving very aggressively during this battle despite it performing fine beforehand. Out of all the matches I’m salty about, this is probably in the top 5: now that I had finally gotten him in a good matchup, it was my chance to beat him, but I failed. He quit Beyblade later that year with a 9-0 record against me :(

Wombat (MF-H Bakushin Leone 90RSF) vs. Stormscorpio1 (MF-F Burn Cancer 90MF)
I didn’t know what to use against SS1 in Limited at this point, so I just defaulted back to Bakushin... unfortunately, he picked a combo that I couldn’t match up well against yet, and though I managed to ramp him out a few times I ended up losing 2-3.
Since the qualifiers were such a big deal at the time, the match between the top 2 players had to be played out a certain way: Rather than just playing one match to determine the winner, they had to play the same matchup three times in a row - geetster used Duo 230MB and Dark used Burn 85MF, resulting in a 3-0 shutout by Duo. Similarly, the big players today in terms of combos were definitely Burn 85/90MF and Duo 230MB, geetster cleaned house and went 12-0 using only those 2 combos, while Dark took second using mainly Burn 85MF and Titan Tite was third using mainly Duo 230MB. What sucks is that both of those normally get destroyed by Attackers, especially Omega, and I literally used Omega for half of my battles.
At this point in time, this was one of my worst Limited performances ever - although I went 4-1 in the Block, I went 1-4 in the finals due to a series of bad picks and bad launches. Geetster won the trip to Toronto and got to compete as a part of Team GT (the now-defunct NC Beyblading team), and while Dark was eventually able to convince my parents to let me go to Canada as well I was bummed to not make the team.
1 note
·
View note
Text
Alice combos (part 1?)
So recently there’s been a relatively new Beyblader near me called Alice, who’s been super into the competitive gaming aspect of Beyblade and has done a bunch of testing on all her parts. While some of the terminology and testing procedures she uses are a little overboard (spinning 2 tops in a plastic bowl a bunch of times probably doesn’t warrant a whole scholarly journal-type essay) she has discovered quite a few interesting combos along the way - here are a few that have caught my attention so far:
(Kaiser Kerbeus) Polish Cycle
One of the most interesting setups IMO is Polish Cycle, which she originally put on Kaiser Kerbeus as a supposed counter to L2 and dF. Though generally Layers with higher Stamina like Odin, Neptune, Alter Chronos, and more recently, M A X I M U M G A R U D A make much better candidates for opposite spin Stamina matches, both Alice’s Kaiser Kerbeus and Kerbeus K2 seem to have exceptional balance and apparently counter L2 and dF fairly well for her. As my Kaiser Kerbeus’ balance isn’t spectacular and my Cycle’s balance is actually pretty horrible (it’s super shaky no matter what I use it on, maybe the big fan thing on the bottom throws off the balance when it spins, in which case it’s going to be a pain to find the right starting position for it) I wasn’t exactly able to replicate the results:
Kaiser Kerbeus Polish Cycle vs. Drain Fafnir Yell Revolve
K2PCy: 3 wins (all OS)
dFYR: 7 wins (all OS)
K2PCy win rate: 30%
Kaiser Kerbeus Polish Cycle vs. Lost Longinus 2Glaive Hold
K2PCy: 2 wins (all OS)
L22GH: 8 wins (all OS)
K2PCy win rate: 20%
I only did 10 rounds because testing opposite spin stamina is honestly the worst since there’s so many damn ties. Somehow Longinus beat it more often than dF, but that probably doesn’t mean much since it’s only one round.
While I have a feeling that changing the Layer to Neptune/Blaze Ragnaruk/Odin would increase the combo’s win rate against left spin, I decided not to go down that route since Polish has bad Stamina in same spin, and most Beyblades are right spin.
Tried it on Drain Fafnir instead, and got some slightly better results:
Drain Fafnir Polish Cycle vs. Blaze Ragnaruk Yell Atomic
dFPCy: 4 wins (all OS)
bRYAt: 6 wins (all OS)
dFPCy win rate: 40%
Drain Fafnir Polish Cycle vs. Neptune Spread Revolve
dFPCy: 4 wins (all OS)
NSR: 6 wins (all OS)
dFPCy win rate: 40%
I had actually tested this combo a bit before my most recent tournament on the 16th, but didn’t really get a chance to use it (I had it in my Deck for the finals, but my opponent kept rematching the same losing matchup between his dFGR and my bRYAt which kept me from switching). Though it’s not terribly consistent against right spin Precession/LAD setups, it works pretty well against anything not on Spread/Yell/_G/Ring/Infinity Revolve/Hold/Atomic. Probably would be a lot better if my Cycle didn’t suck.
Driger Yell Atomic
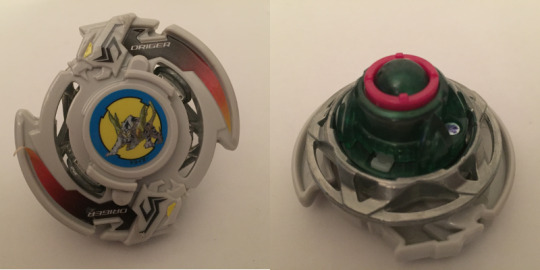
The Layer choice is what’s surprising about this combo - the Disk and Driver are probably tied for the best right spin setup that combines LAD with raw Stamina (and Destabilization), so nothing very surprising there. Back in the Plastics era, Tiger Defenser (the AR the Driger Layer is based on) was top tier for Stamina and performed very well in opposite spin, so it was pretty cool to also see it also do well vs opposite spin in Burst.
Driger Yell Atomic vs. Lost Longinus 2Glaive Hold
DiYAt: 9 wins (all OS)
L22GH: 11 wins (all OS)
DiYAt win rate: 45%
Went to 20 rounds since it was 5-5 after the first 10. Driger did surprisingly well here, but what I found most bizarre about this matchup was that either combo would always outspin the other by a relatively large margin (usually about 10+ rotations, which is relatively high for a spin-equalizing match) despite them being so even winrate wise.
Blaze Ragnaruk Yell Atomic vs. Lost Longinus 2Glaive Hold
bRYAt: 7 wins (all OS)
L22GH: 3 wins (2 OS, 1 KO)
bRYAt win rate: 70%
Unfortunately, it looks like bR can do it better. My Driger’s balance is pretty bad IIRC, so that might have been a factor in why it didn’t perform as well, though it should also be noted that my Hold is pretty great in terms of free spin.
Driger Yell Atomic vs. Neptune Spread Revolve
DiYAt: 4 wins (all OS)
NSR: 6 wins (5 OS, 1 Burst)
DiYAt win rate: 40%
Blaze Ragnaruk Yell Atomic vs. Neptune Spread Revolve
bRYAt: 4 wins (all OS)
NSR: 6 wins (all OS)
bRYAt win rate: 40%
Tried to compare them in terms of destabilization to see if Driger performed better there, but didn’t get very conclusive results. This matchup is highly dependent on whether you can nail the Sliding Shoot with Atomic and knock Revolve off balance early in the match by getting under it. Driger probably performed a little worse than bR due to its self-burst - its attacks had a little more knockback than bR’s (and I’m assuming a little more rotational recoil as well), so maybe it could double as a Burst Attacker, though bR also packs some decent Burst Attack despite its round shape.
I don’t think it’s better than bR, but I might still use it in a tournament one day just to prove that I’m different.
Kerbeus K2 Heavy Press
This technically is a Hasbro combo, but since I don’t have the Hasbro K2 I had to use the TT version instead. Back when Alice only had Hasbro parts and hadn’t started ordering online yet this was the best combo she came up with, and according to her it still holds up really well against TT combos, and was even beating things that should actually be impossible for it to beat (L2 Hold and dFPAt) so I had to test it for myself.
Kaiser Kerbeus Heavy Press vs. Lost Longinus 2Glaive Hold
K2HP: 1 win (OS)
L22GH: 9 wins (OS)
K2HP win rate: 10%
Kaiser Kerbeus Heavy Press vs. Drain Fafnir 4Glaive Atomic
K2HP: 0 wins
dF4GAt: 10 wins (all OS)
K2HP win rate: 0%
Kaiser Kerbeus Heavy Press vs. Drain Fafnir Yell Revolve
K2HP: 0 wins
dFYR: 10 wins (all OS)
K2HP win rate: 0%
As I thought, Press doesn’t have the LAD to compete with these setups, though it did manage one (questionable at best) win against L2. This combo must either really need to have near-perfect balance or be the Hasbro version (I’ve heard quite a few good things about the Hasbro Press, but no one’s ever tested it since the TT one is so bad) to beat any Spin Stealing setup, because I couldn’t get it to work at all.
1 note
·
View note
Text
Up to no good again (Launcher mods)
So for quite a while I’ve wanted to make a custom “Wombat” String Launcher... the problem is that the only really viable String Launcher is the Speed Launcher (which I actually got the measurements for last night while I was fiddling around with my launchers, it’s a whopping 25" compared to the normal string’s 18″ and the Heavy’s string’s 15.75″), which, so far has only seen one release in an increasingly rare and expensive set, the Speed Set. And so far, it’s only available in one color, turquoise.
Normally, swapping parts between String Launchers is legal, but only if the Launchers are identical - and since the Speed and Heavy Launchers contain different gears and strings than the standard String Launcher, swapping parts between them is technically illegal. I spent the better part of last night taking apart some of my frayed, unusable string launchers and putting them back together to see if it was physically possible to swap the mechanisms between the launchers.
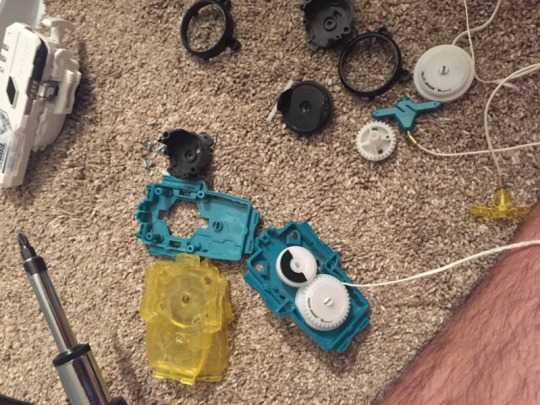
push me to the edge all my launchers are dead
The first thing I tried was to see if I could screw with the gear ratios to create a more powerful launcher - the theory being that if one of the slightly smaller teeth from the Speed/Normal Launcher turns one of the slightly larger teeth from the Normal/Heavy Launcher respectively, the gear that turns the launcher prongs will get more rotations per string length. All Burst Launchers have a 1:1 gear ratio, meaning that the same distance travels between the two gears when they’re spinning regardless of the size and spacing of the teeth (I’m doing a bad job of explaining this, you might have to look on Wikipedia if you don’t already understand sorry) since the distance between each tooth in its respective mechanism is the same. The reason that the Sword Launcher is so powerful is because it doesn’t have a 1:1 gear ratio (it’s 1:1.3 or 1:1.13 IIRC), and while this means more power, it also makes the launcher super easy to break and creates significantly more resistance when launching.
TL;DR the difference in tooth size and spacing was too large to use two different size gears with one another. Kinda disappointing, but probably for the best especially if I want to get this mod legalized.
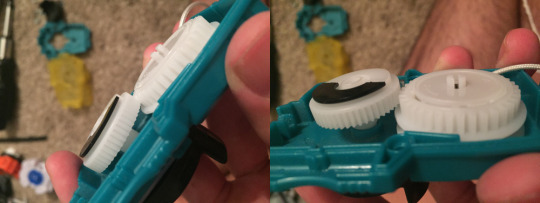
Side note: Normally, this would mean that the Speed Launcher is the most powerful launcher, if all non-Sword Launchers have a 1:1 gear ratio and the Speed Launcher gets the most rotations due to making the teeth travel the longest distance. However, the speed of the rip also makes a difference - the time it takes the Long Winder to travel through the launcher is shorter enough than the normal String Launcher that it overcompensates for the longer “winder” length of the string and offers a more powerful launch.
Back on topic, the next thing I ended up doing was try to mix and match the casings to see if they are compatible (the launchers have different designs on the outside but they’re just aesthetic and shouldn’t affect the internals). Turns out, the casing’s aren’t compatible: the Speed and Heavy Launchers are a few millimeters taller than the normal Launcher and the connection sockets don’t line up properly (though Speed and Heavy can fit on each other).
However, what I did end up finding was that the internals (the gears and string) could be transferred from one type of launcher to another without any issues, which allowed me to create this monstrosity:

Clear yellow normal casings with the Speed Launcher’s internals. It perfonns just like a normal Speed Launcher does (or it would if the string wasn’t frayed). I was also able to put the normal Launcher’s internals in the Speed Launcher without any issues either, except that the lil nubs on the connection peg that holds the prongs on the launcher got worn down from taking the prongs on and off, meaning that the prongs don’t click on and it doesn’t launch properly.
Now that it’s been proven that it’s physically possible to swap the internals of these non-identical launchers, here’s my reasoning on why it shouldn’t be illegal: no matter how you switch things around you’ll never get anything stronger than the perfectly legal stock Speed Launcher - the only thing that changes is the color of the casings surrounding the internals, which has no effect on performance. It’s not on the outside, but on the inside, that matters.
1 note
·
View note
Text
Attack Layers part 1.5 and some other stuff
So I haven’t been keeping the tumblr crew posted on all of this, but there’s been some stuff I’ve been doing on the WBO and Youtube that doesn’t always make it here (hooray for mixed media storytelling, the reason I never got the full BIONICLE story back in the day).
So remember back a few posts ago when I said I was going to try that Attack Layer poll on the WBO and the Discord group? Well here are the new polls:
Burst Attack: http://www.strawpoll.me/13287690
KO Attack: http://www.strawpoll.me/13287627
Make sure to only vote for a Layer if you actually own it and have used it yourself.
Most important YouTube video I’ve made recently: https://www.youtube.com/watch?v=km_ti_-7YHM
This is a tutorial I made on how to run Swiss format tournaments, which are the most complicated kind.
I dunno what else to put here, I had a few more things I wanted to post but I forgot what they were and this is looking like it’s just going to be a filler post. Sorry :/
0 notes
Text
Return of the Plastics - Standard
Immediately following the Plastics tournament from this post, the NC Crew began their Standard tournament. DefStamina88 and his brother smallfry9730 had to leave after Plastics, so we were down to 10 people, put in 2 Blocks of 5. I was with Dark_Mousy, KGirl, Stormscorpio1, and BladerLight.
Wombat (MSF-H Genbull Genbull E230MB) vs. BladerLight (Killerken Dragooon SA165WD)
I wasn’t entirely sure what he would use in Standard, and I also wasn’t even prepared when my match was called since I was still putting away my Plastics - that’s how quickly we moved to the next tournament. I kinda just used this since both of my Genbulls were near the opening of my bag, but ended up getting a bad matchup. There wasn’t really anything I could do, since E230′s Boost Mode gets in the way of Genbull’s Smash Attack, and I ended up losing 0-3.
Wombat (MSF-H Wyvang Dragooon BD145RDF) vs. Dark_Mousy (MSF-F Genbull Dragooon F230CF)
Another really bad pick on my part... I’m not sure what I expected him to use (Maybe Duo 230MB) but I did know that MSF-H Wyvang Dragooon BD145RDF is a pretty safe choice in most scenarios in Standard (to the point where LMAO was a proponent for banning Dragooon + RDF). However, in my experience Dragooon F230GCF can outpsin Dragooon RDF, as evidenced by Dark 3-0ing me here.
Interestingly enough, LMAO claims that Dragooon RDF always wins this matchup for him, and that he’s beaten Kei several times with it. If anything, I think it could have had to do with Dark’s F230 being more free-spinning than Kei’s - the source of the whole “ban F230″ craze that happened during the 2013-2014 era was mainly North Carolina tournaments, where the Canadians were unable to replicate the results.
Wombat (Zirago Wyvang H145RF) vs. Stormscorpio1 (MF-L Duo Cancer B:D)
Knowing how much SS1 likes to use Stamina combos, I decided to go with Attack, and ended up losing 0-3 much to my frustration. Only having one Wyvang at the time must have really weakened my combo (Now that I finally have two Wyvangs five years later, I can KO Duo B:D easily), and by Sliding Shooting B:D, SS1 made his harder to KO.
Wombat (MSF-L Balro Balro BD145MF) vs. KGirl (Ifraid Revizer F230CF)
I was actually kinda mad going into this matchup - normally, I would lose this, and while I’ve done pretty badly in tournaments before, I’d never gone defeated and I would have liked to think I had improved over the last time I performed this badly (2 years ago). However, I was able to pull off a couple surprise OSes due to having a stronger launch, and in the last round I actually popped her CF off the rest of her Beyblade to win the match 3-2 (if the opponent’s Beyblade comes apart mid battle, you win the round).
Like I said earlier, in contrast with winning the Plastics tournament this is probably one of my worst performances in a tournament ever - I got 3-0ed by almost everyone I faced, and my one win was due to luck. I didn’t even lose this badly at my first tournament :/
1 note
·
View note
Text
The Road to El Dorago: Episode 7 - Blazin Hot Cheetos
While nowhere near as popular as Pegasis and Libra are now or Quetzalcoatl was back then, Aquario is probably the least overlooked of all the overlooked Metal System Wheels - Three different users have independently found use for it on a Tornado Staller on three separate occasions. That only goes to show that it’s probably really good on a Staller Setup.
Looking at its design it doesn’t seem to have a huge amount of OWD, so I wonder where the Stamina comes from. I stuck it on MF-L 90MF and tried it against a bunch of Limited opponents to see how much it could OS.
It OSed all of the Defense setups I tried it against pretty easily. I got it to beat MF-H Earth Sagittario II 85RSF, MF-H Scythe Pegasus II GB145RSF, and MF-H Scythe TH220CS, though this last one outspun it a few times. Tried it against Flame 230CS since that beats the Scythe Staller pretty consistently, and it beat it about the same amount of times as Scythe TH220. The EDS variant gave it quite a bit of trouble however.
I tried it against some Stamina setups as well. For whatever reason, it couldn’t OS Stock Earth Eagle, but KOed it relatively easily (my Sliding Shoot game was really weak today for some reason. It’s also tough to switch to MF after playing with RF for so long). Earth 90WD was considerably easier to KO, but Aquario also OSed it almost every time. I had more trouble KOing Scythe W145WD, but it was also easier to OS than Earth. I had to try very hard not to be sidetracked by finding the height that gives Scythe a smooth transition from precession to LAD lol.
Last thing I tried Aquario against was Meteo CH120EWD. With a weak launch, this combo was a bit harder to KO than Scythe W145WD, but still manageable, especially if you have more skill with MF than I do.
Tried HF/S on the same setup instead of MF, and the results were basically identical, with the exception of having more difficulty OSing Earth LTSC and Scythe MTSC. I also self-KOed a frustrating amount of times even when using the Takara HF/S, even moreso than when I tried to Sliding Shoot MF. When its attacks connected properly though, it KOed things a bit more easily than MF.
----------------------------------------------------------------------------------------------------
So I guess the combo to use with Aquario has pretty much already been discovered: MF-L Aquario 90MF is a pretty solid Tornado Staller. Not sure if it’s better than Burn or Scythe yet, but it’s close enough that Aquario is definitely worth using in competition. HF/S can be substituted for MF if you want to hit slightly harder and also maybe fake out some Attack types at the cost of some Stamina and controllability.
EDIT: For those of you wondering, the title is a reference to another youtube video that I probably shouldn’t link here, haha.
1 note
·
View note
Text
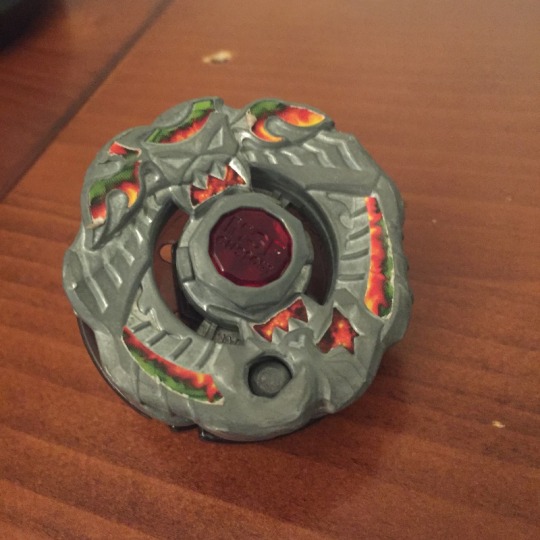
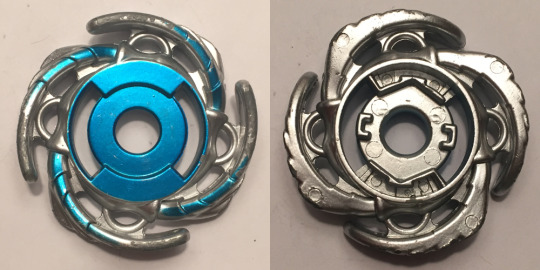
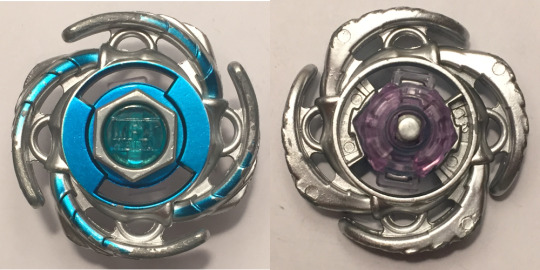
Attack Layers in Burst (part 1 probably)
Some background information for those of you who aren’t aware: one of the many issues plaguing competitive Beyblade Burst is the inability for the community to find a competitive Attack Layer that A) works for everyone and B) doesn’t become unusable after 10 uses. Literally, the only Attack Layer that everyone agreed was good is Valkyrie, but its teeth wear down so fast that it is only good for about 10 battles.
While this similar post about Limited Attack Wheels also highlights the mysterious performance differences for each Attacker for each player, these differences exist to an unprecedented degree in Burst. Rather than “Yeah, Cosmic is good, but I don’t think it’s really top tier compared to something like Lightning”, it’s “I don’t understand how the hell someone can sweep a tournament using Inferno Ifrit I can’t even get it to beat a worn Deathscyther consistently”. It’s not even a matter of skill either - I’ve heard one skilled player claim that God Valkyrie’s Attack power didn’t impress him, while another equally skilled player claimed that they could get God Valkyrie to burst Odin consistently.
So out of curiosity, I ran a poll in the Line chat to see what Layers worked best for most people - I made it anonymous and allowed people to vote for multiple Layers if they thought more than one should be top tier in its category. While not a massive amount people were polled, the Line chat does have a high concentration of skill, containing some of the best players from Toronto, Maryland, Los Angeles, and the UK - the people who voted know what they are doing. So after all that, here’s the results:

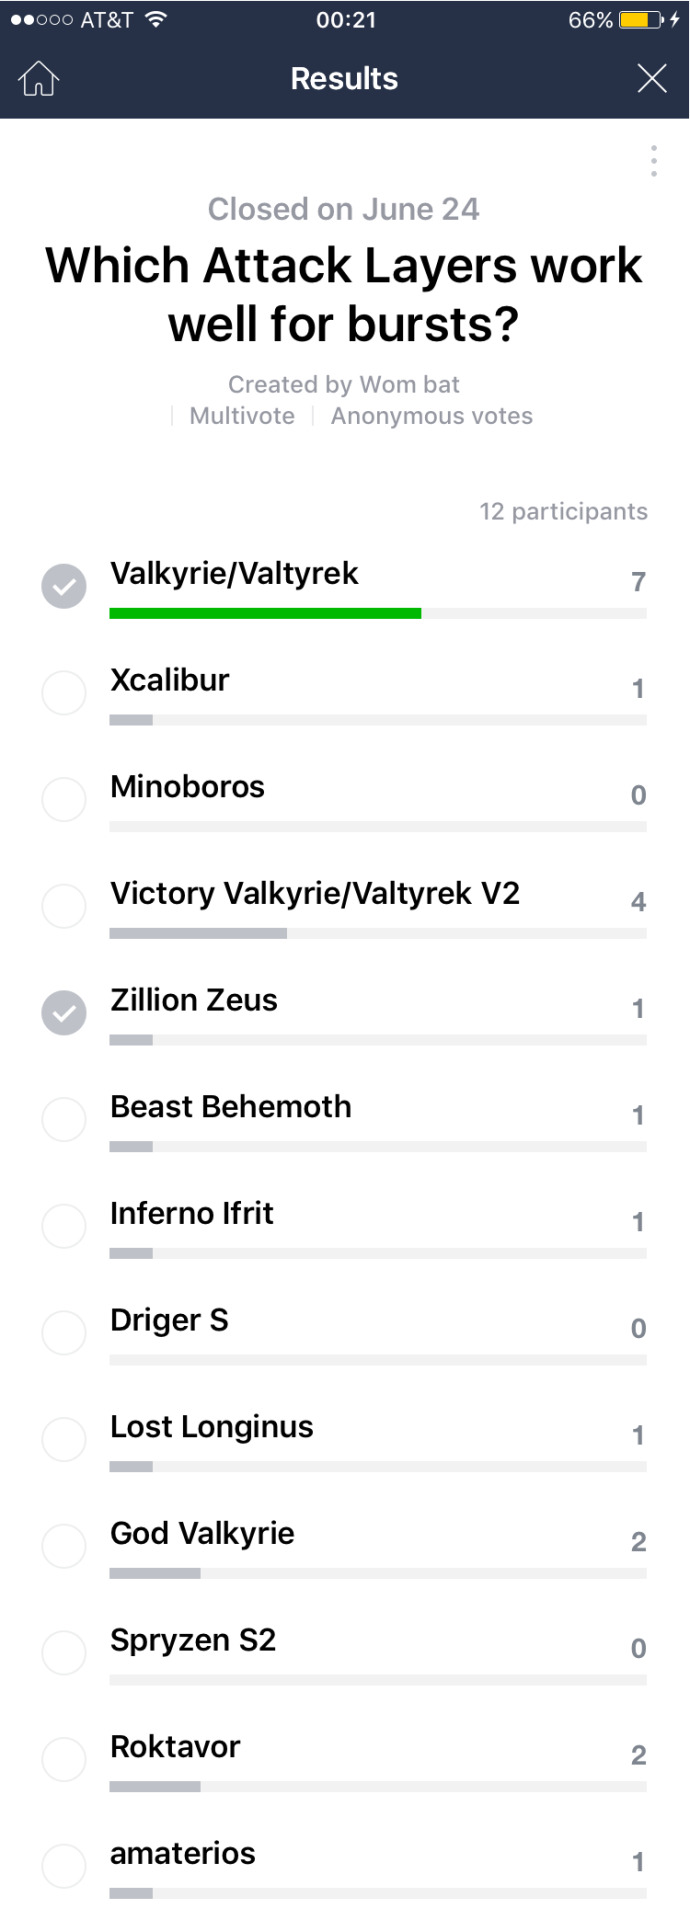
Only Layers that had potential to be good for Attack (as in, they had been used in a tournament, or at least a few people on the WBO had reported them to be good) were listed as options, though people were free to add their own options (as evidenced by my mom lol).
It looks like according to these people, V2, L2, and I2 are the best Layers for KOing things, while the original Valkyrie is still the best for bursting things, though V2 is still decent.
I was surprised to see so many people liked L2, - I find that while it does get surprise critical hits occasionally, it’s pretty easy to neutralize with a weak launch (assuming L2 is up against a right spin combo). I was also surprised to not see a single vote for Driger.
Maybe I’ll try this social experiment again on the WBO or the Beyblade Discord, by running like a strawpoll or something, see if the results there match.
1 note
·
View note
Video
youtube
Tumblr people like memes right? Or are they considered offensive?
0 notes
Text
Frankendrive: Life, Death, LAD
Once upon a time, back in 2012, I received a Beyblade. It was the infamous Phantom Orion B:D, which is basically the Wolborg of the MFB era.
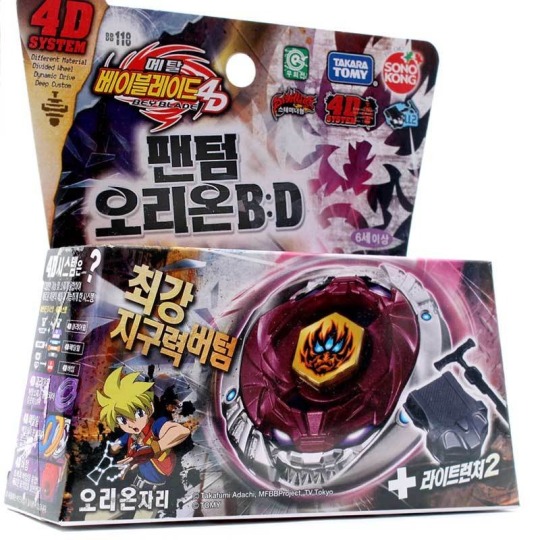
Now if you aren’t aware, This Beyblade comes with B:D (Bearing Drive), which is either an extremely powerful or extremely overrated part depending on who you ask. It’s also prone to wild variations in spin times - depending on how freely the bearing in your B:D spins, it can last from anywhere between 2 minutes to 7 minutes.
I was fortunate enough to get a 7 minute B:D (I think the highest time I ever hit with it was 7:35), and it performed very well for me in tournaments as well - 90% of the time, when I used this B:D, I won (the only thing it ever lost to was [)ragon’s god-tier F230). However, after over 4 years of heavy use, I was testing D:D against it in the Zero-G Stadium in preparation for a Zero-G tournament and the connection piece actually shattered.
Fortunately, I was able to purchase two new Bearing Drives, which actually may have been fake (they started this whole fiasco) - a 3:30 one and a 6 minute one. I used the 6 minute one for a while, but it wasn’t able to consistently beat other Spin Stealing setups in opposite spin like the old 7 minute one was. So eventually I got an idea: Since only the connection piece of the 7 minute B:D was broken, and the bearing and shaft (the parts that actually made it good) were intact, why not just transplant one of the connection pieces from one of my new B:Ds to my old one to restore its former glory?
In order to do this however, I had to rip the bottom off of one of my other B:Ds to get to the screws holding the connection piece in place. While this was easier said than done using the original brute force method, I was eventually successful in separating the tip using that good ol’ dental-floss-tied-to-a-doorknob trick that cartoon characters use to pull their siblings’ teeth.
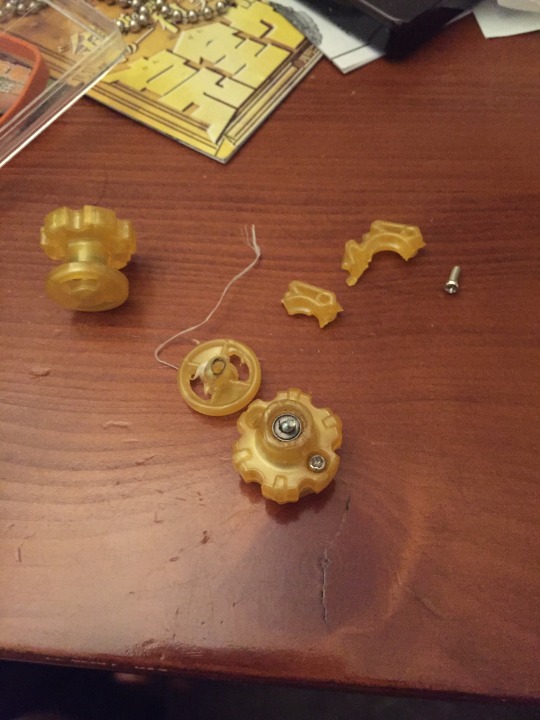
After that, it was just a matter of unscrewing the connection piece of the now broken B:D and re-attaching it to the old one. Though this was a rather difficult process and I probably ended up stripping one of the screws to the point of unusability, I eventually was able to get a tight enough fit.
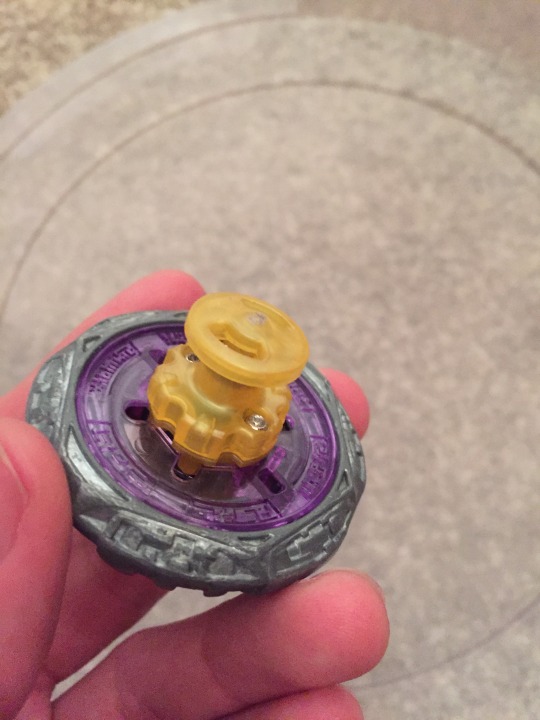
I immediately tested the new B:D out in both battles and solo-spins, and it averaged around 5:45 in solo spin... so not as good as it once was (after breaking the old B:D, I didn’t use it for about a year, which probably would have allowed Dust or other debris to accumulate in the bearing), and went about 50/50 in Spin Stealer battles. It also has a weird movement pattern that makes it move aggressively on one side of the stadium and passively on the other.
While I didn’t fully get my 7 minute B:D back, I was able to turn a 3:30 one and a broken one into an almost 6 minute one, so I guess it’s something,
1 note
·
View note