
Call me Lua or Coco she/they ❀ mid 30s ❀ I love music, nature, fantasy/sci-fi games & shows. Hablo español!❀• ₊°. you are one in a melon . ° ₊•❀
Last active 2 hours ago
Don't wanna be here? Send us removal request.
Statistics
We looked inside some of the posts by kahluacoco and here's what we found interesting.
Average Info
Notes Per Post
4K
Likes Per Post
3K
Reblog Per Post
707
Reply Per Post
70
Time Between Posts
15 days
Number of Posts By Type
Text
17
Last Seen Tumblr Blogs


Fun Fact
Kazakhstan’s Minister of Communications and Informatics has blocked the Tumblr site because it contained 60 sites of terrorism, extremism, and pornography in 2015.
Text

It's not often I draw something digitally. A step away from my usual journals! I was learning how to use ibis paint with this one. This is my submission to the MO discord spring banner contest! The scene itself is inspired by (kind of a redraw from) an animatic that I love by thegodoffortune. Mychael in a former life with some wisteria.
119 notes
·
View notes
Text

From a 'Meet the Artist' event we held recently!
9 notes
·
View notes
Text


The Mushroom Oasis discord server is holding Mychael March this month! There are some fun events you might like to check out, but we also have these writing and drawing prompts.
There are twelve days worth of both writing and drawing ideas on alternating days. I hope these inspire folks! More info on the discord server!
Text versions of these images below. Designs by the amazing @rybreads-rotten! Soon I'll be sharing translated versions of these as well!
Writing Prompts
March 1: Mychael learns of MC adopting another pet
March 3: Mychael visits the beach
March 5: Mychael’s reaction to cuddling
March 7: MR! Mychael with MC thinking of special event plans
March 9: Mychael goes on vacation
March 11: Mychael hasa new pet jellyfish
March 13: Mychael receives new magical powers
March 15: Mychael as a different mushroom species
March 17: MC moves into Mychael’s cabin
March 19: Mychael receives a gift from MC
March 21: MC helps Mychael with the morning chores
March 23: MC is the same species as Mychael
----
Drawing Prompts
March 2: Mychael & any animal
March 4: Mychael underwater
March 6: Lovebug Mychael
March 8: Mychael meets MR!Mychael
March 10: Parade
March 12: Mer! Mychael
March 14: Magical girl Mychael
March 16: Mychael as another species
March 18: Domestic life
March 20: Gardening
March 22: MC, Mychael & chickens
March 24: Evening picnic
262 notes
·
View notes
Text
Mychael March is here woohoo!! 🌻🌻🌻
hello, hello!!
the mushroom oasis discord server's mod team has been working hard to create an event we'd like to call:

Mychael March!!! 🌻
it's an event that lasts from March 1st all the way to March 31st with daily trivia, art/writing prompts, and more!!
check out the discord server for more info!! ☆
255 notes
·
View notes
Text

A little redraw of these two before bed. Love them <3
11 notes
·
View notes
Text

It's been a minute since I've drawn something, but can't forget his birthday. Happy Birthday Mychael!!
613 notes
·
View notes
Text

Kakavasha, past and present. This scene really touched my heart. The longing and hope that he will see his family again one day. The pain that a person who suffers from loss feels. I cried for him and am curious to see where his story goes. I'm sure his family will be proud. On a lighter note, I could have used a larger notebook for this scene! My eyes hurt a little, it's the size of my hand. Here's a desk buddy (pencil sharpener) and office supplies for scale. Of course, I needed to write his prayer.


Estoy pensando en ti Abuelito. Te quiero.
13 notes
·
View notes
Text

I'm a little late, but Happy Birthday Wanderer! In my game he's named Atreus. Someone who fearlessly jumps into the unknown while searching for their purpose. Durin was so much fun to draw!
34 notes
·
View notes
Text
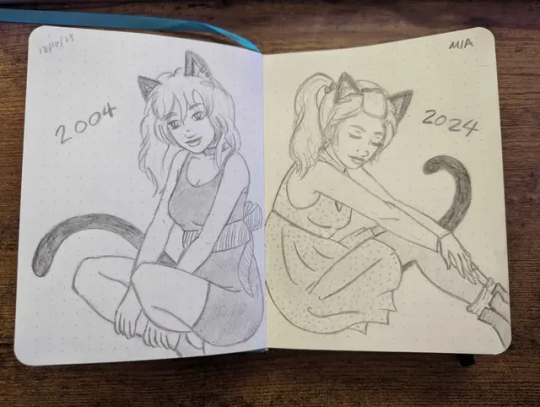
An OC of mine from back in 2004 to now, Mia! I didn't know what to do with her second expression, here's a silly one:

9 notes
·
View notes
Text

Santa Mychael comes bearing gifts for his firefly
394 notes
·
View notes
Text

A little evening doodle for the notebook. I think if it found out luna nova's favorite flower it might have a little something extra on it.
447 notes
·
View notes
Text


I got some new stationary recently. I realize I love stationary now. I was on a work trip and ran into this cute little store called Giant Robot. This small notebook was so comfy to hold! I bought a little mechanical pencil to go with it. Of course, my first doodle was kid Mychael. I wanted to see him smile!
117 notes
·
View notes
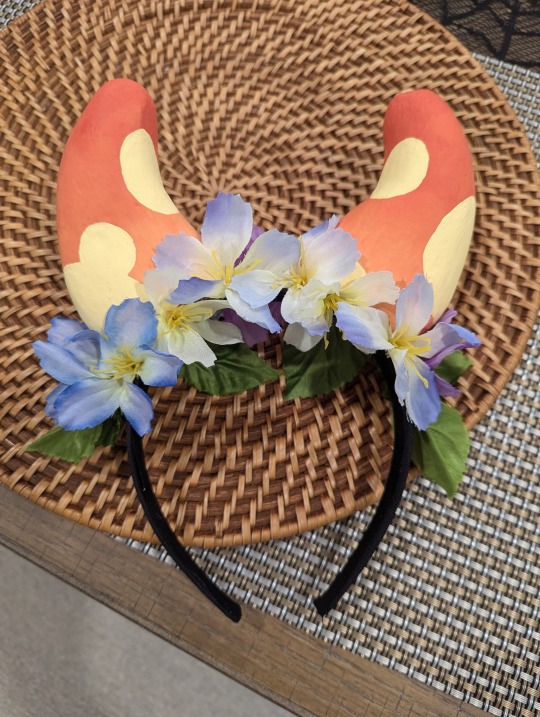
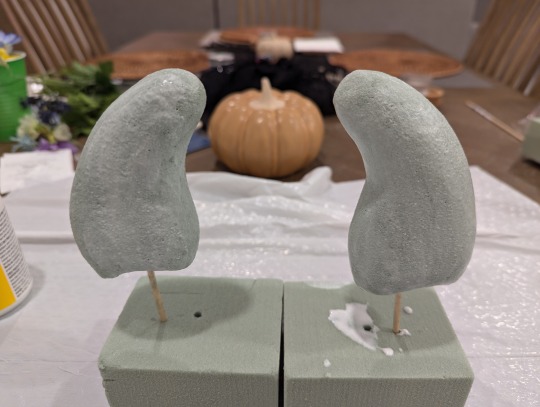
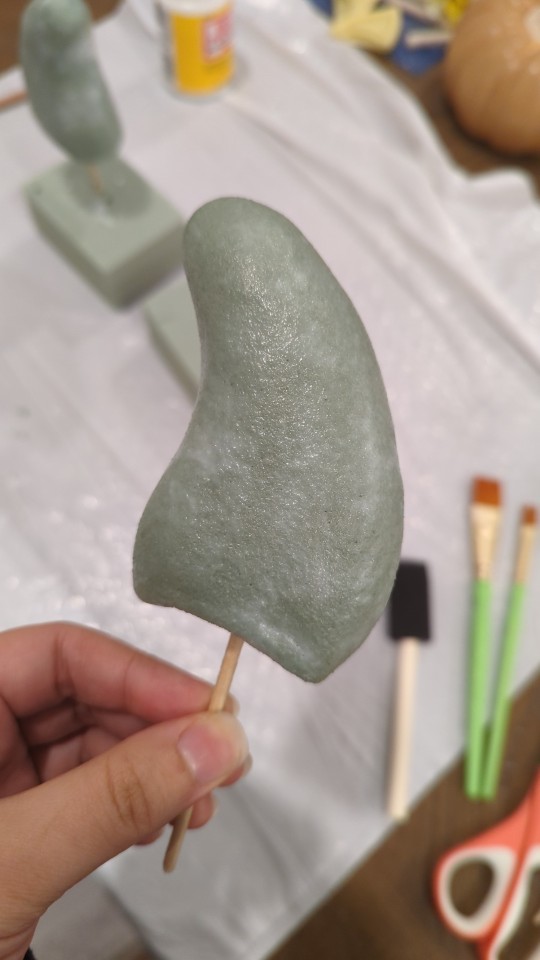
Text
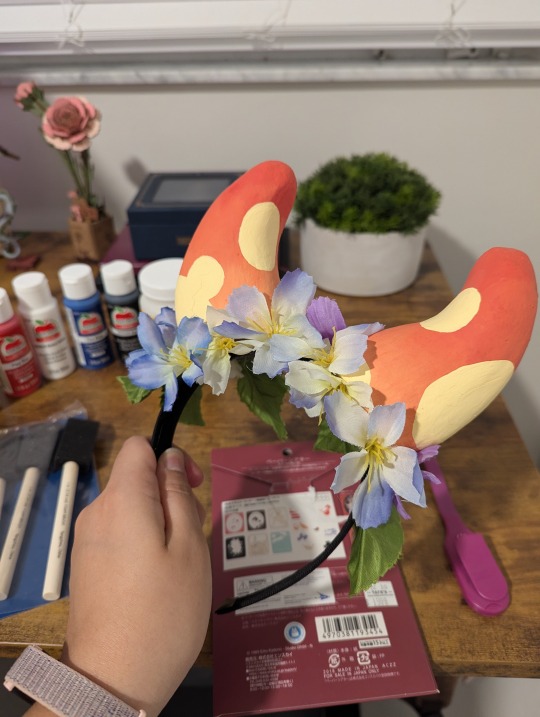
Making Mychael's Horns
My mom likes to celebrate Halloween with a family dinner in costumes. This year I decided to have a Mushroom Oasis inspired outfit. I found a peach mushroom sweater very similar to Mychael's in day three, and his gloves, but I knew what I really wanted to try was to wear his horns! I haven't done a craft project in a while, and I haven't done any cosplay before. This is documenting the process and has some accompanying pictures.
Before the essay starts, (I wrote a lot!) here's the finished product! It was lightweight and fun to make!
Here are the materials I used. Since I made this across multiple days I took some pictures for fun. I didn't expect to make this into a blog post but here we are! Sharing this out in case you want to try and make this. The products I noted here are not to advertise anything, I just tried to find the cheapest materials I could use. I also noted the prices.
Total Cost was ~$22 USD but that includes extra material for other projects. I bought all this at Walmart. I noted all the materials and detailed instructions below!
Materials
Acrylic Red Paint (Apple Barrel Matte Flag Red) $0.58
Acrylic Yellow Paint (Apple Barrel Matte Bright Yellow) $0.58
Acrylic White Paint (Apple Barrel Matte Snow White) $0.58
Acrylic Blue Paint (Apple Barrel Matte Too Blue) $0.58
Mod Podge Matte-Mat-Mate $4.94 for 8 fl oz
Foam Brush (optional for blending) ($1.48 for 4)
Some paint brushes (a few sizes for basecoating and details - $2.98 for 3 brushes)
Pencil
Thin wood dowel $0.42 around 1/8 diameter maybe?
1 Foam Block (Medium/Small - Used as a base to hold the horns upright while working/drying) - $1.97 for 2
Blue artificial flower pick $0.50 (I got one on sale at Walmart that had some purple, white and blue flowers with green leaves. Feel welcome to grab a couple picks just in case)
2 Craft Foam Rectangular Blocks (FloraCraft Foam - I used DryFM green blocks that aren’t as porous. They’re usually used for keeping water for flowers. I got rectangles that were a bit larger than 5 in H x 3 in L x 2 in W. $1.07 for each block.)
Soft Fabric Headband (I used Goody Fabric Covered Headbands in neutral colors. You can get one similar to your haircolor $4.48 for 3)
Hot Glue Gun (I owned one already)
Dinner Knife
Gloves and Face Mask
Scissors

Here are the steps. I added in a lot of notes for gotchas/oopsies that I ran into.
Instructions
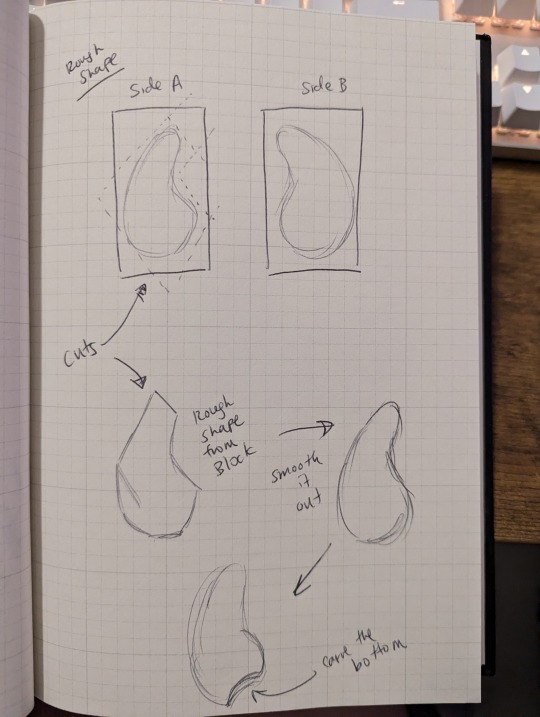
Carving the horns
With the large foam rectangular blocks, draw out the shape of the horns on the two widest sides gently with a pencil. This will help guide carving.
With the serrated knife cut gently along the areas around the lines to form the rough shape of the horns.
Don’t cut directly along the line. Cut out from the rectangle a rough polygon shape to start that is a bit bigger then the drawn lines. Then slowly start carving closer like carving a fruit and curving the knife. You can cut larger shavings for the rough shape, but try to cut smaller shavings as you get closer to your drawn lines so that you can get more detailed easily. The less you cut, the easier it is to fix. If you cut more, then you aren’t able to add foam back. Take your time cutting. See drawing on process.
Since the foam is soft, you can optionally cut the rough shape and use your fingers to smooth the edges and curves of the horns
Once you’ve completed one horn, you can work on the other. As you carve, compare the two horns and try to make them similar in width, height and length.
Recommendations/Notes
Line your work area with a bag for easier cleanup.
I recommend wearing a face mask and gloves so you don’t breath in the fine dry foam as you’re working with it. It’ll get messy if you cut fast. It’ll cling to your hands and maybe clothes.
Be careful with the knife, I ended up using a small serrated dinner carving knife
Treat the foam gently, it can be easily squished if you grip it too strongly
If you want to buy an extra block to practice carving a 3d shape, it might be helpful
No worries if the two horns aren’t exactly the same. Imagine that a horn is like a thumbprint, no two are alike :)
After all the carving, the horns were roughly 5 in H x 3 in L x 2 in D. Feel welcome to make them smaller or larger.
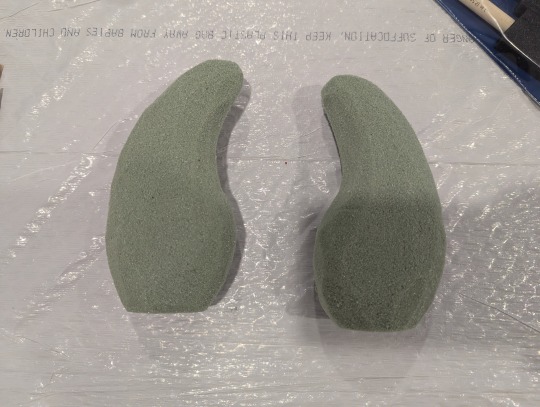
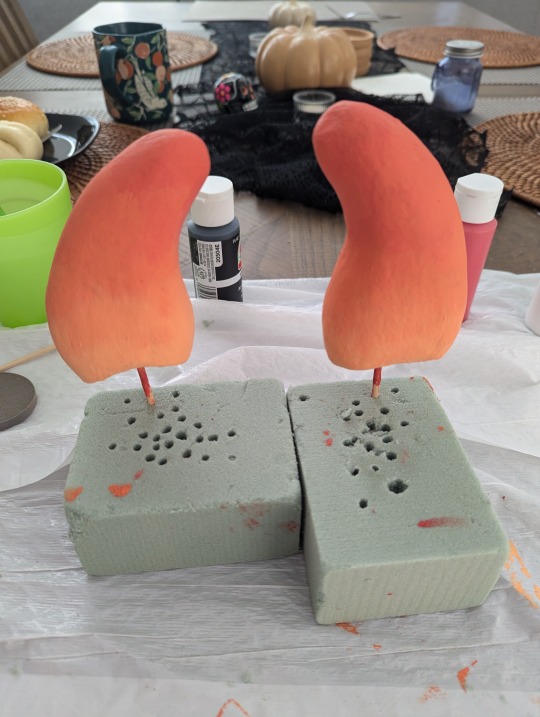
Strengthening the horns
Gently clean away with your gloved hands as much of the foam dust as you can from the exterior of the horns.
Cut up the wood dowel into a couple of small pieces. This will be used to prop up the horns so they’re upright and allow them to dry. Gently poke through the bottom of the horns with the dowel, and poke the dowel through the base foam block.
Pour some mod podge into a reusable cup and with a medium/large brush coat the first layer on both horns. Paint all over the horns including the bottom.
Wait for it to dry and continue to coat the horns with additional layers until it isn’t porous anymore
Recommendations/Notes
Since the foam is porous and soft, some mod podge or similar material will help fill in the holes and strengthen it
Even though the exterior is strengthened and prepped for painting, the foam can still be squished if too much pressure is on it (squeezing it strongly, hitting it with something, etc). I chose this foam since it was lightweight and would be easier to wear, but that is the main downside.
You can use a blow dryer on low heat to help speed up drying. I think I waited at least 15-20+ minutes in between layers. I would go about and do some other stuff around the house and come back to it.
I coated the horns with about 2-3 layers of mod podge.
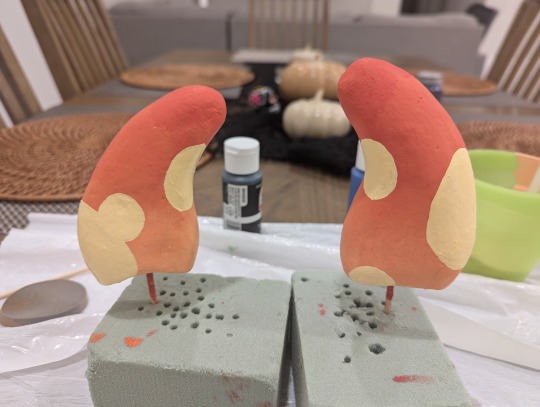
Painting the horns
To cover up the green foam, paint a base coat with the darkest red of the horns. You’ll need about 2-3 layers of base coat to cover all the horns in red. Let the horns dry a bit in between coats.
After the base coats are fully dry, prepare the three horn colors to make the gradient. Paint the darker red at the top, the orange around the middle, and the soft yellow near the base and bottom. Feel welcome to blend with a brush or even some gloved fingers! Let the horns dry a bit and apply additional coats as need until you get the desired result.
Once the gradient on the horns is fully dry, make the spots color and plan out where your spots will be before painting them on. Have fun with it! You can try to match the spot positions in the character reference sheet or make your own. You’ll probably need to let it dry a bit and paint a few coats until they are a nice solid color.
For steps 1-2, you can use the blow dryer until fully dry or let this dry overnight. I waited overnight until the next day in between each step.
If you have a spray on mod podge or other sealer, feel free to spray the horns to lock in and protect the paint colors! I didn’t get a chance to do this. This would be the last step.
Recommendations/Notes
Refer to Mychael’s character reference sheet as a color guide. His horns are a gradient of three colors with a fourth lighter color for spots.
You may want to practice mixing colors a bit to get the hang of it before creating larger quantities. For the quantities I made about 1/4 cup or so? I don’t know the exact proportions I used since I eyeballed it to the best of my ability. Here is a rough approximation:
The darker red at the top is like a vermillion. I used mostly red, with a few touches of blue (no more then 10%), a few touches of yellow (no more then 10%).
The orange was a mix of maybe 60% red and 40% yellow.
The softer yellow for the base was yellow with some white and a bit of peach (no more then 15/20% for the white/peach colors).
The spots were made with some of the soft yellow and extra white
The red paint I purchased was the strongest color, so keep that in mind when creating the oranges and yellows. The paint I used is a bit thin so I had to paint multiple coats.
I ended up painting a base coat with the darkest red color a few times to cover up all the green foam.
I mixed each of these in different reusable cups.
You’ll want to paint the gradient all at once to blend it.
You can use a blow dryer on low heat to help speed up drying. I think I waiting at least 15-20+ minutes in between layers when applying multiple coats. Then I waited overnight to let it fully dry.
Creating the headband
Choose a fabric headband that’s closest to your haircolor (or Mychael’s if you’re wearing a wig!)
Mark faintly with a pencil where the horns will be on the headband. I placed the horns a little less then 2 inches apart from the center of the headband. Feel free to adjust to your liking.
With the glue gun, add some glue to the base of the horn and hold down firmly. Be careful for any excess glue that may spill. I added in extra glue and made sure it was pressed firmly on the hairband to secure it.
Repeat with the second horn a few inches away from the other one. Dry it with a blow dryer on the low cool setting if needed
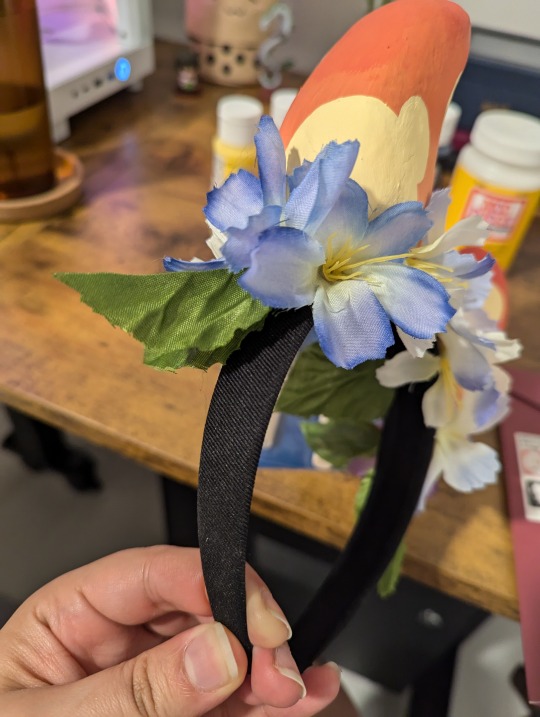
Optional for the flowers
Carefully remove all the fabric flowers from their stems on the flower pick. Remove the plastic base and leave the stamens. Use the scissors to cut some of the back stem if needed.
Apply some glue to the back of the flowers and carefully attach them to the headband around the base of the horns. Feel free to mix around the colors and leaves as you’d like.
Recommendations/Notes
Be careful with the glue gun. If you add too much glue onto the horn, you may burn your fingers when pressing it down onto the headband.
The flowers hide the base of the horns where it’s glued. This is optional if you prefer the horns as they are. I did this since my glue gun work was a bit messy and I thought it would dress up the headband and help blend the horns to my hair. I didn’t wear a wig.
I used 5 blue flower, 3 white flowers, 3 purple flowers, 6 leaves and 5 little fuzzy blue and yellow stems I used some leaves on the sides of the horns and the back. I glued the leaves first, and then some additional flowers on them. I tried to position the flowers at slight angles around the base of the horns in the back and front of the headband.
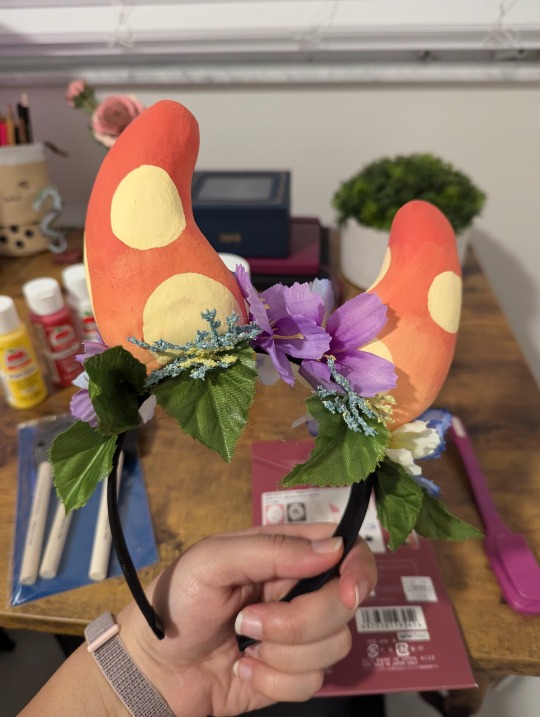
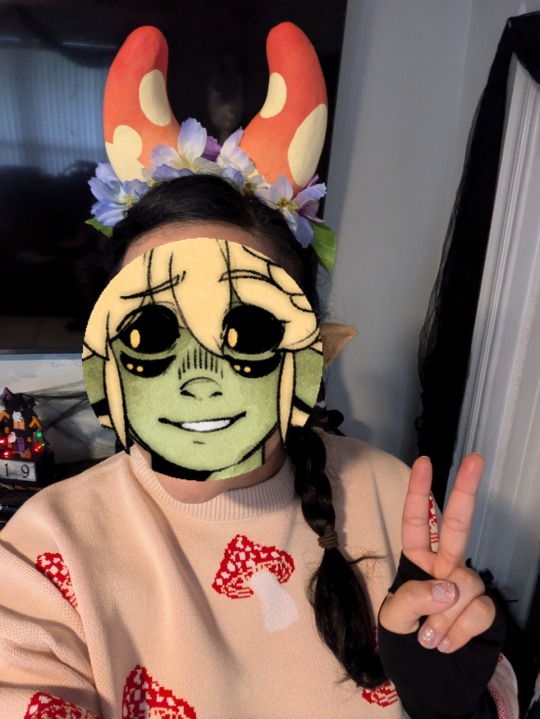
Here's how they look once they're ready! If you do end up making these, please share! It was so much fun dressing up, maybe next time I can try to go green and make a tail.
123 notes
·
View notes
Text


No pressure to complete these, just mentioning you in case you want to try! @l3mon-candy @atlasastrolabos @lovesunnie @lxvelylucas
Bored, thinking about pokemon and want to make a tag game, sooo, here This picrew This quiz (find out what pokemon would be your partner)


Tagging some people to start it off but anybody can join :D
@rainofpainaaaaa @biblically-accu-rat @5567i82 @lemonwaterisamazing @go-ballz-out
@good-beans @vaniliens @absurdly-overpowered-astronaut @fuwamoco-s
@himawari-candyy @rainbowghostcat
201 notes
·
View notes
Text
I'll bring a charcuterie board and mochi ice cream 🍨
@atlasastrolabos @l3mon-candy @lovesunnie (no pressure)
Let's have a digital party
@sombrathedragon @yellow-computer-mouse @scrollwyrm @ilikebookssomuch
Bring some food to said digital party. I have salt potato chips.
1K notes
·
View notes
Text

Back when I drew the Princess Mononoke fanart, I drew this Haku too. I'm really happy with how it turned out. I need to draw another, coloring these was fun.
9 notes
·
View notes
Text
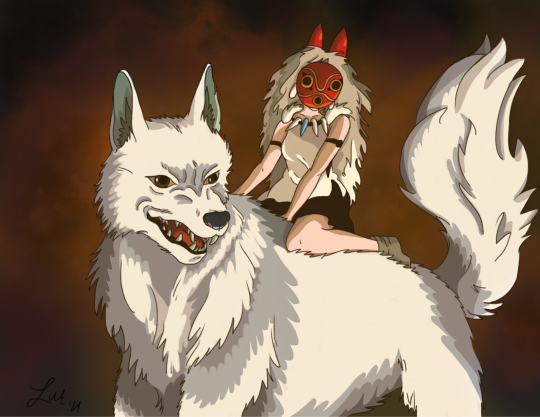
I'm really happy with how this fanart of Princess Mononoke came out! I have fun adding light to night time/darker scenes. But I need to work on my backgrounds.
15 notes
·
View notes