
Statistics
We looked inside some of the posts by kathy5155540-blog and here's what we found interesting.
Average Info
Notes Per Post
74
Likes Per Post
30
Reblog Per Post
0
Reply Per Post
44
Time Between Posts
7 days
Number of Posts By Type
Text
13
Last Seen Tumblr Blogs


Fun Fact
70% of Tumblr users say the Dashboard is their favorite place to spend time online.
Text
Week 13: Overall Course Reflection
What went well / what did I have difficulty with? - I was most happy with my model for project 3. Whilst being able to dabble with a new CAD software, I also grasp the importance of model making when it comes to understanding the basic structure and shape of the design. - I had most difficulty with AutoCAD because I find the software somewhat difficult to navigate e.g. using the model spaces and viewports for printing was confusing at first.
What did I enjoy / dislike? - I didn’t enjoy the technicality of the drawing exercises. Although it drains the fun out of drawing, I understand the importance of drawing things accurately and professionally. - I enjoyed the drawing tutorial (week 13) the most; weren’t restricted to any particular guidelines or rules and was able to do the drawings in my own style.
What would I do differently if I had my time again? - I need to manage my time better and work more efficiently so I can finish the exercises during the tutorial e.g. getting small tasks done up to standard and move on to the next one rather than trying to make everything perfect.
What were some of the key things I learnt, or insights which I developed? - I learnt a lot of new skills through problem solving e.g. learning how to use Fusion for Project 3. - I absorbed information better and work more efficiently when I do the exercises with friends. We are able to identify issues and solve problems quicker and come up with better solutions. - It’s important to take the time and reflect on your learning process because by identifying and analysing the problems encountered you can come up with appropriate solutions and further cement the skills you learnt along the way.
What led to those experiences or insights? - Writing reflections each week really had allow to me gain better insights on the way I learn and really help to cement my knowledge.
Overall, I have enjoyed the course despite some speed bumps and frustration along the way. The course has exposed me a range of methods that I could use to communicate my design ideas. Although, I didn’t quite enjoy the technicality side of the course it has definitely expands my skills set and helped me to visualise and communicate my ideas more articulately.
7 notes
·
View notes


Text
Week 11 Wassily Chair Perspective Drawing
Reference: https://www.knoll.com/product/wassily-chair


Image 1: Drawing grids on the orthogonal views of the chair.
As I reflect on the exercise, I realised that I could have increased the spacing of the grids to make it easier to transfer points for the perspective drawing. For example, have 2cm spacing between the lines instead of 1cm.

Image 2: Constructing the cube Problem: Scaling was the first issue that I encountered. As shown in Image 2, it was difficult to replicate the design in perspective because the cube was too small.
Solution: I could have the vanishing points closer together and divide the page in equal thirds to increase the size of the cube. Also, reducing the number of lines on the grid would give a less crowded drawing, making it less complicated and confusing to transfer points from the grid to the perspective drawing.

Image 3: Attempting to draw the perspective drawing on the outlined cube.
Problem: Smudging of pencil and black outlines was a serious problem that effected the neatness of the drawing.
Solution: Using a transparent plastic ruler instead of a metal one can increase the visibility of constructed lines and lifting the ruler instead of dragging it across the paper would prevent the smudging.
Problem: I found that drawing grids on the orthogonal views did’t really help me the perspective drawing. It was difficult and confusing to transfer points from the grid to my A2 drawing as there were too many lines (as shown in Image 3).
Solution: Instead of using the method above, I traced lightly traced the cube and used my own understanding on the structure of the design to do my final perspective drawing.

Image 4: Finished perspective drawing.
Notes:
- Perspectives of all lines perpendicular to the picture plane converges at the central vanishing point on the horizon line.
- All horizontal straight lines, parallel to the picture plane don’t have vanishing point; their perspectives are parallel and horizontal lines. Likewise for all vertical lines parallel to the picture plane.
7 notes
·
View notes
Text
Week 10 Measuring Techniques
Measuring Techniques
Method 1: Tracing
1. Use a light pencil to plot layers of traces
2. Map out points on a blank sheet of paper and iupload to Autocad.
3. Use the spline tool to interpolate and join up data points (fit method). Set tangent direction for smooth curves or use the polyline edit (PEdit) command to convert a straight-line-segmented polyline into a spline curve form.

Image 1: Foam board set up for tracing technique.
Analysis
- Won’t obtain smooth profile/curves
- May require additional equipments to keep measuring tool levelled
- Time consuming and might not be accurate
Method 2: Profile gauge/ Skewers
1. Measure object with profile gauge and draw contour of object on paper.
2. Use the spline tool to interpolate and join up data points

Image 2: Measuring vase with profile gauge.
Analysis - Profile gauge wasn’t big enough for the vase (gap shown in image 2)
- A more accurate way to obtain the contours of the object in comparison to Method 1.
- Vertical slices would capture the natural curves of the vase better.

Image 3: Measuring vase with skewer profile gauge.
Analysis - Difficult to keep skewers in place and at the right angle (both with corrugated cardboard and foamcore)
- Time consuming
Method 3: Slicer in Fusion
1. Create a 3D CAD drawing of object
2. Upload to Fusion and use Slicer feature to obtain templates for the contours of the object.

Image 4: 3D CAD Drawing of vase on Fusion based on profile photo.

Image 5: Experimenting with different ‘Contraction Technique’ on Slicer (Fusion).
Analysis
- Need to transfer data to Autocad.
- Need a 3D CAD drawing of vase on e.g. Solidworks. Must have a good photo of vase (profile view).
- Can obtain organic curves of vase accurately.
- Can obtain neat slices with printed templates.
- Can experiment with different slicing directions e.g. vertical, horizontal, radial.
Method 4: Image Processing with Matlab
1. Photograph object and upload to Matlab program
2. Use contourslice function to draw contours in volume slice planes https://au.mathworks.com/help/matlab/ref/contourslice.html
- Too complicated and not enough time to learn coding in Matlab.
- Difficult to transfer data to Autocad. Chosen Method: Slicer in Fusion
Bae on the analysis given above I chose this method because it can capture the organic shape of the object more accurately in comparison to the others. The most difficult step would be creating a precise 3D CAD model which can be made possible using a high quality photo of the vase. In addition, I feel more confident using this method because I have had some experience with SolidWorks and would also like to familiarise myself with softwares like Fusion. Notes: - 300 Years of Industrial Design book - datum plane - horizontal plane from which heights and depths are calculated - cut tangents on foam core for smooth curves - use one eye to cut to reduce parallax error

2 notes
·
View notes
Text
Week 9 Project Presentation
Tone and Voice
I spoke clearly but I was not articulate in my language.
Pace of Delivery
I think the presentation was well paced despite the occasional pauses in between because I was trying to remember the next point in my prepared speech.
Body Language
I used hand gestures to emphasise certain points and also to draw attention towards the annotations on the printouts. However, I avoided and didn’t have much eye contact with the audience and mainly looked at the back of the room.
Removing my jacket and improving my posture would have also made me feel more confident and professional.
Pre and Post Presentation
I was somewhat confident at the start of the presentation because I felt adequately prepared. I thought that I have memorised the dot points that I have prepared the night before. Also, to help calm the nerves I was seeing it as an informal presentation in front of my peers where I can comfortably “tell a story” on how the finished the end product.
Strangely, I was feeling quite anxious after the presentation. I felt that it was not well delivered and I did not have much eye contact with the audience.
Support Materials
The support materials were helpful in showing my extensive research on the materials, products and the effects of lighting on the product under difference environment. However, the A4 printouts were too small and it would have been difficult for the audience to see the annotations.
The annotations were clear and simple with all images grouped and organised in a zigzag structure. This allowed me to easily identify the images that I wanted to draw attention to.
Improvements
More practice would have definitely improve the delivery of the presentation e.g. timing myself and use palm cards for the practice runs.
Instead of trying to memorise and rigidly stick to the prepared dot points I should try to remember the overall structure of the presentation.
Print out my research on A2 paper with clearer labels and annotations by using bolder and larger fonts.
Having more eye contact and being confident and articulate during my presentation would have also helped to engage the audience better. Instead of using low modality language like, “I guess...”, “I think...”, use high modality and assertive language like, “This is what I did...”, “This why I did it...”.
Use transition words like “Next...”, “Moving on to the next stage of the research...” to let the audience know that I’m moving on to the next point for a more structured presentation.
5 notes
·
View notes
Text
Week 8 Working on the Project
I rewatched a few tutorials on layers and layer masks because I realised I was struggling with it last week. I also took notes some useful commands when working with layers.
v for move tool
Blending 2 images together using Layer Mask
Upload images as 2 layers
Add vector mask to one image
Press g (gradient)
Drag vector across image
Hold shift while dragging to snap image to a straight line
Painting in Layer Masks to blend images
Hold on shift - add layer mask to layer
b to activate brush tool
[ ] keys to change brush size
x to swap background and foreground colour
Black to hide mask white to show mask
Shift [ for soft edge brush
Shift ] for bard edge brush
Or control option drag up and down
I’ve also noticed I’m slowly getting better and more efficient at using the pen tool this week. Once I finish placing an appropriate number of anchor points for the outline, I began using the option and command keys to convert and move the anchor points to get an accurate outline of the shape.
Colours not showing for the Colour Fill Layer
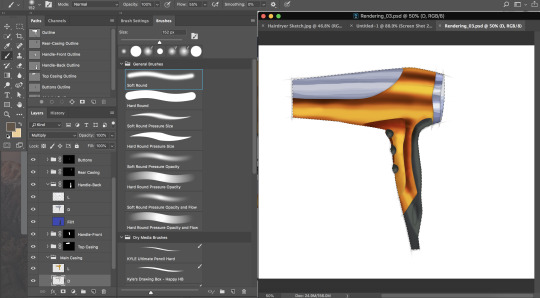
This was the first obstacle and real frustration that I encountered during the assignment (after forgetting to flatten my image and having to redo my group structure). As I go through the video tutorials on layers for the third time then rereading instructions on week 6 tutorial I realised that I forgot to change Linework layer from “Normal” to “Multiply”.
Using too many shades to render
I made a time consuming mistake of trying to blend with too many shades of grey. Initially, I used a ‘grilled pattern’ for speakers as a base layer and filled it with red (warm) then used around 6-7 shades of grey to blend and create a soft gradient of shadows across the grille. This coupled with my inconsistency with the light(L) and dark(D) layers made it difficult to get the gradient effect that I wanted to achieve. After many attempts at this, I was able to narrow down a smaller number of shades suitable for the drawing. Using a small brush also made it easier and more effective as oppose to trying to cover a large area in one attempt.


6 notes
·
View notes
Text
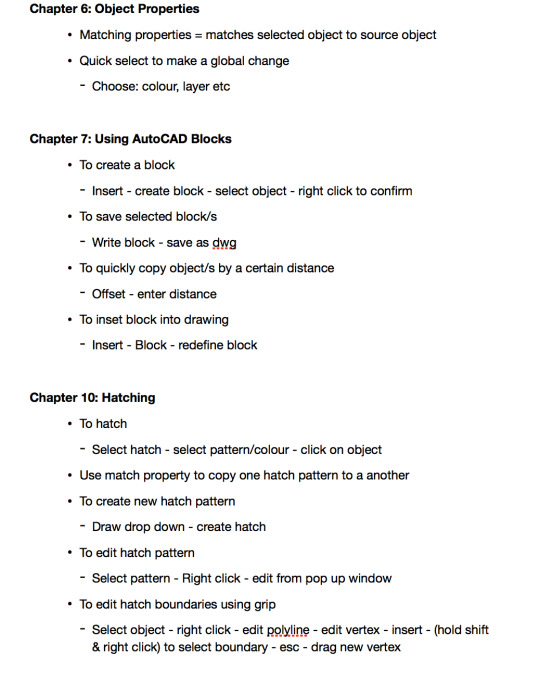
Week 6 Tutorial
Notes
- Adjust greyscale levels in the Levels dialogue box; Clean linework instantly makes the sketch looks cleaner
- blending mode is next to opacity
- To reduce noise- changing the threshold makes it sharper and changing the radius blurs the line

- a path = a layer for linework, define shape and create masks; can scale vectors without changing the quality
- couldnt find "white rectangle next to the fill layer swatch” because each rectangle is a swatch
- click on line instead of dragging for pen tool to be more accurate
- zooming and history tab makes this process a lot easier

-need less anchor points to optimise process, had to go through and delete anchor points, use Bezier anchor points to adjust outline whilst holding on command to convert anchor points
- Curvature pen tool made it quick to draw buttons with only 3 anchor points and no adjustments needed
- used the eye dropper tool for the colour filling
- problem: colour fill shows on the fill window (Fill1) but not on the actual drawing both for buttons and handle-back


Solution: realised I had two groups for the Handle-back and had to delete one of them.

Problem: Didn’t know how to create the hole for the handle back because I still don’t quite understand the method of subtracting and adding layers.

Problem: It was difficult to get clear, defined lines with a mouse.


Using both L and D layers
Using both layers was confusing and fidgeting at times as I tend to get carried away with a single layer and build upon it using both dark and light colours. I was also able to get clearer and more defined, straight lines using both layers.
The colours didn’t transfer exactly the same as the original photo; possibly because of the initial fill layer which was in a light purple/blue colour.

LCD display
- Problem: was able to make a smaller select but didnt know how to create the reflection highlight. I was only able to fill the entire selection with a solid white colour and couldnt replicate the same effect in the example
- Problem: New layers were automatically created for each rectangle I drew.

- Solution: I found a way to select and edit all the layers by using the smart object conversion tool.
Adding a background
I found it much easier to drag and drop an image to the drawing and scale it according to suit drawing.

The Final Result

Overall, despite all the frustration, oddly looking colours and hours spent on trying to perfect each components I am pleased with the final result.
4 notes
·
View notes
Text
Week 5 Tutorial
I was more comfortable with using AutoCAD this week as I continue to familiarise myself with the software and discover various ways to use the different tools. I’m starting to appreciate the benefits of using CAD softwares and seeing it as a neater and time efficient method to do technical drawings. Additionally, I also find that it was much easier and faster to work and navigate with a mouse rather than the trackpad.

The Highlights
Similar to last week, I began by planning out the layout and creating layers for my drawing. I was caught up with the measurements and wasted a bit of time figuring it out before I started my CAD drawing. I had a construction layer (red) that I used throughout the exercise line up my views because I felt it was easier to have a solid line where I can quickly spot rather than hovering and tracking the dashed line. This was especially useful when I needed to mirror my drawing across . The mirroring tool was also one of my favourite tool because I can quickly fix my mistakes and work efficiently without repeating my drawing twice.


Another tool that I found really useful was the offset tool, which allows you to quickly copy a line to a specific spot by entering the distance between the two lines.

Hatching
Hatching on AutoCAD was simple and easy to learn. I also thought it was neat that there are two options for hatching: 1. specifying a point and 2. selecting a boundary to fill.

Quick Fix
One of the problems I had during the tutorial was that my dashed line were showing up as solid lines. I resolved this by needed changing the linetype scale in properties drop down window from 1 mm to 0.25 mm. I also needed to adjust this for my hatching lines.
Small Discoveries
I was gaining more confidence with AutoCAD as I made numerous small discoveries throughout the exercise. These might have been explained in the tutorials on Lynda but I was able to consolidate my knowledge further by rediscovering their purposes myself. For example, I learnt that I can select and edit multiple lines by holding down the command button rather than changing them individually. I also have to press enter twice if I only wanted to trim a specific line on the drawing. There are also different tools for dimensioning, for this exercise I had to use the dimac tool in the dimensions dropdown for the radius of the filleted corners. Finally, ‘grouping’ is a feature similar to ‘block’ which I find quite useful as I didn’t have to do multiple clicks or type in a name for the block. However, this of course also has its limitations and should only be use in simple drawings since you could save, edit and use a block in multiple drawings.


11 notes
·
View notes
Text
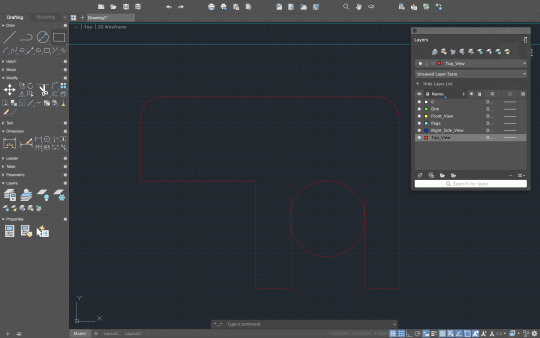
Week 4 Tutorial
The videos on Lynda.com definitely was helpful for this week’s tutorial. I’ve always found CAD softwares to be daunting and frustrating; however, the clear and simple explanations made me feel more comfortable and prepared. I think getting familiar with the software also made it a lot easier to navigate and select the right tools to draw the top, front and right side view of the object.

I began the exercise by creating layers for the different views and drawing out what they would look like with pen and paper.
Old habits
I’m still trying to measure and calculate the dimensions rather than constructing the appropriate lines. This made it more difficult to accurate to line everything up.
However, as I started using ‘grip’ and ‘snap’ to construct lines and frame for the semicircle in the top view, for example, hovering the mouse over the circle to find the midpoint, the process quickly became more efficient and easier.
Another feature that I found neat and had to refer to my notes was the filleting tool to round off sharp corners.


This made it easy to track and draw lines when lining up the different views (as shown below in the dotted green line).

The command line was an additional feature of AutoCAD that I find really useful and efficient because it makes the process much quicker simply by typing in the name of desired tools.
Forgetting to Change Layers
As I progress through the exercise, forgetting to switch between layers was definitely apparent; however, this was an easy fix because I could select the entire object, right click on the object and change its colour in the Properties window. This could also be used to change the appearance of the lines e.g. dashed lines for the hidden features.

Too many layers?
As I finished the exercise, I realised I’ve created many layers that were probably unnecessary and would increase the size of the file. Although, layers would be useful in more complex drawings it may overcomplicate it if there were many layers. It may have been more efficient in future drawings to have the objects on one layer, dimensions on another layer and so on.

Notes

7 notes
·
View notes
Text
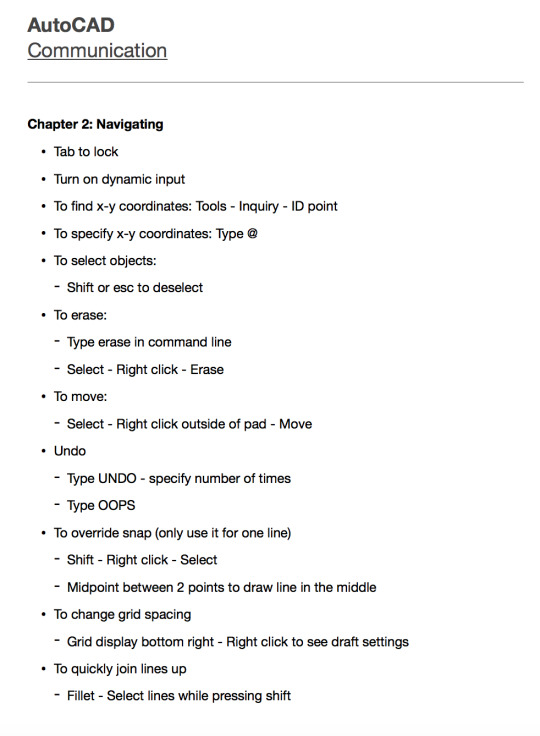
Week 3 Tutorial
This week’s tutorial was somewhat challenging because I still have the “measuring” mindset instead of constructing and projecting lines from the appropriate view. The placement of my sketches were still off despite planning the layout of my drawing at the start. This is likely due to the fact that I still find it difficult to picture the orientation/orthogonal views of the object.

Mistake 1: Not Drawing the Top View First
I wasted a lot of tutorial time trying to picture and figure out the measurements of the sectional view. I was definitely overthinking the entire process and my measurements were also wrong e.g. I tried to measure the distance between the edge and the inner-circle by drawing circles.

Although, it was very time consuming and ineffective to draw the sectional view first I was able to use it to project lines and draw the top view.

Mistake 2: Overthinking and Time management
Even after doing all the required pre-class activities and imprinting the importance of “constructing rather than measuring” method in my mind, I still have the “measuring” mindset which always overcomplicate the entire process (especially in last week’s exercises). This made the tutorial very frustrating and time consuming. I always struggle to finish outlining my sketches towards the end of the tutorial. This made me realise I should always remind myself that whenever it gets too difficult/complicated I’m doing it wrong and I should start constructing and projecting lines rather than trying to figure out the dimensions and orientation of the object.
After drawing the sectional view, the bottom and right side views were much more simpler and faster to finish.

Mistake 3: Hatching with set square
I used the edge of the 45 degrees set square to distanced the hatching lines because the lines were was 2mm apart when I measured it. The lines ended up being 3mm apart. Another way of doing it would be measuring out each lines before outlining it; however, this would also be very time consuming. I haven’t figured out an effective way of drawing the hatching lines, which would be something that I could ask the tutors/peers for their method.
Mistake 4: Outlining on a grainy surface & keeping a clean workspace
There are visible pen marks on the drawings and I had to use the correction pen to white out some of the pen marks especially around the circles. More care should be taken to outline the drawings rather than rushing to get the exercise done. Rushing the final steps has also caused a few other mistakes e.g. hatching the wrong area and off centred circle. This again relates back to poor time management and planning at the start; something that I should continuously work on.
I could do more research into the topics that will be explored in the tutorial along with the post class activities. Watching Youtube videos on how to do sectional views/projection drawings would be more engaging and interactive as oppose to reading the textbook, which I could use as a helpful guide for specific standards.

Overall, I think still have to remind myself that constructing is more effective than measuring at the start of each tutorial and really consider the all the required views during my planning. I also realised the importance of the thickness and difference between different types of lines for clarity.
10 notes
·
View notes
Text
Design by Nature
Capturing the elements and principles of design at Maroubra beach.


1 note
·
View note
Text
Week 2 Tutorial
This week’s tutorial was definitely more challenging with more planning and thinking. I began by planning the layout of my sketches across the page but after looking at the examples in the textbook it was much more logical to organise the front view on the corner of the page and the other views accordingly.


I made a lot of mistakes throughout the tutorial and it was a slow process. From all my mistakes, there are a few key things that I’ve learnt: - the arrangement of the sketches has to match the orientation of the object
- it is important and much more effective to draw the object square on from the picture plane to get the correct measurements (without measuring), for example, I had to utilise the top view (centre of the circle and points of the triangle) to efficiently and accurately draw the side view.

I finished Part 1 of the tutorial with very little time left to start Part 2 so I decided to sketch a simpler object instead of a stapler.

Overall, I think technical drawing is an important and difficult skill to master. I found it particularly challenging to imagine the views and translate them on the page. It was definitely much easier to sketch when I have the physical object for reference.
4 notes
·
View notes
Text
Week 1 Tutorial
My first Communication class was overall an interesting and enjoyable experience despite the slow start. The first exercise was unexpectedly challenging because I didn’t know how to correctly use the T and set squares. Initially, I tried to measure, construct a square around the circle and use the centre point of the circle to evenly space out the star points. Eventually, I was able to find an effective way to finish the exercise by aligning the T square perpendicular to the set square and use the 60 degrees angle side to construct the shape.

Additionally, although I found the second exercise to be much simpler to complete it was fiddly to round off the edges. I was not happy with the quality of my work due to poor time management at the start; however, it was a valuable learning experience.


The last exercise was rushed and I did not get the chance to collaborate with other students and was able to quickly put together the pieces at the end of class.


Overall, this class has made me realise that there are many fundamental skills and aspects of design that I’d still need to learn and practice and that it is much more effective to construct than measure.
5 notes
·
View notes