
Don't wanna be here? Send us removal request.
Statistics
We looked inside some of the posts by keploy and here's what we found interesting.
Average Info
Notes Per Post
0
Likes Per Post
0
Reblog Per Post
0
Reply Per Post
0
Time Between Posts
13 hours
Number of Posts By Type
Text
17
Last Seen Tumblr Blogs


Fun Fact
There are dozens of funny blogs to kill time on Tumblr.
Text
Unit Testing Vs Functional Testing : Hands On Guide For Developers

To evaluate our software application's quality and reliability we are going to have to test our application in a variety of ways. The two most basic forms of testing we have available to us are unit testing and functional testing. Unit testing and functional testing are the TRUE basic building blocks of those different types of testing. All types of testing can verify behavior of software, but are at different levels, with different focuses, and it is important you understand the differences to deliver a bug-free application.
In this blog post we will cover some of the technical important differences between unit testing and functional testing. We will clearly describe what unit testing and functional testing can do, how you can perform each type of testing, and how each kind of testing fits into the big all encompassing testing spectrum.
What is Unit Testing?

Unit testing is the process of testing the current minimum functional unit of code. That is unit testing is performing testing on the software in such a way that we isolate the individual components of the program or units of code, and test them to ensure they function correctly and as intended in isolation.
Unit testing is the smallest, most elemental unit of the testing lifecycle. Therefore, unit testing will be more sharply honed to the lowest level testable elements of an application, like functions, methods, and classes. In unit testing you will run small tests that test only the expected behavior and results of the isolated, testable unit.
Unit Testing is a development approach where individual units of code are isolated and tested to track down bugs as early as possible during then development lifecycle and to create a reasonable, maintainable codebase.
Unit testing can be characterized:
Level: Low-level testing, generally carried out by developers.
Environment: Generally intends to run in a controlled, isolated environment and mock the system, in order to isolate the unit from it's dependencies.
Speed: Unit tests are generally very quick to execute - given the small amount of code they run over, and element of isolation.
Feedback: Unit tests provide fast feedback to the developer about a problem occurring in a specific area of code.
Tools: Frameworks like JUnit (for Java), NUnit (for .Net), pytest (for Python), Jest (for JavaScript), etc.
What is Functional Testing?

Functional Testing is a testing process to confirm a system or application does what it is intended to do, by testing functionality against the defined expected requirements. Functional testing shifts focus from the individual units as a whole, when the system is operational and it is known the code and system provided to user meets what the user expects
Functional testing is focused on creating a set of test cases with known input conditions and comparing their operation outcomes to expected outcomes. Functional testing detects defects that could go undiscovered throughout the application process, which may have been unplanned or even overlooked during development.
Functional testing does not evaluate the internal code structure or implementation faults. As a means of validating the behavior of the system compared to the user’s point of view, it is more appropriate when considering correctness of the system.
Some of the features of functional testing are:
Level: High-level testing which is often conducted by a test professional or QA engineer.
Environment: Typical functional testing will be performed in an environment that closely resembles the production environment.
Speed: Functional tests may be far slower than unit tests, as they take a larger view of the system and can depend on interaction with other parts of the system.
Feedback: Functional tests provide feedback as to whether the application meets the needs of the user and specification.
Tools: The typical tools used are Selenium, Cypress, Playwright for Automated Browser UI Testing; Postman for Web APIs.There is also Keploy, which is an Enterprise grade API Testing Application used Automated Web API testing. It uses AI to create test-cases, and mocks that are perfect for use with large scale applications. You can check out Keploy’s API Testing at: app.keploy.io

Different Scopes
Scopes of Unit Testing
Focuses on testing units, components, functions, or methods in isolation
Verifying that each unit runs as expected with dependency on no other modules.
Aids in detecting bugs early in the development period, thus aiding debugging and code maintenance.
Think of unit testing as often being performed by developers with automated test frameworks.
Unit testing usually has a white-box testing approach, to proving code correctness in detail.
Also helps with refactoring, because you are guaranteed that the code does not break anything on the original unit test.
Ideally, the unit test is fast and can be executed before or with every change to make it harder to break anything.
Scopes of Functional Testing
Asserts functional overall behavior of a system per certain requirements.
Makes sure a user is performing the workflow tasks, is interacting with the system as expected, is accessing and using data as expected, and is integrating responses with other systems and workflows seamlessly, as expected!
Mostly black-box testing, as you do not care how the inner layers of the code are working, you expect behaviors based on your specifications.
Functional testing is usually performed by testers in different aspects of the application testing process.
Functional testing makes sure what the software is doing aligns with user and business expectations.
Functional testing would identify defects in system behavior that could be missed in the unit tests.
Steps Involved
Steps Involved in Unit Testing

Define Test Cases: Identifying the parts you want to test (function, method, or class).
Set Up Test Environment: Set any necessary dependencies, mocks, or stubs to isolate the unit.
Write Test Code: Use a unit test-type framework (for example, JUnit, pytest, NUnit) to implement your test cases.
Execute Tests: Execute the test cases to see if the function performs as expected.
Analyze Results: Compare the actual responses from the unit test to the expected responses to determine failures.
Debug and Resolve Issues: If a test fails, determine why it failed, and update the code accordingly.
Re-run Tests: Run tests again to ensure that the updates did not introduce new issues.
Automate Testing: Incorporate unit tests into CI/CD pipelines so that tests are always run.
Steps Involved in Functional Testing

Identify Test Scenarios: Identify test cases based on functional specifications and user expectations.
Prepare Test Data: Configure what input values or configurations would be needed to test.
Prepare the Test Environment: Make sure that the application is either deployed or ready to be tested.
Execute Test Cases: Tests can be carried out manually, or with the use of automation technologies (like Selenium or Cypress).
Verify Outputs: Where there is matching expected output from the system in comparison with actual output of the system.
Document Defects: Each difference in output produced must be logged for follow-up.
Fix and Retest: Developers will fix logged defects, testers will run up the tests again to verify that the defect was fixed.
Make sure to include migration testing: Confirm that the changes made do not break existing functionality.
Key Differences

Tooling Examples
Example 1: - Unit Test - Java with JUnitCopyCopy@Test public void testAdd() { Calculator calc = new Calculator(); assertEquals(5, calc.add(2, 3)); }
Example 2: - Functional Test – Python with SeleniumCopyCopyfrom selenium import webdriver driver = webdriver.Chrome() driver.get("http://example.com/login") driver.find_element_by_id("username").send_keys("admin") driver.find_element_by_id("password").send_keys("password") driver.find_element_by_id("submit").click() assert "Dashboard" in driver.page_source driver.quit()
Example 3: - Unit Test – Python with PytestCopyCopyimport pytest from calculator import add def test_add(): assert add(2, 3) == 5 if __name__ == "__main__": pytest.main()
Example 4: - Functional Test – Express.js Endpoints in TypeScript using JestCopyCopyimport request from "supertest"; import app from "../src/app"; // Express application instance describe("GET /users", () => { it("should return a list of users", async () => { const response = await request(app).get("/users"); expect(response.status).toBe(200); expect(response.body).toBeInstanceOf(Array); }); });
Recommended Practices
Regarding Unit Testing:
Stick to the AAA pattern: Arrange, Act, Assert,
Utilize MR (mocking frameworks) to help isolate dependencies (e.g. Mockito),
Keep deterministic tests - no external I/O or random values are required,
Regarding Functional Testing:
Automate procedures with realistic data and user flows,
Base tests around acceptance criteria,
Maintain integrity of test data with seed scripts or fixtures.
Common Pitfalls

When You Should Use What

Complementary Nature
It is not Unit vs Functional, both Unit tests and Functional tests are part of a complete testing strategy and both are required. Thinking unit tests would give you peace of mind if integration brakes is dangerous.
Similarly, trusting only functional tests will result in slower feedback loops & more work to maintain.

A balanced approach always helps.
Automate Tedious Testing Tasks with Keploy
Software testing is an important job, but unit tests and functional tests are often time-consuming, requiring a lot of manual labor. For unit tests, you have to write the tests for every component of the application; for functional tests you have to simulate every user interaction and then check to make sure the output matched the expected output. It would be so simple if we could just have the computer do all that, but it was often tedious to write the tests, test again with another user interaction, and stumble through all the manual labor to make the computer obey to check for quality while also trying to keep pace with the development, or else don't rely entirely on unit tests.

With the older test tools like Karate & RestAssured, you have to go through the manual effort of the testing phase by writing the test cases, Keploy eliminates all manual effort by automatically generating the test cases from the real API traffic you already created. In addition to enhancements in accuracy, you can mock your dependencies like your databases or external APIs, which means you never have to touch any manual efforts at all.
By capturing real user interactions with your APIs and re-running your APIs in their pre-production environment, you can ensure your code and the associated APIs will not regress and break functional capabilities. By capturing API regressions prior to going into production, you can ensure you protect and maintain the software integrity without the manual labor.
I cannot end this statement without re stating Keploy saves you manual labor and productivity for unit testing, integration testing, and API testing and guarantees a smarter development process.
How Keploy Simplifies Unit Testing
Keploy makes unit testing easy by generating test cases automatically to take stress off human effort and give the developer better coverage. Keploy’s AI Unit Test Generator (UT Gen) dynamically generates and validates unit tests. Developers write quality code that meets the requirements instead of spending time on test case creation, and coverage is ensured without the need to be a strong coder.

To enhance the developer experience even more, Keploy has a VS Code Extension that brings its test generation capability straight into Tthe developed tool. The extension enhances the developer experience by generating, viewing and running test cases without leaving the development environment and mindfulness, removing context switching, and enabling a smoother feedback loop. It will be especially handy when developers want to get a quick visualization of the generated tests, and make small changes within the code editor.
In also a PR Agent that will autodetect PRs and Generate and validate tests automatically. When the developer raises a pull request, the PR agent activates to auto-generate test cases for the developer's new code, learn existing coverage gaps, and comment inline with suggestions or warnings. This ensures no code is merged without any appropriate coverage without imposing and asking the reviewer to "manually" enforce coverage.

Keploy even comes equipped with error analysis reducing the time developers spend finding issues, and helps promoting an overall acceptance testing approach, as well as maintaining confidence in the quality of code being produced.
How Keploy Automates Functional Testing
Keploy takes the challenge of functional testing a step further, by capturing real API traffic and generating test cases automatically as it does so. It does this by capturing the request made to the API, and the response - including the request and response traffic to any external dependencies. When needed replaying the request is the final act in action, or validating that the behavior of the application follows what was expected and without the involvement of a person.
Keploy provides automatic dependency mocking so you can be testing in isolation, and will reduce your reliance on live services.
Keploy's noise detection will determine noise in determining the response as non-deterministic, filtering unnecessary subsequent traffic to present you with the possible tests you can functionally validate accurately, deploying you ready to create quality tests without the limitations of traditional test case generation by polling all through manual design.
Conclusion
Unit Testing and Functional Testing aren’t competitors - they're collaborators in creating quality software. They have a different role in your CI/CD pipeline and enable you to ship cleaner and more reliable code.
Think about writing fast, reliable unit tests for the logic and behavior of your root code, and well-though-out functional tests that replicate real user behavior. This way you're not writing code - you’re producing confidence.
FAQ
Is Unit Testing only for developers?
Mostly. Unit testing is performed by developers since it tests the internal design and logic of the code. However, testers who are familiar with programming can also create helpful unit tests.
Can Functional Testing catch bugs missed by Unit Tests?
Absolutely. Functional testing checks end-to-end behavior, so it can catch integration issues, broken workflows, or user experience bugs that unit tests miss.
Is Unit Testing faster than Functional Testing?
Yes! Unit tests run in milliseconds because they test isolated code. Functional tests deal with full systems or UIs, so they naturally take longer.
Should I use both Unit and Functional tests in my project?
Definitely. They complement each other. Unit tests give fast, early feedback. Functional tests ensure the app works as a whole. Use both for a complete test strategy.
Do Functional Tests require knowledge of the codebase?
Nope! Functional testing is a black-box approach, so only learn the expected behavior. You won't need to dive into the logic and/or source code.
Can I automate Functional Tests too?
Sure! Automated Functional Testing tools, like Selenium, Cypress, Playwright and Postman, are great choices for automating tests - especially for UIs and APIs.
Does Keploy require me to manually write test cases?
Definitely not! Keploy generates test cases automatically from real API traffic, reducing manual effort. Plus, it even mocks external dependencies, like databases.
What if I only write Unit Tests? Is that enough?
Not really. Unit tests can't catch issues that arise from miscommunication between components. If you don't have functional testing, they can ship you a broken user flow.
Can Functional Tests be flaky?
Definitely, especially UI tests. They can fail for a lot of reasons: DOM changes, timing issues, random network delays, you name it. This is why stability for your tests and ensuring proper setup is critical.
How do I decide whether to write a Unit or a Functional Test?
As simple rule: if you are testing any sort of logic inside a function, you would write a unit test. If you**’**re testing a user or system using the app, you will write a functional test.
Recommended Blogs on Unit Testing in Depth
If you want to learn more about Unit Testing in depth, check out these articles shown below -
0 notes
Text
Platform Engineering vs DevOps: What’s the Difference?
As software teams grow and scale, two modern practices often come into play: Platform Engineering vs DevOps. While they share similar goals—like improving developer productivity, deployment speed, and operational reliability—they are not the same.
In this guide, we'll explore the key differences between platform engineering and DevOps, where they overlap, and how companies can leverage both effectively.
What is DevOps?
DevOps is a cultural and technical movement that emphasizes collaboration between development and operations teams. The goal is to shorten the software development lifecycle, ensure continuous integration and delivery (CI/CD), and improve system reliability.
Key principles of DevOps:
Breaking down silos between developers and IT
Automating the CI/CD pipeline
Monitoring and incident response
Infrastructure as Code (IaC)
Continuous improvement
DevOps is more of a philosophy and set of practices than a defined role.
What is Platform Engineering?
Platform Engineering focuses on building and maintaining internal developer platforms (IDPs) that provide self-service tools and workflows for development teams. These platforms abstract the complexities of infrastructure, environments, and deployment so developers can ship faster and more safely.
Key responsibilities of platform engineers:
Building golden paths (predefined, secure workflows)
Managing Kubernetes clusters, CI/CD tools, secrets, etc.
Providing APIs and interfaces for developers
Enabling standardized and scalable infrastructure setups
Platform engineering is more product-focused, building “platforms as a product” that internal teams use.
Platform Engineering vs DevOps: The Core Differences
Feature
DevOps
Platform Engineering
Focus
Culture & collaboration
Internal platform product
Scope
Broad: people, tools, processes
Specific: platform creation and management
Goal
Accelerate delivery through shared responsibility
Simplify development through abstraction
Output
CI/CD pipelines, IaC, automation
Internal Developer Platforms (IDPs)
Users
Developers, IT, QA
Internal developers (as customers)
Approach
Collaborative, team-driven
Product-oriented, user-focused
How They Work Together
Platform engineering is not a replacement for DevOps—it’s a natural evolution. While DevOps focuses on enabling faster and reliable delivery, platform engineering provides the tools, environments, and systems that make DevOps workflows scalable and consistent.
For example:
DevOps defines how CI/CD should work
Platform engineering builds the pipelines and tools to make it happen for every team
When to Use What?
Use DevOps when:
You're building a DevOps culture in a startup or small team
You need shared responsibility between developers and ops
You’re establishing CI/CD and automation
Use Platform Engineering when:
You have many teams deploying services independently
You need standardization, governance, and self-service
You want to scale DevOps practices across the org
In large organizations, both practices often coexist—DevOps for culture and collaboration, and platform engineering for tooling and infrastructure abstraction.
Final Thoughts
DevOps and Platform Engineering serve the same high-level mission: delivering better software faster and more reliably. DevOps lays the cultural groundwork, while platform engineering builds the tooling foundation. Together, they help modern teams scale confidently and efficiently.Looking to streamline API testing in DevOps or platform workflows? Try Keploy — an open-source tool for generating tests and mocks from real traffic, reducing manual effort and boosting coverage.
0 notes
Text
Getting Started with Selenium IDE
If you're new to browser automation and looking for a no-code way to start testing web applications, Selenium IDE is the perfect entry point. It’s a browser extension that enables record-and-playback testing for web apps without writing a single line of code.
This guide will walk you through what Selenium IDE is, its features, use cases, and how to get started.
What is Selenium IDE?
Selenium IDE (Integrated Development Environment) is a tool from the Selenium suite that lets you record, edit, and play automated tests for web applications directly from your browser. It works as a plugin for Chrome and Firefox, making it easy to set up and start testing within minutes.
Unlike Selenium WebDriver, which requires programming knowledge, Selenium IDE is built for non-developers or QA testers who want to automate test cases visually.
Key Features of Selenium IDE
Record & Playback: Record user interactions and replay them automatically.
Cross-browser support: Works on Chrome and Firefox.
Command editor: Add assertions, conditions, and test logic using built-in commands.
Debugging: Step-by-step playback and logging.
Export Options: Convert recorded tests into Selenium WebDriver scripts in multiple languages (Java, Python, etc.).
When to Use Selenium IDE
For quick regression testing on UI changes
As a starter tool before moving to WebDriver-based automation
For manual testers transitioning into automation
When testing simple workflows or prototyping test cases
It’s ideal for smaller teams or non-technical users who need fast feedback on basic functionality.
Installing Selenium IDE
Go to the official Selenium IDE website or browser extension store.
Add the extension to Chrome or Firefox.
Click on the Selenium IDE icon in your browser to launch it.
How to Create a Simple Test
Click Record a new test in a new project.
Name your project and provide the base URL of your website.
Interact with your site (clicks, form submissions, etc.)—Selenium IDE records it all.
Stop recording and save your test case.
Click Play to replay and verify behavior.
Tips for Using Selenium IDE Efficiently
Use assertions to validate key UI elements.
Organize test cases into suites for better maintenance.
Use the control flow commands (if, while) for basic logic.
Export tests as code if you want to scale to Selenium WebDriver later.
Limitations of Selenium IDE
Limited support for complex test scenarios
Not suitable for full CI/CD pipelines
Cannot test mobile apps or native components
Slower compared to headless automation
For large-scale or API-level automation, tools like Keploy offer code-based test generation and mocking that integrates seamlessly with pipelines.
Alternatives to Selenium IDE
Cypress (JavaScript-based testing)
Playwright (modern browser automation framework)
Puppeteer (for headless Chrome testing)
Keploy (for API test case generation)
Final Thoughts
Selenium IDE is a great tool to start your automation journey. It’s simple, visual, and effective for small projects and quick tests. As your testing needs grow, you can graduate to more advanced tools like Selenium WebDriver or explore automated test generation platforms like Keploy.
Looking to automate API tests without writing code? Check out Keploy’s test generator to speed up your testing workflows.
0 notes
Text
Getting Started With Alpha Testing : Definition, Process, And Key Benefits

What's the difference between a software launch that builds customer confidence and one that becomes a costly disaster? Often, it comes down to how thoroughly the product was tested internally before anyone outside the company ever saw it.
he irony is that alpha testing is often the most cost-effective phase for catching serious issues, yet it's frequently the first thing cut when timelines get tight.
While many teams rush toward beta testing and public releases, the companies that truly succeed know that alpha testing is where the foundation for quality gets built. In this blog, we'll break down everything you need to know about the alpha testing process.
What is Alpha Testing?
Alpha Testing is a type of internal acceptance testing handled by the quality assurance (QA) team and developers to check for bugs before it is made available to the real users. It is conducted toward the end of the development phase but prior to beta testing.
Through alpha testing, major issues are detected and resolved early, so that only a reliable, efficient software solution that meets the intended requirements will be delivered to the customers.
During alpha testing, the software undergoes evaluation in an environment that imitates real-life situations. The software is tested against expected acceptance criteria prepared for it that involve its functionality, performance, stability, and user experience. This phase involves both, white-box testing( focusing on issues within the code) and black-box testing (focusing on external functions and user interactions)
Alpha testing is carried out internally by stakeholders such as developers, testers, and product managers. Thereby, actual customers do not participate in these tests. Feedback from this phase is crucial in addressing major issues at an early stage, fine-tuning the product, and preparing it for the broader scope of beta testing, where the product is finally validated by real users in real-world conditions.
Who is Responsible for Alpha Testing?
Alpha testing is mostly done by internal members of an organization, wherein different roles conjointly share responsibilities.
Among them, the Quality Assurance (QA) team plays a significant role. This includes creating test cases, running test scenarios, and logging bugs and discrepancies from what was expected. Using real-world scenarios , they find out where the application might break down that might not be obvious in ideal conditions, ensuring the software performs reliably in both expected and edge cases.
Developers also play a key role in the alpha testing phase. They usually perform preliminary testing, such as unit and integration testing, before the software is handed over to QA. During alpha testing, developers and testers jointly address issues reported by testers, stabilize, and fine-tune the application while technical intervention remains efficient under their watch. Their involvement gives a quick fix for technical flaws and keep iterating on the issues raised from the alpha testing feedback.
Depending on how the team is structured, product managers, business analysts, and other internal stakeholders may also participate. Their concern is not for technical soundness but to confirm the software aligns with the business goal, meets the user expectation, and provides a coherent experience with which it should be evaluated. This ultimately checks for a balance between the proper functioning of the product and user satisfaction.
Objective of Alpha Testing
Through the process of alpha testing, the problems are identified at early stages of the software development phase, mostly before the software reaches the real users. Testing is carried out by internal teams or trusted partners in a controlled environment to find bugs, ensure proper functionality, and operational smoothness.
Here are some of the Core Objectives:
Bug Detection: Find integration errors, faults that unit tests may not have discovered, and that may lead to crashes and data corruptions.
Functional verification: Ensure features work as per the specification and business requirements, including API-based implementations, backends, and authentication flows.
Quality Assurance: Ensure stability for a software before beta testing and that the project remains on schedule.
Risk and Cost Mitigation: Fixing things early saves money and fame for the better.
Process Enhancement: Apply feedback towards better practices in coding, testing, and planning for releases.
The alpha tests running in controlled conditions would aim at giving the teams much time without any outside pressure in order to complete thorough evaluations, making the product ready for the next phase.
Process of Alpha Testing
Let’s look at the steps involved during alpha testing:
Planning & PreparationEverything begins here. The team designs the test plan, identifies the features to test, and prepares the test environment. They make sure that all roles are allocated, all timelines are set, and that any tools and data required for the tests are put in place. Without proper planning in place, everything else can come crashing down.
Test DevelopmentFollowing that, prepared test cases are designed by the QA team based on expected product behavior. These may include functional tests, tests for edge cases, and sometimes negative testing. If automation is to be used for the process, then the scripts will also be written at this stage. Hence, covering important aspects of the software during testing is targeted.
Test ExecutionNow the real testing. Any developer or an internal tester may work through the test cases to observe how the system behaves. During this process, testers will look for bugs, crashes, behaviors that are not expected, or just something that does not feel right. This step goes a long way in identifying real-time issues in the logic, flow, or interface.
Defect Logging & ValidationAny bug that is found has to be logged so that it states what went wrong, how to reproduce the error, and how critical the error is, based on random levels that have been made available. Every bug is analyzed and classified in terms of its impact on a system level. This ensures that no bug is overlooked during the fixing process.
Bug Fixing & RetestingOnce the issues have been reported, the developers intervene and get to work on fixing them. The QA team is then brought back to retest those suspicious areas to verify that the bugs are now fixed. The retesting usually gets followed with regression testing in an attempt to make sure no new issues managed to slip through during the fix. This series of testing continues until the build is considered stable.
ReportingAll test results, including working, failed, and fixed test cases, are recorded in a detailed report. This helps decision-makers grasp the level of quality of the product at present and decide if it should proceed to the subsequent phase. It also reflects the progress made by the team and the identified risks.
ClosureOnce everything is tested and approved, Alpha testing is wrapped up. A final review is held, discussions are made on the key findings, and the test data is archived, if the product passes the expected quality control.

Phases of Alpha Testing
Alpha testing typically gets divided into two important phases that aim to catch defects early and improve the quality of the software. The main stages include:
Phase 1:
Developer Testing At this stage, the development team takes over and performs initial tests, usually on unit tests and core functionalities. Alpha testing catches obvious bugs, crashes, logic errors, which all happen earlier in the development cycle. Developers use debugging to resist instability and ensure that the individual components really do what they are supposed to.
Lots of unit testing and functional testing
Major bugs and crashes detected
Frequent debugging and bug fixes
Phase 2:
Internal QA Testing Once the developers have finished with their testing, the QA team or internal testers take over and get the software ready for a controlled environment that replicates real-world conditions. It aims to find integration, and usability issues and any unexpected behavior before the product gets sent to beta testers.

Together, the two phases of alpha testing help ensure software stability and reliability before they get released to beta testing or public release. That way, the defect can be caught internally at an early stage during the development process and prevent costly problems later in the development cycle.
Difference between Alpha and Beta Testing
When we talk about how we can make the newly developed software available to the users after all the testing stages, two important test stages are involved: Alpha Testing and Beta Testing; each having a distinct purpose.
Alpha Testing is conducted internally by developers and QA teams before things get into production. It is carried out in a controlled environment for the purpose of catch bugs, as well as any crashes or other detrimental issues. The center of focus is to ensure that the core features of the product work satisfactorily before any outside person has a glimpse at it.
After alpha testing, the product goes into beta testing. Some customers and volunteers try it out to see how good it really is to use . This stage collects feedback on how the software performs in everyday use. That helps capture side effects and problems that go through unnoticed in the alpha testing stage, usually issues of user interface and compatibility.

To put it simple: alpha testing assures internal quality, whereas beta testing checks out the product in real-world environments to make sure user satisfaction has been attained. Both these methods are crucial for the development of a good product.
Alpha Testing Made Easy with Keploy
In alpha testing, developers and QAs fix bugs before the product is made available to real users. Let’s see how Keploy helps you with alpha testing. Keploy offers three products to find bugs early in your development stage (Shift Left approach):
API Testing: Keploy generates complete API workflow tests by observing real traffic to a deployed endpoint. These workflows are fully self-contained and don’t require human review — no test data setup needed, and no reliance on mocks or external fixtures.
Try it out here: app.keploy.io.
Unit Testing: Keploy uses AI to auto-generate unit tests directly inside GitHub PRs by analyzing code changes. Tests are suggested inline and validated before being surfaced — meaning they build, pass, and add meaningful new coverage.
PR Agent: Connects directly to GitHub and analyzes code changes to auto-suggest unit tests. It ensures any new code is covered with tests and provides instant AI feedback right within your PR, saving time and ensuring better code quality.To try PR Agent, use this link: PR Agent on GitHub.
VS Code Extension: Brings the test generation features of Keploy into your editor. With one click, you can generate, run, and view tests, making it easy to catch edge cases and debug faster without leaving VS Code. To try the VS Code Extension, use this link: Keploy VS Code Extension.
Integration Testing: Keploy built the world’s first eBPF-based network proxy that records API interactions as test cases and mocks, then replays them as full integration tests. No code changes are required for integration.
Advantages of Alpha Testing
Alpha Testing possesses many advantages during the process of software development. Given below are few benefits:
Detects Bugs Earlier The major issues are identified earlier, thus reducing the cost and complexity of fixing them at a later stage.
Improves Product Quality The internal testing is a guarantee that the software meets the functional and performance expectations.
Developer Feedback Loop Testers work directly with developers, who gives an almost immediate response, allowing any issues to be dealt with immediately.
Ensures that Core Features Are Stable The core features are ensured to work appropriately before exposing them to the outside world.
Saving Time and Resources Having Issues fixed early avoid costly rework and emergency patches after launch.
Builds Confidence before Beta Testing Gives confidence to the team that the build is ready for the next level of testing.
Disadvantages of Alpha Testing
There are also some notable disadvantages of alpha testing:
Testing using a Limited Environment Alpha testing takes place in a certain controlled environment, which may not justify diverse devices, networks, or even end-user behaviors.
Time-consuming setup The environment setup, test case development, and inter-team coordination sometimes requite a great amount of time and effort.
Not apt for Load or Scalability Testing It does not simulate real-world traffic or stress situations ; thereby these might hide performance bottlenecks.
May Delay Beta Testing When serious bugs are found, fixing them may give push to the actual release schedule.
Missing Real-User Perspective Since it is conducted solely by internal teams, it may not really reflect how actual users will be engaging with the product.
Tester Bias Developers, or internal testers, tend to unintentionally miss out on the bugs due to their familiarity with the system.
Conclusion
Alpha testing is the first phase of crucial validation in which internal teams evaluate the software and its functionality before an actual release. This testing phase identifies critical bugs and usability issues early in the development cycle, thereby saving more costs and significantly reducing user-facing problems.
Alpha testing needs proper planning, dedicated resources, and clear feedback mechanisms. When done correctly, it gives developers insights into realistic usage patterns and helps ensure that the product meets its requirements.
Organizations that practice thorough alpha testing generally release more stable versions and have fewer issues after their product is launched. This very investment into comprehensive testing within the premises pays fruits in terms of enhanced user experiences and a better product launch.
Some of the Other Useful Blogs for Your Reference:
Guide To Automated Testing Tools In 2025-https://keploy.io/blog/community/guide-to-automated-testing-tools-in-2025
Functional Testing: An In-Depth Overview-https://keploy.io/blog/community/functional-testing-an-in-depth-overview
All About Api Testing Solution & Keploy-https://keploy.io/blog/community/all-about-api-testing-keploy
FAQs
Q1. What are the various methods used in alpha testing?
Alpha testing usually involves white box and black box testing, manual and automated testing, usability testing, smoke testing, functional testing, and regression testing to find bugs in the very beginning of the release process.
Q2. Is Alpha Testing restricted to software products?
Mostly yes, but Alpha Testing concepts can apply to other products that need early internal testing before going into public release.
Q3. How long do Alpha Tests usually take?
Depending on the size and complexity of the project, the period can last from a few days to a few weeks.
Q4. What bugs tend to show up during Alpha Testing?
Critical functional bugs, UI problems, crashes, performance issues, and security flaws.
Q5. Does Alpha Testing require a special environment?
Yes, generally, it happens within a controlled testing environment made to simulate user conditions as closely as possible.
0 notes
Text
What Is Software Architecture? A Complete Guide to Building Robust Systems

As software systems grow more complex, the need for a strong foundation becomes critical. That foundation is software architecture—the high-level structure that defines how your system behaves, scales, and evolves.
In this guide, we’ll break down what is software architecture , why it matters, its key components, and the most common architecture patterns used in the industry today.
What Is Software Architecture?
Software architecture refers to the fundamental design and organization of a software system. It describes how different components (modules, databases, APIs, services) are structured and how they interact. In simple terms, it’s like a blueprint for building software—guiding developers on how to structure the codebase, manage data, and handle requests efficiently.
Why Is Software Architecture Important?
Good architecture determines how:
Easily the software can scale
Quickly features can be added or modified
Stable and secure the application is under load
Teams collaborate and build consistently
Without a solid architecture, systems become harder to maintain, debug, and expand over time.
Key Components of Software Architecture
Modules/Components – Individual units of functionality (e.g., user auth, payment)
Data Flow – How data moves between components
APIs/Interfaces – How components communicate with each other
Deployment Model – Monolithic, microservices, serverless, etc.
Scalability & Reliability Layers – Caching, load balancing, failovers
Software Architecture vs Software Design
While architecture focuses on the high-level structure, software design deals with the detailed implementation of components. Think of architecture as city planning, and design as building individual houses.
Popular Software Architecture Patterns
Layered (N-Tier) Architecture Most common in enterprise applications. Divides code into layers like presentation, business logic, and data access.
Microservices Architecture Breaks the app into small, independent services that communicate over APIs. Ideal for scalability and large teams.
Event-Driven Architecture Uses events (triggers) to decouple services and build reactive systems. Great for real-time apps.
Serverless Architecture Runs code in cloud functions without managing infrastructure. Best for lightweight or event-based workloads.
Hexagonal (Ports & Adapters) Architecture Separates core logic from external dependencies. Ensures better testability and flexibility.
Best Practices in Software Architecture
Choose patterns based on business needs, not trends
Document architecture decisions clearly
Design for failure and scalability from the start
Automate testing and deployments
Use domain-driven design (DDD) for large-scale systems
Real-World Use Case
Imagine building a ride-sharing app like Uber:
Use microservices to separate billing, ride-matching, and notifications
Use event-driven architecture to update live locations
Use serverless functions to send SMS alerts
Use APIs for communication between frontend and backend
Add caching and load balancing to ensure speed at scale
Related Reads
What is Unit Testing
Python Code for Pulling API Data
React vs React Native: Which One Should You Use
Conclusion
Software architecture is the backbone of any scalable, maintainable, and high-performing application. Whether you're building a simple web app or a complex distributed system, having the right architectural foundation is critical.Want to level up your architecture and testing stack? Try Keploy’s open-source API test generator for seamless integration testing and mocking.
0 notes
Text
Python List Comprehension with if: When and How to Use It
If you're looking to write cleaner, faster, and more Pythonic code, mastering list comprehensions with if conditions is a must. They allow you to filter and transform lists in a single line, making your code concise and readable.
This guide explains when to use a list comprehension in Python, especially with conditional logic using if.
💡 What is List Comprehension?
List comprehension is a compact way to generate lists using a single line of code. Instead of writing multiple lines with loops, you can use this syntax:
python
CopyEdit
[expression for item in iterable]
It can also include an if condition for filtering:
python
CopyEdit
[expression for item in iterable if condition]
✅ Example: List Comprehension with if
Let’s say you want to extract all even numbers from a list:
python
CopyEdit
numbers = [1, 2, 3, 4, 5, 6]
evens = [n for n in numbers if n % 2 == 0]
print(evens) # Output: [2, 4, 6]
Instead of writing:
python
CopyEdit
evens = []
for n in numbers:
if n % 2 == 0:
evens.append(n)
The list comprehension version is cleaner and faster.
🧠 When to Use List Comprehensions with if
Use them when:
You want to filter items from a list based on a condition.
You’re transforming data and only need specific elements.
You want readable, single-line solutions for simple logic.
Avoid them when:
The logic is too complex (nested conditions, multiple variables).
Readability suffers—write loops instead for clarity.
🛠 Example: Conditional Transformation
You can also include both if and else with this syntax:
python
CopyEdit
["even" if n % 2 == 0 else "odd" for n in numbers]
Output: ['odd', 'even', 'odd', 'even', 'odd', 'even']
📌 Real-World Use Cases
Filtering out empty strings:
python
CopyEdit
names = ["Alice", "", "Bob", "", "Charlie"]
filtered = [name for name in names if name]
Selecting positive numbers:
python
CopyEdit
nums = [-5, 0, 8, -1, 3]
positives = [n for n in nums if n > 0]
Transforming only valid entries:
python
CopyEdit
scores = [85, None, 90, None, 75]
valid = [s for s in scores if s is not None]
🔗 Related Python Guides
What Does enumerate() Do in Python
Python Code for Pulling API Data
What is Unit Testing in Python
🧠 Final Thoughts
Using a Python list comprehension with if conditions makes your code elegant and efficient. It’s ideal for most filtering tasks where readability and simplicity are key. Want to explore more Python tricks like this? Visit our complete guide on when to use a list comprehension in Python.
0 notes
Text
How to Use Python Code for Pulling API Data Efficiently

In today’s data-driven world, APIs are everywhere—from weather apps and stock market dashboards to payment gateways and social media feeds. If you're working with external services, knowing how to pull data using Python code for pulling API data is a must.
This article walks you through the basics and best practices to fetch API data using Python efficiently.
Why Use Python for API Calls?
Python is often the first choice for making API requests because of its:
Readable syntax
Powerful libraries like requests and httpx
Great compatibility with automation, scripts, and data pipelines
Making Your First API Call with requests
The most common way to pull API data in Python is with the requests library.
python
CopyEdit
import requests
url = "https://api.example.com/data"
response = requests.get(url)
if response.status_code == 200:
data = response.json()
print(data)
else:
print("Request failed:", response.status_code)
This simple snippet makes a GET request and prints the JSON response if successful.
Adding Authentication (API Keys)
Many APIs require authentication via headers:
python
CopyEdit
headers = {
"Authorization": "Bearer YOUR_API_KEY"
}
response = requests.get(url, headers=headers)
Always store keys securely—avoid hardcoding them in your scripts.
Handle Errors and Timeouts Gracefully
Good API code handles edge cases:
python
CopyEdit
try:
response = requests.get(url, timeout=5)
response.raise_for_status()
data = response.json()
except requests.exceptions.RequestException as e:
print("Error:", e)
Working with Pagination
Some APIs return paginated responses. Here's a basic way to handle it:
python
CopyEdit
all_data = []
page = 1
while True:
response = requests.get(f"{url}?page={page}")
data = response.json()
if not data:
break
all_data.extend(data)
page += 1
Going Async with httpx
For high-performance API fetching, use the async-ready httpx library:
python
CopyEdit
import httpx
import asyncio
async def fetch_data():
async with httpx.AsyncClient() as client:
response = await client.get("https://api.example.com/data")
print(response.json())
asyncio.run(fetch_data())
This is useful when pulling data from multiple endpoints in parallel.
Pro Tips
Use try/except to catch network issues
Respect API rate limits to avoid getting blocked
Store results locally to prevent redundant calls
Automate with cron jobs or background workers
Use environment variables for secret keys
Common Use Cases
Auto-fetching stock prices or news headlines
Building custom dashboards from third-party APIs
Triggering workflows based on API data
Collecting analytics, logs, or usage reports
Related Reading
What is Unit Testing in Python
What Does Enumerate Do in Python
Generate API Test Cases Automatically
Final Thoughts
Using Python to pull API data is one of the most valuable and flexible skills for modern developers. With just a few lines of code, you can connect with services, automate insights, and power your applications with real-time data. Start simple, handle errors well, and scale your API calls smartly—and you’re set.
0 notes
Text
What Does enumerate() Do in Python?

Ever wondered what does enumerate do in Python? It's a simple yet powerful built-in function that allows you to loop over iterables while keeping track of the index—cleanly and efficiently.
🧠 What is enumerate()?
enumerate() adds a counter to an iterable (like a list or tuple) and returns it as an enumerate object. This allows you to access both the index and value during iteration.
🧪 Syntax
python
CopyEdit
enumerate(iterable, start=0)
iterable: The collection you want to loop through.
start: (Optional) The index to start counting from. Defaults to 0.
✅ Example Usage
Basic Loop
python
CopyEdit
fruits = ['apple', 'banana', 'cherry']
for i, fruit in enumerate(fruits):
print(i, fruit)
Start Index at 1
python
CopyEdit
for i, fruit in enumerate(fruits, start=1):
print(f"{i}. {fruit}")
List Comprehension with Enumerate
python
CopyEdit
indexed = [(i, x.upper()) for i, x in enumerate(['a', 'b', 'c'])]
🚀 Why Use enumerate()?
Cleaner and more readable than manual counters
Avoids common mistakes like using .index() in loops
Considered more "Pythonic"
🔚 Conclusion
If you're looping through an iterable and need the index alongside each item, enumerate() is your go-to solution. It's fast, clean, and makes your code easier to read.
Want to learn more Python tricks? Explore our full guide on what does enumerate do in Python.
0 notes
Text
What is React and React Native? A Beginner-Friendly Overview
In the fast-paced world of modern web and mobile development, what is React and React Native are two of the most powerful and popular tools used by developers. Both were created by Meta (formerly Facebook), and while they share similarities, they serve different purposes.
If you're new to the world of JavaScript frameworks or wondering how to choose between them, this article breaks down what React and React Native are, their key differences, and where to go deeper.
⚛️ What is React?
React is a JavaScript library for building user interfaces, especially for web applications. It lets developers build reusable components that manage their own state, making web UIs easier to develop and maintain.
✅ Key Features of React:
Component-based architecture: Build encapsulated UI components.
Virtual DOM: Improves performance by minimizing real DOM manipulation.
One-way data binding: Makes data flow predictable and easy to debug.
Ecosystem support: Works well with tools like Redux, React Router, etc.
🔍 Example Use Case:
Creating a dynamic web dashboard, where components like charts, tables, and forms are all interactive and data-driven.
📱 What is React Native?
React Native is a framework for building mobile applications using JavaScript and React. Instead of rendering to HTML and CSS, it renders to native platform UI elements (like Android and iOS views).
In short, you can use React principles to write mobile apps, and React Native compiles them into real native mobile code.
✅ Key Features of React Native:
Cross-platform: Write once, deploy on both iOS and Android.
Native performance: Uses native components for smoother UI/UX.
Hot reloading: See changes in real-time during development.
Third-party plugin support: Access native device features via libraries.
🔍 Example Use Case:
Building a mobile e-commerce app that runs on both Android and iOS using the same codebase.
🆚 React vs React Native
While both use JavaScript and share React's core principles, their output targets are completely different: React is for web apps, and React Native is for mobile apps.
Want a detailed side-by-side breakdown? Read our in-depth comparison: 👉 React vs React Native: Which One Should You Use?
🛠️ When to Use React vs React Native
Scenario
Use React
Use React Native
Build a website or web dashboard
✅
❌
Build an iOS/Android mobile app
❌
✅
Use JavaScript for UI development
✅
✅
Render HTML and CSS
✅
❌
Access camera, GPS, native features
❌
✅
🚀 Final Thoughts
React and React Native empower developers to build fast, scalable, and engaging applications across platforms. Whether you’re building a web app with React or a mobile app with React Native, both tools offer robust performance and developer-friendly features. Not sure which one to choose for your next project? Explore this detailed guide: React vs React Native: Which One Should You Use?
0 notes
Text
React vs React Native: Which One Should You Use?

It is said that the special nature of software development is ever-changing so it is important to choose the right tool for the job. Whether it's a web interface or a cross-platform mobile app you are building, React and React Native are two of the most powerful technologies available today. This blog will answer the question of "what is React and What is React Native" and show how Keploy can help improve test efficiency across both frameworks. If you are exploring modern frameworks, knowing what React Native and React are will inform your development decision-making.
What is React?
Getting Started with React
React is an open-source JavaScript library created by Meta for developing user interfaces, especially for single-page applications. It provides a way to create interactive UIs using a component-based approach. This means we will be developing user interfaces faster and with less complexity than a traditional approach.
Why React is so Popular with Web Developers
React is popular because of its virtual DOM, page or component-based structure, and unidirectional data flow. These design features allow for better performance and easier debugging. React also has a large developer community and many tools and accompaniments, which make it one of the leading options for front-end developers. Read more in our blog post on React Testing on VS Code.Use Cases of React in Modern Web Development
React is leveraged in different applications such as:
Interactive dashboards
E-commerce websites
Single-page applications (SPAs)
Progressive web applications (PWAs)
For a comparison with other frameworks, check our Angular vs React guide.
What is React Native?
Understanding React Native
React Native is specifically a framework that permits developers to create mobile applications using JavaScript and React. Instead of targeting the browser, React Native targets mobile platforms such as iOS and Android. The main differences between React Native and React can be described, as their focus on either mobile platforms (for React Native) or web (for React).
How React Native Is Used for Mobile App Development
React Native allows for JavaScript and native platform code to communicate together via a bridge. This, combined with React Native's use of components, allows components built in JavaScript to interact with native APIs, and offer nearly native performance but shared code across both platforms.
React Native Use Cases and Success Stories
React Native is used by companies like Facebook, Instagram, and Walmart. It's ideal for:
Cross-platform mobile applications
MVPs and prototypes
Mobile apps with shared business logic across platforms
React vs React Native — What’s the Difference?

Targeting Platform (Web or Mobile)
React is primarily built for web browsers, whereas React Native is built for mobile software development. This fundamental difference governs how each framework functions.
Language and Compilation Differences
React renders HTML and CSS with JavaScript. On the other hand, React Native leverages native components and styles written in JavaScript, and compiles to native code for mobile phones.
Performance and Developer Experience
React is built to help you create web applications quickly with features, such as virtual DOM, reusable components. React Native is not only a rapid development tool - you get benefits like hot-reloading, unified codebase across iOS and android, with performance comparable to native development.
When to Choose React and When to Choose React Native?
Making the Right Choice for Your Project
If you are building a dynamic web application, choose React. If you need a cross-platform mobile app and want to avoid duplicating your codebase, choose React Native.
Tips For Teams with Development Efforts across Web and Mobile
Share architectural and business logic between web and mobile
Use unified testing frameworks like Keploy
Maintain functional and design consistency across platforms
For additional (hands-on) assistance check out our blog on Running React Code in Visual Studio Code and Online.
How Keploy Works with React & React Native Apps
API Test Automation for Frontend Engineers
Keploy records real API calls in your React and React Native app so it can write automated tests for you. This enables you to stop manually writing tests and provides validation that your APIs are correctly functioning.
Simplifying CI/CD for React & React Native Dev Teams
Keploy allows developers to automate tests in CI/CD pipelines so qualitative insights around bugs and defects can be identified early, enabling you to deploy your code with assurance. You can explore further ways to automate your React apps in our guide with Virtual DOM and Refs.
Final Thoughts on React and React Native
Summary of Key Differences

Selecting the Optimal Framework for Your Stack
React and React Native are both excellent alternatives depending on the user's needs. React is more suitable for dynamic web apps, while React Native is for mobile development leveraging the same code. Testing each platform using Keploy becomes effortless.
Frequently Asked Questions (FAQs)
What is the basic difference between React and React Native?
React is for web interfaces and React Native is for mobile apps.
Can I use React and React Native together?
Yes, you can use React for web and React Native for mobile and share business logic and services.
Is React Native better than native mobile development?
React Native is for cross-platform apps faster. Native is better for platform-specific features and performance.
Do React and React Native use the same programming language?
Yes, React and React Native both use JavaScript and JSX, but each renders UI differently.
0 notes
Text
Pytest vs Unittest: Key Differences Between Python Testing Frameworks

In the world of Python testing, two popular frameworks stand out: Pytest and Unittest. Whether you're a beginner writing your first tests or an experienced developer managing complex test suites, choosing the right framework can significantly affect your productivity and code quality.
In this article, we'll break down the core differences between Pytest and Unittest to help you decide which one fits your testing needs.
🧪 What Is Pytest?
Pytest is a powerful, easy-to-use Python testing framework known for its:
Simplicity in writing tests
Rich ecosystem of plugins
Built-in support for fixtures and parameterization
Pytest works with Python's built-in assert statement, which makes test writing more intuitive and readable.
🧪 What Is Unittest?
Unittest is the built-in testing framework in Python, inspired by Java's JUnit. It's part of Python’s standard library and follows the object-oriented testing style using TestCase classes and methods like assertEqual, assertTrue, etc.
⚔️ Pytest vs Unittest: Feature Comparison
Feature
Pytest
Unittest
Ease of Use
Very simple and concise syntax
More boilerplate with class structure
Built-in with Python
No (install via pip)
Yes (standard library)
Fixtures
Powerful and flexible
Basic support
Test Discovery
Auto-discovers with simple naming
Requires classes and method prefixes
Assertions
Uses plain assert
Uses specific assert* methods
Plugins & Ecosystem
Rich ecosystem (e.g., pytest-django)
Limited
Parameterization
Native support
Requires workarounds
Learning Curve
Low
Slightly higher
Test Reporting
Better out-of-the-box
Basic
✅ When to Use Pytest
Choose Pytest if:
You want concise, readable tests
You're working on modern Python projects
You prefer fewer lines of code
You need powerful fixtures and plugin support
Example:
python
CopyEdit
# test_math.py
def test_add():
assert 1 + 1 == 2
✅ When to Use Unittest
Choose Unittest if:
You need a standard library tool with no external dependencies
You’re maintaining legacy code
You prefer an object-oriented testing approach
Example:
python
CopyEdit
# test_math.py
import unittest
class TestMath(unittest.TestCase):
def test_add(self):
self.assertEqual(1 + 1, 2)
🚀 Which One Should You Pick?
If you're starting a new project and prefer a more modern and efficient testing experience, Pytest is the better choice. However, if you're working in a restricted environment or dealing with existing tests written in Unittest, sticking with the standard library might be more practical.
In short:
Use Pytest for modern, scalable test suites.
Use Unittest when minimal dependencies and legacy compatibility are priorities.
🔗 Related Resources
What is Unit Testing
Unit Testing vs Regression Testing
AI Test Case Generator
💡 Conclusion Both Pytest and Unittest are solid frameworks. Your decision depends on your project needs, preferences, and ecosystem. Whatever you choose, make testing a habit early in development—it saves time, reduces bugs, and builds confidence in your codebase.
0 notes
Text
What Does Enumerate Mean In Python

When you use loops in Python, there are a lot of times when you don’t just want the item from a list, you also want to know where that item is in the list. For example, going through a list of names and needing to show their position, like “1. Alice”, “2. Bob”, and so on, or you could be building a menu where each option needs a number next to it.
In these situations, Python’s enumerate() function is very helpful. It lets you look through the list and gives you both the index and the item at the same time.
enumerate() helps you loop through a list (or any collection) and gives you two things at the same time:
The index
And the actual item itself.
So instead of doing extra work to keep track of the position, enumerate() does it for you, on its own!
What is Enumerate in Python?
In Python, enumerate() is a built-in function that makes it easier to loop through a list (or any collection) and also keep track of the index of each item at the same time.
Normally, when you loop through a list like this:CopyCopyfruits = ['apple', 'banana', 'cherry'] for fruit in fruits: print(fruit)
You get only the items ('apple', 'banana', 'cherry'). But what if you also want to know their index positions?
This is where enumerate() comes in handy:CopyCopyfor index, fruit in enumerate(fruits): print(index, fruit)
Output:CopyCopy0 apple 1 banana 2 cherry
It gives you both the index and the item in each loop.
What Does Enumerate Do in Python?
Behind the scenes, enumerate() takes an iterable object (such as a list or a string) and adds a number to each item, starting from 0 (or any other number you choose). So instead of just getting the item, you also get its position in the list.
It’s a small but useful Python feature that helps make your code shorter and easier to understand. Once you learn how it works, you'll probably want to use it a lot!
The function turns any iterable into a series of indexed pairs. It's very helpful when you have to:
Keep track of positions while processing data.
Make menus or lists with numbers.
Examine the components concerning their neighbors.
Modify lists based on index conditions.
Why use enumerate()?
Without enumerate, you'd typically use range(len()) or maintain a separate counter variable. Both approaches are effective, but they're more prone to error and are lengthy.
It makes your code shorter and cleaner.
It's perfect when you need both the item and its position.
How to Use Enumerate in Python?
enumerate() lets you loop through items and get their indexes at the same time. It's cleaner than using range() or manually tracking the index.
Basic Usage
CopyCopyfruits = ['apple', 'banana', 'orange', 'grape'] for index, fruit in enumerate(fruits): print(f"{index + 1}. {fruit}")
Output:CopyCopy1. apple 2. banana 3. orange 4. grape
You can also specify a custom starting value:
CopyCopyfruits = ['apple', 'banana', 'orange', 'grape'] for index, fruit in enumerate(fruits, start=1): print(f"Item {index}: {fruit}")
Output:CopyCopyItem 1: apple Item 2: banana Item 3: orange Item 4: grape
Syntax of Enumerate in Python
The syntax for enumerate is simple and flexible:CopyCopyenumerate(iterable, start=0)
Parameters:
Iterable: Any object that can be iterated (lists, tuples, strings, etc.)
start: Optional integer specifying the starting value for the counter (default is 0)
Return Value:
An enumerate object that yields tuples of (index, value)
Here are some practical examples:CopyCopy# With strings text = "Python" for i, char in enumerate(text): print(f"Character {i}: {char}") # With tuples coordinates = (10, 20, 30) for index, value in enumerate(coordinates, start=1): print(f"Dimension {index}: {value}") # With dictionaries (iterates over keys) data = {'name': 'John', 'age': 30, 'city': 'NYC'} for i, key in enumerate(data.keys()): print(f"{i}: {key} = {data[key]}")
For Loops Vs. Enumerate in Python
Let's compare different approaches to understand why enumerate is often the better choice:
Traditional approach with range and len:CopyCopyitems = ['laptop', 'mouse', 'keyboard'] # Not recommended for i in range(len(items)): print(f"{i}: {items[i]}")
Output:CopyCopy0: laptop 1: mouse 2: keyboard
Manual counter approach:CopyCopy# Also not ideal counter = 0 for item in items: print(f"{counter}: {item}") counter += 1
Output:CopyCopy0: laptop 1: mouse 2: keyboard
The enumerate way:CopyCopy# Clean and Pythonic for i, item in enumerate(items): print(f"{i}: {item}")
Output:CopyCopy0: laptop 1: mouse 2: keyboard
The enumerate approach is cleaner because:
No manual index management. With enumerate(), counting is done for you automatically by Python. You don’t have to create a separate counter or worry about updating it in each loop.
Fewer mistakes with counting. It is easy to mess up when you try to count by hand, like starting off with the wrong number or skipping something. enumerate() keeps the numbers right, so you don’t have to think about it.
Your code is easier to read. When you use enumerate(), it is clear that you are working with both the item and its index position. This makes the code easier for you (and others) to read and understand.
Works well in all situations. It does not matter if your list has one item, nothing at all, or a bunch of things; enumerate() handles these situations by itself.
How to Use the Python Enumerate Method?
Here are practical scenarios where enumerate shines:
Creating numbered menus:CopyCopymenu_options = ['Start Game', 'Load Game', 'Settings', 'Exit'] print("Game Menu:") for index, option in enumerate(menu_options, start=1): print(f"{index}. {option}")
Output:CopyCopyGame Menu: 1. Start Game 2. Load Game 3. Settings 4. Exit
Finding specific elements:CopyCopynumbers = [10, 25, 30, 45, 50] target = 30 for index, num in enumerate(numbers): if num == target: print(f"Found {target} at position {index}") break
Output:CopyCopyFound 30 at position 2
Modifying lists conditionally:CopyCopyscores = [85, 92, 78, 96, 88] # Add bonus points to every third score for index, score in enumerate(scores): if (index + 1) % 3 == 0: scores[index] = score + 5 print(scores)
Output:CopyCopy [85, 92, 83, 96, 88]
Useful Tips for Using Enumerate in Python
Tip 1: Use meaningful variable namesCopyCopy# Instead of generic i, j for position, student_name in enumerate(students): pass
Tip 2: Combine with list comprehensionsCopyCopywords = ['hello', 'world', 'python'] indexed_words = [(i, word.upper()) for i, word in enumerate(words)] print(indexed_words)
Output:CopyCopy [(0, 'HELLO'), (1, 'WORLD'), (2, 'PYTHON')]
Tip 3: Use enumerate with zip for multiple listsCopyCopypythonnames = ['Alice', 'Bob', 'Charlie'] ages = [25, 30, 35] for index, (name, age) in enumerate(zip(names, ages)): print(f"Person {index + 1}: {name}, {age} years old")
Output:CopyCopyPerson 1: Alice, 25 years old Person 2: Bob, 30 years old Person 3: Charlie, 35 years old
Tip 4: Remember, it works with any iterableCopyCopypython# Works with files with open('data.txt', 'r') as file: for line_num, line in enumerate(file, start=1): print(f"Line {line_num}: {line.strip()}")
Output:CopyCopyLine 1: First line of the file Line 2: Second line of the file Line 3: Third line of the file
How Keploy Helps Us Test Python Applications
In all honesty, testing isn’t exactly the most exciting part of writing code. Every developer knows that it is important, but it can start to feel slow or repetitive. That's where Keploy steps in to make things easier.
Keploy is like having your smart assistant that watches how your app behaves in the real world. It is an open-source testing tool that records things like API calls and database queries, the turns them into test cases and mocks automatically. It is like having your app's personal documentary filmmaker, capturing all of the interesting stuff that happens and turning it into useful testing scripts.
What Makes Keploy Special for Python Developers
Here are some reasons Python developers prefer to use Keploy:
1. Unit Testing Without the Hassle
Keploy has recently launched a Unit Testing Agent that focuses on what matters most, generating stable and relevant unit tests directly in your GitHub Pull Requests (PRs). You don’t need to write test cases from scratch or worry about covering every line of code manually.
2. Smart PR Agent
Keploy's Unit Testing Agent is more than just another code-generating tool. It's a vertical AI focused solely on testing. Here’s what it does:
Uses advanced prompt engineering with validation steps like build, run, and test coverage checks.
Targets only the code changes in your PR, so it doesn’t generate unnecessary or noisy tests.
Works with popular LLMs like Gemini, GPT, and Claude to choose the best test cases for your tech stack.
Fully compliant with ISO, GDPR, SOC2, and HIPAA standards.
You can install Keploy directly from the GitHub Marketplace.
VSCode Extension for Keploy
If you’re working in VSCode, Keploy makes things even easier. The Keploy VSCode extension lets you generate unit tests right from your IDE, with just a few clicks. There’s no need to switch tabs, write prompts, or copy and paste code.
You can install the extension from the VSCode Marketplace.
This tool supports multiple languages, including Python, JavaScript, Java, Go, and more. It’s built to make test generation fast, simple, and developer-friendly.
How Keploy Works
Keploy observes how your code behaves during real use, for example, how it responds to different inputs, how it handles edge cases, and how changes affect surrounding logic. It quietly studies the way your app runs and builds thoughtful tests that make sure everything keeps working as expected.
Rather than randomly generating test cases, Keploy focuses on what truly matters in your code. It looks at recent changes, analyzes the logic, and crafts tests that match the structure and behavior of your application.
That means fewer surprises and better stability. Even when you’re making big updates, Keploy helps you keep confidence in your code.
Whether you are building a web app with Flask, a Django backend, or just writing a Python script to handle some data, Keploy can make testing a whole lot easier. It takes care of the boring, repetitive parts so that you can focus more on building your app and less on writing test cases.
Advantages of Using Enumerate in Python
Cleaner Code Structure: Cleaner Code Structure: Enumerate removes the need for manual indexing, which makes your code much easier to read and manage. You get both the index and value without any extra variables or calculations
Better Performance: Compared to using range(len()), enumerate is mostly faster because it does not need to calculate the length of the iterable beforehand.
Reduced Error Potential: We've all been there, spending hours hunting down why our code crashes because of a miscount by one. Manual counting is like trying to juggle while riding a bike. Enumerate is like having training wheels that never come off. Enumerate does the counting perfectly every time, allowing you to concentrate on the real tasks rather than fixing minor errors.
Pythonic Approach: Python has a motto: "There should be one obvious way to do it." For getting both the index and value, the way is to use enumerate. It's like using a fork to eat pasta instead of your hands - sure, both work, but one is evidently the better option.
Flexibility with Start Values: Need to count from 1? From 100? From -5? Enumerate does not judge. Just tell it where to start, and it will count from there and it will begin counting from that point. You don’t have to do mental calculations; enumerate takes care of the math for you.
Disadvantages of Using Enumerate in Python
Not Always Required: At times, you just want the item itself and may not care about its position. In such scenarios, using enumerate() adds unnecessary effort that only makes your task more complex.
Can Be Confusing Initially: If you are new to Python, the syntax for tuple unpacking may seem somewhat confusing at first. But with a little practice, it gets easier.
Uses More Memory in Some Cases: For very large lists or files, enumerate() can use a little more memory because it makes pairs (index and item). It’s not a big issue for most programs.
Conclusion
Python's enumerate function is like having a really helpful assistant who always remembers what number you are on. It makes looping through data so much easier and keeps your code looking clean and professional.
Think of enumerate as your go-to tool whenever you need to know both "what" and "where", what the item is, and where it sits in your list. Building a menu? Processing files? Creating numbered lists? Enumerate has got your back.
The more you use Python, the more you'll develop a feel for when enumerate makes sense. Trust your instincts, keep your code readable, and remember, if it makes your life easier and your code clearer, you are probably on the right track.
Related Keploy Blogs
1. How To Run a Pytest Program?
2. Prompt Engineering For Python Code Generation With Keploy
3. Python Unit Testing: A Complete Guide
4. Introduction To Rest Api In Python
5. Python Get Current Directory – A Complete Guide
FAQs
1. Can enumerate work with strings and other iterables besides lists?
Yes definitely! while enumerate often works with lists, it works with any iterable object in Python as well which includes using it with strings, tuples, sets, dictionaries, and file objects. With a string, it gives you both the character and its position, and with a dictionary, it goes over the keys by default, giving you both the position and the key.
2. What happens when I use enumerate on an empty list?
If your list is empty, the loop simply does not run; you don’t have to deal with errors, warnings, or unexpected issues, which is pretty convenient because you don't have to check "Is my list empty?" before you use it. Your code will run as usual, which is great when you are dealing when working with data that may not always include anything.
3. How can I start counting from 1 instead of 0?
enumerate() starts counting from 0 by default, but you can use the start parameter like this: enumerate(my_list, start=1) so that it starts the count from 1 instead. This is especially useful when creating numbered lists for users who expect counting to begin at 1. You can actually start from any number you want, be it 10 or -5.
4. Is enumerate faster than using range(len()) for indexing?
Yes, the majority of cases. Here is why:
With enumerate(), Python takes care of the counting for you. You get both the index and the item together without needing to write extra lines of code or having to worry about keeping a counter.
Using range(len()) is more manual; you initially get the length of the list, then go through it by index, and then fetch each item using that index. It works, but it’s not as clean or readable.
The difference in performance is usually minimal, but enumerate() makes your code easier to follow and less prone to common bugs (like beginning at the wrong index or going out of bounds).
5. Can I use enumerate with nested loops or complex data structures?
Absolutely. Enumerate works well with nested structures when you are dealing with data like lists of lists or dictionaries that include lists. Just keep in mind that enumerate only gives you the index at the level it’s used. If you need indices for both outer and inner loops, you'll need a separate enumerate() in each loop.
0 notes
Text
How to Use Python Code for Pulling API Data Efficiently

Do you ever feel like you need a superpower to get the information you need? Especially when you're really into Python? APIs are pretty much that superpower! APIs (Application Programming Interfaces) let your code "talk" to other systems and get exactly what you need. They can help you come up with a new app, find the next big market trend, or even automate your morning weather report.
This guide? It's your own, step-by-step guide to using Python to get data from an API, with lots of real-world examples. And if you're feeling brave, we'll even show you how to put that data directly into a PostgreSQL database.
What is an API?
Okay, let’s think about this: you’re dining at your favorite restaurant. You can see the menu at this point. That menu? It’s somewhat like an API. It shows you all of the delicious things you can get (the data and services available). You tell your waiter (that's your application making the request) exactly what you want and - voila! - it’s at your table. There’s no need for you to know how it’s made, what spices the chef uses, you just want it (the data). APIs are used in a very similar way. They are the rules that allow your app to “order” particular services and data from other software or systems. Pretty neat, huh?

How Do APIs Actually Work?
The interaction your application has with the API is usually like a conversation - a request and a response. In the following sections we'll address these topics.
You Ask: Your application sends a message (that we call a "request") to the API server . This message contains some important items of information:
An API endpoint: You can think of this as the address you send the post office to get your data (it's simply a specific URL)
An HTTP method: The method tells the API you what you want to do. Do you want to ask for data? Then use GET. Do you want to send new data? That's a POST. Do you want to update something? Then you need to use PUT. Are you deleting something? Use DELETE. I think you understand.
Potential extra items: This is maybe a search term or possibly an API key to confirm you belong there.
They think: The API server gets your request, determines what you are asking to do, and scuttles off to find the data or perform the action you want it to do.
They Reply: Take a look, eventually the API server sends a message (a "response") back to your application. This usually contains:
The requested output (which is very often conveniently included in a format like JSON or XML).
An HTTP status code - this will let you know if things went smoothly or if things went awry.
Why Python and APIs are a perfect pair

Python is the best programming language to work with APIs – and it’s easy to see why! Python is easy to learn and use, has a plethora of libraries built for you, and an enormous, supportive community behind it. When you want to work with APIs in your Python programs, look for opportunities to:
Get Outside Data: Maybe grab some fresh weather, public information, or current stock prices? APIs are perfect for getting fresh data from sources outside your program.
Automation of Boring Stuff: Tired of doing your project over and over again? Use APIs to automate your 'boring' code to talk to web services, like posting on social media, emailing, or managing your cloud account.
Link Your Applications: Using Python to connect with other software applications, databases (like PostgreSQL!), or web applications.
Build Cool Apps: Your application pulls fresh Data constantly from an online service.
Maturity: Add something new like integrating for new features or data sources into an existing Python project.
API's are a critical aspect of the technology powering many parts of the internet. Here are some examples of important tools and services that use APIs:
Social Media Tools: Facebook, Twitter, Instagram, and LinkedIn all provide APIs, which are made available to developers so that they can integrate social media with their app functionality. Developers can use the APIs for automated posting, ISO data, or interacting with users.
Payment Gateways: API-enabled services, like PayPal, Stripe, and Square let e-commerce websites, and shoppers, do business in a secure way by completing the transaction via an API.
Maps: API is also part of Google Maps and OpenStreetMap so developers can embed the map, get search results, and get directions in their applications.
Cloud Services: AWS, Google Cloud, Microsoft Azure, and other cloud services provide API's so developers can manage virtual machines, cloud storage, databases, etc.
Data Aggregators: Some services (e.g., weather data, stock price data, news) aggregate plenty of data sources by calling a ton of API's.
When and Why Use API with Python
Because Python is clean, has rich libraries and lots of community support, it is a wonderful language to work with APIs. In your Python programs, you may want to consider using APIs if you need:

More Data than You Can Shake a Stick At : You get to leverage a huge, massive data lake that is bigger than just what's already on your computer.
Real-time Greatness: You are going to build applications that are consuming live data, and building things like dashboards or alert mechanisms.
Speed of Development: Why build everything when web services already have that functionality? Use their APIs and you can use their pre-built functions to save tons of time.
Clean Architecture: They allow you to keep your application loosely-coupled from specific data sources and this can make your code manageable and flexible.
Moving at the Speed of Business: You easily allow your app to engage with other pieces of software, even if they were developed by other people.
The Benefits of Using APIs in Python Projects
APIs improve Python Projects by:
Increasing Data Availability: It provides additional data and information resources that your application can access beyond the local data your application has access to.
Creating Real-time Functionality: It means you'll be able to develop applications that will respond to live data updates, such as: live dashboards and alerts.
Reducing Time to Develop: Utilizing APIs will allow you to build upon the features available through the web services and most likely not have to develop them on your end.
Increasing Modularity: It allows you to design your application to not to depend on the specific data sources, promoting flexibility and progress in data integration.
It encourages Collaboration: Apis enable other applications to communicate with yours to allow your applications to work with independently developed software components.
Configuring Your Python Environment for APIs
Before making your first API request, make sure your Python environment is configured. The most commonly used library in Python for making HTTP requests is requests. If it's not already installed, you can install it from your terminal or command line via pip:CopyCopypip install requests
And for handling JSON data (which you'll see a lot of!), Python's json module is already built-in, so you don't need to install anything extra for that. Easy peasy!
Making Your First API Request in Python
Okay, now we will put our money where our mouth is! We are going to make a very simple GET request to a public API. We will be using the JSONPlaceholder API, which is a free, public and fake API that is great for testing.
import requests import json # Define the API endpoint api_url = "https://jsonplaceholder.typicode.com/posts/1" # Make a GET request response = requests.get(api_url) # Check if the request was successful (status code 200) if response.status_code == 200: # Parse the JSON response data = response.json() print("API Data:") print(json.dumps(data, indent=4)) # Pretty print the JSON else: print(f"Error: Unable to fetch data. Status code: {response.status_code}")
See? Not so scary, right?
Quick Chat About API Status Codes (What Do Those Numbers Mean?)
The little numbers you see in an API response? They can be really important! They specify exactly what happened with your request. You can think of them as normalized messages from the server. Here are the numbers you're likely to see the most:

200 OK: "Sure, I can do that! Everything is alright". This is the response you want to see - your request was successful.
201 Created: "Success! I even created something new for you." You will generally see this response when you send data to create something.
204 No Content: "Success! But there was nothing to send back." The server did what it was supposed to do, but did not have any data to send back to you.
400 Bad Request: "Uh oh, there is something wrong with your request." This could be something you typed, or a message that has invalid data.
401 Unauthorized: "Hold on! You need to authenticate to verify who you are." You attempted to access something without proper credentials.
403 Forbidden: "Sorry, that is not allowed." The server knows who you are, but does not allow you permission.
404 Not Found: "I can't find it!" Whatever you requested simply is not present.
500 Internal Server Error: "Oops, I messed up!" The server encountered an unexpected condition.
Connecting to an API
Connecting to an API is simply creating the correct web address (the "endpoint" we discussed), and then we have our trusty requests library. This library handles the http request (GET or POST).
import requests # For demonstration, let's use the Open-Meteo Weather API base_url = "https://api.open-meteo.com/v1/forecast" params = { "latitude": 52.52, "longitude": 13.41, "current_weather": True } try: response = requests.get(base_url, params=params) response.raise_for_status() # Raise an exception for HTTP errors (4xx or 5xx) print("Successfully connected to the API!") except requests.exceptions.RequestException as e: print(f"Error connecting to API: {e}")
2. Retrieve the information from the API
This is all connected now it's time to get the actual data from the response object we received.CopyCopy# Continuing from the previous example # response object is available here if response.status_code == 200: raw_data = response.text # Get the raw response content as text print("\nRaw API Data:") print(raw_data[:200]) # Print first 200 characters for brevity else: print("Failed to get data from API.")
3. Convert the data to a JSON format
Generally speaking, most APIs will respond to you with data formatted in something called JSON (JavaScript Object Notation). JSON is very popular because it is compact and easy to read. Luckily for you, the requests library will make it easy to parse!CopyCopyimport json # Ensure json is imported # Continuing from the previous example if response.status_code == 200: json_data = response.json() # Parse the JSON content directly print("\nParsed JSON Data:") print(json.dumps(json_data, indent=4)) # Pretty print for readability else: print("Failed to parse data into JSON.")
4. Extract the data and print it
Now that you have your data in a JSON format, it**'s** just like dictionaries and lists in python, and you can navigate into it to find just the pieces of data you want.CopyCopy# Continuing from the previous example if response.status_code == 200: json_data = response.json() # Extracting specific data (example for Open-Meteo) if 'current_weather' in json_data: current_weather = json_data['current_weather'] print("\nExtracted Current Weather Data:") print(f"Temperature: {current_weather['temperature']} {json_data['current_weather_units']['temperature']}") print(f"Wind Speed: {current_weather['windspeed']} {json_data['current_weather_units']['windspeed']}") print(f"Weather Code: {current_weather['weathercode']}") else: print("Current weather data not found in the response.")
API Data Extraction: Getting the Data Just Right
"API data extraction" sounds all fancy, but it really just means retrieving data from an API with your code, cleaning it, and organizing it into the best format for your needs. This usually includes:
Authentication: Sometimes you have to show an "id" (i.e., your API key or token) to get to the good stuff.
Pagination: If an API has lots of data, it might send the data to you in separate chunks, like pages of a book. You'll want to know how to ask for the next "page."
Error Handling: Things can go wrong! You'll want your code to politely handle all those status codes while managing any network bumps.
Data Transformation: The raw output may not be exactly how you would want it. This is where you'll transform the API data into the desired format for your app or database.
Going further: saving your API data in PostgreSQL
So you have acquired data from an API. What do you do now? One really common thing would be to save the data somewhere like a PostgreSQL database. This isn't really "pulling API data" but, would be the perfect next step toward making the data meaningful. Enter, Python's psycopg2 The library will be great use here.

Context: Let's pull some weather data from an API and then save it to our PostgreSQL database.
Install the psycopg2-binary Package
Before diving in, install the PostgreSQL adapter:CopyCopypip install psycopg2-binary
Then, here's some basic code to get that data inserted:
import psycopg2 import requests import json # --- API Data Pull (as shown before) --- api_url = "https://api.open-meteo.com/v1/forecast" params = { "latitude": 52.52, "longitude": 13.41, "current_weather": True } response = requests.get(api_url, params=params) response.raise_for_status() weather_data = response.json() # --- PostgreSQL Connection and Insertion --- db_config = { "host": "localhost", "database": "your_database_name", "user": "your_username", "password": "your_password" } try: conn = psycopg2.connect(**db_config) cur = conn.cursor() # Create table if it doesn't exist (run once) cur.execute(""" CREATE TABLE IF NOT EXISTS weather_logs ( id SERIAL PRIMARY KEY, temperature DECIMAL, windspeed DECIMAL, weather_code INTEGER, timestamp TIMESTAMP DEFAULT CURRENT_TIMESTAMP ); """) conn.commit() if 'current_weather' in weather_data: temp = weather_data['current_weather']['temperature'] wind = weather_data['current_weather']['windspeed'] w_code = weather_data['current_weather']['weathercode'] cur.execute( "INSERT INTO weather_logs (temperature, windspeed, weather_code) VALUES (%s, %s, %s)", (temp, wind, w_code) ) conn.commit() print("Weather data successfully inserted into PostgreSQL.") else: print("No current weather data to insert.") except psycopg2.Error as e: print(f"Error connecting to or interacting with PostgreSQL: {e}") finally: if conn: cur.close() conn.close() print("PostgreSQL connection closed.")
Important: Remember to swap out your_database_name, your_username, and your_password With your actual PostgreSQL details!
What You Can Do Next
With the Observations data now in your database, you have some awesome next steps:
Set Up Data Extraction
You could add some automation to log your weather data by scheduling the execution of the python application to run using a cron (Linux/macOS) or Task Scheduler (Windows).
Visualize the Data
You can connect your PostgreSQL database to a data visualization application like Tableau or Power BI and create reports, or you can use Python libraries like matplotlib or seaborn to visualize it.
Add Data Validation
You may want to add data validation by performing checks for outliers or missing values before you insert the data into your table. There are some checks that you can add to your data validation, which should improve the data quality.
Index Your Table
If you are logging a lot of observations a day, you may improve the turnaround time of your SELECT queries by indexing your log table specifically on the timestamp field.
Why You Should Validate Your APIs

APIs are a key part of many modern-day applications. Whether you're consuming an API from someone else or exposing your own, validation testing is a vital part to ensure the reliability, performance and correctness of your APIs. Here are some of the reasons why testing your APIs is important:
Catch bugs early — So you don’t ship broken endpoints.
Validate performance — To ensure that your APIs perform under load.
Verify against regressions — To ensure that updates and changes to APIs don’t somehow break existing behaviour.
Validate security — To ensure that unauthorized users can’t access sensitive data.
Why Is It Important to Test Your APIs?
APIs are an essential part of modern applications. Whether you are building an internal service or exposing an endpoint to external consumers, app testing makes sure that:
The API is working properly.
Input validation is enforced.
Authentication and authorization are working.
Return data formats and response payloads are consistent.
Changes don't result in regressions.
Without testing, a bug could break working integrations or open the door for a security issue.
How to Test Your APIs
Manual API Testing
Manual API Testing When using manual automation tools such as Postman, cURL or HTTPie, a tester is working through the API end points as user of the application, submitting requests and viewing the response.
When do you manual test?
During original development or prototyping
To validate edges and error handling
For Exploratory Testing
Negatives: Does not scale for large applications
Repetitive testings take time to execute
It does not fit into our Continuous Integration process for the application

What Is Automated API Testing?
Automated testing is just writing (or generating) scripts that automate the testing of your API by sending repeated requests to test the functionality of the new feature. Automated tests are run consistently and can be integrated into CI/CD pipelines.
The Importance of Automated Testing
Reduces manual labor and human error Ensures new changes do not break existing features Provides assurance that you are continuously delivering Provides fast feedback to developers Will scale along with your application!
How it works?
Test Cases: the definition of an API request and what the expected response is Tests run via scripts or test runners If a test fails it will typically provide a failed response immediately, so this prevents a bad deployment Tests are typically version controlled and run automatically during builds You can either write these tests by hand while using existing libraries such as pytest or you could use existing tools to perform automated testing with little configuration.
Keploy: Automated API Testing Without Writing Tests
Keploy streamlines and automates API testing by capturing real traffic and creating test cases on-demand. Keploy captures API requests and responses during the normal use of an application. It later replays these requests and responses as tests.
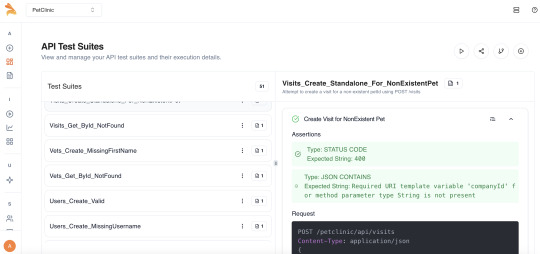
How Keploy can Help?
Records real user behavior as test cases Provides mocks of the dependencies (databases, external apis) Can replay captured tests in either a staging or CI environment No coding or writing test scripts required Works with several frameworks and programming languages
Best Use Cases
Teams that want to automate tests out of the box with little to no configuration APIs that change so often that writing tests out would take too long Applications with many integrations or ongoing changes in the real flows of users
Related Keploy Blogs for Reference
How to Automate Test Case Generation for Faster API Testing - https://keploy.io/blog/community/test-case-generation-for-faster-api-testing
API integration – Importance and Best Practices - https://keploy.io/blog/community/api-integration-importance-and-best-practices
Conclusion
So, there you have it! APIs are tremendously significant in the software world today. They are your door of entry to be able to access a whole new world of data and services, and honestly, Python has the best ecosystem for retrieving data from APIs with an abundance of utility libraries at your disposal, like the requests library and many great data tools. The basics of learning APIs and how to send requests, parse responses, and parse that data into dataframes will allow you to unveil amazing potential for your Python projects! You can go from simply pulling some data to building rich applications that store data in databases like PostgreSQL. So get back in there and leverage APIs! Last, create web applications that will be dynamic, data driven, and connected! You got this!
FAQs
What data format do most APIs use?JSON stands for JavaScript Object Notation. People find it rather easy to read and it is smoothly parsed by machines. XML is still relevant in today's world, but JSON is king these days.
Do I need an API key every time I want to have access?Not necessarily! A lot of public APIs, especially open data APIs, do not ask for a key. But the API may ask for a key if the data you are working with is a user's data, if it needs permission of some type, or if the service has a cost (fee) associated with usage.
What is the difference with a GET vs a POST request?You might look at it like this; with a GET request you are just requesting info, you are requesting data from a server and typically passing any additional info right in the URL. A POST request is for data sent to the server for the server to create or update something, and that data comes from the body of your request and not the URL.
How do I handle large data from an API?Many API's use a paging concept. This means the data returned can be in smaller chunks, and you will need to make many API requests, usually just by changing some parameters, for example, page limit in your call.
What are rate limits of API's? And how do I handle them?APIs may limit you on the number of requests you can make (e.g. 100 requests per minute). It you exceed the limit and make an API call you will not receive anything (the API service thinks your are spam). To handle it, you can add delays (sleep time, e.g. time.sleep() in Python) between your requests or you can use libraries that deal with rate limits for you.
Can I use Python for APIs that require an authentication process?Yes, many third-party libraries provide simple access to an API using the requests library which supports typical forms of authentication (API keys (modern API calls send these via headers or query parameters), basic authentication (username/password) and OAuth). Like all API calls, check the API documentation for any requirements of the authentication method.
0 notes
Text
When to Use a List Comprehension in Python

To be honest, most Python developers are not using list comprehensions. Even I, who is writing this blog, never used list comprehensions before. But when I saw some examples, I felt I had to try and use them in my Python code. The reason for this change of mind is that there are a few advantages we get if we implement list comprehensions. Let’s see what these are in this blog today.
Let’s start from the basics:
What is a List?
If you ask this question to an 11th-grade school student, they will answer what a list is. Basically, lists allow us to store multiple items in a single variable. Also, a list is a built-in dynamically sized array (it automatically grows and shrinks).
Learn about best python ide: https://keploy.io/blog/community/top-5-best-ides-to-use-for-python-in-2024
We can store all types of items.
my_list = [0, a, ['keploy', 'testing'], (2, 06, 2025), b] print(my_list) Lists are mutable in Python. This means you can replace, add or remove elements.How to create list in python?
We have now refreshed our minds about what a list is. Next comes the main interesting topic: how to create a list in Python. Basically, there are two ways:
my_list = [1,2,3,4,5] And less preferable:CopyCopy my_list = list()
Basically the list(obj) is used to transform another sequence into the list.I never tried the second one we are all familiar with the first one, right? That’s how we have learned it, right?
Now let’s meet the hero of today’s blog.
What is List Comprehension?
List comprehension is a concise way to create lists in Python. It lets you build a new list by applying an expression to each item in an existing list (or any iterable), all in a single line of code.
If you’re still not getting the point—basically, list comprehension allows you to create lists with less code. List comprehensions enhance code performance by being faster and more efficient than traditional for loops. They also improve code readability and conciseness, making your code easier to write and maintain.
Let’s look at the following example.
Syntax of list comprehension:CopyCopy[expression for item in iterable]
expression: The value to put in the new list (often using item)
item: Each element from the iterable (e.g., a list or range)
iterable: Any object you can loop over
Basic Example:
Example 1: Creating a List of Squares
Create a list of squares for numbers 1 to 5:CopyCopysquares = [x * x for x in range(1, 6)] print(squares)
Guess the Output?
Example 2: Nested List Comprehension
Create a 3x3 matrix (list of lists) with all values set to 0:CopyCopymatrix = [[0 for _ in range(3)] for _ in range(3)] print(matrix)
Guess the Output?
Example 3: Using If-Else in List Comprehension
Create a list where each number from 1 to 5 is "even" or "odd":
labels = ["even" if x % 2 == 0 else "odd" for x in range(1, 6)] print(labels)
Guess the Output?
Example 4: List Comprehension with Functions
Suppose you have a function that doubles a number. Use it in a list comprehension:
def double(x): return x * 2 numbers = [1, 2, 3, 4, 5] doubled = [double(x) for x in numbers] print(doubled)
Guess the Output?
In the above cases, we saw how list comprehension helps us refactor code, making it easier and simpler to understand. I hope you don’t have any other doubts.
Difference Between 'for' Loop vs. List Comprehension
Instead of just seeing and learning from a boring comparison table, we will see the difference in terms of code. We can see, discuss, and learn the differences—but before that, let’s assume the scenario:
Scenario:
Suppose you have a list of numbers, and you want to make a new list containing the square of each even number, but only if it’s greater than 10.
Let's use the list:CopyCopynumbers = [1, 4, 6, 9, 12, 15, 18, 21]
Let’s implement this using FOR Loop:
result = [] for n in numbers: if n % 2 == 0: square = n * n if square > 10: result.append(square) print(result)
Explanation:
You start with an empty list result.
For every number in numbers:
Check if it’s even (n % 2 == 0).
If yes, square it.
Check if the square is greater than 10.
If both conditions are true, add the squared number to result.
Let implement the same Using List ComprehensionCopyCopy result = [n * n for n in numbers if n % 2 == 0 and n * n > 10] print(result)
Explanation:
All the logic is condensed into a single line.
The expression before for is what you want in your new list (n*n).
The part after for ” describes what you’re iterating over (for n in numbers).
The if at the end combines both filtering conditions.
With the above two examples, you are able to see the exact difference between the two approaches, right? Then comes to interesting part when to use list comprehensions and the benefits of it.
How Keploy Helps You Write Unit Tests for Your Python Application — Without Writing a Single Line of Code
Keploy has recently released a Unit Testing Agent that generates stable and meaningful unit tests directly in your GitHub PRs — focusing only on what truly matters.
The Keploy Unit Test Agent isn’t just “another AI writing code.” It’s a language-trained, vertical AI built specifically for unit testing.
1. PR Agent
Keploy is an AI-powered Unit Testing Agent that generates stable, production-ready unit tests directly in your GitHub PRs — targeting the code that matters most.
Here’s what it does:
Uses advanced prompt engineering with validation — including build, run, and coverage checks for every test
Focuses only on the code changes in the PR — avoiding noisy or irrelevant tests
Integrates with LLMs like Gemini, GPT, ude, etc., and selects the best output based on your tech stack
Fully compliant with ISO, GDPR, SOC2, and HIPAAUse the below link to install keploy PR agents from github marketplace: https://github.com/marketplace/keploy
VSCode Extension
You can also try the Unit Testing Agent directly in your VSCode.
With the Keploy VSCode Extension, you can generate unit tests right from your IDE — no need to copy and paste code or write prompts. Just a few clicks, and your unit tests are ready!
Use the below link to install keploy in VSCode:
When to Use List Comprehensions in Python
You need to create a new list by transforming or filtering items from another list (or any iterable).
You want concise, readable code.
Benefits of Using List Comprehensions
List comprehensions optimize list generation and help to avoid side effects such as gibberish variables. As a result, you get more concise and readable code. These are the things we have been seeing since the start of this blog.
The first advantage I would say is ease of code writing and reading. You don’t have to be an expert to learn and use lists the list comprehension allows you to write code that is easy to maintain.
Improved execution speed in most comparisons, you might have seen the first approach takes much more time as it needs to execute sequentially and do various steps. But if you see the list comprehension, it executes so fast.
No modification of existing lists. A list comprehension call creates a new list in Python without changing the existing one.
Conclusion:
In today’s blog, we learned some really cool stuff, isn’t it? We also learned how to optimize our Python code by following list comprehensions, so then what are you waiting for? Grab your laptop and start playing with list comprehension.
FAQs:
How is a list comprehension different from a for loop?
A list comprehension is more concise and typically more readable for simple operations, while a for loop can handle more complex logic and multiple steps.
Can I use list comprehensions with functions?
Yes! You can call a function inside the expression:CopyCopydef square(x): return x * x squares = [square(x) for x in range(5)]
Are list comprehensions faster than for loops?
Usually yes, for simple transformations, because they are optimized internally in Python.
What is the difference between list comprehensions and generator expressions?
List comprehensions return a list immediately; generator expressions use parentheses and return a generator, which produces items one at a time (lazy evaluation)
List comprehension lst = [x*x for x in range(5)] # Generator expression gen = (x*x for x in range(5))
How can I avoid memory issues with very large lists?
For huge datasets, use generator expressions instead of list comprehensions to save memory.
0 notes
Text
Platform Engineering Vs Devops: Difference In 2025

Let’s start with DevOps, the buzzword that changed how we think about building and shipping software. These days, every college student and other professional wants to become a DevOps engineer. If you are an aspiring DevOps engineer or already working as a DevOps engineer, this blog will help you understand the difference between Platform engineering and Devops
Platform engineering is really changing every company’s perspective on developing platforms. These days, every company has started building its own internal developer platform (IDP). Let’s see why platform engineering is so important and whether platform engineering is replacing DevOps.
What is DevOps?
If you see the definition of DevOps online, this is what you get to see:
“DevOps is the combination of cultural philosophies, practices, and tools that increases an organization’s ability to deliver applications and services at high velocity.”
The goal? To shorten the software development life cycle and deliver high-quality software quickly and reliably. It’s all about collaboration, automation, and breaking down silos between teams.
But DevOps isn’t just about tools. It’s about people working together, sharing responsibility for building, testing, and releasing code. Think of it as a bridge that connects development and operations, powered by automation and transparency.
Now let’s come to our hero.

What is Platform Engineering?
Platform engineering focuses on designing, building, and maintaining the internal platforms that software teams use to build, test, deploy, and operate applications. These platforms aim to make developers’ lives easier by providing self-service tools, infrastructure as code, automation, and standardized processes.
If DevOps is the bridge, platform engineering is like building a really smart highway system on top of it.
Imagine you’re a developer. Instead of dealing with infrastructure headaches every time you want to deploy something, a platform engineer has already built you a “golden path”—a toolkit that lets you focus on your code and ship it faster (and safer).
For example, if you are a developer who needs access to a K8s cluster, instead of waiting for DevOps team or your manager to give you access, imagine if there is a platform (Internal Developer platform) where you can self-provision everything without needing to wait for anyone. How cool is this, right?
How are Platform Engineering and DevOps Different?
At a first glance, DevOps and platform engineering can look pretty similar—they both want to speed up delivery, improve collaboration, and automate all the things. But here’s the big difference:
DevOps is a set of practices and a cultural movement. It encourages developers and operations to work together, adopt automation, and own the entire lifecycle.
Platform Engineering is about productizing infrastructure and tooling. Platform engineers build the reusable platforms, paved roads, and self-service portals that enable DevOps to scale across a company.
How to Get Started with DevOps?
To be honest, the answer will differ. From a company perspective, they may already be implementing DevOps and have DevOps engineers in place. But if you are someone new to DevOps and want to start learning, here’s how you can begin:
First, start with containers and try to containerize your application. Once you are familiar with containerization technology, learn CI/CD. Then, start using any of the popular cloud platforms to deploy your application. Finally, explore Kubernetes. These are tools in DevOps, but you don’t need to learn every tool—focus on learning the technology behind them.
For example, learn containerization technology first before diving into Docker or Podman. The same applies to all tools: understand the underlying technology first, then use the tools.
How to Get Started with Platform Engineering?
I know everyone has this question: How do I get started with Platform Engineering? My first recommendation is to use tools that provide platforms or help in building platforms. This will give you a better understanding of how platform engineering works. Learning theory, like reading this blog, is fine, but try using tools that are useful for building platforms. There are many tools on the market, like Backstage, and the most popular tool I would recommend is Crossplane. Use these tools and then analyze how they can be used to build platforms that solve the internal issues developers are currently facing.
Also, join the Platform Engineering community. The CNCF has a dedicated working group for Platform Engineering. You can join the community and learn how others are building platforms.
How to Implement DevOps
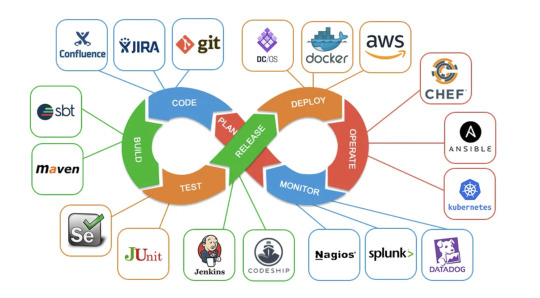
How to Implement Platform Engineering
Understand Developer Needs: Interview your dev teams. What slows them down? What do they need to move faster?
Design for Self-Service: Build tools and platforms that let developers help themselves.
Standardize and Automate: Use Infrastructure as Code (IaC), CI/CD pipelines, and reusable modules.
Feedback Loop: Keep talking to your users (the devs) and keep improving the platform.
Measure Success: Track adoption, developer satisfaction, and the time it takes to deliver features.
Is Platform Engineering Replacing DevOps?

It’s a question a lot of people are asking as platform engineering gains popularity: Is platform engineering replacing DevOps?
The short answer is no platform engineering is not replacing DevOps. Instead, it’s building on the foundation that DevOps created.
DevOps introduced the world to better collaboration, automation, and a culture of shared responsibility between development and operations. Platform engineering takes these ideas a step further by creating internal platforms and tools that make it easier for teams to practice DevOps at scale.
Think of it like this:
DevOps is about changing how teams work together and automate software delivery.
Platform engineering is about building what teams use internal products, self-service tools, and reusable systems that support DevOps practices.
In fact, platform engineering and DevOps go hand in hand. Platform engineering empowers DevOps teams to work more efficiently and consistently, while DevOps culture ensures that platforms are used and improved collaboratively. Rather than a replacement, platform engineering is the next evolution that helps organizations get even more value out of DevOps.
Integrate Keploy into Your CI/CD Pipeline for Continuous Testing
In a typical CI/CD pipeline, I’m sure everyone has integrated some static tools and security tools. But what if there's something we can add for testing? Yes, you can add Keploy to your CI/CD pipeline so that testing becomes a part of it. This way, every time you make changes, testing is included, and you can identify bugs and confirm if any new regressions have been introduced.
No matter where your CI/CD pipeline is whether it’s in GitHub, GitLab, or Jenkins you can run Keploy.
To learn more about Keploy integration with GitHub: https://keploy.io/docs/ci-cd/github/
To learn more about Keploy integration with Gitlab: https://keploy.io/docs/ci-cd/gitlab/
To learn more about Keploy integration with Jenkins: https://keploy.io/docs/ci-cd/jenkins/
Benefits of DevOps
Faster releases: Automate everything from builds to deployment.
Better collaboration: No more “throwing code over the wall.”
Higher reliability: Automated tests and monitoring catch issues earlier.
Continuous improvement: Feedback loops make processes better over time.
More fun at work: Developers and ops feel like they’re on the same team.
Benefits of Platform Engineering
Self-service: Developers don’t have to wait for ops to provision resources.
Consistency: Standardized tools and processes across teams.
Scalability: Easy to grow as your organization grows.
Happier developers: Less time fighting with infrastructure, more time coding.
Security and compliance: Built-in guardrails keep your cloud safe.
Conclusion:
I hope you had some insight on platform engineering and DevOps. I guess DevOps people already know and have used DevOps, but platform engineering is something new to many people. Many organizations have started investing in platform engineering, so it is good to know about these concepts. More importantly, if you are a DevOps engineer, start investing in yourself on platform engineering. Build some simple platforms, do POCs, and then you will understand the importance of platform engineering and how it will improve your team’s productivity.
FAQs:
1. Can you have DevOps without platform engineering? Yes DevOps can work with manual processes or basic automation, but it scales better with a strong platform.
2. Does platform engineering replace DevOps? No. Platform engineering empowers DevOps by providing better tools and reusable infrastructure.
3. Is platform engineering only for big companies? No. Even small teams can benefit from simple platforms, especially as they grow.
4. What skills do platform engineers need? Cloud, automation, programming, CI/CD, and empathy for developers’ pain points.
5. Which roles should own developer experience—DevOps or platform engineering? Both have a stake, but platform engineers are increasingly focused on developer experience as their main product.
0 notes
Text
What Is Unit Testing? A Beginner’s Guide to Writing Reliable Code

In modern software development, testing isn’t a luxury—it’s a necessity. One of the most fundamental forms of testing is unit testing. It ensures your code works exactly as intended, catching bugs early and making maintenance easier. But what exactly is unit testing, and why is it so essential?
In this guide, we’ll explain what unit testing is, how it works, and how you can implement it effectively in your software projects.
What Is Unit Testing?
Unit testing is the process of testing individual units or components of software in isolation. A unit can be a function, method, or class—basically, the smallest testable part of an application.
The goal? To verify that each unit of code performs as expected.
Why Is Unit Testing Important?
Unit testing ensures that:
Code behaves as designed.
Bugs are caught early in the development cycle.
Future changes don’t break existing features.
Refactoring is safer and more efficient.
Key Benefits of Unit Testing
✅ Early Bug Detection Bugs caught during unit testing are cheaper to fix than those found in later stages.
✅ Improved Code Quality Testing forces developers to write modular, cleaner, and more maintainable code.
✅ Facilitates Refactoring With good test coverage, you can confidently refactor without breaking things.
✅ Supports Agile & CI/CD Automated unit tests ensure faster and more reliable deployments.
Example of a Unit Test
Here’s a simple unit test in Python using pytest:
python
CopyEdit
# Code to test
def multiply(x, y):
return x * y
# Unit test
def test_multiply():
assert multiply(3, 4) == 12
This test checks if the multiply function returns the correct product.
How Unit Testing Works
Isolate a single function or method.
Write test cases to validate expected output for various inputs.
Run tests automatically after every code change.
Get feedback instantly if something breaks.
Tools for Unit Testing
Depending on your programming language, popular unit testing tools include:
Language
Unit Testing Frameworks
Python
unittest, pytest
JavaScript
Jest, Mocha, Vitest
Java
JUnit, TestNG
Go
Built-in testing package
C#
xUnit, NUnit
Best Practices for Writing Unit Tests
✅ Test only one thing per test case.
✅ Name tests clearly (test_addition_returns_sum).
✅ Cover both success and failure cases.
✅ Keep tests independent of each other.
✅ Automate test execution using CI tools.
Unit Testing vs Other Testing Types
Test Type
Focus
Performed By
Unit Testing
Individual functions or methods
Developers
Integration Test
Combined components/modules
Devs/Testers
System Test
Entire system behavior
QA/Test engineers
Regression Test
Retest to catch unintended bugs
QA/Test engineers
To learn the difference between unit and regression testing, check out our article on Unit Testing vs Regression Testing.
Final Thoughts
If you're building software, unit testing is non-negotiable. It boosts confidence in your code, saves time during debugging, and keeps your application maintainable in the long run. Whether you're just getting started or building large-scale systems, writing reliable unit tests should be part of your core development process.
🔗 Want to dive deeper? 👉 Read the full article on What Is Unit Testing
Frequently Asked Questions
Q1. Do I need unit tests for every function? Focus on critical logic. Not every function needs a test, but key components definitely should.
Q2. Can unit tests be automated? Yes! In fact, unit tests are best when automated and run with every code push.
Q3. Who writes unit tests? Typically, the same developers who write the code also write unit tests.Q4. What makes a good unit test? It’s fast, focused, isolated, and provides clear feedback.
0 notes
Text
Unit Testing vs Regression Testing: Understanding the Key Differences

When it comes to ensuring software quality, testing plays a critical role. But with so many testing types—unit testing, regression testing, integration testing—it’s easy to get confused. Two essential types you must understand are unit testing and regression testing. While both aim to detect bugs and maintain application stability, they serve different purposes at different stages of development.
In this article, we’ll break down unit testing vs regression testing, their goals, when to use each, and how they complement each other.
What Is Unit Testing?
Unit testing focuses on verifying individual units or components of the software. A unit is typically the smallest piece of testable code in an application—like a function or method.
✅ Key Characteristics of Unit Testing:
Performed by developers.
Happens early in the development cycle.
Fast and automated.
Helps catch bugs at the code level.
📌 Example:
python
CopyEdit
def add(a, b):
return a + b
# Unit test
def test_add():
assert add(2, 3) == 5
This test ensures that the add() function behaves as expected.
What Is Regression Testing?
Regression testing is a type of testing performed to ensure that recent code changes haven't negatively affected existing features.
✅ Key Characteristics of Regression Testing:
Often performed after bug fixes, updates, or enhancements.
Focuses on the entire system’s behavior.
Can be manual or automated.
Includes unit, integration, and functional tests.
📌 Example:
After fixing a bug in the login functionality, regression tests will re-run previous test cases related to login, signup, and dashboard access to ensure nothing else is broken.
Unit Testing vs Regression Testing: Head-to-Head Comparison
Feature
Unit Testing
Regression Testing
Purpose
Test individual components
Ensure new changes don’t break existing code
Scope
Narrow – focuses on small code blocks
Broad – covers entire app or module
Who Performs It
Developers
Testers or QA engineers
Automation
Easily automated
Can be automated or manual
Frequency
Frequent – during development
After code changes or releases
Tools Used
JUnit, NUnit, pytest, etc.
Selenium, Cypress, TestNG, etc.
How They Work Together
Both unit and regression testing are vital to a robust QA process. Unit tests catch bugs early, while regression tests ensure stability as the codebase evolves.
Best practice: ✅ Use unit testing during feature development. ✅ Use regression testing after every major code update, integration, or release cycle.
Together, they:
Reduce bug leakage.
Improve developer confidence.
Enhance product quality.
Why It Matters for Modern DevOps & Agile Teams
In Agile or CI/CD environments, fast feedback loops are essential. Unit testing helps build reliable code fast, while regression testing safeguards the system from unexpected failures during rapid deployments.
By automating both testing types, teams can achieve:
Faster release cycles.
Reduced manual testing effort.
Consistent product performance.
Final Thoughts
Understanding the difference between unit testing vs regression testing is crucial for any developer or tester aiming to deliver high-quality software. They are not mutually exclusive—in fact, they complement each other in the software development lifecycle.
🔗 Want a deeper dive into this topic? 👉 Check out the full article on Unit Testing vs Regression Testing
Frequently Asked Questions
Q1. Which test should I write first: unit or regression? Start with unit tests during development. Add regression tests as the application evolves.
Q2. Are regression tests just a collection of unit tests? No. While regression tests may include unit tests, they typically cover broader scenarios including integration and functional flows.Q3. Can I automate regression tests? Yes. Automated regression testing is highly recommended to save time and maintain quality during frequent releases.
#testing#ai tools#unit testing#software testing#e2e#code coverage#software development#testing tools
0 notes