
keyshot
Render rockin'
KeyShot is the fastest, easiest to use 3D rendering and animation software on the market. http://www.keyshot.com/
74 posts
Don't wanna be here? Send us removal request.
Last Seen Blogs

locy1234
제목 없음

its-that-slut-inethyxa
INETHXYA

karageceninmelegi-blog
⚫Leliel ⚫

munta623
お1人様と1匹様
zodiwhack
Astrology
Text
How to Create Quick Custom Lighting with the KeyShot HDRI Editor
The KeyShot HDRI editor is a great tool for when you want to create real-world lighting but you’re limited by time or computing power. While the Physical Lights capability is the most accurate way to create realistic lighting and shadows, it can require more resources to render. The HDRI editor is the perfect solution for rendering realistic lighting, fast.
KeyShot HDRI Editor Custom Lighting
KeyShot environment capabilities allow you to drag and drop default lighting environments from the Library, Environments tab, import pre-built HDRI’s from third party libraries, or build them from scratch using the HDRI Editor. Let's explore how to create a quick custom HDRI environment for your KeyShot scenes.
youtube
1. Open the HDRI Editor
To start, locate the Create Blank Environment Map option from the icons to the left of the Environments list. This will add a new environment to the list with no lighting and a flat dark gray background color.
Open the HDRI Editor by selecting the HDRI Editor tab under the Environment preview. Take note of the options available:
Just below the tab is your Pin list, which contains any pins you’ve added to your scene as well as folders you’ve introduced to organize your groups of pins.
To the left you have icons that allow you to delete, organize and target your pins.
Below that you have a series of buttons that allow you to customize your environment’s background. This is also where you’ll find your pin’s settings, once they’ve been added and selected from the list.
Selecting Background from the list gives you background options. Most users stick with the Color background for their renderings, but Sun & Sky works spectacularly for outdoor renderings, and Image lets you add an image to give your rendering location specific context.
2. Add Your Pins (lights)
To add your first pin, go to the icons at the top of your pin list and select the left most Add Pin icon to add a new pin to your list. Each pin you add will represent a single light source. This first light will serve as our Fill light. (You can change the name with a slow double-click on the pin name in the pin list.) Add two more pins for a Key light and a Rim light. Don't worry, we'll adjust them next.
3. Adjust Your Lighting
The easiest way to adjust your lights is to select the pin, then select the Set Highlight target icon to the left of the Pin list. This will allow you to simply click the exact spot on the model you would like the light to hit and KeyShot will automatically position the light within the environment to cast a highlight on the desired location. Select Done (at the bottom of the Real-time View) when you have the light positioned as you like. Repeat these steps for your Key light, by aiming it at the front of the model, and your Rim light, by aiming it at the very top of the model, to separate it from the background.
Next, open the Color section and adjust the Brightness for each light to best suit your needs. Here, your Rim light will be the brightest to create a slight halo effect along the surrounding edges of your model. Your Key light will be the second brightest to make the front face more prominent. And, your Fill light will be the least bright, which should provide a nice "1,2,3 read" of the model’s surfaces.
You can also customize your pin’s shape by selecting the Circular and Rectangular option, below the Pin list, and cut the light in half by selecting the Half checkbox.
This is a basic look at the KeyShot HDRI Editor, but the tool gives you a ton of flexibility. From being able to change each individual pin’s shape to creating interesting color schemes, to creating more cinematic style lighting such as the ever-popular orange and teal lighting that you often see in movies and popular YouTube videos. The sky’s the limit, and as you master this tool you can get as creative as your imagination will take you. You can learn more about the KeyShot HDRI Editor in the KeyShot manual.
What Can You Create?
We would love to see what you create with this tip. Visit the KeyShot Amazing Shots forum to see what others are creating and share your own work. And if you have a suggestion for another tip share it in the comments below.
Try KeyShot Pro
3 notes
·
View notes
Text
How to Create Interactive 360° Product Visuals for Your ECommerce Website with KeyShotXR
We all know that eye-catching images are key to driving online sales. What if they could be interactive as well? Read on to learn how KeyShotXR can help you create interactive 360° point-of-sale visuals for your ecommerce store or website.
Create a Touch-enabled 360° KeyShotXR
The KeyShotWeb module allows you to not only produce Product Configurators and share your scenes on KeyShot Cloud, but unlocks the ability to create touch-enabled, 360-degree viewing experiences with KeyShotXR.
youtube
Creating a KeyShotXR is relatively straightforward, but there are a few considerations when prepping your files for your ecommerce platform.
Prepping Your KeyShot Scene for KeyShotXR
Before you create a KeyShotXR, make sure to do the following:
Set the scenes background to pure white.
Product visuals tend to work better with a transparent background. This is the most common background color for websites and will provide more flexibility when adding the visuals to your product page. Start by opening the Environment tab in the Project window and open the Ground section to make sure the Ground Shadows checkbox is unchecked. Then, make sure the background Color is set to white under the Background section. (You can also set this in the Project, Image tab with the Photographic option, going to Layers and changing the Background Color to white.
Check the ecommerce platform’s image size and resolution requirements.
It’s always best to go by the ecommerce platform’s image requirements, but one option that will provide the widest array of uses for your visuals is a 1:1 aspect ratio with a minimum width/height of 1500 pixels and a maximum of 2500 pixels. Now, let’s create a KeyShotXR.
1. Select the KeyShotXR Type
Select KeyShotXR on the Toolbar, hit the X-key, or select Window, KeyShotXR to open the KeyShotXR Wizard.
When the KeyShotXR Wizard opens, it will prompt you to select KeyShotXR type. For most ecommerce applications, selecting a simple turntable is a good option. This option will produce a KeyShotXR with a smaller file size, reducing the bandwidth used on your website. Check with your website administrator or site host to discuss hosting your KeyShotXR.
2. Select the KeyShotXR Rotation Center
Once you’ve selected the KeyShotXR type, hit the Next button to select the rotation point. For your KeyShotXR to spin around its center point, the model itself should be modeled with the pivot at absolute zero.
If your object’s pivot point is not set at zero, you have two options. Go back into your modeling software and add a piece of geometry at absolute zero or add a sphere/cylinder (Edit, Add Geometry...) at absolute zero (Position, 0, 0, 0) then select that geometry through the Custom option.
If your model’s pivot point is correct, you can select Object and move on to set the Initial KeyShotXR View settings.
3. Select KeyShotXR Initial View
These settings will reflect the current settings of the Camera tab, so if you already have your Camera view, you only need to adjust the Inclination (Elevation).
Your product or preference will dictate the view orientation but, generally, an elevation somewhere between 10-30 degrees works well. Again, check your ecommerce platform’s requirements image specifications.
You can then fine tune the rest of your camera’s settings if necessary or hit the Next button to continue.
4. Select Smoothness Control and Render Settings
Smoothness Control is the smoothness of the (mouse or touch) rotation with more frames providing a smoother experience but potentially longer load times. You can try the default setting or test a higher number (like 24, 48 or 72) to achieve the desired smoothness. On the next page you can change your output settings and hit Render Now or click Render Options to adjust the render settings as you typically would. Just make sure that KeyShotXR is selected along the top of the Output window before rendering.
5. Share Your Creation
Once your KeyShotXR is rendered, go to your KeyShot Resources, Renderings folder. Here, you’ll find a sub-folder for the KeyShotXR that contains your KeyShotXR html file, a folder of rendered frames, and an instructions.html document with an embed code for your website.
From here, you can add the KeyShotXR folder to a shared company drive to share with stakeholders and other development partners, host it on your own website, or use the individual frames of the KeyShotXR for more product shots on your ecommerce website. For more information about KeyShotWeb and KeyShotXR, along with a guide on how to embed a KeyShotXR in Wordpress, visit the KeyShot Manual.
What Can You Create?
We would love to see what you create with this tip. Visit the KeyShot Amazing Shots forum to see what others are creating and share your own work. And if you have a suggestion for another tip share it in the comments below.
Try KeyShot Pro
1 note
·
View note
Text
How to Add Fingerprints Using KeyShot Roughness Textures
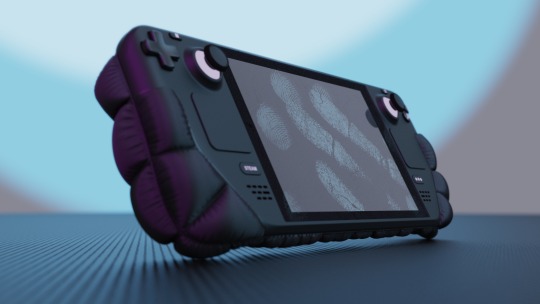
Whether you’re trying to create weathered effects, wear marks, or fingerprints, controlling surface roughness using an image texture in KeyShot will help add a new level of realism and greater flexibility to your projects. Today, we’re going to add fingerprints to a surface using one of KeyShot's included fingerprint textures.

Adding Fingerprints in KeyShot
Though some may question the reason for adding fingerprints to a product shot, you may be surprised at the images you've seen where surface dust, subtle smudges, or fingerprints have been added. There may be times when these textures are needed fora more convincing appearance for countertops, stainless steel surfaces, or other reflective, often fingerprint-attracting material. With this method, you can add any amount of smudge, smear, or fingerprint you need. Let's take a look.
youtube
1. Open the Material Graph and add the Fingerprint Texture
Start by opening the model, double-clicking the surface where you want the fingerprint, and click Material Graph on the Project, Materials tab. You can find a fingerprint texture in the Library window, under the Textures tab. Drag and drop the fingerprint texture into the Material Graph workspace and connect the texture to the Roughness input of the corresponding material.
2. Add a Color To Number Node
Immediately, you’ll notice that the fingerprint texture appears on the surface but if you look closely, the fingerprint appears very smooth, while the rest of the surface is slightly rougher. Since fingerprints are typically rougher than the surface, invert the effect by selecting the connector between the texture and material node, then right-click and select Utilities, Color To Number. Here's what it looks like in the Material Graph.
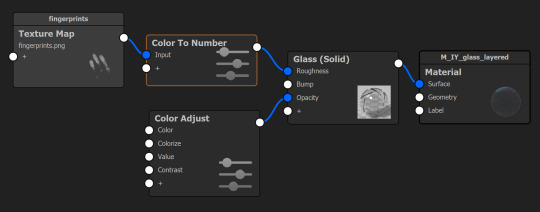
Pro Tip: Use the C-key to color preview the texture and get a better look at what you're working with. Notice that the background appears black while the fingerprints themselves appear white or light gray. This is important since Roughness in KeyShot is controlled by color values between black and white. A pure white turns off the roughness effect while a pure black turns the roughness effect on. You will see no roughness wherever there is white. The Color To Number node allows you to reverse this.
3. Invert the Roughness
To make the fingerprints look rough, instead of the surface, double-click the Color To Number node, and invert the Output From and Output To values so that the background becomes white, and the fingerprints become gray. Then adjust the Input To value down until the fingerprints become visibly black. Exit the Color preview by hitting the C-key again and you will see that the roughness is inverted.
At this point, you can dial in the fingerprint and background roughness by adjusting the values to match your vision for the effect. Although this example specifically demonstrates how to create fingerprints using roughness, the same principles apply to any texture. Understanding how values and roughness work together in KeyShot gives you further control over any roughness effect you need.
You can learn more about the KeyShot Material Graph and the Roughness parameter in the KeyShot Manual. If you're interested in trying KeyShot Pro, just visit portal.keyshot.com/try/keyshot.
What Can You Create?
We would love to see what you create with this tip. Visit the KeyShot Amazing Shots forum to see what others are creating and share your own work. And if you have a suggestion for another tip share it in the comments below.
Try KeyShot Pro
1 note
·
View note
Text
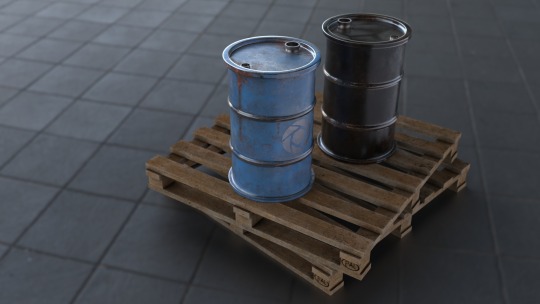
How to Add Realistic Ground Shadow Layers in KeyShot
KeyShot provides plenty of tools to create realistic-looking shadows in any setting. But what about ground shadows? And how can you create a separate ground shadow with a transparent background? Read on to learn how to setup a scene to generate a ground shadow layer for ultimate control (without creating a harsh shadow pass) and, as a bonus, learn more about working with Models Sets in KeyShot.
Separate Ground Shadows in KeyShot
When you need to have greater control over your ground shadow or have it completely separate from the product rendering, this method provides a repeatable process to use across your product renderings. It's a method that works great to dial in or have separate control over the ground shadow size, and color, or adjust how it interacts with other shadows in the scene. Let's dive in.
youtube
Download the Model
1. Add a Ground Plane
The easiest way to have more control over your product shadows during post-processing is to start by isolating and rendering the shadow as an image with a transparent background. To do this, start with an empty scene in KeyShot and add a ground plane.
To add a ground plane, select the Edit menu, then Add Geometry, Add Ground Plane or or use Ctrl-G (Windows)/Cmd-G (Mac). Next, double-click the Ground Plane item in the Project window, Scene Tree to display the Material settings and change the material Type from Ground to Flat. In the Properties sub-tab, change the color to black.
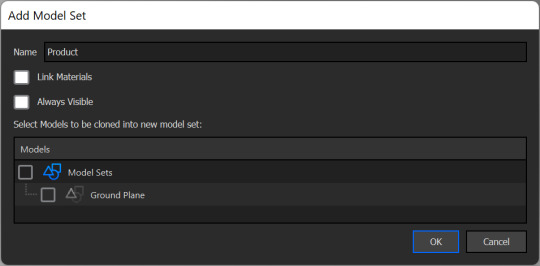
2. Organize Your Model Sets
Next, select the Textures sub-tab, click the Opacity input, and change the Texture type to Occlusion. From there, change the Opacity Map Mode to Inverse Color to blend the ground plane with its environment. At this point, the scene should appear empty, which is ideal for the ground plane Model Set. Back on the Scene tab, rename the Model Set, “Ground", to make it easier to identify. Then, right-click the Model Sets panel and select Add Model Set. This Model Set can be named, "Product".
Important: When you add the new Model Set, make sure that Link Materials and Always Visible are unchecked, and that Ground Plane is also unchecked. This ensures that the new Model Set does not contain a duplicate ground plane. With the new Model Set created, lock the "Ground" Model Set by clicking the padlock icon.
3. Add Your Model
Make sure the "Product" Model Set is selected and drag-and-drop your model into the scene. In the video above, the model is available on the Cloud Library and will download to the Library window, Models tab. You can also import any 3D model from outside of KeyShot. Before proceeding, right-click on one of the Model Sets and select Render Thumbnails to quickly update the thumbnail images so you can easily identify the different sets.
4. Create the Independent Shadow Layer
Now you can set up the last Model Set, which will be used to create an independent shadow layer. Back in the Scene Tree, in the "Product" Model Set, select the parts that have the shadows you want to separate. Right-click the selected parts and select the Create Model Set from Selection option at the bottom of the pop-up menu. This allows you to create your last Model Set (named "Product Alpha" in the video above).
Finally, to display only the shadows, drag-and-drop the emissive white material from the Library window, Material tab onto the parts in the scene. Double-click a part with the emissive material applied to open the Material properties and uncheck Visible to Camera in the Advanced section. By unchecking Visible to Camera, the model is no longer visible, but the shadow created by the model is still present and able to be rendered out independently.
Note: if you encounter undesired shadow artifacts in your scene where your now-hidden model once was, the easy solution is to select the Project window, Lighting tab and simply increase the ray bounces (under General Lighting) and your artifacts should disappear.
You can now render out the separate Model Sets which will provide two image layers with transparent backgrounds for post-processing in any composition or against any background, without including elements of the ground plane or the model’s reflection. You can learn more about Ground Planes or Model Sets in the KeyShot Manual. If you're interested in trying KeyShot Pro, just visit portal.keyshot.com/try/keyshot.
What Can You Create?
We would love to see what you create with this tip. Visit the KeyShot Amazing Shots forum to see what others are creating and share your own work. And if you have a suggestion for another tip share it in the comments below.
Try KeyShot Pro
0 notes
Text
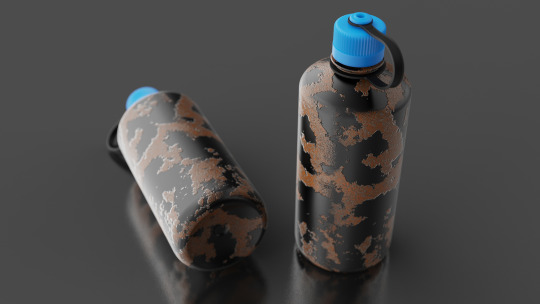
How to Create Water Droplets and Condensation in KeyShot
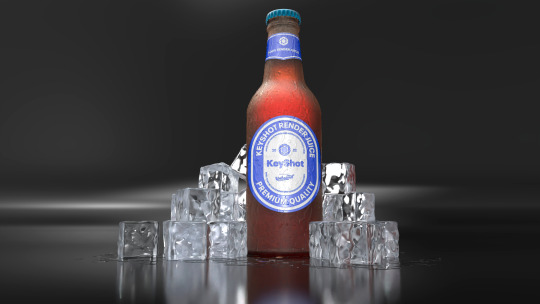
KeyShot not only allows you to create advanced materials and textures with features like 3D Paint, but also provides rich texturing capabilities to add water droplets and condensation. Today, we go in-depth with a texture combination to dial in exactly the water droplet appearance you need for your product visuals.
KeyShot Condensation and Water Droplets
There is an array of applications for making a scene appear more realistic with water droplets, water pools, water streaks, or light condensation. Beverage visuals are probably the most obvious but the following method will work just as well for a bedroom window after a light rain, fresh dew on an outdoor automotive scene, or the hint of sweat on a character's brow. Let's dive in.
youtube
Before You Start
Double-click the object you want to add condensation to and select the Material Graph button from the Project, Material tab. We'll add water droplets to a glass bottle, so make sure the Material Type is set to Solid Glass. If you aren’t using a glass object, no problem at all, you can still use this method to create believable condensation on any material.
Bump Map, Procedural Texture, Displacement, or All?
Once you have your base material set up, the next step is to add the water droplets. You may have experimented with using bump maps, procedural textures, displacement. They all have their own strengths, so we'll show you how to use a combination of them all to dial in the perfect combination of water droplet and condensation.
1. Add a Procedural Texture
To start with, I’ll apply a Spots texture node by right-clicking the Material Graph workspace and selecting Texture, Spots. Select the Spots node and hit the C-key to enable Preview Color for a better look at adjustments you make. Update the Spots Scale, Distortion, and Falloff settings to your liking.
Change the Spots node Color to black and Background color to white to use the texture to drive the roughness of the parent material. Now, connect the Spots node to the Glass materials Roughness input for the white-colored background area to become rough while the black water droplet areas to remain smooth. This will create the appearance of a frosty, chilled glass with water droplet on the surface.
2. Apply the Texture Map
Drag-and-drop a water streak image (example here) into the Material Graph and attach it to the Background color of the Spots node. To add the frosty appearance, right-click the connection between the Texture Map node and the Spots node, and select Utilities, Color To Number to add this node.
Color to Numbers node
The Color To Number node converts color values to number values. This is usually done implicitly such that black is zero and white is 1, however, there are times when you need more control. When used on a Texture Map node, it allows you to control the values of the image texture which will determine the amount of roughness or clarity on a surface. Learn more.
With the Color To Number node selected, hit the C-key to better preview adjustments. Adjust the input and output parameters until you have a mid-to-light gray background and water streaks appear black. Once set, toggle Preview Color off (C-key) to see how the surface looks. If the surface is too frosty/rough, decrease the Output From number to reduce the roughness. If the surface is not frosty enough, increase the Output From number to add more roughness.
3. Add Displacement
Next, we'll add a displacement node so the water is raised off the surface of the bottle. Right-click the Material Graph workspace and select Geometry, Displace. Connect the Displace node to the parent Material node's Geometry input, and attach the Spots node to the Displace node. Adjust the Displacement Height as needed. The Displacement Height is dependent on the scene's overall scale, so don’t be afraid to experiment. Once set, select the Execute Geometry Node button below the Displace Properties or click the Execute Geometry Node icon in the top right corner of the Real-time view. Note: use a negative number for the Displacement Height when the Spot node Color and Background color are inverted. Here is the final Material Graph setup for the Glass material:

Download the KeyShot scene to see the entire Material Graph setup with label and explore the various nodes and settings. To learn more about the KeyShot Material Graph and creating custom materials, visit the KeyShot manual. If you're interested in trying KeyShot Pro, just visit portal.keyshot.com/try/keyshot.
What Can You Create?
We would love to see what you create with this tip. Visit the KeyShot Amazing Shots forum to see what others are creating and share your own work. And if you have a suggestion for another tip share it in the comments below.
Try KeyShot Pro
0 notes
Text
How to Activate the KeyShot for NX Plugin
KeyShot imports all major 3D file formats and has plugins for many of the most common. Among those is the KeyShot for NX plugin, a premium plugin that allows LiveLinking capability between KeyShot and Siemens NX.
KeyShot for NX Plugin
The KeyShot for NX plugin is a premium plugin that requires a subscription license for use with your KeyShot Pro subscription. Once you purchase a license of KeyShot for NX, you may download it from keyshot.com/plugins/ or from the KeyShot plugin manual. The manual also provides additional detail on requirements, installation, and settings. Now, let's dive into how to activate the KeyShot for NX plugin.
youtube
Activating the KeyShot for NX Plugin
Once purchased and installed, you can activate the KeyShot for NX plugin subscription by opening KeyShot, clicking Help at the top of the program window, and selecting Activate license... from the drop-down menu.
At this point, the Activation Wizard will appear. The Activate my license option should be selected. Hit Next and select the I want to change my subscription license option. Hit Next. Make sure you are signed in, then proceed to activate the KeyShot for NX plugin by selecting Add Module button under your active KeyShot subscription. Then, simply enter your activation code (received via the purchase confirmation email) and select Activate.
After successfully activating your License, the KeyShot for NX plugin will be listed directly under your existing KeyShot Pro Subscription. Next, you will see a KeyShot 11 menu in Siemens NX that allows you to Render your models in KeyShot, which creates a LiveLink between KeyShot and Siemens NX, which allows you to Update models you have imported.
You can learn more about the KeyShot for Siemens NX plugin and other KeyShot plugins in the KeyShot plugin manual. If you're interested in trying KeyShot Pro, just visit portal.keyshot.com/try/keyshot.
What Can You Create?
We would love to see what you create with this tip. Visit the KeyShot Amazing Shots forum to see what others are creating and share your own work.
0 notes
Text
How to Create Quick, Seamless Textures in KeyShot
If you need to apply a seamless texture to your product design, but don’t want to jump between programs to do so, there’s a quick way to blend your texture maps seams, without leaving KeyShot.
Seamless Textures in KeyShot
There are various applications that call for seamless textures on a model. You can use the following method to quickly apply different ideas for textures to your concepts without the need to spend a lot of time on image/texture prep. This also works great for background textures, ground textures, or textures that wrap around surfaces. Let's take a look at how it's done.
youtube
To get started make sure you have the texture applied to your model and either the Textures sub-tab open in the Project panel or your Material Graph open with texture selected. (You can learn how to add textures here or view our KeyShot Essentials series.)
From here, locate the Texture Type dropdown and select Tri-planar. Now, we'll adjust the Tri-planar texture properties. Go to the Blend Seams slider and adjust the blending amount until the hard lines of any seam blends to your liking.
This method works for many textures, particularly when they are organic or non-repeating. However, this method can sometimes be less effective when working with repeating patterns and machined textures.
Hopefully this quick tip makes texture mapping your future KeyShot projects a little easier. You can learn more about KeyShot textures and the Tri-planer texture type in the KeyShot manual. If you're interested in trying KeyShot Pro, just visit portal.keyshot.com/try/keyshot.
What Can You Create?
We would love to see what you create with this tip. Visit the KeyShot Amazing Shots forum to see what others are creating and share your own work. And if you have a suggestion for another tip share it in the comments below.
Download KeyShot Pro
5 notes
·
View notes
Text
How to Import Blender Files to KeyShot with the KeyShot for Blender Plugin
One of the most popular workflows for 3D artists and creators is going from Blender to KeyShot. If you're a Blender user, we're excited to finally bring you the KeyShot for Blender plugin. This plugin will help optimize your workflow by speeding up the process of bringing Blender files into KeyShot and updating the files you do bring into KeyShot.
KeyShot for Blender Plugin
To get started, download and install the Blender plugin by visiting keyshot.com/plugins or by visiting the KeyShot for Blender manual for download and installation information. Installers are available for both Windows and MacOS.
youtube
With the plugin installed and Blender open, you’ll notice a new KeyShot tab on the main menu. You have several options, including the ability to send your Blender scene to KeyShot, as well as update the model sent to KeyShot if you’ve made new edits. There are two ways to open a Blender model in KeyShot.
Send Blender Files Directly to KeyShot
First, with the model open in Blender, go to the KeyShot tab and select Send to KeyShot. The Blender model(s) you’ve created will open in a new KeyShot scene, and are 'LiveLinked' to capture any changes you make in Blender. The LiveLink allows you to make updates to your Blender model if needed, and then quickly send those updates to your KeyShot scene without needing to re-import or re-apply materials. To do so, simply select Update KeyShot from the KeyShot menu.
Export Blender Files and Import Into KeyShot
The Second method to open files to KeyShot is to simply export a KeyShot file from Blender. For this method, you’ll locate the KeyShot tab at the top and select export to KeyShot from the dropdown menu. This will export your Blender models as a KeyShot .bip file which you can then open in KeyShot. Be aware that this method will not establish a LiveLink between Blender and KeyShot.
Other KeyShot for Blender Features
Using the KeyShot for Blender plugin not only allows LiveLinking and export of KeyShot files, but also supports exports for rigid and deformable animations as well as any models with meshes, curves, surfaces, and text. The plugin also allows you to import View Layers as Model Sets if needed for your workflow.
We think you'll like what this plugin adds to your workflow and can't wait to see how you use it. You can download the KeyShot for Blender plugin here and learn more in the KeyShot plugin manual. If you're interested in trying KeyShot Pro, just visit portal.keyshot.com/try/keyshot.
What Can You Create?
We would love to see what you create with this tip. Visit the KeyShot Amazing Shots forum to see what others are creating and share your own work. And if you have a suggestion for another tip share it in the comments below.
Download KeyShot
3 notes
·
View notes
Text
How to Set up and Manage Your KeyShot Subscription

With KeyShot 11, we have introduced annual subscription pricing, consolidating our product offerings to make purchase and management of license easier. Today, we'll take a quick look at how you can get set up using your KeyShot Pro subscription license.
Managing a KeyShot Subscription
The subscription pricing for KeyShot Pro deals with more than just pricing. KeyShot subscription licensing is the conduit that make it possible to deliver features and updates regularly while allowing you better access and more options for managing your licenses. With this, we want to share the process of getting set up on a KeyShot Pro subscription and where you go to manage your license.
youtube
If you already have a KeyShot Pro subscription, skip to the next section for details on download, installation, and how to manage your subscription license.
Purchasing a KeyShot Pro Subscription
To get started, visit buy.keyshot.com. Next, add a KeyShot Pro Subscription to your cart. Available subscription add-on modules include KeyShotWeb (to create and share interactive 3D content), KeyShot Network Rendering (to utilize the power of your own computer network), and NX for KeyShot (that provides direct integration and LiveLinking with Siemens NX).
ℹ️Note: the bold price is the monthly breakdown of the subscription cost which is billed annually.
Once you’ve added your subscription to the cart, open your cart at the top right of the page, then read and agree to the terms and conditions before proceeding to checkout. When you click the checkout button, you’ll be redirected to your KeyShot Cloud account login. If you already have a KeyShot Portal account or KeyShot Cloud account, you can go ahead and login here. If you do not, you’ll need to create a new account through the Sign up link below the Sign in button.
⚠️Important: Your email login is the key to your subscription license so, to ensure access to purchase history and ease license management, be sure to use the same login for all KeyShot subscription purchases.
Once you’ve completed the checkout process and your payment has been submitted, you’ll receive an email that lists your purchased products with your subscription code, links to your order and invoice, as well as downloads for KeyShot Pro.
KeyShot Pro Subscription Download and Installation
Download KeyShot Pro via the link in the email or by visiting keyshot.com/download/. Install KeyShot Pro, stepping through the installation prompts and entering the subscription activation code from the email.
Select I have a subscription option at the top of the listed license types, then hit Next.
Sign into your KeyShot Cloud account (using the same login used for your purchase).
Enter the subscription activation code and hit Next.
At this point, your subscription license is activated and you're ready to jump into KeyShot to start creating incredible renderings and animations for your future projects.
Managing Your KeyShot Pro Subscription
There are a few things to remember with your KeyShot Pro subscription. First of all, you can see and manage any KeyShot subscription on the KeyShot Portal.
ℹ️Note: Your subscription license is only intended to be active for one user on one device at a time. However, you can install and sign-in to KeyShot on up to three different devices.
To Activate, Deactivate, and Disable devices, go to the KeyShot Help menu and select Manage Account. This will open portal.keyshot.com in your browser (you’ll be prompted to login if not already). You’ll now be in your account on portal.keyshot.com, where you can manage all products and devices your account is currently tied to.
A KeyShot Pro Subscription and your KeyShot Cloud account is just the start to many great features to come. You can learn more KeyShot Pro features in the KeyShot Manual.
Try KeyShot Pro: portal.keyshot.com/try/keyshot.
0 notes
Text
How to Control 3D Paint Effects in KeyShot 11
KeyShot 11 introduces the new 3D Paint feature that allows you to very easily paint and stamp textures on the surface of your 3D models. Today, we'll break down the capabilities 3D Paint provides to control the effects through the Brush Shape and the Brush Color.
3D Paint in KeyShot
3D Paint is a KeyShot texture tool that allows you to apply textures with an adjustable brush or stamp. You can use this tool to paint weathered appearances, layer textures, apply smudges, add score marks, and much more. There's a new demo scene in KeyShot you can use for reference. After you download and install KeyShot, click the 3DPaint_Barrel scene in the Demo Scene tab of the KeyShot Welcome Window. Ok, let's get into it.
youtube
Where is 3D Paint in KeyShot?
3D Paint is applied as a texture. In fact, it's a node in the KeyShot Pro Material Graph material editor that can be applied to other nodes! To use 3D Paint, double-click a surface on your model. This will open the Project, Material tab. In that window, select the Textures sub-tab, then select 3D Paint from the Texture dropdown.
3D Paint - Brush Shape
With your 3D Paint texture set, you'll see the settings with options to change both the Brush Color and Brush Shape. There are a few methods you can leverage both options to create unique and customizable effects when painting objects in your scenes.
Changing the Brush Shape
By default, the Brush Shape is round, which is useful for many applications but for unique surface effects or custom branding, you’ll want to change the Brush Shape by using an image. For a custom Brush Shape, we recommend using images that are textural (like scratches or splatters) and have a transparent background (which can be set for .png and .tif image formats).
Using a Logo as a Brush Shape
For applications where custom branding is desired, import your logo or logotype as a transparent .png as a Brush Shape and adjust the brush Size and Opacity to fit your needs. You can use your logo as a brush, however, if the goal is to place a single brand mark, the best option is to select Stamp (next to the Brush preview window) to only place one instance of the shape. With Stamp selected, a logo can be placed wherever needed, adjusting Brush Color to adjust the logo color. An added benefit of stamping logos rather than adding them as labels is that you can directly paint on or erase your markings to create weathering effects without having to use texture maps to drive them.
Using the Material Graph to Control Brush Shape
Another way to create unique branding marks with 3D Paint is to use a 3D Paint node to drive the Opacity of a Label material. If you use a brush to create logos through your parent materials surface input, you’re limited to the material that your 3D Paint node is connected to. However, If you want your branding marks to be a different material, the best method is to apply a label that matches the material you want for your branding mark, then attach a 3D Paint texture to the label's opacity input. You would then change your brush shape input the same way we did in the previous example.
This now allows you to give your branding marks the characteristics of your chosen label material and you’ll also be able to change the material's color directly from that label’s material settings. This gives you a little more flexibility in regard to logo material compared to the previous example.
3D Paint - Brush Color
Now that we have an understanding of Brush Shape, let's take a quick look at Brush Color. If you watched our 3D Paint overview, you’ll likely be familiar with this. There are essentially three methods to work with Brush Color when using 3D Paint.
Pick a Brush Color
The first method to set the color of a brush is to simply click on the Brush Color color selector and select a custom color in the Color Picker window the same way you would when changing any brush shapes color. This is the easiest and most direct way to select a color for your brush.
Drive Brush Color with a Texture
The second method is to select an image texture to drive the color by clicking the texture input next to the color selector. By using an image to drive the color, the brush uses the color in the image to apply many instances of the same image as you move the brush along the surface. The number of instances will be entirely dependent on the brush’s flow rate and spacing. This can be really useful when you’re trying to create custom gradient brushes, or you have other unique effects in mind.
Fine Tune Brush Color via Material Graph
The third method is to apply an image textures through the Material Graph in KeyShot Pro. This gives you the greatest control. You can then drag and drop an image texture into the Material Graph Work Area and attach the newly added texture to the 3D Paint node Color input. This allows you to adjust the image texture to the desired scale, and paint a 1:1 representation of the image texture.
There's a lot more to 3D Paint, so be sure to check out the 3D Paint Tutorial. You can learn more about 3D Paint and the Material Graph in the KeyShot Manual. If you're interested in trying KeyShot Pro, just visit portal.keyshot.com/try/keyshot.
What Can You Create?
We would love to see what you create with this tip. Visit the KeyShot Amazing Shots forum to see what others are creating and share your own work. And if you have a suggestion for another tip share it in the comments below.
0 notes
Text
How to Floating Dust in KeyShot

In our last quick tip, we looked at how to create surface dust in KeyShot. But, what if you want a bit of dust floating in the air? As with any rendering, the little details add that extra bit of realism, and one way to add more detail to your scene is to add some atmosphere with floating dust. Today, we'll look at how to do that.
Adding Floating Dust in KeyShot
With KeyShot, you can easily create a floating dust effect by enveloping your scene with basic geometry that has Flakes added using the KeyShot Pro Material Graph. You can make it as dense or as subtle as you like to add just the right level of atmosphere. To get started, open your scene in KeyShot. Now, let's get into it.
youtube
1. Add Basic Geometry
First, add a piece of geometry from the Library, Model tab. A cube works well but a cylinder or sphere could be used also. Scale the geometry so it envelopes the scene in your Camera View (just as you would when creating fog with scattering medium). This is going to be the substrate for the floating dust.
2. Apply Material
With your cube at proper scale, change the material to something that mimics dust particles as closely as possible. A transparent or cloudy plastic works well, but there are a variety of materials that can be used for dust. A transparent material works well since light passes and bends through the particles making it less likely to have strange reflections or shadows. When particles are not transparent, unlit areas may look too dark. Once you have your material set, it’s time to add the flake geometry.
3. Add Flake Geometry
Double-click the cube to display the Material Properties, then open the Material Graph. Right-click the workspace and select Geometry, then Flakes, from the menu. Attach the new node to the Geometry input of your parent material. Now hit Execute Geometry Node (at the bottom of the Flake Properties) to see how the flakes look.
4. Adjust Flakes Properties
At this point, adjust the Flakes Size and Density to decrease the flake's visibility and make them seem more like floating specks. The amount to adjust each parameter will depend on personal preferences, so adjust them until you have a size and density you feel works best for your specific scene.
5. Add Depth of Field
The particles may not feel quite like dust, so in the Project Window, select the Camera tab and check the Depth of Field option. This will blur the particles slightly. A little goes a long way, so start small, particularly if you don’t want a visible depth of field. Adjust the settings so the entire scene is in focus but with enough depth of field that the flakes are blurred and appear more like floating dust.
This trick is also a great way to add snow to your renderings and, if you add a little motion blur, you can even use this method to create rain effects in your KeyShot scenes. You can learn more about the Material Graph and Flakes in the KeyShot Manual. If you're interested in trying KeyShot Pro, just visit portal.keyshot.com/try/keyshot.
0 notes
Text
Add Surface Dust in KeyShot
While it seems like surface dust doesn't belong in a product shot, some like the added realism a little surface dust provides. There are quite a few ways to add surface imperfections to your KeyShot scene. Some are quick, simple and to the point, while others are more involved, requiring many nodes within the KeyShot Material Graph. Today, we'll show how to do this using the Material Graph in KeyShot Pro.
Adding Surface Dust in KeyShot
Using textures to add surface dust is a great starting point to create a more complex and intricate surface appearance for your future KeyShot projects. A subtle amount of dust can provide just enough realism to the product shot to make it look more convincing while a lot of dust can be used to create a truly weathered appearance. With this technique, you can do the same for adding other type of imperfections to surfaces as well. Let's get into it.
youtube
To get started, open a model or download the one above to experiment with and get a closer look at the Material Graph. Next, select the surface you’d like to add dust to and open the Material Graph from the Project window, Material tab.
1. Add a Layer for Dust
Right-click the Material Graph workspace, go to Materials and select Diffuse from the menu. Then, connect the Diffuse node to the Label input of your parent material. Now, change the Diffuse layer Color to something a little closer to white. This is going to be the color of your dust, so pick a color or value that works best for you.
2. Add Opacity Map
At this point, we’re essentially going to mask out parts of the Diffuse layer to create a dust-like effect that will sit on the screen surface. To do this, right-click on the Material Graph workspace again and select Spots from the Textures menu and attach it to the Diffuse (dust layer) Opacity input. With the Diffuse node selected, hit the C-key to enable the Color preview.
Pro Tip:
Isolating a texture using the C-key to activate the Color preview makes viewing your texture as you make edits significantly easier! Add it to your normal workflow if it isn’t already.
3. Adjust the Scale
So, in the Spots texture Properties, adjust the Scale value of the texture to something that looks accurate to the model. This will vary based on your individual scenes and model, so adjust as needed. For a subtle surface dust appearance, you'll want a somewhat uniform, white noise type effect.
4. Invert the Colors
Next, change the Spots Color to white and the Background Color to black. When using Opacity in KeyShot, black is hidden while white is visible. The base layer of your dust material is complete. Next, we'll mask some of the dust to look less like white noise and more like a dusty surface.
5. Add a Color Composite Node
First, add a Color Composite node by right-clicking the line between the Spots and Diffuse nodes and selecting Color Composite from the Utilities menu. Next, go to the Library, Textures tab and drag-and-drop the Dusty Painted Metal texture into the Material Graph. Then, connect it to the Background input of the Color Composite node. Finally, change the Color Composite Blend Mode to Multiply.
6. Add a Color to Number Node
At this point, you may notice that little has changed with the base dust layer. That’s because the texture map is predominantly white and, as mentioned earlier, black hides the material and white allows the material to show. So, to get the effect we want, right-click on the line between the Dusty Painted Metal Texture Map and the Color Composite node to add a Color To Number node. Hit the C-key again to isolate and preview the node. Next, make adjustments to the Input and Output parameters until the desired dust coverage is achieved.
7. Apply to Other Surfaces (Easily)
Now, that may seem like a lot of work but you now have a material you can apply to any other surface. To easily apply the dust to other surfaces in your scene, shift-click and select your Diffuse material along with all the nodes you just created, right-click and select Copy Selection. Now, open up the Material Graph for other materials, right-click and select Paste, and attach the Diffuse node to the Label input.
Again, this is by no means the only way to create dust effects in KeyShot but it is one way that offers a lot of flexibility and allows you to stack different textures to create even more realistic dust-covered surfaces. You can learn more about the Material Graph in the KeyShot Manual. If you're interested in trying KeyShot Pro, just visit portal.keyshot.com/try/keyshot.
Try KeyShot Pro here
1 note
·
View note
Text
How to Add Fillets in KeyShot
Today, we’re going to explore the Rounded Edges tool in KeyShot. This is a handy feature that simulates fillets on parts, without actually altering the geometry and increasing the triangle-count.
Adding Fillets in KeyShot
Rounded edges on parts definitely add to the photorealism of an image, so if you’re not adding fillets in your modelling software, then definitely add them here in KeyShot.
youtube
Rounded Edges Settings
With a part selected, you can find the Rounded Edges feature in the Scene tab of the Project panel. Here you’ll see a Radius slider and a Minimum Edge Angle slider.
The Radius slider is unit-aware to your set scene units, so generally it is best to keep this value pretty low.
The Minimum Edge Angle slider allows you to limit Rounded Edges to corners greater than the set degree value. So if I have this set to 30 degrees, then only corners greater than 30 degrees will see the effect.
Just be aware that the Rounded Edges tool will apply the effect to all instances of a part. For instance, if you duplicate a part with a Rounded Edges already set and adjust the Radius slider, both parts are affected. Think of them as being linked. You can break this link between instances by using one of the Geometry Tools to change the radius on parts independently.
You can learn more about the Rounded Edges in the KeyShot Manual. If you're interested in trying KeyShot Pro, just visit portal.keyshot.com/try/keyshot.
What Can You Create?
We would love to see what you create with this tip. Visit the KeyShot Amazing Shots forum to see what others are creating and share your own work. And if you have a suggestion for another tip share it in the comments below.
0 notes
Text
How to Create Renderings with White Backgrounds in KeyShot

Today, we have a quick tip to help you create clean, crisp product shots. It's from a question we get a lot: How do I get a super nice, all white backgrounds for my renderings. Well, there are two ways to do it. Let's have a look.
White Backgrounds in KeyShot
Why would you want a white background for your product shots? Beside a clean appearance, white backgrounds provide more flexibility when post-processing an image or working it into a web or print layout.
youtube
1. Set the Environment Background
The first option is to head over to the Project window, Environment tab, then scroll down to the Background drop down. By default, KeyShot uses the Lighting Environment as the background, but we’re going to switch that to Color and make sure that color is set to white. And that’s a really quick way to achieve a white background in KeyShot.
2. Switch to Photographic Image Style
If you’re a KeyShot Pro user you’ll have access to the Photographic image settings in the Image tab. With that enabled, switch the Response Curve to Linear, scroll down to the Layers setting and uncheck Background Color. Again, make sure the color there is set to white. And there you go. When toggled on and off, you can see the difference it makes. It really cleans up the edges of the product and makes the background a nice, crisp white.
Now, if you have a white product on a white background, you may need to take a slightly different approach, adjusting not only the scene background color, but your material settings as well. To do that, be sure to check out the blog post to see how Esben Oxholm creates white on white product renderings.
You can learn more about the Environment and Image settings in the KeyShot Manual. If you're interested in trying KeyShot Pro, just visit portal.keyshot.com/try/keyshot.
What Can You Create?
We would love to see what you create with this tip. Visit the KeyShot Amazing Shots forum to see what others are creating and share your own work.
Try KeyShot Pro Today: https://portal.keyshot.com/try/keyshot
1 note
·
View note
Text
How to Create Custom Weave Patterns with KeyShot RealCloth
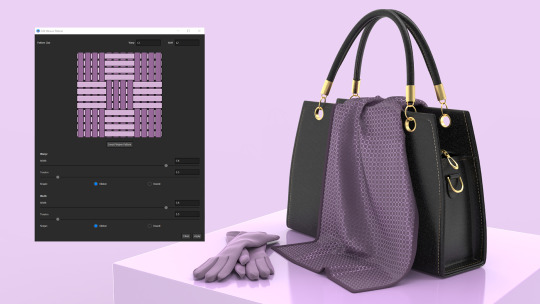
When you’re working with KeyShot RealCloth, you may eventually want to explore more custom weave patterns. While KeyShot comes with some handy presets for applying weave patterns, KeyShot Pro offers the ability to easily customize these weave patterns.
Custom Weave Patterns
Let’s talk about customizing your RealCloth weave patterns. You might need to do this if the cloth on your design needs a slight change, a completely different cloth, or you may just want to explore different variations of color, warp, and weft. The Edit Weave Pattern window provides access to this. There are essentially two places to edit (or customize) your weave pattern. Let's take a look.
youtube
1. Basic RealCloth Weave Patterns
The first place to customize the weave pattern, available to both HD and Pro users, is located in the Project window, Material tab, in the Properties subtab.
From here, you’ll handle the majority of your RealCloth material editing. You can change color of warp and weft threads as well as their roughness and translucency. You can make geometry adjustments, switch between your geometry display settings and add transparency to your material.
You can also add and adjust flyaway fibers to better match a real-world material and, if you’re looking for greater control, you can adjust a variety of advanced parameters through the Advanced section located at the bottom of your properties.
2. Advanced RealCloth Weave Patterns
The second place to customize your RealCloth appearance is through the Edit Weave Pattern window. At the top of the Properties subtab, you’ll find two options. A dropdown to select from 10 different preset Weave Pattern options and an Edit button with a woven material icon. (The presets are available in KeyShot HD and Pro but the Edit button is grayed out in KeyShot HD.)
With KeyShot Pro, you can select Edit to open the Edit Weave Pattern window. From here, you can set Pattern Size for Warp (number of threads along the length) and Weft (number of threads along the width) and preview the weave pattern below these settings.
With the weave pattern preview, you can further customize how the threads cross by clicking on the individual threads for an unlimited array of creative weave possibilities.
Just below the interactive weave preview, there are additional parameters to adjust the Width, Tension and Shape of your threads. Width generally plays a role in increasing or decreasing a materials transparency and, when used with Ribbon shaped thread, helps to add a sheen to the material that better represents a satin like cloth.
With KeyShot Pro, using Edit Weave Pattern also allows you to create custom cloth and mesh patterns that can have any material applied to it using the Material Graph.
Overall, using the edit weave pattern window adds an incredible level of flexibility to your RealCloth applications, and allows you to not only match many real-world patterns, but also design new patterns in real-time. You can learn more about RealCloth and Weave Patterns in the KeyShot Manual. If you're interested in trying KeyShot Pro, just visit portal.keyshot.com/try/keyshot.
What Can You Create?
We would love to see what you create with this tip. Visit the KeyShot Amazing Shots forum to see what others are creating and share your own work.
0 notes
Text
Post-Processing Renders in KeyShot
Post-processing (editing) a rendering can be useful for many reasons. You may want to tweak the contrast, add some bloom or a vignette, or even change background colors and add frontplates. KeyShot allows you to do that prior to rendering but also after you have rendered your scene, along with creating multiple versions. Let's have a look.
Emboss and Deboss Labels
With KeyShot 8 or later, you can quickly and easily make post-render edits using the Adjustments panel in the Render window. Once you’ve selected your output options and hit Render, the Render window will open and show the progress of the image that’s currently being processed. At any point during your local render, you can begin making adjustments by selecting the Show Image Style panel icon on the Render window menu.
youtube
Remember that although you can make adjustments immediately when the render process starts, you can get a more accurate idea of what adjustments might be needed after the render is complete.
Once the Adjustments panel is open, you’ll notice that the tab looks nearly identical to the Image tab in the KeyShot Project panel. The only notable difference is the lack of Resolution settings since the image has already been rendered at the set resolution.
All settings can be edited the same as in the Image settings. In fact, if you created some Image Styles earlier, you will see them here. With the same settings available post render, post-processing is a natural step in the visual creation pipeline and helps reduce the need to re-render images that don't have the appearance you prefer.
With the Adjustments panel available post-render, you have options for Basic and Photographic that include image adjustments such as Exposure, Bloom, Vignette, and Chromatic Aberration, as well as the option to Denoise your images and remove fireflies.
If you use the Photographic option, you gain greater control of your image adjustment parameters, as well as change your background colors and add frontplates, just as you would in the KeyShot Image options.
Once you’ve finished making adjustments and you’re satisfied with the final result, you can save your changes. If you close the window or hit the green checkmark, you will get a prompt to save your changes.
Hopefully, this helps consider the post-processing options in KeyShot. You can learn more about Image Styles in the KeyShot Manual. If you're interested in trying KeyShot Pro, just visit portal.keyshot.com/try/keyshot.
What Can You Create?
We would love to see what you create with this tip. Visit the KeyShot Amazing Shots forum to see what others are creating and share your own work.
0 notes
Text
How to Create Emboss and Deboss Effect in KeyShot

If you’re trying to add some depth to a logo or label in KeyShot, but don’t have the geometry of the graphic modeled on your part, you can easily create the illusion of an embossed or debossed graphic by using a simple bump map.
Emboss and Deboss Labels
KeyShot Labels are usually used to add decals and graphic detail to your model. However, labels can act as a sort of secondary material complete with texture map capabilities to add more detail and more flexibility to your model setup. Let's take a look at how it's done.
youtube
1. Create a White Version of Your Graphic
To get started, you’ll first want to create a white version of your logo or graphic. Colored images may still work, but white tends to create the best results when adjusting your bump maps. Add just a bit of blur to your image to feather the edges. Now, when the bump map is applied, the transition between surface heights will appear slightly graduated to add just a bit more realism to your scene. Then, save your image as a PNG with a transparent background.
2. Apply Label to Model
To apply your newly created label to your model in KeyShot, you can either drag and drop the image onto your model and select an option from the pop-up Texture Map Type dialog, drag and drop the image into the Labels list, or select the Add Label icon to the left of the list and add the image from its saved folder.
3. Position the Label
Next, position your label in its desired location and scale to your needs. Once your label has been applied to your preferred location, you’re ready to create your bump texture.
4. Add Bump Texture
In the Label Textures sub-tab, alt+click and drag your Diffuse layer onto the Bump layer (Option+click if you are an Mac user). If you’re a KeyShot Pro user and prefer to work in the Material Graph, connect the texture to your label material’s bump input, and you’ll achieve the same result.
5. Adjust Label Properties
Finally, adjust the Bump Height to a positive number to create an embossed or raised effect, and adjust it to a negative number to create a debossed or indented effect. Typically, it doesn’t take much adjustment to your Bump Height to achieve your desired result, so start small and work your way in either direction as needed.
With your label in place and bump height set, you can now move on to making further edits to your label, such as adjusting your label Type to a different material or changing the labels color by using the Blend with Color checkbox.
Hopefully, this helps you create more realistic labels in your future KeyShot projects. You can learn more about KeyShot Labels in the KeyShot Manual. If you're interested in trying KeyShot Pro, just visit portal.keyshot.com/try/keyshot.
0 notes