
Don't wanna be here? Send us removal request.
Statistics
We looked inside some of the posts by lacepaint08-blog and here's what we found interesting.
Average Info
Notes Per Post
0
Likes Per Post
0
Reblog Per Post
0
Reply Per Post
0
Time Between Posts
3 days
Number of Posts By Type
Text
17
Last Seen Tumblr Blogs


Fun Fact
After the announcement of the deal with Yahoo!, there were 170K signatures of unhappy Tumblr users petitioning to prevent the sale in 2013.
Text
Rhubarb Mint Margarita
Say cheers with a Rhubarb Mint Margarita! Give margaritas a springtime twist with a simple syrup made with rhubarb and mint!
Every morning the birds have been chirping me awake – and not the alarm on my iPhone (which, funny enough, is the ringtone I use to wake up!) – but the ones outside my window, which are apparently very busy and chatty at around 5:30 am. Their springtime chatter makes me feel like Snow White each morning, waking to their early chirps, and if there wasn’t a screen on the window, I’m convinced they would fly in and perch on my bed for a conversation!
It’s spring, my friends, and to make it feel more official, I spotted my first bunch of rhubarb from the market! And this spring week is extra special since we are celebrating my husband’s birthday. I plan on making his favorite rhubarb cake, but we really need to toast with something special, so that calls for a Rhubarb Mint Margarita.
Margaritas are one of my favorite cocktails, and I love how adding a simple rhubarb mint syrup elevates the drink and adds that sweet and sour tang which makes so much sense in a margarita!
How can you go wrong with rhubarb, mint, and tequila? I can’t think of a better way to celebrate spring…and spring birthdays!
CELEBRATE MARGARITA WEEK!
This year I’m joining Kate from ¡Hola! Jalapeño and many of my fellow bloggers to celebrate Cinco de Mayo with the 4th annual Margarita Week! Follow #MargaritaWeek for lots of margarita inspiration!
MORE MARGARITA RECIPES TO TRY
Watermelon Lime Margaritas Green Apple Margarita Margarita Bars Guyabano Margarita Slushie from Rezel Kealoha Smoky Carrot Mezcal Margaritas from Floating Kitchen Pineapple Margaritas from Foolproof Living Mezcal Margarita Fizz from Vanilla and Bean Simple Lavender Margarita from The Almond Eater
Say cheers with a Rhubarb Mint Margarita! A simple rhubarb syrup with mint gives a classic margarita a springtime twist, perfect for your next fiesta!
Course Beverages
Cuisine Mexican
Keyword beverages, cocktails, drinks, margarita, mint, rhubarb
Prep Time 5 minutes
Total Time 5 minutes
Servings 1 serving
Calories 295kcal
Author Liren Baker
Rhubarb Mint Margarita
3 oz Tequila
1 oz Rhubarb Mint Syrup see recipe below
1 oz lime juice
1 teaspoon Cointreau
1 wheel of lime
1 rhubarb ribbon (thinly sliced rhubarb)
Rhubarb Mint Syrup
1/2 pound rhubarb cut into 1/4-inch pieces
1 1/2 cups water
1 cup granulated sugar
1 sprig mint
Rhubarb Mint Syrup
Place the rhubarb and water in a saucepan over medium heat and bring to a low boil. Lower heat and simmer for 5 minutes or until the rhubarb is tender.
Puree in a food processor or using an immersion blender and strain through a fine strainer or cheesecloth, discarding solids. Return the rhubarb to the saucepan, along with the sugar. Simmer for about 5 minutes.
Remove from heat, drop in mint, and completely cool.
Strain and store in a glass container in the refrigerator until ready to use.
Calories: 295kcal | Carbohydrates: 24g | Sodium: 18mg | Sugar: 22g | Vitamin C: 10.3% | Iron: 5.7%
Source: https://kitchenconfidante.com/rhubarb-mint-margarita
0 notes
Text
The 12 Days of Guy Fieri: How ‘Triple D’ Was Born
When Diners, Drive-Ins and Dives launched back in 2007, nobody could’ve predicted that it would become one of the biggest food shows of all time. The Food Network took some risks by working with a new producer on a show covering a style of restaurant — the greasy spoon — that had not been featured prominently on the channel before. And while Fieri was a rising star on the network, the Platinum Prince himself was not particularly knowledgable about the restaurants featured in the title of the show. “I’ve never been to a diner, really... but I’ve been to a lot of dives,” he remembers telling a producer before shooting began. But despite this unusual set of circumstances, something clicked during the filming of the pilot, and Fieri and his producers laid the groundwork for a food TV behemoth. On this, the third day of The 12 Days of Guy Fieri, it’s time to look back at how Diners, Drive-Ins and Dives was born.

Food Network
Back in 2004, Guy Fieri was a young entrepreneur growing his chain of “pasta grills” in Santa Rosa, California. A natural-born entertainer, Guy had auditioned for the pilot of a Food Network barbecue show in the early 2000s, but gave up on his small screen dreams when that show went nowhere. After learning about the casting call for the Next Food Network Star, Guy’s friends convinced him to film an audition tape and send it in. (“It’s me being a smart-ass,” Fieri recently told Brian Koppelman.) The tape got Fieri a slot on the second season of the show, which he completely dominated, winning the competition and snagging a six-episode deal for the series that would become Guy’s Big Bite.
Around this time, David Page, a former ABC and NBC news producer, was pitching a bunch of show ideas to the Food Network. As Allen Salkin notes in his book From Scratch, Page was on the phone with a network executive named Christianna Reinhardt one day, when he got asked if he had any pitches about diners. Bluffing, the producer said he had an idea for a program called Diners, Drive-ins and Dives, a name Page reportedly made up on the spot. Reinhardt was intrigued by the idea, and after reading a brief summary that Page put together the next day, decided to green-light the pilot and put Fieri in the hosting role.
Food Network/Triple D
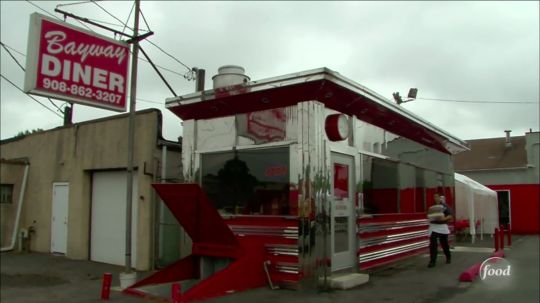
Guy’s shaky understanding of the diner scene quickly became apparent to Page and the rest of the crew on the first day of shooting at the Bayway Diner in Linden, New Jersey. But Fieri didn’t let his his lack of expertise sink the shoot. Instead, he turned on the charm and tapped into his instincts as a chef/restaurateur. Here’s Fieri’s account of that fateful day from a recent episode of Brian Koppelman’s The Moment podcast:
I meet the producer, and he’s giving me this whole list of things, and I’m like, “What is going on?” And he goes, “Do you have a shirt?” And I said, “Yeah I’ve got this work shirt, this Dickies work shirt, with the big panel on it.” That’s where the bowling shirts and all that come from, and I’m in shorts and flip flops. And he says, “Go ask these questions.” I said, “Okay.” So I walk in on the line, and the place is jamming. It’s a diner, it’s open, it’s working, and people are talking, and there’s a camera guy over my shoulder. A lady’s sitting there, and she doesn’t have any coffee, so I’m filling a little coffee. ...
So I’m moving and jiving, and the hash browns are starting to burn. So I flip ’em, and we’re talking, and we’re going back and forth, and I asked all my questions. And [the producer] yells, “What is this? Come outside.” He goes, “What was that?” And I said, “Listen, as a chef I can’t be on the line, shutting down [the owner’s] world.” And he said, “Can you do that again?” And I said, “Can I do that, what I did right there? Yeah... we’re in the groove, baby.” And he threw his clipboard down and said, “We’ve got a hit!”
The shooting of the pilot eventually took 17 days, but Fieri, Page, and the production team hammered out the style and format for the entire series during the shoot. “This guy was really a genius,” Fieri told Koppelman. “This producer really had a vision of what the show would be.” The Bayway Diner, meanwhile, got so popular after being featured on the pilot that owner Mike Giunta expanded seating to a tent outside his tiny diner, and launched a lunch truck and catering business to keep up with the demand.
Stay tuned for more tales from Flavortown tomorrow, as we continue The 12 Days of Guy Fieri. • The 12 Days of Guy Fieri: Car Trouble in Flavortown [E] • The 12 Days of Guy Fieri: A Look Back at the Pretzel Cart That Started It All [E]
Eat, Drink, Watch.
Food entertainment news and streaming recommendations every Friday
By signing up, you agree to our Privacy Policy and European users agree to the data transfer policy.
Source: https://www.eater.com/2018/12/10/18134678/guy-fieri-diners-drive-ins-dives-origin-bayway-new-jersey
0 notes
Text
STRAWBERRY PISTACHIO BAKED FRENCH TOAST
There are a few ingredients that I genuinely believe improve almost anything. Pistachios is one of them. I’m trying to find the words to describe pistachio’s flavor – nutty, obviously, rich, maybe a touch of cherry or a floral note? There’s just something special about it. I especially love them paired with strawberries, so here we are, with my strawberry pistachio baked French Toast. The pistachios add a lovely crunch, the strawberries are sweet and bright, and baked French toast is basically a lower key bread pudding. The extra brilliant thing? You can put everything together the night before, for an epic carbo-licious brunch.
INGREDIENTS
6 large eggs
2 cups milk
1/3 cup heavy cream
1/4 cup sugar
1/4 cup brown sugar
1 teaspoon pure vanilla extract
1 teaspoon freshly grated nutmeg
1/2 teaspoon coarse salt
10 slices day-old brioche (about 3/4 inch thick)
1/4 cup pistachios, shelled, roughly chopped
3 cups strawberries, quartered and divided
3/4 cup maple syrup
2 tablespoons lemon juice
DIRECTIONS
Beat eggs in a bowl. Whisk in milk, heavy cream, 1/3 cup sugar, vanilla extract, nutmeg, and salt.
Working in batches, dip 10 slices day-old brioche into batter to coat. Overlap brioche slices in a 9-by-13-inch ceramic or glass baking dish, sprinkling 1 1/2 cups strawberries throughout. Pour remaining batter over top. Refrigerate, covered, for at least 2 hours.
Preheat oven to 375 degrees. Top with pistachio streusel. Bake, covered with parchment-lined foil, for 25 minutes. Uncover; bake until top is golden brown and crunchy, 20 to 25 minutes more. Serve with syrup.
To make the syrup, combine the remaining strawberries with the maple syrup and lemon juice in a saucepan over medium heat. Cook until the strawberries release their juices, about 10 to 15 minutes, and strain.
INGREDIENTS (PISTACHIO STREUSEL)
1/2 cup flour
1/4 cup sugar
pinch of salt
1 teaspoon cinnamon
2 ounces butter, cold and cubed
1/2 cup pistachios, chopped
DIRECTIONS
Using your fingers or a food processor, combine the flour, sugar, salt, and cinnamon and then mix in the butter until crumbly. Add the pistachios. Place on a baking sheet with a silicone mat and bake at 350 F for 10 minutes. Break apart and mix the streusel up, and bake for another 10 minutes or until golden brown. Crumble and cool.
Source: https://www.thekitchykitchen.com/?recipes=/strawberry-pistachio-baked-french-toast/
0 notes
Text
Instant Pot Chicken Alfredo Pasta
This Instant Pot Chicken Alfredo Pasta is an easy, one pot meal that cooks in record time! It’s creamy, comforting and hearty!
Hey everyone! It’s Ashley here from The Recipe Rebel back with another Instant Pot recipe, because September is crazy enough without us having to worry about getting a good meal on the table in between after school activities, lessons and sports!
I was a little nervous about making pasta in my Instant Pot for the first time, because I thought it would either all clump together (how could it not when there’s no stirring??), or be totally mushy and overcooked.
But somehow, it just works. And it works so well, especially when you have your hands full with littles or other things because once you close the lid and set the cook time, it’s totally hands off. You can’t fuss over it even if you wanted to!
This is one of our go-to recipes because it’s easy, the kids love it, and the leftovers are perfect for lunches the next day (if there are any!). If you’re looking for more Instant Pot pasta recipes, try this Instant Pot Baked Ziti or this Instant Pot Mac and Cheese!
You never want to milk, cream, cheese or other dairy products to the Instant Pot before pressurizing. They will clump and foam when you open the valve to release the pressure. You don’t want to try it.
The worst thing you can do is cook the pasta too long. You will want to cook the pasta for roughly half the time listed on package, especially because in this recipe, you are going to turn the Instant Pot to saute when you add the rest of your sauce ingredients. If your pasta is well cooked to begin with, it’s going to turn into a gross mess when you’re cooking and stirring the sauce.
Feel free to use chicken breasts or chicken thighs, or you can even skip the chicken and opt for a vegetarian meal. You cannot skip sauteeing the chicken in this recipe because the chicken needs a longer cook time than the pasta.
Feel free to mix up the flavors by adding in different veggies when you mix up the rest of the sauce: broccoli, mushrooms, green beans, or anything that can cook fairly quickly are great.
Instant Pot Chicken Alfredo Pasta
This Instant Pot Chicken Alfredo Pasta is an easy, one pot meal that cooks in record time! It's creamy, comforting and hearty!
2 tablespoons canola oil
3 boneless skinless chicken breasts, cut into ½" cubes
1 teaspoon salt
⅛ teaspoon black pepper
1 teaspoon minced garlic
1 teaspoon dried parsley
4.5 cups low sodium chicken broth
375 grams Bowtie pasta (about 5 cups)
8 oz light cream cheese
1 cup shredded mozzarella cheese
¼ cup shredded Parmesan cheese
2 tablespoons water
1 tablespoon corn starch
Turn the Instant Pot to saute. When it reads "hot" add the oil.
Add the chicken breasts, sprinkle with salt and pepper, and brown on both sides, about 3-4 minutes total.
Add the garlic, parsley and oregano and stir and cook 1 minute.
Add the chicken broth, and scrape the bottom of the pot with a hard metal spoon to remove any stuck on bits. Turn the Instant Pot off.
Add the pasta -- don't stir -- and press down with a spatula into the liquid. The liquid will just barely cover the pasta.
Put the lid on, turn the valve to sealing, and select Manual or Pressure Cook for 3 minutes.
When the cook time is over, do a quick release (open the valve all the way) and remove the lid. Turn the Instant Pot to saute.
Stir in the cream cheese, mozzarella, and Parmesan. Stir together the water and corn starch and stir into the pasta. Cook and stir until thickened and season to your tastes. Serve.
Source: https://therecipecritic.com/instant-pot-chicken-alfredo-pasta/
0 notes
Text
Fresh Apple Cake with Caramel Cream Cheese Frosting
This old-fashioned Fresh Apple Cake recipe is all the bits I cherish about fall—apple picking, chunky sweaters, cinnamon sticks, and crackly orange leaves—turned into a warm hug of a dessert and slathered with dreamy caramel cream cheese frosting.
When I think about the perfect fall day, I envision red leaves against icy blue skies, backyard football games, and piping hot mugs of cider.
I imagine pink cheeks, fuzzy slippers, and oversized, squashy armchairs.
Most importantly, my perfect fall day necessitates a big, warm slice of freshly baked apple something. Something frosted. Or glazed. Or ice creamed. Or frosted AND ice creamed.
Fresh Apple Cake with Caramel Cream Cheese Frosting, you are that apple something of my eye!
This fresh Apple Cake is a moist, rich spice cake studded with hunks of tart apple and bits of toasted walnuts. It is scented with cinnamon and nutmeg and allspice and is the kind of homey, comforting dessert I imagine myself loving as a kid and baking as a grandma and craving every autumn in between.
The apple cake recipe was a bit of a saga to get right, but it was worth every Granny Smith (and GASP honeycrisp!) in the bag.
If you follow me on Instagram, you may have witnessed the incident in which the beautiful apple bundt cake I stayed awake until midnight to bake emerged from its pan in 10 odd pieces.
As I learned the hard way, this apple cake is so supremely moist and apple packed, it’s better suited for a regular square baking dish than it is a bundt pan.
(Don’t worry though—I pieced that broken bundt back together, poured caramel glaze over the top, and served it at a dinner party. No leftovers!)
A few adjustments to the recipe later, and I have for you a perfect, more reliable Fresh Apple Cake, scratch-made and ready to be slathered in cream cheese frosting.
But not just any cream cheese frosting. CARAMEL cream cheese frosting. This Fresh Apple Cake is special, and it deserves a special topping to match.
The addition of the brown sugar makes the cream cheese frosting taste like caramel, no making of actual caramel required. Translation: it’s quicker and easier, which means you will be eating apple cake sooner than later. YES.
Add a shower of toasted walnuts and you have a creamy, crunchy sensation in every bite.
Another yummy twist for the next time you bake this cake, as I suspect there will be a next time: Fresh Apple Cake with coconut and pecans (swap pecans for the walnuts and add a sprinkle of both on top). New topping, same warm, happy fall feeling.
Every fall, I like to treat myself to at least one indulgent apple dessert. It’s my grown-up way of experiencing the same unabridged autumn bliss I did as a kid diving into a pile of leaves, with fewer bruises. I can attest to this because I tried jumping into what I thought was a large, cushy leaf pile recently. Let’s just say I don’t bounce back the way I once did.
While Vegan Apple Crisp, Hasselback Apples, and baked Apple Chips are a few of my go-to healthy apple treats, this Fresh Apple Cake is extra special. Don’t skip the cream cheese frosting, and be generous with the nuts. Your inner leaf-jumping kid (and outer apple-dessert-loving adult) will thank you!

Moist, rich old fashioned apple cake with caramel cream cheese frosting. Filled with fresh apples, walnuts, and cinnamon. Easy to make and a fall favorite!
Yield: 1 9x9-inch cake (Serves 12)
Prep Time: 30 minutes
Cook Time: 40 minutes
Total Time: 2 hours, 30 minutes
Ingredients:
For the Apple Cake:
3/4 cup walnut halves
1 2/3 cups white whole wheat flour
1/4 teaspoon baking soda
1/4 teaspoon baking powder
1/2 teaspoon kosher salt
1 teaspoon ground cinnamon
1/4 teaspoon ground nutmeg
1/4 teaspoon ground allspice
6 tablespoons unsalted butter, at room temperature
1/2 cup packed light or dark brown sugar
1/2 cup granulated sugar
2 large eggs, at room temperature
1/4 cup nonfat plain Greek yogurt, at room temperature
1 teaspoon pure vanilla extract
2 cups peeled and 1/4-inch-chopped apples (about 2 medium apples—choose a firm, flavorful variety such as Granny Smith, Fuji, McIntosh, or Cortland)
For the Brown Sugar Cream Cheese Frosting:
6 ounces reduced-fat cream cheese, at room temperature
2 tablespoons unsalted butter, at room temperature
1/2 cup brown sugar
1 teaspoon vanilla extract
1/4 teaspoon kosher salt
1/2 cup powdered sugar
Directions:
Place the rack in the center of your oven. Preheat the oven to 325 degrees F. Line a 9×9-inch or 8×8-inch square baking pan with parchment paper so that it overhangs two of the sides like handles. Lightly coat the parchment with nonstick spray. Set aside. Place the nuts in a single layer on an ungreased baking pan. Bake until toasted and fragrant, about 8 to 12 minutes. Do not walk away during the last few minutes (this is when nuts love to burn). Immediately transfer to a cutting board. Coarsely chop and set aside.
In a medium bowl, whisk together the white whole wheat flour, baking soda, baking powder, salt, cinnamon, nutmeg, and allspice.
In the bowl of a standing mixer fitted with the paddle attachment or a large mixing bowl, cream together the butter, brown sugar, and granulated sugar until light and fluffy, about 3 minutes. Beat in the eggs, one at a time, stopping in between each to scrape down the bowl. Beat in the Greek yogurt and vanilla extract. With the mixer on low, slowly add the dry ingredients, mixing just until evenly moistened. Fold in the apples and 1/2 cup of the toasted chopped walnuts. The batter will be very thick.
Scrape the batter into the prepared pan and with the back of a spatula, spread it evenly. Bake until a toothpick inserted into the center comes out clean and the edges are light golden brown, about 35 to 45 minutes. The baking time will vary depending upon the moisture content of your apples. The center of the cake will still feel soft but should spring back just a little when touched. Check at the 35-minute mark. If your cake isn’t done but the top is browning more quickly than you would like, loosely tent it with foil, then continue baking as directed. When it’s done, place the pan on a wire rack and let cool completely before frosting.
To make the frosting: In a mixing bowl or a stand mixer fitted with the paddle attachment, beat the cream cheese, butter, and brown sugar at medium speed until creamy, about 1 to 2 minutes. Add the vanilla and salt and beat until blended. Reduce the mixer speed to low. Gradually add the powdered sugar, beating just until combined. Increase the mixer speed to high. Beat 1 additional minute or until smooth. Spread the frosting generously onto the cooled cake. Sprinkle the remaining walnuts over the top. Slice generously and serve.
Store leftovers in an airtight container in the refrigerator for up to 5 days. (I find it tastes even better and more moist on day two! Let come close to room temperature prior to serving.)
Freeze (frosted or unfrosted) for up to 1 month. Let thaw overnight in the refrigerator.
All images and text ©Erin Clarke/Well Plated.
Nutrition Information
Serving Size: 1 slice (of 12)
Amount Per Serving:
Calories: 321 Calories
Total Fat: 17g
Saturated Fat: 8g
Cholesterol: 62mg
Carbohydrates: 37g
Fiber: 3g
Sugar: 25g
Protein: 6g

This post contains some affiliate links, which means that I make a small commission off items you purchase at no additional cost to you.

Source: https://www.wellplated.com/fresh-apple-cake/
0 notes
Text
Abruzzo, Italy 2019 Retreat Open for Registration + 2018 Retreat Recap
We are so excited to announce that registration for our next retreat in Abruzzo, Italy is now open for the Fall of 2019! We hosted our first foraging and cooking retreat there this past October, and it really exceeded all of our expectations. We are elated to announce that this time around, we will have an on-site Acupuncture Physician and an on-site Yoga Teacher! In addition to cooking, eating, foraging, hiking, and sightseeing in the beautiful Abruzzo countryside, we will be exploring the ways to inner balance through yoga, meditation, and ancient techniques of Chinese Medicine. Read on for retreat registration, testimonials, and a photo recap of our first retreat. We hope to see you in the fall :)
Forage, Cook and Re-Center Retreat 2019 with On-Site Acupuncture Physician and Daily Yoga/Meditation (September 30th – October 6th, 2019)
Activities and Services will include: one-on-one appointments with on-site Acupuncture Physician (diagnostic consultation, acupressure, deeply relaxing facial and body gua sha massage), daily yoga with on-site certified yoga instructor, meditation, forest-bathing, plant-based meals prepared by the Golubka Kitchen team, foraging, truffle hunting, meditation in a 600 year old olive grove and olive oil tasting, winery visit and wine tasting, plant-based cooking, medicinal jam, and herbal tonic classes with the Golubka Kitchen team, cooking with Abruzzo locals, and more!
Click to Book | Click to See a Sample Itinerary
Testimonials
“Having the opportunity to explore a lesser known region of Italy to find its hidden gems in the Culinary arts was such an enriching experience! Getting to see first hand how the people in these areas live, visiting locals in their homes… From truffle hunting to tasting oil from 600 year old olive groves… Wild foraging for greens & making pasta in an Italian woman’s kitchen…. Not the typical trip to Italy. It was a delightful & delicious experience!”
– Rachel, Alabama
“I loved the retreat. It was well managed, we had the best food, awesome accommodation, great people, perfectly sized travel group and great tour guides. I had looked very much forward to this retreat and it was even better than I imagined. You created an amazing experience, with wonderful and very unique accommodations, the best meals I have ever had, set in a beautiful landscape, off the beaten path. The silence was palpable and so welcome to step out of the noisy and hectic lifestyle most of us have these days. I seriously consider joining you again, so I can have more of those meals, go back to the medieval village of Santo Stefano and the unique scattered hotel. We also had an awesome group, which made it even more special!”
– Claudia, Massachusetts
“It was a trip of a lifetime. Abruzzo could not have been more beautiful! I loved the diversity of the land, the hiking, cooking and loved loved loved the food. I also was glad that it was not a large group…I liked the intimacy of the smaller number of participants. It truly was a remarkable 6 days and you all were so kind, knowledgeable and pleasant to be with.”
– Helen, Michigan
“Thank you for the wonderful trip. It was so much more than I thought it would be. A deep dive into the food, culture and people of Abruzzo. I had experiences that I could never have on my own. I thought we were a good mix of ages, interests and countries. Diversity makes things so interesting.”
– Maudia, Michigan
“I’ve been to Italy before but never like this! We visited magical places that I’d never know about on my own: Santo Stefano with its fairytale charm, the beautiful truffle plantation, ancient olive grove, a winery located right in a family home’s basement… Every single one was a unique, unforgettable experience. Thank you!”
– Katya, Sochi
Truffle Hunting & Tasting
We visited a family truffle plantation, where the sweet truffle-hunting dogs Rita and Nina dug up about 1kg of summer truffles right in front of us. We then got to have home-cooked lunch at the truffle plantation owners’ house, where we sampled the day’s harvest, as well as the family’s line of truffle pastes.
Hiking and Foraging
We hiked up beautiful mountain paths to see historical castles, churches, and hermitages, and foraged for wild herbs, berries, and fruit along the way. We foraged rosehips, wild mint, wild chicory, figs, and even jujube dates.
Exploring Local Villages & Towns
Pictured below are the breathtaking towns of Pacentro, Sulmona and Santo Stefano (we stayed in Santo Stefano in this experience of a hotel), where we had the pleasure of sightseeing and visiting local artisan businesses, as well as a bustling farmer’s market.
Visiting Local Artisans
We visited a local wine producer (also a family business) and sampled their exquisite wines. We also had the transcendent experience of wandering around an olive grove with trees up to 600 years old, and got to taste incredibly fresh olive oil, made with the olives from those trees.
Cooking, Eating & Drinking!
Eating well was the main mission of this retreat, and I think it’s very safe to say that the mission was accomplished. We tasted vegan and vegetarian food from a variety of cozy restaurants, cafes, artisans, and local’s homes. We foraged and ate wild chicory, learned to make pasta and cookies, and got to know famous Abruzzo ingredients, like their local lentils, solina flour, spelt, and more.
Source: https://golubkakitchen.com/abruzzo-italy-2019-retreats-open-for-registration-2018-retreat-recap/
0 notes
Text
Traveling with a Toddler: Travel Beds, Packing List, & Tips!
Find a Recipe
All Recipes
Random Recipe
Traveling with a Toddler: Travel Beds, Packing List, & Tips!
In Travel
Traveling with a toddler? Here are tips on traveling to Europe with toddlers, including toddler travel beds, packing lists, plane activities, and more! Affiliate links are included below.
When Alex and I decided to take our toddler son Larson on vacation to Europe, some people thought we were crazy! Heck, we felt like we were crazy. But with the guidance of friends who had traveled to Europe with toddlers, we were assured that yes, we could actually do it. As a friend of ours always says, traveling with kids is an adventure, not a vacation! A few days in and it actually did start to feel like a vacation! Incredible food, clear blue Mediterranean waters, and ancient ruins combined to make the most memorable adventure. Since we’ve returned, we’ve had many people ask, what are your tips for traveling with a toddler? Good news: we’ve got you covered! Here are all our secrets for the best toddler travel bed, plane activities, and more! For our full toddler packing list, skip to the very end.
Related: Travel Capsule Wardrobe: What to Pack for a Trip to Europe, How to Take Better Vacation Pictures
Our toddler travel bed fit right into half of this suitcase!
Did you use a toddler travel bed?
Yes, we did use a toddler travel bed! In fact, bringing a travel crib for a toddler is one of our top tips for traveling with toddlers! Since Larson was 17 months for our trip, we still did not feel comfortable with him sleeping on a cot or bed. Most of the places we stayed, all of them Airbnbs, were not equipped for toddler sleeping situations. But even more importantly, sleeping in the same toddler travel bed every night was crucial to Larson adapting to the travel. We stayed in many different cities, but each night at the end of the night Larson had the same bed! So by the third night of our three weeks, he was totally adjusted to that travel crib.
What toddler travel bed did we use? This Baby Bjorn Travel Crib Light. We actually bought ours used on Craigslist, which was a steal! We cannot recommend this crib enough: it’s super light, easy to assemble, and fits into half of a large suitcase. The luggage we used was this Samsonite Winfield 2 Hardside 28″ Luggage. It fit right into one side of the suitcase, which left the other half for Larson’s and our clothes and other items. The only other luggage we brought was this Samsonite Winfield 2 Hardside 24″ Luggage and it fit everything we needed for 3 weeks! I could even assemble the Baby Bjorn travel crib all by myself, which is saying something (I’m terrible even at putting together Pack N Plays!).
Larson’s car seat, complete with travel bag
What about a toddler car seat for travel?
Good question! We used Larson’s normal car seat, which is lightweight. The toddler car seat we have is the Evenflo Tribute LX. How it works when flying: you’re not charged extra for having a car seat with you. Make sure to buy a travel bag for the car seat; here’s our carseat bag. When you get to the gate, the flight attendant will provide separate checking tags for the car seat in the bag. Many times you’ll be able to bring it up to the gate and then they’ll check it there. In some countries, the airport had a special place for “bulky luggage” where we had to take it (the flight attendant will instruct you). In both cases, we typically picked up the car seat with our luggage on the luggage carousel.
Do taxis, Ubers, and car services takes toddlers with car seats? All of the Ubers and taxis that we used did take toddlers with car seats! It’s possible that some might not, so make sure to be up front about it when you order. One tip: Since many cars have a latch system for car seats and you may not have secured the car seat with a seatbelt before. Before you travel, make sure to practice putting in the car seat with a seatbelt if you’ve never done it!
For long trips we used our baby carrier, but for strolling we let him run! (Tellaro, Italy)
Did you bring a travel stroller or baby carrier?
For this trip, we ditched the stroller and decided to bring only a baby carrier! Our reasoning: streets in Europe can be rather bumpy and hard to navigate. Also, we didn’t want to have to worry about lugging a stroller around and storing it when we stopped at restaurants. For Alex and me, we preferred the free feeling of just using a baby carrier. Larson falls asleep easily in public in the baby carrier, but not as much in the stroller. However, there are some drawbacks of a baby carrier: it did get rather hot, especially in the summer! Carrying around 20 pounds for a while left huge sweat spots on the back of our shirts. Also, you can’t do anything sitting down when you have a sleeping toddler on your back! It was perfect for hiking and walking through museums with a sleeping toddler, but not so much for going to restaurants.
What baby carrier did we use? This LILLEbaby 3 in 1 CarryOn Toddler Carrier. Like our toddler travel bed, we cannot say enough about this baby carrier! It’s super comfortable and carries up to 60 pounds.
Do babies and toddlers under age 2 fly free overseas?
As you may know, babies and toddlers fly free in the United States if they’re under 2 years old. Score! For overseas travel, we assumed it was the same. Ooops! For overseas travel, the cost of babies and toddlers is up to the airline. On Delta (which we used), it cost 10% of the cost of an adult ticket for a lap child.
Don’t forget to pack swim diapers! (Tellaro, Italy)
Did you reserve a bassinet for flying overseas?
For overseas travel, most airlines have a baby bassinet in the bulkhead seats to give babies a place to sleep. A lot of people suggested this to us, but in the end we decided not to. By 17 months, Larson is pretty picky about where he sleeps, so weren’t sure he’d be into it. You do have to pay an upcharge to reserve the bulkhead seats (around $100), so we decided to have Larson “sleep” with us. Once we got on the plane and checked out the bassinet situation, we were glad we went this direction. However, we do recommend this tip if you’re flying with a baby! If Larson were less than 1 year old, this would have been a perfect solution.
Walking the streets of Rome!
How do you get babies or toddlers to sleep on a plane?
This is a topic of great debate. Many people swear by using Benadryl or melatonin to help toddlers sleep on planes. We weren’t sure what to think, so we asked Alex’s brother, who is a doctor. He cautioned that having a toddler take a drug on a plane for the first time was risky, since Larson had never taken either before. He also mentioned that Benadryl can make babies and toddlers drowsy, which can make it harder to adjust to a new time zone. So, we took the conservative approach to sleeping and did no medications.
So, did Larson sleep on the plane? Yes. Did he sleep as much as we hoped? No. Because Larson was 17 months old for the overseas flight, he was much more aware of his surroundings than on past flights when he was younger. Instead of sleeping, he wanted to explore the plane and chat with other passengers! When the cabin lights darkened for sleeping time, we put on his PJs, gave him the blanket and dog, and even turned on his sound machine at low volume. We tried putting him in our baby carrier hoping the security of the carrier would lull him to sleep. Unfortunately, it was a pretty rough transition because he just wanted to keep exploring!
Eventually, Larson slept about 3 hours of the 9 hour flight overseas. The up side to only sleeping 3 hours was that once we got to Italy, we had a full day and did naps as normal. Once it got to his bedtime, he was SO tired that he slept the entire night! And we did too. The next day, we were all on Italian time. So it actually worked in our favor!
Larson was enthralled by all the dogs and cats (Sibenik, Croatia)
Do you have toddler plane activities or plane toys for toddlers?
Yes! Here are some tips for toddler plane activities / plane toys that we found went over well:
Bring these National Geographic sticker books! They’re less than $7 each and hours of entertainment! Each book has over 1,000 stickers and literally endlessly entertained Larson. They’re also light and easy to pack. There are various different animal themes: we got 4 books and gradually gave him new ones to keep the novelty factor. We cannot recommend these enough for toddlers 16 months and above! Though we did end up with stickers all over us, it was worth it!
Use small snacks as an activity. Eating raisins or Cheerios can last for quite a long time!
Play hide and seek with a small object. Use a toy car or small animal to play hide and seek. We actually use a sunglasses case to “hide” things; it has a zipper that keeps him busy trying to open it. However, you can do this with just a toy too!
Use flashcard or drawing apps on your Smartphone or tablet. We used a few flashcard apps on our phone (we like one called First Animals). Larson loved swiping and hearing the animal sounds.
Read search and find books. Larson loves finding objects in books — and it was on a plane that we actually discovered he knew way more words than we realized! If your toddler gets bored, the airplane magazines in the seat pocket can be good too! We spent hours saying, “Where’s the man? Where’s the tree? Where’s the airplane” and having Larson point to the words.
Don’t bring too much! It’s easy to overpack, so we tried to bring just enough: sticker books, tablet, a few books, and a few small toys.
A meringue the size of his head! (Cartagena, Spain)
What toddler travel snacks did you bring?
The hard part about toddler travel snacks when you’re traveling for 3 weeks is that you have to buy many of them on the road! Here is what we tended to have onhand for travel snacks:
Larabars or energy bars: Larson loves them and they’re made with real food and minimally processed
Yogurt pouches: frozen for travel (this only works on the front end!)
Raisins
Cheerios
Bananas
Blueberries
Crackers / breadsticks
Also, Larson drinks quite a bit of milk. We brought along these Stainless steel cups and Silicone sippy lids, which were perfect for his milk. We bought new milk in each location.
A quick change at a rest stop (somewhere in Slovenia?)
Did you bring a diaper bag?
For this trip, we decided that we’d prefer not carrying a separate diaper bag in addition to our camera bag and my purse. So, we got a combination camera bag and backpack that we used as a diaper bag. This way, we didn’t have to lug along a fully separate diaper bag. This is of course up to your personal preference, but we enjoyed not having to keep track of yet another bag!
What combination camera / diaper bag did we use? The Minimalist from Atlas Supply. In everyday life, it functions as Alex’s camera bag.
How many diapers did you bring?
The hard part about traveling with a toddler is that so much of your luggage is taken up by diapers! For our 3 week trip to Europe, we brought enough diapers for about 2 weeks. This did take up quite a bit of space in our luggage! Looking back however, we recommend bringing enough diapers for about 1 week. Diapers and wipes were very easy to find in grocery stores in Italy, Croatia, and Spain, so we could have packed less than we did.
Even Larson was awed by the Sagrada Familia (Barcelona, Spain)
How do you help a toddler adjust to jet lag?
Good question! Luckily Larson adjusted very quickly to the new time zone, but of course it’s dependent on the toddler! As I mentioned above, Larson only slept 3 hours of the 9 hour flight overseas. This meant that when we arrived in the morning in Italy, he was running on pretty low sleep. We did naps as normal, and then put him to bed at his normal time of 7:00 pm. Because he was so tired, he ended up sleeping the entire night! This seemed to immediately adjust him to Italian time. Larson did wake up a few times crying early on in the evening the first 2 days in Italy, which we think was likely because he was adjusting to the new space. However, after a few days he got used to sleeping in the same travel crib every night and slept soundly.
On the way home, Larson slept about the same amount of time on the flight. However, since we returned home in the evening EST, he was then able to go to bed and sleep through the night since he was so tired again. On the returning side, it took several days for him to adjust back to EST, but he was never up in the middle of the night, lucky for us!
Exploring the streets of Frigiliana, Spain
What are the best toddler travel shoes?
For travelling for toddlers in the summer, we love these Toms canvas shoes. We got them in dark gray so they would hide the dirt, and they’ve held up very well! We also brought a backup pair just in case of an accident, but he didn’t end up needing them.
Speaking of backups: we suggest always taking a backup outfit with you in your diaper bag. There was one incident of car sickness and we only had one backup pair of shorts — so Larson ended up having to spend one day in a not so pleasant shirt. Our mistake!
Larson’s trusty Toms in action at La Alhambra (Granada, Spain)
How did you handle naps on vacation?
A big question we got around traveling with a toddler was schedule: how did you handle naps on vacation? On our trip to Europe (and today!), Larson takes one 2 to 3 hour nap in the middle of the day. So on vacation, we did the same thing! And Alex and I found we actually really loved being forced to take a siesta in the middle of the day. During nap time, Alex and I would have downtime and read, catch up on a little work or emails, and relax. It also kept us out of the hot midday sun. Then when Larson was awake, we’d go out adventuring again in the afternoon. Fun fact: This schedule also helps you take better pictures!
Golden hour = almost bedtime (Tellaro, Italy)
What was your bedtime routine?
One of the hard parts about traveling with a toddler is bedtime: once you put your toddler to bed, no more exploring for you! Rome with kids means no romantic pasta dinners for two, and Barcelona with kids has no room for midnight tapas. One of the ways that we worked around this when traveling is that in many of our destinations, we were traveling with other people. In Italy we were with Alex’s mom, brother, and sister in law, in Croatia we were with a dear friend and her husband, and in Barcelona we stayed with friends. So, usually we were able to juggle having someone stay back with Larson, and the other person would have dinner companions. For 6 days we were by ourselves in Spain; for this timeframe we actually changed his bedtime to 9:00 pm so we could stay out later. Some nights we kept him up a little longer, other days we had a big midday meal and either cooked or had snacks at home.
For the bedtime routine, we tried to keep as many constants as possible. With our travel we had less time for bath time–but if we could, we’d try to do a bath or shower. Then we’d darken his room, turn on his sound machine (we have a great travel sound machine!), and put his dog and blanket in his bed. After reading a book, we’d put him in his toddler travel bed with his pacifier. By a few days into the trip, he went down very easily!
His adventurous spirit made it all worth it! (Cartagena, Spain)
Do you have a toddler packing list?
Yes! Here is our toddler packing list for 3 weeks in Europe in the summer, with links to the items mentioned above!
Travel
Evenflo Car seat
Car seat bag
LILLEbaby baby carrier
Samsonite Winfield 2 Hardside 28″ Luggage
Samsonite Winfield 2 Hardside 24″ Luggage
Passport
Sleeping
Travel white noise sound machine
Baby Bjorn Travel Crib
Lovies (he used a blanket and dog)
Pacifier
Hygiene
Baby bath soap
1 rubber ducky
Child nail clippers
Child Tylenol
Bandaids
Eating
Stainless steel cups and Silicone sippy lids
Water bottle
Snacks: Larabars
Paper towels
Toys
National Geographic sticker books
Search and Find Animal Friends book
2 or 3 other lightweight books
A handful of small toys
Tablet
Clothing (for a boy!):
7 short sleeve shirts, 1 long sleeve (it was summer!)
1 full backup outfit for diaper bag
2 pants
3 shorts
2 pairs of these Toms
2 pajamas
Diapers
Handful of swim diapers
Swim suit
Want more packing lists? Here’s what I brought as my European Capsule Wardrobe.
About the Authors
Sonja Overhiser
Cookbook Author and writer
Sonja Overhiser is author and recipe developer of Pretty Simple Cooking, named one of the “best vegetarian cookbooks” by Epicurious, and a recipe developer and healthy & sustainable food advocate behind the award-nominated food blog A Couple Cooks.
Instagram Youtube
Alex Overhiser
Cookbook Author and photographer
Alex Overhiser is photographer and recipe developer of Pretty Simple Cooking, named one of the “best new cookbooks” by Bon Appetit, and a recipe developer, photographer, and technical expert at A Couple Cooks.
Instagram Twitter
FamilyToddlersTravel
Share Tweet Pin it
We’re Sonja and Alex and we believe in Pretty Simple Cooking!
We’re a writer and photographer who love to cook. This website is a collection of the whole food vegetarian recipes we cook in our kitchen.
Read more >>
Subscribe & Follow
Our Cookbook is here!
Order today:
Amazon
IndieBound
B & N
Source: https://www.acouplecooks.com/traveling-with-toddler-travel-beds-packing-list-tips/
0 notes
Text
Keeping Two Starters @ Different Hydrations
Hey all –
Wanted to try and get some opinions from some of you.
Do you think it's worth keeping two starters at separate hydrations or just convert a few feedings before a bake?
Right now I have one at 80% and another at 100% hydration.
I'm thinking it might be easier–and use less flour–if I only kept my 100% hydration and converted to other hydration levels a few feedings before a bake.
For example *I think* this would be the right way to convert my 100% over to 80%:
Take 20g of my 100% hydration starter (10g water, 10g flour) and feed it 70g of water and 90g of flour to total 80g of water and 100g flour.
Let me know your thoughts!
Source: http://www.thefreshloaf.com/node/57354/keeping-two-starters-different-hydrations
0 notes
Text
Ms. Chi Cafe – Los Angeles (Culver City)
Chef Shirley Chung serves up “progressive Chinese American cuisine” at Ms Chi Cafe, her newly opened all-day restaurant in Culver City. With dreams of pastrami-stuffed scallion pancakes and cheeseburger potstickers dancing in our heads, my colleagues and I endured the long trek across the city for a distinct take on Chinese American fare.
Prior to opening Ms Chi, Chef Shirley competed in seasons 11 and 14 of Top Chef and spent time in the kitchens of Thomas Keller’s Bouchon and Jose Andres’ China Poblano. There’s another Ms. Chi outlet at The Fields downtown, but she considers the Culver City location the flagship.
After placing orders at the counter, our group nibbled on mochi doughnuts ($2.50) while we waited for food and drinks to arrive. All three varieties—black sesame, matcha green tea, and chocolate—boasted admirably chewy textures and true-to-form flavors. The dusty black sesame was tops.
Also excellent was the “Hot Dog Bao” ($3.50), a snappy Kosher dog encased in steamed milk bread. I have entered the hot dog season of life in recent years, and thus I appreciated this Chinese American take very much.
And then came a trio of dumplings to share! First up were the “Chicken Jiaozi” ($8) with scallions and five spice…
…then “Wontons in Chili Oil” ($9) stuffed with pork, shrimp, and Sichuan pickled vegetables…
…and lastly, “Sizzling Pork Potstickers” ($9) with scallions and fennel. The scratch-made parcels were varied and satisfying.
A few colleagues enjoyed the “Hong Kong Minced Beef” ($13) for their main course. Appealingly homey and mushy, the rice came with caramelized onions, a soft egg, and bits of crispy garlic.
The communal Beijing-style “Chilled Sesame Noodles” ($10) boasted some bite, along with shredded chicken and chili oil.
For my main course, I selected one of the scallion pancake “sandwiches” served with a side of tater tots. Dotted with a confetti of minced chilies and salt, the tots were nothing short of addictive.
It’s hard to say which element of the “Mr. Chi” ($13) I adored more—the rich and flaky scallion pancake exterior or the Chinese-spiced pastrami, hazelnut pesto, and Beijing mustard vinaigrette filling. Both elements were thoughtful and well executed.
All of the dishes that we tasted this afternoon were as palate-pleasing as they were personal—a balance of both form and function. Ms Chi’s unique brand of Chinese American cooking is a solid addition to Los Angeles’ ever-evolving dining scene.
—
Ms Chi Cafe 3829 Main Street Culver City, CA 90232 Phone: 424-361-5225
One year ago: Tartine Manufactory – San Francisco Two years ago: Slacker. Three years ago: June’s “Very Hungry Caterpillar” 1st Birthday Four years ago: San Francisco Sweets: Morning Buns, Russian Honey Cakes, Egg Tarts, Doughnuts and more! Five years ago: “Home Common Food” and the Best Bite of the Trip at Zha Zha Mian Jia Chang Cai – Chengdu Six years ago: Ichimi Ann Bamboo Garden – Los Angeles (Torrance) Seven years ago: National Bundt Day: Orange Cardamom Cake Eight years ago: Soy Sauce Brined Turkey Nine years ago: Cookin’ with Coolio: Strawberry Hills Banana Muffins Forever Ten years ago: Savory Stromboli Eleven years ago: Mì Quảng – Da Nang Twelve years ago: Rachael’s Nosheri – Philadelphia
Source: https://gastronomyblog.com/2018/11/15/ms-chi-cafe/
0 notes
Text
REVIEW: Monster Energy Ultra Paradise
What is Monster Energy Ultra Paradise?
Monster Energy just released “Paradise” as the newest addition to its sugar-free Ultra line of energy drinks. According to the back of the can, Monster Ultra Paradise delivers “Pure, Crisp, Invigorating Island Flavors.” The question is, what exactly is an island flavor?
How is it?
I’m a frequent consumer of Monster Ultra, so I know the flavors can be difficult to place. Sure, Ultra Red kind of tastes like fruit punch, and Ultra Sunrise tastes vaguely orangish, but what flavor is Ultra Blue? Ultra Zero? Ultra Paradise at least gives us a hint that it’ll be tropically flavored.
Upon opening, Ultra Paradise is a hazy light green color. The island flavor is… nondescript. Pineapple, maybe? Or maybe Pina Colada? Is the green color supposed to be a hint? It’s definitely tropical, but I still have no idea what that means exactly. You could tell me it was passion fruit flavored, and I’d believe you. (Full disclosure: those weird purple Starburst are the complete extent of my experience with passion fruit.)
Is there anything else you need to know?
Some varieties of Monster Ultra can be too sweet for my tastes, so I appreciate this one keeps it more subdued. It allows the citric acid tang to add a bit of a kick, which is appreciated when I’m looking for a pick-me-up.
Conclusion:
When imbibing a caffeinated beverage, I’m mostly interested in its pharmacological effect. Most of the time that means coffee, but if I’m at a convenience store of questionable quality, with a pot of coffee that’s been there longer than the clerk, I may reach for an energy drink instead. Monster always gets the job done with 140 milligrams of caffeine, and Paradise fits in well with the rest of the Ultra options.
Purchased Price: $2.00 Size: 16 fl. oz. can Purchased at: Festival Foods Rating: 7 out of 10 Nutrition Facts: 0 calories, 0 grams of fat, 160 milligrams of sodium, 1 gram of carbohydrates, 0 grams of sugar, and 0 gram of protein, 100% Niacin, 100% Vitamin B6, 100%, Vitamin B12, 100% Vitamin B5, and 140 mg of caffeine.
Click here to read our previous energy drink reviews.
Source: https://www.theimpulsivebuy.com/wordpress/2019/03/14/monster-energy-ultra-paradise-review/
0 notes
Text
‘Top Chef Kentucky’ Recap: A Chinese New Year Showdown in Macau
In the latest episode of Top Chef Kentucky, the action switches from the Bluegrass State to Macau, where the five remaining contestants compete in the finals — with a few surprise guests as their helpers.
At the start of the episode, the five remaining cheftestepants are clearly excited to have made it all the way to the finals. The stakes are perhaps highest for Michelle, who got eliminated earlier in the competition and then reentered the game via Last Chance Kitchen. “I fought my way back for a reason — I’m ready to kick some ass,” she says. Meanwhile, Eric is proud of the fact he’s been able to get to the finals by cooking West African-influenced food every step of the way. Adrienne remarks that this is the part of the competition where she needs to “start showcasing as a top performer.” Kelsey feels like people have underestimated her in the past, but now she says she’s “here to win big.” And Sara tells the camera, “I’m not going to be cocky about it, but yeah, I think I can beat them.”
After arriving at the fancy MGM Macau hotel, the five chefs give each other hugs and crack open a bottle of Champagne. In the morning, judge Graham Elliot, who owns a restaurant in Macau, arrives to take them on a tour of his favorite local markets. With umbrellas in hand, the chefs inspect various fruits, vegetables, and types of seafood at the market. “I’m soaking up every single thing he’s saying, because I’m either going to use it down the road, or I’m going to use it in the next 15 minutes for the Quickfire,” Kelsey says. And true to her prophecy, once the chefs arrive on the roof of the market, they are greeted by Padma Lakshmi — it’s Quickfire time.
For this challenge, the chefs must create a dish inspired by local market ingredients. Each of them will get to use one cut of the fish that they picked up with Graham as their protein, but they will need to find the rest of the ingredients down in the market. They have 45 minutes, total, to gather their ingredients and cook.
Despite the language barrier, the chefs mostly manage to find what they need in the market. Sara reveals that she actually tried to learn Cantonese before the trip, and Kelsey ends up befriending one vendor who enthusiastically helps her out with a bunch of ingredients, including a bag of mystery bag of white powder that turns out to be cornstarch — perfect for her fried gum fish dish. Although a few chefs struggle with their proteins, all of them manage to finish their dishes on time.
Graham loves Adrienne’s clam ceviche with watermelon, but thinks that Sara’s bowl of raw scallops with apples and water chestnuts is too soupy. Padma likes the flavor, but not the texture, of Eric’s snails with black bean sauce. And Kelsey’s fried gum fish and Michelle’s cuttlefish noodles with Chinese beans both get high marks from the judges. Graham tells the final five, “The person that wins the Quickfire obviously is the one that really embraced the challenge, and that person is Michelle.” A winner of several previous Quickfires, the San Francisco chef is thrilled by this victory. “It feels amazing to hit the ground running, and show the judges that I’m inspired by the things around me,” Michelle says.

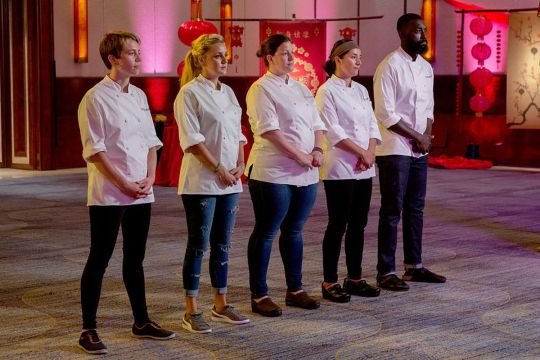
Left to right: Brandon Rosen, Brian Young, David Viana, Eddie Konrad, Justin Sutherland, Michelle Minori, Eric Adjepong, Kelsey Barnard, Sara Bradley, and Adrienne Wright.
Carmo Correia/Bravo
After the Quickfire, Padma introduces Jowett Yu, the chef/proprietor of Hong Kong’s popular restaurant Ho Lee Fook. He will be one of the judges for a Chinese New Year-themed elimination challenge, where the chefs will have to cook a meal for 200 guests. After telling the chefs that they’re going to get “a little help” with this challenge, Padma then summons five eliminated Top Chef contestants — David, Justin, Brian, Brandon, and Eddie — onto the roof. Each of them are holding trays of ingredients adorned with fortune signs.
Since Michelle won the Quickfire, she not only gets to pick who will be her sous chef, but also the order in which the other chefs will get to pick their helpers. The match-ups are: Michelle and David; Adrienne and Brian; Sara and Eddie; Kelsey and Brandon; Eric and Justin. “There’s one more thing,” Padma tells the crew. “Since this is the Year of the Pig, it’s only right that you use pig as your main protein.” The chefs have 30 minutes to shop down at the market, and they will get four hours to cook for the event the next day.
After menu planning with their sous chefs, the final five contestants are treated to a surprise dinner at Five Foot Road, a ritzy restaurant in their hotel. During the meal, Sara reveals that she is going to be making a version of shrimp and grits using cauliflower instead of cornmeal, a move that sounds highly suspect to Adrienne. (As you may recall, they have an old rivalry, of sorts, dating back to the Rupp Arena challenge.) Meanwhile, Kelsey is frustrated to learn that Adrienne is planning to cook a pork belly dish with Brian the meat maestro, since she wanted to put slices of that protein on top of her pea dish.
During prep for the meal the next day, Eric tells Justin that he wants to “bring a little bit of Caribbean flavor to Macau flavor” with his curry. Kelsey is worried that she’s overcooked her peas. And Adrienne and Eddie run into some issues with their sticky rice bites. “There’s a lot of little projects that I wish we had time to finish in the back kitchen, so we are just cutting rice cakes and broccoli florets kind of to order,” she explains.

Left to right: Adrienne Wright, Padma Lakshmi, Jowett Yu.
Carmo Correia/Bravo
Service at the party goes relatively smoothly, although the judges dole out a bit more criticism than usual during this elimination round tasting. After sampling Eric’s curry, Padma tells the chef, “You’re a bit timid with the chiles — I mean, this is the area of the world that can really handle chiles.” Jowett asks Eric, “Do you think maybe some rice or something would be good to soak up something like this?” The chef explains that he thought about that, but wanted to “stay true to everything this challenge asked for.” Later in the evening, after taking a bite of Adrienne’s sticky rice, Padma tells the chef, “Well If you were trying to burn my palate, you succeeded.” She thought the dish was served too hot. Despite these remarks, it seems that the judges generally like what the chefs have put together.
“All you chefs picked up right where you left off,” Tom tells the gang at the judges’ table. “Food was really clean, really delicious, and also I like that most of you at least weaved your own tradition into the Chinese New Year tradition as well.” Graham adds, “It was great to see you guys get dropped into another part of the world and another culture, and infuse your own stories into the food.” The judges think there were two clear standout dishes from this challenge: Michelle’s pork lettuce wrap with a cold noodle salad, and Kelsey’s pea with mushroom broth and Portuguese sausage.
Because she used local ingredients that she was not familiar with in a dish that was both satisfying and soulful, Kelsey wins this round. “This is a very real surreal moment,” she says. “Being on the top for the Quickfire and then winning this challenge is exactly the pace I want to set. I definitely have a new confidence since coming to Macau — I feel like I could win the whole thing.”
Left to right: Adrienne Wright, Kelsey Barnard, Sara Bradley, Michelle Minori, Eric Adjepong.
Carmo Correia/Bravo
With the winner of this challenge announced, it’s time to move onto the bottom three dishes. While Tom liked Eric’s curry, Padma had some issues with this dish. “There was a lack of clarity to it,” she remarks. “It felt a little muddy. I couldn’t pick out the different spices or ingredients.” After hearing this feedback, Eric defend his dish choice. “Respectfully, I disagree,” he says. “You can have curries from anywhere, and when you can’t specifically pinpoint what you’re eating in a curry but it’s at least good to you, that to me is a good curry, because everybody and their mother makes a curry.” Tom jokes that his mother never made curry, and Padma responds, “It’s not that I have to be able to pick out every ingredient, but I want some complexity to that curry, and I think that’s what that curry needed.”
Tom liked Sara’s prawns but thought her cauliflower grits were lacking... something. Padma, on the other hand, found her broth to be a bit too salty. Meanwhile, Graham had problems with the composition of Adrienne’s sticky rice and pork dish. “Adrienne, to go and have the one bite for an event where you’re cooking for 200, it might make sense, but I think for the spirit of what Chinese New Year is, it was off the mark for that,” the judge says. Tom liked the dish more than Graham, but thought the ingredients didn’t really come together.
“We’re here celebrating Chinese New Year, and it kind of reminds me that all celebrations no matter what culture, it really revolves around food,” Tom tells the crew. “When you invite people into your home and you cook for them, it’s about as generous as it can be, and there was just one dish that just left us wanting for a little bit more.” And that dish was Adrienne’s sticky rice with pork. It’s time for the New England chef to pack her knives and go.
“This isn’t how I wanted finals to go for me, but there’s not much I regret about this cook today,” Adrienne says on her way out the door. “My future is really up in the air. I would love to go home to Goshen, Connecticut and be able to raise a family there, open a restaurant, and thrive in this community that’s meant so much to me. I don’t quite know exactly where I’m going to head yet, but I’m really excited about all the possibilities.”
Eat, Drink, Watch.
Food entertainment news and streaming recommendations every Friday
By signing up, you agree to our Privacy Policy and European users agree to the data transfer policy.
Source: https://www.eater.com/2019/3/1/18246088/top-chef-holy-macau-recap-season-16-episode-13

0 notes
Text
Red Robin Onion Rings
Love Red Robin Onion Rings? You can make these crispy Panko encrusted onion ring at home.
Red Robin is renowned for its wide array of burgers that can satisfy just about any burger lover – you can even get a veggie burger. Along with your burger, you have a choice of sides including onion rings. When I go to Red Robin, I always order their onion rings. They are thickly cut and evenly breaded which makes them so crunchy. And, they taste really good! You can even order a tower of onion rings that your kids will love to help make lower.
The Name Red Robin Came From the Song
Red Robin got its start around 1940 when the owner (Sam) of a Seattle tavern changed its name to Sam’s Red Robin. This was because he loved to sing When the Red, Red Robin Comes Bob, Bob, Bobbin’ Along with the barbershop quartet that he was part of. In 1969, Gerry Kingen bought the bar and dropped “Sam’s” from the name but kept Red Robin. After ten years of success, Kingen decided to sell franchises, and today there are more than 550 Red Robins bobbin’ along across the United States and Canada.
What Type of Onions are Best for Onion Rings?
There is really no right answer to this question. A sweet onion like Vidalia or Walla Walla is an excellent choice, but if you prefer a milder taste, red or white onions will be just fine. If you want a bit more “bite” in your onion ring, go for a yellow onion. Click here for a guide to cooking with every type of onion.
What is Panko?
Panko is a type of breadcrumbs, but a little bit different from your average breadcrumbs – Panko is lighter, crispier and flakier. Because of its comparative lightness, Panko will absorb less oil and grease making it perfect for breaded fried foods like onion rings. The word panko is a translation of a Japanese word and panko is widely used for light breading in Japanese dishes. If you would like to learn more about panko breadcrumbs and how to make your own, copykat will tell you – just click here.
Like more Copykat Red Robin recipes? Just Check out all of these recipes
Red Robin Campfire Sauce Red Robin Pickle Nickels – Fried pickles – why not? Red Robin Screaming Zombie Drink – Warning – highly alcoholic! Red Robin Freckled Lemonade
And, if you really love onion rings, try these CopyKat onion ring recipes.
Dairy Queen Onion Rings Fat Ronnie’s Fried Onion Rings Simon and Seafort’s Onion Rings Sonic Onion Rings
Red Robin Onion Rings
Make your own Red Robin Onion Rings at home with this easy copycat recipe. These onion rings make the perfect appetizer or side dish.
Ingredients
2 large sweet onions
1 cup flour
1/2 teaspoon seasoned salt
1/4 teaspoon ground black pepper
1 cup whole milk
2 eggs
2 cups panko breadcrumbs
vegetable oil for frying
Instructions
Preheat vegetable oil to 350 degrees. Add enough oil to fill the cooking container to 3 inches deep.
Peel onions, and cut into ½ to ¾ inch rings. Separate onions into rings. Take the center rings and save for another recipe. You can chop those small rings for chopped onions in another recipe.
Set up a breading station by placing three small bowls or dishes into a row. In the first shallow container add flour, seasoned salt, and black pepper, stir to combine. In the second dish combine the eggs with 1 cup of milk. Whisk the eggs and the milk together until they are well-combined. Finally, in the third container, add the panko breadcrumbs.
Breading the Onion Rings
First, dip the rings into the flour, and allow them to rest a couple of minutes on a wire rack. Then dip the floured onion ring into the egg wash mixture. Shake the onion ring gently to remove the excess egg wash, then place into the panko breadcrumbs. Coat the panko breadcrumbs over the onion ring well. Place the onion ring back onto a wire rack and allow it to rest a minute or two before cooking. This will help keep the coating in place.
Cooking the Onion Rings
Make sure you heat the oil to 350 degrees. You can use a deep fryer, or you can simply use a frying pan with 2 or 3 inches of oil in the frying pan. Cook for two to three minutes filling flipping half way through cooking. Remove onion ring and drain on a wire rack before serving.
Nutrition Facts
Red Robin Onion Rings
Amount Per Serving
Calories 446 Calories from Fat 162
% Daily Value*
Total Fat 18g 28%
Saturated Fat 2g 10%
Cholesterol 6mg 2%
Sodium 550mg 23%
Potassium 369mg 11%
Total Carbohydrates 60g 20%
Dietary Fiber 3g 12%
Sugars 13g
Protein 10g 20%
Vitamin A 2%
Vitamin C 9.6%
Calcium 16.2%
Iron 18.5%
* Percent Daily Values are based on a 2000 calorie diet.
Source: https://copykat.com/red-robin-onion-rings/
0 notes
Text
10 anni di Juls’ Kitchen, un giveaway e un podcast
Quel giorno, al ritorno dall’ufficio, trovai mamma che stava preparando la cena: gli occhiali calati sul naso, un grembiule scolorito che non riusciva comunque a proteggerla dagli schizzi di olio e dalla sbadataggine, un tratto di famiglia, e un golf di lana per tenerle calde le spalle. La stufa bruciava in un angolo, spandendo un calore che arriva dritto alle ossa e che ti accoglieva a casa come un abbraccio.
Nonostante fossero a malapena le sette, era già tutto pronto. A mamma è sempre piaciuto iniziare per tempo. La tavola era quasi apparecchiata, sul fuoco stava finendo di cuocere un pentolone di minestra di verdura. Dall’odore acre nell’aria e dal rumore della cappa che faceva a gara con il telegiornale regionale in sottofondo, capii che mamma aveva bruciato il soffritto della cipolla per l’ennesima volta. Si distrae, mette il fuoco al massimo sotto la pentola e aggiunge la cipolla tagliata a fette troppo spesse in un olio ormai trasparente per il calore: pochi secondi e la cipolla inizia a sfrigolare, si attacca e alla fine, invariabilmente, brucia. Mamma non si dà per vinta, versa la minestra di verdura congelata dalla busta direttamente sulla cipolla bruciata. I cubetti di verdura sibilano e sputacchiano, ma lei li copre di acqua e li lascia cuocere sul fuoco finché la minestra non raggiunge la tonalità e la consistenza esatta che ricerca, l’unico modo in cui lei abbia mai mangiato la minestra di verdura. La cipolla bruciata è il tratto distintivo della minestra di mamma, lascia un retrogusto affumicato e dolciastro. Con gli anni ho imparato a riconoscere in quel gusto il sapore di casa.
Mamma, la minestra lasciala a domani, stasera faccio un risotto.
Da quando leggo i blog di cucina, ho scoperto nuovi ingredienti che non avevano mai varcato le mura di casa: la zucca, per dirne una. Tagliare la zucca e sentire il rumore secco del coltello che la attraversa, accarezzarne la scorza liscia e irregolare, tostare il riso fino a che non diventa traslucido e non inizia a scoppiettare, quasi fosse popcorn, ecco di cosa avevo bisogno. Sentivo l’urgenza fisica di mantecare il riso con la zucca, con convinzione e dedizione, stringendo il mestolo di legno così saldamente in mano da sentirne tutte le fibre, mescolando finché la zucca non si fosse disfatta nel riso, tingendolo del colore di un tramonto. Solo quello mi avrebbe fatto dimenticare l’ennesima giornata storta in un lavoro che avevo inseguito con caparbietà, ma che adesso mi stava togliendo quell’entusiasmo e quel sorriso nei quali mi ero sempre riconosciuta.
Ancora una volta la cucina mi stava salvando.
Al liceo cercavo di farmi qualche amico portando una torta quando c’era un’occasione da festeggiare, anche se finivo col parlare con la professoressa o i bidelli di ricette. Le torte non mi rendevano popolare quanto passare i compiti di greco appena arriva in classe, ma erano un ottimo argomento di conversazione durante l’intervallo.
Questa abilità in cucina mi era però tornata utile all’università: la mia pasta al forno mi aveva aperto le porte di tante feste, anche se poi la porta dietro la quale mi sentivo più a mio agio era sempre quella della cucina. Avevo cominciato a capire che il saper cucinare non era solo un divertimento, ma una risorsa, una terapia nei giorni più bui.
Poco dopo a tavola, mangiando quel risotto alla zucca che mi aveva fatto ricacciare indietro le lacrime del giorno, annunciai che avrei aperto un blog di ricette. Dirlo a voce alta sembrava dare spessore a un progetto che mi girava nella mente da qualche tempo. La prima scettica ero proprio io. Chissà se durerà quanto tutte le mie altre passioni…
Più tardi, nella mia camera sopra la cucina, mi vedevo riflessa nella finestra che si apriva sul buio della campagna invernale: fuori c’era un’oscurità piena e profonda, erano sparite tutte quelle lucine degli agriturismi che in estate punteggiano la collina di fronte. La luce del monitor del computer illuminava un viso stanco.
Digitai poche frasi, impetuose, finalmente piene di quella passione che avevo sentito spegnersi piano piano in me. Pubblica.
Era il 1 febbraio 2009 e avevo appena dato inizio alla mia nuova vita.
Da quel momento sono passati 10 anni. Da una parte sono volati, dall’altra non ricordo cosa volesse dire non avere un blog. Dieci anni sono tanti, e il blog ha totalmente cambiato il mio modo di percepire il mondo: sono più attenta alle storie che mi circondano, ai cambiamenti della natura, a quello che mangio e a quello che cucino. Non avevo aperto un blog per cambiare la mia vita, ma in qualche modo è successo. Grazie a Juls’ Kitchen ho un lavoro che amo.
Ho incontrato Tommaso grazie al blog. Ho incontrato te, che mi leggi in treno, o in autobus, che mi leggi in pausa pranzo in ufficio o a colazione la mattina prima che si sveglino tutti, che non hai mai provato una ricetta, ma ti riprometti di farlo presto, o che ormai conosci a memoria gli ingredienti della torta di mele e dell’arista. Ho incontrato anche me stessa, nascosta in cucina, un po’ intimorita da tutto, ma sempre fiduciosa che qualcosa di buono dovesse accadere.
Oggi ti facciamo un regalo per festeggiare i 10 anni di Juls’ Kitchen.
Ci piacerebbe aprire le porte dello studio e farti sedere a tavola con noi, chiacchierare con una tazza di tè e una fetta di torta di mele, o magari davanti a un piatto di pici tirati a mano. Tante volte, in questi anni, mi è sembrato che questo blog ci abbia aiutati a superare barriere di spazio e tempo, a sentirci vicini, come se, alzando gli occhi da questo computer, potessi vederti seduto al di là dello schermo, così da poter riprendere un discorso che dal virtuale passa al reale.
Grazie al Fettunta Party e ai corsi di cucina tante volte siamo riusciti a rendere vero questo incontro nella vita reale, e quindi abbiamo pensato di festeggiare i 10 anni di Juls’ Kitchen con il nostro primo giveaway, mettendo in palio come primo premio proprio un incontro nella vita vera, tra mercato e cucina. Vediamo quindi come funziona.
Questi sono i premi del giveaway:
1 premio: corso di cucina del mercato per 2 persone, in data da concordare insieme
2 premio: una copia di La Cucina dei Mercati in Toscana, oppure dell’edizione inglese, From the Markets of Tuscany
3 premio: 2 grembiuli di Juls’ Kitchen, perché è bello cucinare insieme
Come partecipare al giveaway?
Metti like alla pagina FB di Juls’ Kitchen
Segui @julskitchen su Instagram
Metti like a questo post e commenta con la tua ricetta preferita di Juls’ Kitchen
Tagga in questo post 2 persone che potrebbero essere interessate a partecipare al giveaway
Il giveaway è aperto ai partecipanti di ogni nazionalità e si concluderà il 14 febbraio. Il 15 febbraio sorteggeremo in diretta su Instagram i vincitori con CommentPiker, e li annunceremo sia su Instagram che qui sul blog.
Update! I vincitori!
Congratulazioni a @azaharcuisine, @warmandwolly e @lauraelesuericette!
E adesso, siamo noi a chiederti un regalo per questi 10 anni di Juls’ Kitchen.
Ci racconti qual è il post che ti è piaciuto di più in questi anni di blog? C’è stata una ricetta che ti è piaciuta tanto da entrare a far parte della tua routine familiare? Oppure, ti ricordi quando ti sei imbattuto per la prima volta in Juls’ Kitchen?
E adesso, rullo di tamburi, introduciamo anche l’ultima novità. Oggi lanciamo Cooking with an Italian Accent, il primo podcast firmato Juls’ Kitchen.
Cooking with an Italian Accent, il podcast di Juls’ Kitchen
Parto subito con la domanda che so verrà fuori immediatamente. Perché in inglese? Io e Tommaso ci abbiamo pensato a lungo, e alla fine abbiamo dovuto scegliere, a malincuore, una sola lingua, perché il lavoro di ricerca, registrazione e editing è già abbastanza oneroso in termini di tempo e impegno con una lingua, figuriamoci due.
Abbiamo scelto l’inglese perché ci permette di raggiungere un pubblico più ampio, rispetto all’italiano, e perché il mio inglese con forte accento italiano – da qui il titolo del podcast – è sicuramente comprensibile a tantissimi italiani, molto più di quanto lo sarebbe il mio italiano con accento toscano a chi non parla italiano.
Tommaso ci ha messo mesi a convincermi a provare, perché da sempre non sopporto di riascoltare la mia voce, soprattutto quando parlo inglese. Ma ho deciso di prenderlo come un gioco, e di divertirmi. Credo tantissimo nel detto che un accento straniero sia un segno di coraggio, e quindi ho messo da parte ansia da prestazione, senso di inadeguatezza a parlare una lingua non mia e tutte quelle domande che mi faccio continuamente: sarò abbastanza brava per farlo? Sarò interessante abbastanza?
Ci proviamo, senza aspettative, solo con l’intenzione di comunicare attraverso un mezzo ancora diverso quella passione che in questi 10 anni ci ha portati fin qui. Prima era solo il blog, poi sono arrivati i social, poi i video, adesso ci confrontiamo con i podcast. Questo non vuol dire che lasceremo indietro il resto, anzi. Non mi stanco mai di ripetere che per noi il contenuto più importante resterà sempre qui, sul blog. I social servono per tenerci in contatto in maniera più istantanea, per raccontare tanti dietro le quinte, ma con il podcast puntiamo a una comunicazione ancora più intima, più calda. Funzionerà? Per noi durerà finché ci divertiremo a farlo.
Abbiamo iniziato con calma, con qualche episodio in cui ci raccontiamo, per scaldarci un po’ e per prendere confidenza con il nuovo mezzo, poi arriveranno puntate in cui parleremo di cucina toscana e italiana, o di ricette, in cui intervisteremo amici e produttori. Non voglio mettermi in cattedra, non ci saranno ricette della tradizione scolpite nella pietra, o verità assolute a cui inchinarci. Saranno chiacchiere, come se fossimo seduti attorno allo stesso tavolo, come se fossimo in cucina a stendere la pasta o a tenere d’occhio un ragù.
Oggi lanciamo il trailer e poi, da mercoledì, ogni settimana, uscirà una nuova puntata. Trovi tutte le info per ascoltare il trailer e le prossime puntate nella pagina del blog Podcast: Cooking with an Italian Accent.
Abbiamo bisogno di un grande, grandissimo in bocca al lupo!
Source: https://it.julskitchen.com/altro/life/10-anni-blog-giveaway
0 notes
Text
Bake Fresh Flatbread On Your Grill This Summer
It’s no secret that our team loves to fire up the grill—so much so that we even found ways to bake fresh bread with one while working on Modernist Bread. Gas and charcoal grills (and infrared grills, which aren’t common but can also be used for this purpose) aren’t the first option that comes to mind for baking bread. It turns out, however, that you can successfully bake breads and flatbreads on grills. Summer is the perfect time to expand your grilling repertoire by giving it a try. Read on to learn how to bake fresh naan on your grill in a few easy steps.
Naan is flatbread with a long history and a lot of fans. The soft flatbread is traditionally eaten in South Asia and often accompanies a meal. There are many varieties of naan—some are stuffed with meat or vegetables, others are filled with fruit or nuits, and some are topped with ingredients in much the way pizzas are. Naan is baked in a tandoor oven, which requires you to build up as much intense, concentrated heat as possible inside the oven’s cavity. The oven is well insulated and made of dense materials that absorb and retain heat for extended periods of time. This type of oven has been around for centuries and is meant to cook food quickly—slight charring is even expected because the oven is so hot.
Fortunately, it’s relatively easy to mimic a tandoor with a grill. All you need is a basic home grill, a baking stone or steel, and some really hot embers. You can cook more than one piece of dough at a time if you can fit it on the baking stone or baking steel. The dough cooks so quickly that you can cook it as needed and eat the bread warm.
1. Light the charcoal. Allow it to heat until it is burning as hot embers.
2. Place a tava directly on the grill, and heat it, with the grill lid closed, to a least 290 °C / 550 °F, about 30 minutes. A tava baking dome is made expressly for baking flatbreads. Alternatively, you can use a baking stone, baking steel, or wok (make sure that it has a metal handle). The wok or tava can be placed on the grill facing up or down. Use an infrared surface thermometer directly on the baking surface to determine the temperature. If you don’t have this type of thermometer, make sure to preheat for the recommended time. While you can use the thermometer built into most grill lids, those only measure the temperature of the air directly in contact with the thermometer probe.
3. Once the baking surface has reached the target temperature, carefully place the dough on the tava, wok, baking steel, or baking stone. You do not need to cover the grill again. Bake the naan until it has brown pockmarks and the dough itself has turned a creamy white.
4. Flip the naan over. Once it has browned on the bottom side, remove it from the grill.
5. Repeat the process with as many pieces of dough as you have.

Source: https://modernistcuisine.com/2018/07/bake-fresh-flatbread-on-your-grill-this-summer/
0 notes
Text
FAST FOOD NEWS: Wendy’s S’Awesome Bacon Classic
This time last year, Wendy’s rolled out a new dipping sauce to go with its revamped chicken tenders. That sauce, a Side of S’Awesome, is now a condiment on Wendy’s newest burger.
Wendy’s S’Awesome Bacon Classic comes with a 1/4 lb. beef patty, three strips of Applewood-smoked bacon, American cheese, lettuce, onion, pickles, and, of course, a slathering of Side of S’Awesome on a toasted bun.
If your taste buds have not experienced the sauce, according to Wendy’s it “…blends the creaminess of ranch dressing and the smoky components of barbeque, plus a lick of hot sauce, a hint of honey mustard and a dash of Worcestershire–creating a deliciously different sauce found only at Wendy’s.”
The burger is available for a limited time at $4.99 at participating locations.
An S’Awesome Bacon Classic Single has 640 calories, 40 grams of fat, 15 grams of saturated fat, 1.5 grams of trans fat, 115 milligrams of cholesterol, 1390 milligrams of sodium, 40 grams of carbohydrates, 3 grams of fiber, 8 grams of sugar, and 34 grams of protein.
If you’ve tried it, let us know what you think of it in the comments.
(Image via Wendy’s.)
Here are a few posts that might interest you:

Source: https://www.theimpulsivebuy.com/wordpress/2018/10/09/fast-food-news-wendys-sawesome-bacon-classic/
0 notes
Text
Oh cookie mio, sta ‘nfronte a te.


Remember the Oreo Cookie Cookies of yore? I suddenly did and decided to use the brand new Trader Joe’s Neapolitan Joe-Joe’s in yet another adaptation of the original recipe. A little less butter (because I ran out), (slightly) better sugar (which I powdered because I didn’t want the tell-tale brown spots Sucanat can leave behind), no baking soda (holy sheesh, there was no need for so much rising agent in the first place), a different flour (just because), no cream of tartar (because no eggs), no egg replacer (why bother?). Oh, and freeze-dried strawberries for added flavor and prettiness.
Now normally, I don’t use vegan butter in my cookies or baking anymore because I find oil to be more reliable to bake with. And I’m also more likely to have oil in my pantry than I do butter. Which would be in the fridge and not in the pantry anyway, so pbbbbt. But what the heck. As a great philosopher once said: C is for cookie, that’s good enough for me.
As always, I weigh most of the ingredients when baking (and cooking) so I’m listing weights before measures here. It’s been a while since I sang the praises of using a kitchen scale, but I’ll be merciful and spare you the litany.
Neapolitan Joe-Joe’s Cookie Cookies Yield: 10 cookies
55 g (1/4 cup) vegan butter 60 g (5 tablespoons) granulated sugar 60 g (5 tablespoons) finely ground Sucanat 1 teaspoon pure vanilla extract 120 g (1 cup) light spelt flour 1/4 teaspoon fine sea salt 1/2 teaspoon baking powder Plant-based milk of choice, as needed 5 Neapolitan Joe-Joe’s, cut in half, then cut in thirds 3 tablespoons chopped vegan chocolate 6 slices freeze-dried strawberries, coarsely chopped
Preheat oven to 350°F. Line a baking sheet with parchment paper. (Alternatively, you can bake the cookies the next day after an overnight stay in the fridge for the covered dough. In which case you’ll only need to preheat the oven when you’re going to bake them of course.) Beat butter, sugars, and vanilla together until combined. In a separate bowl, sift together flour, baking powder, and salt. Add flour mix to margarine mix, combine well. The mixture might be dry: add milk a little at a time, as needed, until the dough sticks together well when pinched. It shouldn’t be crumbly or dry, not should it be too wet. Be sure to add the milk slowly so as not to overmoisten the dough. Add cookie pieces, chocolate, and strawberries with a rubber spatula, being careful not to crush the cookie pieces and strawberry bits too much. Form into balls, using a packed 3-tablespoon scoop. Pat them down just a little. Place on baking sheet. Bake for 10 minutes, or until light golden brown. Let cool on sheet for a few minutes before attempting to remove. Place on cooling rack.


Source: http://havecakewilltravel.com/2018/08/20/oh-cookie-mio-sta-nfronte-a-te/
0 notes
Text
Chocolate Banana Muffins
August 14, 2018by: Christina Lane
Chocolate banana muffins are a fun way to use up one lonely brown spotted banana! This small recipe makes 6 chocolate banana muffins.
This is another recipe is sponsored by Rodelle; remember my chocolate graham crackers?
I made these chocolate banana muffins for my toddler, and I had every intention of posting them in the Baby Food section on this site. But, I made the mistake of eating one. I ate it hot, right out of the oven. Oh, Mama.
The warm, tender chocolatey muffin with two types of chocolate did a number on me.
This recipe is based on my vegan banana muffins recipe. I received a question last week inquiring about a substitute for the flaxseed. I forgot to tell you that the flaxseed mixed with water is an egg substitute, which keeps the muffins vegan. If you want to substitute it, use a real egg! It’s not vegan then, of course, but it worked for her.
So, I made these chocolate banana muffins with an egg. I cut back on the sugar a touch–just 1/4 cup for 6 muffins isn’t bad, right Mamas? I added chocolate chips and Rodelle’s Dutch-processed cocoa powder. They’re perfection.
Over the past 2 weeks, I’ve made the recipe 4 times and my testers have, too. We all agree they’re the lightest, fluffiest, most tender and moist little banana muffins around.
You could open a coffee shop with just these chocolate banana muffins on the menu, and I think you would succeed.
I think the key is Rodelle’s Dutch cocoa. It has a dark, rich flavor that makes the muffins almost black instead of brown. More color = more flavor, especially when it comes to chocolate.
Next time you have a lonely brown banana on your counter, I hope you think of these muffins! It only requires one banana and one egg to get sublime banana muffins in your face in less than 30 minutes.
Recipe tip for one-bowl chocolate banana muffins:
First, mash the banana very well with a fork before stirring in all of the liquid ingredients. When it comes time to add the dry ingredients, use a whisk to break up any lumps. The cocoa powder will be sufficiently sifted with the whisking action.
I love that this recipe can be made entirely in one bowl. It’s almost a requirement for me when I’m small batch baking. If we’re only making 6 muffins, how many dishes should we dirty? (Answer: as few as possible!)
You can definitely double this recipe and make 1 dozen muffins, and the muffins keep great in the freezer for up to 1 month.
In that case, defrost them in the microwave in 15 second intervals until warm.
Although, I don’t think you’ll have any problem with leftovers since it only makes 6 muffins. The muffins are usually gone by the end of the day in my house!
Chocolate banana muffins are a fun way to use up one lonely brown spotted banana! This small recipe makes 6 chocolate banana muffins.
Prep Time 15 minutes
Cook Time 18 minutes
Total Time 33 minutes
Ingredients
1 large very ripe banana
1/4 cup sugar
2 tablespoons canola oil
1 large egg
1/2 teaspoon Rodelle vanilla extract
1/2 cup all-purpose flour
1/4 cup Rodelle Dutch-process cocoa powder
1 teaspoon baking soda
1/4 teaspoon salt
1/4 cup semisweet chocolate chips.
Instructions
Preheat the oven to 350, and line a muffin pan with 6 cups.
In a large bowl, mash the banana very well with a fork until it's smooth. Mash it very well until it's almost liquid, not lumpy.
Next, whisk in the sugar, oil, egg and vanilla extract. Whisk very well until combined.
In the same bowl, sprinkle the flour, cocoa powder, baking soda, and salt on top. Using a spatula, stir until well-combined.
Finally, stir in the chocolate chips, saving a few for the top of the muffins.
Divide the batter between the muffin cups evenly, and sprinkle chocolate chips on top of each muffin.
Bake for 18 minutes, or until the muffins are done. They're done when they spring back when pressed gently on the top.
Move the muffins to a cooling rack, and let cool completely before serving.

Source: https://www.dessertfortwo.com/chocolate-banana-muffins/

0 notes