Statistics
We looked inside some of the posts by lauragardner and here's what we found interesting.
Average Info
Notes Per Post
15
Likes Per Post
15
Reblog Per Post
0
Reply Per Post
0
Time Between Posts
2 days
Number of Posts By Type
Text
8
Photo
9
Last Seen Tumblr Blogs


Fun Fact
When “GIF” was named word of the year in 2012, Oxford Dictionaries U.S.A. credited Tumblr for pushing the word.
Text
MOVING IMAGE
POST PRODUCTION:
Initially I imported all the footage in to an editing software called iMovie, then I proceeded to organize it into iMovie we then looked through all the footage and went through with the trimming tool and trimmed the edges while keeping a close eye on the timing I also played with the effects to exaggerate the effect, this was the production of the moving image. 

2 notes
·
View notes
Text
I made this video by editing together several short videos. I edited it using IMovie. I am satisfied with the result. I tried to transmit the joy of eating a snack and the sadness of the end of enjoyment. I think I have been successful in that attempt.
1 note
·
View note
Text
Structure evaluation
I liked this project because it allowed me to face new challenges. I was able to enjoy the project as well because I was able to do it outside and because the building I selected was near my home. My challenge with this project was to be able to find the right day and time to take my photographs. The changing weather and light patterns made this difficult. There were good days in terms of weather, but finding the right time of day in order to take the right photographs without the shadows was difficult. It was very helpful for me to use the app that our instructor recommended to help us with this job. It helped me to know what day was good and what time was good to take the photographs. Another problem that was difficult was that I was not able to take photographs inside the building. I was only able to take pictures of the windows because students were occupying the rest of the building. So I could only take a few brief photographs from the windows of the building and of the buildings. With regard to the editing, I also faced new challenges. That was how to eliminate objects that I did not need or want in the images like rubbish bins and cars. It also had lots of signs, and lampposts. However, I learned how to eliminate these images with photoshop. I also learned how to correct some of the distortion of perspective of some buildings, although two of my corrected photographs did not need much correction. I was able to fix them with the autocorrector in photoshop and lightroom. In the exercise that they gave us with regard to research perspective allowed me positive results. It allowed me to correct the images following all of the steps and find positive results, not only with the automatic method, but also following the guides have been laid out and doing it manually. While I dont think my images are perfect, I am satisfied with the work I have done.
0 notes


Text
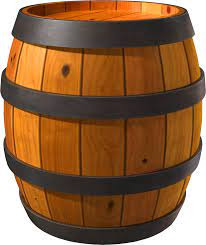
EXERCISE: PERSPECTIVE CONTROL
Barrel distortion (lens distortion)
Optical distortion it is created by the curved shape of the lens. Because the lens is curved or because the field of view of the lens is much wider than the size the image sensor and hence it needs to be squeezed to fit as a result the image takes the shape of a barrel as you see in the image below.


perspective distortion
It is caused by the position of the camera relative to the subject or by the position of the subject within the image frame.
How to correct images distortions
For these exercise I selected a photo that a took of a building close to home and the editing program Adobe lightroom.
1 I opened my photo in Lightroom
2- I clicked on the Development option that is on the up right had side how show de image below.

3-In the panel that was displayed when i pressed Development option Looked the option Lens correction how show the image below,.

4- I ticked the small square “ Enable profile correction” sometimes this helps me to improve the distortion images but this was not my case. For this reason i clicked in the “Transform option” how show the image below.

5- In the Transform panel I clicked auto option and it improve my image, but the building was still a bit distorted as you seen in the image below.

6- To improve it even more I did it manually with the options that offer me transform panel like: vertical, horizontal etc. and through the guides I was able to achieve it. However, in the photo there were white spaces in the image how show the image below.

7 I corrected these white spaces with Adobe Photoshop program (lasso tool and Content aware fill)

2 notes
·
View notes
Photo

My five structure final pictures.
1 note
·
View note
Text
Structure editing process.
BASICS CORRECTIONS
In order to edit each of the five photos for structure project I selected one of the option that helps filters me images via Photoshop. These gave me several options. I choose the option filter camera RAW. This help me to edit some of the basic aspects of my images such as contrast, texture, vibrance, white balance, noise reduction, accentuate or dissimulate the levels of the whites, add nuance and detail. I think that these photos were already sharp, but these tool help me to improve my images.

REMOVE UNWANTED OBJECTS
Take out unwanted elements in the images, In two of my photos, I was able to identify several unwanted objects, such as stains on objects, lamps, sings, vehicles, rubbish bins and others elements.
To do this I used the lasso tool that is in the left hand side of Photoshop. With this tool I was able to draw around what I wanted to eliminate. Once I have done that I went to the options panel and selected the editing option. This gave me other options. Among them I choose the option “fill” and i used this to open and option than allows me to fill in the area that i had chosen to eliminate. This allowed me to take out the unwanted objects and fill them in with elements that allowed the photo to look as if there had never been and object there.


PERSPECTIVE CORRECTION:
I went to the the filter option and among the options offered. I choose the “Camera RAW option” and on the option panel for that option, I choose the “geometry” option. This allowed me to click on the letter “A” as seen in the photo. This corrected the perspective of my building. My second photo I was able to correct the perspective building with Adobe light room. This allowed me to do it as you see in the image below. I have to mention that the buildings in my photos weren’t very distorted so I used aforementioned functions.


1 note
·
View note
Photo

Another contact sheet of two of the photos I Chose for the Structure project.
0 notes
Photo

Unseen project my three edited final photos.
1 note
·
View note
Photo

These are some pictures that I took for the unseen project two of these are not edited yet (The cherries image is only been cropped and the pink image doesn't have any changes).
3 notes
·
View notes
Text
Unseen editing process Macro
When I edited the macro picture that I chose for one of my three final pictures I really didn’t have big changes to make because it was already sharp. I just gave it a touch up, to accentuate contrasts gand colour on the chosen object to do this i went to the menu at the top on Photoshop and i chose the filter option, filter gave me other options and i chose Filter Camera raw and those option gave me a panel to correct a basic edit corrections.

Cross Polarization Photo:
The editing process was not difficult I spent more time getting a photo that I would really be happy with. I opened my photograph in Photoshop and I choose the Crop tool that is to your left hand in Photoshop panel and i cropped the photo to focus more attention on the portrayed object. After that i went to the camera filter Raw and corrected a little bit of the sharpness and played with the different functions to improve a picture I specially focused on textures colours and vibrancy

Highspeed flash
I imported the photo editing program Light Room once there I went to the Develop option and it allowed me to access the corrections panel. In the correction panel I chose the option to remove stains and i removed the marks on the tank and the small drops that splashes when the drop of water fell.

In Light Room I also cropped the picture then and i improved the texture, sharpness and colour but in the centre where the drop felt it was still dark. So my post-production Teacher taught me how to use a photoshop tool that I hadn't used before that helps to improve colour locally and I was finally very satisfied with the results.
1 note
·
View note
Photo

Contac sheet/ Unseen project/ Studio session 2
I took many shots today but I have choose these shots for editing.
0 notes
Photo


Structure contact sheets.
1 note
·
View note


Photo


UNSEEN PROJECT (Studio first day)
These are the three pictures of the three techniques we practiced in the studio
High speed flash
Macro photo
Cross polarization
1 note
·
View note


